remove CHEVROLET SILVERADO 2500 2023 Manual Online
[x] Cancel search | Manufacturer: CHEVROLET, Model Year: 2023, Model line: SILVERADO 2500, Model: CHEVROLET SILVERADO 2500 2023Pages: 441, PDF Size: 14.4 MB
Page 358 of 441
Chevrolet Silverado 2500 HD/3500 HD Owner Manual (GMNA-Localizing-U.
S./Canada/Mexico-15546003) - 2022 - CRC - 5/5/21
Vehicle Care 357
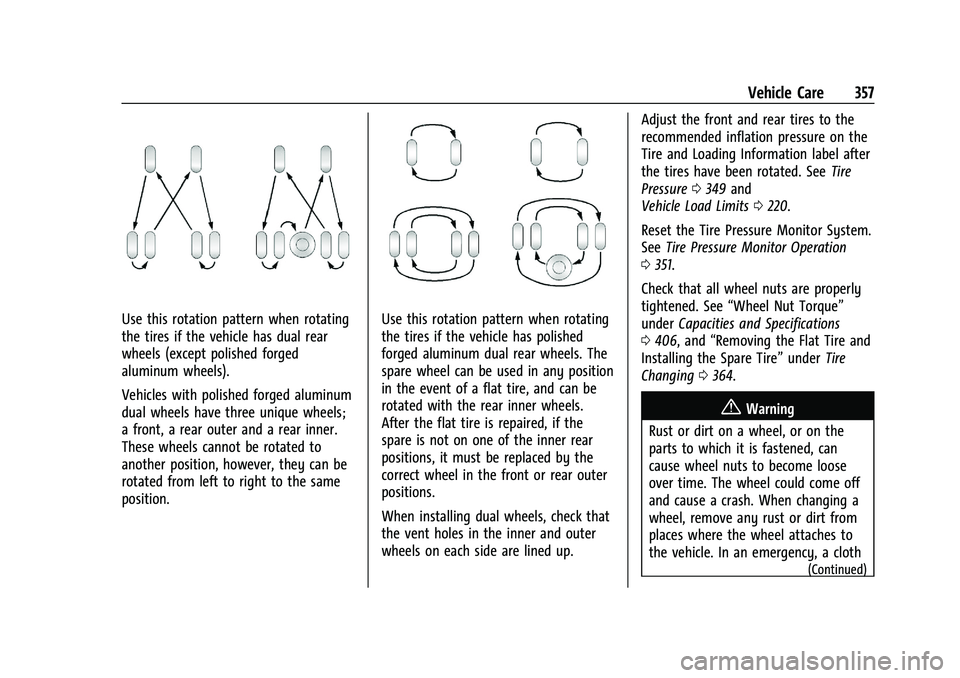
Use this rotation pattern when rotating
the tires if the vehicle has dual rear
wheels (except polished forged
aluminum wheels).
Vehicles with polished forged aluminum
dual wheels have three unique wheels;
a front, a rear outer and a rear inner.
These wheels cannot be rotated to
another position, however, they can be
rotated from left to right to the same
position.Use this rotation pattern when rotating
the tires if the vehicle has polished
forged aluminum dual rear wheels. The
spare wheel can be used in any position
in the event of a flat tire, and can be
rotated with the rear inner wheels.
After the flat tire is repaired, if the
spare is not on one of the inner rear
positions, it must be replaced by the
correct wheel in the front or rear outer
positions.
When installing dual wheels, check that
the vent holes in the inner and outer
wheels on each side are lined up.Adjust the front and rear tires to the
recommended inflation pressure on the
Tire and Loading Information label after
the tires have been rotated. See
Tire
Pressure 0349 and
Vehicle Load Limits 0220.
Reset the Tire Pressure Monitor System.
See Tire Pressure Monitor Operation
0 351.
Check that all wheel nuts are properly
tightened. See “Wheel Nut Torque”
under Capacities and Specifications
0 406, and “Removing the Flat Tire and
Installing the Spare Tire” underTire
Changing 0364.
{Warning
Rust or dirt on a wheel, or on the
parts to which it is fastened, can
cause wheel nuts to become loose
over time. The wheel could come off
and cause a crash. When changing a
wheel, remove any rust or dirt from
places where the wheel attaches to
the vehicle. In an emergency, a cloth
(Continued)
Page 359 of 441
Chevrolet Silverado 2500 HD/3500 HD Owner Manual (GMNA-Localizing-U.
S./Canada/Mexico-15546003) - 2022 - CRC - 5/5/21
358 Vehicle Care
Warning (Continued)
or paper towel can be used; however,
use a scraper or wire brush later to
remove all rust or dirt.
Lightly coat the inner diameter of the
wheel hub opening with wheel bearing
grease after a wheel change or tire
rotation to prevent corrosion or rust
build-up.
{Warning
Do not apply grease to the wheel
mounting surface, wheel conical
seats, or the wheel nuts or bolts.
Grease applied to these areas could
cause a wheel to become loose or
come off, resulting in a crash.
When It Is Time for New Tires
Factors, such as maintenance, temperatures,
driving speeds, vehicle loading, and road
conditions affect the wear rate of the tires.
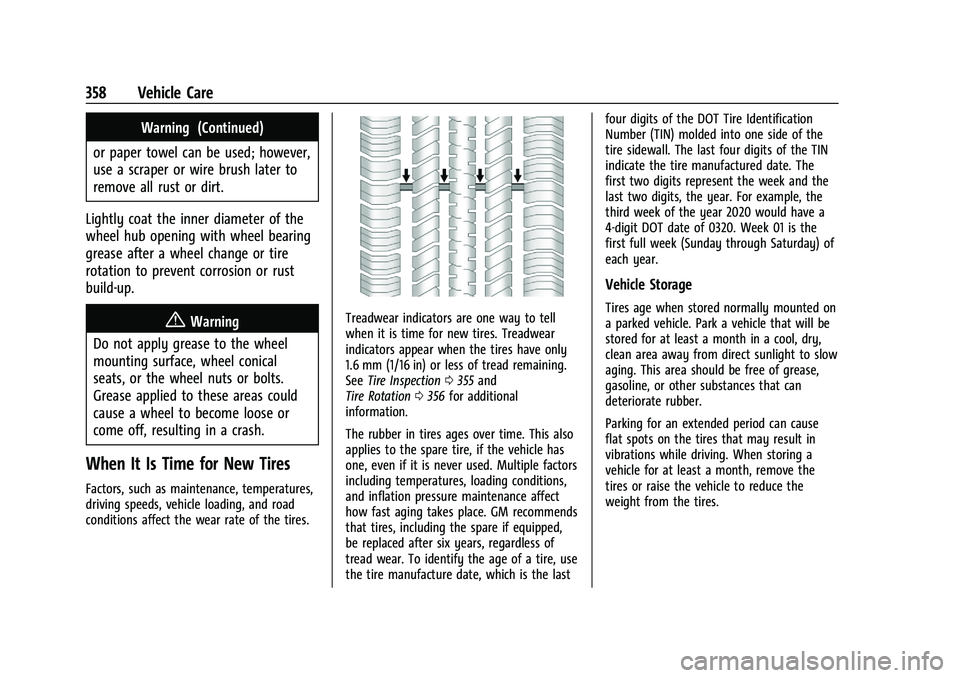
Treadwear indicators are one way to tell
when it is time for new tires. Treadwear
indicators appear when the tires have only
1.6 mm (1/16 in) or less of tread remaining.
See Tire Inspection 0355 and
Tire Rotation 0356 for additional
information.
The rubber in tires ages over time. This also
applies to the spare tire, if the vehicle has
one, even if it is never used. Multiple factors
including temperatures, loading conditions,
and inflation pressure maintenance affect
how fast aging takes place. GM recommends
that tires, including the spare if equipped,
be replaced after six years, regardless of
tread wear. To identify the age of a tire, use
the tire manufacture date, which is the last four digits of the DOT Tire Identification
Number (TIN) molded into one side of the
tire sidewall. The last four digits of the TIN
indicate the tire manufactured date. The
first two digits represent the week and the
last two digits, the year. For example, the
third week of the year 2020 would have a
4-digit DOT date of 0320. Week 01 is the
first full week (Sunday through Saturday) of
each year.
Vehicle Storage
Tires age when stored normally mounted on
a parked vehicle. Park a vehicle that will be
stored for at least a month in a cool, dry,
clean area away from direct sunlight to slow
aging. This area should be free of grease,
gasoline, or other substances that can
deteriorate rubber.
Parking for an extended period can cause
flat spots on the tires that may result in
vibrations while driving. When storing a
vehicle for at least a month, remove the
tires or raise the vehicle to reduce the
weight from the tires.
Page 363 of 441
Chevrolet Silverado 2500 HD/3500 HD Owner Manual (GMNA-Localizing-U.
S./Canada/Mexico-15546003) - 2022 - CRC - 5/5/21
362 Vehicle Care
Your dealer will know the kind of wheel that
is needed.
Each new wheel should have the same
load-carrying capacity, diameter, width,
offset, and be mounted the same way as
the one it replaces.
Replace wheels, wheel bolts, wheel nuts,
or Tire Pressure Monitor System (TPMS)
sensors with new GM original equipment
parts.
{Warning
Using the wrong replacement wheels,
wheel bolts, or wheel nuts can be
dangerous. It could affect the braking and
handling of the vehicle. Tires can lose air,
and cause loss of control, causing a crash.
Always use the correct wheel, wheel
bolts, and wheel nuts for replacement.
Caution
The wrong wheel can also cause
problems with bearing life, brake cooling,
speedometer or odometer calibration,
headlamp aim, bumper height, vehicle
ground clearance, and tire or tire chain
clearance to the body and chassis.
Used Replacement Wheels
{Warning
Replacing a wheel with a used one is
dangerous. How it has been used or how
far it has been driven may be unknown.
It could fail suddenly and cause a crash.
When replacing wheels, use a new GM
original equipment wheel.
Tire Chains
{Warning
If the vehicle has LT275/65R20 size tires,
do not use tire chains. There is not
enough clearance. Tire chains used on a
vehicle without the proper amount of
clearance can cause damage to the
brakes, suspension, or other vehicle parts.
The area damaged by the tire chains
could cause loss of control and a crash.
Use another type of traction device only
if its manufacturer recommends it for the
vehicle's tire size combination and road
conditions. Follow that manufacturer's
instructions. To avoid vehicle damage,
drive slow and readjust or remove the(Continued)
Warning (Continued)
traction device if it is contacting the
vehicle. Do not spin the wheels.
If traction devices are used, install them
on the rear tires.
Caution
Use tire chains only where legal and only
when necessary. Use chains that are the
proper size for the tires. If the vehicle has
LT235/80R17 size tires, install the chains
on the tires of the rear axle only. If the
vehicle has LT245/75R17, LT265/70R17,
or LT275/70R18 size tires, install the
chains on the tires of the front and rear
axle. Tighten them as tightly as possible
with the ends securely fastened. Drive
slowly and follow the chain
manufacturer's instructions. If the chains
contact the vehicle, stop and retighten
them. If the contact continues, slow
down until it stops. Driving too fast or
spinning the wheels with chains on will
damage the vehicle.
Page 365 of 441
Chevrolet Silverado 2500 HD/3500 HD Owner Manual (GMNA-Localizing-U.
S./Canada/Mexico-15546003) - 2022 - CRC - 5/5/21
364 Vehicle Care
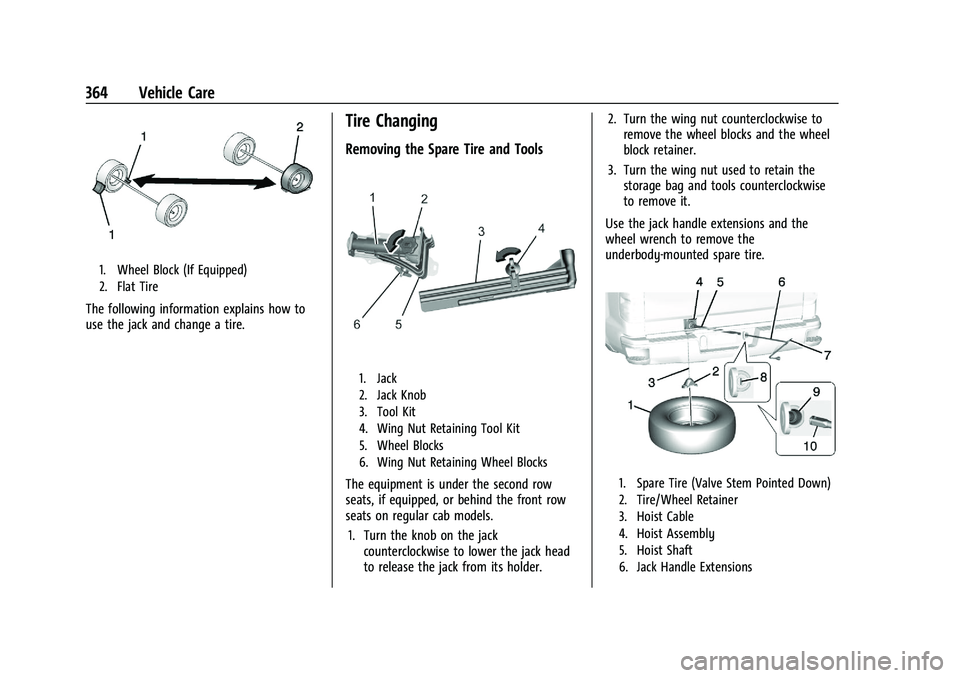
1. Wheel Block (If Equipped)
2. Flat Tire
The following information explains how to
use the jack and change a tire.
Tire Changing
Removing the Spare Tire and Tools
1. Jack
2. Jack Knob
3. Tool Kit
4. Wing Nut Retaining Tool Kit
5. Wheel Blocks
6. Wing Nut Retaining Wheel Blocks
The equipment is under the second row
seats, if equipped, or behind the front row
seats on regular cab models.1. Turn the knob on the jack counterclockwise to lower the jack head
to release the jack from its holder. 2. Turn the wing nut counterclockwise to
remove the wheel blocks and the wheel
block retainer.
3. Turn the wing nut used to retain the storage bag and tools counterclockwise
to remove it.
Use the jack handle extensions and the
wheel wrench to remove the
underbody-mounted spare tire.1. Spare Tire (Valve Stem Pointed Down)
2. Tire/Wheel Retainer
3. Hoist Cable
4. Hoist Assembly
5. Hoist Shaft
6. Jack Handle Extensions
Page 366 of 441
Chevrolet Silverado 2500 HD/3500 HD Owner Manual (GMNA-Localizing-U.
S./Canada/Mexico-15546003) - 2022 - CRC - 5/5/21
Vehicle Care 365
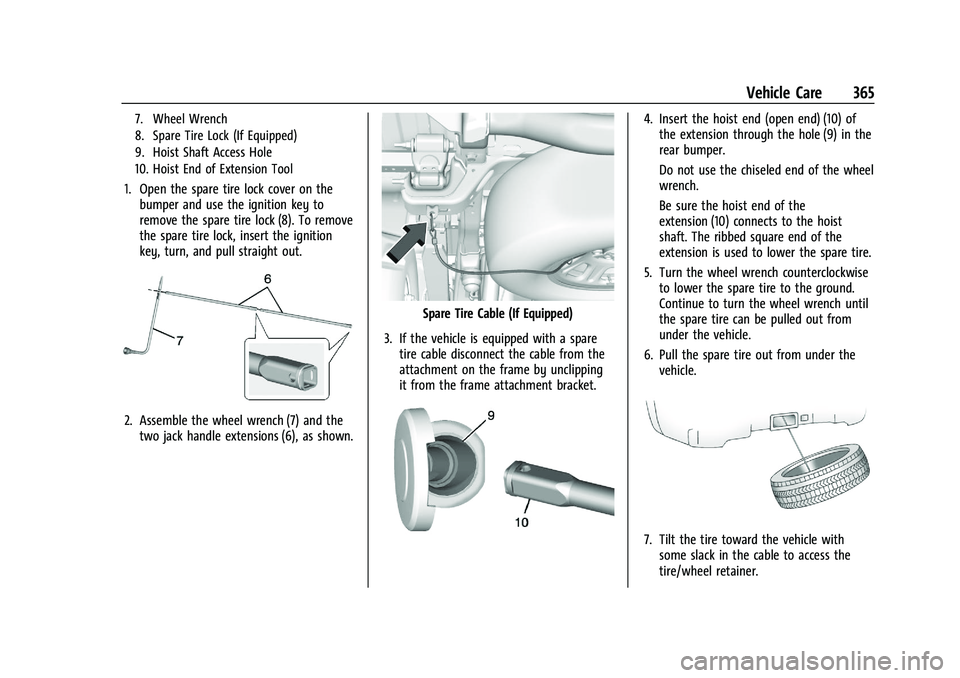
7. Wheel Wrench
8. Spare Tire Lock (If Equipped)
9. Hoist Shaft Access Hole
10. Hoist End of Extension Tool
1. Open the spare tire lock cover on thebumper and use the ignition key to
remove the spare tire lock (8). To remove
the spare tire lock, insert the ignition
key, turn, and pull straight out.
2. Assemble the wheel wrench (7) and thetwo jack handle extensions (6), as shown.
Spare Tire Cable (If Equipped)
3. If the vehicle is equipped with a spare tire cable disconnect the cable from the
attachment on the frame by unclipping
it from the frame attachment bracket.
4. Insert the hoist end (open end) (10) ofthe extension through the hole (9) in the
rear bumper.
Do not use the chiseled end of the wheel
wrench.
Be sure the hoist end of the
extension (10) connects to the hoist
shaft. The ribbed square end of the
extension is used to lower the spare tire.
5. Turn the wheel wrench counterclockwise to lower the spare tire to the ground.
Continue to turn the wheel wrench until
the spare tire can be pulled out from
under the vehicle.
6. Pull the spare tire out from under the vehicle.
7. Tilt the tire toward the vehicle withsome slack in the cable to access the
tire/wheel retainer.
Page 367 of 441
Chevrolet Silverado 2500 HD/3500 HD Owner Manual (GMNA-Localizing-U.
S./Canada/Mexico-15546003) - 2022 - CRC - 5/5/21
366 Vehicle Care
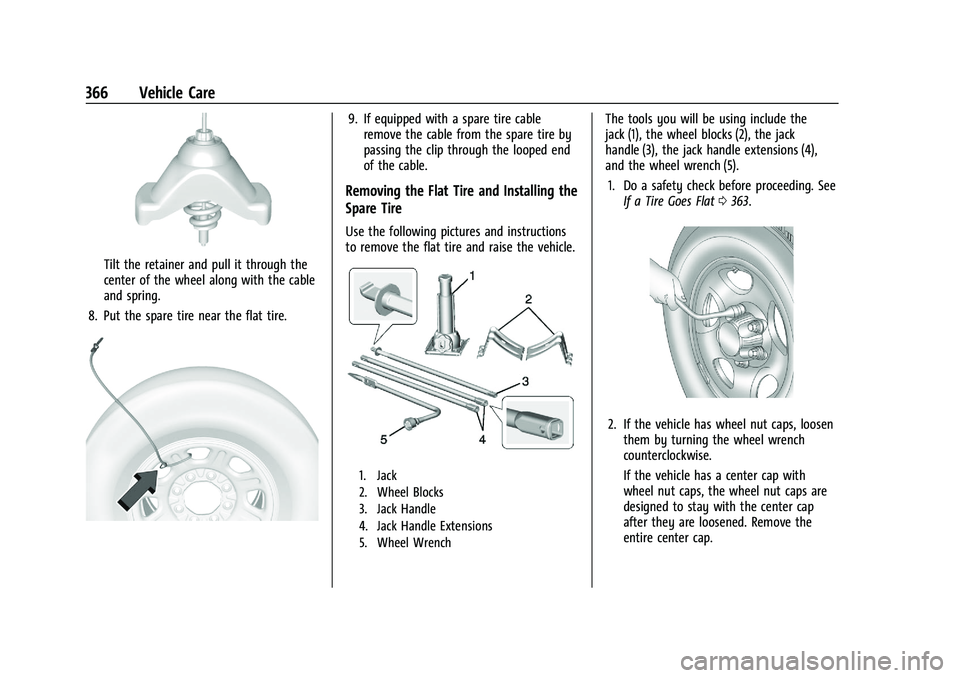
Tilt the retainer and pull it through the
center of the wheel along with the cable
and spring.
8. Put the spare tire near the flat tire.
9. If equipped with a spare tire cable remove the cable from the spare tire by
passing the clip through the looped end
of the cable.
Removing the Flat Tire and Installing the
Spare Tire
Use the following pictures and instructions
to remove the flat tire and raise the vehicle.
1. Jack
2. Wheel Blocks
3. Jack Handle
4. Jack Handle Extensions
5. Wheel Wrench
The tools you will be using include the
jack (1), the wheel blocks (2), the jack
handle (3), the jack handle extensions (4),
and the wheel wrench (5).
1. Do a safety check before proceeding. See If a Tire Goes Flat 0363.
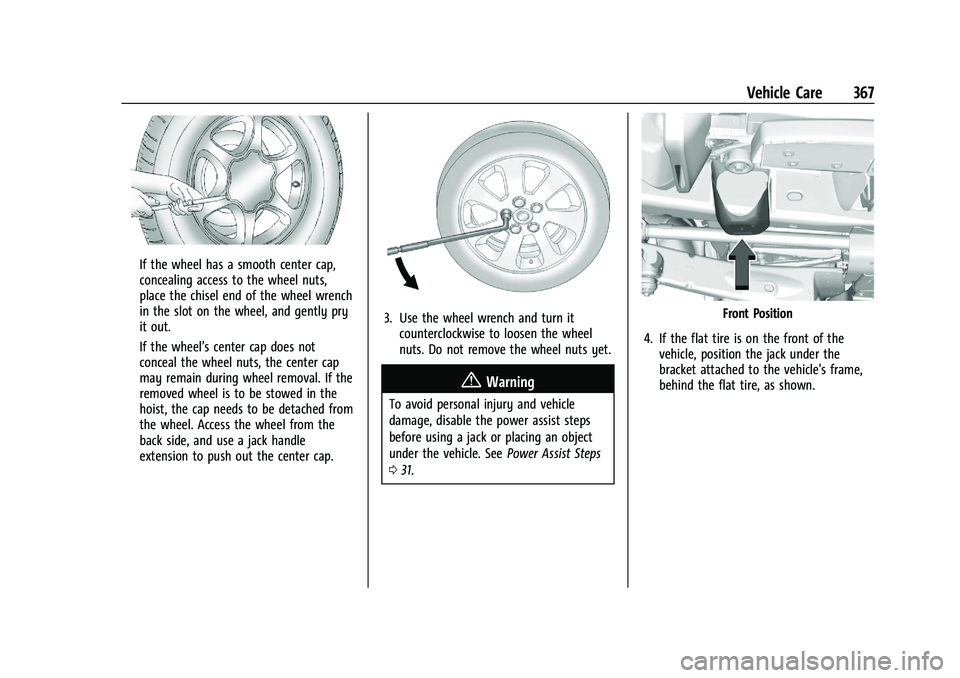
2. If the vehicle has wheel nut caps, loosen
them by turning the wheel wrench
counterclockwise.
If the vehicle has a center cap with
wheel nut caps, the wheel nut caps are
designed to stay with the center cap
after they are loosened. Remove the
entire center cap.
Page 368 of 441
Chevrolet Silverado 2500 HD/3500 HD Owner Manual (GMNA-Localizing-U.
S./Canada/Mexico-15546003) - 2022 - CRC - 5/5/21
Vehicle Care 367
If the wheel has a smooth center cap,
concealing access to the wheel nuts,
place the chisel end of the wheel wrench
in the slot on the wheel, and gently pry
it out.
If the wheel’s center cap does not
conceal the wheel nuts, the center cap
may remain during wheel removal. If the
removed wheel is to be stowed in the
hoist, the cap needs to be detached from
the wheel. Access the wheel from the
back side, and use a jack handle
extension to push out the center cap.
3. Use the wheel wrench and turn itcounterclockwise to loosen the wheel
nuts. Do not remove the wheel nuts yet.
{Warning
To avoid personal injury and vehicle
damage, disable the power assist steps
before using a jack or placing an object
under the vehicle. See Power Assist Steps
0 31.
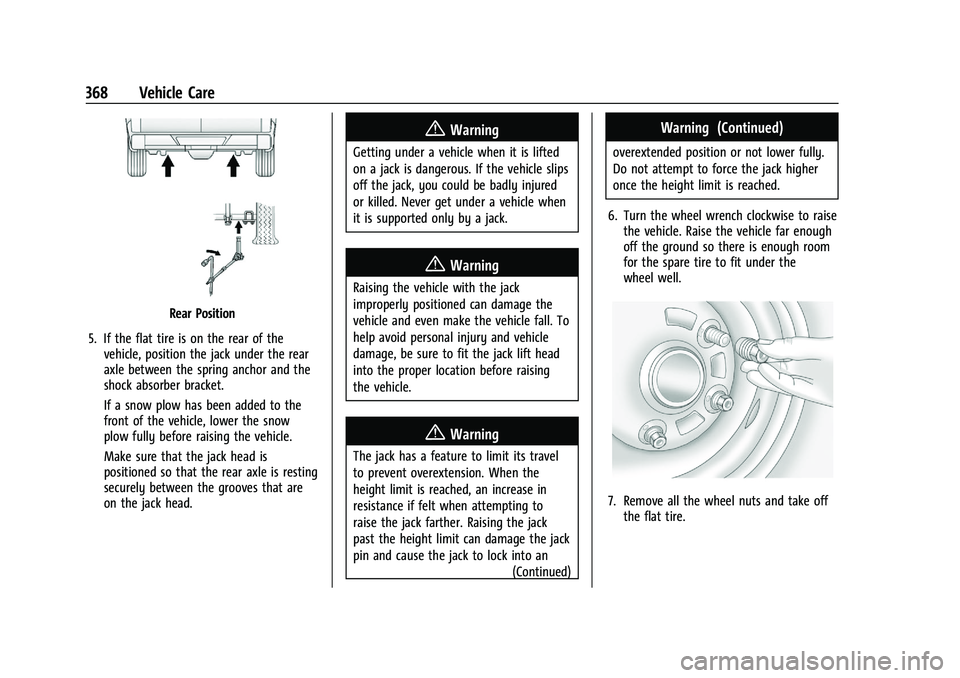
Front Position
4. If the flat tire is on the front of the vehicle, position the jack under the
bracket attached to the vehicle's frame,
behind the flat tire, as shown.
Page 369 of 441
Chevrolet Silverado 2500 HD/3500 HD Owner Manual (GMNA-Localizing-U.
S./Canada/Mexico-15546003) - 2022 - CRC - 5/5/21
368 Vehicle Care
Rear Position
5. If the flat tire is on the rear of the vehicle, position the jack under the rear
axle between the spring anchor and the
shock absorber bracket.
If a snow plow has been added to the
front of the vehicle, lower the snow
plow fully before raising the vehicle.
Make sure that the jack head is
positioned so that the rear axle is resting
securely between the grooves that are
on the jack head.
{Warning
Getting under a vehicle when it is lifted
on a jack is dangerous. If the vehicle slips
off the jack, you could be badly injured
or killed. Never get under a vehicle when
it is supported only by a jack.
{Warning
Raising the vehicle with the jack
improperly positioned can damage the
vehicle and even make the vehicle fall. To
help avoid personal injury and vehicle
damage, be sure to fit the jack lift head
into the proper location before raising
the vehicle.
{Warning
The jack has a feature to limit its travel
to prevent overextension. When the
height limit is reached, an increase in
resistance if felt when attempting to
raise the jack farther. Raising the jack
past the height limit can damage the jack
pin and cause the jack to lock into an
(Continued)
Warning (Continued)
overextended position or not lower fully.
Do not attempt to force the jack higher
once the height limit is reached.
6. Turn the wheel wrench clockwise to raise the vehicle. Raise the vehicle far enough
off the ground so there is enough room
for the spare tire to fit under the
wheel well.
7. Remove all the wheel nuts and take offthe flat tire.
Page 370 of 441
Chevrolet Silverado 2500 HD/3500 HD Owner Manual (GMNA-Localizing-U.
S./Canada/Mexico-15546003) - 2022 - CRC - 5/5/21
Vehicle Care 369
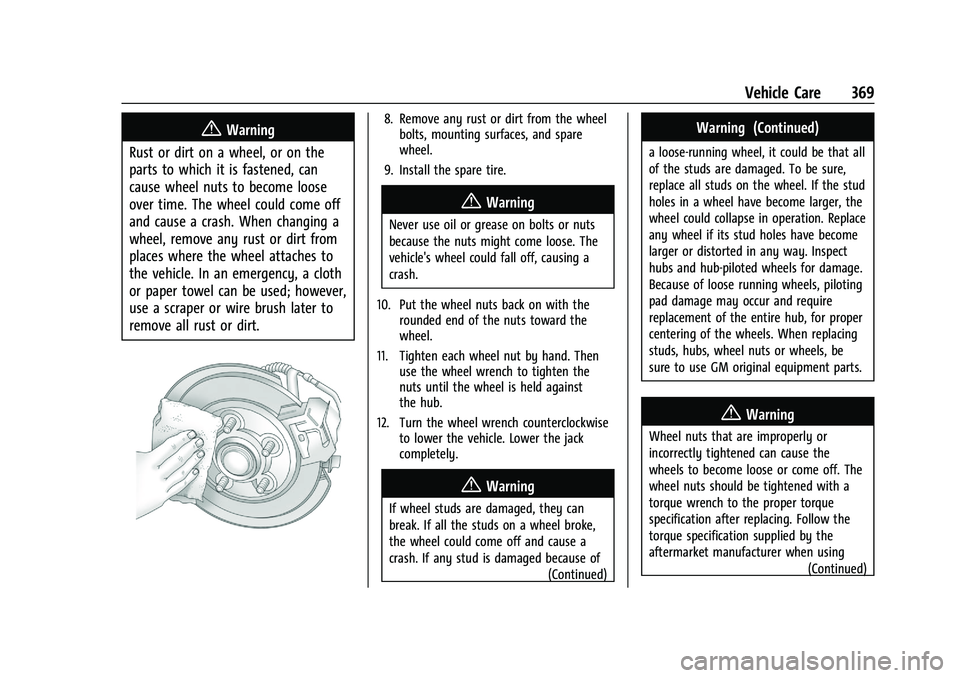
{Warning
Rust or dirt on a wheel, or on the
parts to which it is fastened, can
cause wheel nuts to become loose
over time. The wheel could come off
and cause a crash. When changing a
wheel, remove any rust or dirt from
places where the wheel attaches to
the vehicle. In an emergency, a cloth
or paper towel can be used; however,
use a scraper or wire brush later to
remove all rust or dirt.8. Remove any rust or dirt from the wheel bolts, mounting surfaces, and spare
wheel.
9. Install the spare tire.
{Warning
Never use oil or grease on bolts or nuts
because the nuts might come loose. The
vehicle's wheel could fall off, causing a
crash.
10. Put the wheel nuts back on with the rounded end of the nuts toward the
wheel.
11. Tighten each wheel nut by hand. Then use the wheel wrench to tighten the
nuts until the wheel is held against
the hub.
12. Turn the wheel wrench counterclockwise to lower the vehicle. Lower the jack
completely.
{Warning
If wheel studs are damaged, they can
break. If all the studs on a wheel broke,
the wheel could come off and cause a
crash. If any stud is damaged because of
(Continued)
Warning (Continued)
a loose-running wheel, it could be that all
of the studs are damaged. To be sure,
replace all studs on the wheel. If the stud
holes in a wheel have become larger, the
wheel could collapse in operation. Replace
any wheel if its stud holes have become
larger or distorted in any way. Inspect
hubs and hub‐piloted wheels for damage.
Because of loose running wheels, piloting
pad damage may occur and require
replacement of the entire hub, for proper
centering of the wheels. When replacing
studs, hubs, wheel nuts or wheels, be
sure to use GM original equipment parts.
{Warning
Wheel nuts that are improperly or
incorrectly tightened can cause the
wheels to become loose or come off. The
wheel nuts should be tightened with a
torque wrench to the proper torque
specification after replacing. Follow the
torque specification supplied by the
aftermarket manufacturer when using
(Continued)
Page 371 of 441
Chevrolet Silverado 2500 HD/3500 HD Owner Manual (GMNA-Localizing-U.
S./Canada/Mexico-15546003) - 2022 - CRC - 5/5/21
370 Vehicle Care
Warning (Continued)
accessory locking wheel nuts. See
Capacities and Specifications0406 for
original equipment wheel nut torque
specifications.
Caution
Improperly tightened wheel nuts can lead
to brake pulsation and rotor damage. To
avoid expensive brake repairs, evenly
tighten the wheel nuts in the proper
sequence and to the proper torque
specification. See Capacities and
Specifications 0406 for the wheel nut
torque specification.
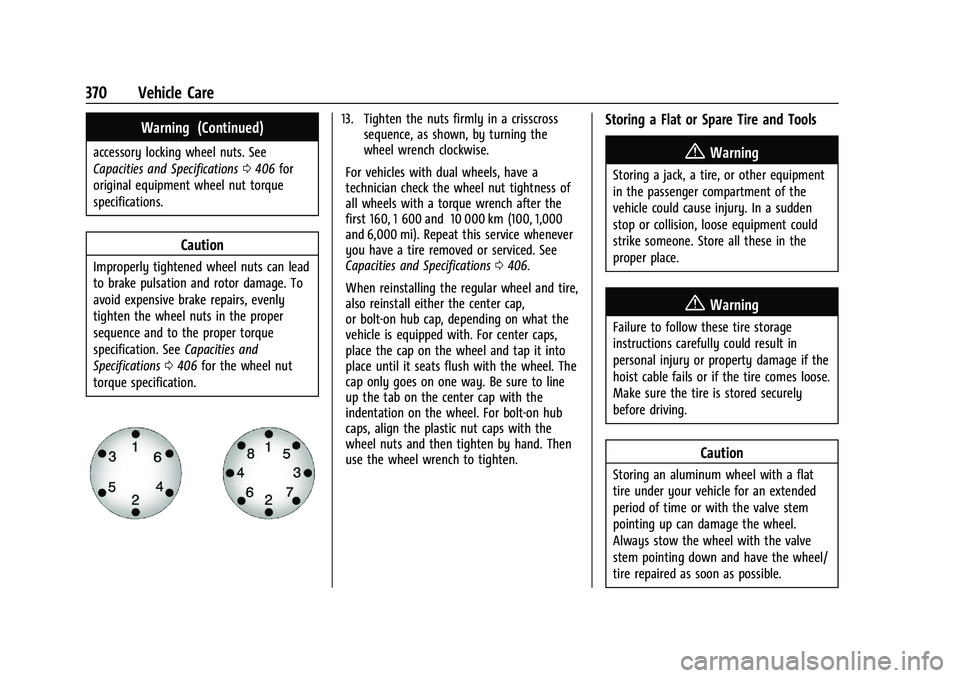
13. Tighten the nuts firmly in a crisscross sequence, as shown, by turning the
wheel wrench clockwise.
For vehicles with dual wheels, have a
technician check the wheel nut tightness of
all wheels with a torque wrench after the
first 160, 1 600 and 10 000 km (100, 1,000
and 6,000 mi). Repeat this service whenever
you have a tire removed or serviced. See
Capacities and Specifications 0406.
When reinstalling the regular wheel and tire,
also reinstall either the center cap,
or bolt-on hub cap, depending on what the
vehicle is equipped with. For center caps,
place the cap on the wheel and tap it into
place until it seats flush with the wheel. The
cap only goes on one way. Be sure to line
up the tab on the center cap with the
indentation on the wheel. For bolt-on hub
caps, align the plastic nut caps with the
wheel nuts and then tighten by hand. Then
use the wheel wrench to tighten.Storing a Flat or Spare Tire and Tools
{Warning
Storing a jack, a tire, or other equipment
in the passenger compartment of the
vehicle could cause injury. In a sudden
stop or collision, loose equipment could
strike someone. Store all these in the
proper place.
{Warning
Failure to follow these tire storage
instructions carefully could result in
personal injury or property damage if the
hoist cable fails or if the tire comes loose.
Make sure the tire is stored securely
before driving.
Caution
Storing an aluminum wheel with a flat
tire under your vehicle for an extended
period of time or with the valve stem
pointing up can damage the wheel.
Always stow the wheel with the valve
stem pointing down and have the wheel/
tire repaired as soon as possible.