display CHEVROLET VOLT 2011 Owner's Manual
[x] Cancel search | Manufacturer: CHEVROLET, Model Year: 2011, Model line: VOLT, Model: CHEVROLET VOLT 2011Pages: 516, PDF Size: 6.61 MB
Page 349 of 516
Black plate (47,1)Chevrolet Volt Owner Manual - 2011
Driving and Operating 9-47
Turning the Rear Vision Camera
System On or Off
To turn the RVC system on or off:
1. Shift into P (Park).
2. Press the CONFIG button on thecenter stack.
3. Select Display.
4. Select Camera. When a checkmark appears next to
Camera, then the RVC system
is on.
Symbols
The navigation system may have
a feature that lets the driver view
symbols on the navigation screen
while using the RVC. The Ultrasonic
Front and Rear Parking Assist
(UFRPA) system must not be
disabled to use the caution symbols. The error message REAR PARKING
ASSIST SYMBOLS UNAVAILABLE
may display if UFRPA has been
disabled and the symbols have
been turned on. See
Ultrasonic
Parking Assist on page 9‑43.
The symbols appear and may
cover an object when viewing the
navigation screen when an object
is detected by the UFRPA system.
To turn the symbols on or off:
1. Shift into P (Park).
2. Press the CONFIG button on the
center stack.
3. Select Display.
4. Select Symbols. When a checkmark appears next to
Symbols, symbols will appear. Guidelines
The RVC system has a guideline
overlay that can help the driver align
the vehicle when backing into a
parking spot.
To turn the guidelines on or off:
1. Shift into P (Park).
2. Press the CONFIG button on the
center stack.
3. Select Display.
4. Select Guidelines. When a checkmark appears next to
Guidelines, guidelines will
appear.
Page 350 of 516
Black plate (48,1)Chevrolet Volt Owner Manual - 2011
9-48 Driving and Operating
Rear Vision Camera Error
Messages
SERVICE REAR VISION CAMERA
SYSTEM:If this message appears
in the center stack display, the
system is not receiving information it
requires from other vehicle systems.
If any other problem occurs or if a
problem persists, see your dealer.
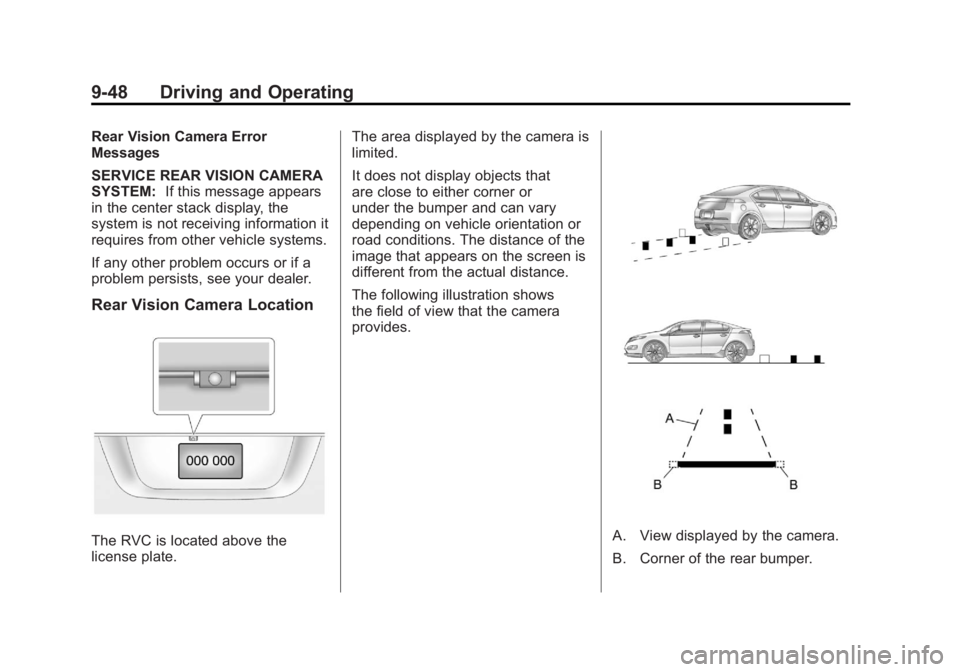
Rear Vision Camera Location
The RVC is located above the
license plate. The area displayed by the camera is
limited.
It does not display objects that
are close to either corner or
under the bumper and can vary
depending on vehicle orientation or
road conditions. The distance of the
image that appears on the screen is
different from the actual distance.
The following illustration shows
the field of view that the camera
provides.A. View displayed by the camera.
B. Corner of the rear bumper.
Page 351 of 516

Black plate (49,1)Chevrolet Volt Owner Manual - 2011
Driving and Operating 9-49
When the System Does Not
Seem To Work Properly
The RVC system may not work
properly or display a clear image if:
.The RVC is turned off.
See“Turning the Rear Vision
Camera System On or Off”
earlier in this section.
.It is dark.
.The sun or the beam of
headlamps is shining directly
into the camera lens.
.Ice, snow, mud, or anything else
has built up on the camera lens.
Clean the lens, rinse it with
water, and wipe it with a soft
cloth.
.The back of the vehicle was in
an accident. The position and
mounting angle of the camera
can change or the camera can
be affected. Be sure to have
the camera and its position and
mounting angle checked at your
dealer.
Charging
Plug-In Charging
This section explains the process
for charging the vehicle's high
voltage battery. Do not allow the
vehicle to remain in temperature
extremes for long periods without
being driven or plugged in. It is
recommended that the vehicle
be plugged in when temperatures
are below 0°C (32°F) and above
32°C (90°F) to maximize high
voltage battery life.
The charging system may run fans
and pumps that result in sounds
from the vehicle while it is turned
off. Additional unexpected clicking
sounds may be experienced caused
by the electrical devices used while
charging.
Charging
Start Charge
1. The charge port door release button is on the driver door inner
trim panel. With the vehicle in
P (Park), press the button for
one second and release to open
the charge port door. The charge
port door can also be opened
using the RKE transmitter.
See Remote Keyless Entry
(RKE) System Operation on
page 2‑3.
Page 362 of 516
Black plate (60,1)Chevrolet Volt Owner Manual - 2011
9-60 Driving and Operating
Some gasolines that are
not reformulated for low
emissions can contain an
octane-enhancing additive
called methylcyclopentadienyl
manganese tricarbonyl (MMT);
ask the attendant where you buy
gasoline whether the fuel contains
MMT. We recommend against
the use of such gasolines. Fuels
containing MMT can reduce spark
plug life and affect emission
control system performance.
The malfunction indicator lamp
might turn on. If this occurs,
return to your dealer for service.Filling the Tank
{WARNING
Fuel vapor burns violently and a
fuel fire can cause bad injuries.
To help avoid injuries to you and
others, read and follow all the
instructions on the fuel pump
island. Turn off the vehicle when
refueling. Do not smoke near
fuel or when refueling the vehicle.
Do not use cellular phones.
Keep sparks, flames, and
smoking materials away from
fuel. Do not leave the fuel pump
unattended when refueling the
vehicle. This is against the law
in some places. Do not re-enter
the vehicle while pumping fuel.
Keep children away from the
fuel pump; never let children
pump fuel.The fuel system on this vehicle
requires a refueling process to
control evaporative emissions.
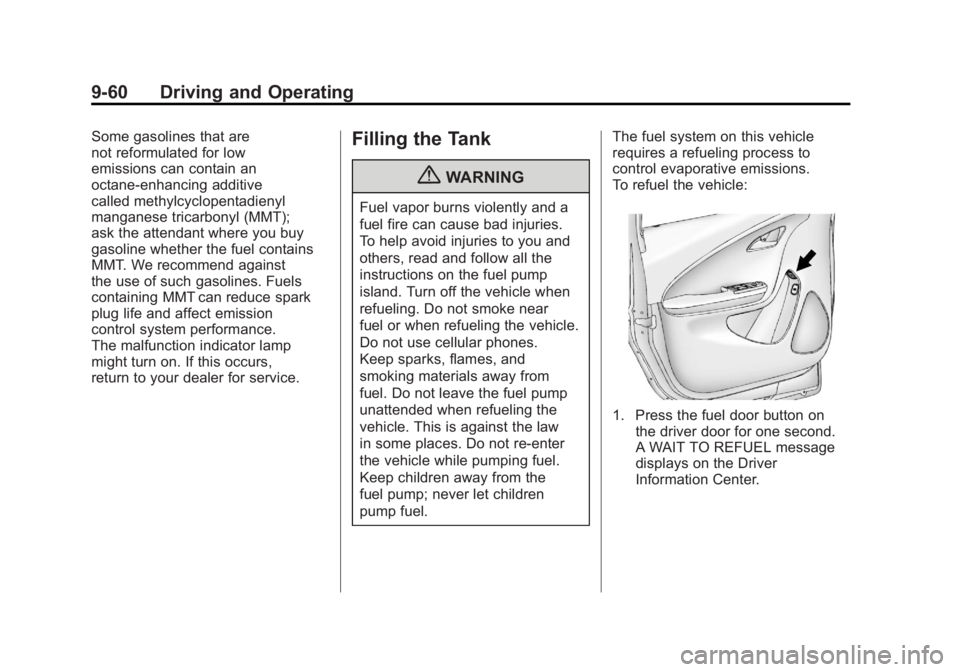
To refuel the vehicle:
1. Press the fuel door button on
the driver door for one second.
A WAIT TO REFUEL message
displays on the Driver
Information Center.
Page 363 of 516
Black plate (61,1)Chevrolet Volt Owner Manual - 2011
Driving and Operating 9-61
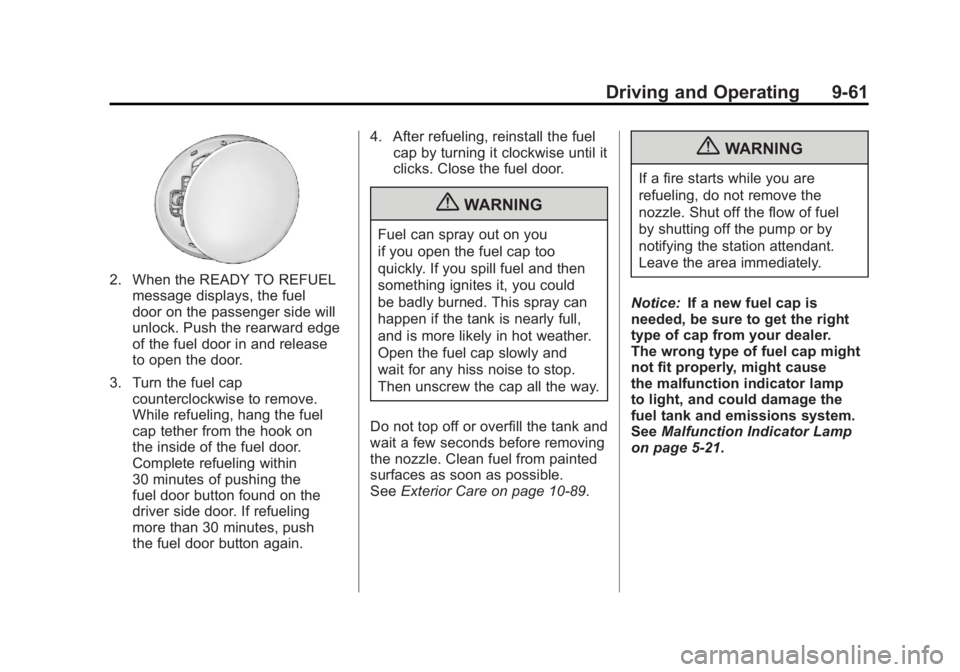
2. When the READY TO REFUELmessage displays, the fuel
door on the passenger side will
unlock. Push the rearward edge
of the fuel door in and release
to open the door.
3. Turn the fuel cap counterclockwise to remove.
While refueling, hang the fuel
cap tether from the hook on
the inside of the fuel door.
Complete refueling within
30 minutes of pushing the
fuel door button found on the
driver side door. If refueling
more than 30 minutes, push
the fuel door button again. 4. After refueling, reinstall the fuel
cap by turning it clockwise until it
clicks. Close the fuel door.
{WARNING
Fuel can spray out on you
if you open the fuel cap too
quickly. If you spill fuel and then
something ignites it, you could
be badly burned. This spray can
happen if the tank is nearly full,
and is more likely in hot weather.
Open the fuel cap slowly and
wait for any hiss noise to stop.
Then unscrew the cap all the way.
Do not top off or overfill the tank and
wait a few seconds before removing
the nozzle. Clean fuel from painted
surfaces as soon as possible.
See Exterior Care on page 10‑89.
{WARNING
If a fire starts while you are
refueling, do not remove the
nozzle. Shut off the flow of fuel
by shutting off the pump or by
notifying the station attendant.
Leave the area immediately.
Notice: If a new fuel cap is
needed, be sure to get the right
type of cap from your dealer.
The wrong type of fuel cap might
not fit properly, might cause
the malfunction indicator lamp
to light, and could damage the
fuel tank and emissions system.
See Malfunction Indicator Lamp
on page 5‑21.
Page 380 of 516
Black plate (14,1)Chevrolet Volt Owner Manual - 2011
10-14 Vehicle Care
Use of Substitute Engine Oils if
dexos is unavailable: In the event
that dexos‐approved engine oil is
not available at an oil change or
for maintaining proper oil level,
you may use substitute engine oil
displaying the API Starburst symbol
and of SAE 5W-30 viscosity grade.
Use of oils that do not meet the
dexos specification, however,
may result in reduced performance
under certain circumstances.
Viscosity Grade
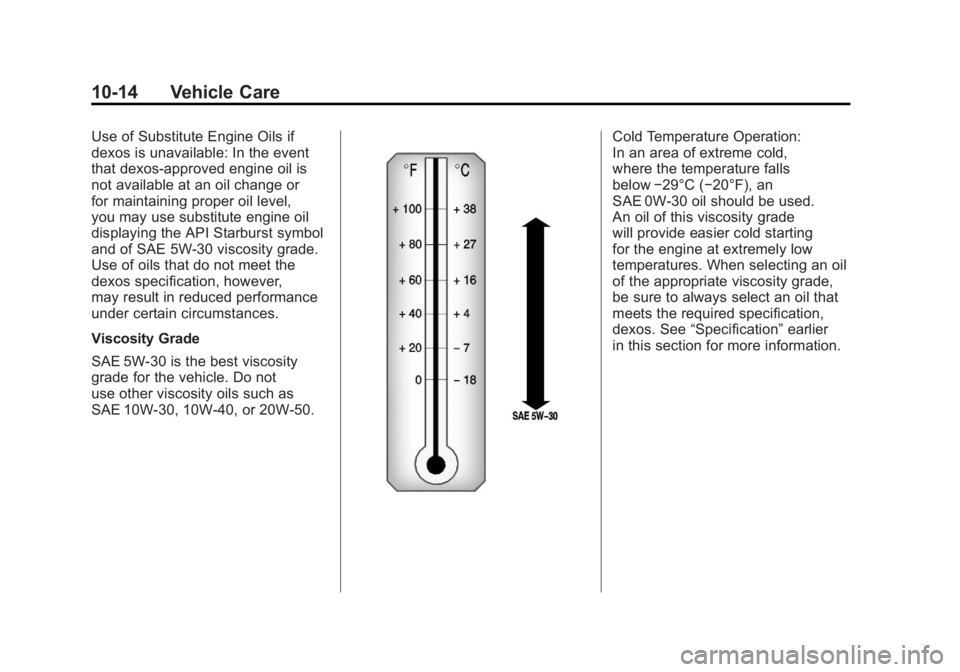
SAE 5W-30 is the best viscosity
grade for the vehicle. Do not
use other viscosity oils such as
SAE 10W‐30, 10W‐40, or 20W-50.Cold Temperature Operation:
In an area of extreme cold,
where the temperature falls
below−29°C (−20°F), an
SAE 0W-30 oil should be used.
An oil of this viscosity grade
will provide easier cold starting
for the engine at extremely low
temperatures. When selecting an oil
of the appropriate viscosity grade,
be sure to always select an oil that
meets the required specification,
dexos. See “Specification” earlier
in this section for more information.
Page 381 of 516
Black plate (15,1)Chevrolet Volt Owner Manual - 2011
Vehicle Care 10-15
Engine Oil Additives/Engine
Oil Flushes
Do not add anything to the oil.
The recommended oils with the
dexos specification and displaying
the dexos certification mark are all
that is needed for good performance
and engine protection.
Engine oil system flushes are not
recommended and could cause
engine damage not covered by
the vehicle warranty.
What to Do with Used Oil
Used engine oil contains certain
elements that can be unhealthy for
your skin and could even cause
cancer. Do not let used oil stay on
your skin for very long. Clean your
skin and nails with soap and water,
or a good hand cleaner. Wash or
properly dispose of clothing or rags
containing used engine oil. See the
manufacturer's warnings about the
use and disposal of oil products.
Used oil can be a threat to the
environment. If you change your
own oil, be sure to drain all the
oil from the filter before disposal.
Never dispose of oil by putting
it in the trash or pouring it on the
ground, into sewers, or into streams
or bodies of water. Recycle it by
taking it to a place that collects
used oil.
Engine Oil Life System
When to Change Engine Oil
This vehicle has a computer system
that indicates when to change the
engine oil and filter. This is based
on a combination of factors which
include engine revolutions, engine
temperature, and miles driven.
Based on driving conditions, the
mileage at which an oil change is
indicated can vary considerably.
For the oil life system to work
properly, the system must be reset
every time the oil is changed.
Page 382 of 516

Black plate (16,1)Chevrolet Volt Owner Manual - 2011
10-16 Vehicle Care
When the system has calculated
that oil life has been diminished,
it indicates that an oil change is
necessary. A CHANGE ENGINE
OIL SOON message comes on.
Change the oil as soon as possible
within the next 1 000 km (600 mi).
It is possible that, if driving under
the best conditions, the oil life
system might indicate that an oil
change is not necessary for up
to two years. The engine oil and
filter must be changed at least
once every two years and, at this
time, the system must be reset.
Your dealer has trained service
people who will perform this work
and reset the system. It is also
important to check the oil regularly
over the course of an oil drain
interval and keep it at the proper
level.
If the system is ever reset
accidentally, the oil must be
changed at 5 000 km (3,000 mi)
since the last oil change.
Remember to reset the oil life
system whenever the oil is changed.How to Reset the Engine Oil
Life System
Reset the system whenever the
engine oil is changed so that the
system can calculate the next
engine oil change. To reset the
system:
1. Use the SELECT knob to selectOIL LIFE on the DIC menu.
2. Press SELECT to start the OIL LIFE reset procedure.
3. The DIC menu will display “Are
you sure that you want to reset?”
Use SELECT to choose YES to
reset oil life or NO to exit and
return to the previous menu.
4. If YES is selected, the DIC menu will display RESET OIL LIFE for
a short time and then 100% OIL
LIFE will be displayed when
OIL LIFE is successfully reset.
If the CHANGE ENGINE OIL SOON
message comes back on when the
vehicle is started, the engine oil life
system has not reset. Repeat the
procedure.
Engine Air Cleaner/Filter
See Engine Compartment Overview
on page 10‑10 for the location of the
engine air cleaner/filter.
When to Inspect the Engine Air
Filter
Inspect the air filter at the scheduled
maintenance intervals and replace
it at the first oil change after each
80 000 km (50,000 mi) interval.
See Scheduled Maintenance on
page 11‑2 for more information.
If driving in dusty/dirty conditions,
inspect the air filter at each engine
oil change.
How to Inspect the Engine Air
Filter
To inspect the air filter, remove it
from the engine air cleaner/filter
assembly and lightly shake to
release loose dust and dirt. If the
air filter remains covered with dirt,
a new air filter is required.
Page 394 of 516
Black plate (28,1)Chevrolet Volt Owner Manual - 2011
10-28 Vehicle Care
Battery
This vehicle has a high voltage
battery and a standard 12‐volt
battery.
If the vehicle is in a crash, the
sensing system may shut down
the high voltage system. When this
occurs, the high voltage battery is
disconnected and the vehicle will
not start. The SERVICE VEHICLE
SOON message in the Driver
Information Center (DIC), will be
displayed. Before the vehicle can
be operated again, it must be
serviced at your dealer.
See“If a Crash Occurs” under
Collision Damage Repair on
page 13‑10 for additional
information. If an airbag has
inflated, see What Will You See
after an Airbag Inflates? on
page 3‑31. Only a trained service technician
with the proper knowledge and
tools should inspect, test, or replace
the high voltage battery. See your
dealer if the high voltage battery
needs service. The dealer has
information on how to recycle
the high voltage battery. There
is also information available at
http://www.recyclemybattery.com.
Keep the vehicle plugged in, even
when fully charged, to keep the high
voltage battery temperature ready
for the next drive. This is important
when outside temperatures are
extremely hot or cold.
A vehicle cover, which can reduce
sun loading on the vehicle and
improve high voltage battery life,
is available from your dealer.
Refer to the replacement number
shown on the original battery label
when a new 12‐volt battery is
needed.{DANGER
Battery posts, terminals, and
related accessories contain lead
and lead compounds, chemicals
known to the State of California
to cause cancer and reproductive
harm. Wash hands after handling.
Vehicle Storage
{WARNING
12‐volt batteries have acid that
can burn you and gas that can
explode. You can be badly hurt
if you are not careful. See
Jump
Starting on page 10‑79 for tips on
working around a battery without
getting hurt.
Page 407 of 516

Black plate (41,1)Chevrolet Volt Owner Manual - 2011
Vehicle Care 10-41
Mini Fuses Usage53 Traction
Power Inverter
Module
–Run/Crank
54 Run/Crank for Air
Conditioning Control
Module/Instrument
Cluster/Passenger
Airbag Display/
Accessory Power
Module
J‐Case Fuses Usage
16 Empty
18 Empty
19 Power
Window
–Front
20 Empty
21 Antilock Brake
System Electronic
Control Unit J‐Case
Fuses Usage
23 Charge Port Door
27 Empty
28 Empty
29 Empty
30 Antilock Brake
System Motor
42 Cooling Fan –Right
43 Front Wipers
44 Charger
45 Empty
48 Cooling Fan –Left
Mini Relays Usage 3 Powertrain
4 Rear Defog (Lower
Grid)/Heated Mirrors
7 Empty Mini Relays Usage
9 Empty
11 Empty
12 Empty
13 Empty
14 Run/Crank
Micro
Relays Usage
1 Empty
2 Empty
6 Empty
8 Empty
10 Empty
Ultra Micro Relays Usage
5 Charge Port Door