display CHRYSLER 300 2015 2.G Owner's Manual
[x] Cancel search | Manufacturer: CHRYSLER, Model Year: 2015, Model line: 300, Model: CHRYSLER 300 2015 2.GPages: 180, PDF Size: 30.54 MB
Page 45 of 180

EIGHT-SPEED AUTOMATIC TRANSMISSION
The transmission is controlled using a rotary electronic gear selector located on the center
console. The transmission gear range (PRNDL/S) is displayed both above the gear selector and
in the Driver Information Display (DID). To select a gear range, simply rotate the gear selector.
To access the L or S position, push down on the gear selector and then rotate it. You must also
press the brake pedal to shift the transmission out of PARK, or to shift from NEUTRAL into
DRIVE or REVERSE when the vehicle is stopped or moving at low speeds (refer to “Brake/
Tr a n s m i s s i o n S h i f t I n t e r l o c k S y s t e m ” o n t h e D V D f o r f u r t h e r i n f o r m a t i o n ) . To s h i f t p a s t m u l t i p l e
gear ranges at once (such as PARK to DRIVE), simply rotate the gear selector to the appropriate
detent. Select the DRIVE range for normal driving.
The electronically-controlled transmission provides a precise shift schedule. The transmission
electronics are self-calibrating; therefore, the first few shifts on a new vehicle may be somewhat
abrupt. This is a normal condition, and precision shifts will develop within a few hundred miles
(kilometers).
Only shift from DRIVE to PARK or REVERSE when the accelerator pedal is released and the
vehicle is stopped. Be sure to keep your foot on the brake pedal when shifting between these
gears.
Standard Shifter
The standard transmission gear selector has PARK, REVERSE, NEUTRAL, DRIVE, and LOW
shift positions. Using the LOW position manually downshifts the transmission to a lower gear
based on vehicle speed.
Premium Shifter With AutoStick
The premium transmission gear selector pro-
vides PARK, REVERSE, NEUTRAL, DRIVE,
and SPORT shift positions. Manual shifts can
be made using the AutoStick shift control (shift
paddles mounted on the steering wheel).
Pressing the shift paddles (-/+) while in the
DRIVE or SPORT position will manually select
the transmission gear, and will display the cur-
rent gear in the instrument cluster as 1, 2, 3, etc.
Refer to “AutoStick” in this section for further
information.
Gear Selector
OPERATING YOUR VEHICLE
43
Page 46 of 180
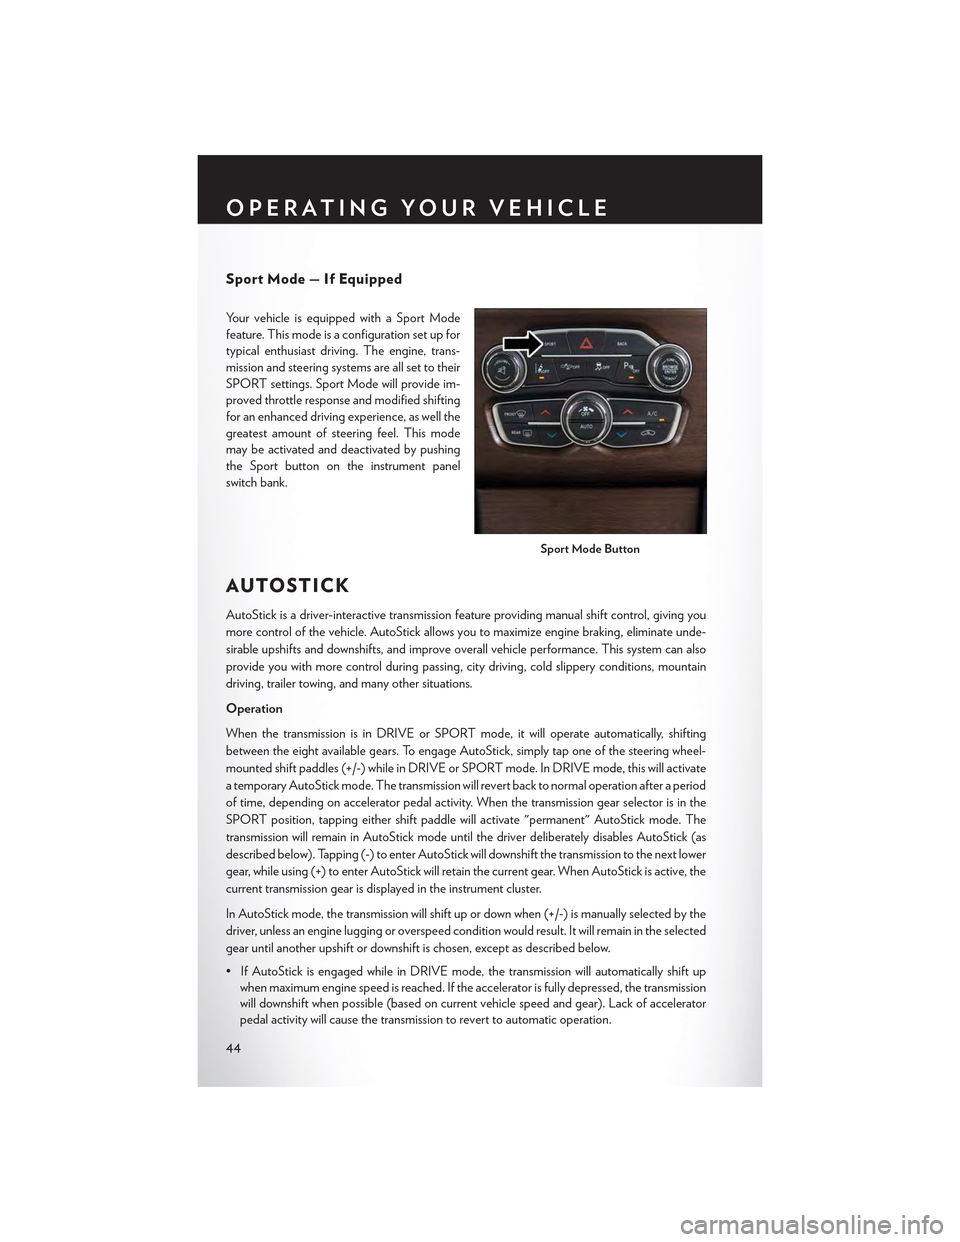
Sport Mode — If Equipped
Yo u r v e h i c l e i s e q u i p p e d w i t h a S p o r t M o d e
feature. This mode is a configuration set up for
typical enthusiast driving. The engine, trans-
mission and steering systems are all set to their
SPORT settings. Sport Mode will provide im-
proved throttle response and modified shifting
for an enhanced driving experience, as well the
greatest amount of steering feel. This mode
may be activated and deactivated by pushing
the Sport button on the instrument panel
switch bank.
AUTOSTICK
AutoStick is a driver-interactive transmission feature providing manual shift control, giving you
more control of the vehicle. AutoStick allows you to maximize engine braking, eliminate unde-
sirable upshifts and downshifts, and improve overall vehicle performance. This system can also
provide you with more control during passing, city driving, cold slippery conditions, mountain
driving, trailer towing, and many other situations.
Operation
When the transmission is in DRIVE or SPORT mode, it will operate automatically, shifting
between the eight available gears. To engage AutoStick, simply tap one of the steering wheel-
mounted shift paddles (+/-) while in DRIVE or SPORT mode. In DRIVE mode, this will activate
atemporaryAutoStickmode.Thetransmissionwillrevertbacktonormaloperationafteraperiod
of time, depending on accelerator pedal activity. When the transmission gear selector is in the
SPORT position, tapping either shift paddle will activate "permanent" AutoStick mode. The
transmission will remain in AutoStick mode until the driver deliberately disables AutoStick (as
described below). Tapping (-) to enter AutoStick will downshift the transmission to the next lower
gear, while using (+) to enter AutoStick will retain the current gear. When AutoStick is active, the
current transmission gear is displayed in the instrument cluster.
In AutoStick mode, the transmission will shift up or down when (+/-) is manually selected by the
driver, unless an engine lugging or overspeed condition would result. It will remain in the selected
gear until another upshift or downshift is chosen, except as described below.
• If AutoStick is engaged while in DRIVE mode, the transmission will automatically shift up
when maximum engine speed is reached. If the accelerator is fully depressed, the transmission
will downshift when possible (based on current vehicle speed and gear). Lack of accelerator
pedal activity will cause the transmission to revert to automatic operation.
Sport Mode Button
OPERATING YOUR VEHICLE
44
Page 47 of 180

• If AutoStick is engaged while the transmission gear selector is in the SPORT position, manual
gear selection will be maintained until the gear selector is returned to DRIVE, or as described
below. The transmission will not upshift automatically at redline in this mode, nor will down-
shifts be obtained if the accelerator pedal is pressed to the floor.
•IneitherDRIVEorSPORTmode,thetransmissionwillautomaticallydownshiftasthevehicle
slows (to prevent engine lugging) and will display the current gear.
• The transmission will automatically downshift to first gear when coming to a stop. After a stop,
the driver should manually upshift (+) the transmission as the vehicle is accelerated.
• You can start out, from a stop, in first or second gear. Tapping (+) at a stop will allow starting in
second gear. Starting out in second gear can be helpful in snowy or icy conditions.
•Ifarequesteddownshiftwouldcausetheenginetoover-speed,thatshiftwillnotoccur.
•Thesystemwillignoreattemptstoupshiftattoolowofavehiclespeed.
•Holdingthe(-)paddledepressedwilldownshiftthetransmissiontothelowestgearpossibleat
the current speed.
• Transmission shifting will be more noticeable when AutoStick is engaged.
•Thesystemmayreverttoautomaticshiftmodeifafaultoroverheatconditionisdetected.
To d i s e n g a g e A u t o S t i c k m o d e , p r e s s a n d h o l d t h e ( + ) s h i f t p a d d l e u n t i l " D " o r " S " i s o n c e a g a i n
indicated in the instrument cluster. Shifting out of SPORT mode will also disable AutoStick. You
can shift in or out of AutoStick mode at any time without taking your foot off the accelerator
pedal.
WARNING!
Do not downshift for additional engine braking on a slippery surface. The drive wheels could
lose their grip and the vehicle could skid, causing a collision or personal injury.
OPERATING YOUR VEHICLE
45
Page 58 of 180
3. The Uconnect® Voice Command and Uconnect® Phone buttons are located on the left side of
your steering wheel. These buttons let you use your voice to give commands, make phone
calls, send and receive text messages hands-free, enter navigation destinations, and control
your radio and media devices.
Included Trial Period For New Vehicles
Yo u r n e w v e h i c l e m a y c o m e w i t h a n i n c l u d e d t r i a l p e r i o d f o r u s e o f t h e U c o n n e c t ® A c c e s s
Services starting at the date of vehicle purchase (date based on vehicle sales notification from
your dealer).To a c t i v a t e t h e t r i a l , y o u m u s t f i r s t r e g i s t e r w i t h U c o n n e c t ® A c c e s s. After the
trial period, if you wish to continue your Uconnect® Access Services you can choose to purchase
a subscription.
Features And Packages
•Afterthetrialperiod,youcansubscribetocontinueyourservicebyvisitingtheUconnect®
Store located within the Mopar Owner Connect website moparownerconnect.com. If you
need assistance, U.S. residents can call Uconnect® Care at 1-855-792-4241 .
•Forthelatestinformationonpackagesandpricinginformation:U.S.residentsvisit
DriveUconnect.com.
Uconnect® Access Registration (Uconnect® 8.4A/8.4AN, U.S. 48
Contiguous States, Alaska And Hawaii)
To u n l o c k t h e f u l l p o t e n t i a l o f U c o n n e c t ® A c c e s s i n y o u r v e h i c l e , y o u f i r s t n e e d t o r e g i s t e r w i t h
Uconnect® Access.
1. From the parked vehicle with the radio touchscreen powered on, select the “Apps” button
located near the bottom right-hand corner of the radio touchscreen.
NOTE:
Should you require assistance anytime during the registration process, simply call Uconnect®
Care at 1-855-792-4241 .
2. Press “Start” on the reminder screen or select “Uconnect Registration” under the “All Apps” or
“Favorites Apps” tab on the Apps list.
3. The Uconnect® Access Registration App will open and display step-by-step instructions to
start your registration.
4. Enter your email address into the radio touchscreen.
5. A message will display on the touchscreen indicating your email submission was accepted. In
afewminutes,youwillreceiveanemailwhichwillallowyoutoregisteryourvehiclefor
Uconnect® Access. You should open this email and begin your Uconnect® Access registration
within 72 hours.
6. Check for an email from Uconnect® Access that contains your personalized registration link.
If you don't see it, check your spam or junk mail folder. Open the email and click on the link to
continue registering.
ELECTRONICS
56
Page 60 of 180

Aha™ by HARMAN (www.aharadio.com)
•EnteryouremailaddressandpasswordforAha™,orcreateanewAha™account.
•YoucanlinkyourFacebook,TwitterorSlackeraccountsontheAha™website.
iHeartRadio (www.iHeartRadio.com)
•EnteryouremailaddressandpasswordforiHeartRadio,orcreateanewiHeartRadioaccount.
•Select“Activate”tocontinue,
• Select “Close” to complete activation.
Pandora® (www.pandora.com)
•EnteryourPandora®username/emailaddressandpassword,thenclick“Save.”
• Create a new Pandora® account.
Slacker Radio (www.slacker.com)
•EnteryourSlackerusername/emailaddressandpassword,thenclick“Save.”
•CreateanewSlackerRadioaccount.
Invite family and friends to use the Via Mobile Apps in your vehicle by setting up their own Via
Mobile profile.
Renewing Subscriptions And Purchasing WiFi Hotspot (Uconnect®
8.4A/8.4AN, U.S. 48 Contiguous States And Alaska)
Subscriptions, and WiFi Hotspot, can be purchased from the Uconnect® Store within your
vehicle, and online at Mopar Owner Connect. If you need help push the ASSIST button on the
rearview mirror, then select Uconnect® Care (or dial 1-855-792-4241 ).
Purchasing Online
Yo u c a n r e n e w y o u r s u b s c r i p t i o n t o a p a c k a g e o r p u r c h a s e W i F i f r o m t h e M o p a r O w n e r C o n n e c t
website. You must first set up a Uconnect® Access Payment Account online. Log into
moparownerconnect.com
1. Log In to the Mopar Owner Connect website (moparownerconnect.com) with your
username/email and password.
2. Click on the “Shop” tab, then click on the Uconnect® Store.
3. From the Uconnect® Store, select the item you wish to purchase.
4. This will launch the selected item into purchase mode along with providing additional
information.
5. The Uconnect® Store will display a “Purchase Overview” message confirming the financial
details of your purchase. Click the “Purchase” key to continue.
6. The Uconnect® Store will ask you to “Confirm Payment” using your default payment method
on file in your Payment Account. Click the “Complete” key to continue.
ELECTRONICS
58
Page 64 of 180

1.Assist Call— The rearview mirror contains an ASSIST push button which (once registered)
automatically connects the vehicle occupants to one of these predefined destinations for
immediate support:
•Roadside Assistance Call— If you get a
flat tire, or need a tow, you’ll be con-
nected to someone who can help any-
time. Additional fees may apply. Addi-
tional information in this section.
•Uconnect® Access Care— In vehicle
support for Uconnect® Access System,
Apps and Features.
•Vehicle Care—Totalsupportforyour
FCA US LLC vehicle.
2.Emergency 9-1-1 Call (If Equipped)—
The rearview mirror contains a 9-1-1 button
that, when pressed, may place a call from
your vehicle to a local 9-1-1 operator to re-
quest help from local police, fire or ambu-
lance personnel. If this button is accidentally pushed, you will have 10 seconds to stop the call.
To cancel, push the 9-1-1 Call button again or press the “cancel” button shown on the
touchscreen. After 10 seconds has passed, the 9-1-1 call will be placed and only the 9-1-1
operator can cancel it. The LED light on the rearview mirror will turn green once a connection
to a 9-1-1 operator has been made. The green LED light will turn off once the 9-1-1 call is
terminated. Have an authorized dealer service the vehicle if the rearview mirror light is
continuously red. On equipped vehicles, this feature requires a functioning electrical system
and wireless coverage to function properly.If a connection is made between a 9-1-1
operator and your vehicle, you understand and agree that 9-1-1 operators may, like any
other 9-1-1 call, record conversations and sounds in and near your vehicle upon connec-
tion.
3.Roadside Assistance (If Equipped)—Ifyourvehicleisequippedwiththisfeatureandwithin
wireless range, you may be able to connect to Roadside Assistance by pushing the “ASSIST”
button on the rearview mirror. You will be presented with Assist Care options. Make a selection
by pressing the prompts displayed on the radio. If Roadside Assistance is provided to your
vehicle, you agree to be responsible for any additional roadside assistance service costs that
you may incur. To provide Uconnect® Services to you, we may record and monitor your
conversations with Roadside Assistance, Uconnect® Care or Vehicle Care, whether such
conversations are initiated through the Uconnect® Services in your vehicle, or via a landline or
mobile telephone, and may share information obtained through such recording and monitor-
ing in accordance with regulatory requirements. You acknowledge, agree and consent to any
recording, monitoring or sharing of information obtained through any such call recordings.
ASSIST/9-1-1 Buttons
1 — ASSIST Button2 — 9-1-1 Button
ELECTRONICS
62
Page 71 of 180
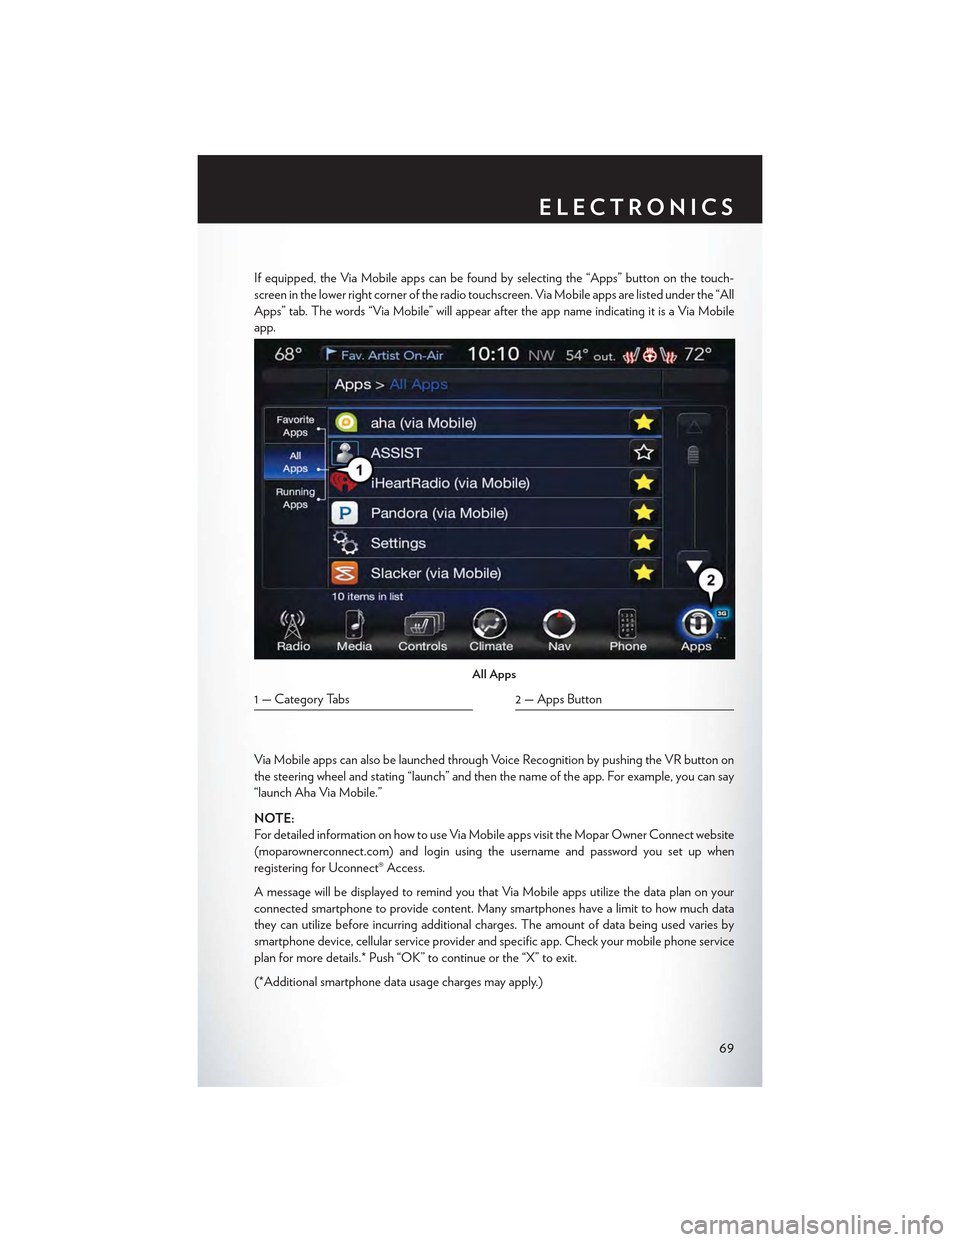
If equipped, the Via Mobile apps can be found by selecting the “Apps” button on the touch-
screen in the lower right corner of the radio touchscreen. Via Mobile apps are listed under the “All
Apps” tab. The words “Via Mobile” will appear after the app name indicating it is a Via Mobile
app.
Via Mobile apps can also be launched through Voice Recognition by pushing the VR button on
the steering wheel and stating “launch” and then the name of the app. For example, you can say
“launch Aha Via Mobile.”
NOTE:
For detailed information on how to use Via Mobile apps visit the Mopar Owner Connect website
(moparownerconnect.com) and login using the username and password you set up when
registering for Uconnect® Access.
AmessagewillbedisplayedtoremindyouthatViaMobileappsutilizethedataplanonyour
connected smartphone to provide content. Many smartphones have a limit to how much data
they can utilize before incurring additional charges. The amount of data being used varies by
smartphone device, cellular service provider and specific app. Check your mobile phone service
plan for more details.* Push “OK” to continue or the “X” to exit.
(*Additional smartphone data usage charges may apply.)
All Apps
1 — Category Tabs2 — Apps Button
ELECTRONICS
69
Page 73 of 180
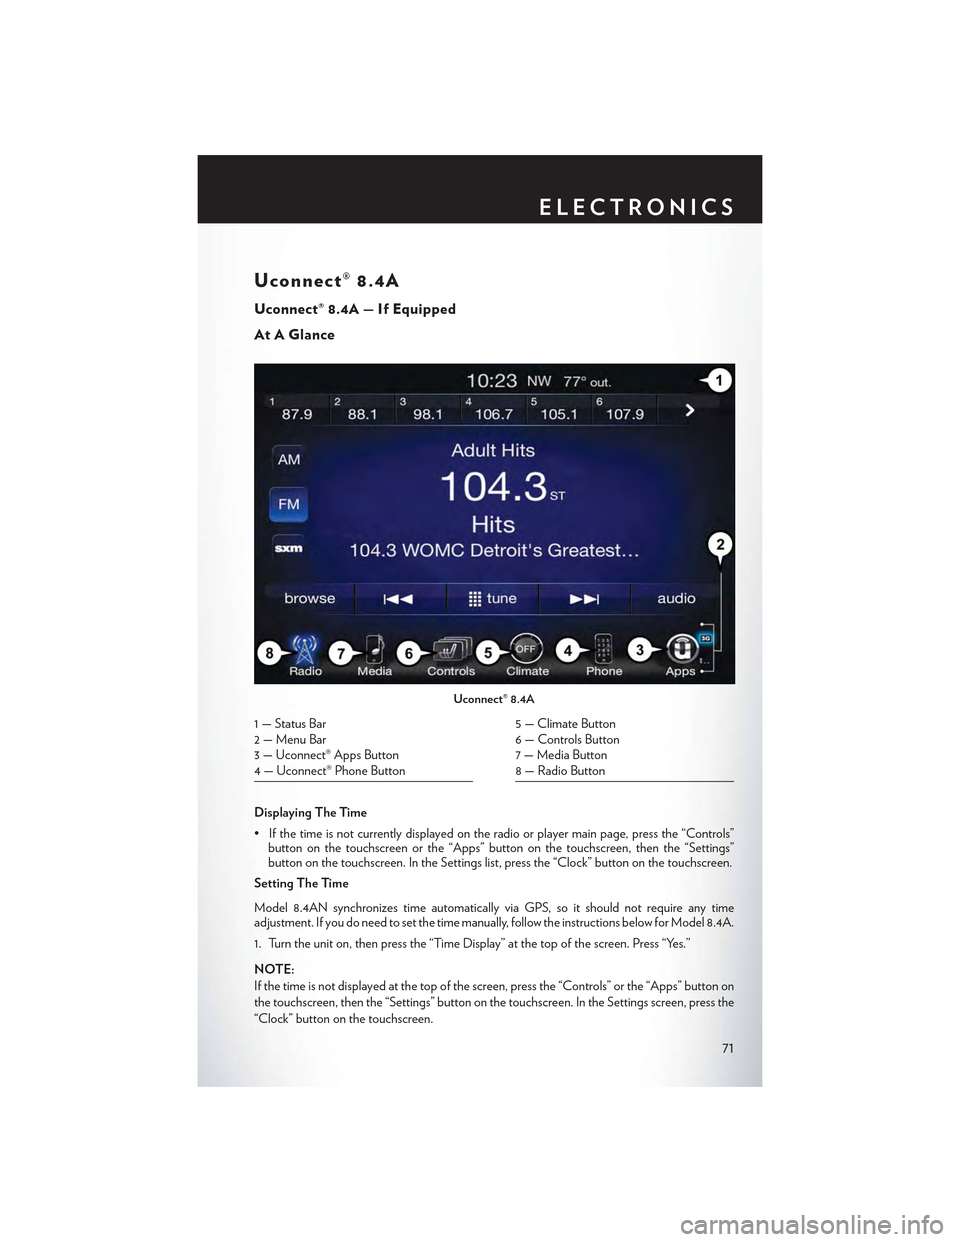
Uconnect® 8.4A
Uconnect® 8.4A — If Equipped
At A Glance
Displaying The Time
•Ifthetimeisnotcurrentlydisplayedontheradioorplayermainpage,pressthe“Controls”button on the touchscreen or the “Apps” button on the touchscreen, then the “Settings”button on the touchscreen. In the Settings list, press the “Clock” button on the touchscreen.
Setting The Time
Model 8.4AN synchronizes time automatically via GPS, so it should not require any timeadjustment. If you do need to set the time manually, follow the instructions below for Model 8.4A.
1. Turn the unit on, then press the “Time Display” at the top of the screen. Press “Yes.”
NOTE:
If the time is not displayed at the top of the screen, press the “Controls” or the “Apps” button on
the touchscreen, then the “Settings” button on the touchscreen. In the Settings screen, press the
“Clock” button on the touchscreen.
Uconnect® 8.4A
1 — Status Bar2 — Menu Bar3 — Uconnect® Apps Button4 — Uconnect® Phone Button
5 — Climate Button6 — Controls Button7 — Media Button8 — Radio Button
ELECTRONICS
71
Page 74 of 180
2. Press “+” or “–” next to Set Time Hours and Set Time Minutes to adjust the time.
3. If these features are not available, uncheck the Sync with GPS box.
4. Press “X” to save your settings and exit out of the Clock Setting screen.
Audio Settings
1. Press the “Media” or “Radio” button on the touchscreen.
2. Press the “Audio” button on the touchscreen to activate the Audio settings screen to adjust
Balance/Fade, Equalizer and Speed Adjusted Volume.
3. You can return to the Radio screen by pressing the “X” located at the top right.
Balance/Fade
1. Press the “Media” or “Radio” button on the touchscreen.
2. Press the “Audio” button on the touchscreen to activate the Audio settings screen to adjust
Balance/Fade, Equalizer and Speed Adjusted Volume.
3. Press the “Balance/Fade” button on the touchscreen to Balance audio between the front
speakers or fade the audio between the rear and front speakers.
4. Pressing the “Front,” “Rear,” “Left” or “Right” button on the touchscreens or press and drag the
Speaker Icon to adjust the Balance/Fade.
Equalizer
1. Press the “Media” or “Radio” button on the touchscreen.
2. Press the “Audio” button on the touchscreen to activate the Audio settings screen to adjust
Balance/Fade, Equalizer and Speed Adjusted Volume.
3. Press the “Equalizer” button on the touchscreen to activate the Equalizer screen.
4. Press the “+” or “–” button on the touchscreens, or by pressing and dragging over the “level
bar” for each of the equalizer bands. The level value, which spans between plus or minus 9, is
displayed at the bottom of each of the Bands.
Speed Adjusted Volume
1. Press the “Media” or “Radio” button on the touchscreen.
2. Press the “Audio” button on the touchscreen to activate the Audio settings screen to adjust
Balance/Fade, Equalizer and Speed Adjusted Volume.
3. Press the “Speed Adjusted Volume” button on the touchscreen to activate the Speed
Adjusted Volume screen. The Speed Adjusted Volume is adjusted by pressing the “volume
level” indicator. This alters the automatic adjustment of the audio volume with variation to
vehicle speed.
ELECTRONICS
72
Page 78 of 180
Replay
Lets you replay up to 44 minutes of the content of the current SiriusXM channel.
ReplayOptionOption Description
Play/Pause Press to Pause content playback. Press Pause/Play again to resume playback.
Rewind/RW Rewinds the channel content in steps of five seconds. Press and hold to rewindcontinuously, then release to begin playing content at that point.
FastForward/FWForwards the content, and works similarly to Rewind/RW. However, FastForward/FW can only be used when content has been previously rewound.
Replay Time Displays the amount of time in the upper center of the screen by which your contentlags the Live channel.
Live Resumes playback of Live content at any time while replaying rewound content.
SiriusXM services require subscriptions, sold separately after the 12-month trial included with the
new vehicle purchase.If you decide to continue your service at the end of your trial subscrip-
tion, the plan you choose will automatically renew and bill at then-current rates until you call
SiriusXM at 1-866-635-2349 for U.S. residents and 1-888-539-7474 for Canadian residents
to cancel. See SiriusXM Customer Agreement for complete terms at www.siriusxm.com for
U.S. residents and www.siriusxm.ca for Canadian residents.All fees and programming subject
to change. Our satellite service is available only to those at least 18 and older in the 48 contiguous
USA and D.C. Our Sirius satellite service is also available in PR (with coverage limitations). Our
Internet radio service is available throughout our satellite service area and in AK and HI. © 2015
Sirius XM Radio Inc. Sirius, XM and all related marks and logos are trademarks of Sirius XM
Radio Inc.
MEDIA HUB — PLAYING iPod®/USB/MP3 DEVICES
There are many ways to play music from iPod®/MP3 players or USB devices through your
vehicle's sound system. Press your “Media” button on the touchscreen to begin.
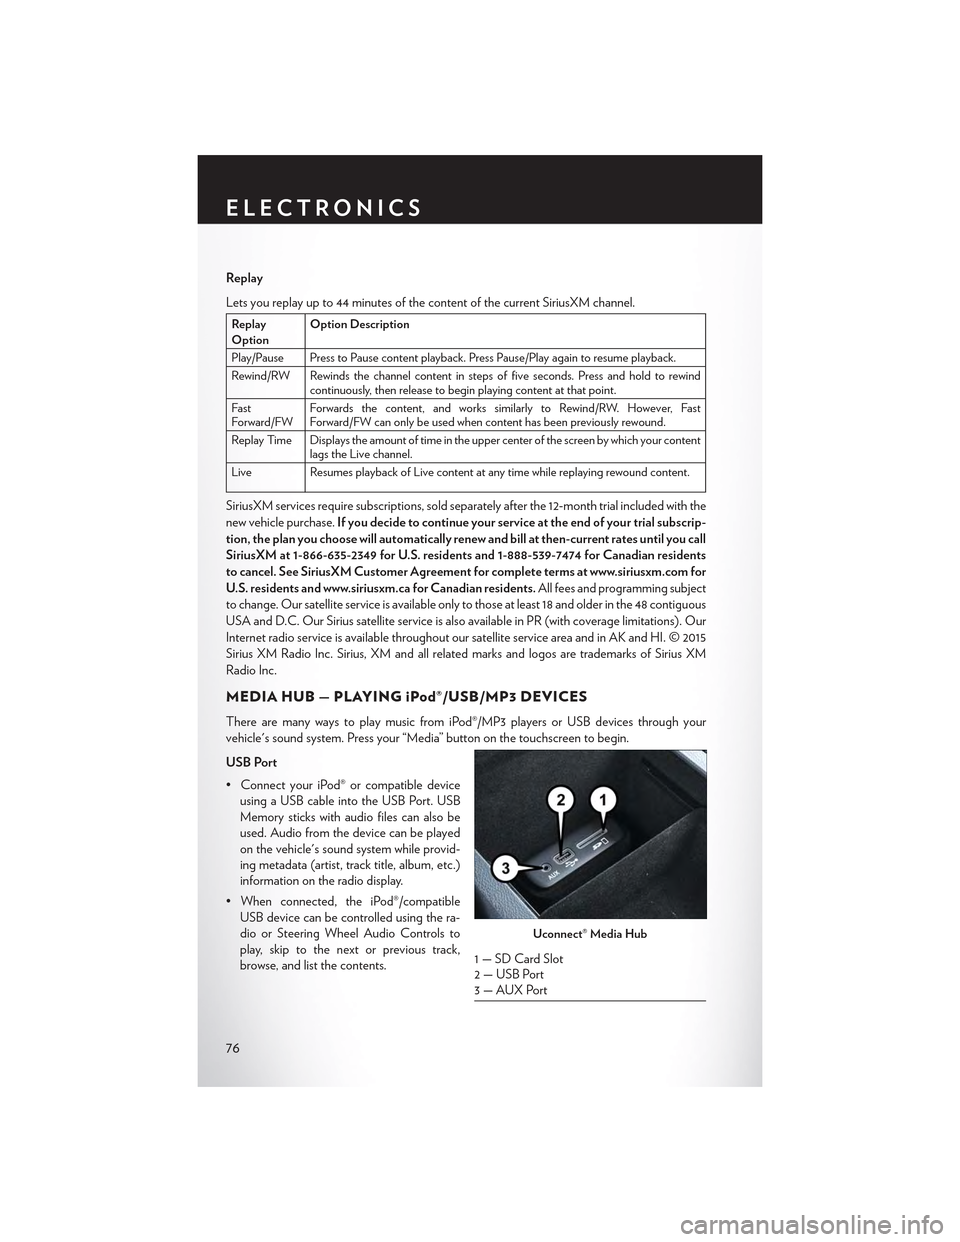
USB Port
•ConnectyouriPod®orcompatibledevice
using a USB cable into the USB Port. USB
Memory sticks with audio files can also be
used. Audio from the device can be played
on the vehicle's sound system while provid-
ing metadata (artist, track title, album, etc.)
information on the radio display.
•Whenconnected,theiPod®/compatible
USB device can be controlled using the ra-
dio or Steering Wheel Audio Controls to
play, skip to the next or previous track,
browse, and list the contents.
Uconnect® Media Hub
1 — SD Card Slot2 — USB Port3—AUXPort
ELECTRONICS
76