CHRYSLER VOYAGER 1996 Service Manual
Manufacturer: CHRYSLER, Model Year: 1996, Model line: VOYAGER, Model: CHRYSLER VOYAGER 1996Pages: 1938, PDF Size: 55.84 MB
Page 1801 of 1938
SLIDING DOOR LOWER ROLLER ARM
REMOVAL
(1) Open sliding door.
(2) Mark outline of roller arm on sliding door
bracket to aid installation.
(3) Remove sliding door sill plate.
(4) Remove screws holding hold open latch to
lower roller arm.
(5) Separate hold open latch from lower arm.(6) Support sliding door on a suitable lifting device
with a padded upper surface. The door must be
moveable with lifting device in place.
(7) Remove bolts holding lower roller arm to slid-
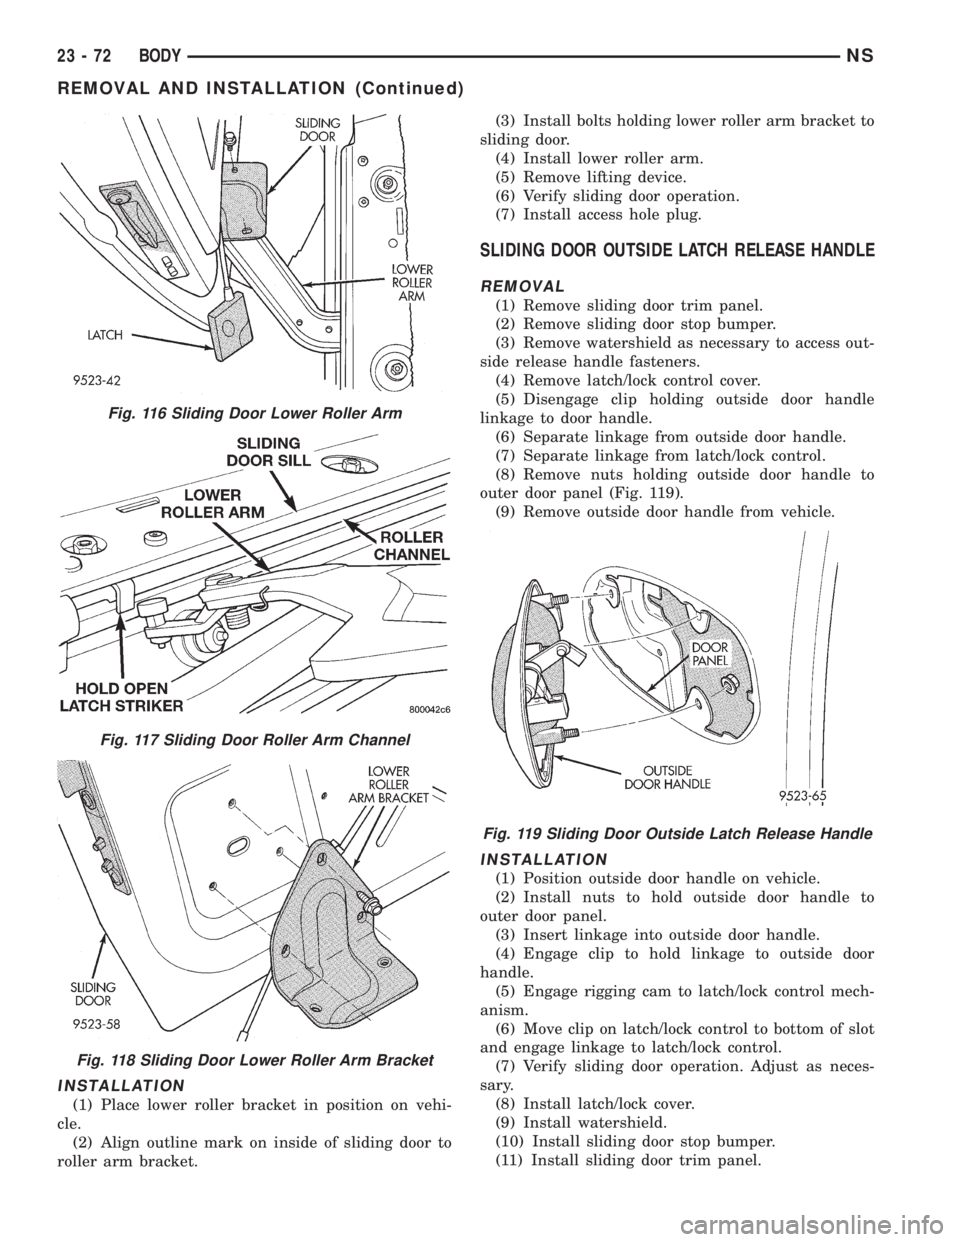
ing door (Fig. 116).
(8) Remove roller arm from sliding door.
(9) Disengage roller arm from lower channel (Fig.
117).
(10) Remove roller arm from vehicle.
INSTALLATION
For installation, reverse the above procedures.
SLIDING DOOR LOWER ROLLER ARM BRACKET
REMOVAL
(1) Remove access hole plug.
(2) Open sliding door.
(3) Support sliding door on a suitable lifting
device.
(4) Remove lower roller arm.
(5) Mark outline of roller arm bracket on inside of
sliding door.
(6) Remove bolts holding lower roller arm bracket
to sliding door (Fig. 118).
(7) Remove lower roller bracket from vehicle.
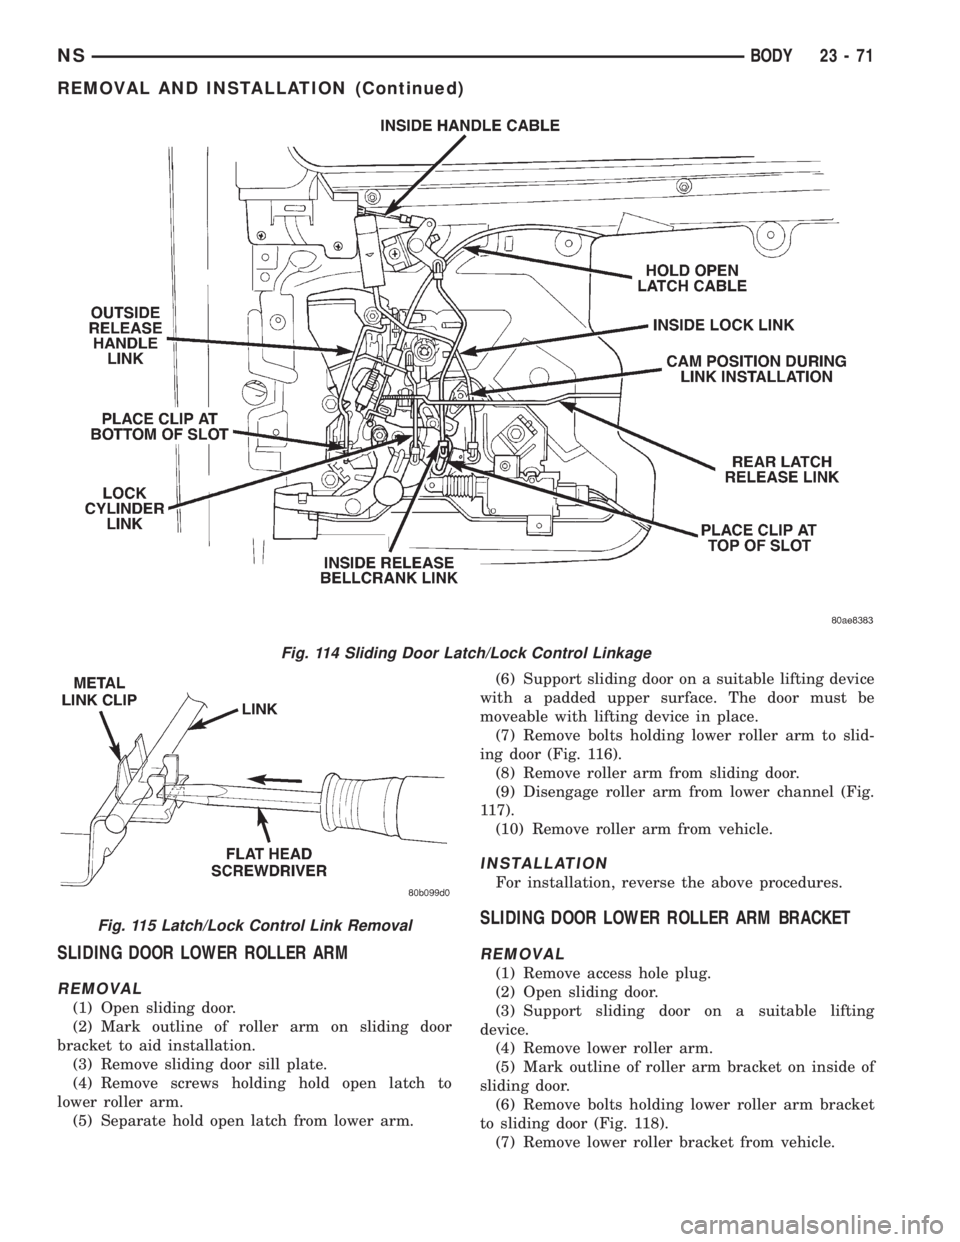
Fig. 114 Sliding Door Latch/Lock Control Linkage
Fig. 115 Latch/Lock Control Link Removal
NSBODY 23 - 71
REMOVAL AND INSTALLATION (Continued)
Page 1802 of 1938
INSTALLATION
(1) Place lower roller bracket in position on vehi-
cle.
(2) Align outline mark on inside of sliding door to
roller arm bracket.(3) Install bolts holding lower roller arm bracket to
sliding door.
(4) Install lower roller arm.
(5) Remove lifting device.
(6) Verify sliding door operation.
(7) Install access hole plug.
SLIDING DOOR OUTSIDE LATCH RELEASE HANDLE
REMOVAL
(1) Remove sliding door trim panel.
(2) Remove sliding door stop bumper.
(3) Remove watershield as necessary to access out-
side release handle fasteners.
(4) Remove latch/lock control cover.
(5) Disengage clip holding outside door handle
linkage to door handle.
(6) Separate linkage from outside door handle.
(7) Separate linkage from latch/lock control.
(8) Remove nuts holding outside door handle to
outer door panel (Fig. 119).
(9) Remove outside door handle from vehicle.
INSTALLATION
(1) Position outside door handle on vehicle.
(2) Install nuts to hold outside door handle to
outer door panel.
(3) Insert linkage into outside door handle.
(4) Engage clip to hold linkage to outside door
handle.
(5) Engage rigging cam to latch/lock control mech-
anism.
(6) Move clip on latch/lock control to bottom of slot
and engage linkage to latch/lock control.
(7) Verify sliding door operation. Adjust as neces-
sary.
(8) Install latch/lock cover.
(9) Install watershield.
(10) Install sliding door stop bumper.
(11) Install sliding door trim panel.
Fig. 116 Sliding Door Lower Roller Arm
Fig. 117 Sliding Door Roller Arm Channel
Fig. 118 Sliding Door Lower Roller Arm Bracket
Fig. 119 Sliding Door Outside Latch Release Handle
23 - 72 BODYNS
REMOVAL AND INSTALLATION (Continued)
Page 1803 of 1938
SLIDING DOOR REAR LATCH
REMOVAL
(1) Remove sliding door trim panel.
(2) Remove water shield as necessary.
(3) Open sliding door to the ajar position.
(4) Disengage clip holding linkage to rear latch.
(5) Remove screws holding rear latch to sliding
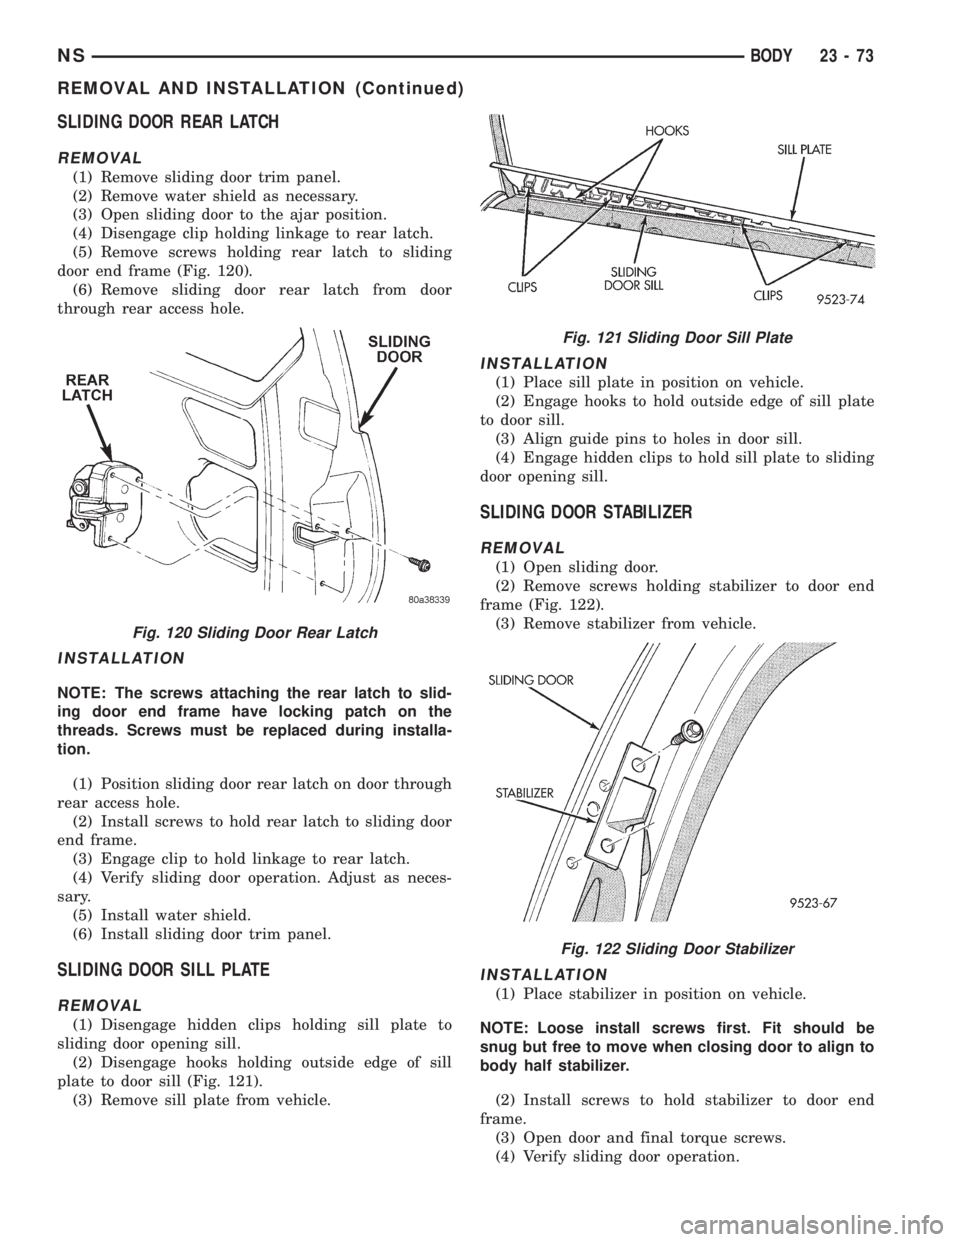
door end frame (Fig. 120).
(6) Remove sliding door rear latch from door
through rear access hole.
INSTALLATION
NOTE: The screws attaching the rear latch to slid-
ing door end frame have locking patch on the
threads. Screws must be replaced during installa-
tion.
(1) Position sliding door rear latch on door through
rear access hole.
(2) Install screws to hold rear latch to sliding door
end frame.
(3) Engage clip to hold linkage to rear latch.
(4) Verify sliding door operation. Adjust as neces-
sary.
(5) Install water shield.
(6) Install sliding door trim panel.
SLIDING DOOR SILL PLATE
REMOVAL
(1) Disengage hidden clips holding sill plate to
sliding door opening sill.
(2) Disengage hooks holding outside edge of sill
plate to door sill (Fig. 121).
(3) Remove sill plate from vehicle.
INSTALLATION
(1) Place sill plate in position on vehicle.
(2) Engage hooks to hold outside edge of sill plate
to door sill.
(3) Align guide pins to holes in door sill.
(4) Engage hidden clips to hold sill plate to sliding
door opening sill.
SLIDING DOOR STABILIZER
REMOVAL
(1) Open sliding door.
(2) Remove screws holding stabilizer to door end
frame (Fig. 122).
(3) Remove stabilizer from vehicle.
INSTALLATION
(1) Place stabilizer in position on vehicle.
NOTE: Loose install screws first. Fit should be
snug but free to move when closing door to align to
body half stabilizer.
(2) Install screws to hold stabilizer to door end
frame.
(3) Open door and final torque screws.
(4) Verify sliding door operation.
Fig. 120 Sliding Door Rear Latch
Fig. 121 Sliding Door Sill Plate
Fig. 122 Sliding Door Stabilizer
NSBODY 23 - 73
REMOVAL AND INSTALLATION (Continued)
Page 1804 of 1938
SLIDING DOOR STABILIZER SOCKET
REMOVAL
(1) Open sliding door.
(2) Remove screws holding stabilizer socket to
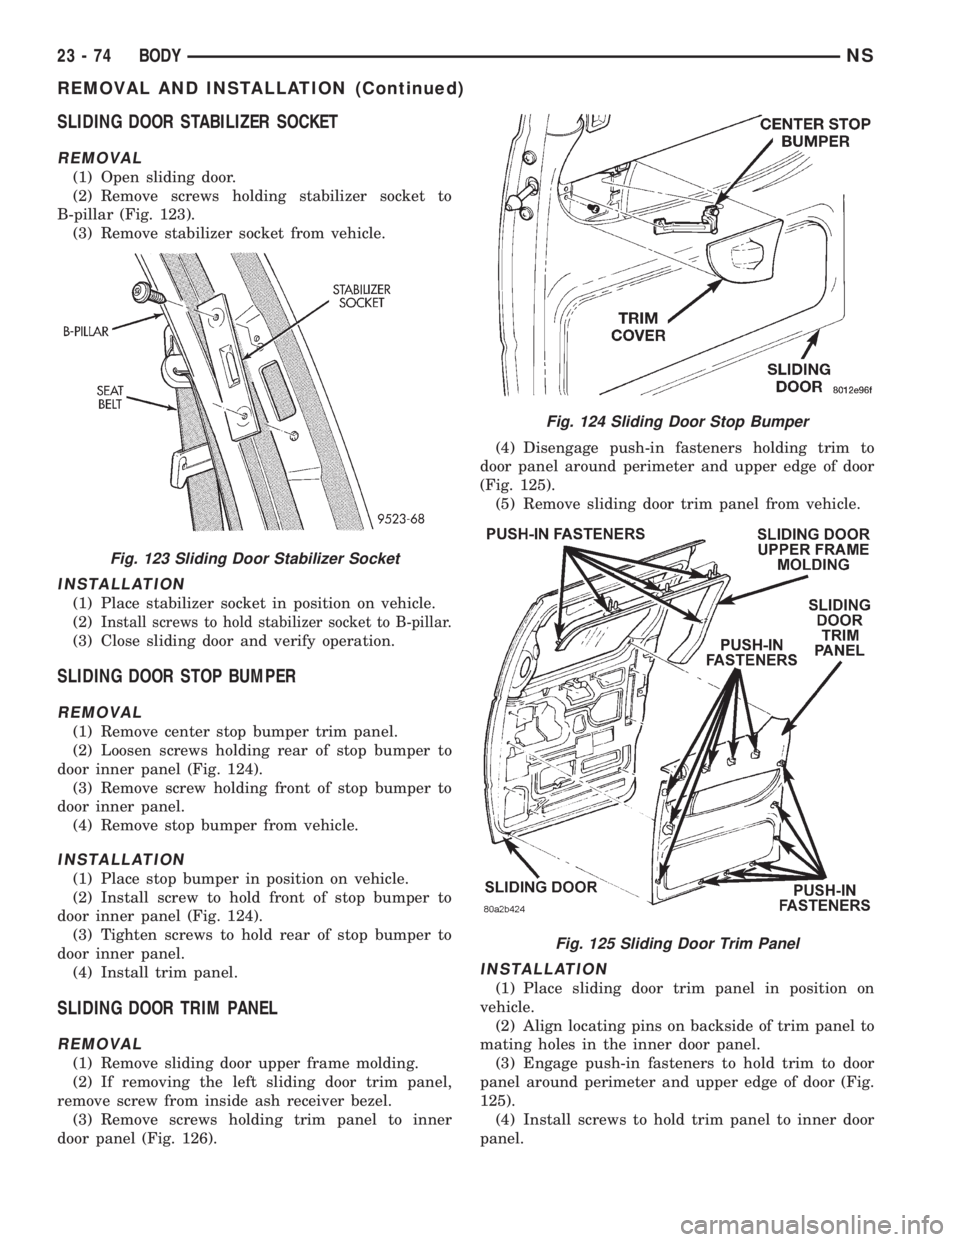
B-pillar (Fig. 123).
(3) Remove stabilizer socket from vehicle.
INSTALLATION
(1) Place stabilizer socket in position on vehicle.
(2) I
nstall screws to hold stabilizer socket to B-pillar.
(3) Close sliding door and verify operation.
SLIDING DOOR STOP BUMPER
REMOVAL
(1) Remove center stop bumper trim panel.
(2) Loosen screws holding rear of stop bumper to
door inner panel (Fig. 124).
(3) Remove screw holding front of stop bumper to
door inner panel.
(4) Remove stop bumper from vehicle.
INSTALLATION
(1) Place stop bumper in position on vehicle.
(2) Install screw to hold front of stop bumper to
door inner panel (Fig. 124).
(3) Tighten screws to hold rear of stop bumper to
door inner panel.
(4) Install trim panel.
SLIDING DOOR TRIM PANEL
REMOVAL
(1) Remove sliding door upper frame molding.
(2) If removing the left sliding door trim panel,
remove screw from inside ash receiver bezel.
(3) Remove screws holding trim panel to inner
door panel (Fig. 126).(4) Disengage push-in fasteners holding trim to
door panel around perimeter and upper edge of door
(Fig. 125).
(5) Remove sliding door trim panel from vehicle.
INSTALLATION
(1) Place sliding door trim panel in position on
vehicle.
(2) Align locating pins on backside of trim panel to
mating holes in the inner door panel.
(3) Engage push-in fasteners to hold trim to door
panel around perimeter and upper edge of door (Fig.
125).
(4) Install screws to hold trim panel to inner door
panel.
Fig. 123 Sliding Door Stabilizer Socket
Fig. 124 Sliding Door Stop Bumper
Fig. 125 Sliding Door Trim Panel
23 - 74 BODYNS
REMOVAL AND INSTALLATION (Continued)
Page 1805 of 1938
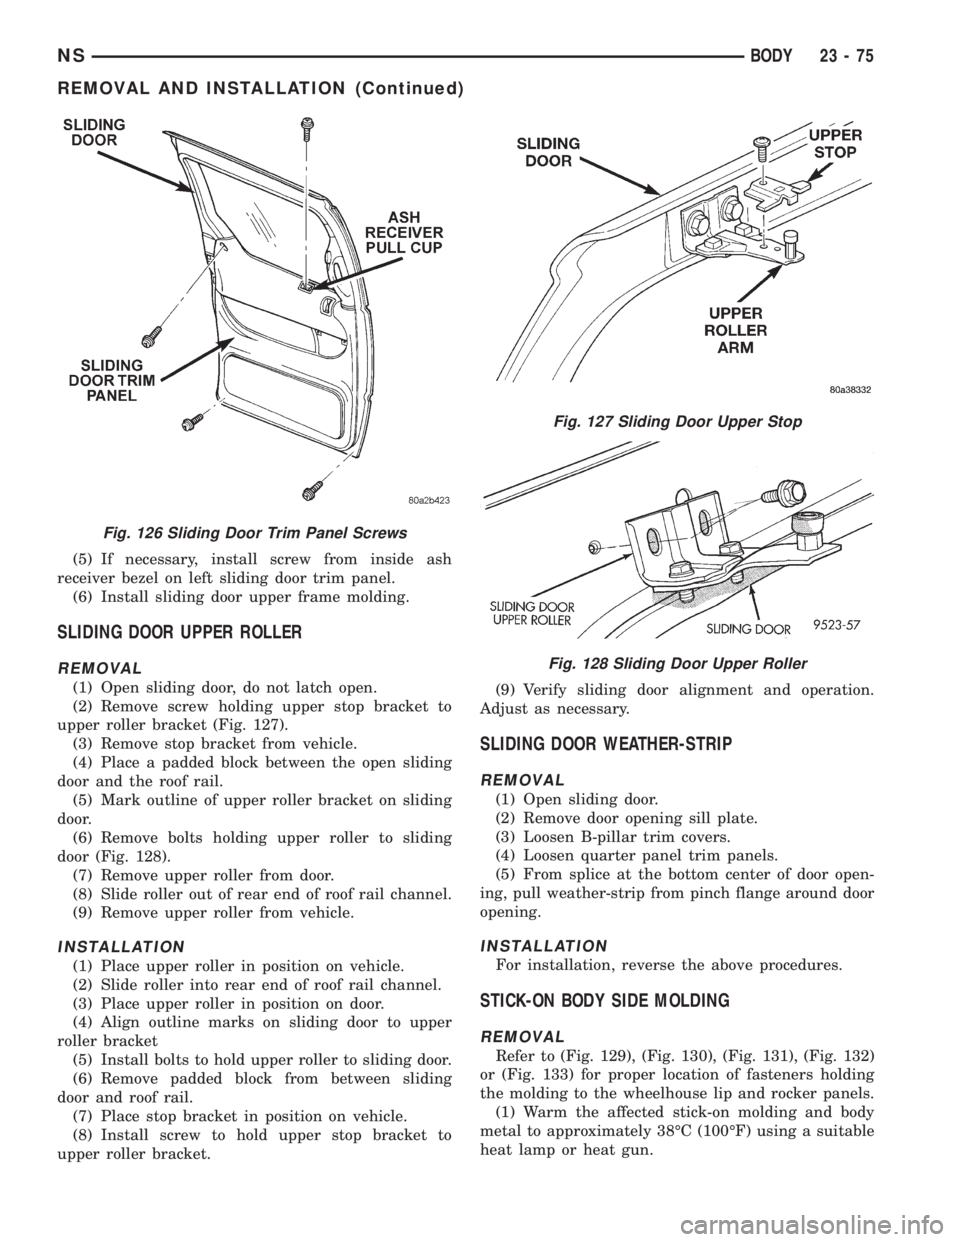
(5) If necessary, install screw from inside ash
receiver bezel on left sliding door trim panel.
(6) Install sliding door upper frame molding.
SLIDING DOOR UPPER ROLLER
REMOVAL
(1) Open sliding door, do not latch open.
(2) Remove screw holding upper stop bracket to
upper roller bracket (Fig. 127).
(3) Remove stop bracket from vehicle.
(4) Place a padded block between the open sliding
door and the roof rail.
(5) Mark outline of upper roller bracket on sliding
door.
(6) Remove bolts holding upper roller to sliding
door (Fig. 128).
(7) Remove upper roller from door.
(8) Slide roller out of rear end of roof rail channel.
(9) Remove upper roller from vehicle.
INSTALLATION
(1) Place upper roller in position on vehicle.
(2) Slide roller into rear end of roof rail channel.
(3) Place upper roller in position on door.
(4) Align outline marks on sliding door to upper
roller bracket
(5) Install bolts to hold upper roller to sliding door.
(6) Remove padded block from between sliding
door and roof rail.
(7) Place stop bracket in position on vehicle.
(8) Install screw to hold upper stop bracket to
upper roller bracket.(9) Verify sliding door alignment and operation.
Adjust as necessary.
SLIDING DOOR WEATHER-STRIP
REMOVAL
(1) Open sliding door.
(2) Remove door opening sill plate.
(3) Loosen B-pillar trim covers.
(4) Loosen quarter panel trim panels.
(5) From splice at the bottom center of door open-
ing, pull weather-strip from pinch flange around door
opening.
INSTALLATION
For installation, reverse the above procedures.
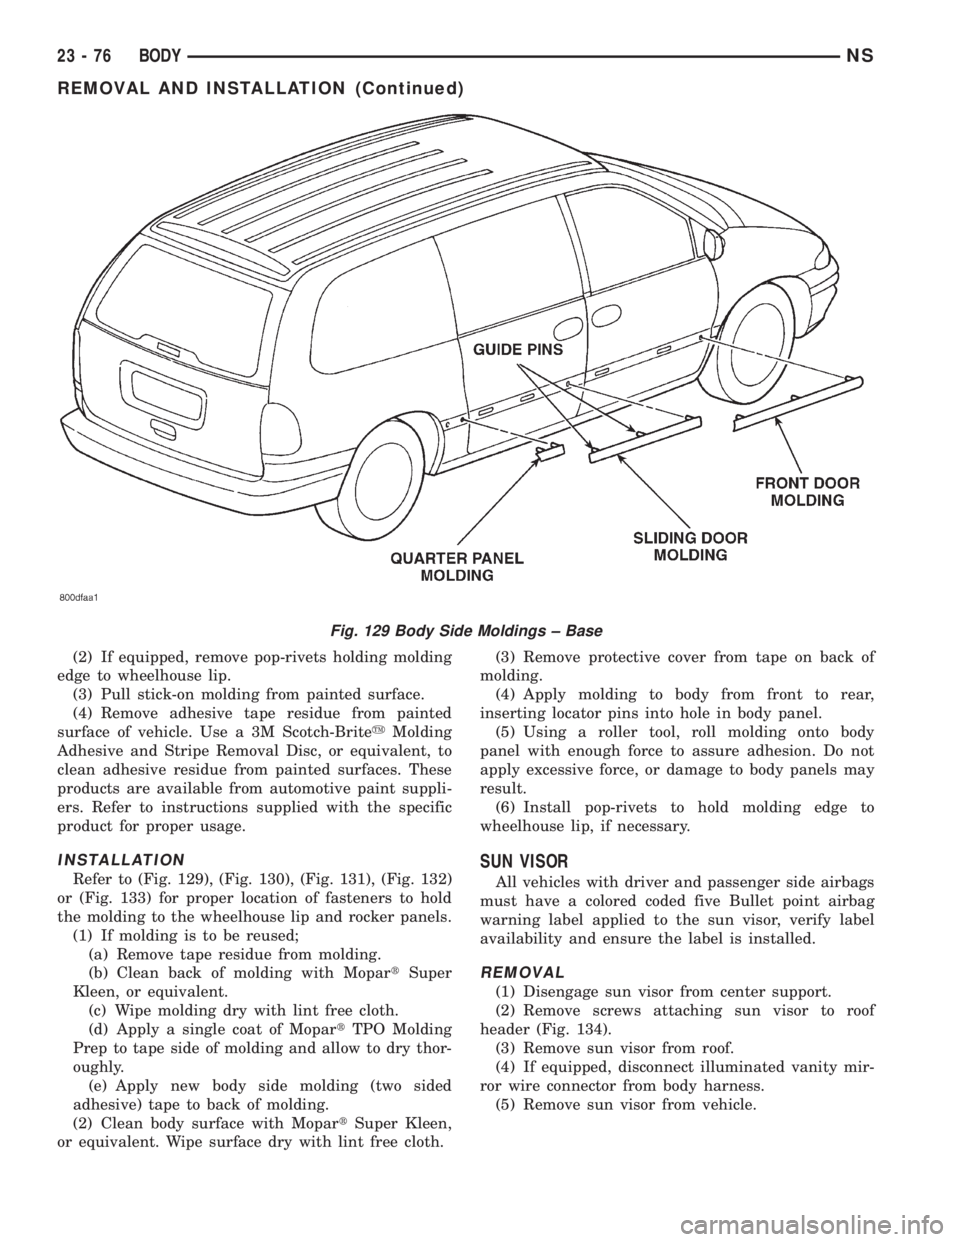
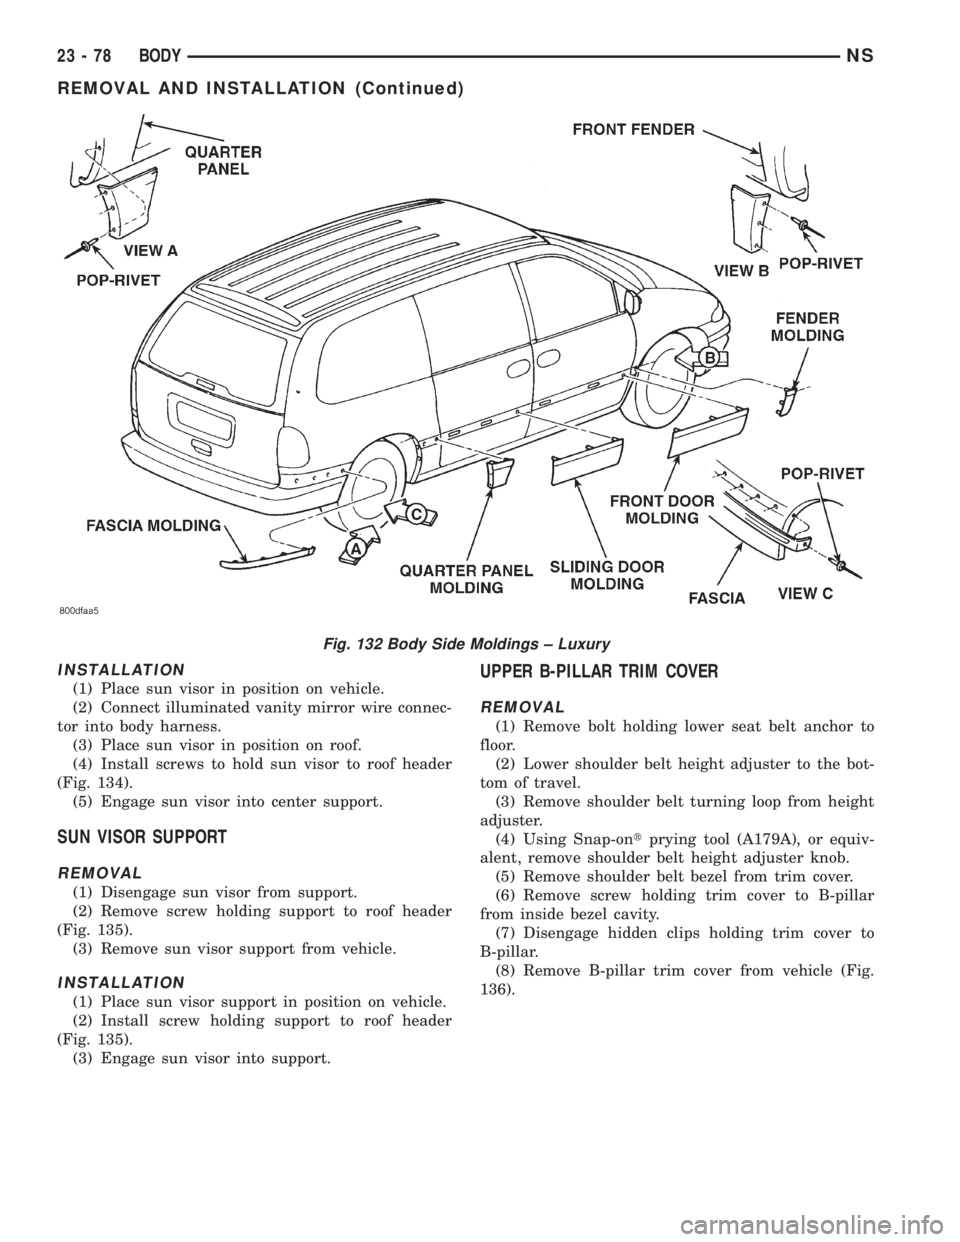
STICK-ON BODY SIDE MOLDING
REMOVAL
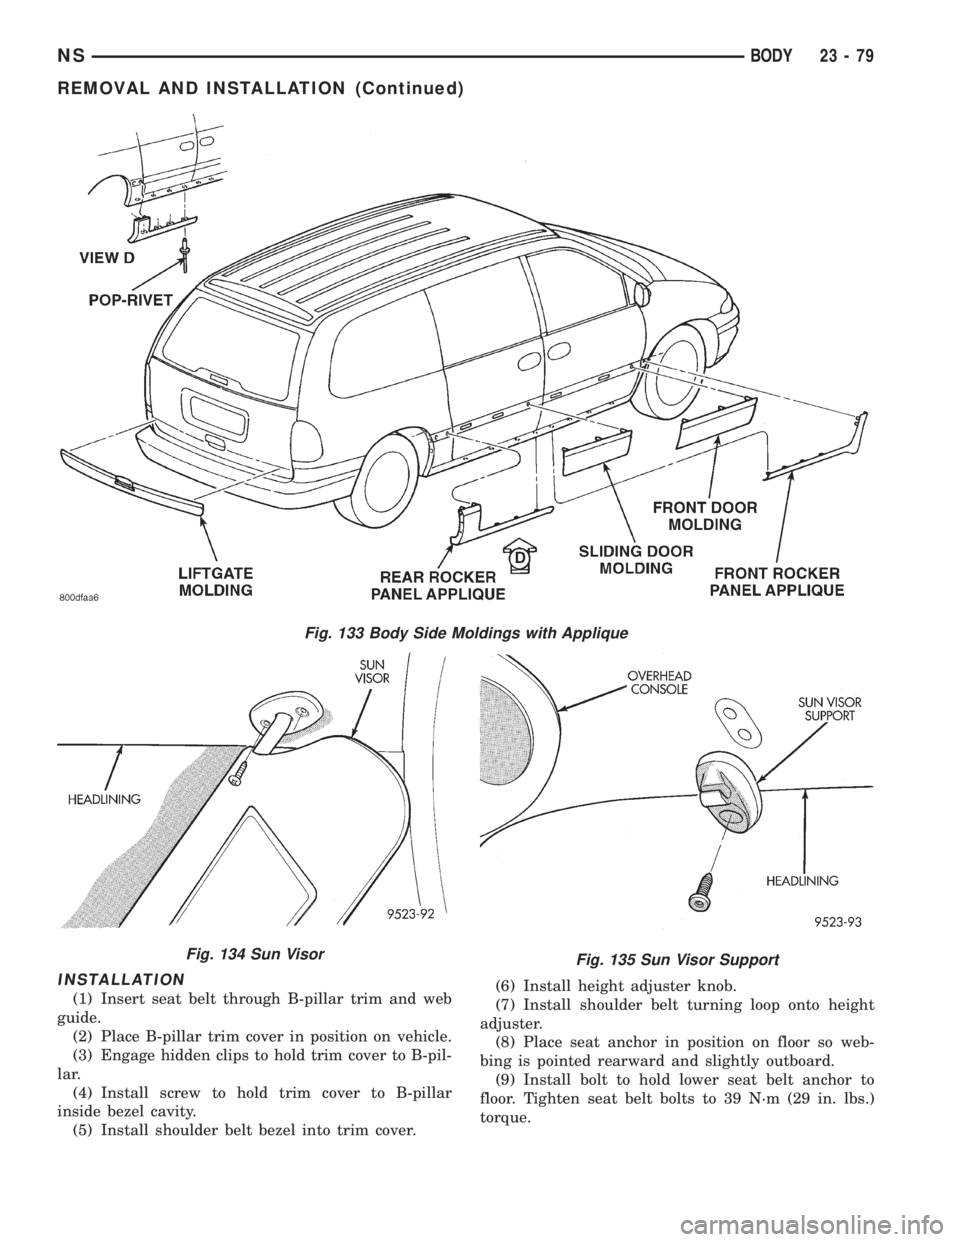
Refer to (Fig. 129), (Fig. 130), (Fig. 131), (Fig. 132)
or (Fig. 133) for proper location of fasteners holding
the molding to the wheelhouse lip and rocker panels.
(1) Warm the affected stick-on molding and body
metal to approximately 38ÉC (100ÉF) using a suitable
heat lamp or heat gun.
Fig. 126 Sliding Door Trim Panel Screws
Fig. 127 Sliding Door Upper Stop
Fig. 128 Sliding Door Upper Roller
NSBODY 23 - 75
REMOVAL AND INSTALLATION (Continued)
Page 1806 of 1938
(2) If equipped, remove pop-rivets holding molding
edge to wheelhouse lip.
(3) Pull stick-on molding from painted surface.
(4) Remove adhesive tape residue from painted
surface of vehicle. Use a 3M Scotch-BriteyMolding
Adhesive and Stripe Removal Disc, or equivalent, to
clean adhesive residue from painted surfaces. These
products are available from automotive paint suppli-
ers. Refer to instructions supplied with the specific
product for proper usage.
INSTALLATION
Refer to (Fig. 129), (Fig. 130), (Fig. 131), (Fig. 132)
or (Fig. 133) for proper location of fasteners to hold
the molding to the wheelhouse lip and rocker panels.
(1) If molding is to be reused;
(a) Remove tape residue from molding.
(b) Clean back of molding with MopartSuper
Kleen, or equivalent.
(c) Wipe molding dry with lint free cloth.
(d) Apply a single coat of MopartTPO Molding
Prep to tape side of molding and allow to dry thor-
oughly.
(e) Apply new body side molding (two sided
adhesive) tape to back of molding.
(2) Clean body surface with MopartSuper Kleen,
or equivalent. Wipe surface dry with lint free cloth.(3) Remove protective cover from tape on back of
molding.
(4) Apply molding to body from front to rear,
inserting locator pins into hole in body panel.
(5) Using a roller tool, roll molding onto body
panel with enough force to assure adhesion. Do not
apply excessive force, or damage to body panels may
result.
(6) Install pop-rivets to hold molding edge to
wheelhouse lip, if necessary.
SUN VISOR
All vehicles with driver and passenger side airbags
must have a colored coded five Bullet point airbag
warning label applied to the sun visor, verify label
availability and ensure the label is installed.
REMOVAL
(1) Disengage sun visor from center support.
(2) Remove screws attaching sun visor to roof
header (Fig. 134).
(3) Remove sun visor from roof.
(4) If equipped, disconnect illuminated vanity mir-
ror wire connector from body harness.
(5) Remove sun visor from vehicle.
Fig. 129 Body Side Moldings ± Base
23 - 76 BODYNS
REMOVAL AND INSTALLATION (Continued)
Page 1807 of 1938
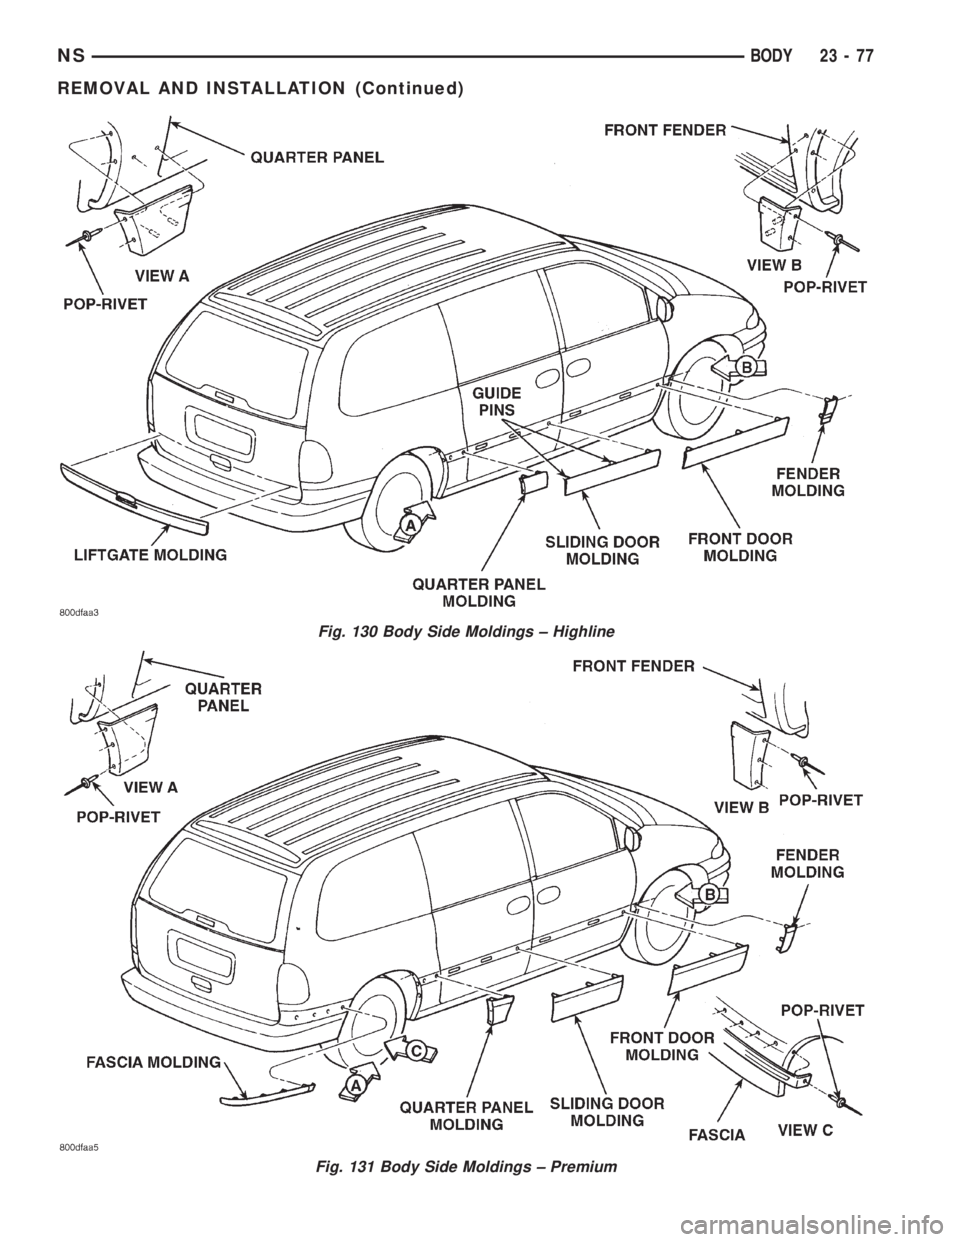
Fig. 130 Body Side Moldings ± Highline
Fig. 131 Body Side Moldings ± Premium
NSBODY 23 - 77
REMOVAL AND INSTALLATION (Continued)
Page 1808 of 1938
INSTALLATION
(1) Place sun visor in position on vehicle.
(2) Connect illuminated vanity mirror wire connec-
tor into body harness.
(3) Place sun visor in position on roof.
(4) Install screws to hold sun visor to roof header
(Fig. 134).
(5) Engage sun visor into center support.
SUN VISOR SUPPORT
REMOVAL
(1) Disengage sun visor from support.
(2) Remove screw holding support to roof header
(Fig. 135).
(3) Remove sun visor support from vehicle.
INSTALLATION
(1) Place sun visor support in position on vehicle.
(2) Install screw holding support to roof header
(Fig. 135).
(3) Engage sun visor into support.
UPPER B-PILLAR TRIM COVER
REMOVAL
(1) Remove bolt holding lower seat belt anchor to
floor.
(2) Lower shoulder belt height adjuster to the bot-
tom of travel.
(3) Remove shoulder belt turning loop from height
adjuster.
(4) Using Snap-ontprying tool (A179A), or equiv-
alent, remove shoulder belt height adjuster knob.
(5) Remove shoulder belt bezel from trim cover.
(6) Remove screw holding trim cover to B-pillar
from inside bezel cavity.
(7) Disengage hidden clips holding trim cover to
B-pillar.
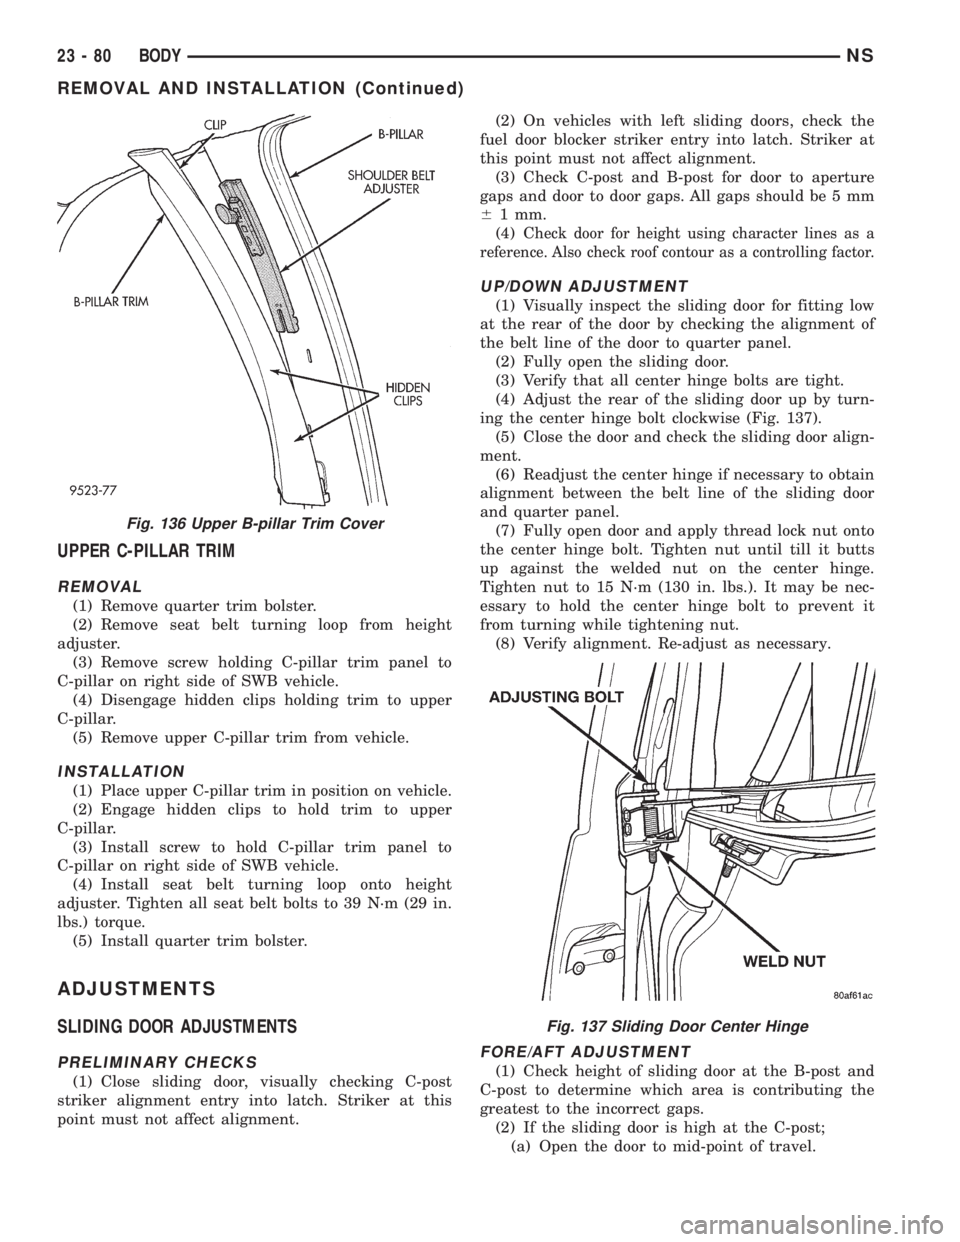
(8) Remove B-pillar trim cover from vehicle (Fig.
136).
Fig. 132 Body Side Moldings ± Luxury
23 - 78 BODYNS
REMOVAL AND INSTALLATION (Continued)
Page 1809 of 1938
INSTALLATION
(1) Insert seat belt through B-pillar trim and web
guide.
(2) Place B-pillar trim cover in position on vehicle.
(3) Engage hidden clips to hold trim cover to B-pil-
lar.
(4) Install screw to hold trim cover to B-pillar
inside bezel cavity.
(5) Install shoulder belt bezel into trim cover.(6) Install height adjuster knob.
(7) Install shoulder belt turning loop onto height
adjuster.
(8) Place seat anchor in position on floor so web-
bing is pointed rearward and slightly outboard.
(9) Install bolt to hold lower seat belt anchor to
floor. Tighten seat belt bolts to 39 N´m (29 in. lbs.)
torque.
Fig. 133 Body Side Moldings with Applique
Fig. 134 Sun VisorFig. 135 Sun Visor Support
NSBODY 23 - 79
REMOVAL AND INSTALLATION (Continued)
Page 1810 of 1938
UPPER C-PILLAR TRIM
REMOVAL
(1) Remove quarter trim bolster.
(2) Remove seat belt turning loop from height
adjuster.
(3) Remove screw holding C-pillar trim panel to
C-pillar on right side of SWB vehicle.
(4) Disengage hidden clips holding trim to upper
C-pillar.
(5) Remove upper C-pillar trim from vehicle.
INSTALLATION
(1) Place upper C-pillar trim in position on vehicle.
(2) Engage hidden clips to hold trim to upper
C-pillar.
(3) Install screw to hold C-pillar trim panel to
C-pillar on right side of SWB vehicle.
(4) Install seat belt turning loop onto height
adjuster. Tighten all seat belt bolts to 39 N´m (29 in.
lbs.) torque.
(5) Install quarter trim bolster.
ADJUSTMENTS
SLIDING DOOR ADJUSTMENTS
PRELIMINARY CHECKS
(1) Close sliding door, visually checking C-post
striker alignment entry into latch. Striker at this
point must not affect alignment.(2) On vehicles with left sliding doors, check the
fuel door blocker striker entry into latch. Striker at
this point must not affect alignment.
(3) Check C-post and B-post for door to aperture
gaps and door to door gaps. All gaps should be 5 mm
61 mm.
(4) C
heck door for height using character lines as a
reference. Also check roof contour as a controlling factor.
UP/DOWN ADJUSTMENT
(1) Visually inspect the sliding door for fitting low
at the rear of the door by checking the alignment of
the belt line of the door to quarter panel.
(2) Fully open the sliding door.
(3) Verify that all center hinge bolts are tight.
(4) Adjust the rear of the sliding door up by turn-
ing the center hinge bolt clockwise (Fig. 137).
(5) Close the door and check the sliding door align-
ment.
(6) Readjust the center hinge if necessary to obtain
alignment between the belt line of the sliding door
and quarter panel.
(7) Fully open door and apply thread lock nut onto
the center hinge bolt. Tighten nut until till it butts
up against the welded nut on the center hinge.
Tighten nut to 15 N´m (130 in. lbs.). It may be nec-
essary to hold the center hinge bolt to prevent it
from turning while tightening nut.
(8) Verify alignment. Re-adjust as necessary.
FORE/AFT ADJUSTMENT
(1) Check height of sliding door at the B-post and
C-post to determine which area is contributing the
greatest to the incorrect gaps.
(2) If the sliding door is high at the C-post;
(a) Open the door to mid-point of travel.
Fig. 136 Upper B-pillar Trim Cover
Fig. 137 Sliding Door Center Hinge
23 - 80 BODYNS
REMOVAL AND INSTALLATION (Continued)