ECO mode CHRYSLER VOYAGER 1996 Owner's Manual
[x] Cancel search | Manufacturer: CHRYSLER, Model Year: 1996, Model line: VOYAGER, Model: CHRYSLER VOYAGER 1996Pages: 1938, PDF Size: 55.84 MB
Page 519 of 1938
VEHICLE THEFT/SECURITY SYSTEMS
CONTENTS
page page
GENERAL INFORMATION
INTRODUCTION........................ 1
SMART KEY IMMOBILIZER SYSTEM....... 1
DESCRIPTION AND OPERATION
SMART KEY IMMOBILIZER MODULE....... 1
SMART KEY IMMOBILIZER SYSTEM
INDICATOR LAMP..................... 3
SMART KEY IMMOBILIZER TRANSPONDER . 2DIAGNOSIS AND TESTING
SMART KEY IMMOBILIZER SYSTEM....... 3
SERVICE PROCEDURES
SMART KEY IMMOBILIZER SYSTEM
TRANSPONDER PROGRAMMING......... 4
REMOVAL AND INSTALLATION
SMART KEY IMMOBILIZER MODULE....... 4
GENERAL INFORMATION
INTRODUCTION
The Smart Key Immobilizer System (SKIS) is
available factory-installed optional equipment for this
model. Following are some general descriptions of the
features and components of the SKIS. Refer to the
vehicle owner's manual for more information on the
use and operation of the SKIS. Refer to 8W-30 - Fuel/
Ignition System in Group 8W - Wiring Diagrams for
complete circuit descriptions and diagrams.
SMART KEY IMMOBILIZER SYSTEM
The Smart Key Immobilizer System (SKIS) is
designed to provide passive protection against unau-
thorized vehicle use by preventing the engine from
operating while the system is armed. The primary
components of this system are the Smart Key Immo-
bilizer Module (SKIM), the Smart Key transponder,
the SKIS indicator lamp, and the Powertrain Control
Module (PCM), for gasoline engines, and the Body
Control Module (BCM) for diesel engines.
The SKIM is installed on the steering column near
the ignition lock cylinder. The transponder is located
under the molded rubber cap on the head of the igni-
tion key. The SKIS indicator lamp is located in the
instrument cluster.
The SKIS includes two valid Smart Key transpon-
ders from the factory. If the customer wishes, addi-
tional non-coded blank Smart Keys are available.
These blank keys can be cut to match a valid ignition
key, but the engine will not start unless the key tran-
sponder is also programmed to the vehicle. The SKIS
will recognize no more than eight valid Smart Key
transponders at any one time.
The SKIS performs a self-test each time the igni-
tion switch is turned to the On position, and will
store Diagnostic Trouble Codes (DTCs) if a systemmalfunction is detected. The SKIS can be diagnosed,
and any stored DTC can be retrieved using a DRB
scan tool as described in the proper Diagnostic Pro-
cedures manual.
DESCRIPTION AND OPERATION
SMART KEY IMMOBILIZER MODULE
The Smart Key Immobilizer Module (SKIM) con-
tains a Radio Frequency (RF) transceiver and a cen-
tral processing unit, which includes the Smart Key
Immobilizer System (SKIS) program logic. The SKIS
programming enables the SKIM to program and
retain in memory the codes of at least two, but no
more than eight electronically coded Smart Key tran-
sponders. The SKIS programming also enables the
SKIM to communicate over the Chrysler Collision
Detection (CCD) data bus network with the Power-
train Control Module (PCM), the instrument cluster
and/or the DRB scan tool.
The SKIM transmits and receives RF signals
through a tuned antenna enclosed within a molded
plastic ring formation that is integral to the SKIM
housing. When the SKIM is properly installed on the
steering column, the antenna ring is oriented around
the circumference of the ignition lock cylinder hous-
ing. This antenna ring must be located within eight
millimeters (0.31 inches) of the Smart Key in order
to ensure proper RF communication between the
SKIM and the Smart Key transponder.
For added system security, each SKIM is pro-
grammed with a unique ªSecret Keyº code and a
security code. The SKIM keeps the ªSecret Keyº code
in memory and sends the code over the CCD data
bus to the PCM, which also keeps this code in its
memory. The SKIM also sends the ªSecret Keyº code
to each of the programmed Smart Key transponders.
The security code is used by the assembly plant to
NS/GSVEHICLE THEFT/SECURITY SYSTEMS 8Q - 1
Page 521 of 1938
determine whether a valid key is in the ignition lock
cylinder.
The Smart Key transponder cannot be repaired
and, if faulty or damaged, it must be replaced.
SMART KEY IMMOBILIZER SYSTEM INDICATOR
LAMP
The Smart Key Immobilizer System (SKIS) indica-
tor lamp gives an indication when the SKIS is faulty
or when the vehicle has been immobilized due to the
use of an invalid ignition key. The lamp is controlled
by the instrument cluster circuitry based upon mes-
sages received from the Smart Key Immobilizer Mod-
ule (SKIM) on the Chrysler Collision Detection (CCD)
data bus.
The SKIM sends messages to the instrument clus-
ter to turn the lamp on for about three seconds when
the ignition switch is turned to the On position as a
bulb test. After completion of the bulb test, the SKIM
sends bus messages to keep the lamp off for a dura-
tion of about one second. Then the SKIM sends mes-
sages to the instrument cluster circuitry to turn the
lamp on or off based upon the results of the SKIS
self-tests. If the SKIS indicator lamp comes on and
stays on after the bulb test, it indicates that the
SKIM has detected a system malfunction and/or that
the SKIS has become inoperative. If the SKIM
detects an invalid key when the ignition switch is
turned to the On position, it sends messages to the
instrument cluster to flash the SKIS indicator lamp.
The SKIM can also send messages to the instru-
ment cluster to flash the lamp and to generate a sin-
gle audible chime tone. These functions serve as an
indication to the customer that the SKIS has been
placed in its ªCustomer Learnº programming mode.
See Smart Key Immobilizer System Transponder Pro-
gramming in this group for more information on the
ªCustomer Learnº programming mode.
The SKIS indicator lamp uses a replaceable incan-
descent bulb and bulb holder on the instrument clus-
ter electronic circuit board. Refer to Group 8E -
Instrument Panel Systems for diagnosis and service
of a faulty SKIS indicator lamp. If the SKIS indicator
lamp comes on and stays on after the bulb test func-
tion, diagnosis of the SKIS should be performed with
a DRB scan tool and the proper Diagnostic Proce-
dures manual.
DIAGNOSIS AND TESTING
SMART KEY IMMOBILIZER SYSTEM
WARNING: ON VEHICLES EQUIPPED WITH AIR-
BAGS, REFER TO GROUP 8M - PASSIVE
RESTRAINT SYSTEMS BEFORE ATTEMPTING ANY
STEERING WHEEL, STEERING COLUMN, OR
INSTRUMENT PANEL COMPONENT DIAGNOSIS OR
SERVICE. FAILURE TO TAKE THE PROPER PRE-
CAUTIONS COULD RESULT IN ACCIDENTAL AIR-
BAG DEPLOYMENT AND POSSIBLE PERSONAL
INJURY.
NOTE: The following tests may not prove conclu-
sive in the diagnosis of this system. The most reli-
able, efficient, and accurate means to diagnose the
Smart Key Immobilizer System involves the use of a
DRB scan tool. Refer to the proper Diagnostic Pro-
cedures manual for the procedures.
The Smart Key Immobilizer System (SKIS) and the
Chrysler Collision Detection (CCD) data bus network
should be diagnosed using a DRB scan tool. The DRB
will allow confirmation that the CCD data bus is
functional, that the Smart Key Immobilizer Module
(SKIM) is placing the proper messages on the CCD
data bus, and that the Powertrain Control Module
(PCM) and the instrument cluster are receiving the
CCD data bus messages. Refer to the proper Diag-
nostic Procedures manual for the procedures. Refer
to 8W-30 - Fuel/Ignition System in Group 8W - Wir-
ing Diagrams for complete circuit descriptions and
diagrams.
(1) Check the fuses in the fuseblock module. If OK,
go to Step 2. If not OK, repair the shorted circuit or
component as required and replace the faulty fuse.
(2) Disconnect and isolate the battery negative
cable. Unplug the wire harness connector at the
SKIM. Check for continuity between the ground cir-
cuit cavity of the SKIM wire harness connector and a
good ground. There should be continuity. If OK, go to
Step 3. If not OK, repair the open circuit to ground
as required.
(3) Connect the battery negative cable. Check for
battery voltage at the fused B(+) circuit cavity of the
SKIM wire harness connector. If OK, go to Step 4. If
not OK, repair the open circuit to the fuse in the
fuseblock module as required.
NS/GSVEHICLE THEFT/SECURITY SYSTEMS 8Q - 3
DESCRIPTION AND OPERATION (Continued)
Page 532 of 1938
two positions of seat and recliner, and the side view
mirrors as chosen by the driver.
The inputs from these switches to the memory
seat/mirror module is a ground level signal.
(1) Adjust the seat, recliner and side view mirrors
to the desired position.
(2)
Press momentarily and release memory switch S.
(3) Press momentarily and release memory switch
1 or 2. Do NOT press any switches for 10 seconds.
(4) To program the second driver's position, follow
the above sequence.
(5) To recall either of the programmed positions
momentarily press and release either memory selec-
tor switch 1 or 2.
DEFINITION OF: MOMENTARILY AND
RELEASE
The memory seat/mirror module has switch input
timing requirements of a minimum press momen-
tarily time of 250 milliseconds followed by a maxi-
mum hold time of 5 seconds, followed by a maximum
release time between steps of 5 seconds that must be
met for proper operation of the system.
SEAT AND RECLINER SWITCHES
The seat and recliner switch assembly is mounted
outboard on the seat side-shield. Press and hold the
desired seat or recliner switch to effect movement.
The Memory Seat/Mirror Module (MSM Module) will
drive a maximum of 2 motors at a time in a given
direction. If conflicting directions are requested, the
priority for response will be as follows:
²Seat Track Rearward
²Seat Front Down
²Seat Rear Down
²Recliner Rearward
²Seat Track Forward
²Seat Front Up
²Seat Rear Up
²Recliner Forward
The inputs from these switches to the MSM Mod-
ule is a current limited battery source fed by the
MSM Module. This protects the MSM Module printed
circuit board traces from acting as fuses. All of these
switch contact inputs to the module are normally
closed to ground, except when actuated.
POSITION SENSING SEAT AND RECLINER
POTENTIOMETERS
A potentiometer is mounted to each seat track and
recliner motor end-bell to provide a sense voltage to
the Memory Seat/Mirror Module that will indicate to
the module where the seat track or recliner is posi-
tioned.
This sense voltage is derived from a 5 volt source
provided by the module to the potentiometer. Thesense voltage is input into the module and stored by
the Memory Seat/Mirror Module.
DIAGNOSIS AND TESTING
MEMORY SELECTOR SWITCHES
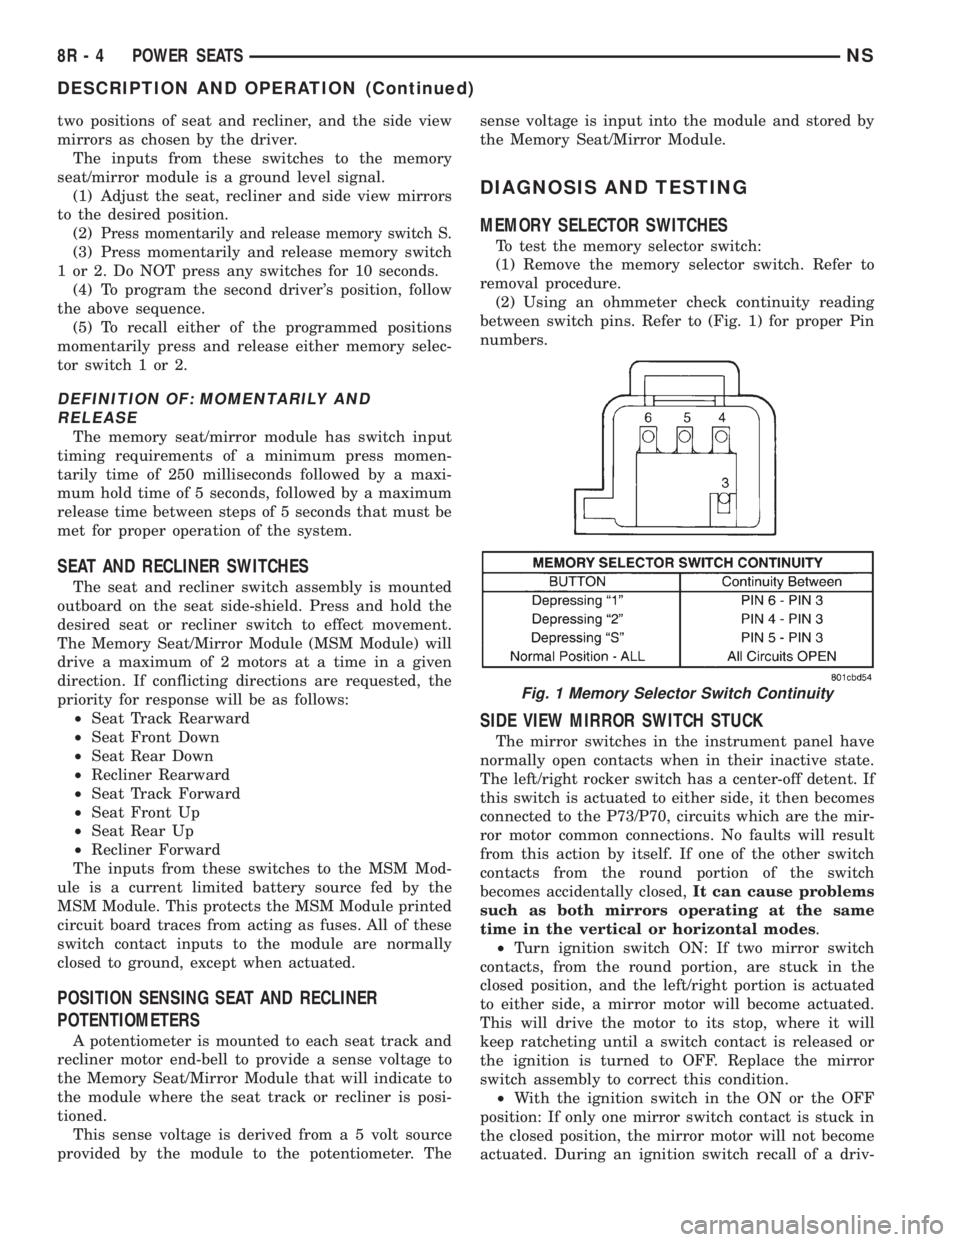
To test the memory selector switch:
(1) Remove the memory selector switch. Refer to
removal procedure.
(2) Using an ohmmeter check continuity reading
between switch pins. Refer to (Fig. 1) for proper Pin
numbers.
SIDE VIEW MIRROR SWITCH STUCK
The mirror switches in the instrument panel have
normally open contacts when in their inactive state.
The left/right rocker switch has a center-off detent. If
this switch is actuated to either side, it then becomes
connected to the P73/P70, circuits which are the mir-
ror motor common connections. No faults will result
from this action by itself. If one of the other switch
contacts from the round portion of the switch
becomes accidentally closed,It can cause problems
such as both mirrors operating at the same
time in the vertical or horizontal modes.
²Turn ignition switch ON: If two mirror switch
contacts, from the round portion, are stuck in the
closed position, and the left/right portion is actuated
to either side, a mirror motor will become actuated.
This will drive the motor to its stop, where it will
keep ratcheting until a switch contact is released or
the ignition is turned to OFF. Replace the mirror
switch assembly to correct this condition.
²With the ignition switch in the ON or the OFF
position: If only one mirror switch contact is stuck in
the closed position, the mirror motor will not become
actuated. During an ignition switch recall of a driv-
Fig. 1 Memory Selector Switch Continuity
8R - 4 POWER SEATSNS
DESCRIPTION AND OPERATION (Continued)
Page 533 of 1938
er's chosen position, the Memory Seat/Mirror Module
will attempt to drive the mirror motor only if:
²The closed switch contact was the same as the
desired direction
²Until the lack of a signal seen by the module
shuts off the drive to the motor
The Memory Seat/Mirror Module will shut off the
drive to the desired motor. It is possible that a single
stuck contact could place an opposite mirror or direc-
tion into a series connection. This would run the con-
nected motors at approximately half speed. Replace
the mirror switch assembly to correct this condition.
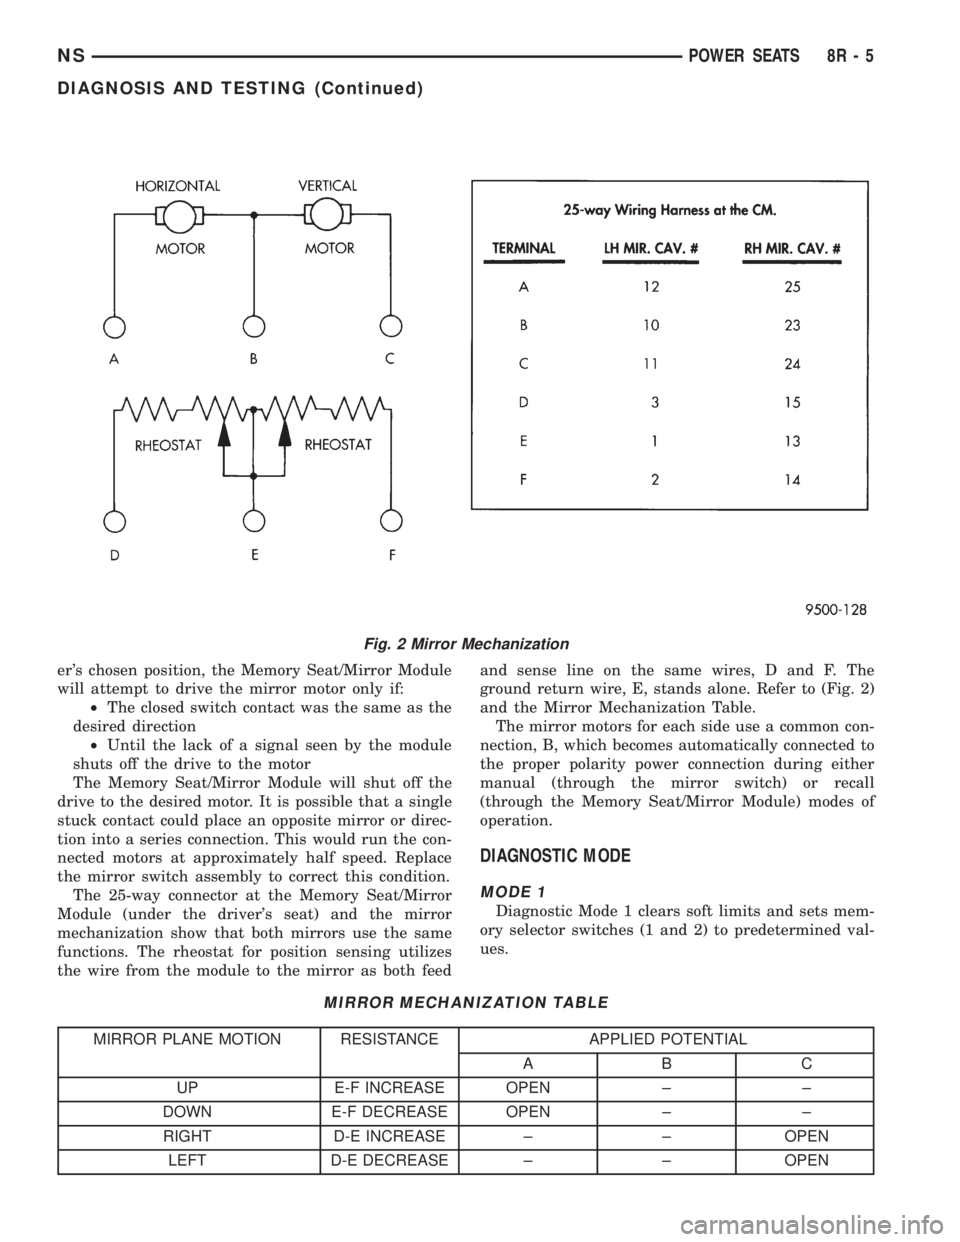
The 25-way connector at the Memory Seat/Mirror
Module (under the driver's seat) and the mirror
mechanization show that both mirrors use the same
functions. The rheostat for position sensing utilizes
the wire from the module to the mirror as both feedand sense line on the same wires, D and F. The
ground return wire, E, stands alone. Refer to (Fig. 2)
and the Mirror Mechanization Table.
The mirror motors for each side use a common con-
nection, B, which becomes automatically connected to
the proper polarity power connection during either
manual (through the mirror switch) or recall
(through the Memory Seat/Mirror Module) modes of
operation.
DIAGNOSTIC MODE
MODE 1
Diagnostic Mode 1 clears soft limits and sets mem-
ory selector switches (1 and 2) to predetermined val-
ues.
Fig. 2 Mirror Mechanization
MIRROR MECHANIZATION TABLE
MIRROR PLANE MOTION RESISTANCE APPLIED POTENTIAL
AB C
UP E-F INCREASE OPEN ± ±
DOWN E-F DECREASE OPEN ± ±
RIGHT D-E INCREASE ± ± OPEN
LEFT D-E DECREASE ± ± OPEN
NSPOWER SEATS 8R - 5
DIAGNOSIS AND TESTING (Continued)
Page 534 of 1938

ACTIVATION-Press and hold the S and 1 buttons
for 5 seconds to enter diagnostic mode 1. This mode
is exited at the completion of the mode 1 tasks or
upon grounding the RKE input to the Memory Seat/
Mirror Module.
Mode 1 will:
²Clear all soft limits to their default hard limit
values
²Load memory 1 with default settings corre-
sponding to horizontal rearward, front down, rear
down, and recliner rearward positions²Load memory 2 with default settings corre-
sponding to horizontal forward, front up, rear up,
and recliner forward positions
MODE 2
Diagnostic mode 2 provides a way to determine if
the seat/mirror motors and position sensors are con-
nected properly.
ACTIVATION-Press and hold the S and 2 buttons
for 5 seconds to enter diagnostic mode 2. This mode
is exited after 5 seconds of switch inactivity or upon
grounding the RKE input by moving the transmis-
sion out of the PARK position.
Mode 2 will:
²Place the seat and mirror motors at their mid-
point
²When a single axis of seat or mirror motion is
requested by pressing a switch, the corresponding
motor is energized. This tests switch input and motor
output
²When the switch is released, the motor will
automatically return to its original position. If the
corresponding sensor is out of range, then the motor
will not return to its original position. This tests the
integrity of the sensors and motor outputs. Refer to
(Fig. 3), (Fig. 4), (Fig. 5) and (Fig. 6) for module con-
nector call outs.
Fig. 3 Memory Seat/Mirror Module
Fig. 4 Memory Seat/Mirror Module 10-Way Connector
8R - 6 POWER SEATSNS
DIAGNOSIS AND TESTING (Continued)
Page 539 of 1938
POWER MIRRORS
CONTENTS
page page
GENERAL INFORMATION
HEATED MIRROR........................ 1
INTRODUCTION......................... 1
MEMORY MIRRORS...................... 1
DIAGNOSIS AND TESTING
HEATED MIRROR TEST................... 1MIRROR MOTOR TEST................... 1
MIRROR SWITCH TEST................... 1
REMOVAL AND INSTALLATION
POWER MIRROR SWITCH................. 3
POWER MIRROR........................ 3
GENERAL INFORMATION
INTRODUCTION
Electrically-operated remote control mirrors are
controlled by a switch assembly located on the head-
lamp switch bezel in the instrument panel.
The vehicle uses a rocker switch for right or left
side mirror selection and a single platform button for
mirror UP, DOWN, RIGHT, or LEFT movement.
The motors which operate the mirrors are part of
the mirror assembly and cannot be serviced sepa-
rately.
HEATED MIRROR
Heated mirrors are available on models with
Power Mirrors and Rear Window Defogger only. The
heated mirror is controlled by the rear window defog-
ger switch. The heated mirror is ON when the rear
window defogger is ON.
MEMORY MIRRORS
For memory mirrors refer to Group 8R, Power
Seats section Memory Seat/Mirror system.
DIAGNOSIS AND TESTING
MIRROR MOTOR TEST
(1) Remove headlamp switch bezel. Refer to Group
8E, Instrument Panel and Gauges.
(2) Disconnect wiring harness connector to the
power mirror switch and headlamp switch.
(3) Using two jumper wires:
²Connect one to a 12-volt source
²Connect the other to a good body ground
²Refer to the Mirror Test Chart for wire hookups
at the switch connector (Fig. 1).(4) If results shown in chart are not obtained,
check for broken or shorted circuit, or replace mirror
assembly as necessary.
MIRROR SWITCH TEST
(1) Remove power mirror switch from mounting
position.
(2) Disconnect wiring harness at switch connector.
(3) Using a ohmmeter, test for continuity between
the terminals of the switch as shown in the Mirror
Switch Continuity Chart (Fig. 2).
(4) If results shown in the chart are not obtained,
replace the switch.
HEATED MIRROR TEST
Heated mirrors are available on models with
Power Mirrors and Rear Window Defogger only. The
heated mirror is controlled by the rear window defog-
ger switch. The heated mirror is ON when the rear
window defogger is ON.
TEST PROCEDURE
(1) The mirror should be warm to the touch.
(2) If not, check the 10 amp fuse (12) in the junc-
tion block behind the instrument panel to the left of
the steering column.
(3) Test voltage at rear window defogger switch.
²If no voltage repair wire.
²Apply voltage to one wire and ground the other,
refer to (Fig. 1) for pin numbers. Mirror should
become warm to the touch.
²If not remove mirror glass and test the wires for
continuity. If no continuity repair wires.
²If wires are OK, replace mirror glass.
²To test defogger switch refer to Group 8N, Elec-
trically Heated Systems.
NSPOWER MIRRORS 8T - 1
Page 551 of 1938

OVERHEAD CONSOLE
CONTENTS
page page
DESCRIPTION AND OPERATION
COMPASS MINI-TRIP COMPUTER (CMTC).... 1
COMPASS/TEMPERATURE MINI TRIP
COMPUTER SELF-DIAGNOSTIC TEST....... 1
THERMOMETER AND COMPASS............ 2
UNIVERSAL TRANSMITTER................ 2
DIAGNOSIS AND TESTING
READING/DOME LAMP DIAGNOSIS......... 3
TRAVELER MESSAGES.................... 3
UNIVERSAL TRANSMITTER................ 3
SERVICE PROCEDURES
COMPASS CALIBRATION PROCEDURE (FAST
METHOD)............................. 4
COMPASS CALIBRATION PROCEDURE....... 4
DEMAGNETIZING PROCEDURE............. 4UNIVERSAL TRANSMITTER................ 5
REMOVAL AND INSTALLATION
AMBIENT TEMPERATURE SENSOR.......... 5
COMPASS MINI-TRIP COMPUTER (CMTC)
LAMP BULBS......................... 6
COMPASS MINI-TRIP COMPUTER (CMTC)
MODULE............................. 6
FRONT HEADER READING/COURTESY LAMP . . 6
OVERHEAD CONSOLE.................... 6
READING/COURTESY LAMP ASSEMBLY...... 7
READING/COURTESY LAMP............... 6
UNIVERSAL TRANSMITTER................ 7
SPECIAL TOOLS
SPECIAL TOOL.......................... 9
DESCRIPTION AND OPERATION
COMPASS/TEMPERATURE MINI TRIP COMPUTER
SELF-DIAGNOSTIC TEST
The CMTC is capable of performing a diagnostic
self check on many of its internal functions. CMTC
diagnostics may be performed using a scan tool
(DRB) and the proper Body Diagnostic Procedures
manual or by the following procedure.
(1) With the ignition switch in the OFF position,
press both the US/M and STEP button.
(2) Turn ignition switch to the ON position.
The CMTC will perform internal checks while
lighting all segments of the vacuum florescent dis-
play. Upon completion of the internal check, the
CMTC will display.
²PASS
²FAIL
²CCd
If any segment of the CMTC fails to light replace
the module.
If FAIL is displayed, replace the module.
If CCd is displayed, check the CCD and Body Con-
trol Module (BCM) for proper operation, refer to the
appropriate diagnostic test procedures manual If the
CCD and the BCM are OK, replace the CMTC mod-
ule.
For additional diagnostic information on the CMTC
and for identifying CMTC problems, refer to the
proper Body Diagnostic Procedures manual.
COMPASS MINI-TRIP COMPUTER (CMTC)
The Compass Mini-Trip Computer (CMTC) system
is located in the overhead console. CMTC consists of
a electronic control module with a vacuum fluores-
cent display (VFD) and function switches. The CMTC
consists of a electronic module that displays compass,
trip computer, and temperature features. Actuating
the STEP switch will cause the CMTC to change
mode of operation when ignition is ON. Example:
²Compass/Temperature
²Trip odometer (ODO)
²Average miles per gallon (ECO)
²Instant miles per gallon (ECO)
²Distance to empty (DTE)
²Elapsed time (ET)
²Off
The CMTC module in the overhead console has
three buttons used to select various functions. The
CMTC selector buttons will not operate until the
ignition is in the RUN position (Fig. 1).
When the ignition switch is first turned to the
RUN position the CMTC display;
²Blanks momentarily
²All segments of the VFD will light for one sec-
ond
²Blanks momentarily
²Returns to the last mode setting selected before
the ignition was last switched OFF.
NSOVERHEAD CONSOLE 8V - 1
Page 554 of 1938
²Rotate your hand-held transmitter end-over-end
and train again. For best results, place the end oppo-
site from the battery compartment against the uni-
versal transmitter while training.
²The frequency of the hand-held transmitter may
not be in the desired frequencies between 286MHz
and 399MHz set by FCC.
SERVICE PROCEDURES
COMPASS CALIBRATION PROCEDURE
Variance is the difference between magnetic North
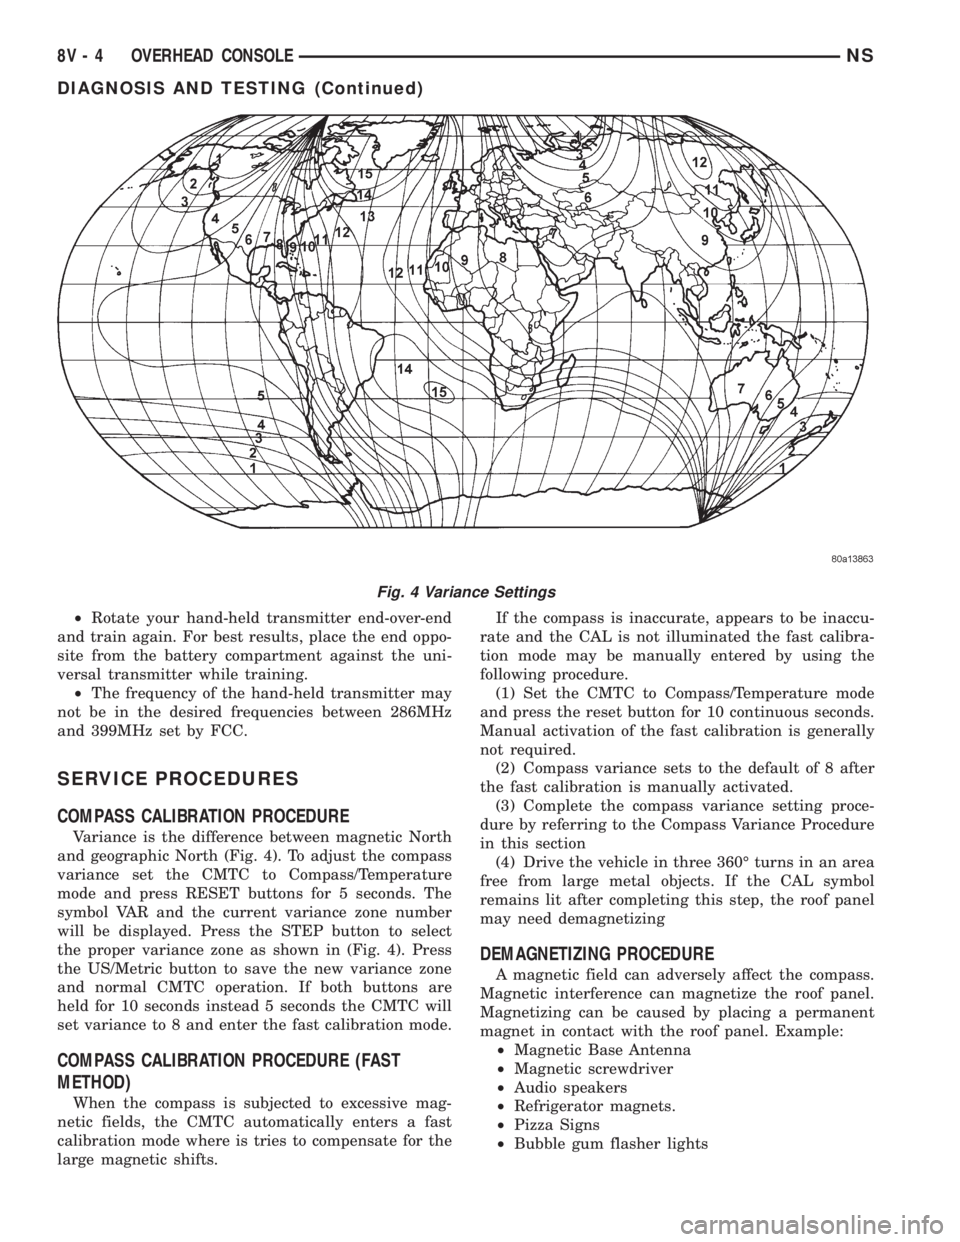
and geographic North (Fig. 4). To adjust the compass
variance set the CMTC to Compass/Temperature
mode and press RESET buttons for 5 seconds. The
symbol VAR and the current variance zone number
will be displayed. Press the STEP button to select
the proper variance zone as shown in (Fig. 4). Press
the US/Metric button to save the new variance zone
and normal CMTC operation. If both buttons are
held for 10 seconds instead 5 seconds the CMTC will
set variance to 8 and enter the fast calibration mode.
COMPASS CALIBRATION PROCEDURE (FAST
METHOD)
When the compass is subjected to excessive mag-
netic fields, the CMTC automatically enters a fast
calibration mode where is tries to compensate for the
large magnetic shifts.If the compass is inaccurate, appears to be inaccu-
rate and the CAL is not illuminated the fast calibra-
tion mode may be manually entered by using the
following procedure.
(1) Set the CMTC to Compass/Temperature mode
and press the reset button for 10 continuous seconds.
Manual activation of the fast calibration is generally
not required.
(2) Compass variance sets to the default of 8 after
the fast calibration is manually activated.
(3) Complete the compass variance setting proce-
dure by referring to the Compass Variance Procedure
in this section
(4) Drive the vehicle in three 360É turns in an area
free from large metal objects. If the CAL symbol
remains lit after completing this step, the roof panel
may need demagnetizing
DEMAGNETIZING PROCEDURE
A magnetic field can adversely affect the compass.
Magnetic interference can magnetize the roof panel.
Magnetizing can be caused by placing a permanent
magnet in contact with the roof panel. Example:
²Magnetic Base Antenna
²Magnetic screwdriver
²Audio speakers
²Refrigerator magnets.
²Pizza Signs
²Bubble gum flasher lights
Fig. 4 Variance Settings
8V - 4 OVERHEAD CONSOLENS
DIAGNOSIS AND TESTING (Continued)
Page 566 of 1938
CIRCUIT INFORMATION
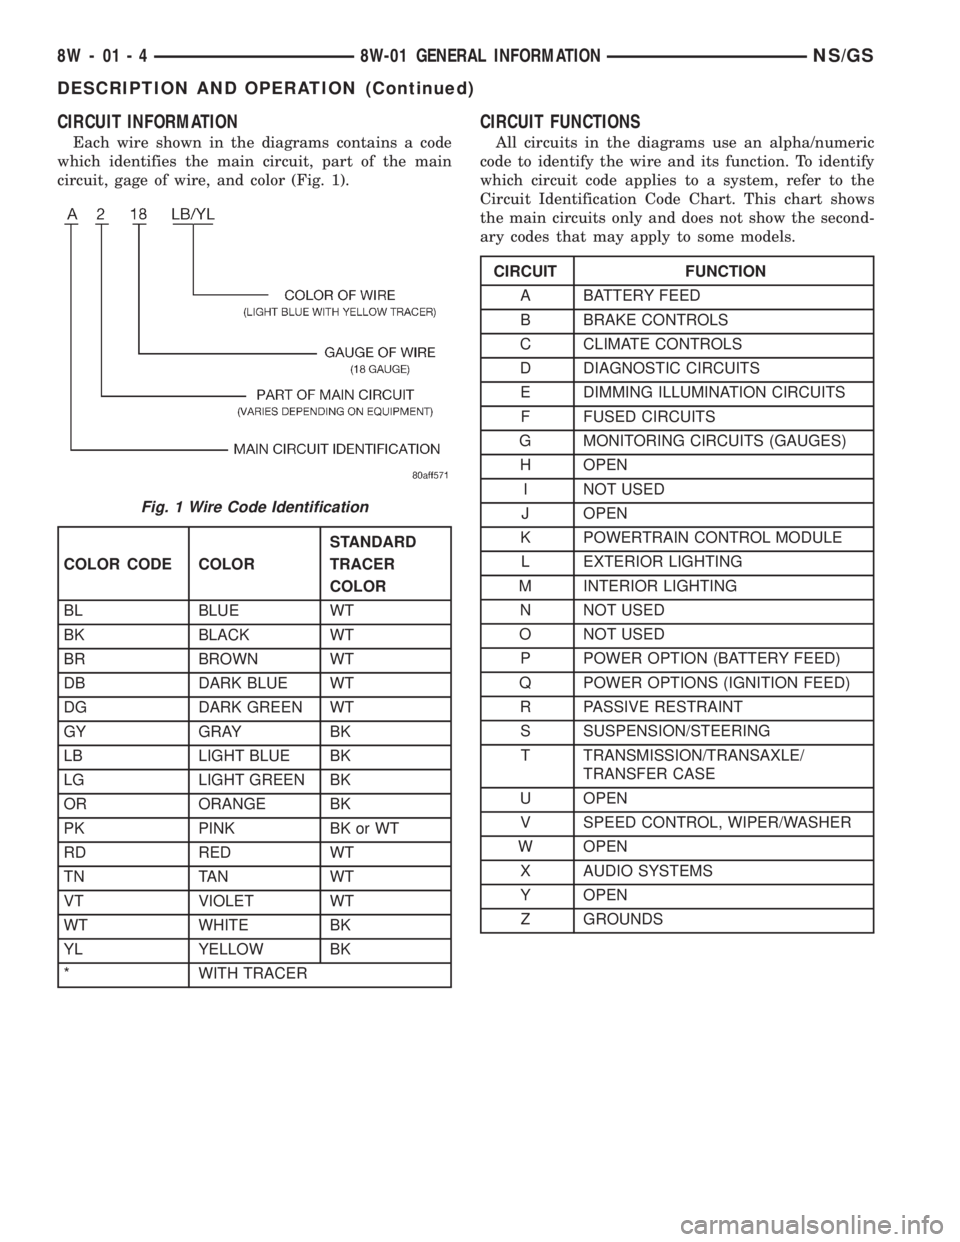
Each wire shown in the diagrams contains a code
which identifies the main circuit, part of the main
circuit, gage of wire, and color (Fig. 1).
CIRCUIT FUNCTIONS
All circuits in the diagrams use an alpha/numeric
code to identify the wire and its function. To identify
which circuit code applies to a system, refer to the
Circuit Identification Code Chart. This chart shows
the main circuits only and does not show the second-
ary codes that may apply to some models.
Fig. 1 Wire Code Identification
COLOR CODE COLORSTANDARD
TRACER
COLOR
BL BLUE WT
BK BLACK WT
BR BROWN WT
DB DARK BLUE WT
DG DARK GREEN WT
GY GRAY BK
LB LIGHT BLUE BK
LG LIGHT GREEN BK
OR ORANGE BK
PK PINK BK or WT
RD RED WT
TN TAN WT
VT VIOLET WT
WT WHITE BK
YL YELLOW BK
* WITH TRACER
CIRCUIT FUNCTION
A BATTERY FEED
B BRAKE CONTROLS
C CLIMATE CONTROLS
D DIAGNOSTIC CIRCUITS
E DIMMING ILLUMINATION CIRCUITS
F FUSED CIRCUITS
G MONITORING CIRCUITS (GAUGES)
H OPEN
I NOT USED
J OPEN
K POWERTRAIN CONTROL MODULE
L EXTERIOR LIGHTING
M INTERIOR LIGHTING
N NOT USED
O NOT USED
P POWER OPTION (BATTERY FEED)
Q POWER OPTIONS (IGNITION FEED)
R PASSIVE RESTRAINT
S SUSPENSION/STEERING
T TRANSMISSION/TRANSAXLE/
TRANSFER CASE
U OPEN
V SPEED CONTROL, WIPER/WASHER
W OPEN
X AUDIO SYSTEMS
Y OPEN
Z GROUNDS
8W - 01 - 4 8W-01 GENERAL INFORMATIONNS/GS
DESCRIPTION AND OPERATION (Continued)
Page 1066 of 1938

sealing and a chrome plated taper faced intermediate
ring for additional cylinder pressure control. There
are also standard oil control rings.
CYLINDER HEAD:Features a Dual Over Head
Camshaft (DOHC) 4 valves per cylinder cross flow
design. The valves are arranged in two inline banks,
with the ports of the bank of two intake valves per
cylinder facing toward the radiator side of engine
and ports of the bank of two exhaust valves per cyl-
inder facing toward the dash panel. Incorporates
powder metal valve guides and seats. Integral oil gal-
leys within the cylinder head supplies oil to the
hydraulic lash adjusters, camshaft and valve mecha-
nisms.
CAMSHAFTS:The nodular iron camshafts have
six bearing journals and 2 cam lobes per cylinder.
Flanges at the rear journals control camshaft end
play. Provision for cam position sensor is located on
the intake camshaft at the rear of cylinder head. A
hydrodynamic oil seal is used for oil control at the
front of the camshaft.
VALVES:4 valves per cylinder are actuated by
roller cam followers which pivot on stationary
hydraulic lash adjusters. All valves have 6 mm diam-
eter chrome plated valve stems. The valve sizes are
34.8 mm (1.370 inch.) diameter intake valves and
30.5 mm (1.20 inch.) diameter exhaust valves. Viton
rubber valve stem seals are integral with the spring
seats. Valve springs, spring retainers, and locks are
conventional.
INTAKE MANIFOLD:The intake manifold is a
two piece aluminum casting, attached to the cylinder
head with ten screws. This long branch fan design
enhances low and midspeed torque, while minimizing
undesirable inlet noise.
EXHAUST MANIFOLD:The exhaust manifold is
made of cast iron for strength and high tempera-
tures.
ENGINE LUBRICATION:Refer to Group 0
Lubrication and Maintenance for recommended oil to
be used in various engine application. System is full
flow filtration, pressure feed type. The oil pump is
mounted in the front engine cover and driven by the
crankshaft. Pressurized oil is then routed through
the main oil gallery, running the length of the cylin-
der block, supplying main and rod bearings with fur-
ther routing. Pistons are lubricated from rod bearing
throw off and lubricating slots on the connecting rod
assemblies. Camshaft and valve mechanisms are
lubricated from a full length cylinder head oil gallery
supplied from the crankcase main oil gallery.DIAGNOSIS AND TESTING
CHECKING ENGINE OIL PRESSURE
(1) Remove oil pressure sending unit and install
gauge assembly C-3292.
(2) Run engine until thermostat opens.
CAUTION: If oil pressure is 0 at idle, Do Not Run
engine at 3000 RPM
(3) Oil Pressure:Curb Idle25 kPa (4 psi) mini-
mum3000 RPM170/550 kPa (25/80 psi).
(4) If oil pressure is 0 at idle. Shut off engine,
check for pressure relief valve stuck open or a
clogged oil pickup screen.
SERVICE PROCEDURES
FITTING PISTONS
Piston and cylinder wall must be clean and dry.
Piston diameter should be measured 90 degrees to
piston pin about 14 mm (9/16 inch.) from the bottom
of the skirt as shown in (Fig. 3). Cylinder bores
should be measured halfway down the cylinder bore
and transverse to the engine crankshaft center line
shown in (Fig. 2). Refer to Cylinder Bore and Piston
Specification Chart.
Correct piston to bore clearance must be estab-
lished in order to assure quiet and economical oper-
ation.
Chrysler engines use pistons designed specifically
for each engine model. Clearance and sizing locations
vary with respect to engine model.
NOTE: Pistons and cylinder bores should be mea-
sured at normal room temperature, 70ÉF (21ÉC).
FITTING PISTON RINGS
(1) Wipe cylinder bore clean. Insert ring and push
down with piston to ensure it is square in bore. The
ring gap measurement must be made with the ring
positioning at least 12 mm (0.50 inch) from bottom of
cylinder bore. Check gap with feeler gauge (Fig. 4).
Refer to specification in Piston Ring Specification
Chart.
(2) Check piston ring to groove side clearance (Fig.
5). Refer to specification in Piston Ring Specification
Chart.
9 - 16 2.4L ENGINENS
DESCRIPTION AND OPERATION (Continued)