sensor CHRYSLER VOYAGER 1996 Owner's Manual
[x] Cancel search | Manufacturer: CHRYSLER, Model Year: 1996, Model line: VOYAGER, Model: CHRYSLER VOYAGER 1996Pages: 1938, PDF Size: 55.84 MB
Page 137 of 1938
CAUTION: The master cylinder is used to create
the seal for holding vacuum in the vacuum booster.
The vacuum seal on the master cylinder MUST be
replaced with a NEW seal whenever the master cyl-
inder is removed from the vacuum booster.
CAUTION: When removing the vacuum seal from
the master cylinder do not use a sharp tool.
(7) Using a soft tool such as a trim stick, remove
the vacuum seal from the master cylinder mounting
flange.
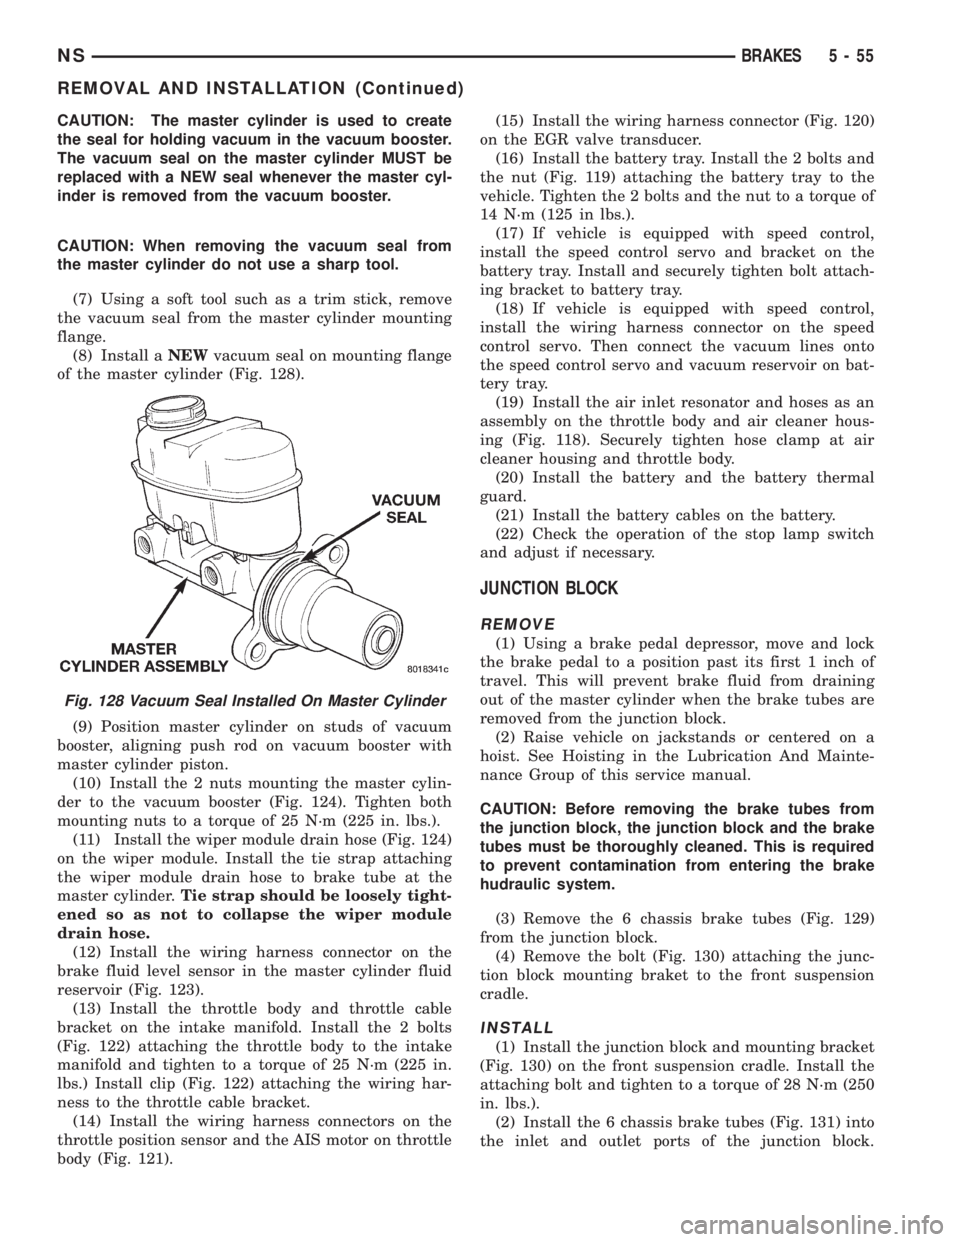
(8) Install aNEWvacuum seal on mounting flange
of the master cylinder (Fig. 128).
(9) Position master cylinder on studs of vacuum
booster, aligning push rod on vacuum booster with
master cylinder piston.
(10) Install the 2 nuts mounting the master cylin-
der to the vacuum booster (Fig. 124). Tighten both
mounting nuts to a torque of 25 N´m (225 in. lbs.).
(11) Install the wiper module drain hose (Fig. 124)
on the wiper module. Install the tie strap attaching
the wiper module drain hose to brake tube at the
master cylinder.Tie strap should be loosely tight-
ened so as not to collapse the wiper module
drain hose.
(12) Install the wiring harness connector on the
brake fluid level sensor in the master cylinder fluid
reservoir (Fig. 123).
(13) Install the throttle body and throttle cable
bracket on the intake manifold. Install the 2 bolts
(Fig. 122) attaching the throttle body to the intake
manifold and tighten to a torque of 25 N´m (225 in.
lbs.) Install clip (Fig. 122) attaching the wiring har-
ness to the throttle cable bracket.
(14) Install the wiring harness connectors on the
throttle position sensor and the AIS motor on throttle
body (Fig. 121).(15) Install the wiring harness connector (Fig. 120)
on the EGR valve transducer.
(16) Install the battery tray. Install the 2 bolts and
the nut (Fig. 119) attaching the battery tray to the
vehicle. Tighten the 2 bolts and the nut to a torque of
14 N´m (125 in lbs.).
(17) If vehicle is equipped with speed control,
install the speed control servo and bracket on the
battery tray. Install and securely tighten bolt attach-
ing bracket to battery tray.
(18) If vehicle is equipped with speed control,
install the wiring harness connector on the speed
control servo. Then connect the vacuum lines onto
the speed control servo and vacuum reservoir on bat-
tery tray.
(19) Install the air inlet resonator and hoses as an
assembly on the throttle body and air cleaner hous-
ing (Fig. 118). Securely tighten hose clamp at air
cleaner housing and throttle body.
(20) Install the battery and the battery thermal
guard.
(21) Install the battery cables on the battery.
(22) Check the operation of the stop lamp switch
and adjust if necessary.
JUNCTION BLOCK
REMOVE
(1) Using a brake pedal depressor, move and lock
the brake pedal to a position past its first 1 inch of
travel. This will prevent brake fluid from draining
out of the master cylinder when the brake tubes are
removed from the junction block.
(2) Raise vehicle on jackstands or centered on a
hoist. See Hoisting in the Lubrication And Mainte-
nance Group of this service manual.
CAUTION: Before removing the brake tubes from
the junction block, the junction block and the brake
tubes must be thoroughly cleaned. This is required
to prevent contamination from entering the brake
hudraulic system.
(3) Remove the 6 chassis brake tubes (Fig. 129)
from the junction block.
(4) Remove the bolt (Fig. 130) attaching the junc-
tion block mounting braket to the front suspension
cradle.
INSTALL
(1) Install the junction block and mounting bracket
(Fig. 130) on the front suspension cradle. Install the
attaching bolt and tighten to a torque of 28 N´m (250
in. lbs.).
(2) Install the 6 chassis brake tubes (Fig. 131) into
the inlet and outlet ports of the junction block.
Fig. 128 Vacuum Seal Installed On Master Cylinder
NSBRAKES 5 - 55
REMOVAL AND INSTALLATION (Continued)
Page 143 of 1938
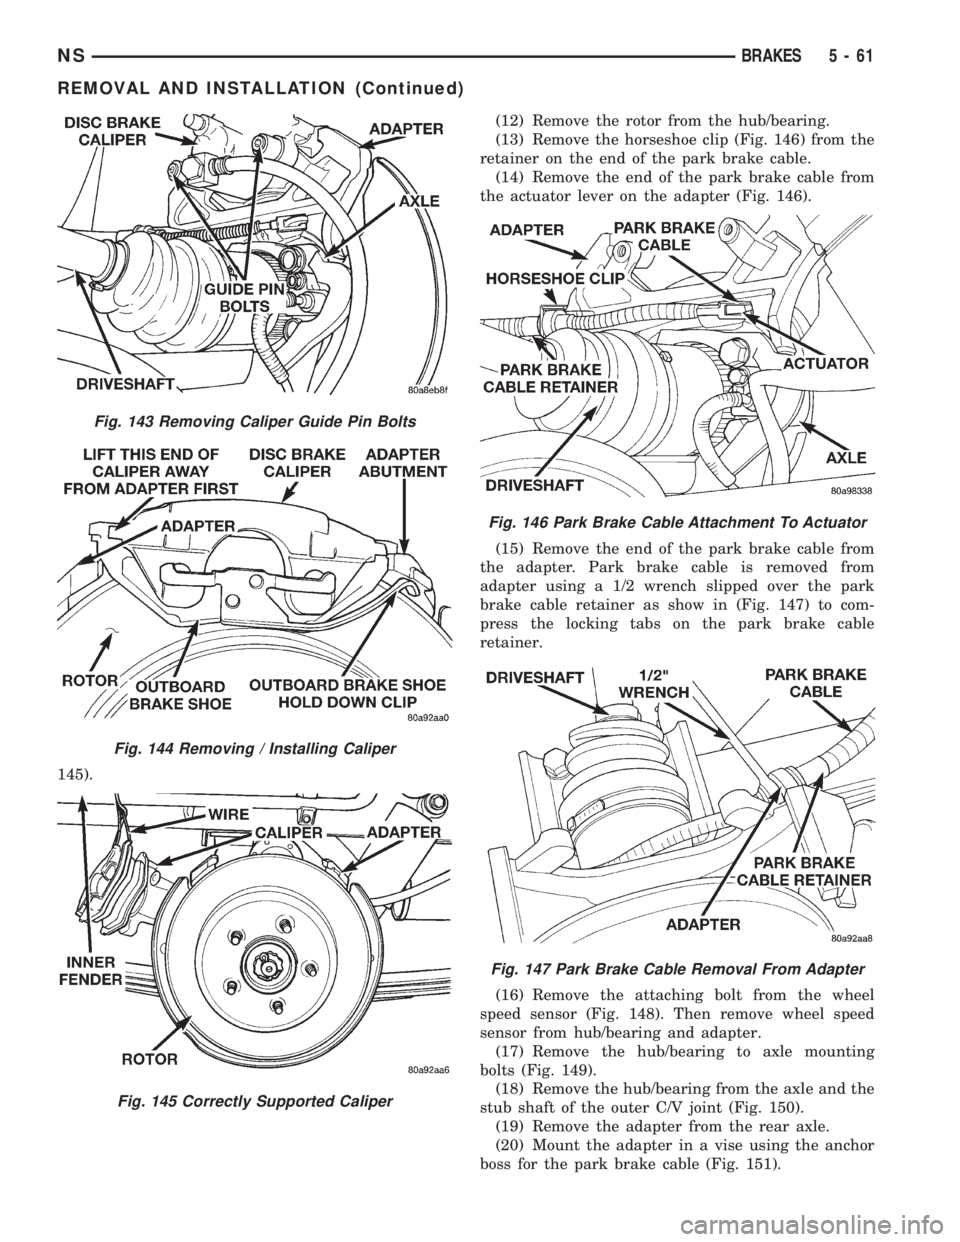
145).(12) Remove the rotor from the hub/bearing.
(13) Remove the horseshoe clip (Fig. 146) from the
retainer on the end of the park brake cable.
(14) Remove the end of the park brake cable from
the actuator lever on the adapter (Fig. 146).
(15) Remove the end of the park brake cable from
the adapter. Park brake cable is removed from
adapter using a 1/2 wrench slipped over the park
brake cable retainer as show in (Fig. 147) to com-
press the locking tabs on the park brake cable
retainer.
(16) Remove the attaching bolt from the wheel
speed sensor (Fig. 148). Then remove wheel speed
sensor from hub/bearing and adapter.
(17) Remove the hub/bearing to axle mounting
bolts (Fig. 149).
(18) Remove the hub/bearing from the axle and the
stub shaft of the outer C/V joint (Fig. 150).
(19) Remove the adapter from the rear axle.
(20) Mount the adapter in a vise using the anchor
boss for the park brake cable (Fig. 151).
Fig. 143 Removing Caliper Guide Pin Bolts
Fig. 144 Removing / Installing Caliper
Fig. 145 Correctly Supported Caliper
Fig. 146 Park Brake Cable Attachment To Actuator
Fig. 147 Park Brake Cable Removal From Adapter
NSBRAKES 5 - 61
REMOVAL AND INSTALLATION (Continued)
Page 144 of 1938
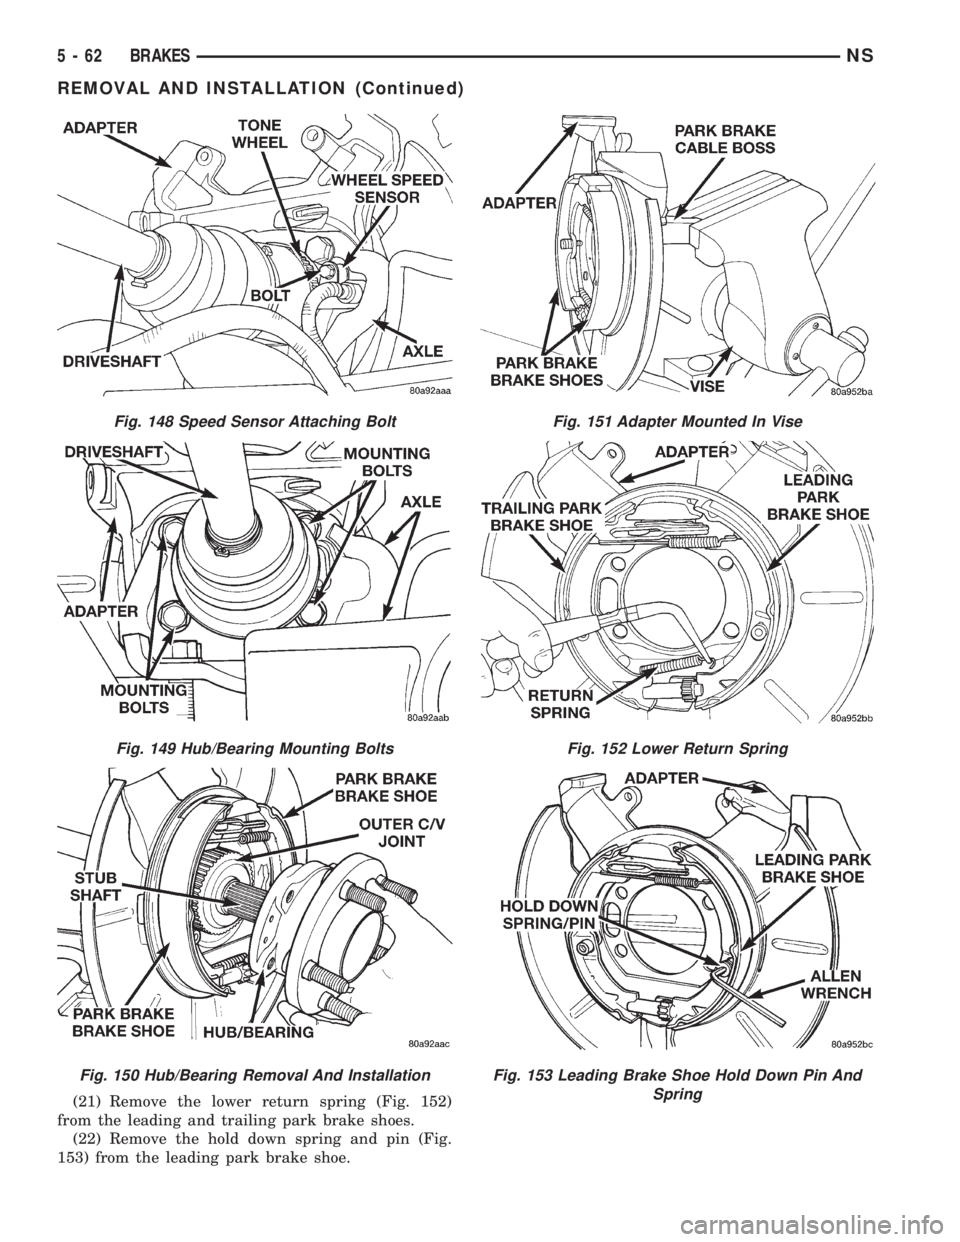
(21) Remove the lower return spring (Fig. 152)
from the leading and trailing park brake shoes.
(22) Remove the hold down spring and pin (Fig.
153) from the leading park brake shoe.
Fig. 148 Speed Sensor Attaching Bolt
Fig. 149 Hub/Bearing Mounting Bolts
Fig. 150 Hub/Bearing Removal And Installation
Fig. 151 Adapter Mounted In Vise
Fig. 152 Lower Return Spring
Fig. 153 Leading Brake Shoe Hold Down Pin And
Spring
5 - 62 BRAKESNS
REMOVAL AND INSTALLATION (Continued)
Page 146 of 1938
NOTE: When the hold down pin is installed, the
long part of the hold down pin is to be positioned
strait up and down. This will ensure that the hold
down pin is correctly engaged with the adapter.
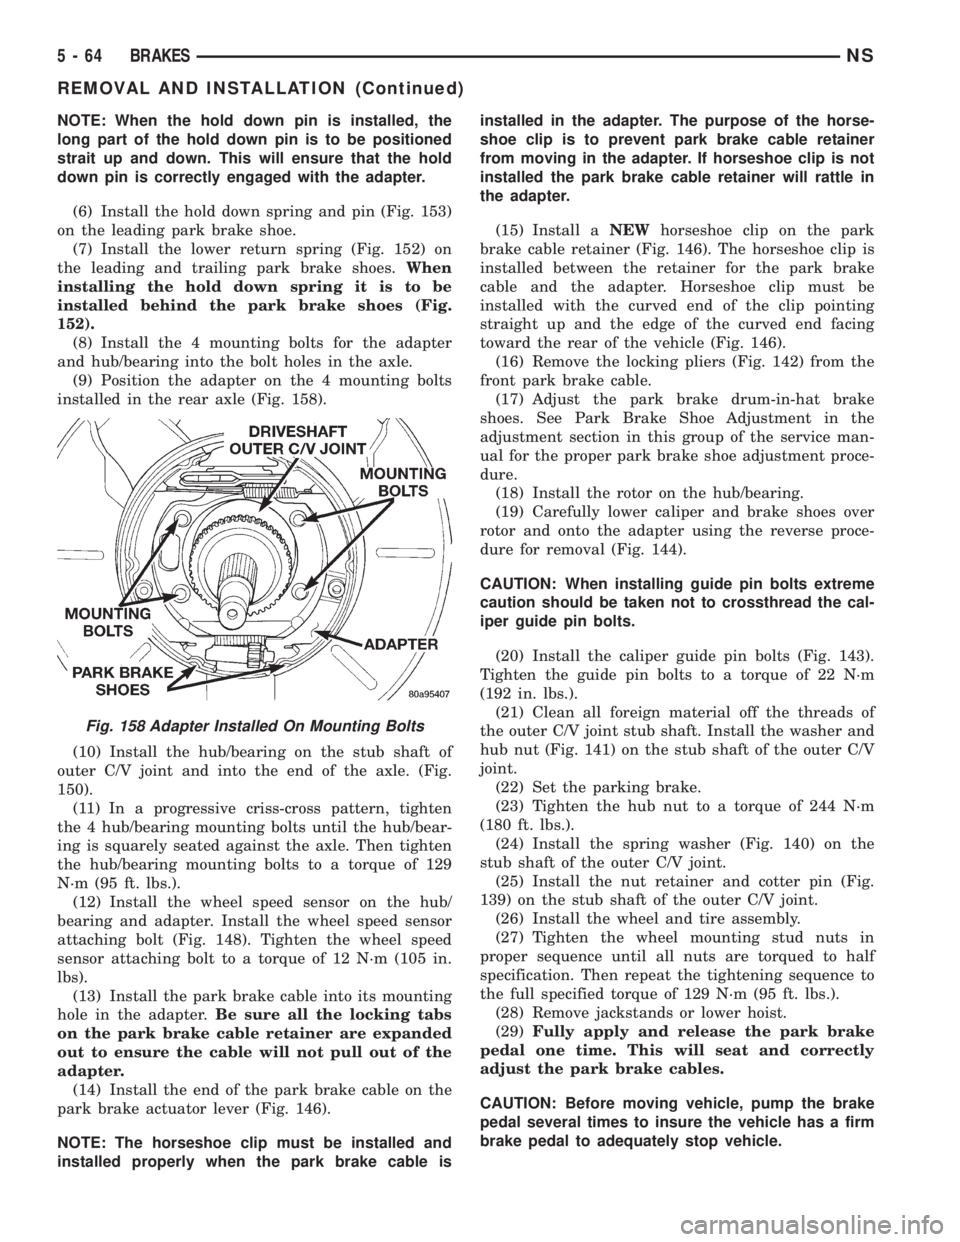
(6) Install the hold down spring and pin (Fig. 153)
on the leading park brake shoe.
(7) Install the lower return spring (Fig. 152) on
the leading and trailing park brake shoes.When
installing the hold down spring it is to be
installed behind the park brake shoes (Fig.
152).
(8) Install the 4 mounting bolts for the adapter
and hub/bearing into the bolt holes in the axle.
(9) Position the adapter on the 4 mounting bolts
installed in the rear axle (Fig. 158).
(10) Install the hub/bearing on the stub shaft of
outer C/V joint and into the end of the axle. (Fig.
150).
(11) In a progressive criss-cross pattern, tighten
the 4 hub/bearing mounting bolts until the hub/bear-
ing is squarely seated against the axle. Then tighten
the hub/bearing mounting bolts to a torque of 129
N´m (95 ft. lbs.).
(12) Install the wheel speed sensor on the hub/
bearing and adapter. Install the wheel speed sensor
attaching bolt (Fig. 148). Tighten the wheel speed
sensor attaching bolt to a torque of 12 N´m (105 in.
lbs).
(13) Install the park brake cable into its mounting
hole in the adapter.Be sure all the locking tabs
on the park brake cable retainer are expanded
out to ensure the cable will not pull out of the
adapter.
(14) Install the end of the park brake cable on the
park brake actuator lever (Fig. 146).
NOTE: The horseshoe clip must be installed and
installed properly when the park brake cable isinstalled in the adapter. The purpose of the horse-
shoe clip is to prevent park brake cable retainer
from moving in the adapter. If horseshoe clip is not
installed the park brake cable retainer will rattle in
the adapter.
(15) Install aNEWhorseshoe clip on the park
brake cable retainer (Fig. 146). The horseshoe clip is
installed between the retainer for the park brake
cable and the adapter. Horseshoe clip must be
installed with the curved end of the clip pointing
straight up and the edge of the curved end facing
toward the rear of the vehicle (Fig. 146).
(16) Remove the locking pliers (Fig. 142) from the
front park brake cable.
(17) Adjust the park brake drum-in-hat brake
shoes. See Park Brake Shoe Adjustment in the
adjustment section in this group of the service man-
ual for the proper park brake shoe adjustment proce-
dure.
(18) Install the rotor on the hub/bearing.
(19) Carefully lower caliper and brake shoes over
rotor and onto the adapter using the reverse proce-
dure for removal (Fig. 144).
CAUTION: When installing guide pin bolts extreme
caution should be taken not to crossthread the cal-
iper guide pin bolts.
(20) Install the caliper guide pin bolts (Fig. 143).
Tighten the guide pin bolts to a torque of 22 N´m
(192 in. lbs.).
(21) Clean all foreign material off the threads of
the outer C/V joint stub shaft. Install the washer and
hub nut (Fig. 141) on the stub shaft of the outer C/V
joint.
(22) Set the parking brake.
(23) Tighten the hub nut to a torque of 244 N´m
(180 ft. lbs.).
(24) Install the spring washer (Fig. 140) on the
stub shaft of the outer C/V joint.
(25) Install the nut retainer and cotter pin (Fig.
139) on the stub shaft of the outer C/V joint.
(26) Install the wheel and tire assembly.
(27) Tighten the wheel mounting stud nuts in
proper sequence until all nuts are torqued to half
specification. Then repeat the tightening sequence to
the full specified torque of 129 N´m (95 ft. lbs.).
(28) Remove jackstands or lower hoist.
(29)Fully apply and release the park brake
pedal one time. This will seat and correctly
adjust the park brake cables.
CAUTION: Before moving vehicle, pump the brake
pedal several times to insure the vehicle has a firm
brake pedal to adequately stop vehicle.
Fig. 158 Adapter Installed On Mounting Bolts
5 - 64 BRAKESNS
REMOVAL AND INSTALLATION (Continued)
Page 153 of 1938
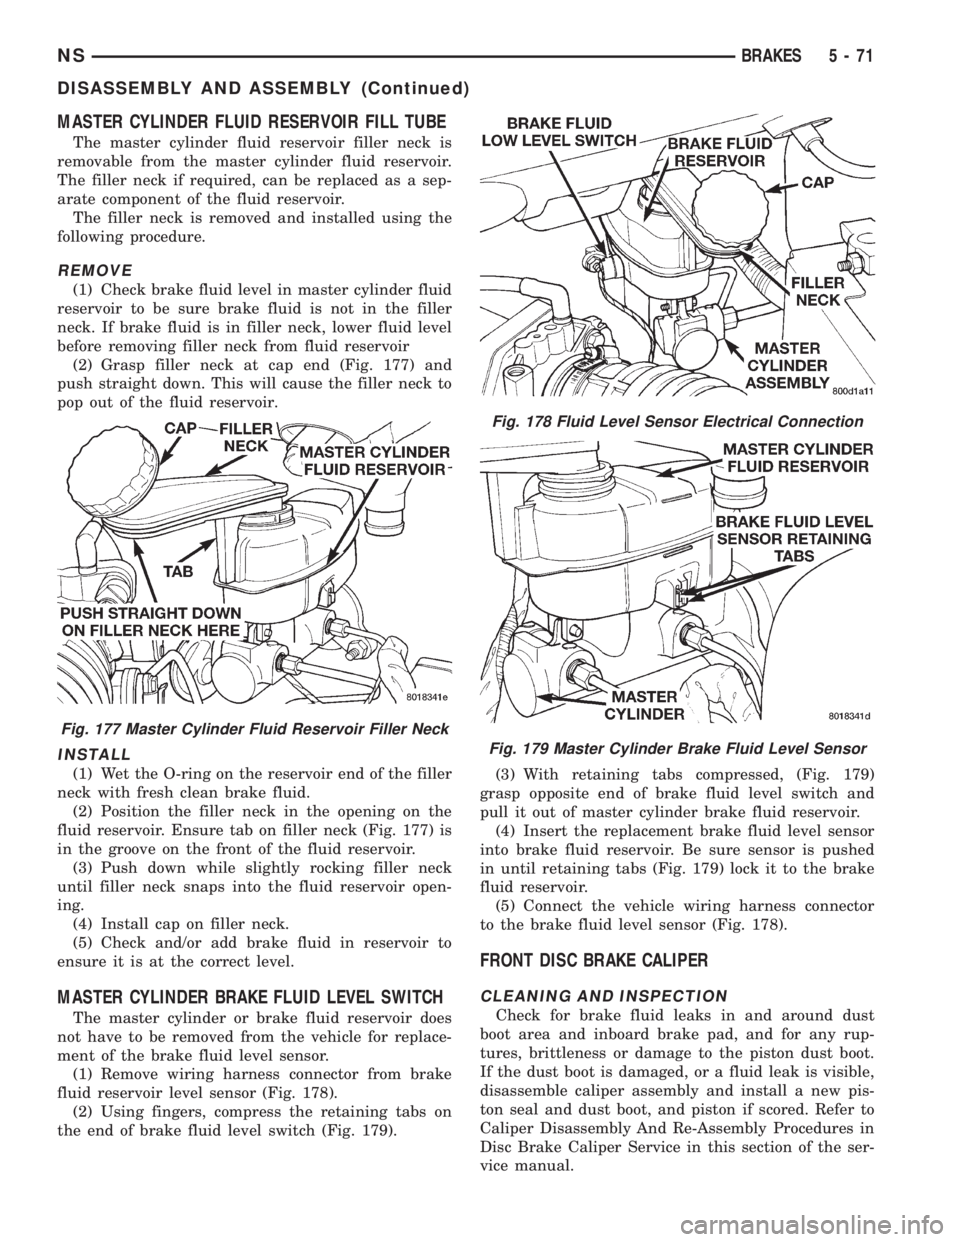
MASTER CYLINDER FLUID RESERVOIR FILL TUBE
The master cylinder fluid reservoir filler neck is
removable from the master cylinder fluid reservoir.
The filler neck if required, can be replaced as a sep-
arate component of the fluid reservoir.
The filler neck is removed and installed using the
following procedure.
REMOVE
(1) Check brake fluid level in master cylinder fluid
reservoir to be sure brake fluid is not in the filler
neck. If brake fluid is in filler neck, lower fluid level
before removing filler neck from fluid reservoir
(2) Grasp filler neck at cap end (Fig. 177) and
push straight down. This will cause the filler neck to
pop out of the fluid reservoir.
INSTALL
(1) Wet the O-ring on the reservoir end of the filler
neck with fresh clean brake fluid.
(2) Position the filler neck in the opening on the
fluid reservoir. Ensure tab on filler neck (Fig. 177) is
in the groove on the front of the fluid reservoir.
(3) Push down while slightly rocking filler neck
until filler neck snaps into the fluid reservoir open-
ing.
(4) Install cap on filler neck.
(5) Check and/or add brake fluid in reservoir to
ensure it is at the correct level.
MASTER CYLINDER BRAKE FLUID LEVEL SWITCH
The master cylinder or brake fluid reservoir does
not have to be removed from the vehicle for replace-
ment of the brake fluid level sensor.
(1) Remove wiring harness connector from brake
fluid reservoir level sensor (Fig. 178).
(2) Using fingers, compress the retaining tabs on
the end of brake fluid level switch (Fig. 179).(3) With retaining tabs compressed, (Fig. 179)
grasp opposite end of brake fluid level switch and
pull it out of master cylinder brake fluid reservoir.
(4) Insert the replacement brake fluid level sensor
into brake fluid reservoir. Be sure sensor is pushed
in until retaining tabs (Fig. 179) lock it to the brake
fluid reservoir.
(5) Connect the vehicle wiring harness connector
to the brake fluid level sensor (Fig. 178).
FRONT DISC BRAKE CALIPER
CLEANING AND INSPECTION
Check for brake fluid leaks in and around dust
boot area and inboard brake pad, and for any rup-
tures, brittleness or damage to the piston dust boot.
If the dust boot is damaged, or a fluid leak is visible,
disassemble caliper assembly and install a new pis-
ton seal and dust boot, and piston if scored. Refer to
Caliper Disassembly And Re-Assembly Procedures in
Disc Brake Caliper Service in this section of the ser-
vice manual.
Fig. 177 Master Cylinder Fluid Reservoir Filler Neck
Fig. 178 Fluid Level Sensor Electrical Connection
Fig. 179 Master Cylinder Brake Fluid Level Sensor
NSBRAKES 5 - 71
DISASSEMBLY AND ASSEMBLY (Continued)
Page 165 of 1938
BRAKE ACTUATION SYSTEM
ACTUATION:
Vacuum Operated Power Brakes.........Standard
Hydraulic System...........Dual-Diagonally Split
Antilock Brake Sytem (Teves Mark-20)...........
MASTER CYLINDER ASSEMBLY:
Supplier..............................Bosch
Type For Non-ABSAnd
ABS Brakes. . . .Conventional Compensating Port
Type For ABS Brakes
With Traction Control . . .Dual Center Port Design
Body Material...............Anodized Aluminum
Reservoir Material................Polypropelene
MASTER CYLINDER BORE /
STROKE AND SPLIT:
ABS W/Disc/Drum Brakes......23.8 mm x 36 mm
(.937 in. x 1.47 in.)
AWD W/Disc/Disc Brakes........25.4 mm x 39 mm
(1.00 in. x 1.50 in.)
Displacement Split.....................50/50
MASTER CYLINDER FLUID OUTLET PORTS:
Non-ABS And ABS . . .Primary 7/16±24 Secondary 7/
16±24
ABS With Traction Control.......Primary M12 x 1
Secondary M12 x 1
Outlet Fitting Type Non-ABS
AndABS...........Double Wall Inverted Flare
Outlet Fitting Type ABS With
Traction Control...................ISO Flare
ABS HYDRAULIC CONTROL UNIT:
Hydraulic Tube Fitting Type............ISO Flare
BOOSTER:
Make/Type.................Bosch Vacuum Assist
Mounting Studs.....................M8x1.25
Type .........................270 ZLT RSMV
Boost At 20 inches Of
Manifold Vacuum...........3800 N´m (850 lbs.)
PROPORTIONING VALVE:
Material...........................Aluminum
Function....................Hydraulic Pressure
Proportioning To Rear Brakes
BRAKE PEDAL
Pedal Ratio.............................3.36
BRAKE FASTENER TORQUE SPECIFICATIONS
DESCRIPTION TORQUE
BRAKE TUBES:
Tube Nuts To Fittings And
Components..............17N´m(145 in. lbs.)
BRAKE HOSE:
To Caliper Banjo Bolt..........48N´m(35ft.lbs.)
Intermediate Bracket.........12N´m(105 in. lbs.)
MASTER CYLINDER:
To Vacuum Booster
Mounting Nut............25N´m(225 in. lbs.)
FIXED PROPORTIONING VALVE:
To Frame Rail Attaching
Bolts....................14N´m(125 in. lbs.)
HEIGHT SENSING PROPORTIONING VALVE:
To Mounting Bracket
Attaching Bolts...........23N´m(200 in. lbs.)
Actuator Assembly
Adjustment Nut.............5N´m(45in.lbs.)
Mounting Bracket To Frame
Rail Bolts................17N´m(150 in. lbs.)
JUNCTION BLOCK (NON-ABS BRAKES)
To Suspension Cradle
Mounting Bolt............28N´m(250 in. lbs.)
VACUUM BOOSTER:
To Dash Panel Mounting
Nuts....................28N´m(250 in. lbs.)
REAR WHEEL CYLINDER:
To Support Plate Mounting
Bolts.....................8N´m(75in.lbs.)
Bleeder Screw...............10N´m(80in.lbs.)
BRAKE SUPPORT PLATE:
To Rear Axle Mounting Bolts . . .130 N´m (95 ft. lbs.)
DISC BRAKE CALIPER:
Guide Pin Bolts..............41N´m(30ft.lbs.)
Bleeder Screw..............15N´m(125 in. lbs.)
ABS HYDRAULIC CONTROL UNIT:
Mounting Bracket To
Suspension Cradle Bolts.....28N´m(250 in. lbs.)
To Mounting Bracket Isolator
Attaching Bolts............11N´m(97in.lbs.)
CAB To HCU Mounting Screws . . .2 N´m (17 in. lbs.)
WHEEL SPEED SENSOR:
To Axle Or Steering Knuckle
Mounting Bolt............12N´m(105 in. lbs.)
PARKING BRAKE:
Pedal Assembly Mounting
Bolts....................28N´m(250 in. lbs.)
REAR HUB AND BEARING:
To Axle Mounting Bolts........129 N´m (95 ft. lbs.)
WHEEL:
Stud Lug Nut........115±156 N´m (84-115 ft. lbs.)
NSBRAKES 5 - 83
SPECIFICATIONS (Continued)
Page 167 of 1938
ANTILOCK BRAKE SYSTEM ± TEVES MARK-20
INDEX
page page
DESCRIPTION AND OPERATION
ABS BRAKE SYSTEM COMPONENTS........ 87
ABS BRAKES COMPONENT
ABBREVIATION LIST.................... 85
ABS BRAKES OPERATION AND VEHICLE
PERFORMANCE....................... 86
ABS FUSES............................ 89
ABS MASTER CYLINDER AND POWER
BRAKE BOOSTER..................... 87
ABS RELAYS........................... 89
ABS WARNING LAMP (YELLOW)............ 91
ANTILOCK BRAKES OPERATION
DESCRIPTION........................ 85
ASR VALVE (ABS WITH TRACTION
CONTROL ONLY)...................... 88
CONTROLLER ANTILOCK BRAKES (CAB)..... 90
HCU BRAKE FLUID ACCUMULATORS AND
NOISE DAMPING CHAMBER............. 88
HCU PUMP/MOTOR..................... 89
HYDRAULIC CIRCUITS AND VALVE
OPERATION.......................... 92
INLET VALVES AND SOLENOIDS............ 88
INTEGRATED CONTROL UNIT (ICU)......... 87
OUTLET VALVES AND SOLENOIDS.......... 88
PROPORTIONING VALVES................ 89
WHEEL SPEED SENSORS................. 89
DIAGNOSIS AND TESTING
ABS BRAKE DIAGNOSTIC TOOL
CONNECTOR......................... 96
ABS DIAGNOSTIC TROUBLE CODES........ 97
ABS DIAGNOSTICS MANUAL.............. 96ABS GENERAL DIAGNOSTICS
INFORMATION........................ 95
ABS SERVICE PRECAUTIONS.............. 99
ABS SYSTEM SELF DIAGNOSTICS.......... 96
ABS WIRING DIAGRAM INFORMATION....... 95
BRAKE FLUID CONTAMINATION............ 98
DRB DIAGNOSTIC SCAN TOOL USAGE...... 96
INTERMITTENT DIAGNOSTIC TROUBLE
CODES.............................. 97
PROPORTIONING VALVE................. 98
TEST DRIVING ABS COMPLAINT VEHICLE.... 98
TONEWHEEL INSPECTION................ 98
SERVICE PROCEDURES
BLEEDING TEVES MARK 20 HYDRAULIC
SYSTEM............................. 99
BRAKE FLUID LEVEL INSPECTION.......... 99
REMOVAL AND INSTALLATION
ABS GENERAL SERVICE PRECAUTIONS.... 100
CONTROLLER ANTILOCK BRAKES (CAB).... 103
HYDRAULIC CONTROL UNIT.............. 100
TONE WHEEL (REAR AWD)............... 111
TONE WHEEL (REAR FWD)............... 110
WHEEL SPEED SENSOR (FRONT)......... 105
WHEEL SPEED SENSOR (REAR AWD)...... 108
WHEEL SPEED SENSOR (REAR FWD)...... 106
SPECIFICATIONS
BRAKE FASTENER TORQUE
SPECIFICATIONS..................... 112
SPEED SENSOR TONE WHEEL RUNOUT.... 112
WHEEL SPEED SENSOR TO TONE
WHEEL CLEARANCE.................. 112
DESCRIPTION AND OPERATION
ANTILOCK BRAKES OPERATION DESCRIPTION
The purpose of an Antilock Brake System (ABS) is to
prevent wheel lock-up under braking conditions on virtu-
ally any type of road surface. Antilock Braking is desirable
because a vehicle which is stopped without locking the
wheels will retain directional stability and some steering
capability. This allows the driver to retain greater control
of the vehicle during braking.
This section of the service manual covers the description
and on car service for the ITT Teves Mark 20 ABS Brake
System and the ITT Teves Mark 20 ABS Brake System
with Traction Control. If other service is required on the
non ABS related components of the brake system, refer to
the appropriate section in this group of the service manual
for the specific service procedure required.
ABS BRAKES COMPONENT ABBREVIATION LIST
In this section of the service manual, several
abbreviations are used for the components of the
Teves Mark 20 ABS Brake System and the Teves
Mark 20 ABS Brake System with Traction Control.
They are listed below for your reference.
²CAB±Controller Antilock Brake
²ICU±Integrated Control Unit
²HCU±Hydraulic Control Unit
²TCS±Traction Control
²ABS±Antilock Brake System
²PSI±Pounds Per Square Inch (pressure)
²WSS±Wheel Speed Sensor
²FWD±Front Wheel Drive
²AWD±All Wheel Drive
²DTC±Diagnostic Trouble Code
NSBRAKES 5 - 85
Page 168 of 1938
ABS BRAKES OPERATION AND VEHICLE
PERFORMANCE
This ABS System represents the current state-of-
the-art in vehicle braking systems and offers the
driver increased safety and control during braking.
This is accomplished by a sophisticated system of
electrical and hydraulic components. As a result,
there are a few performance characteristics that may
at first seem different but should be considered nor-
mal. These characteristics are discussed below.
NORMAL BRAKING SYSTEM FUNCTION
Under normal braking conditions, the ABS System
functions the same as a standard brake system with
a diagonally split master cylinder and conventional
vacuum assist.
ABS SYSTEM OPERATION
If a wheel locking tendency is detected during a
brake application, the brake system will enter the
ABS mode. During ABS braking, hydraulic pressure
in the four wheel circuits is modulated to prevent
any wheel from locking. Each wheel circuit is
designed with a set of electric solenoids to allow mod-
ulation, although for vehicle stability, both rear
wheel solenoids receive the same electrical signal.
During an ABS stop, the brakes hydraulic system
is still diagonally split. However, the brake system
pressure is further split into four control channels.
During antilock operation of the vehicle's brake sys-
tem the front wheels are controlled independently
and are on two separate control channels and the
rear wheels of the vehicle are controlled together.
The system can build and release pressure at each
wheel, depending on signals generated by the wheel
speed sensors (WSS) at each wheel and received at
the Controller Antilock Brake (CAB).
ABS operation is available at all vehicle speeds
above 3 to 5 mph. Wheel lockup may be perceived at
the very end of an ABS stop and is considered nor-
mal.
VEHICLE HANDLING PERFORMANCE DURING
ABS BRAKING
It is important to remember that an antilock brake
system does not shorten a vehicle's stopping distance
under all driving conditions, but does provide
improved control of the vehicle while stopping. Vehi-
cle stopping distance is still dependent on vehicle
speed, weight, tires, road surfaces and other factors.
Though ABS provides the driver with some steer-
ing control during hard braking, there are conditions
however, where the system does not provide any ben-
efit. In particular, hydroplaning is still possible when
the tires ride on a film of water. This results in the
vehicles tires leaving the road surface rendering the
vehicle virtually uncontrollable. In addition, extremesteering maneuvers at high speed or high speed cor-
nering beyond the limits of tire adhesion to the road
surface may cause vehicle skidding, independent of
vehicle braking. For this reason, the ABS system is
termed Antilock instead of Anti-Skid.
NOISE AND BRAKE PEDAL FEEL
During ABS braking, some brake pedal movement
may be felt. In addition, ABS braking will create
ticking, popping and/or groaning noises heard by the
driver. This is normal due to pressurized fluid being
transferred between the master cylinder and the
brakes. If ABS operation occurs during hard braking,
some pulsation may be felt in the vehicle body due to
fore and aft movement of the suspension as brake
pressures are modulated.
At the end of an ABS stop, ABS will be turned off
when the vehicle is slowed to a speed of 3±4 mph.
There may be a slight brake pedal drop anytime that
the ABS is deactivated, such as at the end of the stop
when the vehicle speed is less then 3 mph or during
an ABS stop where ABS is no longer required. These
conditions will exist when a vehicle is being stopped
on a road surface with patches of ice, loose gravel or
sand on it. Also stopping a vehicle on a bumpy road
surface will activate ABS because of the wheel hop
caused by the bumps.
TIRE NOISE AND MARKS
Although the ABS system prevents complete wheel
lock-up, some wheel slip is desired in order to
achieve optimum braking performance. Wheel slip is
defined as follows, 0 percent slip means the wheel is
rolling freely and 100 percent slip means the wheel is
fully locked. During brake pressure modulation,
wheel slip is allowed to reach up to 25 to30%. This
means that the wheel rolling velocity is 25 to 30%
less than that of a free rolling wheel at a given vehi-
cle speed. This slip may result in some tire chirping,
depending on the road surface. This sound should not
be interpreted as total wheel lock-up.
Complete wheel lock up normally leaves black tire
marks on dry pavement. The ABS System will not
leave dark black tire marks since the wheel never
reaches a fully locked condition. Tire marks may
however be noticeable as light patched marks.
START UP CYCLE
When the ignition is turned on, a popping sound
and a slight brake pedal movement may be noticed.
Additionally, when the vehicle is first driven off a
humming may be heard and/or felt by the driver at
approximately 20 to 40 kph (12 to 25 mph). The ABS
warning lamp will also be on for up to 5 seconds
after the ignition is turned on. All of these conditions
are a normal function of ABS as the system is per-
forming a diagnosis check.
5 - 86 BRAKESNS
DESCRIPTION AND OPERATION (Continued)
Page 169 of 1938
PREMATURE ABS CYCLING
NOTE: When working on a vehicle which has a
complaint of premature ABS cycling it may be nec-
essary to use a DRB Scan Tool to detect and verify
the condition.
There is one complaint called Premature ABS
Cycling in which neither the Red Brake Warning
Lamp nor the Amber Antilock Lamp were illumi-
nated and no fault codes were stored in the CAB.
Symptoms of Premature ABS Cycling, include click-
ing sounds from the solenoids valves, pump motor
running and pulsations in the brake pedal. This con-
dition can occur at any braking rate of the vehicle
and on any type of road surface. This creates an
additional condition which needs to be correctly
assessed when diagnosing problems with the antilock
brake system.
The following conditions are common causes that
need to be checked when diagnosing a condition of
Premature ABS Cycling. Damaged tone wheels,
incorrect tone wheels, damage to a wheel speed sen-
sor mounting boss on a steering knuckle, a loose
wheel speed sensor mounting bolt, and excessive tone
wheel runout. Also, an excessively large tone wheel
to wheel speed sensor air gap can lead to the condi-
tion of Premature ABS Cycling. Special attention is
to be given to these components when diagnosing a
vehicle exhibiting the condition of Premature ABS
Cycling. After diagnosing the defective component,
repair or replace as required.
When the component repair or replacement is com-
pleted, test drive the vehicle to verify the condition of
Premature ABS Cycling has been corrected.
ABS BRAKE SYSTEM COMPONENTS
The following is a detailed description of the Teves
Mark 20 ABS brake system components. For infor-
mation on servicing the base brake system compo-
nents, see the base Brake System section of this
Service Manual.
ABS MASTER CYLINDER AND POWER BRAKE
BOOSTER
A vehicle equipped with Teves Mark 20 ABS
without optional traction control uses the same
type of a master cylinder and power brake
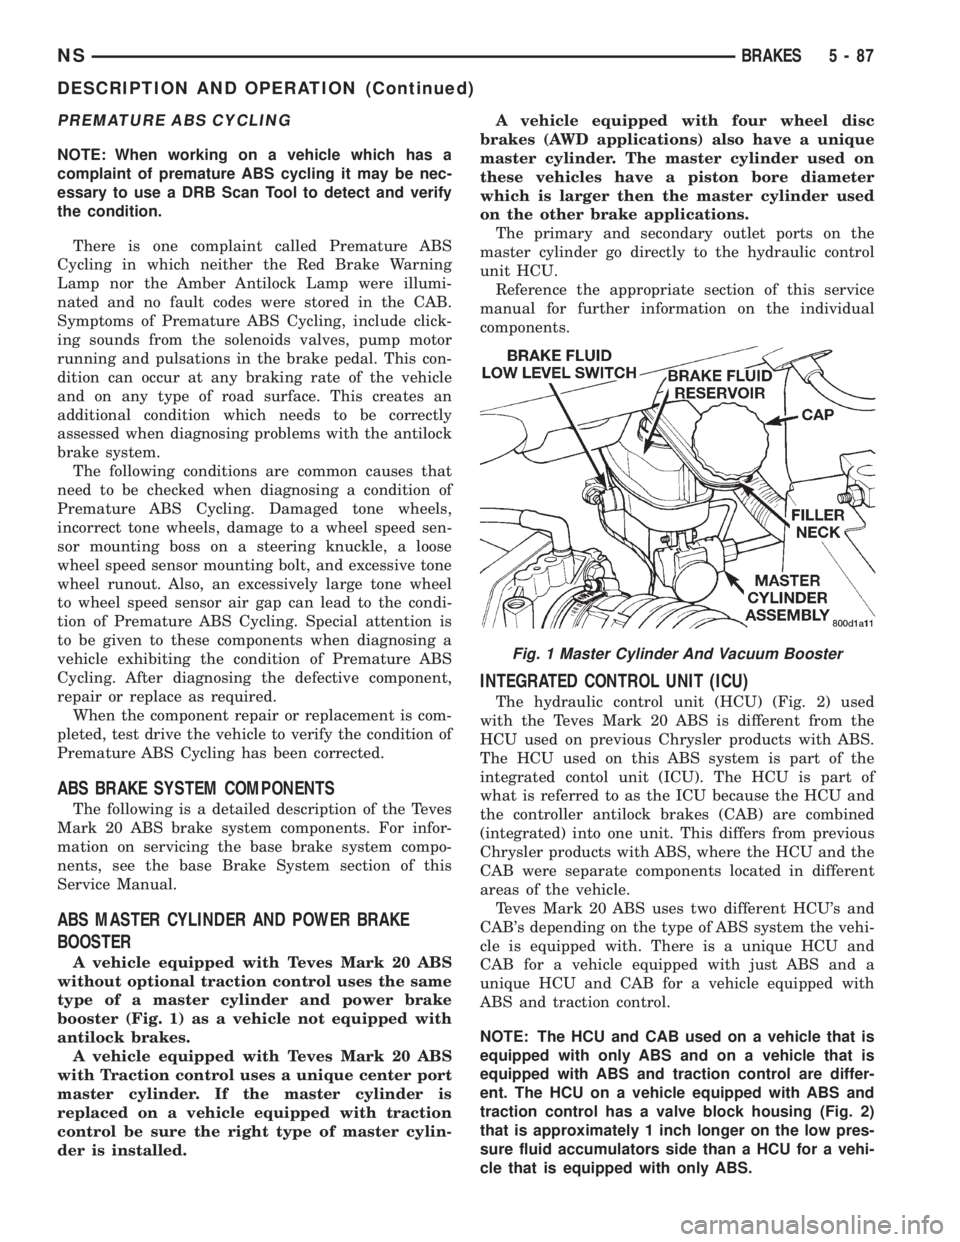
booster (Fig. 1) as a vehicle not equipped with
antilock brakes.
A vehicle equipped with Teves Mark 20 ABS
with Traction control uses a unique center port
master cylinder. If the master cylinder is
replaced on a vehicle equipped with traction
control be sure the right type of master cylin-
der is installed.A vehicle equipped with four wheel disc
brakes (AWD applications) also have a unique
master cylinder. The master cylinder used on
these vehicles have a piston bore diameter
which is larger then the master cylinder used
on the other brake applications.
The primary and secondary outlet ports on the
master cylinder go directly to the hydraulic control
unit HCU.
Reference the appropriate section of this service
manual for further information on the individual
components.
INTEGRATED CONTROL UNIT (ICU)
The hydraulic control unit (HCU) (Fig. 2) used
with the Teves Mark 20 ABS is different from the
HCU used on previous Chrysler products with ABS.
The HCU used on this ABS system is part of the
integrated contol unit (ICU). The HCU is part of
what is referred to as the ICU because the HCU and
the controller antilock brakes (CAB) are combined
(integrated) into one unit. This differs from previous
Chrysler products with ABS, where the HCU and the
CAB were separate components located in different
areas of the vehicle.
Teves Mark 20 ABS uses two different HCU's and
CAB's depending on the type of ABS system the vehi-
cle is equipped with. There is a unique HCU and
CAB for a vehicle equipped with just ABS and a
unique HCU and CAB for a vehicle equipped with
ABS and traction control.
NOTE: The HCU and CAB used on a vehicle that is
equipped with only ABS and on a vehicle that is
equipped with ABS and traction control are differ-
ent. The HCU on a vehicle equipped with ABS and
traction control has a valve block housing (Fig. 2)
that is approximately 1 inch longer on the low pres-
sure fluid accumulators side than a HCU for a vehi-
cle that is equipped with only ABS.
Fig. 1 Master Cylinder And Vacuum Booster
NSBRAKES 5 - 87
DESCRIPTION AND OPERATION (Continued)
Page 171 of 1938
fluid accumulators temporarily store brake fluid that
is decayed from the wheel brakes during an ABS
cycle. This stored brake fluid is then used by the
pump in the HCU to provide build pressure for the
brake hydraulic system.
Additionally on vehicles that are equipped with
only ABS (non-traction control vehicles) there is a
mini brake fluid accumulator on the secondary
hydraulic circuit which protects the master cylinder's
seals during an ABS stop. There is also a noise
damping chamber on the primary hydraulic circuit.
On ABS equipped vehicles with traction control, in
addition to the brake fluid accumulators there are
also two noise damping chambers in the HCU.
HCU PUMP/MOTOR
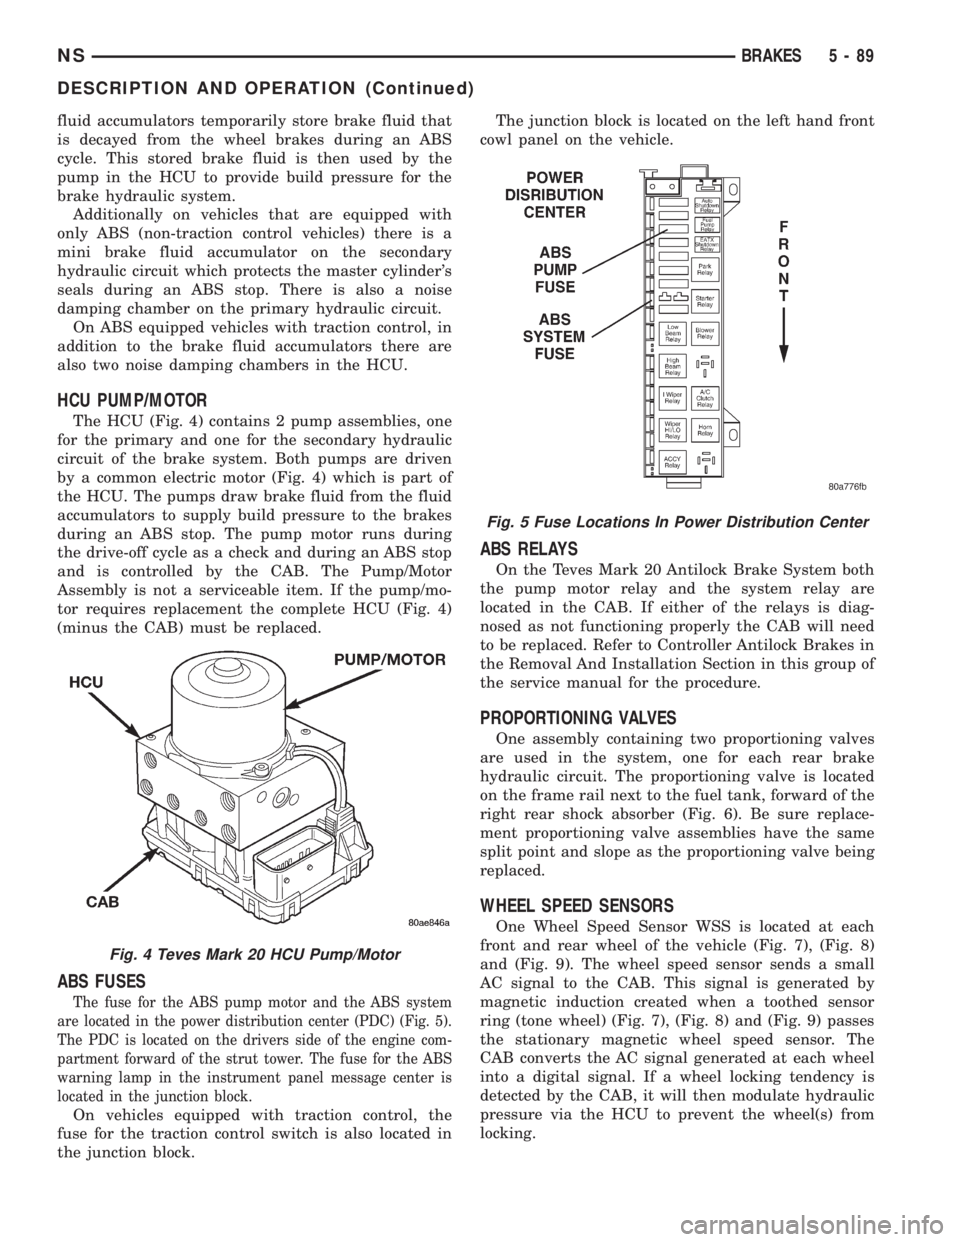
The HCU (Fig. 4) contains 2 pump assemblies, one
for the primary and one for the secondary hydraulic
circuit of the brake system. Both pumps are driven
by a common electric motor (Fig. 4) which is part of
the HCU. The pumps draw brake fluid from the fluid
accumulators to supply build pressure to the brakes
during an ABS stop. The pump motor runs during
the drive-off cycle as a check and during an ABS stop
and is controlled by the CAB. The Pump/Motor
Assembly is not a serviceable item. If the pump/mo-
tor requires replacement the complete HCU (Fig. 4)
(minus the CAB) must be replaced.
ABS FUSES
The fuse for the ABS pump motor and the ABS system
are located in the power distribution center (PDC) (Fig. 5).
The PDC is located on the drivers side of the engine com-
partment forward of the strut tower. The fuse for the ABS
warning lamp in the instrument panel message center is
located in the junction block.
On vehicles equipped with traction control, the
fuse for the traction control switch is also located in
the junction block.The junction block is located on the left hand front
cowl panel on the vehicle.
ABS RELAYS
On the Teves Mark 20 Antilock Brake System both
the pump motor relay and the system relay are
located in the CAB. If either of the relays is diag-
nosed as not functioning properly the CAB will need
to be replaced. Refer to Controller Antilock Brakes in
the Removal And Installation Section in this group of
the service manual for the procedure.
PROPORTIONING VALVES
One assembly containing two proportioning valves
are used in the system, one for each rear brake
hydraulic circuit. The proportioning valve is located
on the frame rail next to the fuel tank, forward of the
right rear shock absorber (Fig. 6). Be sure replace-
ment proportioning valve assemblies have the same
split point and slope as the proportioning valve being
replaced.
WHEEL SPEED SENSORS
One Wheel Speed Sensor WSS is located at each
front and rear wheel of the vehicle (Fig. 7), (Fig. 8)
and (Fig. 9). The wheel speed sensor sends a small
AC signal to the CAB. This signal is generated by
magnetic induction created when a toothed sensor
ring (tone wheel) (Fig. 7), (Fig. 8) and (Fig. 9) passes
the stationary magnetic wheel speed sensor. The
CAB converts the AC signal generated at each wheel
into a digital signal. If a wheel locking tendency is
detected by the CAB, it will then modulate hydraulic
pressure via the HCU to prevent the wheel(s) from
locking.
Fig. 4 Teves Mark 20 HCU Pump/Motor
Fig. 5 Fuse Locations In Power Distribution Center
NSBRAKES 5 - 89
DESCRIPTION AND OPERATION (Continued)