torque CHRYSLER VOYAGER 1996 Owner's Guide
[x] Cancel search | Manufacturer: CHRYSLER, Model Year: 1996, Model line: VOYAGER, Model: CHRYSLER VOYAGER 1996Pages: 1938, PDF Size: 55.84 MB
Page 80 of 1938
(2) Install a jackstand under the side of the axle
having the leaf spring mount removed. Using the
jackstand, support the weight of the axle and leaf
spring.
(3) Remove the lower mounting bolt from the
shock absorber.
(4) Remove the bolts attaching the leaf spring rear
mount to the body of the vehicle (Fig. 29).
(5) Lower the jackstand and the rear of the leaf
spring. Remove the shackle from the leaf spring
bushing.
INSTALL
CAUTION: The following sequence must be fol-
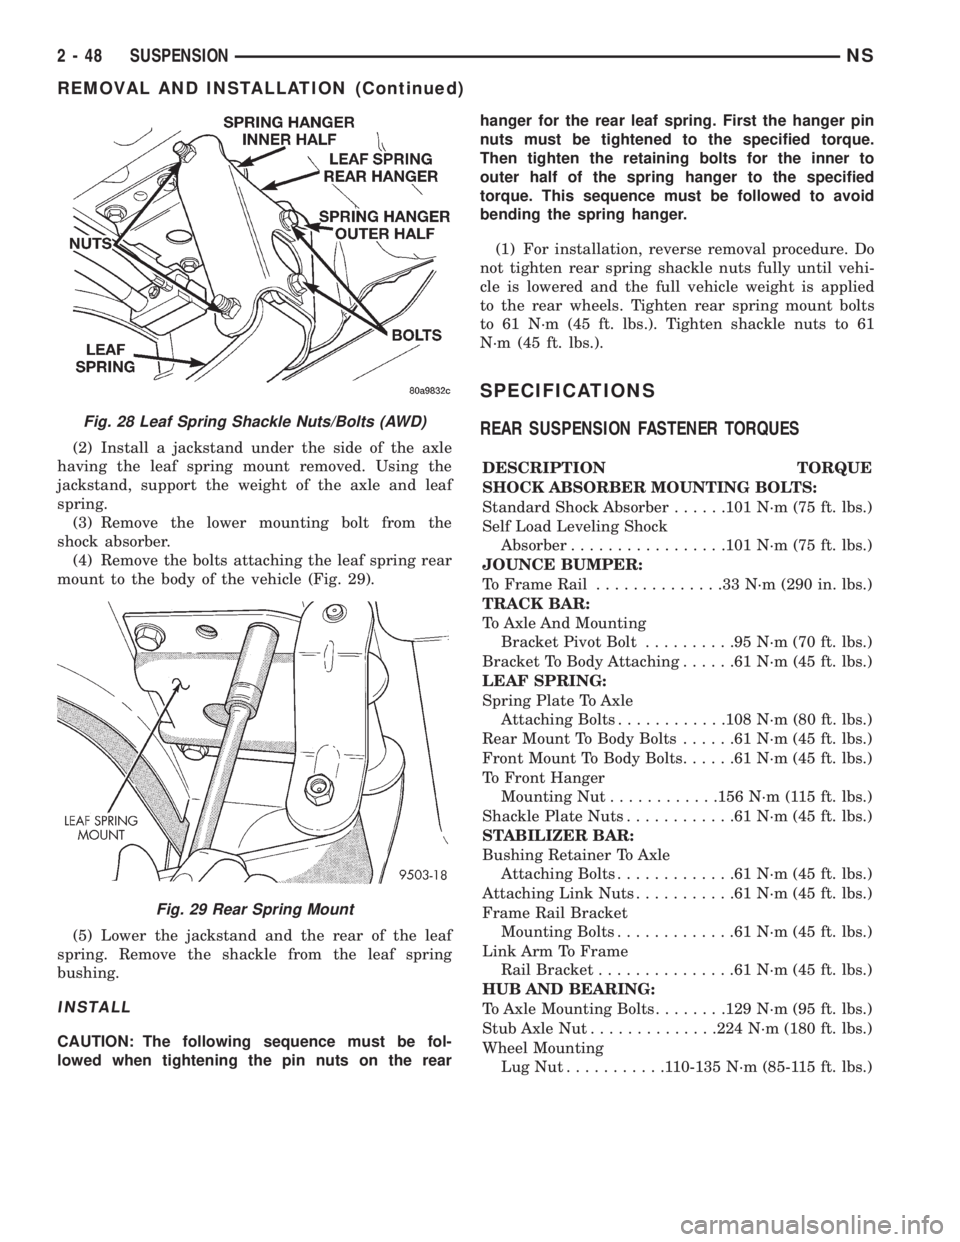
lowed when tightening the pin nuts on the rearhanger for the rear leaf spring. First the hanger pin
nuts must be tightened to the specified torque.
Then tighten the retaining bolts for the inner to
outer half of the spring hanger to the specified
torque. This sequence must be followed to avoid
bending the spring hanger.
(1) For installation, reverse removal procedure. Do
not tighten rear spring shackle nuts fully until vehi-
cle is lowered and the full vehicle weight is applied
to the rear wheels. Tighten rear spring mount bolts
to 61 N´m (45 ft. lbs.). Tighten shackle nuts to 61
N´m (45 ft. lbs.).
SPECIFICATIONS
REAR SUSPENSION FASTENER TORQUES
DESCRIPTION TORQUE
SHOCK ABSORBER MOUNTING BOLTS:
Standard Shock Absorber......101 N´m (75 ft. lbs.)
Self Load Leveling Shock
Absorber.................101 N´m (75 ft. lbs.)
JOUNCE BUMPER:
To Frame Rail..............33N´m(290 in. lbs.)
TRACK BAR:
To Axle And Mounting
Bracket Pivot Bolt..........95N´m(70ft.lbs.)
Bracket To Body Attaching......61N´m(45ft.lbs.)
LEAF SPRING:
Spring Plate To Axle
Attaching Bolts............108 N´m (80 ft. lbs.)
Rear Mount To Body Bolts......61N´m(45ft.lbs.)
Front Mount To Body Bolts......61N´m(45ft.lbs.)
To Front Hanger
Mounting Nut............156 N´m (115 ft. lbs.)
Shackle Plate Nuts............61N´m(45ft.lbs.)
STABILIZER BAR:
Bushing Retainer To Axle
Attaching Bolts.............61N´m(45ft.lbs.)
Attaching Link Nuts...........61N´m(45ft.lbs.)
Frame Rail Bracket
Mounting Bolts.............61N´m(45ft.lbs.)
Link Arm To Frame
Rail Bracket...............61N´m(45ft.lbs.)
HUB AND BEARING:
To Axle Mounting Bolts........129 N´m (95 ft. lbs.)
Stub Axle Nut..............224 N´m (180 ft. lbs.)
Wheel Mounting
LugNut...........110-135 N´m (85-115 ft. lbs.)
Fig. 28 Leaf Spring Shackle Nuts/Bolts (AWD)
Fig. 29 Rear Spring Mount
2 - 48 SUSPENSIONNS
REMOVAL AND INSTALLATION (Continued)
Page 85 of 1938
BASE BRAKE SYSTEM
INDEX
page page
DESCRIPTION AND OPERATION
CHASSIS TUBES AND HOSES.............. 7
FRONT DISC BRAKE SYSTEM.............. 4
HUB/BEARING REAR WHEEL............... 9
MASTER CYLINDER...................... 7
PARKING BRAKE SYSTEM OPERATION....... 5
POWER BRAKE VACUUM BOOSTER
OPERATION........................... 8
PROPORTIONING VALVES................. 5
REAR DISC BRAKES...................... 5
REAR DRUM BRAKES..................... 5
RED BRAKE WARNING LAMP OPERATION..... 8
STOP LAMP SWITCH...................... 9
DIAGNOSIS AND TESTING
ADJUSTER REAR DRUM BRAKE
(AUTOMATIC)......................... 14
BRAKE FLUID CONTAMINATION............ 19
BRAKE ROTOR......................... 14
BRAKE SYSTEM BASIC DIAGNOSIS GUIDE.... 9
BRAKE SYSTEM DIAGNOSIS CHARTS....... 10
PROPORTIONING VALVES................ 16
RED BRAKE WARNING LAMP TEST......... 19
STOP LAMP SWITCH TEST PROCEDURE..... 19
TRACTION CONTROL LAMP TEST.......... 19
SERVICE PROCEDURES
BLEEDING BASE BRAKE
HYDRAULIC SYSTEM................... 20
BRAKE DRUM MACHINING................ 24
BRAKE TUBE REPAIR PROCEDURE......... 24
MASTER CYLINDER BLEEDING
PROCEDURE......................... 22
MASTER CYLINDER FLUID LEVEL CHECK.... 20
PARK BRAKE AUTO ADJUSTER
MECHANISM RELEASE................. 26
ROTOR MACHINING (FRONT/REAR)......... 22
REMOVAL AND INSTALLATION
BRAKE SUPPORT PLATE (REAR DRUM
BRAKES)............................ 37
FRONT DISC BRAKE CALIPER............. 27
FRONT DISC BRAKE PADS................ 30
FRONT PARK BRAKE CABLE.............. 65
HUB/BEARING.......................... 40
HYDRAULIC BRAKE TUBES AND HOSES..... 58
INTERMEDIATE PARK BRAKE CABLE....... 66
JUNCTION BLOCK....................... 55
LEFT REAR PARK BRAKE CABLE........... 67
MASTER CYLINDER..................... 44
PARK BRAKE PEDAL MECHANISM.......... 58PARK BRAKE SHOES (WITH REAR DISC
BRAKES)............................ 60
PROPORTIONING VALVE (W/ABS BRAKES) . . . 56
PROPORTIONING VALVE
(W/O ABS BRAKES).................... 57
REAR BRAKE DRUM..................... 33
REAR BRAKE WHEEL CYLINDER........... 39
REAR DISC BRAKE CALIPER.............. 28
REAR DISC BRAKE SHOES................ 31
REAR DRUM BRAKE SHOES............... 34
RIGHT REAR PARK BRAKE CABLE......... 66
STOP LAMP SWITCH..................... 69
VACUUM BOOSTER 2.4 LITER ENGINE...... 47
VACUUM BOOSTER 3.0 LITER ENGINE...... 49
VACUUM BOOSTER 3.3/3.8 LITER ENGINE.... 52
WHEEL AND TIRE INSTALLATION........... 27
DISASSEMBLY AND ASSEMBLY
FRONT DISC BRAKE CALIPER............. 71
MASTER CYLINDER BRAKE FLUID LEVEL
SWITCH............................. 71
MASTER CYLINDER FLUID RESERVOIR
FILL TUBE............................ 71
MASTER CYLINDER FLUID RESERVOIR...... 70
MASTER CYLINDER TO POWER BRAKE
BOOSTER VACUUM SEAL............... 69
WHEEL CYLINDER REAR DRUM BRAKE...... 76
CLEANING AND INSPECTION
BRAKE HOSE AND BRAKE LINES
INSPECTION.......................... 78
FRONT DISC BRAKE PAD LINING
INSPECTION.......................... 76
REAR DISC BRAKES..................... 76
REAR DRUM BRAKE SHOE LINING
INSPECTION.......................... 77
REAR DRUM BRAKE WHEEL CYLINDER...... 78
REAR WHEEL HUB AND BEARING
ASSEMBLY........................... 78
ADJUSTMENTS
PARK BRAKE CABLE ADJUSTMENT......... 81
PARK BRAKE SHOES (WITH REAR DISC
BRAKES)............................ 79
PROPORTIONING VALVE
(HEIGHT SENSING).................... 81
REAR DRUM BRAKE SHOE ADJUSTMENT.... 79
STOP LAMP SWITCH..................... 78
SPECIFICATIONS
BRAKE ACTUATION SYSTEM.............. 83
BRAKE FASTENER TORQUE
SPECIFICATIONS...................... 83
NSBRAKES 5 - 3
Page 97 of 1938
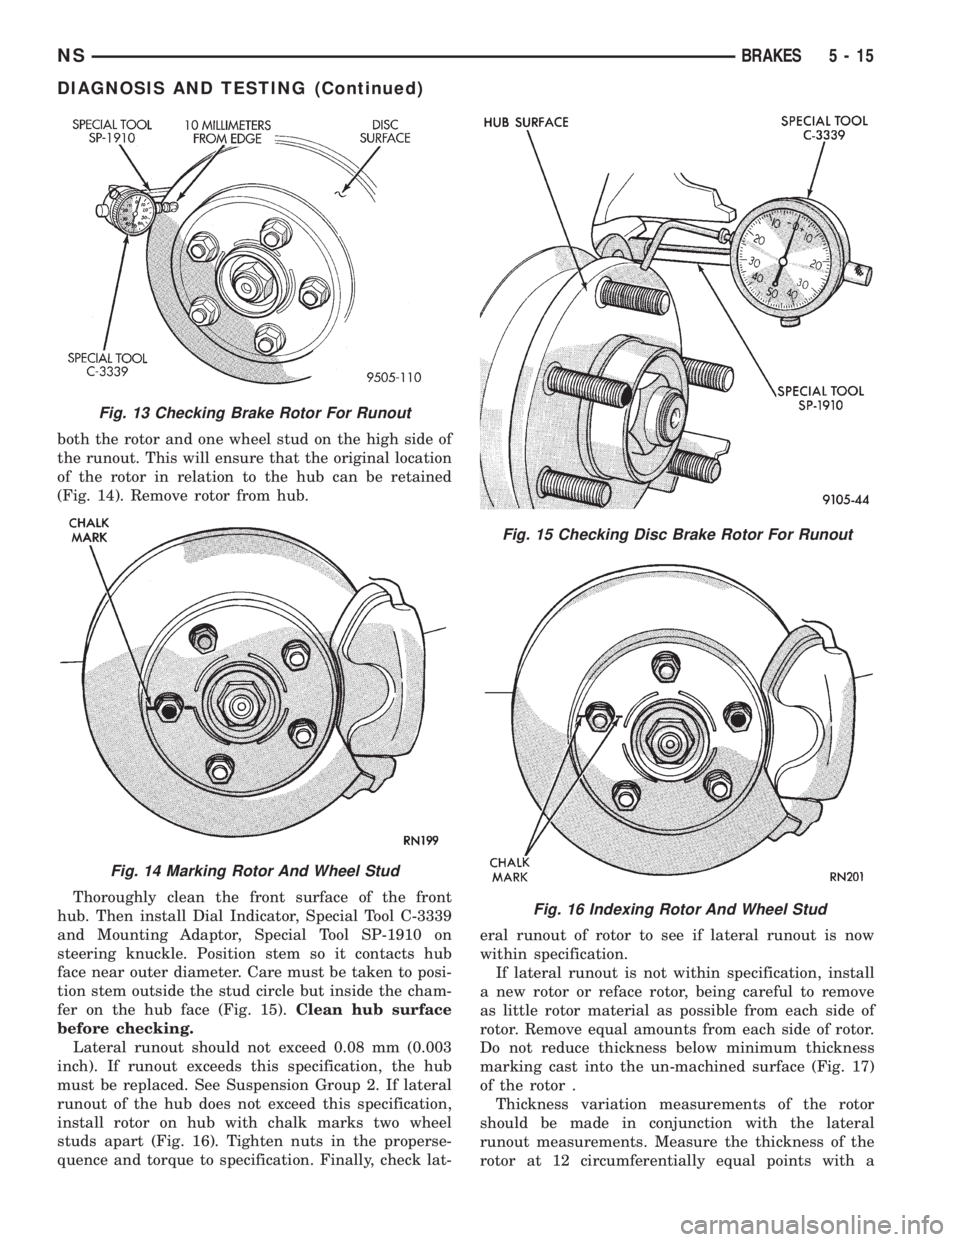
both the rotor and one wheel stud on the high side of
the runout. This will ensure that the original location
of the rotor in relation to the hub can be retained
(Fig. 14). Remove rotor from hub.
Thoroughly clean the front surface of the front
hub. Then install Dial Indicator, Special Tool C-3339
and Mounting Adaptor, Special Tool SP-1910 on
steering knuckle. Position stem so it contacts hub
face near outer diameter. Care must be taken to posi-
tion stem outside the stud circle but inside the cham-
fer on the hub face (Fig. 15).Clean hub surface
before checking.
Lateral runout should not exceed 0.08 mm (0.003
inch). If runout exceeds this specification, the hub
must be replaced. See Suspension Group 2. If lateral
runout of the hub does not exceed this specification,
install rotor on hub with chalk marks two wheel
studs apart (Fig. 16). Tighten nuts in the properse-
quence and torque to specification. Finally, check lat-eral runout of rotor to see if lateral runout is now
within specification.
If lateral runout is not within specification, install
a new rotor or reface rotor, being careful to remove
as little rotor material as possible from each side of
rotor. Remove equal amounts from each side of rotor.
Do not reduce thickness below minimum thickness
marking cast into the un-machined surface (Fig. 17)
of the rotor .
Thickness variation measurements of the rotor
should be made in conjunction with the lateral
runout measurements. Measure the thickness of the
rotor at 12 circumferentially equal points with a
Fig. 16 Indexing Rotor And Wheel Stud
Fig. 13 Checking Brake Rotor For Runout
Fig. 14 Marking Rotor And Wheel Stud
Fig. 15 Checking Disc Brake Rotor For Runout
NSBRAKES 5 - 15
DIAGNOSIS AND TESTING (Continued)
Page 109 of 1938
(4) Remove the locking pliers from the front park
brake cable. This will allow the adjuster in the park
brake pedal mechanism to rotate around to its stop.
This will remove the tension from the adjuster and
front park brake cable.
Use the following procedure to reset the auto
adjuster in the park brake pedal mechanism.
(5) Grasp the exposed section of the front park
brake cable and pull rearward on it. While holding
the park brake in this position, install a pair of lock-
ing pliers on the front park brake cable just rearward
of the second body outrigger bracket (Fig. 42).
(6) Install the equalizer on the front park brake
cable.
(7) Install the left rear and intermediate park
brake cable in the correct location on the park brake
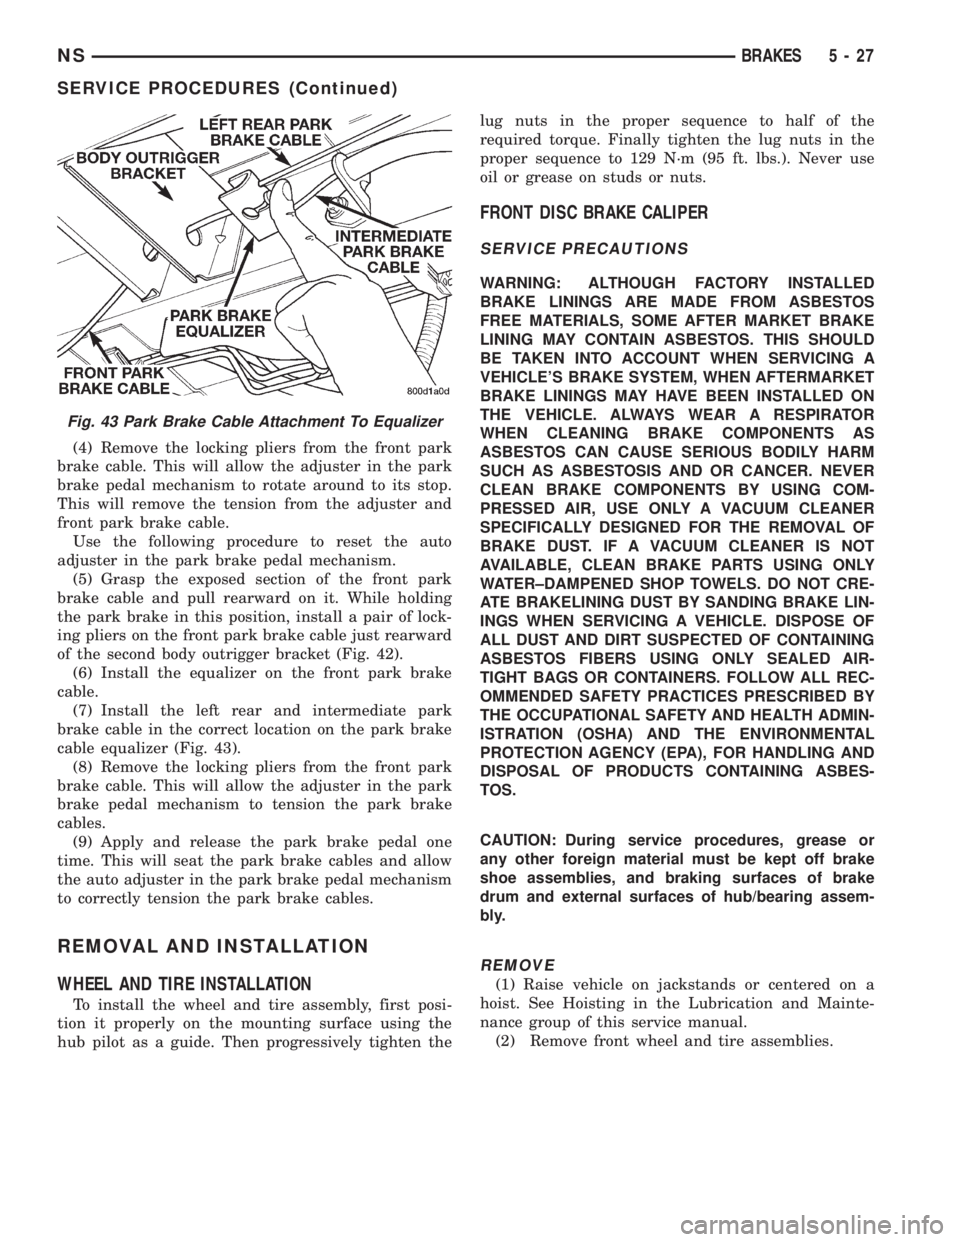
cable equalizer (Fig. 43).
(8) Remove the locking pliers from the front park
brake cable. This will allow the adjuster in the park
brake pedal mechanism to tension the park brake
cables.
(9) Apply and release the park brake pedal one
time. This will seat the park brake cables and allow
the auto adjuster in the park brake pedal mechanism
to correctly tension the park brake cables.
REMOVAL AND INSTALLATION
WHEEL AND TIRE INSTALLATION
To install the wheel and tire assembly, first posi-
tion it properly on the mounting surface using the
hub pilot as a guide. Then progressively tighten thelug nuts in the proper sequence to half of the
required torque. Finally tighten the lug nuts in the
proper sequence to 129 N´m (95 ft. lbs.). Never use
oil or grease on studs or nuts.
FRONT DISC BRAKE CALIPER
SERVICE PRECAUTIONS
WARNING: ALTHOUGH FACTORY INSTALLED
BRAKE LININGS ARE MADE FROM ASBESTOS
FREE MATERIALS, SOME AFTER MARKET BRAKE
LINING MAY CONTAIN ASBESTOS. THIS SHOULD
BE TAKEN INTO ACCOUNT WHEN SERVICING A
VEHICLE'S BRAKE SYSTEM, WHEN AFTERMARKET
BRAKE LININGS MAY HAVE BEEN INSTALLED ON
THE VEHICLE. ALWAYS WEAR A RESPIRATOR
WHEN CLEANING BRAKE COMPONENTS AS
ASBESTOS CAN CAUSE SERIOUS BODILY HARM
SUCH AS ASBESTOSIS AND OR CANCER. NEVER
CLEAN BRAKE COMPONENTS BY USING COM-
PRESSED AIR, USE ONLY A VACUUM CLEANER
SPECIFICALLY DESIGNED FOR THE REMOVAL OF
BRAKE DUST. IF A VACUUM CLEANER IS NOT
AVAILABLE, CLEAN BRAKE PARTS USING ONLY
WATER±DAMPENED SHOP TOWELS. DO NOT CRE-
ATE BRAKELINING DUST BY SANDING BRAKE LIN-
INGS WHEN SERVICING A VEHICLE. DISPOSE OF
ALL DUST AND DIRT SUSPECTED OF CONTAINING
ASBESTOS FIBERS USING ONLY SEALED AIR-
TIGHT BAGS OR CONTAINERS. FOLLOW ALL REC-
OMMENDED SAFETY PRACTICES PRESCRIBED BY
THE OCCUPATIONAL SAFETY AND HEALTH ADMIN-
ISTRATION (OSHA) AND THE ENVIRONMENTAL
PROTECTION AGENCY (EPA), FOR HANDLING AND
DISPOSAL OF PRODUCTS CONTAINING ASBES-
TOS.
CAUTION: During service procedures, grease or
any other foreign material must be kept off brake
shoe assemblies, and braking surfaces of brake
drum and external surfaces of hub/bearing assem-
bly.
REMOVE
(1) Raise vehicle on jackstands or centered on a
hoist. See Hoisting in the Lubrication and Mainte-
nance group of this service manual.
(2) Remove front wheel and tire assemblies.
Fig. 43 Park Brake Cable Attachment To Equalizer
NSBRAKES 5 - 27
SERVICE PROCEDURES (Continued)
Page 110 of 1938
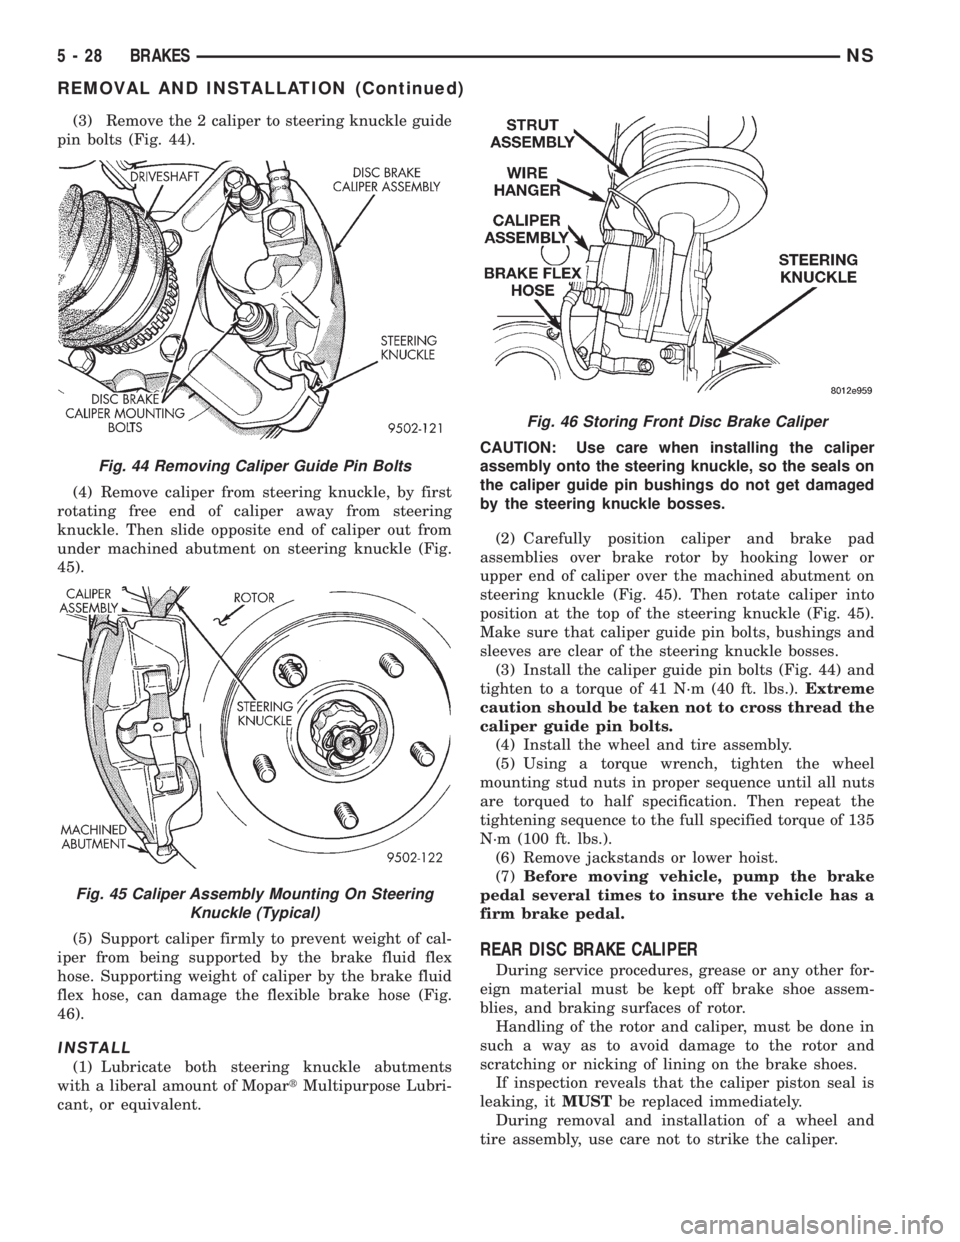
(3) Remove the 2 caliper to steering knuckle guide
pin bolts (Fig. 44).
(4) Remove caliper from steering knuckle, by first
rotating free end of caliper away from steering
knuckle. Then slide opposite end of caliper out from
under machined abutment on steering knuckle (Fig.
45).
(5) Support caliper firmly to prevent weight of cal-
iper from being supported by the brake fluid flex
hose. Supporting weight of caliper by the brake fluid
flex hose, can damage the flexible brake hose (Fig.
46).
INSTALL
(1) Lubricate both steering knuckle abutments
with a liberal amount of MopartMultipurpose Lubri-
cant, or equivalent.CAUTION: Use care when installing the caliper
assembly onto the steering knuckle, so the seals on
the caliper guide pin bushings do not get damaged
by the steering knuckle bosses.
(2) Carefully position caliper and brake pad
assemblies over brake rotor by hooking lower or
upper end of caliper over the machined abutment on
steering knuckle (Fig. 45). Then rotate caliper into
position at the top of the steering knuckle (Fig. 45).
Make sure that caliper guide pin bolts, bushings and
sleeves are clear of the steering knuckle bosses.
(3) Install the caliper guide pin bolts (Fig. 44) and
tighten to a torque of 41 N´m (40 ft. lbs.).Extreme
caution should be taken not to cross thread the
caliper guide pin bolts.
(4) Install the wheel and tire assembly.
(5) Using a torque wrench, tighten the wheel
mounting stud nuts in proper sequence until all nuts
are torqued to half specification. Then repeat the
tightening sequence to the full specified torque of 135
N´m (100 ft. lbs.).
(6) Remove jackstands or lower hoist.
(7)Before moving vehicle, pump the brake
pedal several times to insure the vehicle has a
firm brake pedal.
REAR DISC BRAKE CALIPER
During service procedures, grease or any other for-
eign material must be kept off brake shoe assem-
blies, and braking surfaces of rotor.
Handling of the rotor and caliper, must be done in
such a way as to avoid damage to the rotor and
scratching or nicking of lining on the brake shoes.
If inspection reveals that the caliper piston seal is
leaking, itMUSTbe replaced immediately.
During removal and installation of a wheel and
tire assembly, use care not to strike the caliper.
Fig. 44 Removing Caliper Guide Pin Bolts
Fig. 45 Caliper Assembly Mounting On Steering
Knuckle (Typical)
Fig. 46 Storing Front Disc Brake Caliper
5 - 28 BRAKESNS
REMOVAL AND INSTALLATION (Continued)
Page 111 of 1938
REMOVE
(1) Raise vehicle on jackstands or centered on a
hoist. See Hoisting in the Lubrication and Mainte-
nance section of this manual.
(2) Remove rear wheel and tire assemblies from
vehicle.
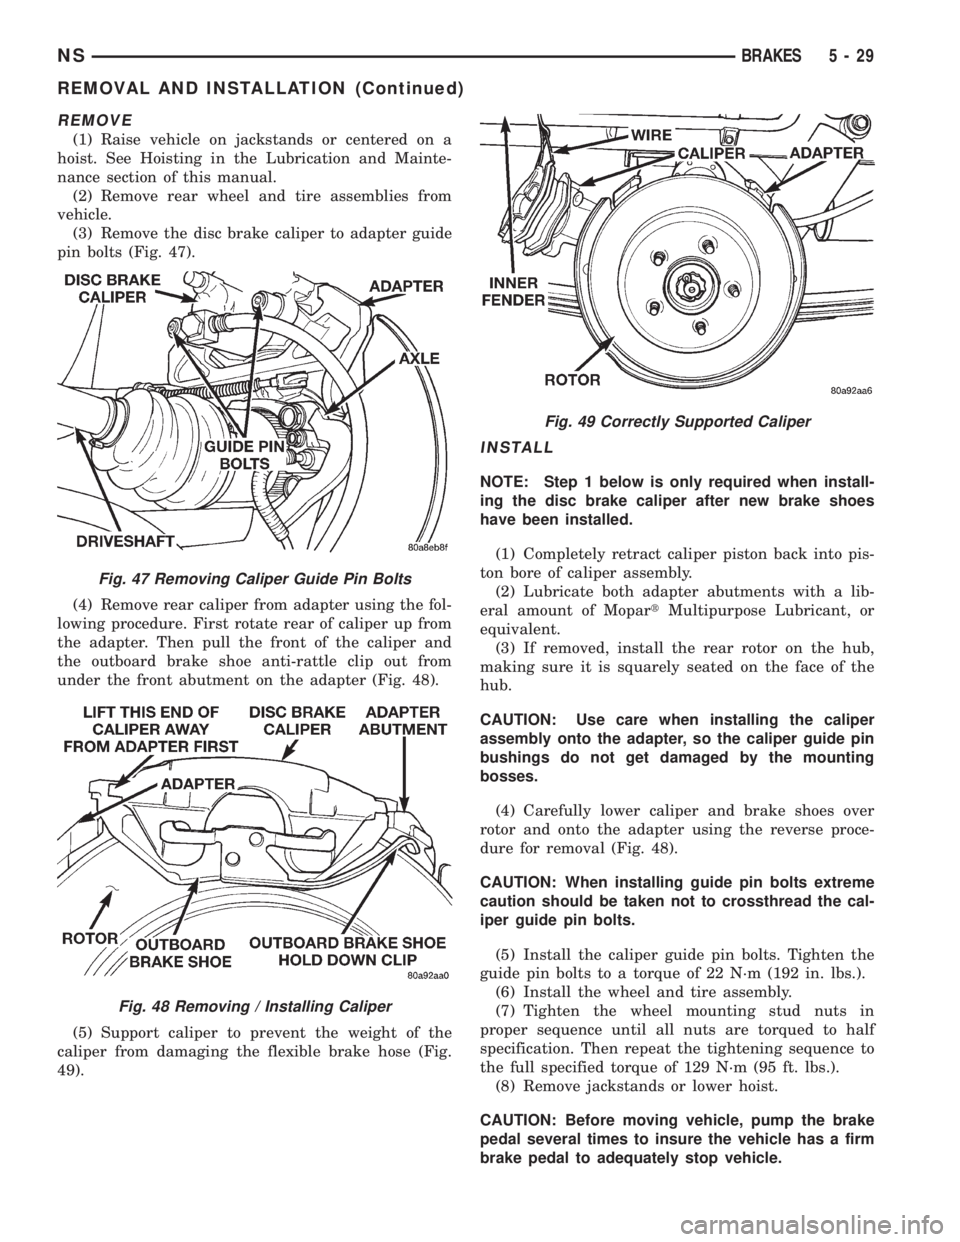
(3) Remove the disc brake caliper to adapter guide
pin bolts (Fig. 47).
(4) Remove rear caliper from adapter using the fol-
lowing procedure. First rotate rear of caliper up from
the adapter. Then pull the front of the caliper and
the outboard brake shoe anti-rattle clip out from
under the front abutment on the adapter (Fig. 48).
(5) Support caliper to prevent the weight of the
caliper from damaging the flexible brake hose (Fig.
49).
INSTALL
NOTE: Step 1 below is only required when install-
ing the disc brake caliper after new brake shoes
have been installed.
(1) Completely retract caliper piston back into pis-
ton bore of caliper assembly.
(2) Lubricate both adapter abutments with a lib-
eral amount of MopartMultipurpose Lubricant, or
equivalent.
(3) If removed, install the rear rotor on the hub,
making sure it is squarely seated on the face of the
hub.
CAUTION: Use care when installing the caliper
assembly onto the adapter, so the caliper guide pin
bushings do not get damaged by the mounting
bosses.
(4) Carefully lower caliper and brake shoes over
rotor and onto the adapter using the reverse proce-
dure for removal (Fig. 48).
CAUTION: When installing guide pin bolts extreme
caution should be taken not to crossthread the cal-
iper guide pin bolts.
(5) Install the caliper guide pin bolts. Tighten the
guide pin bolts to a torque of 22 N´m (192 in. lbs.).
(6) Install the wheel and tire assembly.
(7) Tighten the wheel mounting stud nuts in
proper sequence until all nuts are torqued to half
specification. Then repeat the tightening sequence to
the full specified torque of 129 N´m (95 ft. lbs.).
(8) Remove jackstands or lower hoist.
CAUTION: Before moving vehicle, pump the brake
pedal several times to insure the vehicle has a firm
brake pedal to adequately stop vehicle.
Fig. 47 Removing Caliper Guide Pin Bolts
Fig. 48 Removing / Installing Caliper
Fig. 49 Correctly Supported Caliper
NSBRAKES 5 - 29
REMOVAL AND INSTALLATION (Continued)
Page 115 of 1938
(5) Install the outboard brake shoe on the disc
brake caliper
CAUTION: Use care when installing the caliper
assembly onto the adapter, so the caliper guide pin
bushings do not get damaged by the mounting
bosses.
(6) Carefully lower caliper and brake shoes over
rotor and onto adapter, reversing the removal proce-
dure (Fig. 56)
CAUTION: When installing the caliper guide pin
bolts extreme caution should be taken not to
crossthread the guide pin bolts.
(7) Install the caliper guide pin bolts. Tighten the
guide pin bolts to a torque of 22 N´m (192 in. lbs.).
(8) Install the wheel and tire assembly.
(9) Tighten the wheel mounting stud nuts in
proper sequence until all nuts are torqued to half
specification. Then repeat the tightening sequence to
the full specified torque of 129 N´m (95 ft. lbs.).
(10) Remove jackstands or lower hoist.
CAUTION: Before moving vehicle, pump the brake
pedal several times to insure the vehicle has a firm
brake pedal to adequately stop the vehicle.
(11) Road test the vehicle and make several stops
to wear off any foreign material on the brakes and to
seat the brake shoe linings.
REAR BRAKE DRUM
REMOVE
(1) Remove the tire and wheel assembly from the
vehicle
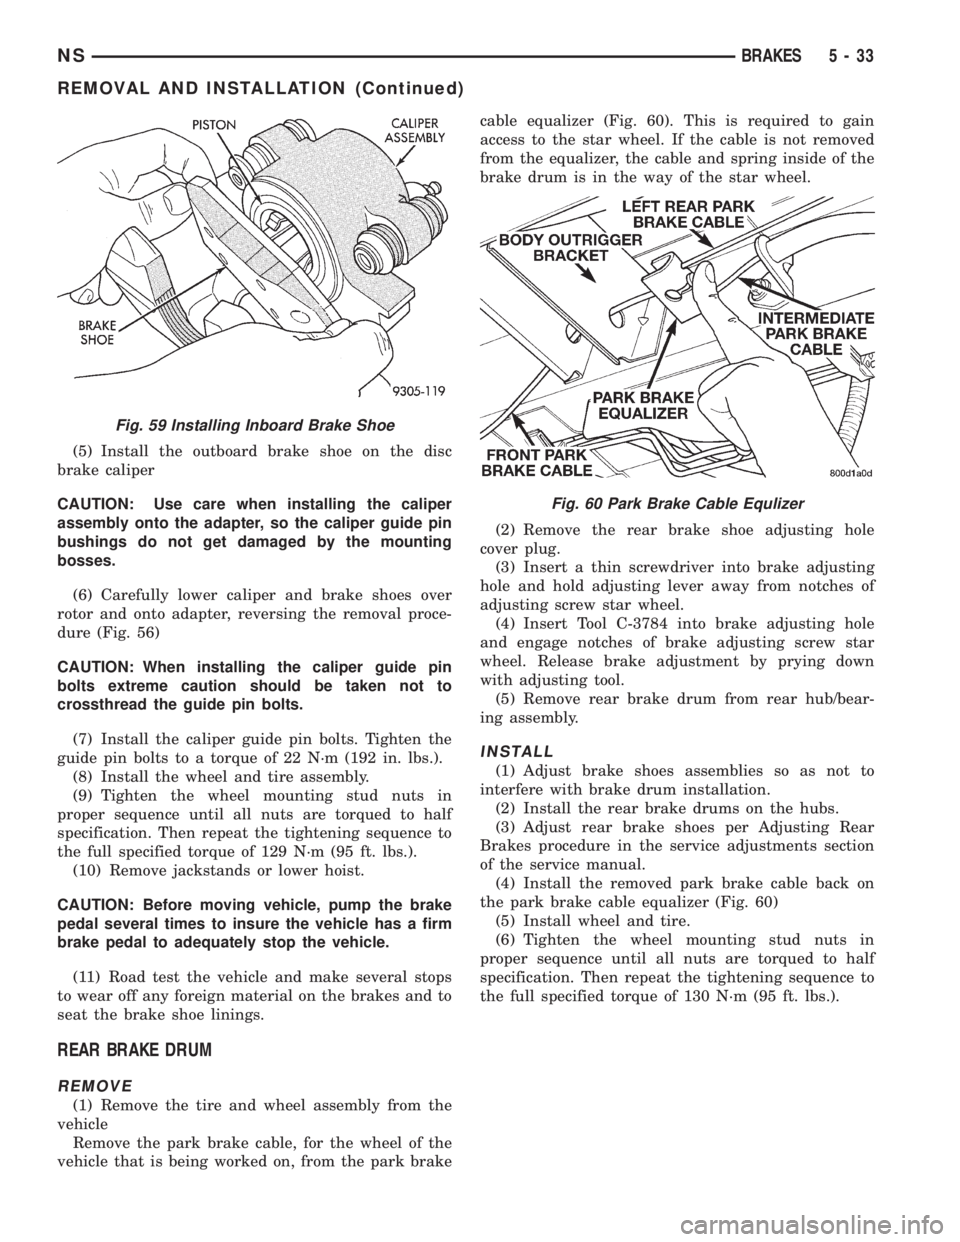
Remove the park brake cable, for the wheel of the
vehicle that is being worked on, from the park brakecable equalizer (Fig. 60). This is required to gain
access to the star wheel. If the cable is not removed
from the equalizer, the cable and spring inside of the
brake drum is in the way of the star wheel.
(2) Remove the rear brake shoe adjusting hole
cover plug.
(3) Insert a thin screwdriver into brake adjusting
hole and hold adjusting lever away from notches of
adjusting screw star wheel.
(4) Insert Tool C-3784 into brake adjusting hole
and engage notches of brake adjusting screw star
wheel. Release brake adjustment by prying down
with adjusting tool.
(5) Remove rear brake drum from rear hub/bear-
ing assembly.
INSTALL
(1) Adjust brake shoes assemblies so as not to
interfere with brake drum installation.
(2) Install the rear brake drums on the hubs.
(3) Adjust rear brake shoes per Adjusting Rear
Brakes procedure in the service adjustments section
of the service manual.
(4) Install the removed park brake cable back on
the park brake cable equalizer (Fig. 60)
(5) Install wheel and tire.
(6) Tighten the wheel mounting stud nuts in
proper sequence until all nuts are torqued to half
specification. Then repeat the tightening sequence to
the full specified torque of 130 N´m (95 ft. lbs.).
Fig. 59 Installing Inboard Brake Shoe
Fig. 60 Park Brake Cable Equlizer
NSBRAKES 5 - 33
REMOVAL AND INSTALLATION (Continued)
Page 119 of 1938
CAUTION: When installing the tension clip on the
automatic adjuster, it must be located on only the
threaded area of the adjuster assembly (Fig. 66). If
it is located on a non-threaded area of the adjuster,
the function of the automatic adjuster will be
affected.
(7) Install the tension clip (Fig. 66) attaching the
upper return spring to the automatic adjuster assem-
bly.
(8) Install the brake shoe to brake shoe lower
return springs on the brake shoes (Fig. 64) and (Fig.
65).
(9) Install automatic adjustment lever on the lead-
ing brake shoe of the rear brake assembly (Fig. 63).
(10) Install the actuating spring on the automatic
adjustment lever and leading brake shoe assembly
(Fig. 62).
(11) Verify that the automatic adjuster lever has
positive contact with the star wheel on the automatic
adjuster assembly.
(12) When all components of both rear brake
assemblies are correctly and fully installed, remove
the locking pliers from the front park brake cable.
(13) Adjust brake shoes assemblies so as not to
interfere with brake drum installation.
(14) Install the rear brake drums on the hubs.
(15) Adjust rear brake shoes per Adjusting Rear
Brakes procedure in the service adjustments section
of the service manual.
(16) Install the wheel and tire assembly.
(17) Push the park brake pedal to the floor once
and release pedal. This will automatically remove the
slack from and correctly adjust the park brake
cables.
(18) Tighten the wheel mounting stud nuts in
proper sequence until all nuts are torqued to half
specification. Then repeat the tightening sequence to
the full specified torque of 130 N´m (95 ft. lbs.).
(19) Road test vehicle. The automatic adjuster will
continue the brake adjustment during the road test
of the vehicle.
BRAKE SUPPORT PLATE (REAR DRUM BRAKES)
REMOVE
(1) Raise vehicle on jackstands or centered on a
frame contact type hoist. See Hoisting in the Lubri-
cation and Maintenance section of this service man-
ual for required lifting procedure.
(2) Remove wheel and tire.
(3) Remove brake drum from hub/bearing.
(4) Remove brake shoes from brake support plate.
Refer to Rear Brake Shoe Removal in the removal
and installation section in this group of the service
manual for the required procedure.(5) Disconnect the park brake cable from the park
brake actuation lever.
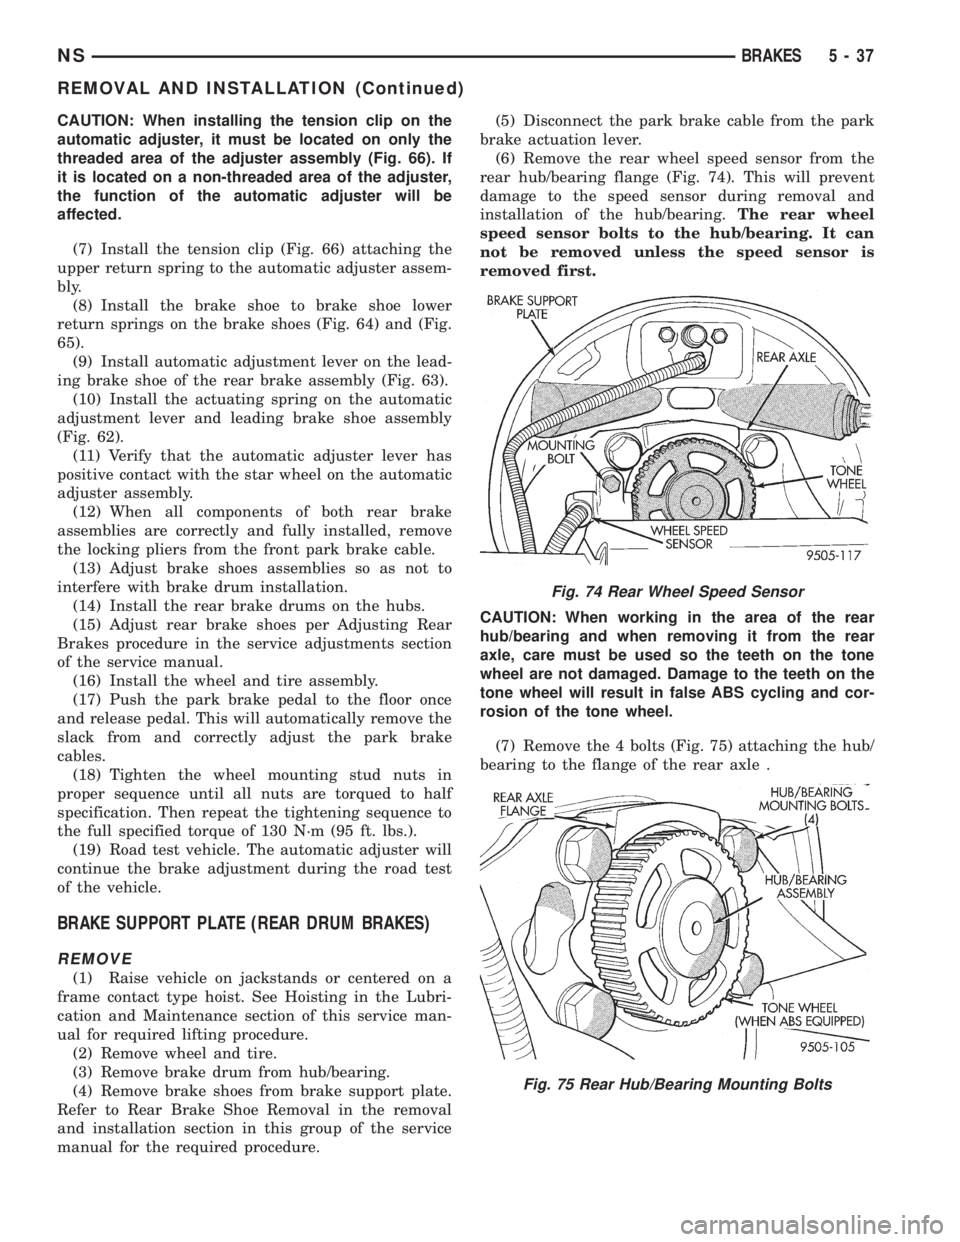
(6) Remove the rear wheel speed sensor from the
rear hub/bearing flange (Fig. 74). This will prevent
damage to the speed sensor during removal and
installation of the hub/bearing.The rear wheel
speed sensor bolts to the hub/bearing. It can
not be removed unless the speed sensor is
removed first.
CAUTION: When working in the area of the rear
hub/bearing and when removing it from the rear
axle, care must be used so the teeth on the tone
wheel are not damaged. Damage to the teeth on the
tone wheel will result in false ABS cycling and cor-
rosion of the tone wheel.
(7) Remove the 4 bolts (Fig. 75) attaching the hub/
bearing to the flange of the rear axle .
Fig. 74 Rear Wheel Speed Sensor
Fig. 75 Rear Hub/Bearing Mounting Bolts
NSBRAKES 5 - 37
REMOVAL AND INSTALLATION (Continued)
Page 121 of 1938
INSTALL
(1) Install the 4 hub/bearing to axle mounting
bolts into the mounting holes in the flange of the
rear axle.
(2) Install the rear brake support plate on the 4
mounting bolts installed in the flange of the rear axle
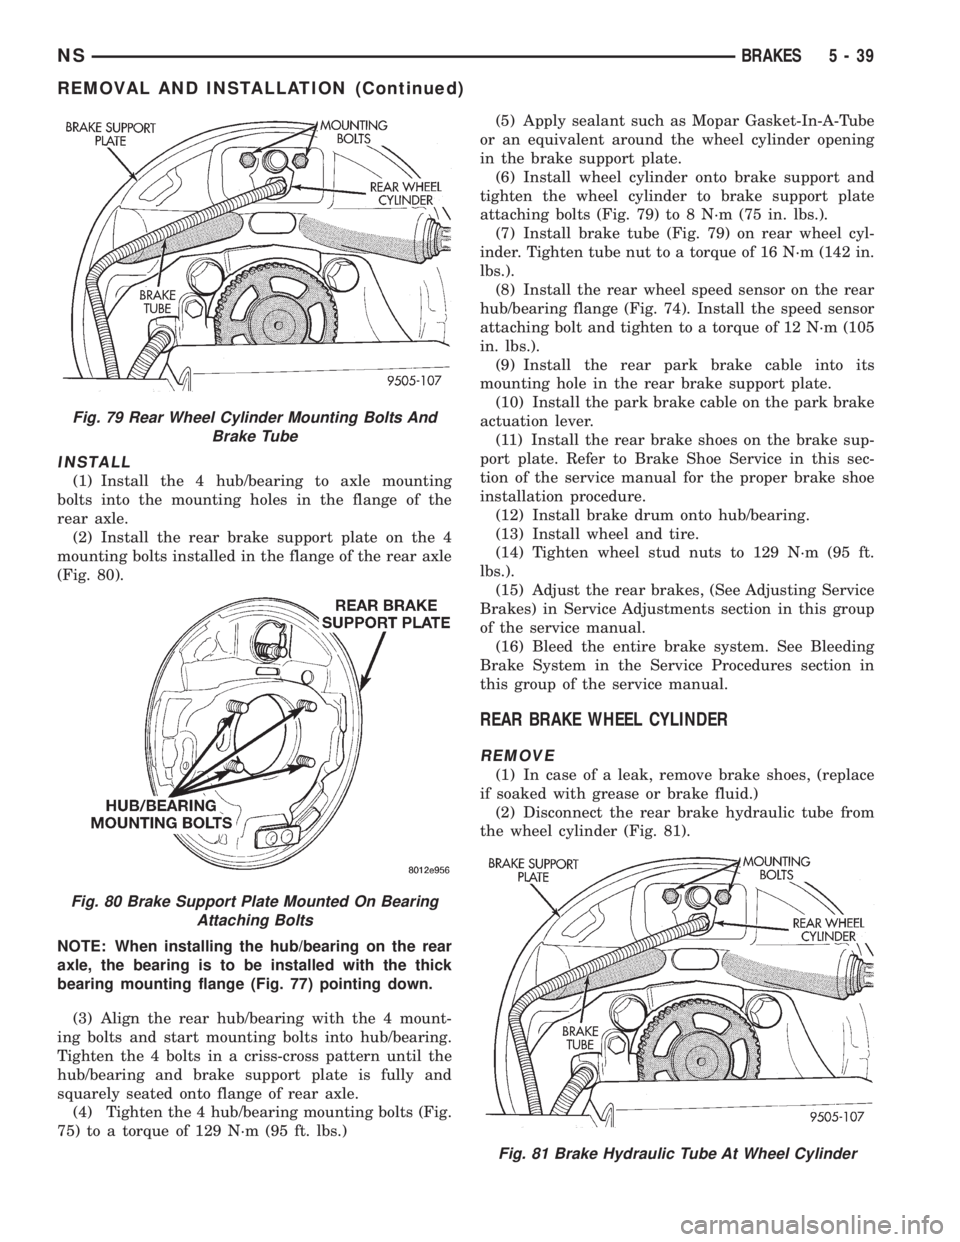
(Fig. 80).
NOTE: When installing the hub/bearing on the rear
axle, the bearing is to be installed with the thick
bearing mounting flange (Fig. 77) pointing down.
(3) Align the rear hub/bearing with the 4 mount-
ing bolts and start mounting bolts into hub/bearing.
Tighten the 4 bolts in a criss-cross pattern until the
hub/bearing and brake support plate is fully and
squarely seated onto flange of rear axle.
(4) Tighten the 4 hub/bearing mounting bolts (Fig.
75) to a torque of 129 N´m (95 ft. lbs.)(5) Apply sealant such as Mopar Gasket-In-A-Tube
or an equivalent around the wheel cylinder opening
in the brake support plate.
(6) Install wheel cylinder onto brake support and
tighten the wheel cylinder to brake support plate
attaching bolts (Fig. 79) to 8 N´m (75 in. lbs.).
(7) Install brake tube (Fig. 79) on rear wheel cyl-
inder. Tighten tube nut to a torque of 16 N´m (142 in.
lbs.).
(8) Install the rear wheel speed sensor on the rear
hub/bearing flange (Fig. 74). Install the speed sensor
attaching bolt and tighten to a torque of 12 N´m (105
in. lbs.).
(9) Install the rear park brake cable into its
mounting hole in the rear brake support plate.
(10) Install the park brake cable on the park brake
actuation lever.
(11) Install the rear brake shoes on the brake sup-
port plate. Refer to Brake Shoe Service in this sec-
tion of the service manual for the proper brake shoe
installation procedure.
(12) Install brake drum onto hub/bearing.
(13) Install wheel and tire.
(14) Tighten wheel stud nuts to 129 N´m (95 ft.
lbs.).
(15) Adjust the rear brakes, (See Adjusting Service
Brakes) in Service Adjustments section in this group
of the service manual.
(16) Bleed the entire brake system. See Bleeding
Brake System in the Service Procedures section in
this group of the service manual.
REAR BRAKE WHEEL CYLINDER
REMOVE
(1) In case of a leak, remove brake shoes, (replace
if soaked with grease or brake fluid.)
(2) Disconnect the rear brake hydraulic tube from
the wheel cylinder (Fig. 81).
Fig. 79 Rear Wheel Cylinder Mounting Bolts And
Brake Tube
Fig. 80 Brake Support Plate Mounted On Bearing
Attaching Bolts
Fig. 81 Brake Hydraulic Tube At Wheel Cylinder
NSBRAKES 5 - 39
REMOVAL AND INSTALLATION (Continued)
Page 123 of 1938
(d) Align bolt in Special Tool 8214-2 with pilot
hole in Special Tool 8214-1. Tighten bolt against
Special Tool 8214-1.
(e) Press hub/bearing out of axle by continuing
to tighten bolt in Special Tool 8214-2 against Spe-
cial Tool 8214-1.
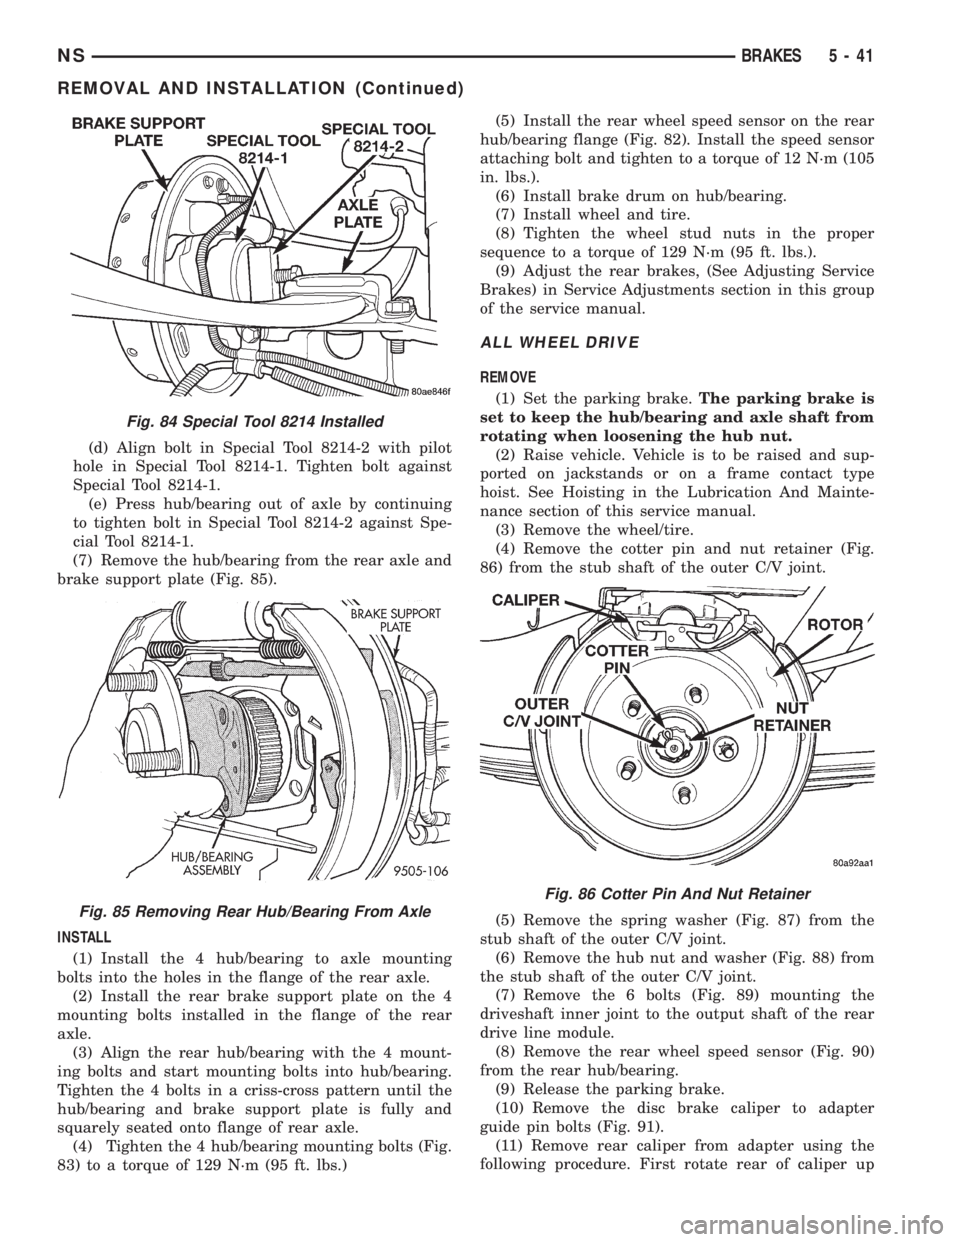
(7) Remove the hub/bearing from the rear axle and
brake support plate (Fig. 85).
INSTALL
(1) Install the 4 hub/bearing to axle mounting
bolts into the holes in the flange of the rear axle.
(2) Install the rear brake support plate on the 4
mounting bolts installed in the flange of the rear
axle.
(3) Align the rear hub/bearing with the 4 mount-
ing bolts and start mounting bolts into hub/bearing.
Tighten the 4 bolts in a criss-cross pattern until the
hub/bearing and brake support plate is fully and
squarely seated onto flange of rear axle.
(4) Tighten the 4 hub/bearing mounting bolts (Fig.
83) to a torque of 129 N´m (95 ft. lbs.)(5) Install the rear wheel speed sensor on the rear
hub/bearing flange (Fig. 82). Install the speed sensor
attaching bolt and tighten to a torque of 12 N´m (105
in. lbs.).
(6) Install brake drum on hub/bearing.
(7) Install wheel and tire.
(8) Tighten the wheel stud nuts in the proper
sequence to a torque of 129 N´m (95 ft. lbs.).
(9) Adjust the rear brakes, (See Adjusting Service
Brakes) in Service Adjustments section in this group
of the service manual.
ALL WHEEL DRIVE
REMOVE
(1) Set the parking brake.The parking brake is
set to keep the hub/bearing and axle shaft from
rotating when loosening the hub nut.
(2) Raise vehicle. Vehicle is to be raised and sup-
ported on jackstands or on a frame contact type
hoist. See Hoisting in the Lubrication And Mainte-
nance section of this service manual.
(3) Remove the wheel/tire.
(4) Remove the cotter pin and nut retainer (Fig.
86) from the stub shaft of the outer C/V joint.
(5) Remove the spring washer (Fig. 87) from the
stub shaft of the outer C/V joint.
(6) Remove the hub nut and washer (Fig. 88) from
the stub shaft of the outer C/V joint.
(7) Remove the 6 bolts (Fig. 89) mounting the
driveshaft inner joint to the output shaft of the rear
drive line module.
(8) Remove the rear wheel speed sensor (Fig. 90)
from the rear hub/bearing.
(9) Release the parking brake.
(10) Remove the disc brake caliper to adapter
guide pin bolts (Fig. 91).
(11) Remove rear caliper from adapter using the
following procedure. First rotate rear of caliper up
Fig. 84 Special Tool 8214 Installed
Fig. 85 Removing Rear Hub/Bearing From Axle
Fig. 86 Cotter Pin And Nut Retainer
NSBRAKES 5 - 41
REMOVAL AND INSTALLATION (Continued)