fuse CHRYSLER VOYAGER 1996 Workshop Manual
[x] Cancel search | Manufacturer: CHRYSLER, Model Year: 1996, Model line: VOYAGER, Model: CHRYSLER VOYAGER 1996Pages: 1938, PDF Size: 55.84 MB
Page 532 of 1938
two positions of seat and recliner, and the side view
mirrors as chosen by the driver.
The inputs from these switches to the memory
seat/mirror module is a ground level signal.
(1) Adjust the seat, recliner and side view mirrors
to the desired position.
(2)
Press momentarily and release memory switch S.
(3) Press momentarily and release memory switch
1 or 2. Do NOT press any switches for 10 seconds.
(4) To program the second driver's position, follow
the above sequence.
(5) To recall either of the programmed positions
momentarily press and release either memory selec-
tor switch 1 or 2.
DEFINITION OF: MOMENTARILY AND
RELEASE
The memory seat/mirror module has switch input
timing requirements of a minimum press momen-
tarily time of 250 milliseconds followed by a maxi-
mum hold time of 5 seconds, followed by a maximum
release time between steps of 5 seconds that must be
met for proper operation of the system.
SEAT AND RECLINER SWITCHES
The seat and recliner switch assembly is mounted
outboard on the seat side-shield. Press and hold the
desired seat or recliner switch to effect movement.
The Memory Seat/Mirror Module (MSM Module) will
drive a maximum of 2 motors at a time in a given
direction. If conflicting directions are requested, the
priority for response will be as follows:
²Seat Track Rearward
²Seat Front Down
²Seat Rear Down
²Recliner Rearward
²Seat Track Forward
²Seat Front Up
²Seat Rear Up
²Recliner Forward
The inputs from these switches to the MSM Mod-
ule is a current limited battery source fed by the
MSM Module. This protects the MSM Module printed
circuit board traces from acting as fuses. All of these
switch contact inputs to the module are normally
closed to ground, except when actuated.
POSITION SENSING SEAT AND RECLINER
POTENTIOMETERS
A potentiometer is mounted to each seat track and
recliner motor end-bell to provide a sense voltage to
the Memory Seat/Mirror Module that will indicate to
the module where the seat track or recliner is posi-
tioned.
This sense voltage is derived from a 5 volt source
provided by the module to the potentiometer. Thesense voltage is input into the module and stored by
the Memory Seat/Mirror Module.
DIAGNOSIS AND TESTING
MEMORY SELECTOR SWITCHES
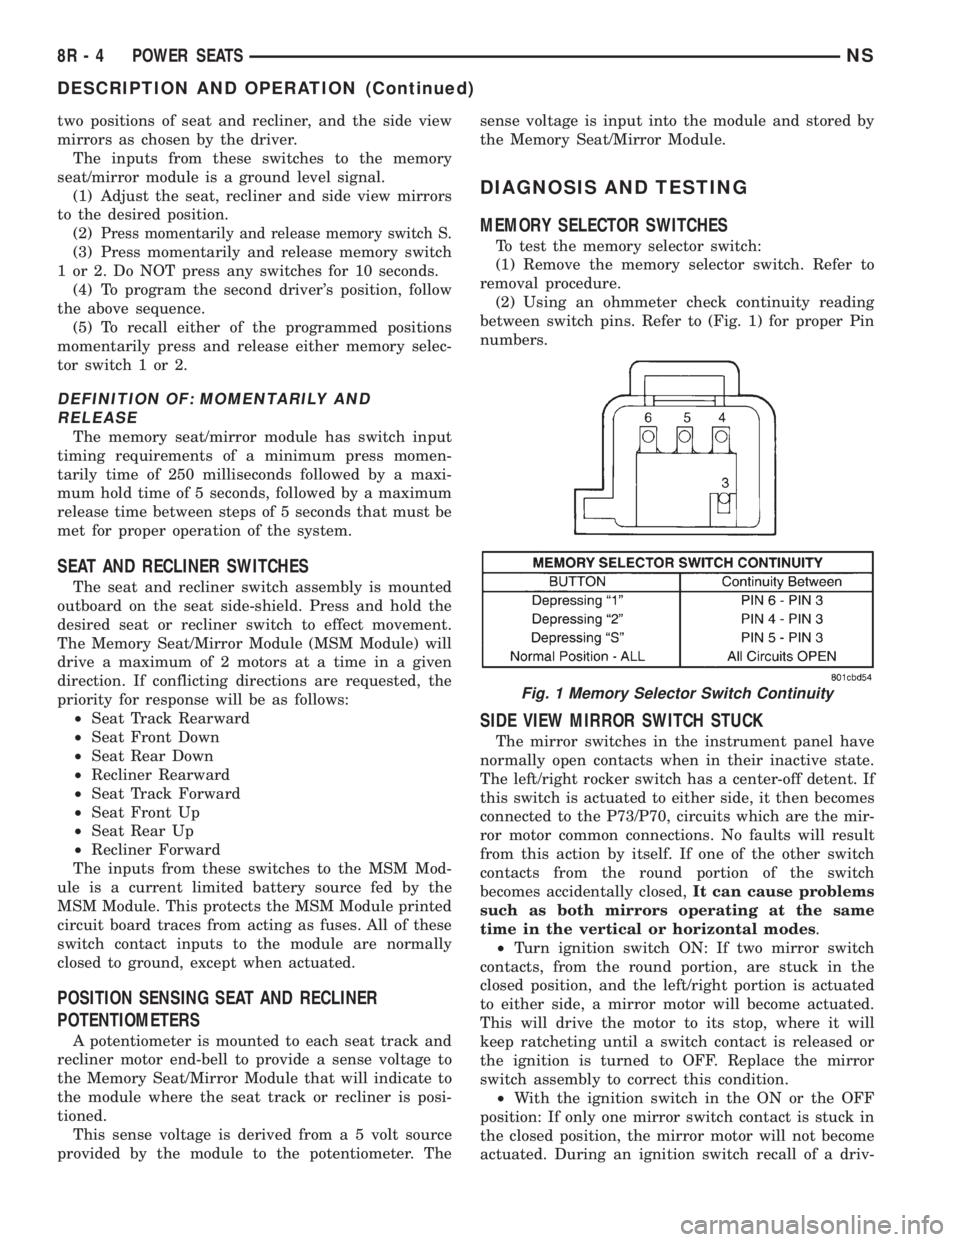
To test the memory selector switch:
(1) Remove the memory selector switch. Refer to
removal procedure.
(2) Using an ohmmeter check continuity reading
between switch pins. Refer to (Fig. 1) for proper Pin
numbers.
SIDE VIEW MIRROR SWITCH STUCK
The mirror switches in the instrument panel have
normally open contacts when in their inactive state.
The left/right rocker switch has a center-off detent. If
this switch is actuated to either side, it then becomes
connected to the P73/P70, circuits which are the mir-
ror motor common connections. No faults will result
from this action by itself. If one of the other switch
contacts from the round portion of the switch
becomes accidentally closed,It can cause problems
such as both mirrors operating at the same
time in the vertical or horizontal modes.
²Turn ignition switch ON: If two mirror switch
contacts, from the round portion, are stuck in the
closed position, and the left/right portion is actuated
to either side, a mirror motor will become actuated.
This will drive the motor to its stop, where it will
keep ratcheting until a switch contact is released or
the ignition is turned to OFF. Replace the mirror
switch assembly to correct this condition.
²With the ignition switch in the ON or the OFF
position: If only one mirror switch contact is stuck in
the closed position, the mirror motor will not become
actuated. During an ignition switch recall of a driv-
Fig. 1 Memory Selector Switch Continuity
8R - 4 POWER SEATSNS
DESCRIPTION AND OPERATION (Continued)
Page 535 of 1938
CIRCUIT DESCRIPTION
Power to both driver and passenger seats, as well
as power door locks, rear blower, and front fog lamps
(if so equipped), is provided by the A3 circuit through
a 40 amp MAXI-fuse in the Power Distribution Cen-
ter (PDC) under the hood. If all of these devices are
nonfunctional, replace the MAXI-fuse. If the new
MAXI-fuse blows immediately, correct the wiring
short to Ground that could be on any of those afore-
mentioned loads before proceeding further.
Once the power is back ON, if the power seats still
do not work, check the 30 amp circuit breaker that is
located in the driver's seat wiring harness approxi-
mately 10 inches from the 4-way connector. The
power feed circuit to the 30 amp circuit breaker is 14
ga. A3 RD/WT.
Following the 30 amp circuit breaker is a 14 ga.
wire designated as F35 RD that provides power into
the Memory Seat/Mirror Module and is double
crimped with a 14 ga. F35A RD that provides power
to the passenger seat through the 4-way connector.If the power door locks, rear blower, and front fog
lamps (if so equipped) are functional and the seats
are both nonfunctional, repair/replace the open wir-
ing and/or circuit breaker in the driver's seat harness
to correct the condition.
Ensure that the 12 ga. ground wire Z1 BK from
the electrical distribution wiring ground splice into
the 4-way connector is providing ground. The Z1 BK
is double crimped at the seat harness side of the
4-way connector taking a 14 ga. Z1 BK into the
10-way connector (cavity 7) 14 ga. This double crimp
carries a 20 ga. Z1A BK to cavity 3 of the power seat
switch 10-way. If the passenger power seat is func-
tional, and the driver's seat is nonfunctional examine
the circuit F35 RD from the double crimped circuit
breaker connector into the 10-way connector cavity 8
of the control module for continuity. Repair or replace
as necessary. If the driver's seat is still nonfunc-
tional, use a multi-function meter to check the P9 RD
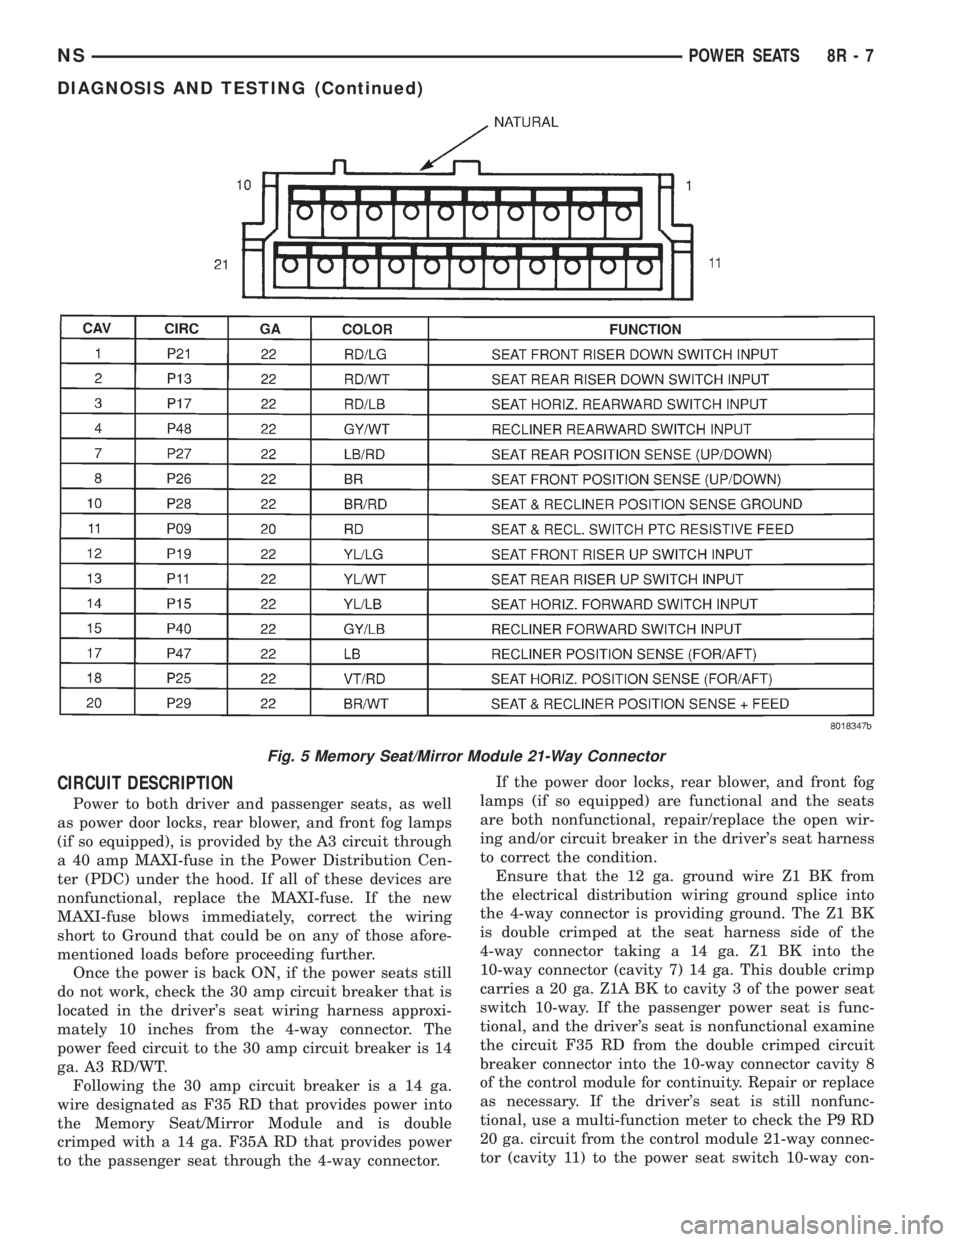
20 ga. circuit from the control module 21-way connec-
tor (cavity 11) to the power seat switch 10-way con-
Fig. 5 Memory Seat/Mirror Module 21-Way Connector
NSPOWER SEATS 8R - 7
DIAGNOSIS AND TESTING (Continued)
Page 536 of 1938

nector (cavity 5)This is a low current battery
feed from the control module that will not illu-
minate a test lamp.
During shipping of the vehicle, an M1 circuit 10
amp fuse (labeled IOD) is temporarily removed from
the PDC in the engine compartment to eliminate
unnecessary battery depletion. However, this fused
circuit being open (that feeds through the electrical
distribution wiring to cavity 16 of the 25-way connec-
tor) will not stop manual seat actuations from taking
place (only recall mode requests) during shipping.
(1) If the memory seat/mirror module does not
respond with a relay click to any seat switch input
(as well as the desired motion) when actuated, pro-
ceed with the following analysis:²Verify power ON F35 and ground Z1 into the
system as indicated above.
²Verify all connectors are mated with the memory
seat/mirror module.
²Place the vehicle gear shift lever in any position
except PARK (causes the Memory Seat/Mirror Mod-
ule to wake-up and provide a position sense voltage
to the seat motor potentiometers and the mirror
rheostat(s). This voltage can be checked at the appro-
priate cavities of the 21 and 25-way connectors.
²Verify the switch connector is mated with the
seat switch on the inside of the outboard side-shield.
²Verify battery voltage at the P9 circuit refer-
enced to the Z1A ground reference (cavity 1) of the
seat switch. If P9 low current battery is not available
Fig. 6 Memory Seat/Mirror Module 25-Way Connector
8R - 8 POWER SEATSNS
DIAGNOSIS AND TESTING (Continued)
Page 539 of 1938
POWER MIRRORS
CONTENTS
page page
GENERAL INFORMATION
HEATED MIRROR........................ 1
INTRODUCTION......................... 1
MEMORY MIRRORS...................... 1
DIAGNOSIS AND TESTING
HEATED MIRROR TEST................... 1MIRROR MOTOR TEST................... 1
MIRROR SWITCH TEST................... 1
REMOVAL AND INSTALLATION
POWER MIRROR SWITCH................. 3
POWER MIRROR........................ 3
GENERAL INFORMATION
INTRODUCTION
Electrically-operated remote control mirrors are
controlled by a switch assembly located on the head-
lamp switch bezel in the instrument panel.
The vehicle uses a rocker switch for right or left
side mirror selection and a single platform button for
mirror UP, DOWN, RIGHT, or LEFT movement.
The motors which operate the mirrors are part of
the mirror assembly and cannot be serviced sepa-
rately.
HEATED MIRROR
Heated mirrors are available on models with
Power Mirrors and Rear Window Defogger only. The
heated mirror is controlled by the rear window defog-
ger switch. The heated mirror is ON when the rear
window defogger is ON.
MEMORY MIRRORS
For memory mirrors refer to Group 8R, Power
Seats section Memory Seat/Mirror system.
DIAGNOSIS AND TESTING
MIRROR MOTOR TEST
(1) Remove headlamp switch bezel. Refer to Group
8E, Instrument Panel and Gauges.
(2) Disconnect wiring harness connector to the
power mirror switch and headlamp switch.
(3) Using two jumper wires:
²Connect one to a 12-volt source
²Connect the other to a good body ground
²Refer to the Mirror Test Chart for wire hookups
at the switch connector (Fig. 1).(4) If results shown in chart are not obtained,
check for broken or shorted circuit, or replace mirror
assembly as necessary.
MIRROR SWITCH TEST
(1) Remove power mirror switch from mounting
position.
(2) Disconnect wiring harness at switch connector.
(3) Using a ohmmeter, test for continuity between
the terminals of the switch as shown in the Mirror
Switch Continuity Chart (Fig. 2).
(4) If results shown in the chart are not obtained,
replace the switch.
HEATED MIRROR TEST
Heated mirrors are available on models with
Power Mirrors and Rear Window Defogger only. The
heated mirror is controlled by the rear window defog-
ger switch. The heated mirror is ON when the rear
window defogger is ON.
TEST PROCEDURE
(1) The mirror should be warm to the touch.
(2) If not, check the 10 amp fuse (12) in the junc-
tion block behind the instrument panel to the left of
the steering column.
(3) Test voltage at rear window defogger switch.
²If no voltage repair wire.
²Apply voltage to one wire and ground the other,
refer to (Fig. 1) for pin numbers. Mirror should
become warm to the touch.
²If not remove mirror glass and test the wires for
continuity. If no continuity repair wires.
²If wires are OK, replace mirror glass.
²To test defogger switch refer to Group 8N, Elec-
trically Heated Systems.
NSPOWER MIRRORS 8T - 1
Page 566 of 1938
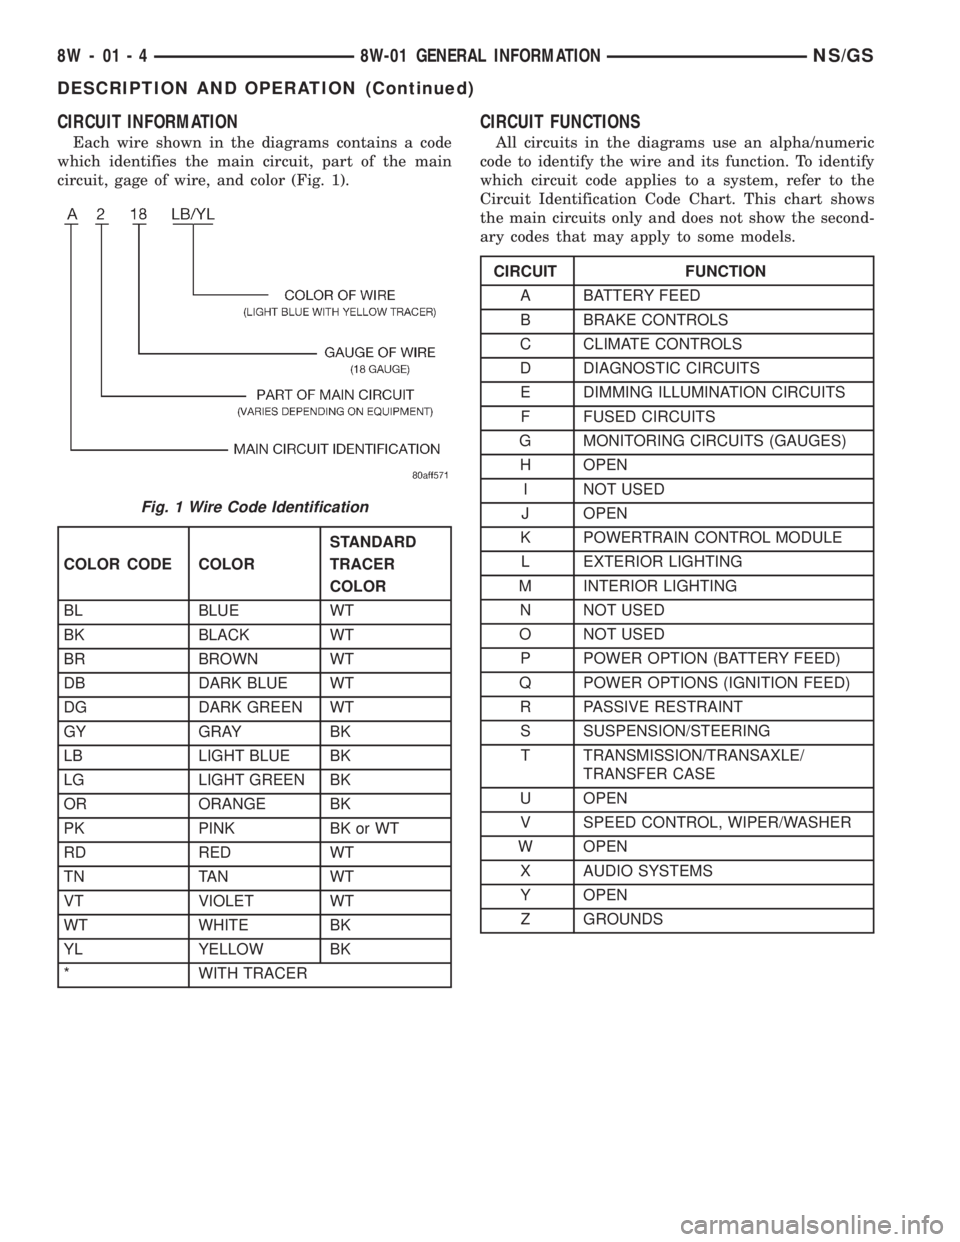
CIRCUIT INFORMATION
Each wire shown in the diagrams contains a code
which identifies the main circuit, part of the main
circuit, gage of wire, and color (Fig. 1).
CIRCUIT FUNCTIONS
All circuits in the diagrams use an alpha/numeric
code to identify the wire and its function. To identify
which circuit code applies to a system, refer to the
Circuit Identification Code Chart. This chart shows
the main circuits only and does not show the second-
ary codes that may apply to some models.
Fig. 1 Wire Code Identification
COLOR CODE COLORSTANDARD
TRACER
COLOR
BL BLUE WT
BK BLACK WT
BR BROWN WT
DB DARK BLUE WT
DG DARK GREEN WT
GY GRAY BK
LB LIGHT BLUE BK
LG LIGHT GREEN BK
OR ORANGE BK
PK PINK BK or WT
RD RED WT
TN TAN WT
VT VIOLET WT
WT WHITE BK
YL YELLOW BK
* WITH TRACER
CIRCUIT FUNCTION
A BATTERY FEED
B BRAKE CONTROLS
C CLIMATE CONTROLS
D DIAGNOSTIC CIRCUITS
E DIMMING ILLUMINATION CIRCUITS
F FUSED CIRCUITS
G MONITORING CIRCUITS (GAUGES)
H OPEN
I NOT USED
J OPEN
K POWERTRAIN CONTROL MODULE
L EXTERIOR LIGHTING
M INTERIOR LIGHTING
N NOT USED
O NOT USED
P POWER OPTION (BATTERY FEED)
Q POWER OPTIONS (IGNITION FEED)
R PASSIVE RESTRAINT
S SUSPENSION/STEERING
T TRANSMISSION/TRANSAXLE/
TRANSFER CASE
U OPEN
V SPEED CONTROL, WIPER/WASHER
W OPEN
X AUDIO SYSTEMS
Y OPEN
Z GROUNDS
8W - 01 - 4 8W-01 GENERAL INFORMATIONNS/GS
DESCRIPTION AND OPERATION (Continued)
Page 570 of 1938
WARNING: BE SURE THAT THE IGNITION SWITCH
ALWAYS IS IN THE OFF POSITION, UNLESS THE
PROCEDURE REQUIRES IT TO BE ON.
WARNING: SET THE PARKING BRAKE WHEN
WORKING ON ANY VEHICLE. AN AUTOMATIC
TRANSMISSION SHOULD BE IN PARK. A MANUAL
TRANSMISSION SHOULD BE IN NEUTRAL.
WARNING: OPERATE THE ENGINE ONLY IN A
WELL-VENTILATED AREA.
WARNING: KEEP AWAY FROM MOVING PARTS
WHEN THE ENGINE IS RUNNING, ESPECIALLY THE
FAN AND BELTS.
WARNING: TO PREVENT SERIOUS BURNS, AVOID
CONTACT WITH HOT PARTS SUCH AS THE RADIA-
TOR, EXHAUST MANIFOLD(S), TAIL PIPE, CATA-
LYTIC CONVERTER, AND MUFFLER.
WARNING: DO NOT ALLOW FLAME OR SPARKS
NEAR THE BATTERY. GASES ARE ALWAYS
PRESENT IN AND AROUND THE BATTERY.
WARNING: ALWAYS REMOVE RINGS, WATCHES,
LOOSE HANGING JEWELRY, AND LOOSE CLOTH-
ING.
TAKE OUTS
The abbreviation T/O is used in the component
location section to indicate a point in which the wir-
ing harness branches out to a component.
ELECTROSTATIC DISCHARGE (ESD) SENSITIVE
DEVICES
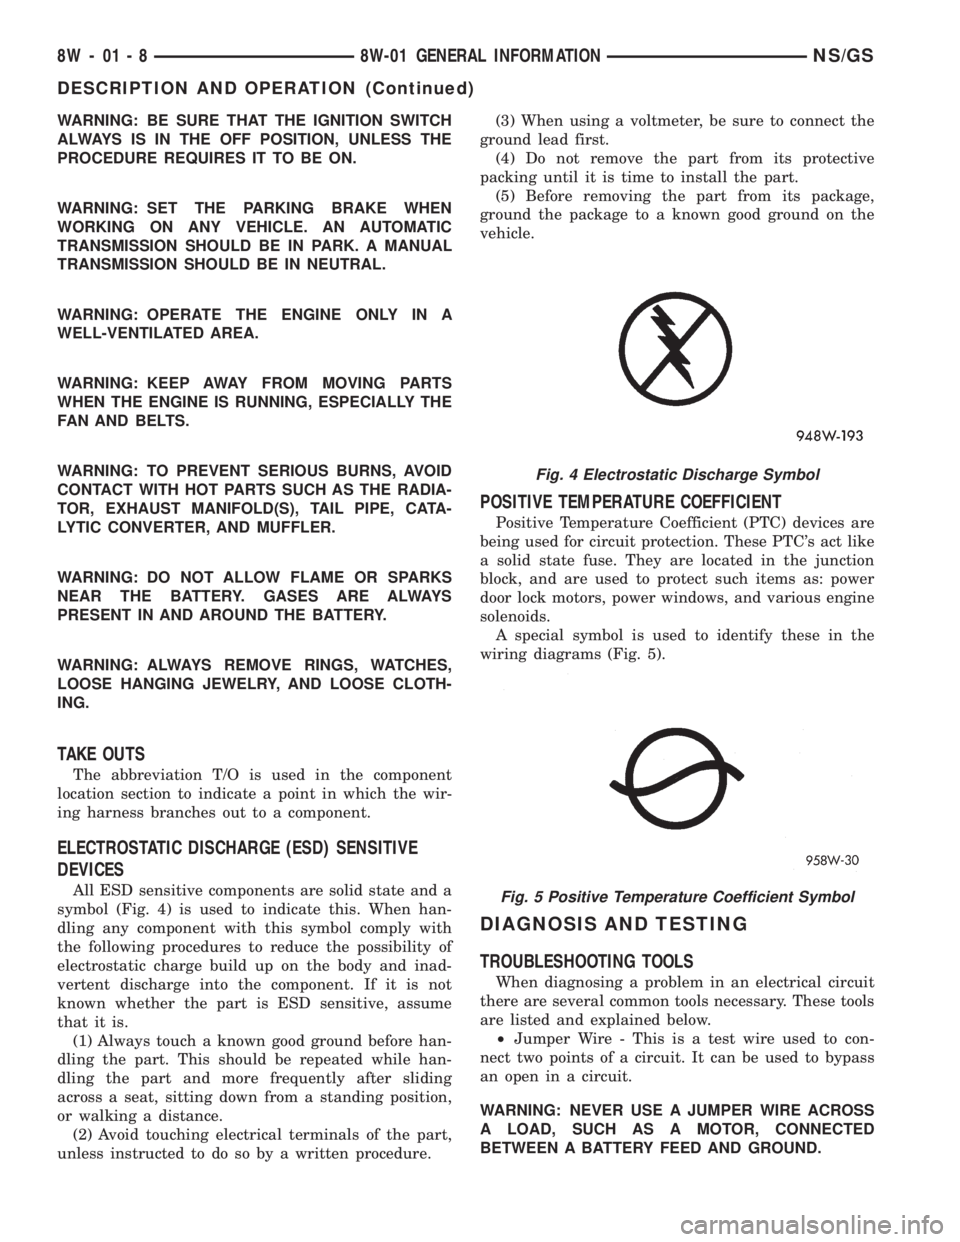
All ESD sensitive components are solid state and a
symbol (Fig. 4) is used to indicate this. When han-
dling any component with this symbol comply with
the following procedures to reduce the possibility of
electrostatic charge build up on the body and inad-
vertent discharge into the component. If it is not
known whether the part is ESD sensitive, assume
that it is.
(1) Always touch a known good ground before han-
dling the part. This should be repeated while han-
dling the part and more frequently after sliding
across a seat, sitting down from a standing position,
or walking a distance.
(2) Avoid touching electrical terminals of the part,
unless instructed to do so by a written procedure.(3) When using a voltmeter, be sure to connect the
ground lead first.
(4) Do not remove the part from its protective
packing until it is time to install the part.
(5) Before removing the part from its package,
ground the package to a known good ground on the
vehicle.
POSITIVE TEMPERATURE COEFFICIENT
Positive Temperature Coefficient (PTC) devices are
being used for circuit protection. These PTC's act like
a solid state fuse. They are located in the junction
block, and are used to protect such items as: power
door lock motors, power windows, and various engine
solenoids.
A special symbol is used to identify these in the
wiring diagrams (Fig. 5).
DIAGNOSIS AND TESTING
TROUBLESHOOTING TOOLS
When diagnosing a problem in an electrical circuit
there are several common tools necessary. These tools
are listed and explained below.
²Jumper Wire - This is a test wire used to con-
nect two points of a circuit. It can be used to bypass
an open in a circuit.
WARNING: NEVER USE A JUMPER WIRE ACROSS
A LOAD, SUCH AS A MOTOR, CONNECTED
BETWEEN A BATTERY FEED AND GROUND.
Fig. 4 Electrostatic Discharge Symbol
Fig. 5 Positive Temperature Coefficient Symbol
8W - 01 - 8 8W-01 GENERAL INFORMATIONNS/GS
DESCRIPTION AND OPERATION (Continued)
Page 571 of 1938

²Voltmeter - Used to check for voltage on a cir-
cuit. Always connect the black lead to a known good
ground and the red lead to the positive side of the
circuit.
CAUTION: Most of the electrical components used
in today's vehicle are solid state. When checking
voltages in these circuits use a meter with a 10-me-
gohm or greater impedance rating.
²Ohmmeter - Used to check the resistance
between two points of a circuit. Low or no resistance
in a circuit means good continuity.
CAUTION: - Most of the electrical components used
in today's vehicle are Solid State. When checking
resistance in these circuits use a meter with a 10-
megohm or greater impedance rating. In addition,
make sure the power is disconnected from the cir-
cuit. Circuits that are powered up by the vehicle
electrical system can cause damage to the equip-
ment and provide false readings.
²Probing Tools - These tools are used for probing
terminals in connectors (Fig. 6). Select the proper
size tool from Special Tool Package 6807, and insert
it into the terminal being tested. Use the other end
of the tool to insert the meter probe.
INTERMITTENT AND POOR CONNECTIONS
Most intermittent electrical problems are caused
by faulty electrical connections or wiring. It is also
possible for a sticking component or relay to cause a
problem. Before condemning a component or wiring
assembly check the following items.
²Connectors are fully seated
²Spread terminals, or terminal push out
²Terminals in the wiring assembly are fully
seated into the connector/component and locked in
position
²Dirt or corrosion on the terminals. Any amount
of corrosion or dirt could cause an intermittent prob-
lem
²Damaged connector/component casing exposing
the item to dirt and moisture²Wire insulation that has rubbed through causing
a short to ground
²Some or all of the wiring strands broken inside
of the insulation covering.
²Wiring broken inside of the insulation
TROUBLESHOOTING TESTS
Before beginning any tests on a vehicles electrical
system use the Wiring Diagrams and study the cir-
cuit. Also refer to the Troubleshooting Wiring Prob-
lems in this section.
TESTING FOR VOLTAGE POTENTIAL
(1) Connect the ground lead of a voltmeter to a
known good ground (Fig. 7).
(2) Connect the other lead of the voltmeter to the
selected test point. The vehicle ignition may need to
be turned ON to check voltage. Refer to the appropri-
ate test procedure.
TESTING FOR CONTINUITY
(1) Remove the fuse for the circuit being checked
or, disconnect the battery.
(2) Connect one lead of the ohmmeter to one side
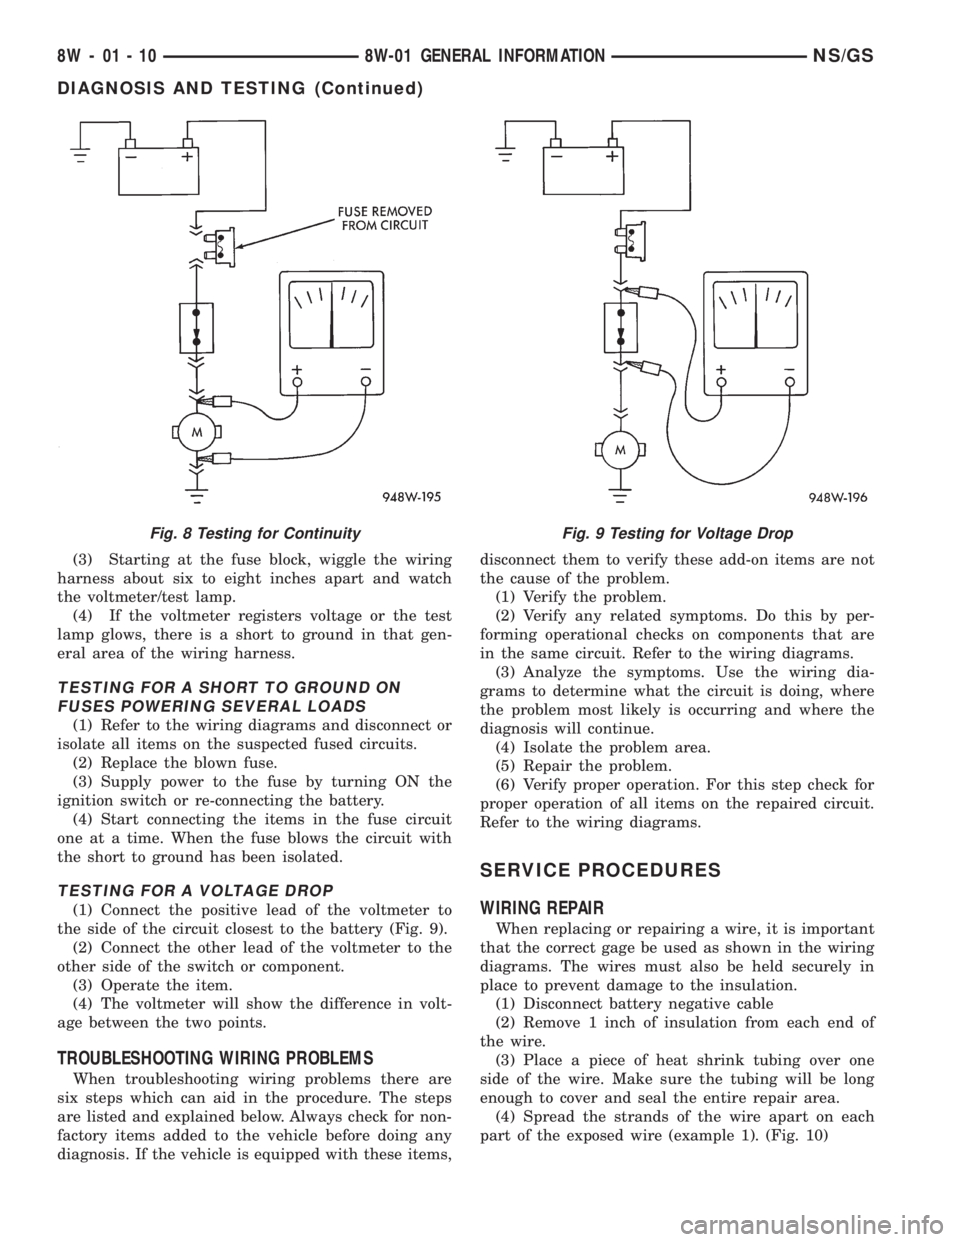
of the circuit being tested (Fig. 8).
(3) Connect the other lead to the other end of the
circuit being tested. Low or no resistance means good
continuity.
TESTING FOR A SHORT TO GROUND
(1) Remove the fuse and disconnect all items
involved with the fuse.
(2) Connect a test light or a voltmeter across the
terminals of the fuse.
Fig. 6 Probing Tool
Fig. 7 Testing for Voltage Potential
NS/GS8W-01 GENERAL INFORMATION 8W - 01 - 9
DIAGNOSIS AND TESTING (Continued)
Page 572 of 1938
(3) Starting at the fuse block, wiggle the wiring
harness about six to eight inches apart and watch
the voltmeter/test lamp.
(4) If the voltmeter registers voltage or the test
lamp glows, there is a short to ground in that gen-
eral area of the wiring harness.
TESTING FOR A SHORT TO GROUND ON
FUSES POWERING SEVERAL LOADS
(1) Refer to the wiring diagrams and disconnect or
isolate all items on the suspected fused circuits.
(2) Replace the blown fuse.
(3) Supply power to the fuse by turning ON the
ignition switch or re-connecting the battery.
(4) Start connecting the items in the fuse circuit
one at a time. When the fuse blows the circuit with
the short to ground has been isolated.
TESTING FOR A VOLTAGE DROP
(1) Connect the positive lead of the voltmeter to
the side of the circuit closest to the battery (Fig. 9).
(2) Connect the other lead of the voltmeter to the
other side of the switch or component.
(3) Operate the item.
(4) The voltmeter will show the difference in volt-
age between the two points.
TROUBLESHOOTING WIRING PROBLEMS
When troubleshooting wiring problems there are
six steps which can aid in the procedure. The steps
are listed and explained below. Always check for non-
factory items added to the vehicle before doing any
diagnosis. If the vehicle is equipped with these items,disconnect them to verify these add-on items are not
the cause of the problem.
(1) Verify the problem.
(2) Verify any related symptoms. Do this by per-
forming operational checks on components that are
in the same circuit. Refer to the wiring diagrams.
(3) Analyze the symptoms. Use the wiring dia-
grams to determine what the circuit is doing, where
the problem most likely is occurring and where the
diagnosis will continue.
(4) Isolate the problem area.
(5) Repair the problem.
(6) Verify proper operation. For this step check for
proper operation of all items on the repaired circuit.
Refer to the wiring diagrams.
SERVICE PROCEDURES
WIRING REPAIR
When replacing or repairing a wire, it is important
that the correct gage be used as shown in the wiring
diagrams. The wires must also be held securely in
place to prevent damage to the insulation.
(1) Disconnect battery negative cable
(2) Remove 1 inch of insulation from each end of
the wire.
(3) Place a piece of heat shrink tubing over one
side of the wire. Make sure the tubing will be long
enough to cover and seal the entire repair area.
(4) Spread the strands of the wire apart on each
part of the exposed wire (example 1). (Fig. 10)
Fig. 8 Testing for ContinuityFig. 9 Testing for Voltage Drop
8W - 01 - 10 8W-01 GENERAL INFORMATIONNS/GS
DIAGNOSIS AND TESTING (Continued)
Page 578 of 1938

Component Page
Fuel Tank Module...................8W-30, 45
Fuel Temperature Sensor.................8W-30
Fuel Timing Solenoid....................8W-30
Fuses (JB)............................8W-12
Fuses (PDC)...........................8W-10
Fusible Link.....................8W-20, 21, 63
Fusible Link A0........................8W-30
Fusible Link A11.......................8W-10
Fusible Link A54.......................8W-10
Grounds..............................8W-15
Generator.............................8W-20
Glove Box Lamp........................8W-44
Glow Plug Lamp.....................8W-30, 46
Glow Plugs............................8W-30
Glow Plug Relay........................8W-30
Headlamps............................8W-50
Headlamp Dimmer Switch..........8W-10, 46, 50
Headlamp Leveling Motors...............8W-50
Headlamp Switch.......................8W-50
Headlamp Washer......................8W-53
High Beam Indicator....................8W-46
High Beam Relay....................8W-10, 50
Headlamps............................8W-50
Horns................................8W-41
Hood Ajar Switch....................8W-39, 44
Horn Relay.........................8W-39, 41
Horn Switch.....................8W-10, 39, 41
HVAC Control.........................8W-42
Idle Air Control Motor...................8W-30
Ignition Coil Pack.......................8W-30
Ignition Switch.........................8W-10
Instrument Cluster.....................8W-40
Intake Air Temperature Sensor............8W-30
Intake Air Temperature/Manifold Absolute
Pressure Sensor.....................8W-30
Interior Lamps On Switch................8W-44
Junction Block.........................8W-12
Key-In Halo Lamp......................8W-44
Knock Sensor..........................8W-30
Lamp Assemblies.......................8W-51
License Lamp..........................8W-51
Liftgate Ajar Indicator Lamp..............8W-40
Liftgate Ajar Switch...............8W-39, 40, 44
Liftgate Arm/Disarm Switch............8W-39, 61
Liftgate Flood Lamps....................8W-44
Liftgate Lock Motor.....................8W-61
Low Beam Relay.....................8W-10, 50
Low Coolant Level Switch................8W-45
Low Fuel Warning Indicator Lamp..........8W-40
Low Oil Pressure Lamp..................8W-46
Low Washer Fluid Level Indicator Lamp.....8W-40
Low Washer Fluid Switch.................8W-53
Low/Reverse Pressure Switch..............8W-31
Low/Reverse Solenoid....................8W-31Component Page
Manifold Absolute Pressure Sensor.........8W-30
Memory Power Seat Switch...............8W-63
Seat Sensors...........................8W-63
Memory Seat/Mirror Module...........8W-62, 63
Memory Set Switch..................8W-62, 63
Message Center........................8W-46
Mid Reading Lamps.....................8W-44
Mode Door Actuator.....................8W-42
Name Brand Speaker Relay...............8W-47
Needle Movement Sensor.................8W-30
Odometer.............................8W-40
Output Shaft Speed Sensor...............8W-31
Overdrive Pressure Switch................8W-31
Overdrive Solenoid......................8W-31
Overhead Console.......................8W-49
Park Brake Switch...................8W-46, 50
Park Lamp Relay.........8W-10, 12, 44, 50, 51, 54
Park/Turn Signal Lamps.................8W-50
Airbag Squibs..........................8W-43
Power Distribution Center................8W-10
Power Folding Mirror Switch..............8W-62
Power Mirror Fold Relay.................8W-62
Power Mirror Switch....................8W-62
Power Mirror Unfold Relay...............8W-62
Power Seat Circuit Breaker............8W-62, 63
Powertrain Control Module...............8W-30
PTCs (JB).............................8W-12
Radiator Fan Disconnect.................8W-42
Radiator Fan Relays.....................8W-42
Radio................................8W-47
Radio Choke...........................8W-47
Reading Lamps........................8W-44
Rear A/C Heater Unit....................8W-42
Rear Blower Control Switches.............8W-42
Rear Cigar Lighter/Power Outlet...........8W-41
Rear Defogger On Indicator...............8W-42
Rear Dome Lamp.......................8W-44
Rear Fog Lamp.........................8W-51
Rear Fog Lamp Indicator.................8W-51
Rear Washer Motor.....................8W-53
Rear Washer Switch..................8W-42, 53
Rear Window Defogger...................8W-48
Rear Window Defogger Relay..............8W-48
Rear Window Defogger Switch..........8W-42, 48
Rear Wiper Delay On Indicator.........8W-42, 53
Rear Wiper Delay Switch..............8W-42, 53
Rear Wiper Motor.......................8W-53
Rear Wiper On Indicator..............8W-42, 53
Rear Wiper On Switch................8W-42, 53
Recirculate Mode Indicator................8W-42
Recirculate Mode Switch.................8W-42
Recirculation Door Actuator...............8W-42
Remote Keyless Entry Module.............8W-61
Repeater Lamps.....................8W-51, 52
8W - 02 - 2 8W - 02 COMPONENT INDEXNS/GS
Page 581 of 1938
8W-10 POWER DISTRIBUTION
Component Page
A/C Compressor Clutch........................8W-10-29
A/C Compressor Clutch Relay................8W-10-10, 25, 29
Airbag Control Module........................8W-10-35
Automatic Shut Down Relay....................8W-10-9, 23
Battery.............................8W-10-8, 27, 28
Body Control Module...........8W-10-11, 14, 16, 17, 19, 21, 30, 32
BS15..................................8W-10-33
BS16..................................8W-10-34
BS19..................................8W-10-30
BS33..................................8W-10-25
Center Dome Lamp..........................8W-10-21
Cigar/Accessory Relay......................8W-10-10, 31
Clockspring..............................8W-10-30
Combination Flasher/DRL Module................8W-10-29, 32
Controller Anti-Lock Brake....................8W-10-15, 29
Courtesy Lamp Relay.........................8W-10-21
Crank Case Heater..........................8W-10-27
CS01..................................8W-10-21
CS02..................................8W-10-20
CS1 ..................................8W-10-21
Data Link Connector.........................8W-10-11
Diesel Power Relay.......................8W-10-9, 25, 29
Door Lock Relay............................8W-10-13
Door Unlock Relay..........................8W-10-13
Downstream Heated Oxygen Sensor.................8W-10-23
Driver Door Courtesy Lamp.....................8W-10-21
Driver Door Unlock Relay......................8W-10-13
Driver Power Mirror.......................8W-10-12, 22
EGR Solenoid.............................8W-10-25
Engine Starter Motor.......................8W-10-8, 16
Engine Starter Motor Relay....................8W-10-8, 16
ES01................................8W-10-27, 28
ES06................................8W-10-25, 29
ES07..................................8W-10-29
ES09..................................8W-10-8
ES11 ................................8W-10-8, 28
ES12..................................8W-10-23
ES26..................................8W-10-8
ES28..................................8W-10-8
ES29................................8W-10-25, 29
ES40..................................8W-10-27
ES99..................................8W-10-24
Fog Lamp Relay............................8W-10-33
Front Blower Motor..........................8W-10-18
Front Blower Motor Relay.....................8W-10-8, 18
Front Cigar Lighter/Power Outlet..................8W-10-31
Front Reading Lamps/Switch.....................8W-10-20
Front Wiper Switch..........................8W-10-19
FS01..................................8W-10-24
FS03..................................8W-10-23
Fuel Heater..............................8W-10-27
Fuel Heater Relay.........................8W-10-9, 27
Fuel Injector No. 1........................8W-10-23, 24
Fuel Injector No. 2........................8W-10-23, 24
Fuel Injector No. 3........................8W-10-23, 24
Fuel Injector No. 4........................8W-10-23, 24
Fuel Injector No. 5..........................8W-10-24
Fuel Injector No. 6..........................8W-10-24
Fuel Pump Module..........................8W-10-25
Fuel Pump Relay..........................8W-10-9, 26
Fuel Tank Module...........................8W-10-26
Fuse 1 (JB)..............................8W-10-17
Fuse 1 (PDC)...........................8W-10-14, 35
Fuse 2 (JB)............................8W-10-11, 16
Fuse 2 (PDC).............................8W-10-35
Fuse 3 (JB)..............................8W-10-17
Fuse 4 (JB)..............................8W-10-17
Fuse 4 (PDC).......................8W-10-10, 32, 33, 34
Fuse 5 (JB)..............................8W-10-17
Fuse 5 (PDC).......................8W-10-10, 32, 33, 34
Fuse 6 (JB)..............................8W-10-16
Fuse 6 (PDC).......................8W-10-10, 32, 33, 34
Fuse 7 (JB)..............................8W-10-12
Fuse 7 (PDC).......................8W-10-10, 32, 33, 34
Fuse 8 (JB)..............................8W-10-16
Fuse 8 (PDC)...........................8W-10-10, 31
Fuse 9 (JB)..............................8W-10-16
Fuse 9 (PDC)...........................8W-10-10, 30
Fuse 10 (JB)..............................8W-10-16
Fuse 10 (PDC)...........................8W-10-10, 29
Fuse 11 (JB)..............................8W-10-14
Fuse 11 (PDC)...........................8W-10-10, 29
Fuse 12 (JB)............................8W-10-14, 18
Fuse 12 (PDC)...........................8W-10-10, 29
Fuse 13 (PDC)...........................8W-10-10, 29
Fuse 15 (PDC)...........................8W-10-9, 28
Fuse 16 (JB)..............................8W-10-27
Fuse 16 (PDC)...........................8W-10-9, 26
Fuse 17 (PDC).......................8W-10-9, 23, 25, 29
Fuse 18 (PDC)...........................8W-10-9, 20Component Page
Fuse 19 (PDC)...........................8W-10-8, 19
Fuse 20 (PDC)...........................8W-10-8, 19
Fuse 21 (PDC)...........................8W-10-8, 18
Fuse 22 (PDC)...........................8W-10-8, 17
Fuse 23 (PDC)...........................8W-10-8, 16
Fuse 24 (PDC)...........................8W-10-8, 15
Fuse 25 (PDC)...........................8W-10-8, 15
Fuse 26 (PDC)...........................8W-10-8, 13
Fuse 27 (PDC)...........................8W-10-8, 12
Fuse 28 (PDC)...........................8W-10-9, 11
Fusible Link A11............................8W-10-8
Fusible Link A54............................8W-10-8
G100................................8W-10-27, 28
G103................................8W-10-27, 28
G200................................8W-10-14, 32
G300............................8W-10-14, 18, 19, 31
Generator............................8W-10-8, 23, 25
Glove Box Lamp............................8W-10-20
Glow Plug Relay..........................8W-10-8, 25
Headlamp Dimmer Switch......................8W-10-32
Headlamp Switch.........................8W-10-21, 34
High Beam Relay.....................8W-10-10, 32, 33, 34
High Note Horn............................8W-10-30
Horn Relay............................8W-10-10, 30
Horn Switch..............................8W-10-30
HS6D S02...............................8W-10-13
Ignition Coil Pack...........................8W-10-23
Ignition Switch........................8W-10-11, 14, 16
Instrument Cluster........................8W-10-11, 14
Junction Block..........8W-10-11, 12, 13, 14, 16, 17, 18, 20, 21, 22,
26, 27, 29, 30, 31, 32, 35
Key-In Halo Lamp..........................8W-10-21
Left Headlamp..........................8W-10-33, 34
Left Headlamp Leveling Motor....................8W-10-34
Left High Headlamp.........................8W-10-33
Left Liftgate Flood Lamp.......................8W-10-21
Left Mid Reading Lamp.....................8W-10-20, 21
Left Rear Reading Lamp.....................8W-10-20, 21
Left Visor/Vanity Mirror Lamps...................8W-10-20
Low Beam Relay.....................8W-10-10, 32, 33, 34
Low Note Horn............................8W-10-30
Memory Seat/Mirror Module.....................8W-10-11
Message Center......................8W-10-11, 14, 33, 34
Name Brand Speaker Relay.....................8W-10-16
Park Lamp Relay..........................8W-10-8, 17
Passenger Door Courtesy Lamp...................8W-10-21
Passenger Power Mirror.....................8W-10-12, 22
Power Distribution Center .8W-10-8, 9, 10, 11, 12, 13, 14, 15, 16, 17, 18, 19,
20, 23, 25, 26, 27, 28, 29, 30, 31, 32, 33, 34, 35
Power Mirror Fold Relay.......................8W-10-22
Power Mirror Switch.........................8W-10-20
Power Mirror Unfold Relay....................8W-10-21, 22
Power Seat Circuit Breaker.....................8W-10-13
Powertrain Control Module............8W-10-16, 23, 25, 26, 27, 29
PTC 1 (JB)......................8W-10-16, 26, 27, 29, 35
PTC 3 (JB)..............................8W-10-13
PTC 7 (JB)............................8W-10-16, 31
PTC 8 (JB)..............................8W-10-16
PTC 9 (JB)..............................8W-10-16
Radiator Fan Relay..........................8W-10-15
Radiator Fan Relay No. 1.......................8W-10-25
Radiator Fan Relay No. 2.....................8W-10-15, 25
Radiator Fan Relay No. 3.....................8W-10-19, 25
Radio..................................8W-10-11
Rear Cigar Lighter/Power Outlet...................8W-10-31
Rear Dome Lamp...........................8W-10-21
Rear Window Defogger........................8W-10-12
Rear Window Defogger Relay.....................8W-10-12
Remote Keyless Entry Module....................8W-10-11
Right Headlamp..........................8W-10-33, 34
Right Headlamp Leveling Motor...................8W-10-34
Right High Headlamp.........................8W-10-33
Right Liftgate Flood Lamp......................8W-10-21
Right Low Headlamp.........................8W-10-33
Right Mid Reading Lamp.....................8W-10-20, 21
Right Rear Reading Lamp....................8W-10-20, 21
Right Visor/Vanity Mirror Lamps..................8W-10-20
Sentry Key Immobilizer Module...................8W-10-20
Stop Lamp Switch...........................8W-10-29
Transmission Control Module..................8W-10-16, 28
Transmission Control Relay....................8W-10-9, 28
Transmission Control Solenoids...................8W-10-28
Universal Garage Door Opener....................8W-10-20
Upstream Heated Oxygen Sensor..................8W-10-23
Vehicle Speed Sensor.......................8W-10-27, 29
Washer Module............................8W-10-13
Wiper High/Low Relay........................8W-10-19
Wiper Module.............................8W-10-19
Wiper On Relay..........................8W-10-8, 19
NS/GS8W - 10 POWER DISTRIBUTION 8W - 10 - 1