airbag CHRYSLER VOYAGER 1996 Workshop Manual
[x] Cancel search | Manufacturer: CHRYSLER, Model Year: 1996, Model line: VOYAGER, Model: CHRYSLER VOYAGER 1996Pages: 1938, PDF Size: 55.84 MB
Page 966 of 1938
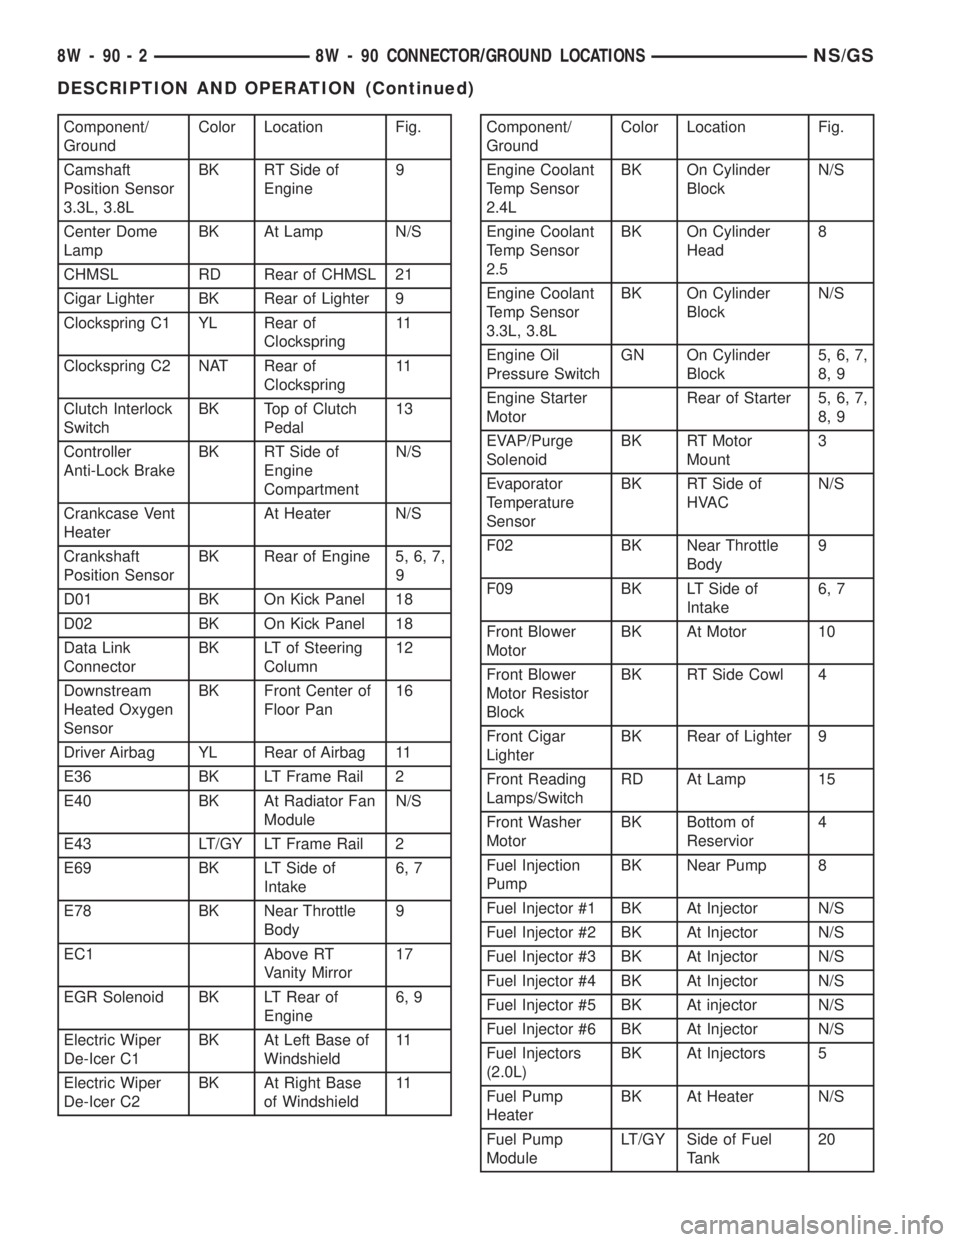
Component/
GroundColor Location Fig.
Camshaft
Position Sensor
3.3L, 3.8LBK RT Side of
Engine9
Center Dome
LampBK At Lamp N/S
CHMSL RD Rear of CHMSL 21
Cigar Lighter BK Rear of Lighter 9
Clockspring C1 YL Rear of
Clockspring11
Clockspring C2 NAT Rear of
Clockspring11
Clutch Interlock
SwitchBK Top of Clutch
Pedal13
Controller
Anti-Lock BrakeBK RT Side of
Engine
CompartmentN/S
Crankcase Vent
HeaterAt Heater N/S
Crankshaft
Position SensorBK Rear of Engine 5, 6, 7,
9
D01 BK On Kick Panel 18
D02 BK On Kick Panel 18
Data Link
ConnectorBK LT of Steering
Column12
Downstream
Heated Oxygen
SensorBK Front Center of
Floor Pan16
Driver Airbag YL Rear of Airbag 11
E36 BK LT Frame Rail 2
E40 BK At Radiator Fan
ModuleN/S
E43 LT/GY LT Frame Rail 2
E69 BK LT Side of
Intake6, 7
E78 BK Near Throttle
Body9
EC1 Above RT
Vanity Mirror17
EGR Solenoid BK LT Rear of
Engine6, 9
Electric Wiper
De-Icer C1BK At Left Base of
Windshield11
Electric Wiper
De-Icer C2BK At Right Base
of Windshield11Component/
GroundColor Location Fig.
Engine Coolant
Temp Sensor
2.4LBK On Cylinder
BlockN/S
Engine Coolant
Temp Sensor
2.5BK On Cylinder
Head8
Engine Coolant
Temp Sensor
3.3L, 3.8LBK On Cylinder
BlockN/S
Engine Oil
Pressure SwitchGN On Cylinder
Block5, 6, 7,
8, 9
Engine Starter
MotorRear of Starter 5, 6, 7,
8, 9
EVAP/Purge
SolenoidBK RT Motor
Mount3
Evaporator
Temperature
SensorBK RT Side of
HVACN/S
F02 BK Near Throttle
Body9
F09 BK LT Side of
Intake6, 7
Front Blower
MotorBK At Motor 10
Front Blower
Motor Resistor
BlockBK RT Side Cowl 4
Front Cigar
LighterBK Rear of Lighter 9
Front Reading
Lamps/SwitchRD At Lamp 15
Front Washer
MotorBK Bottom of
Reservior4
Fuel Injection
PumpBK Near Pump 8
Fuel Injector #1 BK At Injector N/S
Fuel Injector #2 BK At Injector N/S
Fuel Injector #3 BK At Injector N/S
Fuel Injector #4 BK At Injector N/S
Fuel Injector #5 BK At injector N/S
Fuel Injector #6 BK At Injector N/S
Fuel Injectors
(2.0L)BK At Injectors 5
Fuel Pump
HeaterBK At Heater N/S
Fuel Pump
ModuleLT/GY Side of Fuel
Tank20
8W - 90 - 2 8W - 90 CONNECTOR/GROUND LOCATIONSNS/GS
DESCRIPTION AND OPERATION (Continued)
Page 967 of 1938
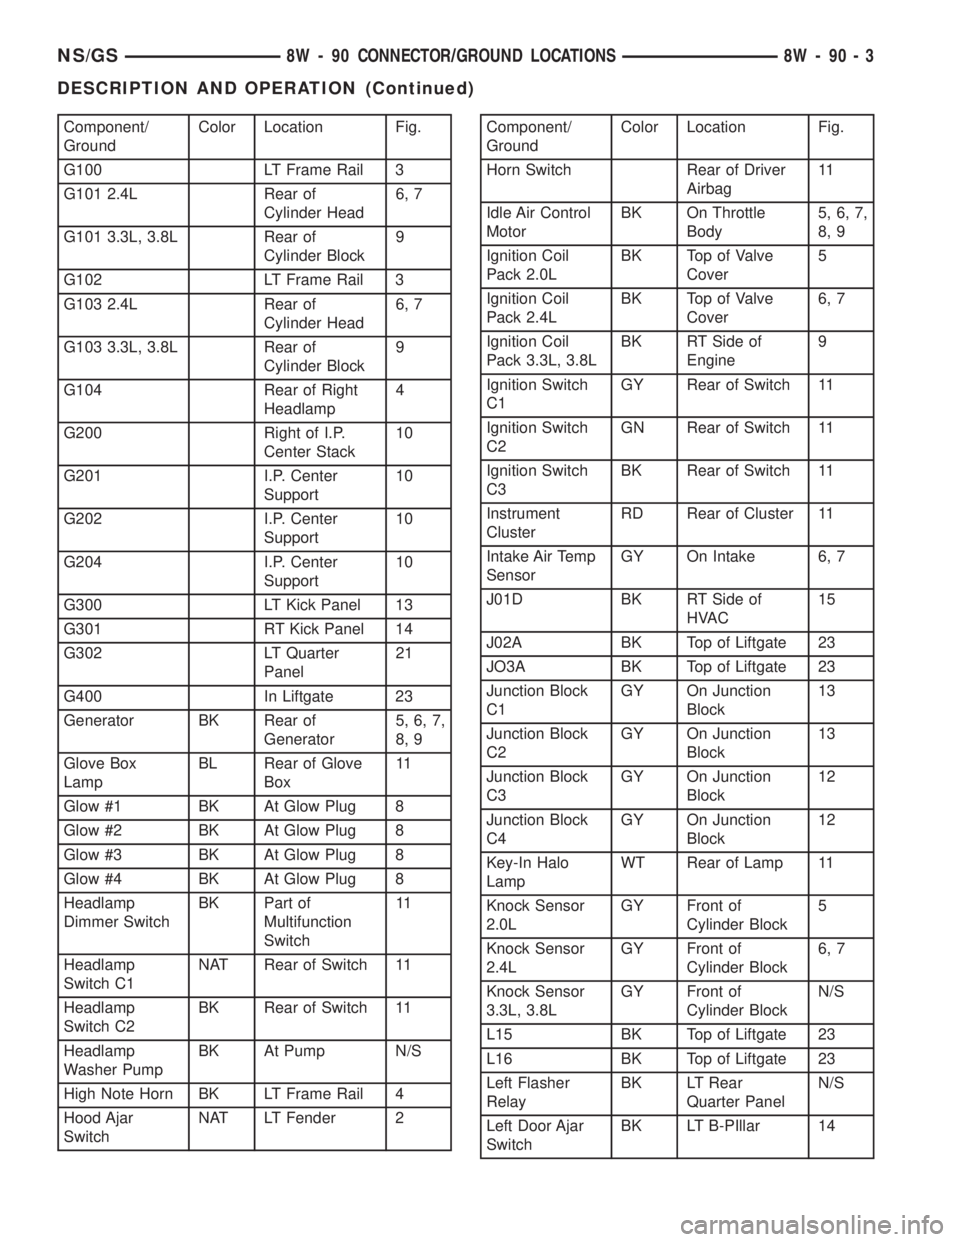
Component/
GroundColor Location Fig.
G100 LT Frame Rail 3
G101 2.4L Rear of
Cylinder Head6, 7
G101 3.3L, 3.8L Rear of
Cylinder Block9
G102 LT Frame Rail 3
G103 2.4L Rear of
Cylinder Head6, 7
G103 3.3L, 3.8L Rear of
Cylinder Block9
G104 Rear of Right
Headlamp4
G200 Right of I.P.
Center Stack10
G201 I.P. Center
Support10
G202 I.P. Center
Support10
G204 I.P. Center
Support10
G300 LT Kick Panel 13
G301 RT Kick Panel 14
G302 LT Quarter
Panel21
G400 In Liftgate 23
Generator BK Rear of
Generator5, 6, 7,
8, 9
Glove Box
LampBL Rear of Glove
Box11
Glow #1 BK At Glow Plug 8
Glow #2 BK At Glow Plug 8
Glow #3 BK At Glow Plug 8
Glow #4 BK At Glow Plug 8
Headlamp
Dimmer SwitchBK Part of
Multifunction
Switch11
Headlamp
Switch C1NAT Rear of Switch 11
Headlamp
Switch C2BK Rear of Switch 11
Headlamp
Washer PumpBK At Pump N/S
High Note Horn BK LT Frame Rail 4
Hood Ajar
SwitchNAT LT Fender 2Component/
GroundColor Location Fig.
Horn Switch Rear of Driver
Airbag11
Idle Air Control
MotorBK On Throttle
Body5, 6, 7,
8, 9
Ignition Coil
Pack 2.0LBK Top of Valve
Cover5
Ignition Coil
Pack 2.4LBK Top of Valve
Cover6, 7
Ignition Coil
Pack 3.3L, 3.8LBK RT Side of
Engine9
Ignition Switch
C1GY Rear of Switch 11
Ignition Switch
C2GN Rear of Switch 11
Ignition Switch
C3BK Rear of Switch 11
Instrument
ClusterRD Rear of Cluster 11
Intake Air Temp
SensorGY On Intake 6, 7
J01D BK RT Side of
HVAC15
J02A BK Top of Liftgate 23
JO3A BK Top of Liftgate 23
Junction Block
C1GY On Junction
Block13
Junction Block
C2GY On Junction
Block13
Junction Block
C3GY On Junction
Block12
Junction Block
C4GY On Junction
Block12
Key-In Halo
LampWT Rear of Lamp 11
Knock Sensor
2.0LGY Front of
Cylinder Block5
Knock Sensor
2.4LGY Front of
Cylinder Block6, 7
Knock Sensor
3.3L, 3.8LGY Front of
Cylinder BlockN/S
L15 BK Top of Liftgate 23
L16 BK Top of Liftgate 23
Left Flasher
RelayBK LT Rear
Quarter PanelN/S
Left Door Ajar
SwitchBK LT B-PIllar 14
NS/GS8W - 90 CONNECTOR/GROUND LOCATIONS 8W - 90 - 3
DESCRIPTION AND OPERATION (Continued)
Page 969 of 1938
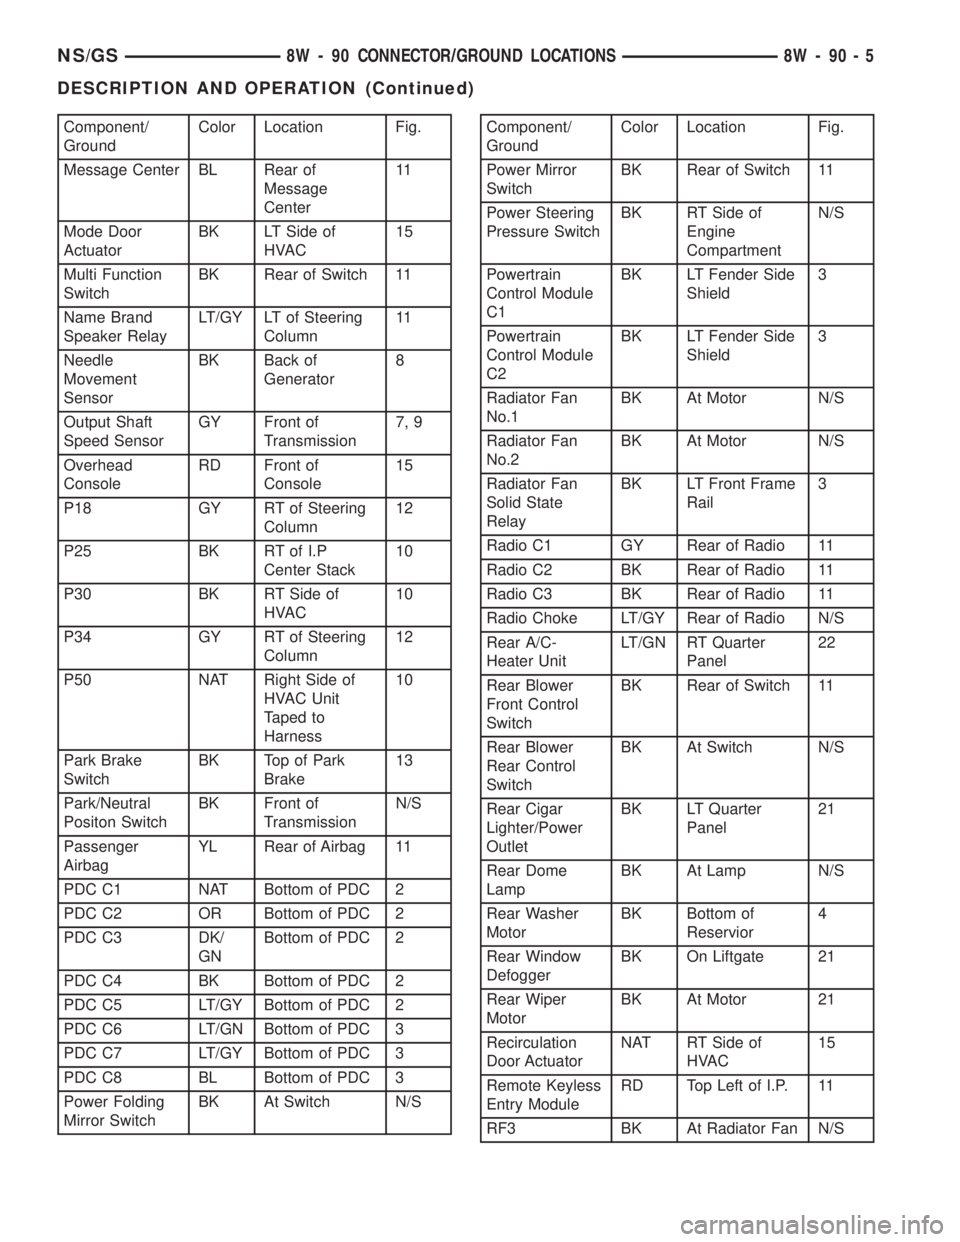
Component/
GroundColor Location Fig.
Message Center BL Rear of
Message
Center11
Mode Door
ActuatorBK LT Side of
HVAC15
Multi Function
SwitchBK Rear of Switch 11
Name Brand
Speaker RelayLT/GY LT of Steering
Column11
Needle
Movement
SensorBK Back of
Generator8
Output Shaft
Speed SensorGY Front of
Transmission7, 9
Overhead
ConsoleRD Front of
Console15
P18 GY RT of Steering
Column12
P25 BK RT of I.P
Center Stack10
P30 BK RT Side of
HVAC10
P34 GY RT of Steering
Column12
P50 NAT Right Side of
HVAC Unit
Taped to
Harness10
Park Brake
SwitchBK Top of Park
Brake13
Park/Neutral
Positon SwitchBK Front of
TransmissionN/S
Passenger
AirbagYL Rear of Airbag 11
PDC C1 NAT Bottom of PDC 2
PDC C2 OR Bottom of PDC 2
PDC C3 DK/
GNBottom of PDC 2
PDC C4 BK Bottom of PDC 2
PDC C5 LT/GY Bottom of PDC 2
PDC C6 LT/GN Bottom of PDC 3
PDC C7 LT/GY Bottom of PDC 3
PDC C8 BL Bottom of PDC 3
Power Folding
Mirror SwitchBK At Switch N/SComponent/
GroundColor Location Fig.
Power Mirror
SwitchBK Rear of Switch 11
Power Steering
Pressure SwitchBK RT Side of
Engine
CompartmentN/S
Powertrain
Control Module
C1BK LT Fender Side
Shield3
Powertrain
Control Module
C2BK LT Fender Side
Shield3
Radiator Fan
No.1BK At Motor N/S
Radiator Fan
No.2BK At Motor N/S
Radiator Fan
Solid State
RelayBK LT Front Frame
Rail3
Radio C1 GY Rear of Radio 11
Radio C2 BK Rear of Radio 11
Radio C3 BK Rear of Radio 11
Radio Choke LT/GY Rear of Radio N/S
Rear A/C-
Heater UnitLT/GN RT Quarter
Panel22
Rear Blower
Front Control
SwitchBK Rear of Switch 11
Rear Blower
Rear Control
SwitchBK At Switch N/S
Rear Cigar
Lighter/Power
OutletBK LT Quarter
Panel21
Rear Dome
LampBK At Lamp N/S
Rear Washer
MotorBK Bottom of
Reservior4
Rear Window
DefoggerBK On Liftgate 21
Rear Wiper
MotorBK At Motor 21
Recirculation
Door ActuatorNAT RT Side of
HVAC15
Remote Keyless
Entry ModuleRD Top Left of I.P. 11
RF3 BK At Radiator Fan N/S
NS/GS8W - 90 CONNECTOR/GROUND LOCATIONS 8W - 90 - 5
DESCRIPTION AND OPERATION (Continued)
Page 995 of 1938

CONNECTOR/GROUND LOCATIONS
For items not shown in this section a N/S is placed
in the Fig. column.
Component/
GroundColor Location Fig.
A/C
Compressor
ClutchBK Top of A/C
Compressor5, 6, 7,
8, 9
A/C-Heater
Control Module
C1NAT Rear of Control 11
A/C-Heater
Control Module
C2BK Rear of Control 11
A/C Pressure
TransducerGY RT Side Cowl 3
A/C Zone Door
ActuatorNAT LT Side of
HVAC15
Airbag Control
Module C1YL Rear of I.P.
Center Stack12
Airbag Contol
Module C2BK Rear of I.P.
Center Stack12
All Wheel Drive
SolenoidBK Near Fuel Tank 20
Ambient
Temperature
SensorGY On Radiator
Closure Panel4
Ash Receiver
LampRD At Lamp 10
Automatic
Day/Night MirrorBK At Mirror 17
B01 BK RT Kick Panel 18
B02 BK RT Kick Panel 18
B03 BK LT Kick Panel 18
B09 BK Under Seat 16
B17 BK LT Quarter
Panel21
B23 BK RT of Steering
Column13
B33 BK LT Frame Rail 2
B56 BK Under Seat 16
B70 LT/GY LT Frame Rail 2
B75 BL Bottom of RT
B-Pillar14
B98 BK Rear of RT Tail
LampN/SComponent/
GroundColor Location Fig.
B99 BK Rear of LT Tail
LampN/S
B120 BK LT Kick Panel N/S
Backup Lamp
Switch (M/T)BK On
Transmission5, 6, 8
Blend Door
ActuatorNAT LT Side of
HVAC15
Body Control
Module C1NAT On Junction
Block12
Body Control
Module C2NAT On Junction
Block12
Brake Pressure
SwitchBK On Master
Cylinder2
C19 At Top Center
of Windshield17
C20 Bottom of RT
B-PillarN/S
Camshaft
Position Sensor
2.4LBK Rear of
Cylinder Head6, 7
Camshaft
Position Sensor
3.3L, 3.8LBK RT Side of
Engine9
Center Dome
LampBK At Lamp N/S
CHMSL RD Rear of CHMSL 23
Clockspring C1 YL Rear of
Clockspring11
Clockspring C2 NAT Rear of
Clockspring11
Clutch Switch BK Top of Clutch
Pedal13
Controller
Anti-Lock BrakeBK LT Side of
Engine
CompartmentN/S
Crankshaft
Position SensorBK Rear of Engine 5, 6, 7,
9
D01 BK On Kick Panel 19
D02 BK On Kick Panel 19
Data Link
ConnectorBK LT of Steering
Column12
NS/GS8W - 90 CONNECTOR/GROUND LOCATIONS 8W - 90 - 31
DESCRIPTION AND OPERATION (Continued)
Page 996 of 1938

Component/
GroundColor Location Fig.
Downstream
Heated Oxygen
SensorBK Front Center of
Floor Pan16
Driver Airbag YL Rear of Airbag 11
E36 BK LT Frame Rail 2
E40 BK At Radiator Fan
ModuleN/S
E43 LT/GY LT Frame Rail 2
E69 BK LT Side of
Intake6, 7
E78 BK Near Throttle
Body9
EC1 At Top Center
of Windshield17
EGR Solenoid BK LT Rear of
Engine6, 9
Electric Wiper
De-Icer C1BK At Right Base
of Windshield11
Electric Wiper
De-Icer C2BK At Left Base of
Windshield11
Engine Coolant
Temp Sensor
2.4LBK On Cylinder
BlockN/S
Engine Coolant
Temp Sensor
3.3L, 3.8LBK On Cylinder
BlockN/S
Engine Oil
Pressure SwitchGN On Cylinder
Block5, 6, 7,
8, 9
Engine Starter
MotorRear of Starter 5, 6, 7,
8, 9
EVAP/Purge
SolenoidBK RT Motor
Mount3
Evaporator
Temperature
SensorBK RT Side of
HVACN/S
F02 BK Near Throttle
Body9
F09 BK LT Side of
Intake6, 7
Front Blower
MotorBK At Motor 10
Front Blower
Motor Resistor
BlockBK LT Side of
Engine2
Front Cigar
LighterBK Rear of Lighter 11Component/
GroundColor Location Fig.
Front Reading
Lamps/SwitchBL At Lamp 17
Front Washer
MotorBK Bottom of
Reservior4
Fuel Injector #1 BK At Injector N/S
Fuel Injector #2 BK At Injector N/S
Fuel Injector #3 BK At Injector N/S
Fuel Injector #4 BK At Injector N/S
Fuel Injector #5 BK At Injector N/S
Fuel Injector #6 BK At Injector N/S
Fuel Pump
ModuleGY Side of Fuel
Tank20
G100 LT Frame Rail 3
G101 2.4L Rear of
Cylinder Head6, 7
G101 3.3L, 3.8L Rear of
Cylinder Block9
G102 LT Frame Rail 3
G103 2.4L Rear of
Cylinder Head6, 7
G103 3.3L, 3.8L Rear of
Cylinder Block9
G104 Near T/O for
RT HeadlampN/S
G200 Left of I.P.
Center Stack10
G201 I.P. Center
Support10
G202 I.P. Center
Support10
G204 I.P. Center
Support10
G300 BK LT Kick Panel 13
G301 RT Kick Panel 13, 14
G302 BK LT Quarter
Panel21
G400 BK In Liftgate 23
Generator BK Rear of
Generator5, 6, 7,
8, 9
Glove Box
LampBL Rear of Glove
Box11
Headlamp
Dimmer SwitchBK Part of
Multifunction
Switch11
8W - 90 - 32 8W - 90 CONNECTOR/GROUND LOCATIONSNS/GS
DESCRIPTION AND OPERATION (Continued)
Page 997 of 1938

Component/
GroundColor Location Fig.
Headlamp
Switch C1NAT Rear of Switch 11
Headlamp
Switch C2BK Rear of Switch 11
Headlamp
Washer MotorBottom of
ReserviorN/S
High Note Horn BK LT Frame Rail 4
Hood Ajar
SwitchNAT LT Fender 2
Horn Switch Rear of Driver
Airbag11
Idle Air Control
MotorBK On Throttle
Body5, 6, 7,
8, 9
Ignition Coil
Pack 2.4LBK Top of Valve
Cover6, 7
Ignition Coil
Pack 3.3L, 3.8LBK RT Side of
Engine9
Ignition Switch
C1GY Rear of Switch 11
Ignition Switch
C2GN Rear of Switch 11
Ignition Switch
C3BK Rear of Switch 11
Instrument
ClusterRD Rear of Cluster 11
Intake Air Temp
SensorGY On Intake 6, 7
J01D BK RT Side of
HVAC15
J02A BK Top of Liftgate 23
JO3A BK Top of Liftgate 23
Junction Block
C1GY On Junction
Block12, 13
Junction Block
C2GY On Junction
Block12, 13
Junction Block
C3GY On Junction
Block12
Junction Block
C4GY On Junction
Block12
Key-In Halo
LampWT Rear of Lamp 11
Knock Sensor
2.4LGY Front of
Cylinder Block6, 7
Knock Sensor
3.3L, 3.8LGY Front of
Cylinder BlockN/S
L15 BK Top of Liftgate 23Component/
GroundColor Location Fig.
L16 BK Top of Liftgate 23
Left
Combination
RelayBK LT Rear
Quarter PanelN/S
Left Door Ajar
SwitchBK LT B-PIllar 12
Left Door
Arm/Disarm
SwitchBK At Switch 19
Left Door
Courtesy LampBK At Lamp 19
Left Door
SpeakerBK At Speaker 19
Left Fog Lamp GY At Lamp 4
Left Front Door
Lock MotorBK At Motor 19
Left Front Panel
SpeakerBK At Speaker 11
Left Front
Park/Turn
Signal LampBK At Lamp 4
Left Front
Wheel Speed
SensorBK LT Fender Side
Shield2
Left Front
Window MotorRD At Motor 19
Left Headlamp BK At Lamp 2
Left Headlamp
Leveling MotorBK At Motor N/S
Left Liftgate
Flood LampBK At Lamp 23
Left Mid
Reading LampGY At Lamp 17
Left Power Door
Lock SwitchBK At Switch 19
Left Power
Mirror C1RD At Mirror 11
Left Power
Mirror C2BL At Mirror 11
Left Power
Window SwitchOR At Switch 19
Left Rear Lamp
AssemblyBK At Lamp 21
Left Rear Door
Ajar SwitchBK LT C-Pillar 21
Left Rear Pillar
SpeakerBK At Speaker 21
NS/GS8W - 90 CONNECTOR/GROUND LOCATIONS 8W - 90 - 33
DESCRIPTION AND OPERATION (Continued)
Page 998 of 1938

Component/
GroundColor Location Fig.
Left Rear
Reading LampGY At Lamp 17
Left Rear
Sliding Door
ContactBK LT B-Pillar 14
Left Rear
Sliding Door
Lock MotorBK At Motor N/S
Left Rear
SpeakerBK At Speaker 21
Left Rear Vent
MotorNAT At Motor 21
Left Rear Wheel
Speed SensorGY Center Rear of
Floor Pan16
Left Repeater
LampGY At Lamp N/S
Left Speed
Control SwitchLeft Side of
Steering Wheel
Pad11
Left Stop/Turn
Signal RelayBK LT Quarter
PanelN/S
Left Visor/Vanity
LampBK At Lamp 17
License Lamp GY At Lamps 23
Liftgate Ajar
SwitchBK At Latch 23
Liftgate
Arm/Disarm
SwitchGY At Key Cylinder 23
Liftgate Lock
MotorBK At Motor 23
LJ01 BK LT Quarter
Panel21
Low Note Horn BK LT Frame Rail 4
Low Washer
Fluid Level
SensorBK Bottom of
Reservior4
MAP Sensor
2.4LBK On Intake N/S
MAP Sensor
3.3L, 3.8LBK Near Throttle
Body9
Memort
Seat/Mirror
ModuleBK RT Front of
Floor Pan16
Memory Set
SwitchBL At Switch 19Component/
GroundColor Location Fig.
Message Center BL Rear of
Message
Center11
Mode Door
ActuatorBK LT Side of
HVAC15
Multi Function
SwitchBK Rear of Switch 11
Name Brand
Speaker RelayLT/GY LT of Steering
ColumnN/S
Output Shaft
Speed SensorGY Front of
Transmission7, 9
Overhead
ConsoleRD Front of
Console17
P18 GY RT of Steering
Column12
P30 BK RT Side of
HVAC10
P34 GY RT of Steering
Column12
P50 NAT Right Side of
HVAC Taped to
Harness10
Park Brake
SwitchNAT Top of Park
BrakeN/S
Park/Neutral
Positon SwitchBK Front of
TransmissionN/S
Passenger
AirbagYL Rear of Airbag 11
PDC C1 NAT Bottom of PDC 2
PDC C2 OR Bottom of PDC 2
PDC C3 DK/
GNBottom of PDC 2
PDC C4 BK Bottom of PDC 2
PDC C5 LT/GY Bottom of PDC 2
PDC C6 LT/GN Bottom of PDC 3
PDC C7 LT/GY Bottom of PDC 3
PDC C8 BL Bottom of PDC 3
Power Folding
Mirror SwitchBK At Switch N/S
Power Mirror
SwitchBK Rear of Switch 11
Power Steering
Pressure SwitchBK RT Side of
Engine
CompartmentN/S
8W - 90 - 34 8W - 90 CONNECTOR/GROUND LOCATIONSNS/GS
DESCRIPTION AND OPERATION (Continued)
Page 1283 of 1938
FRAME
INDEX
page page
REMOVAL AND INSTALLATION
FRONT CROSSMEMBER MOUNT BUSHINGS . . . 5
FRONT CROSSMEMBER................... 3SPECIFICATIONS
FRAME AND BODY OPENING DIMENSIONS.... 5
REMOVAL AND INSTALLATION
FRONT CROSSMEMBER
The front suspension crossmember must be
installed in the design location to achieve proper
front end suspension alignment. If the crossmember
is removed without applying reference marks on the
frame rails, align the crossmember according to the
dimensions provided in this group.
NOTE: If the caged nuts in the frame rails become
damaged and cannot be reused, a replacement nut
can be obtained through a MoparTParts supplier.
REMOVAL
(1) Disconnect battery negative cable.
(2) Remove steering column lower cover from
instrument panel. Refer to Group 8E, Instrument
Panel and Systems.
(3) Remove knee blocker reinforcement. Refer to
Group 8E, Instrument Panel and Systems.
(4) Position steering so front wheels are straight
ahead.
CAUTION: Do not rotate steering wheel after disen-
gaging lower coupling from steering gear, damage
to airbag clock spring can result.
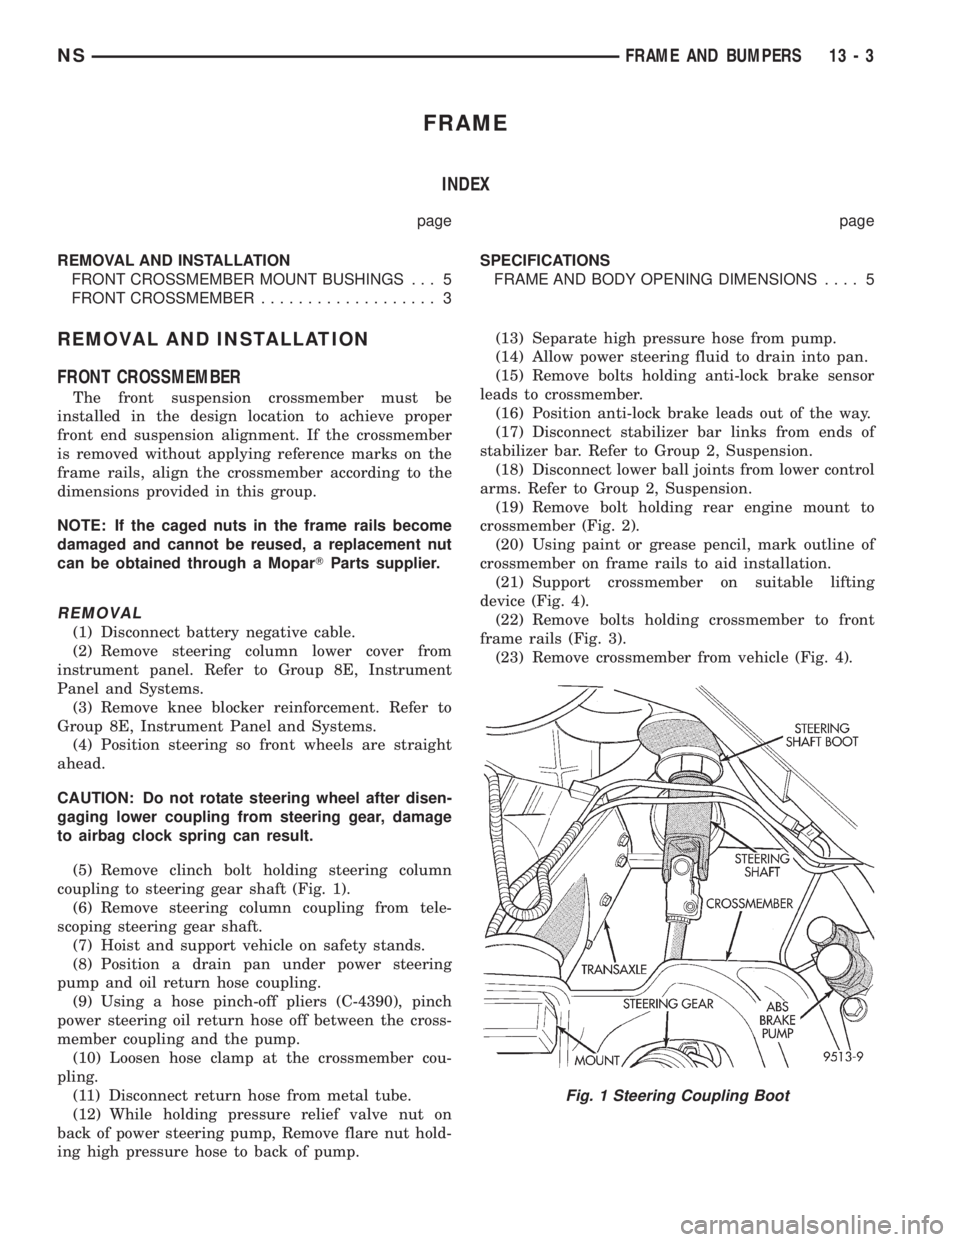
(5) Remove clinch bolt holding steering column
coupling to steering gear shaft (Fig. 1).
(6) Remove steering column coupling from tele-
scoping steering gear shaft.
(7) Hoist and support vehicle on safety stands.
(8) Position a drain pan under power steering
pump and oil return hose coupling.
(9) Using a hose pinch-off pliers (C-4390), pinch
power steering oil return hose off between the cross-
member coupling and the pump.
(10) Loosen hose clamp at the crossmember cou-
pling.
(11) Disconnect return hose from metal tube.
(12) While holding pressure relief valve nut on
back of power steering pump, Remove flare nut hold-
ing high pressure hose to back of pump.(13) Separate high pressure hose from pump.
(14) Allow power steering fluid to drain into pan.
(15) Remove bolts holding anti-lock brake sensor
leads to crossmember.
(16) Position anti-lock brake leads out of the way.
(17) Disconnect stabilizer bar links from ends of
stabilizer bar. Refer to Group 2, Suspension.
(18) Disconnect lower ball joints from lower control
arms. Refer to Group 2, Suspension.
(19) Remove bolt holding rear engine mount to
crossmember (Fig. 2).
(20) Using paint or grease pencil, mark outline of
crossmember on frame rails to aid installation.
(21) Support crossmember on suitable lifting
device (Fig. 4).
(22) Remove bolts holding crossmember to front
frame rails (Fig. 3).
(23) Remove crossmember from vehicle (Fig. 4).
Fig. 1 Steering Coupling Boot
NSFRAME AND BUMPERS 13 - 3
Page 1462 of 1938
STEERING COLUMN
INDEX
page page
DESCRIPTION AND OPERATION
STEERING COLUMN DESCRIPTION......... 36
DIAGNOSIS AND TESTING
STEERING COLUMN..................... 38
SERVICE PROCEDURES
STEERING COLUMN SERVICE PROCEDURE
WARNINGS........................... 38REMOVAL AND INSTALLATION
STEERING COLUMN ASSEMBLY............ 38
SPECIFICATIONS
STEERING COLUMN FASTENER TORQUE
SPECIFICATIONS...................... 45
DESCRIPTION AND OPERATION
STEERING COLUMN DESCRIPTION
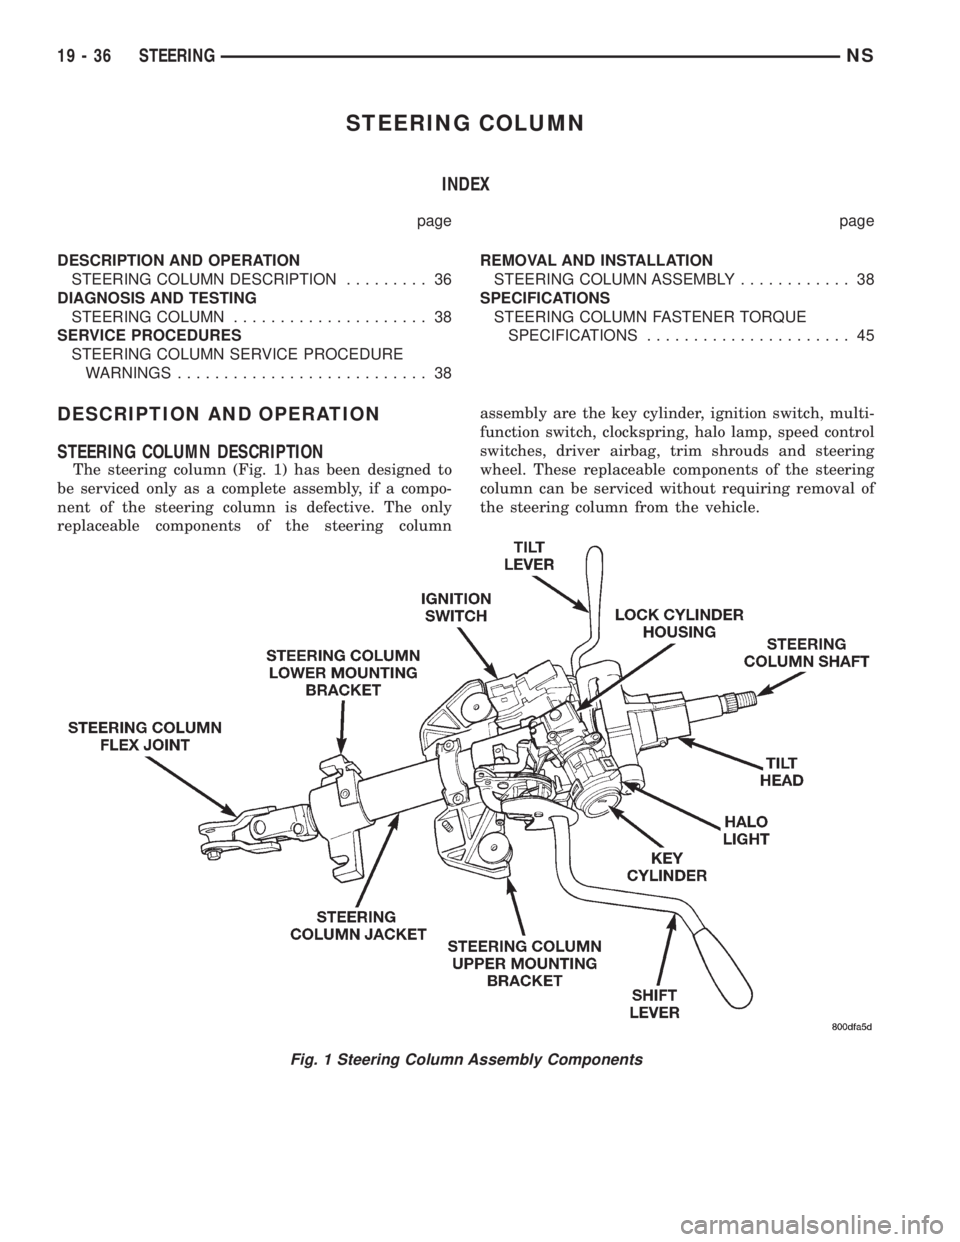
The steering column (Fig. 1) has been designed to
be serviced only as a complete assembly, if a compo-
nent of the steering column is defective. The only
replaceable components of the steering columnassembly are the key cylinder, ignition switch, multi-
function switch, clockspring, halo lamp, speed control
switches, driver airbag, trim shrouds and steering
wheel. These replaceable components of the steering
column can be serviced without requiring removal of
the steering column from the vehicle.
Fig. 1 Steering Column Assembly Components
19 - 36 STEERINGNS
Page 1471 of 1938
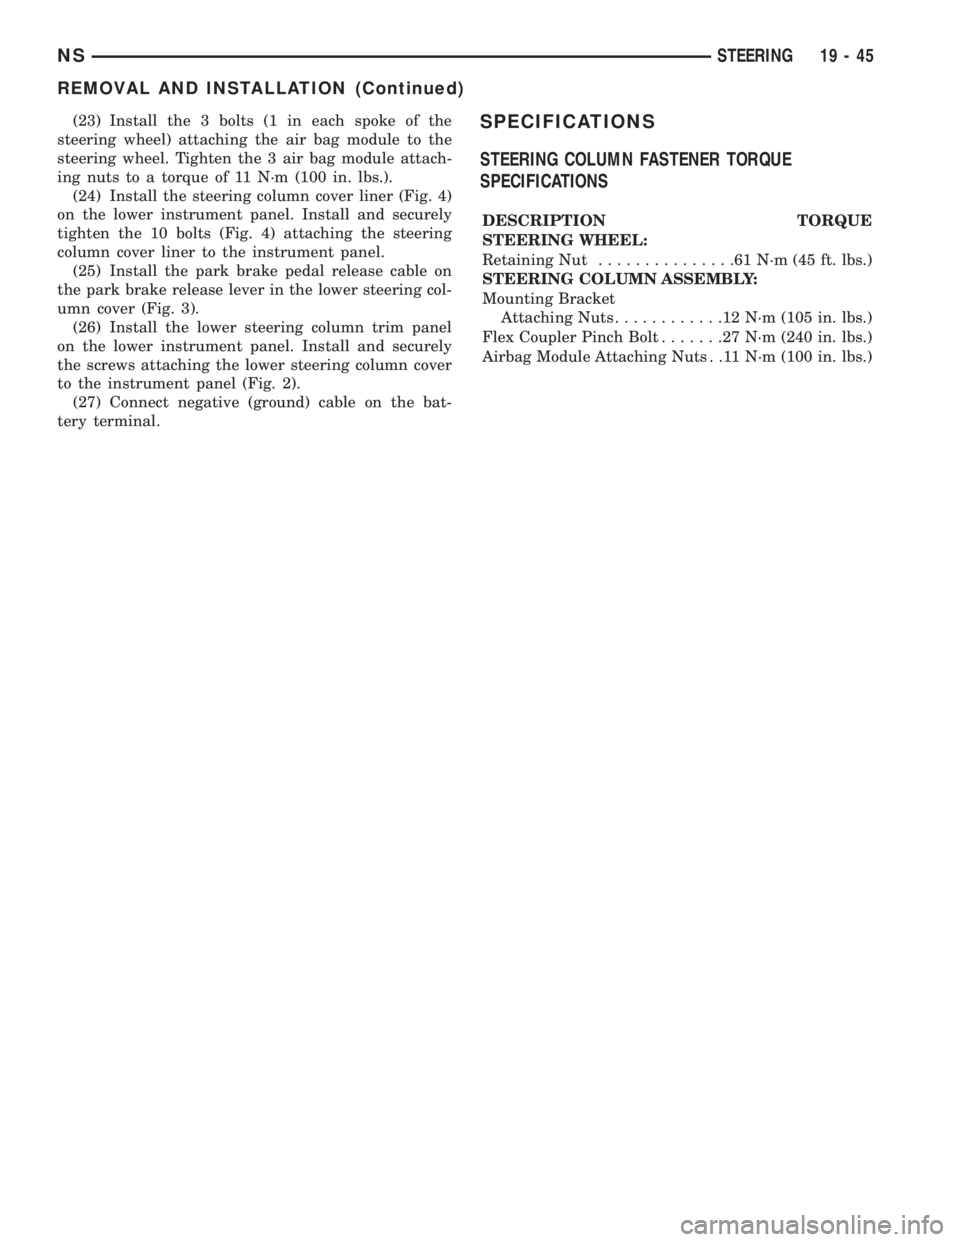
(23) Install the 3 bolts (1 in each spoke of the
steering wheel) attaching the air bag module to the
steering wheel. Tighten the 3 air bag module attach-
ing nuts to a torque of 11 N´m (100 in. lbs.).
(24) Install the steering column cover liner (Fig. 4)
on the lower instrument panel. Install and securely
tighten the 10 bolts (Fig. 4) attaching the steering
column cover liner to the instrument panel.
(25) Install the park brake pedal release cable on
the park brake release lever in the lower steering col-
umn cover (Fig. 3).
(26) Install the lower steering column trim panel
on the lower instrument panel. Install and securely
the screws attaching the lower steering column cover
to the instrument panel (Fig. 2).
(27) Connect negative (ground) cable on the bat-
tery terminal.SPECIFICATIONS
STEERING COLUMN FASTENER TORQUE
SPECIFICATIONS
DESCRIPTION TORQUE
STEERING WHEEL:
Retaining Nut...............61N´m(45ft.lbs.)
STEERING COLUMN ASSEMBLY:
Mounting Bracket
Attaching Nuts............12N´m(105 in. lbs.)
Flex Coupler Pinch Bolt.......27N´m(240 in. lbs.)
Airbag Module Attaching Nuts . .11 N´m (100 in. lbs.)
NSSTEERING 19 - 45
REMOVAL AND INSTALLATION (Continued)