airbag CHRYSLER VOYAGER 1996 Service Manual
[x] Cancel search | Manufacturer: CHRYSLER, Model Year: 1996, Model line: VOYAGER, Model: CHRYSLER VOYAGER 1996Pages: 1938, PDF Size: 55.84 MB
Page 361 of 1938

(8) Using the indicator adjuster thumbwheel on
the indicator clip below the steering column. Rotate
the indicator thumbwheel to position the indicator
calibration arrow to the center of the N slot on the
instrument cluster mask.
(9) After the indicator has been properly adjusted,
move the shift lever through each gear position to
verify the appropriate gear position has been selected
and the slot is fully covered by the indicator. The left
edge of the indicator will just peek at the left edge of
the P slot in Park.
(10) If the indicator is not covering each of the
selected gear positions when selected, place the shift
lever back into neutral N and readjust the indicator.
Repeat the process until each gear is covered when
selected.
(11) Install the metal knee blocker panel.
(12) Install the lower steering column cover.
INSTRUMENT PANEL
The instrument panel is removed as a unit. The
steering column and wiring harnesses are assembled
into the panel before installation. Service procedures
for interior trim not related to the instrument panel
can be found in Group 23, Body.
REMOVAL
(1) Disconnect the battery, negative cable first.
(2) Remove the lower console.
(3) Remove the screw holding the lower heat duct
to the instrument panel support (Fig. 26).
(4) Disconnect the heat duct from the vehicle.
(5) Remove the bolts holding the lower supports to
the instrument panel frame (Fig. 27).(6) Remove the bolts holding the lower supports to
the floor pan.
(7) Remove the right and left end covers.
(8) Disconnect the wire connectors from the Pas-
senger Airbag Module.
(9) Remove the front door sill trim covers.
(10) Remove the A-pillar trim covers.
(11) Remove the glove box.
(12) Disconnect the antenna lead connector from
behind the glove box.
(13) Remove the lower steering column cover.
(14) Remove the knee blocker panel.
(15) Disconnect the lower two, forty pin wire har-
ness connectors, from the main Junction Block near
left cowl side panel (Fig. 28).
(16) Disconnect the instrument panel wire harness
connector from the bottom of Body Control Module.
(17) Disconnect the two forty pin connectors from
the right of the steering column (Fig. 29).
(18) Remove the clinch bolt holding upper the
steering shaft to the lower steering shaft (Fig. 29).
Fig. 25 Range Indicator Cable
Fig. 26 Heat Duct
Fig. 27 Lower Supports
NSINSTRUMENT PANEL AND SYSTEMS 8E - 25
REMOVAL AND INSTALLATION (Continued)
Page 393 of 1938
(6) Remove the bolts holding the lower supports to
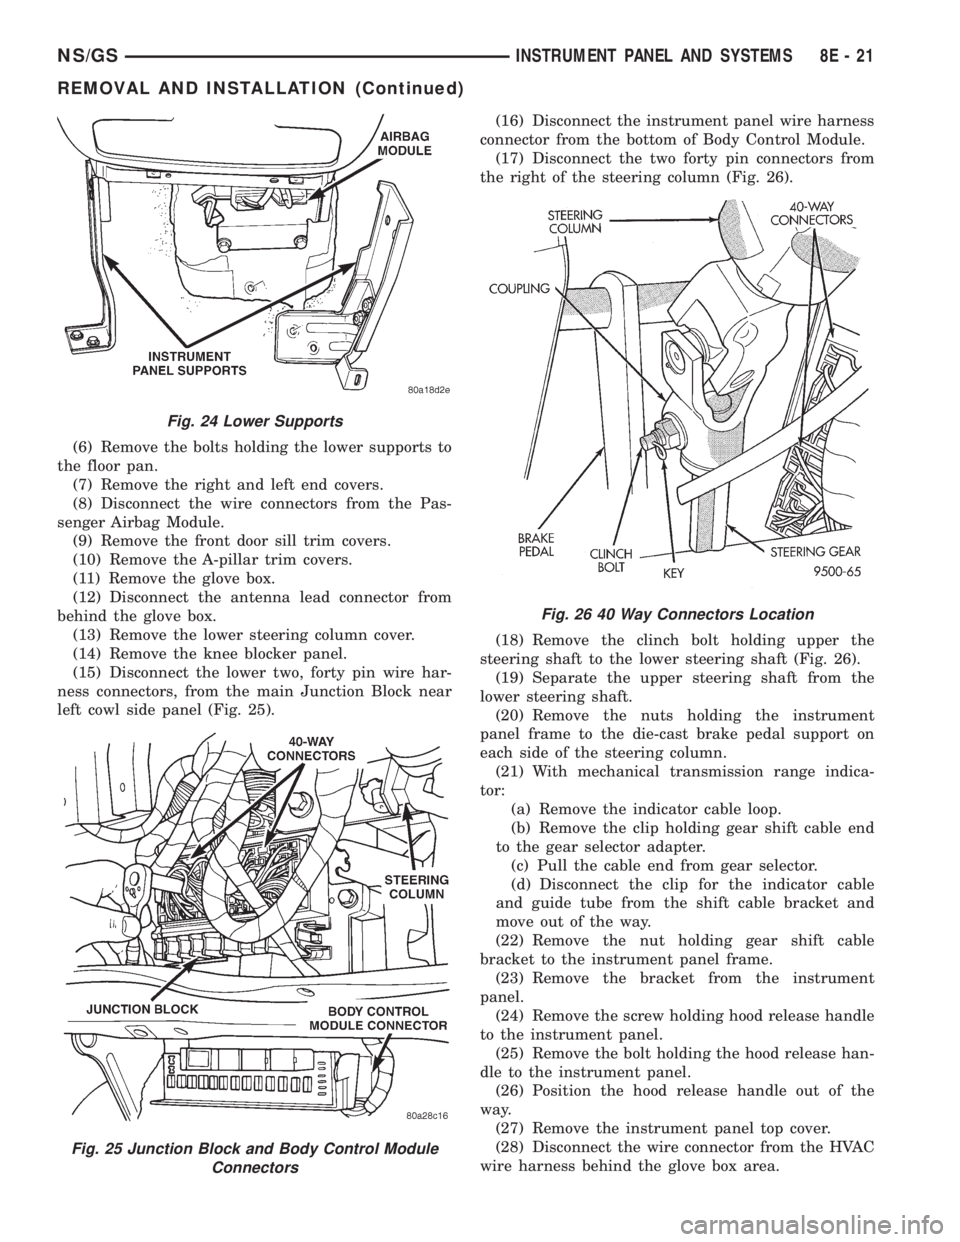
the floor pan.
(7) Remove the right and left end covers.
(8) Disconnect the wire connectors from the Pas-
senger Airbag Module.
(9) Remove the front door sill trim covers.
(10) Remove the A-pillar trim covers.
(11) Remove the glove box.
(12) Disconnect the antenna lead connector from
behind the glove box.
(13) Remove the lower steering column cover.
(14) Remove the knee blocker panel.
(15) Disconnect the lower two, forty pin wire har-
ness connectors, from the main Junction Block near
left cowl side panel (Fig. 25).(16) Disconnect the instrument panel wire harness
connector from the bottom of Body Control Module.
(17) Disconnect the two forty pin connectors from
the right of the steering column (Fig. 26).
(18) Remove the clinch bolt holding upper the
steering shaft to the lower steering shaft (Fig. 26).
(19) Separate the upper steering shaft from the
lower steering shaft.
(20) Remove the nuts holding the instrument
panel frame to the die-cast brake pedal support on
each side of the steering column.
(21) With mechanical transmission range indica-
tor:
(a) Remove the indicator cable loop.
(b) Remove the clip holding gear shift cable end
to the gear selector adapter.
(c) Pull the cable end from gear selector.
(d) Disconnect the clip for the indicator cable
and guide tube from the shift cable bracket and
move out of the way.
(22) Remove the nut holding gear shift cable
bracket to the instrument panel frame.
(23) Remove the bracket from the instrument
panel.
(24) Remove the screw holding hood release handle
to the instrument panel.
(25) Remove the bolt holding the hood release han-
dle to the instrument panel.
(26) Position the hood release handle out of the
way.
(27) Remove the instrument panel top cover.
(28) Disconnect the wire connector from the HVAC
wire harness behind the glove box area.
Fig. 24 Lower Supports
Fig. 25 Junction Block and Body Control Module
Connectors
Fig. 26 40 Way Connectors Location
NS/GSINSTRUMENT PANEL AND SYSTEMS 8E - 21
REMOVAL AND INSTALLATION (Continued)
Page 408 of 1938
(1) Check the fuse(s) in the junction block and the
Power Distribution Center (PDC). If OK, go to Step
2. If not OK, repair the shorted circuit or component
as required and replace the faulty fuse(s).
(2) Check for battery voltage at the fuse in the
PDC. If OK, go to Step 3. If not OK, repair the open
circuit to the battery as required.
(3) Turn the ignition switch to the ON position.
Check for battery voltage at the fuse in the junction
block. If OK, go to Step 4. If not OK, repair the open
circuit to the ignition switch as required.
(4) Turn the ignition switch to the OFF position.
Disconnect and isolate the battery negative cable.
Remove the instrument cluster center bezel. Remove
the radio, but do not unplug the wire harness connec-
tors. Check for continuity between the radio chassis
and a good ground. There should be continuity. If
OK, go to Step 5. If not OK, repair the open radio
chassis ground circuit as required.
(5) Connect the battery negative cable. Turn the
ignition switch to the ON position. Check for battery
voltage at the fused ignition switch output circuit
cavity of the left (gray) radio wire harness connector.
If OK, go to Step 6. If not OK, repair the open circuit
as required.
(6) Turn the ignition switch to the OFF position.
Check for battery voltage at the fused B(+) circuit
cavity of the left (gray) radio wire harness connector.
If OK, replace the faulty radio. If not OK, repair the
open circuit to the Ignition-Off Draw (IOD) fuse as
required.
REMOTE RADIO SWITCHES
WARNING: ON VEHICLES EQUIPPED WITH AIR-
BAGS, REFER TO GROUP 8M - PASSIVE
RESTRAINT SYSTEMS BEFORE ATTEMPTING ANY
STEERING WHEEL, STEERING COLUMN, OR
INSTRUMENT PANEL COMPONENT DIAGNOSIS OR
SERVICE. FAILURE TO TAKE THE PROPER PRE-
CAUTIONS COULD RESULT IN ACCIDENTAL AIR-
BAG DEPLOYMENT AND POSSIBLE PERSONAL
INJURY.
(1) Disconnect and isolate the battery negative
cable. Wait two minutes for the airbag system capac-
itor to discharge before further service.
(2) Remove the remote radio switch(es) from the
steering wheel.
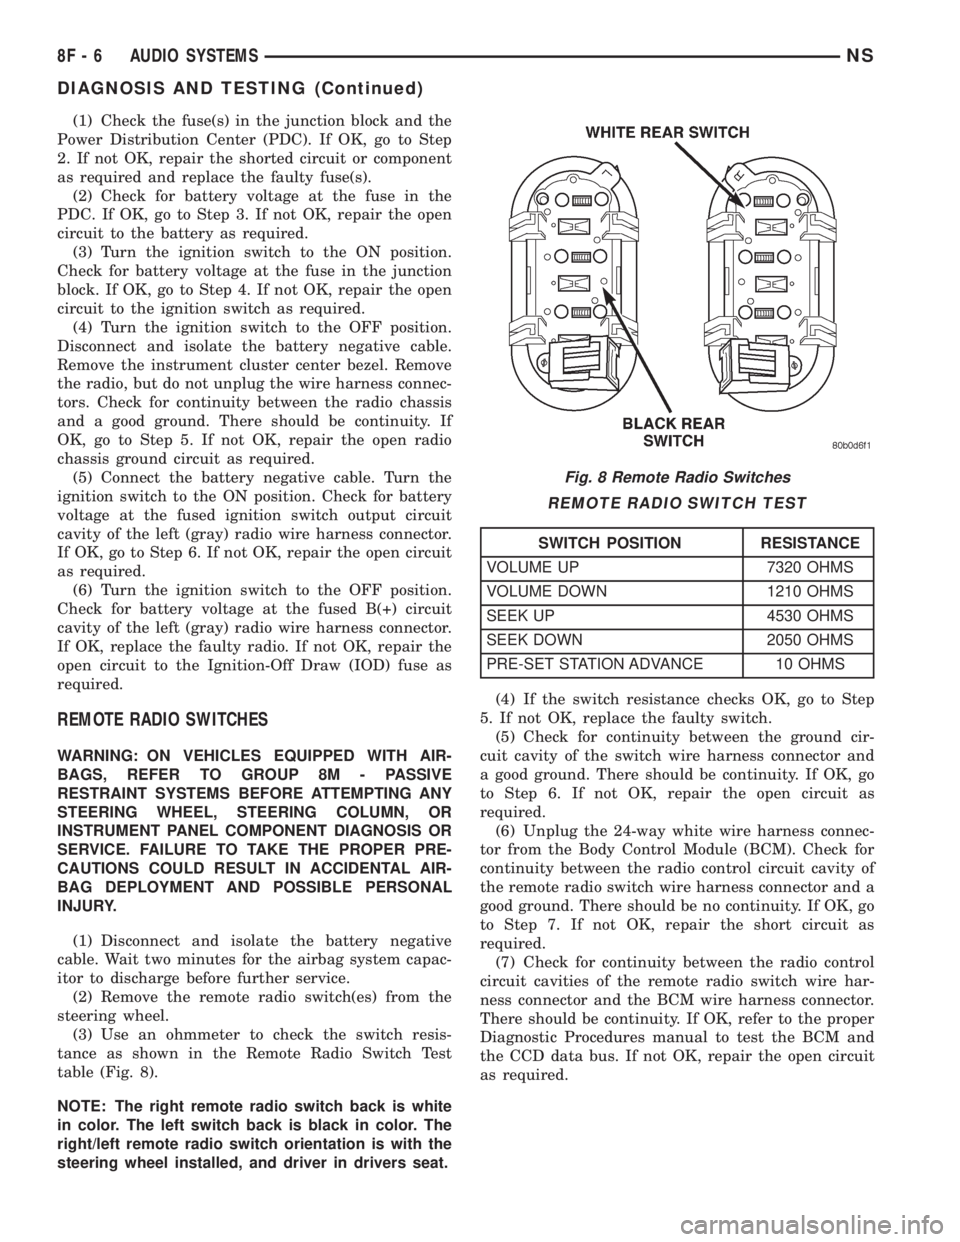
(3) Use an ohmmeter to check the switch resis-
tance as shown in the Remote Radio Switch Test
table (Fig. 8).
NOTE: The right remote radio switch back is white
in color. The left switch back is black in color. The
right/left remote radio switch orientation is with the
steering wheel installed, and driver in drivers seat.(4) If the switch resistance checks OK, go to Step
5. If not OK, replace the faulty switch.
(5) Check for continuity between the ground cir-
cuit cavity of the switch wire harness connector and
a good ground. There should be continuity. If OK, go
to Step 6. If not OK, repair the open circuit as
required.
(6) Unplug the 24-way white wire harness connec-
tor from the Body Control Module (BCM). Check for
continuity between the radio control circuit cavity of
the remote radio switch wire harness connector and a
good ground. There should be no continuity. If OK, go
to Step 7. If not OK, repair the short circuit as
required.
(7) Check for continuity between the radio control
circuit cavities of the remote radio switch wire har-
ness connector and the BCM wire harness connector.
There should be continuity. If OK, refer to the proper
Diagnostic Procedures manual to test the BCM and
the CCD data bus. If not OK, repair the open circuit
as required.
Fig. 8 Remote Radio Switches
REMOTE RADIO SWITCH TEST
SWITCH POSITION RESISTANCE
VOLUME UP 7320 OHMS
VOLUME DOWN 1210 OHMS
SEEK UP 4530 OHMS
SEEK DOWN 2050 OHMS
PRE-SET STATION ADVANCE 10 OHMS
8F - 6 AUDIO SYSTEMSNS
DIAGNOSIS AND TESTING (Continued)
Page 411 of 1938
FRONT DOOR SPEAKER
REMOVAL
(1) Remove front door trim panel as necessary to
gain access to door speaker. Refer to Group 23, Body
for proper procedures.
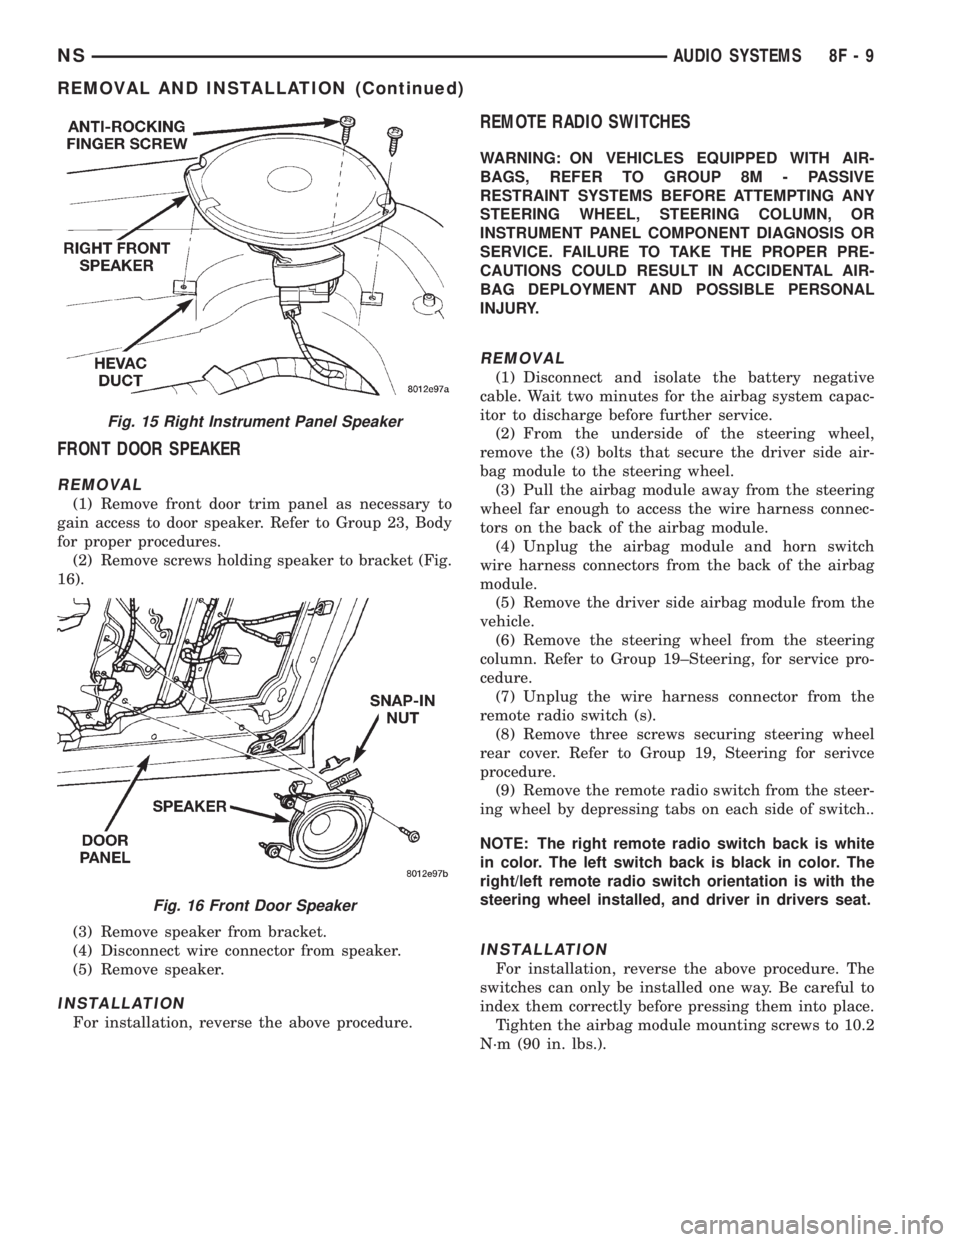
(2) Remove screws holding speaker to bracket (Fig.
16).
(3) Remove speaker from bracket.
(4) Disconnect wire connector from speaker.
(5) Remove speaker.
INSTALLATION
For installation, reverse the above procedure.
REMOTE RADIO SWITCHES
WARNING: ON VEHICLES EQUIPPED WITH AIR-
BAGS, REFER TO GROUP 8M - PASSIVE
RESTRAINT SYSTEMS BEFORE ATTEMPTING ANY
STEERING WHEEL, STEERING COLUMN, OR
INSTRUMENT PANEL COMPONENT DIAGNOSIS OR
SERVICE. FAILURE TO TAKE THE PROPER PRE-
CAUTIONS COULD RESULT IN ACCIDENTAL AIR-
BAG DEPLOYMENT AND POSSIBLE PERSONAL
INJURY.
REMOVAL
(1) Disconnect and isolate the battery negative
cable. Wait two minutes for the airbag system capac-
itor to discharge before further service.
(2) From the underside of the steering wheel,
remove the (3) bolts that secure the driver side air-
bag module to the steering wheel.
(3) Pull the airbag module away from the steering
wheel far enough to access the wire harness connec-
tors on the back of the airbag module.
(4) Unplug the airbag module and horn switch
wire harness connectors from the back of the airbag
module.
(5) Remove the driver side airbag module from the
vehicle.
(6) Remove the steering wheel from the steering
column. Refer to Group 19±Steering, for service pro-
cedure.
(7) Unplug the wire harness connector from the
remote radio switch (s).
(8) Remove three screws securing steering wheel
rear cover. Refer to Group 19, Steering for serivce
procedure.
(9) Remove the remote radio switch from the steer-
ing wheel by depressing tabs on each side of switch..
NOTE: The right remote radio switch back is white
in color. The left switch back is black in color. The
right/left remote radio switch orientation is with the
steering wheel installed, and driver in drivers seat.
INSTALLATION
For installation, reverse the above procedure. The
switches can only be installed one way. Be careful to
index them correctly before pressing them into place.
Tighten the airbag module mounting screws to 10.2
N´m (90 in. lbs.).
Fig. 15 Right Instrument Panel Speaker
Fig. 16 Front Door Speaker
NSAUDIO SYSTEMS 8F - 9
REMOVAL AND INSTALLATION (Continued)
Page 413 of 1938

HORNS
CONTENTS
page page
DESCRIPTION AND OPERATION
INTRODUCTION......................... 1
DIAGNOSIS AND TESTING
HORN RELAY........................... 1
HORN SYSTEM.......................... 3
HORN SYSTEM TEST..................... 3HORN................................. 1
HORNS SOUND CONTINUOUSLY............ 3
HORNS WILL NOT SOUND................ 2
REMOVAL AND INSTALLATION
HORN SWITCH.......................... 4
HORNS................................ 4
DESCRIPTION AND OPERATION
INTRODUCTION
WARNING: ON VEHICLES EQUIPPED WITH AIR-
BAG, SEE GROUP 8M, RESTRAINT SYSTEMS FOR
SAFETY PRECAUTIONS. DISCONNECT THE NEGA-
TIVE CABLE FROM THE BATTERY BEFORE SER-
VICING COMPONENTS INVOLVING THE AIRBAG
SYSTEM. ACCIDENTAL DEPLOYMENT OF AIRBAG
AND PERSONAL INJURY CAN RESULT.
The horn circuit consists of a horn switch, clock-
spring, horn relay, horns and Body Control Module
(Fig. 1). The horn switch is a membrane switch
located in the airbag cover. The horns are located for-
ward of the left front wheel behind the bumper fas-
cia. The horn relay plugs into the junction block. For
circuit information and component locations refer to
Group 8W, Wiring Diagrams.
DIAGNOSIS AND TESTING
HORN
(1) Disconnect wire connector at horn.
(2) Using a voltmeter, connect one lead to ground
terminal and the other lead to the positive wire ter-
minal (Fig. 3).
(3) Depress the horn switch, battery voltage
should be present.
(4) If no voltage, refer to Horn Will Not Sound. If
voltage is OK, go to step Step 5.
(5) Using ohmmeter, test ground wire for continu-
ity to ground.
(6) If no ground repair as necessary.
(7) If wires test OK and horn does not sound,
replace horn.
HORN RELAY
(1) Remove horn relay.
(2) Using ohmmeter, test between relay connector
terminals 85 to 86 for 70 to 75 ohms resistance (Fig.
2). If resistance not OK, replace relay.
(3) Test for continuity between ground and termi-
nal 85 of horn relay.
(a) When the horn switch is not depressed, no
continuity should be present.
(b) Continuity to ground when horn switch is
depressed.
(c) If continuity is not correct repair horn
switch or wiring as necessary, refer to Group 8W,
Wiring Diagrams Group 8M Restraint System for
Driver's Airbag Module removal procedures.
(4) Using voltmeter, test voltage at:
(a) Terminals 30 and 86 of the horn relay to
body ground.
(b) If NO voltage check fuse 7 of the BCM.
(c) If incorrect voltage repair as necessary. Refer
to Group 8W, Wiring Diagrams.
(5) Insert a jumper wire between terminal 30 and
87 of the power distribution center.
(a) If horn sounds replace relay.
Fig. 1 Horn System
NSHORNS 8G - 1
Page 414 of 1938

(b) If the horn does not sound, install horn relay
and refer to Horn Test.
HORNS WILL NOT SOUND
Check horn fuse 6 in the Power Distribution Cen-
ter and fuse 7 in the Junction Block. If fuse is blown
refer to FUSE BLOWN section. If fuse is OK, refer to
FUSE OK section.
FUSE BLOWN
(1) Verify condition of battery terminals and volt-
age, refer to Group 8A, Battery. If battery connec-
tions and battery charge is OK proceed to Step 2.
(2) Using a voltmeter, test for battery voltage at
both sides of horn fuse 7. If voltage is OK, on both
sides of fuse, proceed to Fuse OK. If voltage is OK,
on one side of fuse, the fuse is blown, proceed to Step
3.
(3) Using a suitable ammeter in place of the fuse,
test amperage draw of the horn circuit. If amperage
draw is greater than 20 amps without the horn
switch depressed, a grounded circuit exists between
the fuse and the horn relay. Proceed to Step 4. If
amperage draw is greater than 20 amps with the
horn switch depressed, a grounded circuit exists
between the horn relay and the horn. Proceed to step
Step 5.
(4) Remove the horn relay from the Junction
Block. If the amperage draw drops to 0 amps, the
horn switch or circuit is shorted. Refer to group 8W,
Wiring Diagrams for circuit information. If the
amperage draw does not drop to 0 amps, repair short
at the Junction Block.
(5) Disengage a wire connector from one of the
horns. If amperage drops and the connected horn
sounds, replace the faulty horn. If amperage does not
drop with both horns disconnected and the horn
switch depressed, proceed to Step 6.
(6) Using a continuity tester, with the horns dis-
connected test continuity of the X2 cavity of the horn
relay to ground. Refer to Group 8W, Wiring Diagrams
for circuit information. If continuity is detected, the
circuit is grounded between the Junction Block and
the horns. Locate and repair pinched harness.
FUSE OK
(1) Remove the horn relay from the Junction
Block.
(2) Using a continuity tester, Depress horn switch
and test continuity from the X3 cavity of the horn
relay to ground. Refer to Group 8W, Wiring Diagrams
for circuit information.
(a) If continuity is detected, proceed to Step 3.
(b) If NO continuity, proceed to Step 4.
(3) Using a suitable jumper wire, jump across the
fuse F62 cavity and the X2 cavity of the horn relay in
the Junction Block.
(a) If the horn sounds, replace the horn relay.
(b) If the horn does not sound, proceed to Step 4.
(4) Remove airbag/horn pad from steering wheel.
Refer to Group 8M, Restraint Systems for proper pro-
cedures.
(5) Test continuity across horn switch connectors
with horn switch depressed.
(a) If continuity is detected, repair open circuit
between the relay and the horn switch.
(b) If NO continuity, replace airbag cover.
(6) Install horn relay into Junction Block.
(7) Disengage wire connectors from horns.
(8) Using a voltmeter, with the horn switch
depressed test voltage across horn connector termi-
nals of the wire harness (Fig. 3).
(a) If voltage is detected, replace horns.
(b) If NO voltage, proceed to step Step 9.
(9) With the horn switch depressed, test for volt-
age between the X2 circuit and ground.
(a) If voltage OK, repair system ground at right
cowl area. Refer to Group 8W, Wiring Diagrams.
(b) If NO voltage, repair open X2 circuit between
the relay and the horns.
Fig. 2 Horn Relay
Fig. 3 Horn and Connector
8G - 2 HORNSNS
DIAGNOSIS AND TESTING (Continued)
Page 415 of 1938

HORNS SOUND CONTINUOUSLY
CAUTION: Continuous sounding of horns may
cause relay to fail.
The horn switch (membrane) sometimes can be the
cause without the switch being depressing.
(1) Remove the horn relay from the junction block.
(2) Using a continuity tester, test continuity from
the X3 cavity of the horn relay to ground. Refer to
Group 8W, Wiring Diagrams for circuit information.
(a) If continuity is detected, proceed to step Step
3.
(b) If NO continuity, replace the horn relay.
(3) Remove the airbag/horn pad from the steering
wheel and disengage horn connector.
(4) Install horn relay into junction block.
(a) If horn does not sound, replace airbag cover/
horn pad.
(b) If horn sounds, repair grounded X3 circuit
from junction block to clockspring in steering in
steering column. Refer to Group 8W, Wiring Dia-
grams.
HORN SYSTEM
Refer to Horn System Test below. If the horn does
not sound, check horn fuse located in the Power Dis-
tribution Center. If the fuse is blown, replace with
the correct fuse. If the horn fail to sound and the
new fuse blows when depressing the horn switch, a
short circuit in the horn or the horn wiring between
the fuse terminal and the horn is responsible, or a
defective horn switch allowed the horn to burn out is
responsible.
If the fuse is OK, test horn relay refer to Horn
Relay Test.
If the relay is OK, test horn. Refer to Horn System
Test.
CAUTION: Continuous sounding of horn may
cause horn relay to fail.
Should the horn sound continuously:
²Unplug the horn relay from Power Distribution
Center.
²Refer to Horn Relay Test.
Refer to Group 8W, Wiring Diagrams for circuit
and wiring information.
HORN SYSTEM TEST
CONDITION POSSIBLE CAUSE CORRECTION
Horn sounds continuously.
NOTE: Immediately unplug horn
relay in the Power Distribution
Center (PDC)(1) Faulty horn relay.
(2) Horn control circuit to relay
shorted to ground.
(3) Pinched horn switch wire under
Driver Airbag Module.
(4) Defective horn switch(1) Refer to horn relay test.
(2) Check terminal 85 in Junction
Block for continuity to ground. If
continuity to ground indicates:
(a) Steering Wheel horn switch/lead
shorted to ground.
(b) Wiring harness shorted to
ground. Find the short and repair as
necessary.
(3) Replace Driver Airbag Module.
(4) Replace Driver Airbag Module.
Horn sound intermittently as the
steering wheel is turned.(1) Horn relay control circuit X3 is
shorted to ground inside steering
column or wheel.
(2) Pinched horn switch wire under
Driver Airbag Module
(3) Defective horn switch(1) Remove Driver Airbag Module
and/or wheel. Check for rubbing or
loose wire/connector, repair as
necessary.
(2) Replace Driver Airbag Module.
(3) Replace Driver Airbag Module.
Horn does not sound (1) Check fuse 6 in PDC
(2) No Voltage at horn relay
terminals 30 & 86, and fuse is OK.
(3) Open circuit from terminal 85 of
the horn relay to horn switch, X3
circuit.
(4) Defective or damaged horn.
(5) Defective horn switch(1) Replace fuse if blown repair as
necessary.
(2) No voltage, repair the A6 circuit
as necessary.
(3) Repair circuit as necessary.
(4) Voltage at horn when horn switch
is pressed, replace horn.
(5) Replace Driver Airbag Module.
NSHORNS 8G - 3
DIAGNOSIS AND TESTING (Continued)
Page 416 of 1938

CONDITION POSSIBLE CAUSE CORRECTION
Fuse blows when horn sounds (1) Short circuit in horn or horn
wiring(1) Remove horn relay, check for
shorted horn or horn wiring.
Disconnect horn wire harness to
isolate short and repair as
necessary.
Fuse blows without blowing horn (1) Short circuit (1) Remove relay, install new fuse, if
fuse does not blow replace horn
relay. If fuse blows with relay
removed, check for short to ground
with ohmmeter on circuit between
terminals 30 & 86 and the fuse
terminal. Repair as necessary.
NOTE: For wiring repairs refer to
Group 8W, Wire Diagrams.
REMOVAL AND INSTALLATION
HORN SWITCH
The horn switch is molded into the airbag cover.
The horn switch cannot be serviced separately. Refer
to Group 8M, Restraint System for Driver Airbag
Module Removal and Installation procedures.
HORNS
REMOVAL
(1) Hoist and support the front of the vehicle on
safety stands.
(2) From behind the front fascia and forward of
the left front wheel, disconnect the wire connectors
from horn.
(3) Remove the mount bracket attaching nut from
the bottom of radiator closure panel. Do not remove
the horn from mounting bracket (Fig. 4).
(4) Separate the horn from vehicle.
INSTALLATION
For installation reverse the above procedures.
Fig. 4 Horn Removal/Installation
8G - 4 HORNSNS
DIAGNOSIS AND TESTING (Continued)
Page 425 of 1938
INSTALLATION
Transfer speed control cable to replacement speed
control servo. Reverse the preceding operation.
SPEED CONTROL SWITCHES
REMOVAL
(1) Release hood latch and open hood.
(2) Disconnect battery negative cable.
(3) Remove airbag/horn pad from steering wheel,
refer to Group 8M, Restraint Systems for proper pro-
cedures.
(4) Disconnect wire connector from horn switch,
airbag, and speed control switches.
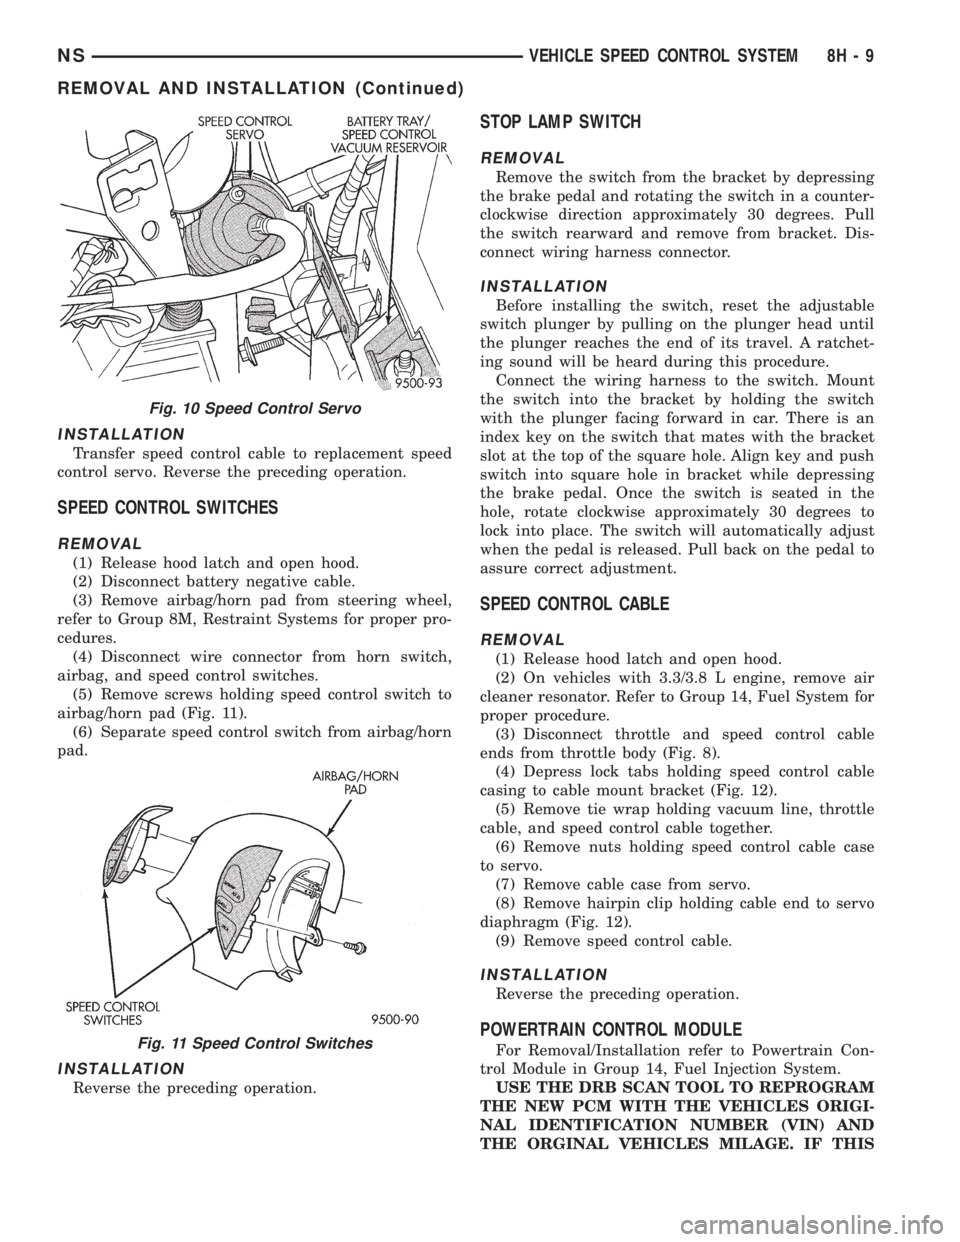
(5) Remove screws holding speed control switch to
airbag/horn pad (Fig. 11).
(6) Separate speed control switch from airbag/horn
pad.
INSTALLATION
Reverse the preceding operation.
STOP LAMP SWITCH
REMOVAL
Remove the switch from the bracket by depressing
the brake pedal and rotating the switch in a counter-
clockwise direction approximately 30 degrees. Pull
the switch rearward and remove from bracket. Dis-
connect wiring harness connector.
INSTALLATION
Before installing the switch, reset the adjustable
switch plunger by pulling on the plunger head until
the plunger reaches the end of its travel. A ratchet-
ing sound will be heard during this procedure.
Connect the wiring harness to the switch. Mount
the switch into the bracket by holding the switch
with the plunger facing forward in car. There is an
index key on the switch that mates with the bracket
slot at the top of the square hole. Align key and push
switch into square hole in bracket while depressing
the brake pedal. Once the switch is seated in the
hole, rotate clockwise approximately 30 degrees to
lock into place. The switch will automatically adjust
when the pedal is released. Pull back on the pedal to
assure correct adjustment.
SPEED CONTROL CABLE
REMOVAL
(1) Release hood latch and open hood.
(2) On vehicles with 3.3/3.8 L engine, remove air
cleaner resonator. Refer to Group 14, Fuel System for
proper procedure.
(3) Disconnect throttle and speed control cable
ends from throttle body (Fig. 8).
(4) Depress lock tabs holding speed control cable
casing to cable mount bracket (Fig. 12).
(5) Remove tie wrap holding vacuum line, throttle
cable, and speed control cable together.
(6) Remove nuts holding speed control cable case
to servo.
(7) Remove cable case from servo.
(8) Remove hairpin clip holding cable end to servo
diaphragm (Fig. 12).
(9) Remove speed control cable.
INSTALLATION
Reverse the preceding operation.
POWERTRAIN CONTROL MODULE
For Removal/Installation refer to Powertrain Con-
trol Module in Group 14, Fuel Injection System.
USE THE DRB SCAN TOOL TO REPROGRAM
THE NEW PCM WITH THE VEHICLES ORIGI-
NAL IDENTIFICATION NUMBER (VIN) AND
THE ORGINAL VEHICLES MILAGE. IF THIS
Fig. 10 Speed Control Servo
Fig. 11 Speed Control Switches
NSVEHICLE SPEED CONTROL SYSTEM 8H - 9
REMOVAL AND INSTALLATION (Continued)
Page 427 of 1938
VEHICLE SPEED CONTROL SYSTEM
CONTENTS
page
GENERAL INFORMATION
INTRODUCTION........................ 1
GENERAL INFORMATION
INTRODUCTION
This group covers both Left-Hand Drive (LHD) and
Right-Hand Drive (RHD) versions of this model.
Whenever feasible, the RHD versions of affected
vehicle components have been constructed as mirror-
image of the LHD versions. While most of the illus-
trations used in this group represent only the LHD
version, the diagnostic and service procedures out-
lined can generally be applied to either version.
Exceptions to this rule have been clearly identified as
LHD or RHD, if a special illustration or procedure
was/is required.
The speed control system used with the 2.5L diesel
engine is basically identical to the system used with
gasoline powered engines. Features unique to the
diesel engine will be covered in this section.
²Models equipped with the 2.5L diesel engine do
not use a vacuum reservoir to retain engine vacuum
for speed control operation. There are no vaccum-op-
erated speed control servos used in vehicles with the
2.5L diesel engine.
²The range of the speed control system operation
is restricted to speeds between 56 km/h (35 MPH) to
145 km/h (90 MPH).
²Inputs to the MSA that allow speed control oper-
ation are from the vehicle speed sensor and the
Speed Control Switch.²Two separate speed control switch modules are
mounted on the steering wheel to the left and right
side of the driver's airbag module. Switch features
are:
a. Within the two switch modules, fivemomen-
tarycontact switches, supporting seven different
speed control functions are used.
b. The outputs from these switches are filtered
into one input. The MSA determines which output
has been applied throughresistive multiplexing.
The input circuit voltage is measured by the MSA
to determine which switch function has been
selected.
c. A speed control indicator lamp, located on the
instrument panel cluster is energized by the MSA
via the CCD Bus. This occurs when speed control
system power has been turned ON, and the engine
is running.
d. The two switch modules are labeled: ON/OFF,
SET, RESUME/ACCEL, CANCEL and COAST.
Refer to the owner's manual for more information
on speed control switch functions and setting pro-
cedures. The individual switches cannot be
repaired. If one individual switch fails, the switch
module must be replaced.
NS/GSVEHICLE SPEED CONTROL SYSTEM 8H - 1