power steering CHRYSLER VOYAGER 1996 Service Manual
[x] Cancel search | Manufacturer: CHRYSLER, Model Year: 1996, Model line: VOYAGER, Model: CHRYSLER VOYAGER 1996Pages: 1938, PDF Size: 55.84 MB
Page 18 of 1938
ENGINE OIL
SAE VISCOSITY RATING INDICATES ENGINE OIL VISCOSITY
An SAE viscosity grade is used to specify the vis-
cosity of engine oil. SAE 30 specifies a single viscos-
ity engine oil. Engine oils also have multiple
viscosities. These are specified with a dual SAE vis-
cosity grade which indicates the cold-to-hot tempera-
ture viscosity range.
²SAE 30 = single grade engine oil.
²SAE 10W-30 = multiple grade engine oil.
API QUALITY CLASSIFICATION
The API Service Grade specifies the type of perfor-
mance the engine oil is intended to provide. The API
Service Grade specifications also apply to energy con-
serving engine oils.
Use engine oils that are API Service Certified.
5W-30 and 10W-30 MOPAR engine oils conform to
specifications.
Refer to Group 9, Engine for engine oil specifica-
tion.
GEAR LUBRICANTS
SAE ratings also apply to multiple grade gear
lubricants. In addition, API classification defines the
lubricants usage.LUBRICANTS AND GREASES
Lubricating grease is rated for quality and usage
by the NLGI. All approved products have the NLGI
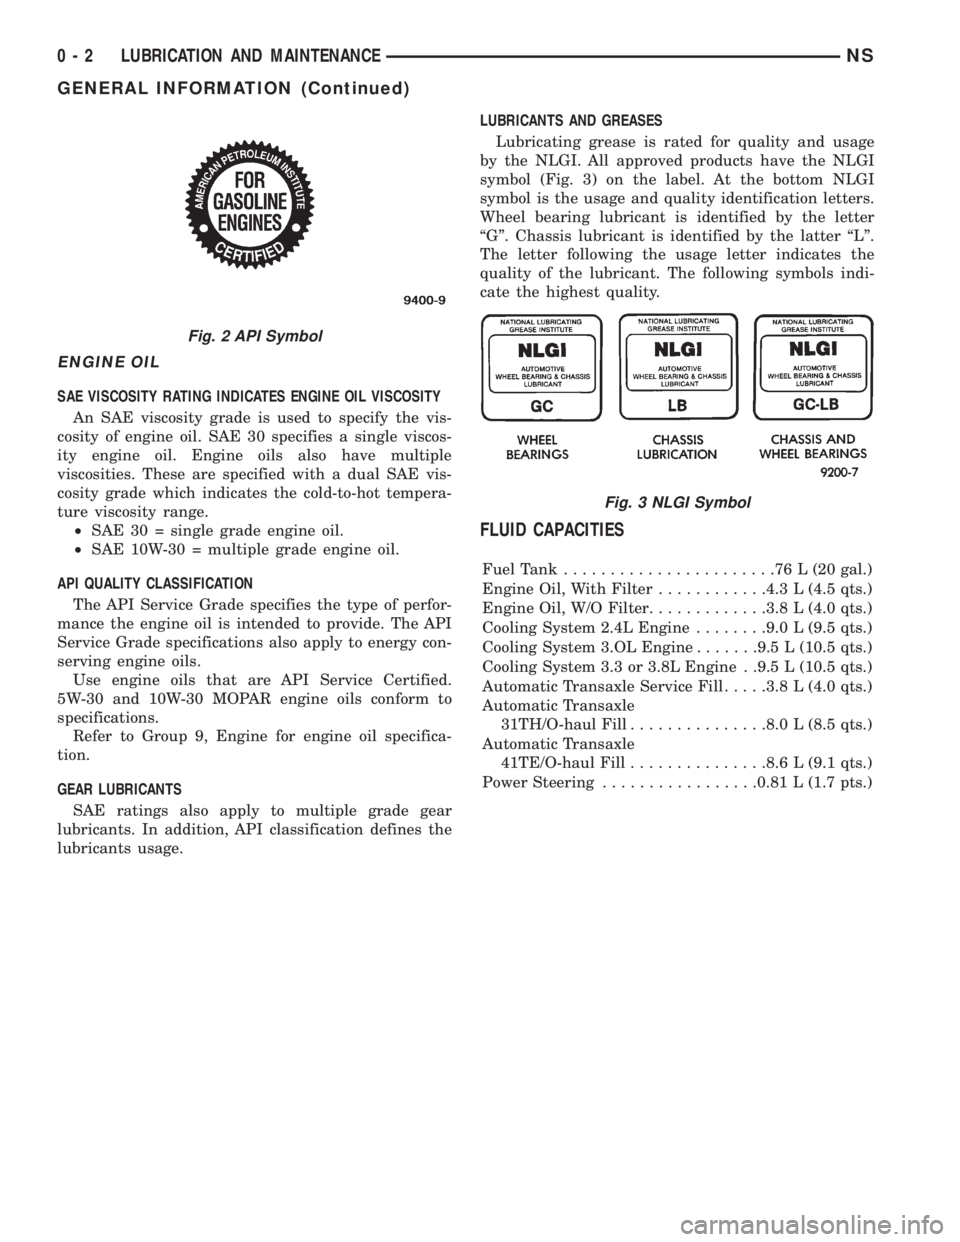
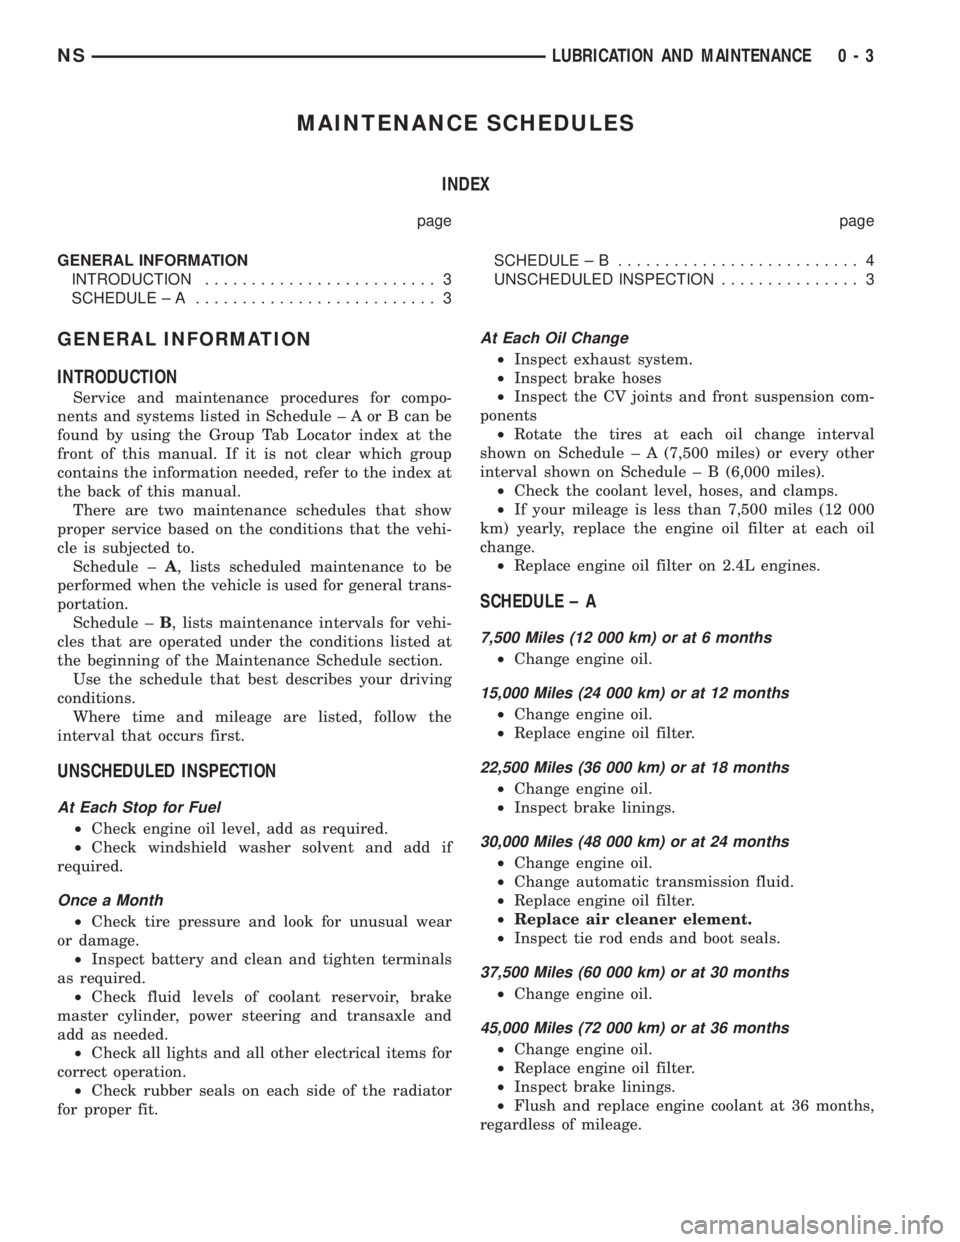
symbol (Fig. 3) on the label. At the bottom NLGI
symbol is the usage and quality identification letters.
Wheel bearing lubricant is identified by the letter
ªGº. Chassis lubricant is identified by the latter ªLº.
The letter following the usage letter indicates the
quality of the lubricant. The following symbols indi-
cate the highest quality.
FLUID CAPACITIES
Fuel Tank.......................76L(20gal.)
Engine Oil, With Filter............4.3 L (4.5 qts.)
Engine Oil, W/O Filter.............3.8 L (4.0 qts.)
Cooling System 2.4L Engine........9.0 L (9.5 qts.)
Cooling System 3.OL Engine.......9.5 L (10.5 qts.)
Cooling System 3.3 or 3.8L Engine . .9.5 L (10.5 qts.)
Automatic Transaxle Service Fill.....3.8 L (4.0 qts.)
Automatic Transaxle
31TH/O-haul Fill...............8.0 L (8.5 qts.)
Automatic Transaxle
41TE/O-haul Fill...............8.6 L (9.1 qts.)
Power Steering.................0.81 L (1.7 pts.)
Fig. 2 API Symbol
Fig. 3 NLGI Symbol
0 - 2 LUBRICATION AND MAINTENANCENS
GENERAL INFORMATION (Continued)
Page 19 of 1938
MAINTENANCE SCHEDULES
INDEX
page page
GENERAL INFORMATION
INTRODUCTION......................... 3
SCHEDULE ± A.......................... 3SCHEDULE ± B.......................... 4
UNSCHEDULED INSPECTION............... 3
GENERAL INFORMATION
INTRODUCTION
Service and maintenance procedures for compo-
nents and systems listed in Schedule ± A or B can be
found by using the Group Tab Locator index at the
front of this manual. If it is not clear which group
contains the information needed, refer to the index at
the back of this manual.
There are two maintenance schedules that show
proper service based on the conditions that the vehi-
cle is subjected to.
Schedule ±A, lists scheduled maintenance to be
performed when the vehicle is used for general trans-
portation.
Schedule ±B, lists maintenance intervals for vehi-
cles that are operated under the conditions listed at
the beginning of the Maintenance Schedule section.
Use the schedule that best describes your driving
conditions.
Where time and mileage are listed, follow the
interval that occurs first.
UNSCHEDULED INSPECTION
At Each Stop for Fuel
²Check engine oil level, add as required.
²Check windshield washer solvent and add if
required.
Once a Month
²Check tire pressure and look for unusual wear
or damage.
²Inspect battery and clean and tighten terminals
as required.
²Check fluid levels of coolant reservoir, brake
master cylinder, power steering and transaxle and
add as needed.
²Check all lights and all other electrical items for
correct operation.
²Check rubber seals on each side of the radiator
for proper fit.
At Each Oil Change
²Inspect exhaust system.
²Inspect brake hoses
²Inspect the CV joints and front suspension com-
ponents
²Rotate the tires at each oil change interval
shown on Schedule ± A (7,500 miles) or every other
interval shown on Schedule ± B (6,000 miles).
²Check the coolant level, hoses, and clamps.
²If your mileage is less than 7,500 miles (12 000
km) yearly, replace the engine oil filter at each oil
change.
²Replace engine oil filter on 2.4L engines.
SCHEDULE ± A
7,500 Miles (12 000 km) or at 6 months
²Change engine oil.
15,000 Miles (24 000 km) or at 12 months
²Change engine oil.
²Replace engine oil filter.
22,500 Miles (36 000 km) or at 18 months
²Change engine oil.
²Inspect brake linings.
30,000 Miles (48 000 km) or at 24 months
²Change engine oil.
²Change automatic transmission fluid.
²Replace engine oil filter.
²Replace air cleaner element.
²Inspect tie rod ends and boot seals.
37,500 Miles (60 000 km) or at 30 months
²Change engine oil.
45,000 Miles (72 000 km) or at 36 months
²Change engine oil.
²Replace engine oil filter.
²Inspect brake linings.
²Flush and replace engine coolant at 36 months,
regardless of mileage.
NSLUBRICATION AND MAINTENANCE 0 - 3
Page 28 of 1938
MAINTENANCE SCHEDULES
INDEX
page page
GENERAL INFORMATION
MAINTENANCE SCHEDULE............... 2
MAINTENANCE SCHEDULEÐ
DIESEL ENGINE....................... 2SCHEDULEÐA (DIESEL).................. 2
SCHEDULEÐB (DIESEL).................. 3
UNSCHEDULED INSPECTION.............. 2
GENERAL INFORMATION
MAINTENANCE SCHEDULE
Refer to the 1998 GS Service Manual for Gasoline
Engine and non-engine related Maintenance Sched-
ules.
MAINTENANCE SCHEDULEÐDIESEL ENGINE
The following are engine related Maintenance
items which are unique to Diesel engine-equipped
vehicles. Refer to the 1998 GS Service Manual for
Gasoline Engine and non-engine related Maintenance
Schedules.
The service intervals are based on odometer read-
ings in kilometers. There are two maintenance sched-
ules that show proper service intervals. Use the
schedule that best describes the conditions the vehi-
cle is operated under.Schedule-Alists all the sched-
uled maintenance to be performed under normal
operating conditions.Schedule-Bis the schedule for
vehicles that are operated under one or more of the
following conditions:
²Day and night temperatures are below freezing.
²Stop and go driving.
²Long periods of engine idling.
²Driving in dusty conditions.
²Short trips of less than 5 miles.
²Operation at sustained high speeds during hot
weather above 32ÉC (90ÉF).
²Taxi, police or delivery service.
²Trailer towing.
UNSCHEDULED INSPECTION
At Each Stop for Fuel
²Check engine oil level, add as required.
²Check windshield washer solvent and add if
required.
Once a Month
²Check tire pressure and look for unusual wear
or damage.
²Inspect battery and clean and tighten terminals
as required.²Check fluid levels of coolant reservoir, brake
master cylinder, power steering and transaxle and
add as needed.
²Check all lights and all other electrical items for
correct operation.
²Check rubber seals on each side of the radiator
for proper fit.
At Each Oil Change
²Inspect exhaust system.
²Inspect brake hoses
²Inspect the CV joints and front suspension com-
ponents
²Rotate the tires at each oil change interval
shown on ScheduleÐA (7,500 miles) or every other
interval shown on ScheduleÐ B (6,000 miles).
²Check the coolant level, hoses, and clamps.
²If your mileage is less than 7,500 miles (12 000
km) yearly, replace the engine oil filter at each oil
change.
²Replace engine oil filter.
SCHEDULEÐA (DIESEL)
1 000 KM
²Change engine oil.
²Change engine oil filter.
²Check all fluid levels.
²Check correct torque, intake manifold mounting
nuts.
²Check correct torque, exhaust manifold mount-
ing nuts.
²Check correct torque, turbocharger mounting
nuts.
²Check correct torque, water manifold bolts.
10 000 KM
²Change engine oil.
²Change engine oil filter.
20 000 KM
²Change engine oil.
²Change engine oil filter.
²Replace air filter element.
0 - 2 LUBRICATION AND MAINTENANCENS/GS
Page 36 of 1938
CONDITION POSSIBLE CAUSES CORRECTION
Road Wander 1. Incorrect tire pressure 1. Inflate tires to recommended
pressure
2. Incorrect front or rear wheel toe 2. Check and reset wheel toe
3. Worn wheel bearings 3. Replace wheel bearing
4. Worn control arm bushings 4. Replace control arm bushing
5. Excessive friction in steering gear 5. Replace steering gear
6. Excessive friction in steering shaft
coupling6. Replace steering coupler
7. Excessive friction in strut upper
bearing7. Replace strut bearing
Lateral Pull 1. Unequal tire pressure 1. Inflate all tires to recommended
pressure
2. Radial tire lead 2. Perform lead correction procedure
3. Incorrect front wheel camber 3. Check and reset front wheel
camber
4. Power steering gear imbalance 4. Replace power steering gear
5. Wheel braking 5. Correct braking condition causing
lateral pull
Excessive Steering Free Play 1. Incorrect Steering Gear Adjustment 1. Adjust Or Replace Steering Gear
2. Worn or loose tie rod ends 2. Replace or tighten tie rod ends
3. Loose steering gear mounting bolts 3. Tighten steering gear bolts to
specified torque
4. Loose or worn steering shaft
coupler4. Replace steering shaft coupler
Excessive Steering Effort 1. Low tire pressure 1. Inflate all tires to recommended
pressure
2. Lack of lubricant in steering gear 2. Replace steering gear
3. Low power steering fluid level 3. Fill power steering fluid reservoir to
correct level
4. Loose power steering pump drive
belt4. Correctly adjust power steering
pump drive belt
5. Lack of lubricant in ball joints 5. Lubricate or replace ball joints
6. Steering gear malfunction 6. Replace steering gear
7. Lack of lubricant in steering
coupler7. Replace steering coupler
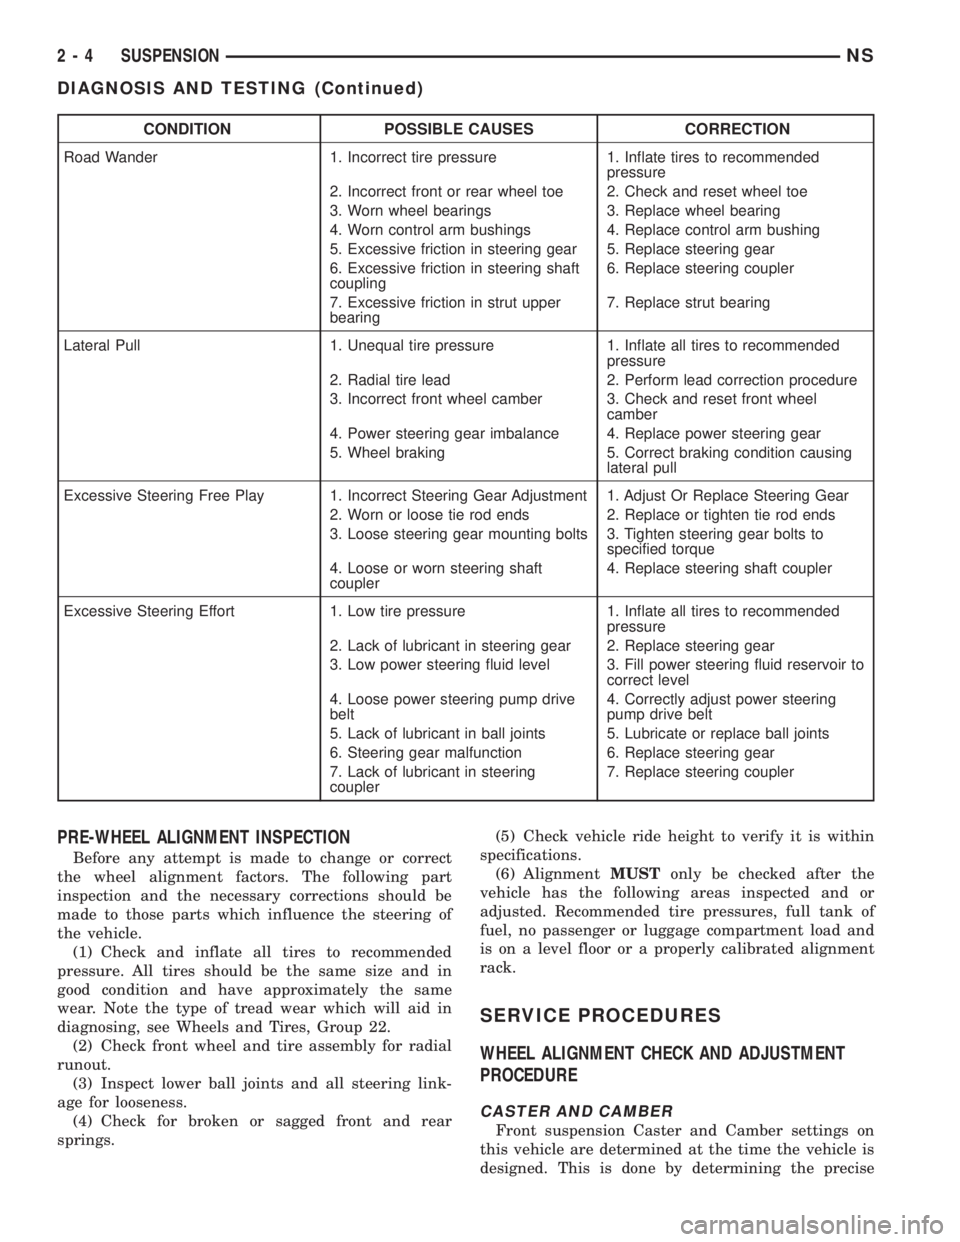
PRE-WHEEL ALIGNMENT INSPECTION
Before any attempt is made to change or correct
the wheel alignment factors. The following part
inspection and the necessary corrections should be
made to those parts which influence the steering of
the vehicle.
(1) Check and inflate all tires to recommended
pressure. All tires should be the same size and in
good condition and have approximately the same
wear. Note the type of tread wear which will aid in
diagnosing, see Wheels and Tires, Group 22.
(2) Check front wheel and tire assembly for radial
runout.
(3) Inspect lower ball joints and all steering link-
age for looseness.
(4) Check for broken or sagged front and rear
springs.(5) Check vehicle ride height to verify it is within
specifications.
(6) AlignmentMUSTonly be checked after the
vehicle has the following areas inspected and or
adjusted. Recommended tire pressures, full tank of
fuel, no passenger or luggage compartment load and
is on a level floor or a properly calibrated alignment
rack.
SERVICE PROCEDURES
WHEEL ALIGNMENT CHECK AND ADJUSTMENT
PROCEDURE
CASTER AND CAMBER
Front suspension Caster and Camber settings on
this vehicle are determined at the time the vehicle is
designed. This is done by determining the precise
2 - 4 SUSPENSIONNS
DIAGNOSIS AND TESTING (Continued)
Page 41 of 1938

FRONT SUSPENSION
INDEX
page page
DESCRIPTION AND OPERATION
BALL JOINT............................ 11
COIL SPRING........................... 11
FRONT SUSPENSION DESCRIPTION......... 9
HUB AND BEARING ASSEMBLY............ 10
LOWER CONTROL ARM.................. 10
Mc PHERSON STRUT ASSEMBLY........... 10
STABILIZER BAR ATTACHING LINK.......... 10
STABILIZER BAR........................ 10
STEERING KNUCKLE.................... 10
SUSPENSION CRADLE (CROSSMEMBER)..... 9
WHEEL MOUNTING STUDS................ 11
DIAGNOSIS AND TESTING
BALL JOINT (LOWER).................... 12
HUB AND BEARING ASSEMBLY............ 12
LOWER CONTROL ARM.................. 12
Mc PHERSON STRUT.................... 11
STABILIZER BAR........................ 12
STEERING KNUCKLE.................... 12SERVICE PROCEDURES
SUSPENSION CRADLE THREAD REPAIR
PROCEDURE......................... 12
REMOVAL AND INSTALLATION
BALL JOINT............................ 22
FRONT WHEEL MOUNTING STUDS......... 28
HUB AND BEARING ASSEMBLY............ 25
LOWER CONTROL ARM.................. 19
Mc PHERSON STRUT.................... 13
REAR WHEEL MOUNTING STUDS.......... 29
STABILIZER BAR........................ 23
STEERING KNUCKLE.................... 14
DISASSEMBLY AND ASSEMBLY
BALL JOINT SEAL BOOT.................. 33
LOWER CONTROL ARM FRONT BUSHING.... 34
LOWER CONTROL ARM REAR BUSHING..... 35
Mc PHERSON STRUT.................... 30
STABILIZER BAR BUSHING................ 35
SPECIFICATIONS
FRONT SUSPENSION FASTENER TORQUES . . 36
SPECIAL TOOLS
FRONT SUSPENSION.................... 37
DESCRIPTION AND OPERATION
FRONT SUSPENSION DESCRIPTION
An independent Mc Pherson Strut type front sus-
pension is used on these vehicles. Vertical shock
absorbing Mc Pherson Struts attach to the top of the
steering knuckle and to the front strut tower. This
interconnection between the steering knuckle and the
body of the vehicle, provides for the correct steering
knuckle position. This steering knuckle position pro-
vides for the correct front Caster and Camber set-
tings for the vehicle, at the time the vehicle is
designed.
Lower control arms are attached inboard to the
cast aluminum front suspension cradle and outboard
to the bottom of the steering knuckle. Attachment of
the lower control arm to the steering knuckle is done
through a ball joint in the lower control arm.
During steering maneuvers, the strut and the
steering knuckle (through the ball joint and a pivot
bearing in the strut's upper retainer) turn as an
assembly.
SUSPENSION CRADLE (CROSSMEMBER)
This vehicle uses a one piece cast aluminum cradle
for the front suspension. The cradle is used as theattaching points for the lower control arms, stabilizer
bar and steering gear. The cradle also has the power
steering hoses and the chassis brake tubes attached
to it.
The cradle is mounted to the front frame rails at
four points, two on each side of the vehicle. The cra-
dle is isolated from the body of the vehicle using four
isolators, one located at each mounting bolt location.
WARNING: If a threaded hole in the suspension
cradle needs to be repaired, only use the type of
thread insert and installation procedure specified
for this application.
The threaded holes in the cradle that are
used for attachment of the lower control arm
rear bushing retainer, power steering hose and
chassis brake tubes can be repaired. The repair
is done by the installation of a Heli-Coilt
thread insert which has been specifically devel-
oped for this application. Refer to the Mopar
Parts Catalog for the specified Heli-Coil thread
insert to be used for this application. The pro-
cedure for installing the Heli-Coiltthread
insert is detailed in the Service Procedures sec-
tion in this group of the service manual.
NSSUSPENSION 2 - 9
Page 44 of 1938
STEERING KNUCKLE
The front suspension knuckle is not a repairable
component of the vehicles front suspensionIT MUST
BE REPLACED.If bent, broken or damaged in any
way, do not attempt to straighten or repair the steer-
ing knuckle.
Service replacement of the front hub/bearing
assembly can be done with the front steering knuckle
remaining on the vehicle.
LOWER CONTROL ARM
If damaged, the lower control arm casting is ser-
viced only as a complete component. Inspect lower
control arm for signs of damage from contact with
the ground or road debris. If lower control arm shows
any sign of damage, inspect lower control arm for
distortion.Do not attempt to repair or straighten
a broken or bent lower control arm.
The serviceable components of the lower control
arm are: the ball joint assembly, ball joint assembly
grease seal and control arm bushings. Inspect both
control arm bushings for severe deterioration, and
replace if required. Inspect ball joint per inspection
procedure in this section of the service manual and
replace if required. Service procedures to replace
these components are detailed in the specific compo-
nent removal and installation sections in this group
of the service manual.
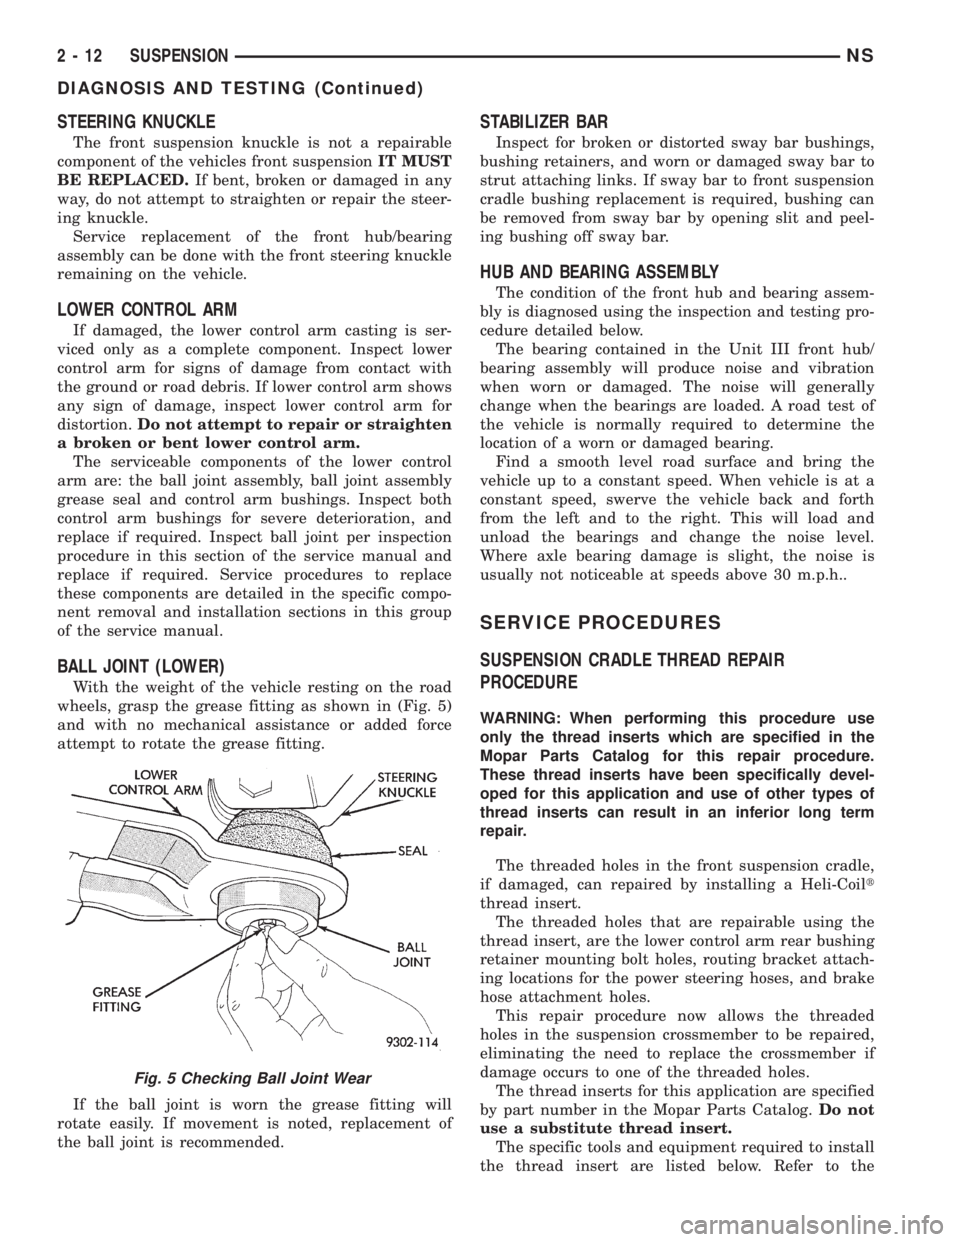
BALL JOINT (LOWER)
With the weight of the vehicle resting on the road
wheels, grasp the grease fitting as shown in (Fig. 5)
and with no mechanical assistance or added force
attempt to rotate the grease fitting.
If the ball joint is worn the grease fitting will
rotate easily. If movement is noted, replacement of
the ball joint is recommended.
STABILIZER BAR
Inspect for broken or distorted sway bar bushings,
bushing retainers, and worn or damaged sway bar to
strut attaching links. If sway bar to front suspension
cradle bushing replacement is required, bushing can
be removed from sway bar by opening slit and peel-
ing bushing off sway bar.
HUB AND BEARING ASSEMBLY
The condition of the front hub and bearing assem-
bly is diagnosed using the inspection and testing pro-
cedure detailed below.
The bearing contained in the Unit III front hub/
bearing assembly will produce noise and vibration
when worn or damaged. The noise will generally
change when the bearings are loaded. A road test of
the vehicle is normally required to determine the
location of a worn or damaged bearing.
Find a smooth level road surface and bring the
vehicle up to a constant speed. When vehicle is at a
constant speed, swerve the vehicle back and forth
from the left and to the right. This will load and
unload the bearings and change the noise level.
Where axle bearing damage is slight, the noise is
usually not noticeable at speeds above 30 m.p.h..
SERVICE PROCEDURES
SUSPENSION CRADLE THREAD REPAIR
PROCEDURE
WARNING: When performing this procedure use
only the thread inserts which are specified in the
Mopar Parts Catalog for this repair procedure.
These thread inserts have been specifically devel-
oped for this application and use of other types of
thread inserts can result in an inferior long term
repair.
The threaded holes in the front suspension cradle,
if damaged, can repaired by installing a Heli-Coilt
thread insert.
The threaded holes that are repairable using the
thread insert, are the lower control arm rear bushing
retainer mounting bolt holes, routing bracket attach-
ing locations for the power steering hoses, and brake
hose attachment holes.
This repair procedure now allows the threaded
holes in the suspension crossmember to be repaired,
eliminating the need to replace the crossmember if
damage occurs to one of the threaded holes.
The thread inserts for this application are specified
by part number in the Mopar Parts Catalog.Do not
use a substitute thread insert.
The specific tools and equipment required to install
the thread insert are listed below. Refer to the
Fig. 5 Checking Ball Joint Wear
2 - 12 SUSPENSIONNS
DIAGNOSIS AND TESTING (Continued)
Page 102 of 1938
SERVICE PROCEDURES
MASTER CYLINDER FLUID LEVEL CHECK
Check master cylinder reservoir fluid level a mini-
mum of twice annually.
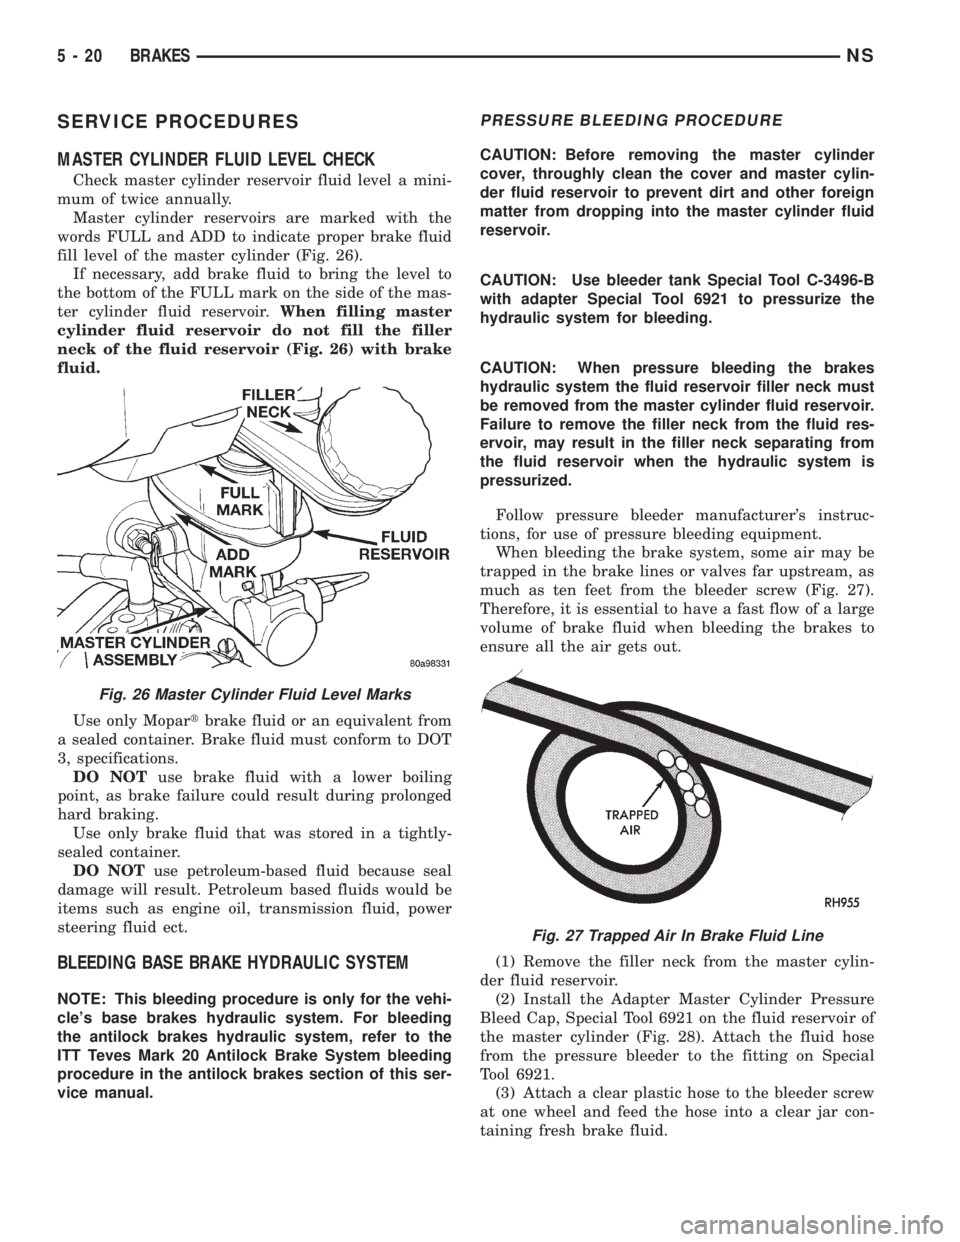
Master cylinder reservoirs are marked with the
words FULL and ADD to indicate proper brake fluid
fill level of the master cylinder (Fig. 26).
If necessary, add brake fluid to bring the level to
the bottom of the FULL mark on the side of the mas-
ter cylinder fluid reservoir.When filling master
cylinder fluid reservoir do not fill the filler
neck of the fluid reservoir (Fig. 26) with brake
fluid.
Use only Mopartbrake fluid or an equivalent from
a sealed container. Brake fluid must conform to DOT
3, specifications.
DO NOTuse brake fluid with a lower boiling
point, as brake failure could result during prolonged
hard braking.
Use only brake fluid that was stored in a tightly-
sealed container.
DO NOTuse petroleum-based fluid because seal
damage will result. Petroleum based fluids would be
items such as engine oil, transmission fluid, power
steering fluid ect.
BLEEDING BASE BRAKE HYDRAULIC SYSTEM
NOTE: This bleeding procedure is only for the vehi-
cle's base brakes hydraulic system. For bleeding
the antilock brakes hydraulic system, refer to the
ITT Teves Mark 20 Antilock Brake System bleeding
procedure in the antilock brakes section of this ser-
vice manual.
PRESSURE BLEEDING PROCEDURE
CAUTION: Before removing the master cylinder
cover, throughly clean the cover and master cylin-
der fluid reservoir to prevent dirt and other foreign
matter from dropping into the master cylinder fluid
reservoir.
CAUTION: Use bleeder tank Special Tool C-3496-B
with adapter Special Tool 6921 to pressurize the
hydraulic system for bleeding.
CAUTION: When pressure bleeding the brakes
hydraulic system the fluid reservoir filler neck must
be removed from the master cylinder fluid reservoir.
Failure to remove the filler neck from the fluid res-
ervoir, may result in the filler neck separating from
the fluid reservoir when the hydraulic system is
pressurized.
Follow pressure bleeder manufacturer's instruc-
tions, for use of pressure bleeding equipment.
When bleeding the brake system, some air may be
trapped in the brake lines or valves far upstream, as
much as ten feet from the bleeder screw (Fig. 27).
Therefore, it is essential to have a fast flow of a large
volume of brake fluid when bleeding the brakes to
ensure all the air gets out.
(1) Remove the filler neck from the master cylin-
der fluid reservoir.
(2) Install the Adapter Master Cylinder Pressure
Bleed Cap, Special Tool 6921 on the fluid reservoir of
the master cylinder (Fig. 28). Attach the fluid hose
from the pressure bleeder to the fitting on Special
Tool 6921.
(3) Attach a clear plastic hose to the bleeder screw
at one wheel and feed the hose into a clear jar con-
taining fresh brake fluid.
Fig. 26 Master Cylinder Fluid Level Marks
Fig. 27 Trapped Air In Brake Fluid Line
5 - 20 BRAKESNS
Page 130 of 1938
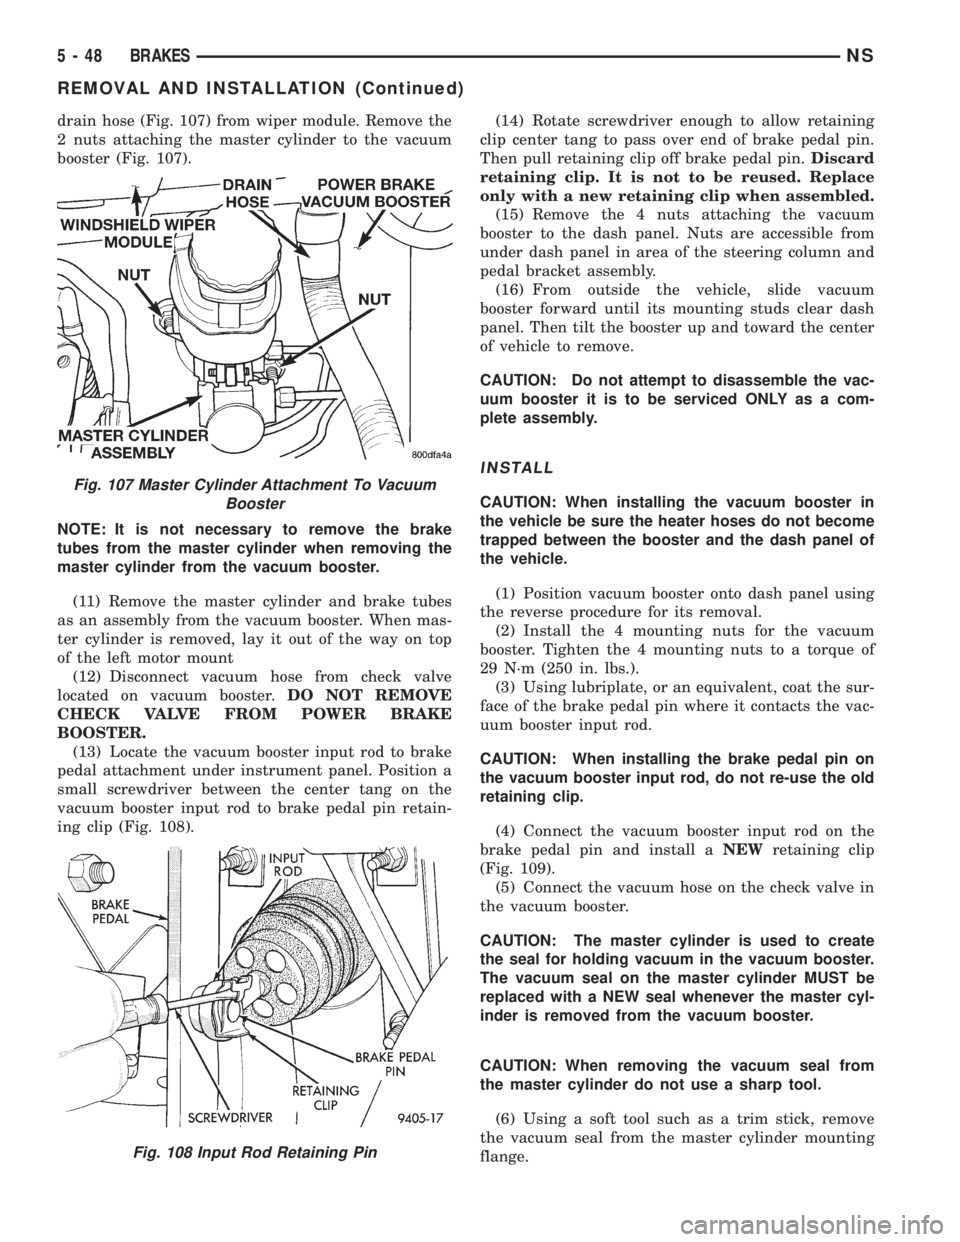
drain hose (Fig. 107) from wiper module. Remove the
2 nuts attaching the master cylinder to the vacuum
booster (Fig. 107).
NOTE: It is not necessary to remove the brake
tubes from the master cylinder when removing the
master cylinder from the vacuum booster.
(11) Remove the master cylinder and brake tubes
as an assembly from the vacuum booster. When mas-
ter cylinder is removed, lay it out of the way on top
of the left motor mount
(12) Disconnect vacuum hose from check valve
located on vacuum booster.DO NOT REMOVE
CHECK VALVE FROM POWER BRAKE
BOOSTER.
(13) Locate the vacuum booster input rod to brake
pedal attachment under instrument panel. Position a
small screwdriver between the center tang on the
vacuum booster input rod to brake pedal pin retain-
ing clip (Fig. 108).(14) Rotate screwdriver enough to allow retaining
clip center tang to pass over end of brake pedal pin.
Then pull retaining clip off brake pedal pin.Discard
retaining clip. It is not to be reused. Replace
only with a new retaining clip when assembled.
(15) Remove the 4 nuts attaching the vacuum
booster to the dash panel. Nuts are accessible from
under dash panel in area of the steering column and
pedal bracket assembly.
(16) From outside the vehicle, slide vacuum
booster forward until its mounting studs clear dash
panel. Then tilt the booster up and toward the center
of vehicle to remove.
CAUTION: Do not attempt to disassemble the vac-
uum booster it is to be serviced ONLY as a com-
plete assembly.
INSTALL
CAUTION: When installing the vacuum booster in
the vehicle be sure the heater hoses do not become
trapped between the booster and the dash panel of
the vehicle.
(1) Position vacuum booster onto dash panel using
the reverse procedure for its removal.
(2) Install the 4 mounting nuts for the vacuum
booster. Tighten the 4 mounting nuts to a torque of
29 N´m (250 in. lbs.).
(3) Using lubriplate, or an equivalent, coat the sur-
face of the brake pedal pin where it contacts the vac-
uum booster input rod.
CAUTION: When installing the brake pedal pin on
the vacuum booster input rod, do not re-use the old
retaining clip.
(4) Connect the vacuum booster input rod on the
brake pedal pin and install aNEWretaining clip
(Fig. 109).
(5) Connect the vacuum hose on the check valve in
the vacuum booster.
CAUTION: The master cylinder is used to create
the seal for holding vacuum in the vacuum booster.
The vacuum seal on the master cylinder MUST be
replaced with a NEW seal whenever the master cyl-
inder is removed from the vacuum booster.
CAUTION: When removing the vacuum seal from
the master cylinder do not use a sharp tool.
(6) Using a soft tool such as a trim stick, remove
the vacuum seal from the master cylinder mounting
flange.
Fig. 107 Master Cylinder Attachment To Vacuum
Booster
Fig. 108 Input Rod Retaining Pin
5 - 48 BRAKESNS
REMOVAL AND INSTALLATION (Continued)
Page 132 of 1938

(10) Remove clip attaching drain hose to brake
tube at master cylinder. Remove drain hose (Fig. 114)
from wiper module. Remove the 2 nuts attaching the
master cylinder assembly to the power brake vacuum
booster (Fig. 114).
NOTE: It is not necessary to remove the brake
tubes from the master cylinder when removing the
master cylinder from the power brake vacuum
booster.
(11) Remove the master cylinder and the brake
tubes as an assembly from power brake vacuum
booster. When master cylinder is removed, lay it out
of the way on top of the left motor mount(12) Disconnect vacuum hose from check valve
located on power brake vacuum booster.DO NOT
REMOVE CHECK VALVE FROM POWER
BRAKE BOOSTER.
(13) Locate the power brake vacuum booster input
rod to brake pedal attachment under instrument
panel. Position a small screwdriver between the cen-
ter tang on the power brake booster input rod to
brake pedal pin retaining clip (Fig. 115).
(14) Rotate screwdriver enough to allow retaining
clip center tang to pass over end of brake pedal pin.
Then pull retaining clip off brake pedal pin.Discard
retaining clip. It is not to be reused. Replace
only with a new retaining clip when assembled.
(15) Remove the 4 nuts attaching the vacuum
booster to the dash panel. Nuts are accessible from
under dash panel in area of the steering column and
pedal bracket assembly.
(16) From outside the vehicle, slide power brake
vacuum booster forward until its mounting studs
Fig. 111 Air Inlet Resonator
Fig. 112 Battery Tray Mounting Locations
Fig. 113 Electrical Connection To Fluid Level Sensor
Fig. 114 Master Cylinder Attachment To Power
Brake Vacuum Booster
5 - 50 BRAKESNS
REMOVAL AND INSTALLATION (Continued)
Page 136 of 1938
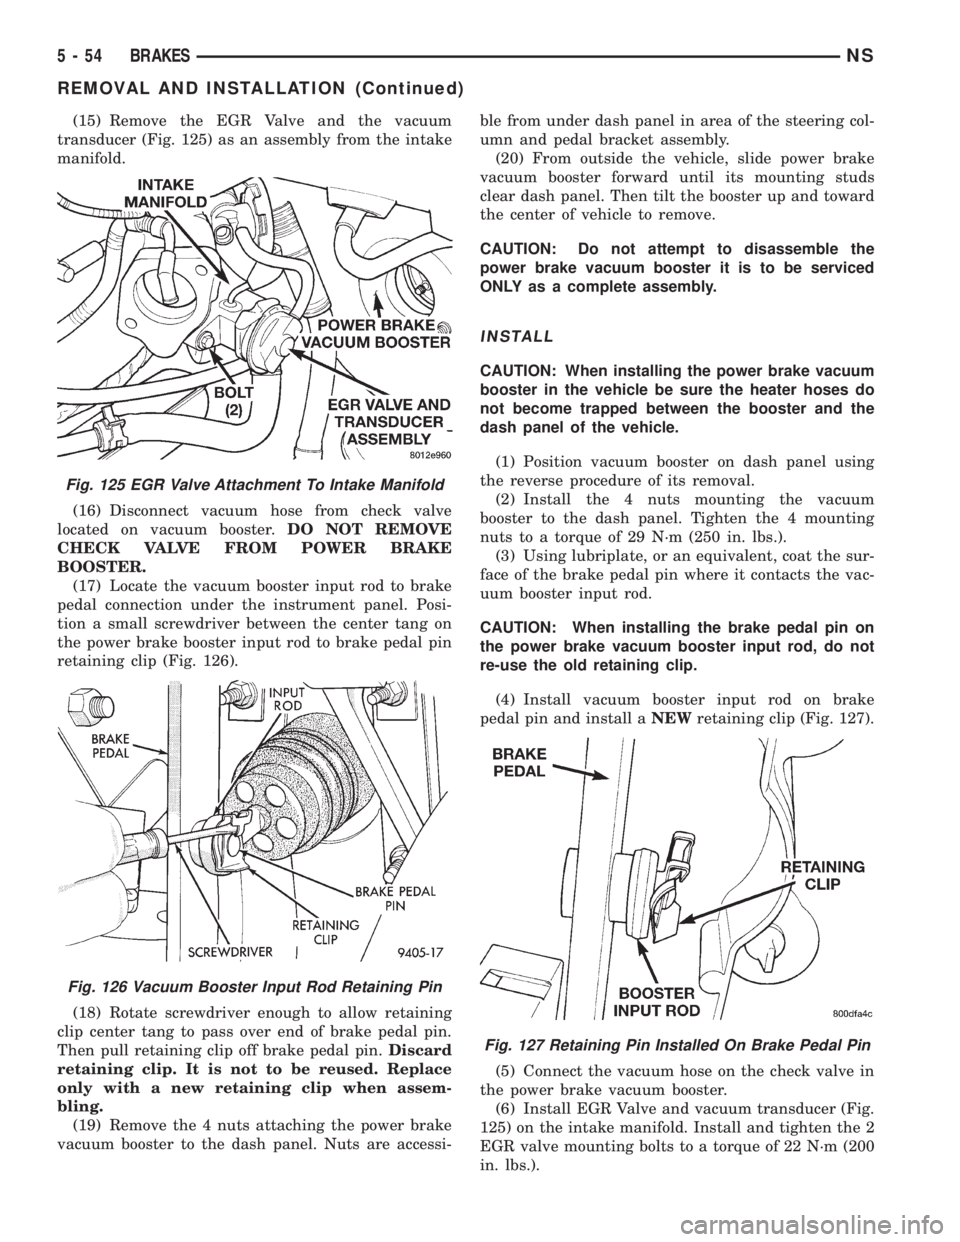
(15) Remove the EGR Valve and the vacuum
transducer (Fig. 125) as an assembly from the intake
manifold.
(16) Disconnect vacuum hose from check valve
located on vacuum booster.DO NOT REMOVE
CHECK VALVE FROM POWER BRAKE
BOOSTER.
(17) Locate the vacuum booster input rod to brake
pedal connection under the instrument panel. Posi-
tion a small screwdriver between the center tang on
the power brake booster input rod to brake pedal pin
retaining clip (Fig. 126).
(18) Rotate screwdriver enough to allow retaining
clip center tang to pass over end of brake pedal pin.
Then pull retaining clip off brake pedal pin.Discard
retaining clip. It is not to be reused. Replace
only with a new retaining clip when assem-
bling.
(19) Remove the 4 nuts attaching the power brake
vacuum booster to the dash panel. Nuts are accessi-ble from under dash panel in area of the steering col-
umn and pedal bracket assembly.
(20) From outside the vehicle, slide power brake
vacuum booster forward until its mounting studs
clear dash panel. Then tilt the booster up and toward
the center of vehicle to remove.
CAUTION: Do not attempt to disassemble the
power brake vacuum booster it is to be serviced
ONLY as a complete assembly.
INSTALL
CAUTION: When installing the power brake vacuum
booster in the vehicle be sure the heater hoses do
not become trapped between the booster and the
dash panel of the vehicle.
(1) Position vacuum booster on dash panel using
the reverse procedure of its removal.
(2) Install the 4 nuts mounting the vacuum
booster to the dash panel. Tighten the 4 mounting
nuts to a torque of 29 N´m (250 in. lbs.).
(3) Using lubriplate, or an equivalent, coat the sur-
face of the brake pedal pin where it contacts the vac-
uum booster input rod.
CAUTION: When installing the brake pedal pin on
the power brake vacuum booster input rod, do not
re-use the old retaining clip.
(4) Install vacuum booster input rod on brake
pedal pin and install aNEWretaining clip (Fig. 127).
(5) Connect the vacuum hose on the check valve in
the power brake vacuum booster.
(6) Install EGR Valve and vacuum transducer (Fig.
125) on the intake manifold. Install and tighten the 2
EGR valve mounting bolts to a torque of 22 N´m (200
in. lbs.).
Fig. 125 EGR Valve Attachment To Intake Manifold
Fig. 126 Vacuum Booster Input Rod Retaining Pin
Fig. 127 Retaining Pin Installed On Brake Pedal Pin
5 - 54 BRAKESNS
REMOVAL AND INSTALLATION (Continued)