power steering fluid CHRYSLER VOYAGER 1996 Service Manual
[x] Cancel search | Manufacturer: CHRYSLER, Model Year: 1996, Model line: VOYAGER, Model: CHRYSLER VOYAGER 1996Pages: 1938, PDF Size: 55.84 MB
Page 18 of 1938
ENGINE OIL
SAE VISCOSITY RATING INDICATES ENGINE OIL VISCOSITY
An SAE viscosity grade is used to specify the vis-
cosity of engine oil. SAE 30 specifies a single viscos-
ity engine oil. Engine oils also have multiple
viscosities. These are specified with a dual SAE vis-
cosity grade which indicates the cold-to-hot tempera-
ture viscosity range.
²SAE 30 = single grade engine oil.
²SAE 10W-30 = multiple grade engine oil.
API QUALITY CLASSIFICATION
The API Service Grade specifies the type of perfor-
mance the engine oil is intended to provide. The API
Service Grade specifications also apply to energy con-
serving engine oils.
Use engine oils that are API Service Certified.
5W-30 and 10W-30 MOPAR engine oils conform to
specifications.
Refer to Group 9, Engine for engine oil specifica-
tion.
GEAR LUBRICANTS
SAE ratings also apply to multiple grade gear
lubricants. In addition, API classification defines the
lubricants usage.LUBRICANTS AND GREASES
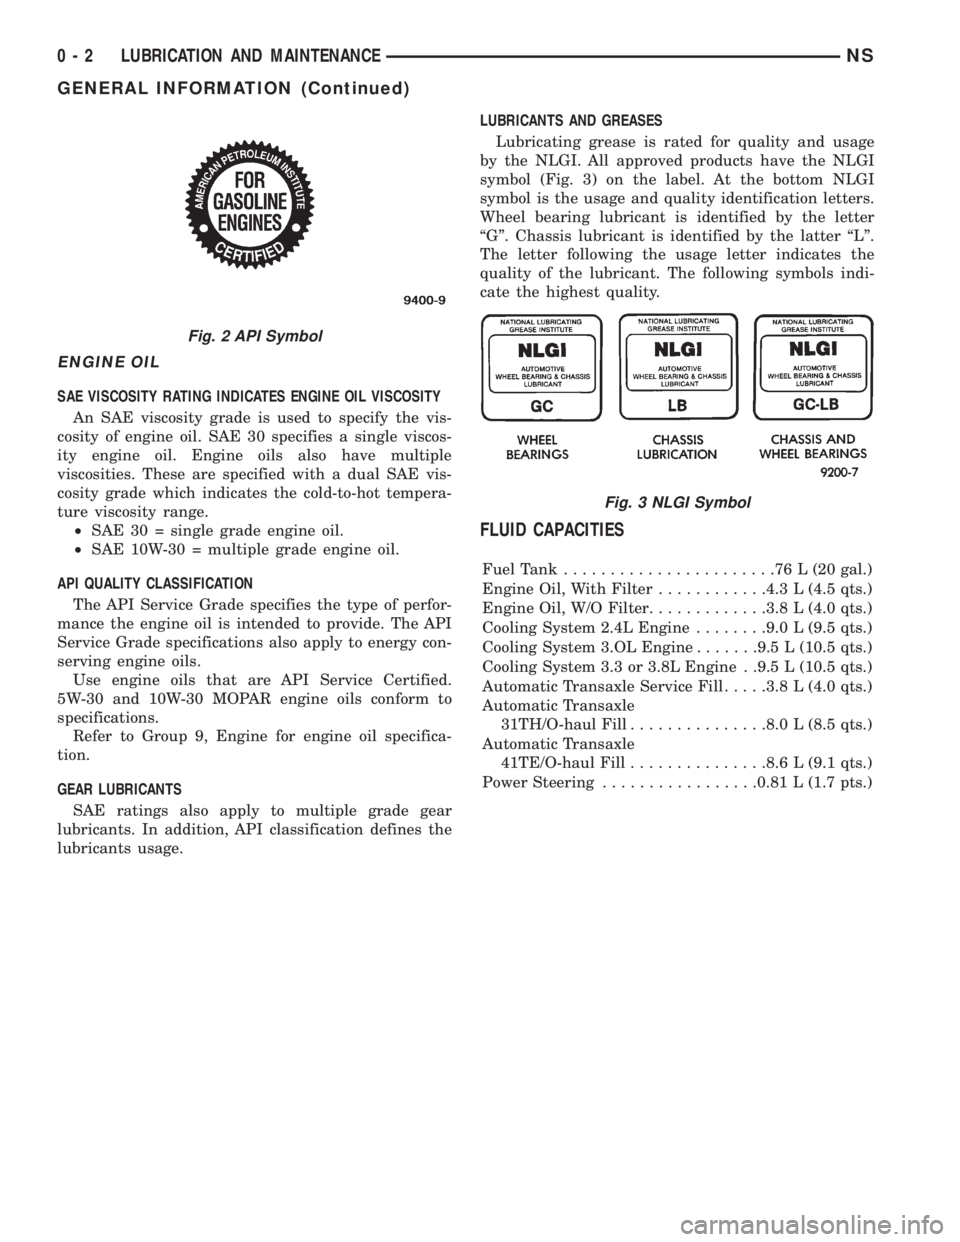
Lubricating grease is rated for quality and usage
by the NLGI. All approved products have the NLGI
symbol (Fig. 3) on the label. At the bottom NLGI
symbol is the usage and quality identification letters.
Wheel bearing lubricant is identified by the letter
ªGº. Chassis lubricant is identified by the latter ªLº.
The letter following the usage letter indicates the
quality of the lubricant. The following symbols indi-
cate the highest quality.
FLUID CAPACITIES
Fuel Tank.......................76L(20gal.)
Engine Oil, With Filter............4.3 L (4.5 qts.)
Engine Oil, W/O Filter.............3.8 L (4.0 qts.)
Cooling System 2.4L Engine........9.0 L (9.5 qts.)
Cooling System 3.OL Engine.......9.5 L (10.5 qts.)
Cooling System 3.3 or 3.8L Engine . .9.5 L (10.5 qts.)
Automatic Transaxle Service Fill.....3.8 L (4.0 qts.)
Automatic Transaxle
31TH/O-haul Fill...............8.0 L (8.5 qts.)
Automatic Transaxle
41TE/O-haul Fill...............8.6 L (9.1 qts.)
Power Steering.................0.81 L (1.7 pts.)
Fig. 2 API Symbol
Fig. 3 NLGI Symbol
0 - 2 LUBRICATION AND MAINTENANCENS
GENERAL INFORMATION (Continued)
Page 19 of 1938
MAINTENANCE SCHEDULES
INDEX
page page
GENERAL INFORMATION
INTRODUCTION......................... 3
SCHEDULE ± A.......................... 3SCHEDULE ± B.......................... 4
UNSCHEDULED INSPECTION............... 3
GENERAL INFORMATION
INTRODUCTION
Service and maintenance procedures for compo-
nents and systems listed in Schedule ± A or B can be
found by using the Group Tab Locator index at the
front of this manual. If it is not clear which group
contains the information needed, refer to the index at
the back of this manual.
There are two maintenance schedules that show
proper service based on the conditions that the vehi-
cle is subjected to.
Schedule ±A, lists scheduled maintenance to be
performed when the vehicle is used for general trans-
portation.
Schedule ±B, lists maintenance intervals for vehi-
cles that are operated under the conditions listed at
the beginning of the Maintenance Schedule section.
Use the schedule that best describes your driving
conditions.
Where time and mileage are listed, follow the
interval that occurs first.
UNSCHEDULED INSPECTION
At Each Stop for Fuel
²Check engine oil level, add as required.
²Check windshield washer solvent and add if
required.
Once a Month
²Check tire pressure and look for unusual wear
or damage.
²Inspect battery and clean and tighten terminals
as required.
²Check fluid levels of coolant reservoir, brake
master cylinder, power steering and transaxle and
add as needed.
²Check all lights and all other electrical items for
correct operation.
²Check rubber seals on each side of the radiator
for proper fit.
At Each Oil Change
²Inspect exhaust system.
²Inspect brake hoses
²Inspect the CV joints and front suspension com-
ponents
²Rotate the tires at each oil change interval
shown on Schedule ± A (7,500 miles) or every other
interval shown on Schedule ± B (6,000 miles).
²Check the coolant level, hoses, and clamps.
²If your mileage is less than 7,500 miles (12 000
km) yearly, replace the engine oil filter at each oil
change.
²Replace engine oil filter on 2.4L engines.
SCHEDULE ± A
7,500 Miles (12 000 km) or at 6 months
²Change engine oil.
15,000 Miles (24 000 km) or at 12 months
²Change engine oil.
²Replace engine oil filter.
22,500 Miles (36 000 km) or at 18 months
²Change engine oil.
²Inspect brake linings.
30,000 Miles (48 000 km) or at 24 months
²Change engine oil.
²Change automatic transmission fluid.
²Replace engine oil filter.
²Replace air cleaner element.
²Inspect tie rod ends and boot seals.
37,500 Miles (60 000 km) or at 30 months
²Change engine oil.
45,000 Miles (72 000 km) or at 36 months
²Change engine oil.
²Replace engine oil filter.
²Inspect brake linings.
²Flush and replace engine coolant at 36 months,
regardless of mileage.
NSLUBRICATION AND MAINTENANCE 0 - 3
Page 28 of 1938
MAINTENANCE SCHEDULES
INDEX
page page
GENERAL INFORMATION
MAINTENANCE SCHEDULE............... 2
MAINTENANCE SCHEDULEÐ
DIESEL ENGINE....................... 2SCHEDULEÐA (DIESEL).................. 2
SCHEDULEÐB (DIESEL).................. 3
UNSCHEDULED INSPECTION.............. 2
GENERAL INFORMATION
MAINTENANCE SCHEDULE
Refer to the 1998 GS Service Manual for Gasoline
Engine and non-engine related Maintenance Sched-
ules.
MAINTENANCE SCHEDULEÐDIESEL ENGINE
The following are engine related Maintenance
items which are unique to Diesel engine-equipped
vehicles. Refer to the 1998 GS Service Manual for
Gasoline Engine and non-engine related Maintenance
Schedules.
The service intervals are based on odometer read-
ings in kilometers. There are two maintenance sched-
ules that show proper service intervals. Use the
schedule that best describes the conditions the vehi-
cle is operated under.Schedule-Alists all the sched-
uled maintenance to be performed under normal
operating conditions.Schedule-Bis the schedule for
vehicles that are operated under one or more of the
following conditions:
²Day and night temperatures are below freezing.
²Stop and go driving.
²Long periods of engine idling.
²Driving in dusty conditions.
²Short trips of less than 5 miles.
²Operation at sustained high speeds during hot
weather above 32ÉC (90ÉF).
²Taxi, police or delivery service.
²Trailer towing.
UNSCHEDULED INSPECTION
At Each Stop for Fuel
²Check engine oil level, add as required.
²Check windshield washer solvent and add if
required.
Once a Month
²Check tire pressure and look for unusual wear
or damage.
²Inspect battery and clean and tighten terminals
as required.²Check fluid levels of coolant reservoir, brake
master cylinder, power steering and transaxle and
add as needed.
²Check all lights and all other electrical items for
correct operation.
²Check rubber seals on each side of the radiator
for proper fit.
At Each Oil Change
²Inspect exhaust system.
²Inspect brake hoses
²Inspect the CV joints and front suspension com-
ponents
²Rotate the tires at each oil change interval
shown on ScheduleÐA (7,500 miles) or every other
interval shown on ScheduleÐ B (6,000 miles).
²Check the coolant level, hoses, and clamps.
²If your mileage is less than 7,500 miles (12 000
km) yearly, replace the engine oil filter at each oil
change.
²Replace engine oil filter.
SCHEDULEÐA (DIESEL)
1 000 KM
²Change engine oil.
²Change engine oil filter.
²Check all fluid levels.
²Check correct torque, intake manifold mounting
nuts.
²Check correct torque, exhaust manifold mount-
ing nuts.
²Check correct torque, turbocharger mounting
nuts.
²Check correct torque, water manifold bolts.
10 000 KM
²Change engine oil.
²Change engine oil filter.
20 000 KM
²Change engine oil.
²Change engine oil filter.
²Replace air filter element.
0 - 2 LUBRICATION AND MAINTENANCENS/GS
Page 36 of 1938
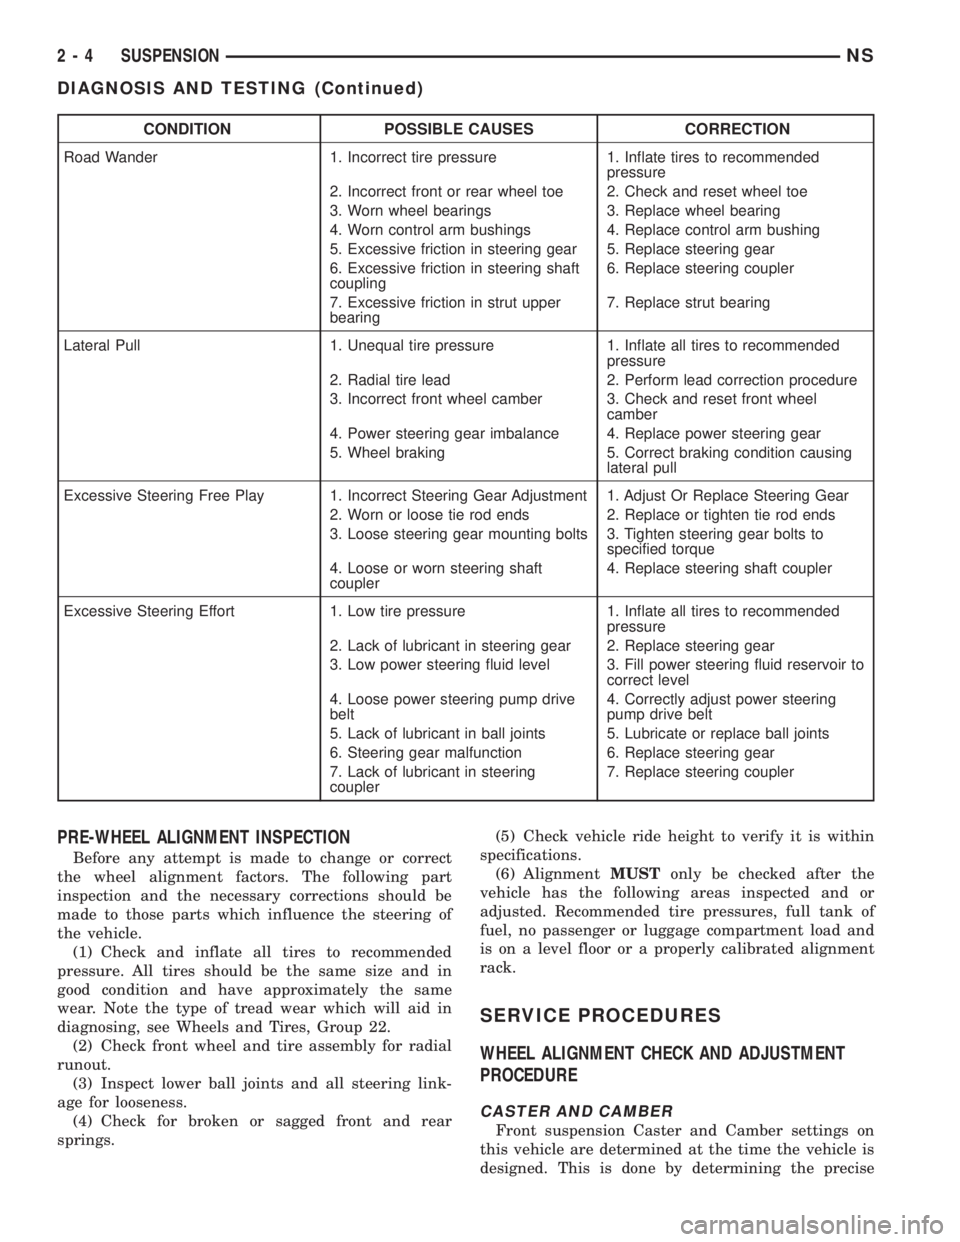
CONDITION POSSIBLE CAUSES CORRECTION
Road Wander 1. Incorrect tire pressure 1. Inflate tires to recommended
pressure
2. Incorrect front or rear wheel toe 2. Check and reset wheel toe
3. Worn wheel bearings 3. Replace wheel bearing
4. Worn control arm bushings 4. Replace control arm bushing
5. Excessive friction in steering gear 5. Replace steering gear
6. Excessive friction in steering shaft
coupling6. Replace steering coupler
7. Excessive friction in strut upper
bearing7. Replace strut bearing
Lateral Pull 1. Unequal tire pressure 1. Inflate all tires to recommended
pressure
2. Radial tire lead 2. Perform lead correction procedure
3. Incorrect front wheel camber 3. Check and reset front wheel
camber
4. Power steering gear imbalance 4. Replace power steering gear
5. Wheel braking 5. Correct braking condition causing
lateral pull
Excessive Steering Free Play 1. Incorrect Steering Gear Adjustment 1. Adjust Or Replace Steering Gear
2. Worn or loose tie rod ends 2. Replace or tighten tie rod ends
3. Loose steering gear mounting bolts 3. Tighten steering gear bolts to
specified torque
4. Loose or worn steering shaft
coupler4. Replace steering shaft coupler
Excessive Steering Effort 1. Low tire pressure 1. Inflate all tires to recommended
pressure
2. Lack of lubricant in steering gear 2. Replace steering gear
3. Low power steering fluid level 3. Fill power steering fluid reservoir to
correct level
4. Loose power steering pump drive
belt4. Correctly adjust power steering
pump drive belt
5. Lack of lubricant in ball joints 5. Lubricate or replace ball joints
6. Steering gear malfunction 6. Replace steering gear
7. Lack of lubricant in steering
coupler7. Replace steering coupler
PRE-WHEEL ALIGNMENT INSPECTION
Before any attempt is made to change or correct
the wheel alignment factors. The following part
inspection and the necessary corrections should be
made to those parts which influence the steering of
the vehicle.
(1) Check and inflate all tires to recommended
pressure. All tires should be the same size and in
good condition and have approximately the same
wear. Note the type of tread wear which will aid in
diagnosing, see Wheels and Tires, Group 22.
(2) Check front wheel and tire assembly for radial
runout.
(3) Inspect lower ball joints and all steering link-
age for looseness.
(4) Check for broken or sagged front and rear
springs.(5) Check vehicle ride height to verify it is within
specifications.
(6) AlignmentMUSTonly be checked after the
vehicle has the following areas inspected and or
adjusted. Recommended tire pressures, full tank of
fuel, no passenger or luggage compartment load and
is on a level floor or a properly calibrated alignment
rack.
SERVICE PROCEDURES
WHEEL ALIGNMENT CHECK AND ADJUSTMENT
PROCEDURE
CASTER AND CAMBER
Front suspension Caster and Camber settings on
this vehicle are determined at the time the vehicle is
designed. This is done by determining the precise
2 - 4 SUSPENSIONNS
DIAGNOSIS AND TESTING (Continued)
Page 102 of 1938
SERVICE PROCEDURES
MASTER CYLINDER FLUID LEVEL CHECK
Check master cylinder reservoir fluid level a mini-
mum of twice annually.
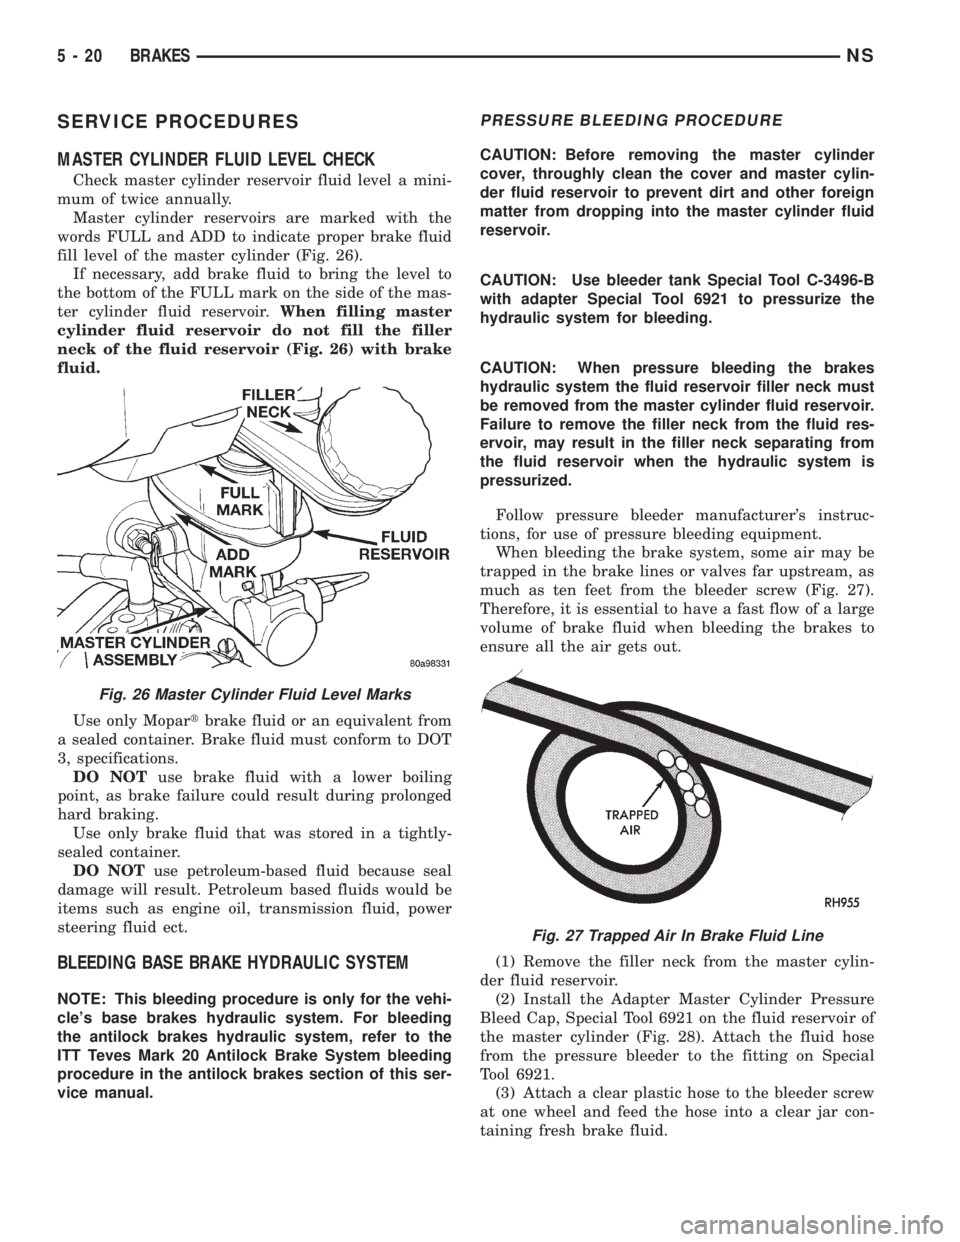
Master cylinder reservoirs are marked with the
words FULL and ADD to indicate proper brake fluid
fill level of the master cylinder (Fig. 26).
If necessary, add brake fluid to bring the level to
the bottom of the FULL mark on the side of the mas-
ter cylinder fluid reservoir.When filling master
cylinder fluid reservoir do not fill the filler
neck of the fluid reservoir (Fig. 26) with brake
fluid.
Use only Mopartbrake fluid or an equivalent from
a sealed container. Brake fluid must conform to DOT
3, specifications.
DO NOTuse brake fluid with a lower boiling
point, as brake failure could result during prolonged
hard braking.
Use only brake fluid that was stored in a tightly-
sealed container.
DO NOTuse petroleum-based fluid because seal
damage will result. Petroleum based fluids would be
items such as engine oil, transmission fluid, power
steering fluid ect.
BLEEDING BASE BRAKE HYDRAULIC SYSTEM
NOTE: This bleeding procedure is only for the vehi-
cle's base brakes hydraulic system. For bleeding
the antilock brakes hydraulic system, refer to the
ITT Teves Mark 20 Antilock Brake System bleeding
procedure in the antilock brakes section of this ser-
vice manual.
PRESSURE BLEEDING PROCEDURE
CAUTION: Before removing the master cylinder
cover, throughly clean the cover and master cylin-
der fluid reservoir to prevent dirt and other foreign
matter from dropping into the master cylinder fluid
reservoir.
CAUTION: Use bleeder tank Special Tool C-3496-B
with adapter Special Tool 6921 to pressurize the
hydraulic system for bleeding.
CAUTION: When pressure bleeding the brakes
hydraulic system the fluid reservoir filler neck must
be removed from the master cylinder fluid reservoir.
Failure to remove the filler neck from the fluid res-
ervoir, may result in the filler neck separating from
the fluid reservoir when the hydraulic system is
pressurized.
Follow pressure bleeder manufacturer's instruc-
tions, for use of pressure bleeding equipment.
When bleeding the brake system, some air may be
trapped in the brake lines or valves far upstream, as
much as ten feet from the bleeder screw (Fig. 27).
Therefore, it is essential to have a fast flow of a large
volume of brake fluid when bleeding the brakes to
ensure all the air gets out.
(1) Remove the filler neck from the master cylin-
der fluid reservoir.
(2) Install the Adapter Master Cylinder Pressure
Bleed Cap, Special Tool 6921 on the fluid reservoir of
the master cylinder (Fig. 28). Attach the fluid hose
from the pressure bleeder to the fitting on Special
Tool 6921.
(3) Attach a clear plastic hose to the bleeder screw
at one wheel and feed the hose into a clear jar con-
taining fresh brake fluid.
Fig. 26 Master Cylinder Fluid Level Marks
Fig. 27 Trapped Air In Brake Fluid Line
5 - 20 BRAKESNS
Page 132 of 1938

(10) Remove clip attaching drain hose to brake
tube at master cylinder. Remove drain hose (Fig. 114)
from wiper module. Remove the 2 nuts attaching the
master cylinder assembly to the power brake vacuum
booster (Fig. 114).
NOTE: It is not necessary to remove the brake
tubes from the master cylinder when removing the
master cylinder from the power brake vacuum
booster.
(11) Remove the master cylinder and the brake
tubes as an assembly from power brake vacuum
booster. When master cylinder is removed, lay it out
of the way on top of the left motor mount(12) Disconnect vacuum hose from check valve
located on power brake vacuum booster.DO NOT
REMOVE CHECK VALVE FROM POWER
BRAKE BOOSTER.
(13) Locate the power brake vacuum booster input
rod to brake pedal attachment under instrument
panel. Position a small screwdriver between the cen-
ter tang on the power brake booster input rod to
brake pedal pin retaining clip (Fig. 115).
(14) Rotate screwdriver enough to allow retaining
clip center tang to pass over end of brake pedal pin.
Then pull retaining clip off brake pedal pin.Discard
retaining clip. It is not to be reused. Replace
only with a new retaining clip when assembled.
(15) Remove the 4 nuts attaching the vacuum
booster to the dash panel. Nuts are accessible from
under dash panel in area of the steering column and
pedal bracket assembly.
(16) From outside the vehicle, slide power brake
vacuum booster forward until its mounting studs
Fig. 111 Air Inlet Resonator
Fig. 112 Battery Tray Mounting Locations
Fig. 113 Electrical Connection To Fluid Level Sensor
Fig. 114 Master Cylinder Attachment To Power
Brake Vacuum Booster
5 - 50 BRAKESNS
REMOVAL AND INSTALLATION (Continued)
Page 164 of 1938
(13) Lower the vehicle to the ground.Be sure
that the suspension is supporting the full
weight of the vehicle.
(14) Tighten the spring to front hanger pivot bolts
to a torque of 156 N´m (115 ft. lbs.).
(15) Tighten the shock absorber mounting bolts to
a torque of 101 N´m (75 ft. lbs.).
(16) Tighten the track bar mounting bolt to a
torque of 95 N´m (70 ft. lbs.).
(17) Road test vehicle to ensure that the prema-
ture rear wheel lockup condition has been corrected.
SPECIFICATIONS
BRAKE FLUID
The brake fluid used in this vehicle must conform
to DOT 3 specifications and SAE J1703 standards.No other type of brake fluid is recommended or
approved for usage in the vehicle brake system. Use
only Mopar brake fluid or an equivalent from a
tightly sealed container.
CAUTION: Never use reclaimed brake fluid or fluid
from an container which has been left open. An
open container will absorb moisture from the air
and contaminate the fluid.
CAUTION: Never use any type of a petroleum-
based fluid in the brake hydraulic system. Use of
such type fluids will result in seal damage of the
vehicle brake hydraulic system causing a failure of
the vehicle brake system. Petroleum based fluids
would be items such as engine oil, transmission
fluid, power steering fluid ect.
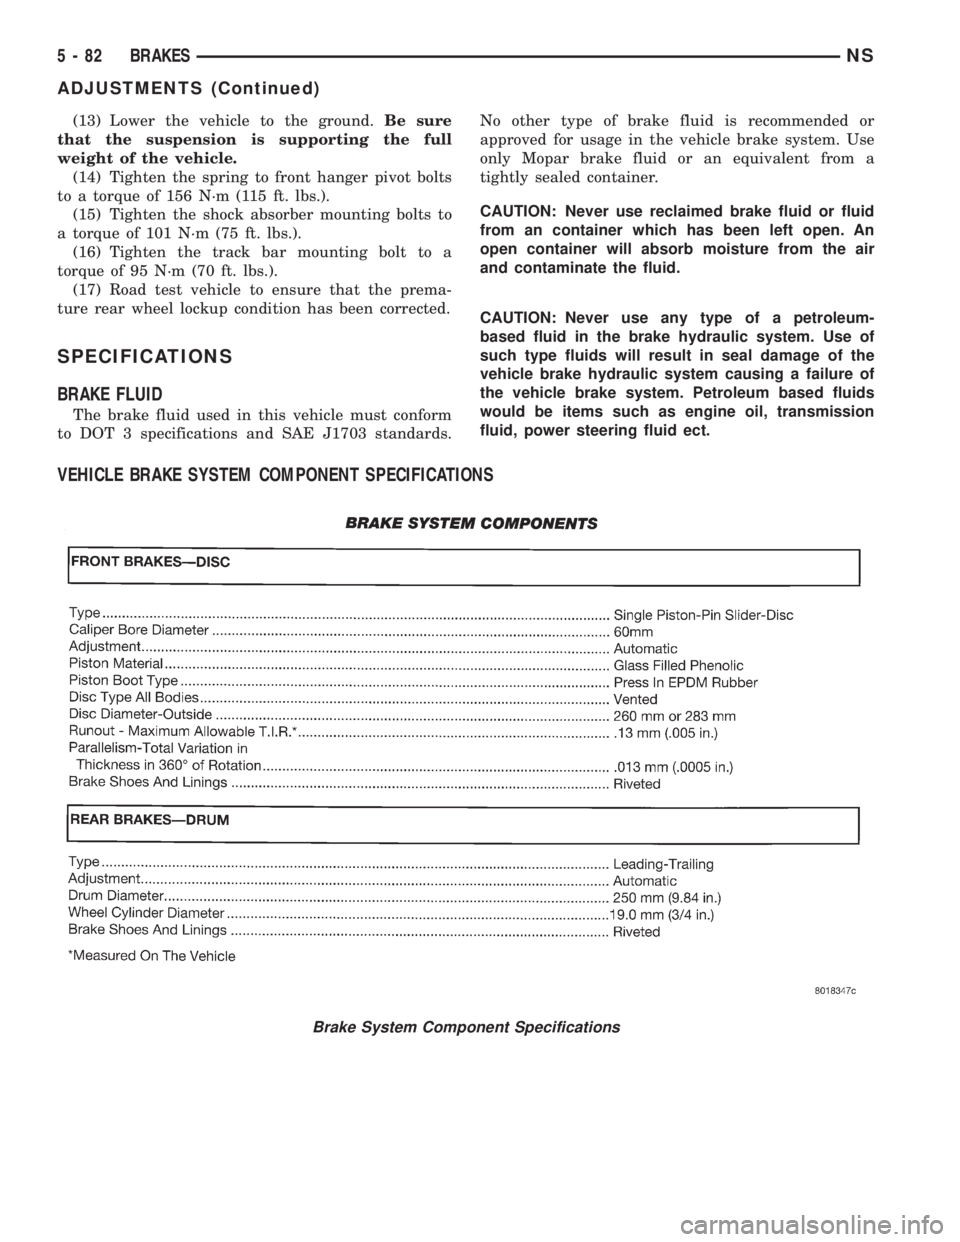
VEHICLE BRAKE SYSTEM COMPONENT SPECIFICATIONS
Brake System Component Specifications
5 - 82 BRAKESNS
ADJUSTMENTS (Continued)
Page 165 of 1938
BRAKE ACTUATION SYSTEM
ACTUATION:
Vacuum Operated Power Brakes.........Standard
Hydraulic System...........Dual-Diagonally Split
Antilock Brake Sytem (Teves Mark-20)...........
MASTER CYLINDER ASSEMBLY:
Supplier..............................Bosch
Type For Non-ABSAnd
ABS Brakes. . . .Conventional Compensating Port
Type For ABS Brakes
With Traction Control . . .Dual Center Port Design
Body Material...............Anodized Aluminum
Reservoir Material................Polypropelene
MASTER CYLINDER BORE /
STROKE AND SPLIT:
ABS W/Disc/Drum Brakes......23.8 mm x 36 mm
(.937 in. x 1.47 in.)
AWD W/Disc/Disc Brakes........25.4 mm x 39 mm
(1.00 in. x 1.50 in.)
Displacement Split.....................50/50
MASTER CYLINDER FLUID OUTLET PORTS:
Non-ABS And ABS . . .Primary 7/16±24 Secondary 7/
16±24
ABS With Traction Control.......Primary M12 x 1
Secondary M12 x 1
Outlet Fitting Type Non-ABS
AndABS...........Double Wall Inverted Flare
Outlet Fitting Type ABS With
Traction Control...................ISO Flare
ABS HYDRAULIC CONTROL UNIT:
Hydraulic Tube Fitting Type............ISO Flare
BOOSTER:
Make/Type.................Bosch Vacuum Assist
Mounting Studs.....................M8x1.25
Type .........................270 ZLT RSMV
Boost At 20 inches Of
Manifold Vacuum...........3800 N´m (850 lbs.)
PROPORTIONING VALVE:
Material...........................Aluminum
Function....................Hydraulic Pressure
Proportioning To Rear Brakes
BRAKE PEDAL
Pedal Ratio.............................3.36
BRAKE FASTENER TORQUE SPECIFICATIONS
DESCRIPTION TORQUE
BRAKE TUBES:
Tube Nuts To Fittings And
Components..............17N´m(145 in. lbs.)
BRAKE HOSE:
To Caliper Banjo Bolt..........48N´m(35ft.lbs.)
Intermediate Bracket.........12N´m(105 in. lbs.)
MASTER CYLINDER:
To Vacuum Booster
Mounting Nut............25N´m(225 in. lbs.)
FIXED PROPORTIONING VALVE:
To Frame Rail Attaching
Bolts....................14N´m(125 in. lbs.)
HEIGHT SENSING PROPORTIONING VALVE:
To Mounting Bracket
Attaching Bolts...........23N´m(200 in. lbs.)
Actuator Assembly
Adjustment Nut.............5N´m(45in.lbs.)
Mounting Bracket To Frame
Rail Bolts................17N´m(150 in. lbs.)
JUNCTION BLOCK (NON-ABS BRAKES)
To Suspension Cradle
Mounting Bolt............28N´m(250 in. lbs.)
VACUUM BOOSTER:
To Dash Panel Mounting
Nuts....................28N´m(250 in. lbs.)
REAR WHEEL CYLINDER:
To Support Plate Mounting
Bolts.....................8N´m(75in.lbs.)
Bleeder Screw...............10N´m(80in.lbs.)
BRAKE SUPPORT PLATE:
To Rear Axle Mounting Bolts . . .130 N´m (95 ft. lbs.)
DISC BRAKE CALIPER:
Guide Pin Bolts..............41N´m(30ft.lbs.)
Bleeder Screw..............15N´m(125 in. lbs.)
ABS HYDRAULIC CONTROL UNIT:
Mounting Bracket To
Suspension Cradle Bolts.....28N´m(250 in. lbs.)
To Mounting Bracket Isolator
Attaching Bolts............11N´m(97in.lbs.)
CAB To HCU Mounting Screws . . .2 N´m (17 in. lbs.)
WHEEL SPEED SENSOR:
To Axle Or Steering Knuckle
Mounting Bolt............12N´m(105 in. lbs.)
PARKING BRAKE:
Pedal Assembly Mounting
Bolts....................28N´m(250 in. lbs.)
REAR HUB AND BEARING:
To Axle Mounting Bolts........129 N´m (95 ft. lbs.)
WHEEL:
Stud Lug Nut........115±156 N´m (84-115 ft. lbs.)
NSBRAKES 5 - 83
SPECIFICATIONS (Continued)
Page 167 of 1938
ANTILOCK BRAKE SYSTEM ± TEVES MARK-20
INDEX
page page
DESCRIPTION AND OPERATION
ABS BRAKE SYSTEM COMPONENTS........ 87
ABS BRAKES COMPONENT
ABBREVIATION LIST.................... 85
ABS BRAKES OPERATION AND VEHICLE
PERFORMANCE....................... 86
ABS FUSES............................ 89
ABS MASTER CYLINDER AND POWER
BRAKE BOOSTER..................... 87
ABS RELAYS........................... 89
ABS WARNING LAMP (YELLOW)............ 91
ANTILOCK BRAKES OPERATION
DESCRIPTION........................ 85
ASR VALVE (ABS WITH TRACTION
CONTROL ONLY)...................... 88
CONTROLLER ANTILOCK BRAKES (CAB)..... 90
HCU BRAKE FLUID ACCUMULATORS AND
NOISE DAMPING CHAMBER............. 88
HCU PUMP/MOTOR..................... 89
HYDRAULIC CIRCUITS AND VALVE
OPERATION.......................... 92
INLET VALVES AND SOLENOIDS............ 88
INTEGRATED CONTROL UNIT (ICU)......... 87
OUTLET VALVES AND SOLENOIDS.......... 88
PROPORTIONING VALVES................ 89
WHEEL SPEED SENSORS................. 89
DIAGNOSIS AND TESTING
ABS BRAKE DIAGNOSTIC TOOL
CONNECTOR......................... 96
ABS DIAGNOSTIC TROUBLE CODES........ 97
ABS DIAGNOSTICS MANUAL.............. 96ABS GENERAL DIAGNOSTICS
INFORMATION........................ 95
ABS SERVICE PRECAUTIONS.............. 99
ABS SYSTEM SELF DIAGNOSTICS.......... 96
ABS WIRING DIAGRAM INFORMATION....... 95
BRAKE FLUID CONTAMINATION............ 98
DRB DIAGNOSTIC SCAN TOOL USAGE...... 96
INTERMITTENT DIAGNOSTIC TROUBLE
CODES.............................. 97
PROPORTIONING VALVE................. 98
TEST DRIVING ABS COMPLAINT VEHICLE.... 98
TONEWHEEL INSPECTION................ 98
SERVICE PROCEDURES
BLEEDING TEVES MARK 20 HYDRAULIC
SYSTEM............................. 99
BRAKE FLUID LEVEL INSPECTION.......... 99
REMOVAL AND INSTALLATION
ABS GENERAL SERVICE PRECAUTIONS.... 100
CONTROLLER ANTILOCK BRAKES (CAB).... 103
HYDRAULIC CONTROL UNIT.............. 100
TONE WHEEL (REAR AWD)............... 111
TONE WHEEL (REAR FWD)............... 110
WHEEL SPEED SENSOR (FRONT)......... 105
WHEEL SPEED SENSOR (REAR AWD)...... 108
WHEEL SPEED SENSOR (REAR FWD)...... 106
SPECIFICATIONS
BRAKE FASTENER TORQUE
SPECIFICATIONS..................... 112
SPEED SENSOR TONE WHEEL RUNOUT.... 112
WHEEL SPEED SENSOR TO TONE
WHEEL CLEARANCE.................. 112
DESCRIPTION AND OPERATION
ANTILOCK BRAKES OPERATION DESCRIPTION
The purpose of an Antilock Brake System (ABS) is to
prevent wheel lock-up under braking conditions on virtu-
ally any type of road surface. Antilock Braking is desirable
because a vehicle which is stopped without locking the
wheels will retain directional stability and some steering
capability. This allows the driver to retain greater control
of the vehicle during braking.
This section of the service manual covers the description
and on car service for the ITT Teves Mark 20 ABS Brake
System and the ITT Teves Mark 20 ABS Brake System
with Traction Control. If other service is required on the
non ABS related components of the brake system, refer to
the appropriate section in this group of the service manual
for the specific service procedure required.
ABS BRAKES COMPONENT ABBREVIATION LIST
In this section of the service manual, several
abbreviations are used for the components of the
Teves Mark 20 ABS Brake System and the Teves
Mark 20 ABS Brake System with Traction Control.
They are listed below for your reference.
²CAB±Controller Antilock Brake
²ICU±Integrated Control Unit
²HCU±Hydraulic Control Unit
²TCS±Traction Control
²ABS±Antilock Brake System
²PSI±Pounds Per Square Inch (pressure)
²WSS±Wheel Speed Sensor
²FWD±Front Wheel Drive
²AWD±All Wheel Drive
²DTC±Diagnostic Trouble Code
NSBRAKES 5 - 85
Page 169 of 1938
PREMATURE ABS CYCLING
NOTE: When working on a vehicle which has a
complaint of premature ABS cycling it may be nec-
essary to use a DRB Scan Tool to detect and verify
the condition.
There is one complaint called Premature ABS
Cycling in which neither the Red Brake Warning
Lamp nor the Amber Antilock Lamp were illumi-
nated and no fault codes were stored in the CAB.
Symptoms of Premature ABS Cycling, include click-
ing sounds from the solenoids valves, pump motor
running and pulsations in the brake pedal. This con-
dition can occur at any braking rate of the vehicle
and on any type of road surface. This creates an
additional condition which needs to be correctly
assessed when diagnosing problems with the antilock
brake system.
The following conditions are common causes that
need to be checked when diagnosing a condition of
Premature ABS Cycling. Damaged tone wheels,
incorrect tone wheels, damage to a wheel speed sen-
sor mounting boss on a steering knuckle, a loose
wheel speed sensor mounting bolt, and excessive tone
wheel runout. Also, an excessively large tone wheel
to wheel speed sensor air gap can lead to the condi-
tion of Premature ABS Cycling. Special attention is
to be given to these components when diagnosing a
vehicle exhibiting the condition of Premature ABS
Cycling. After diagnosing the defective component,
repair or replace as required.
When the component repair or replacement is com-
pleted, test drive the vehicle to verify the condition of
Premature ABS Cycling has been corrected.
ABS BRAKE SYSTEM COMPONENTS
The following is a detailed description of the Teves
Mark 20 ABS brake system components. For infor-
mation on servicing the base brake system compo-
nents, see the base Brake System section of this
Service Manual.
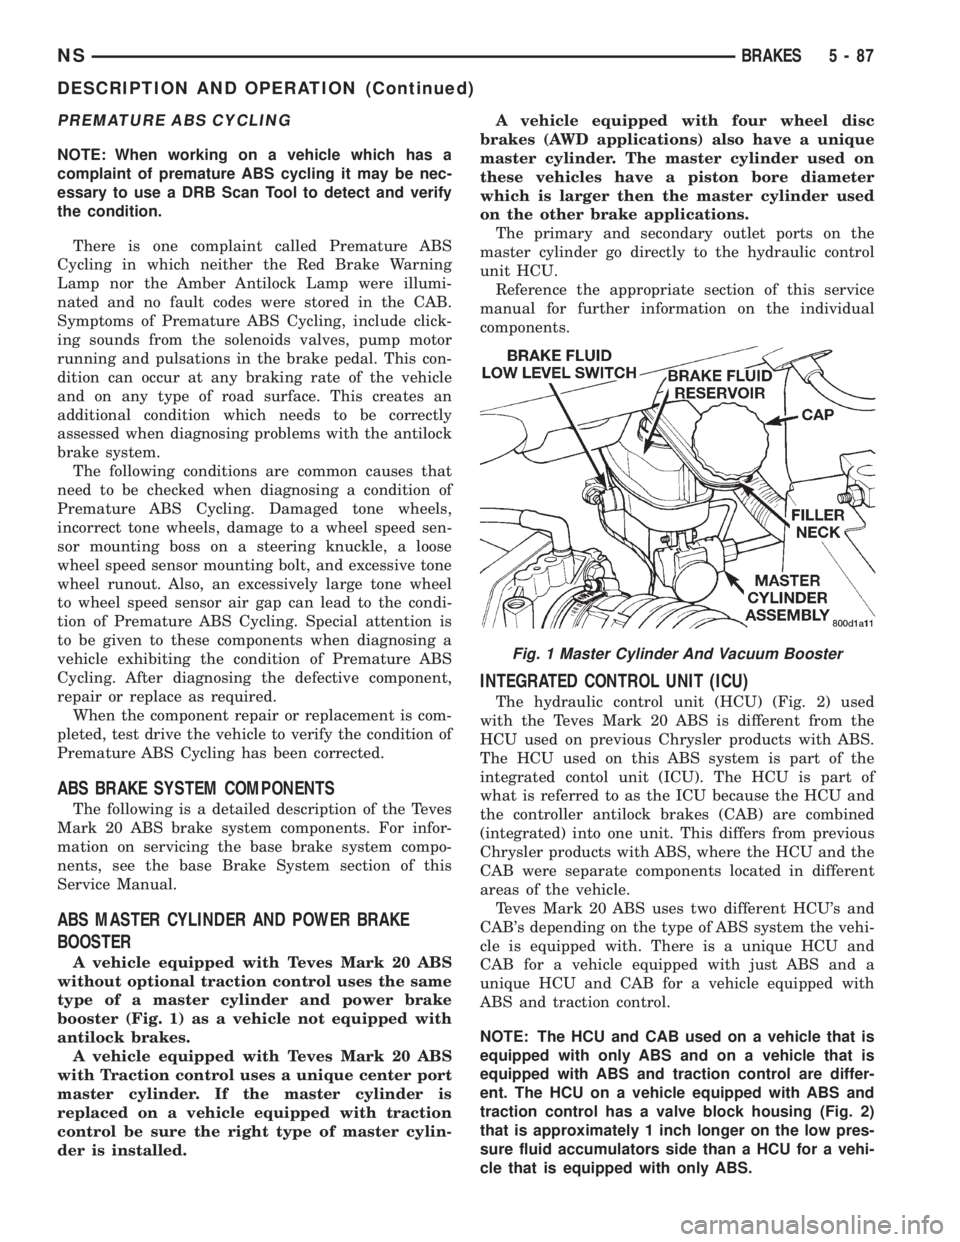
ABS MASTER CYLINDER AND POWER BRAKE
BOOSTER
A vehicle equipped with Teves Mark 20 ABS
without optional traction control uses the same
type of a master cylinder and power brake
booster (Fig. 1) as a vehicle not equipped with
antilock brakes.
A vehicle equipped with Teves Mark 20 ABS
with Traction control uses a unique center port
master cylinder. If the master cylinder is
replaced on a vehicle equipped with traction
control be sure the right type of master cylin-
der is installed.A vehicle equipped with four wheel disc
brakes (AWD applications) also have a unique
master cylinder. The master cylinder used on
these vehicles have a piston bore diameter
which is larger then the master cylinder used
on the other brake applications.
The primary and secondary outlet ports on the
master cylinder go directly to the hydraulic control
unit HCU.
Reference the appropriate section of this service
manual for further information on the individual
components.
INTEGRATED CONTROL UNIT (ICU)
The hydraulic control unit (HCU) (Fig. 2) used
with the Teves Mark 20 ABS is different from the
HCU used on previous Chrysler products with ABS.
The HCU used on this ABS system is part of the
integrated contol unit (ICU). The HCU is part of
what is referred to as the ICU because the HCU and
the controller antilock brakes (CAB) are combined
(integrated) into one unit. This differs from previous
Chrysler products with ABS, where the HCU and the
CAB were separate components located in different
areas of the vehicle.
Teves Mark 20 ABS uses two different HCU's and
CAB's depending on the type of ABS system the vehi-
cle is equipped with. There is a unique HCU and
CAB for a vehicle equipped with just ABS and a
unique HCU and CAB for a vehicle equipped with
ABS and traction control.
NOTE: The HCU and CAB used on a vehicle that is
equipped with only ABS and on a vehicle that is
equipped with ABS and traction control are differ-
ent. The HCU on a vehicle equipped with ABS and
traction control has a valve block housing (Fig. 2)
that is approximately 1 inch longer on the low pres-
sure fluid accumulators side than a HCU for a vehi-
cle that is equipped with only ABS.
Fig. 1 Master Cylinder And Vacuum Booster
NSBRAKES 5 - 87
DESCRIPTION AND OPERATION (Continued)