CHRYSLER VOYAGER 2001 Service Manual
Manufacturer: CHRYSLER, Model Year: 2001, Model line: VOYAGER, Model: CHRYSLER VOYAGER 2001Pages: 4284, PDF Size: 83.53 MB
Page 3141 of 4284
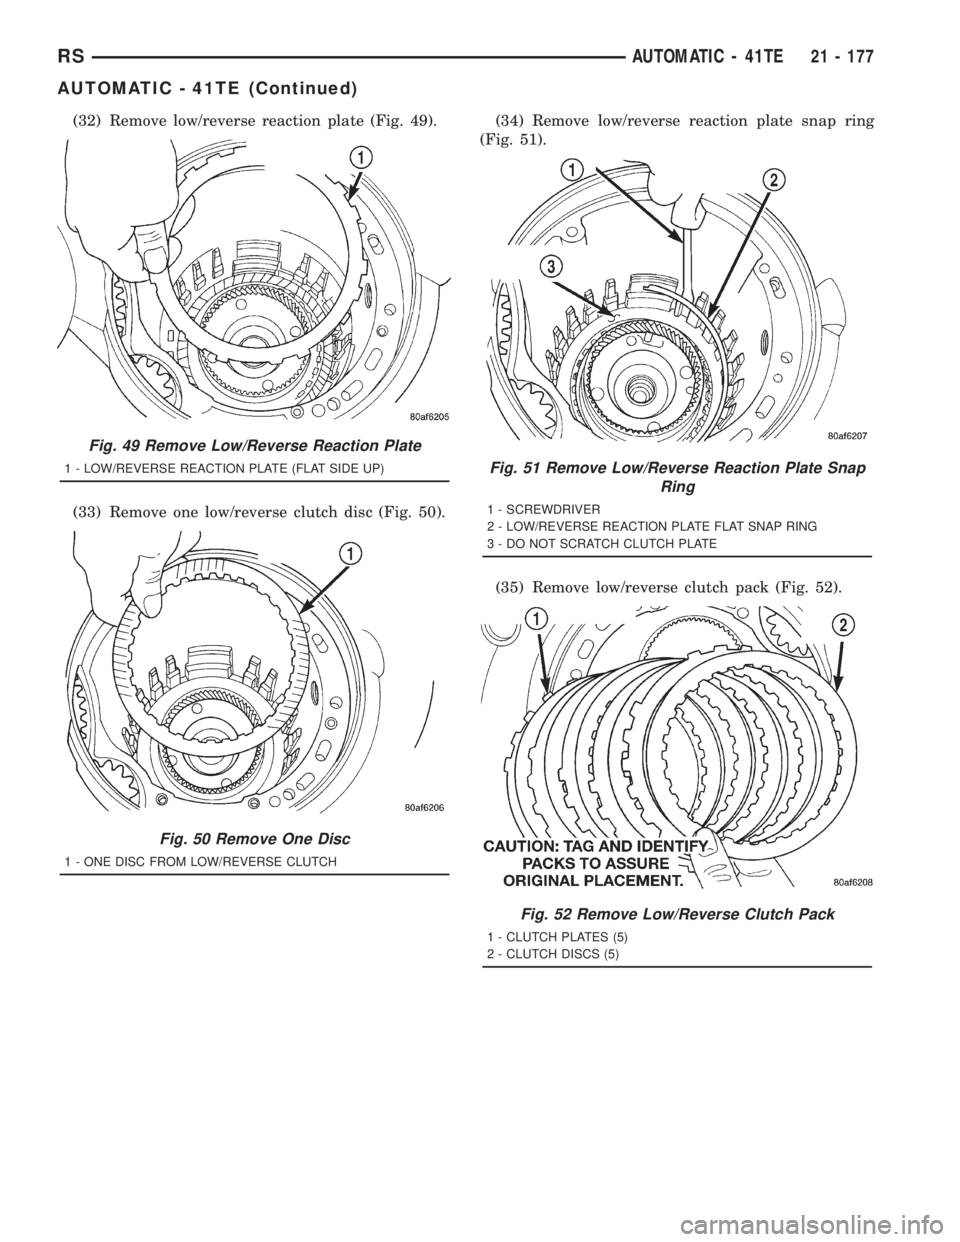
(32) Remove low/reverse reaction plate (Fig. 49).
(33) Remove one low/reverse clutch disc (Fig. 50).(34) Remove low/reverse reaction plate snap ring
(Fig. 51).
(35) Remove low/reverse clutch pack (Fig. 52).
Fig. 49 Remove Low/Reverse Reaction Plate
1 - LOW/REVERSE REACTION PLATE (FLAT SIDE UP)
Fig. 50 Remove One Disc
1 - ONE DISC FROM LOW/REVERSE CLUTCH
Fig. 51 Remove Low/Reverse Reaction Plate Snap
Ring
1 - SCREWDRIVER
2 - LOW/REVERSE REACTION PLATE FLAT SNAP RING
3 - DO NOT SCRATCH CLUTCH PLATE
Fig. 52 Remove Low/Reverse Clutch Pack
1 - CLUTCH PLATES (5)
2 - CLUTCH DISCS (5)
RSAUTOMATIC - 41TE21 - 177
AUTOMATIC - 41TE (Continued)
Page 3142 of 4284
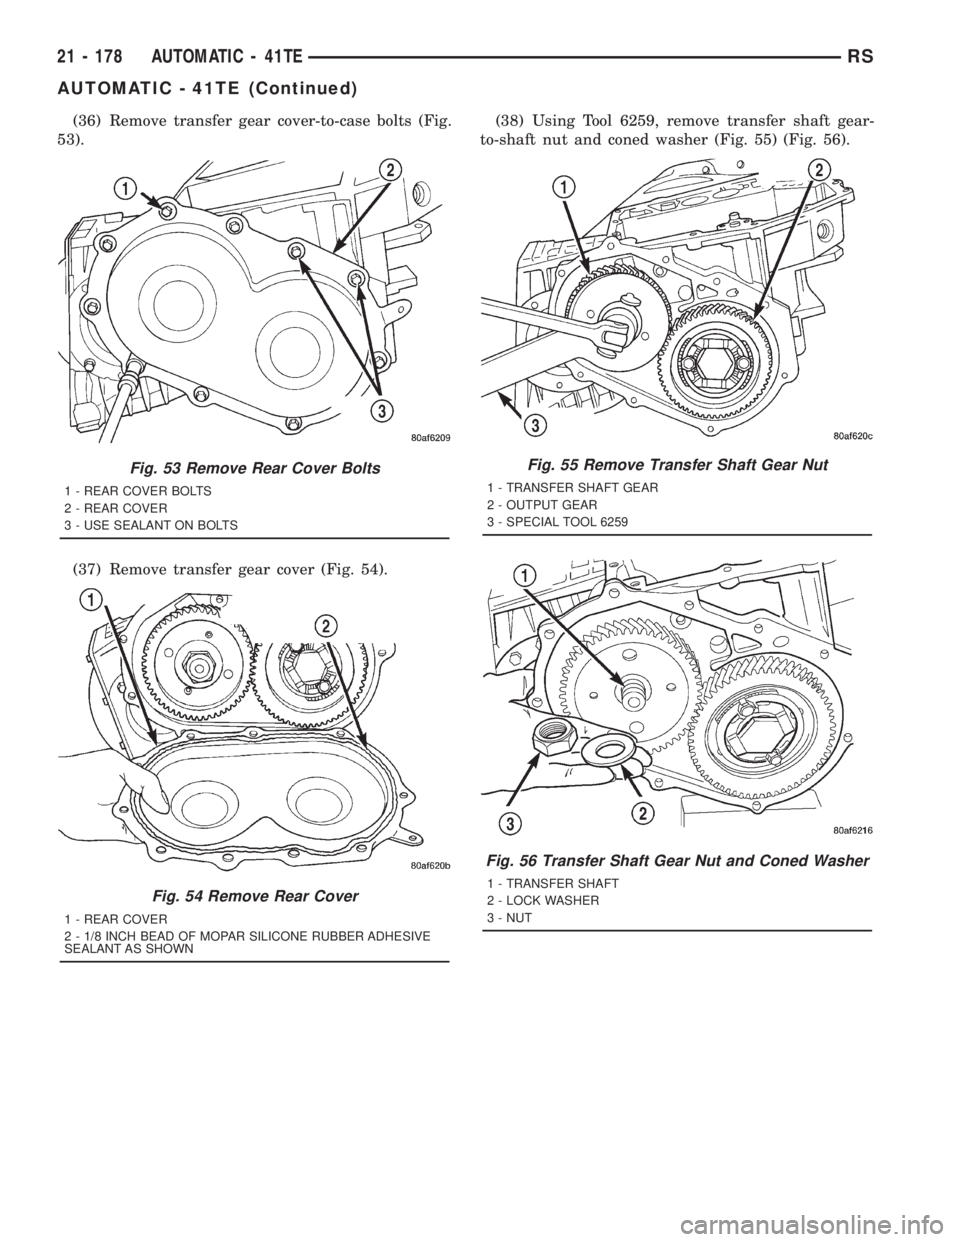
(36) Remove transfer gear cover-to-case bolts (Fig.
53).
(37) Remove transfer gear cover (Fig. 54).(38) Using Tool 6259, remove transfer shaft gear-
to-shaft nut and coned washer (Fig. 55) (Fig. 56).
Fig. 53 Remove Rear Cover Bolts
1 - REAR COVER BOLTS
2 - REAR COVER
3 - USE SEALANT ON BOLTS
Fig. 54 Remove Rear Cover
1 - REAR COVER
2 - 1/8 INCH BEAD OF MOPAR SILICONE RUBBER ADHESIVE
SEALANT AS SHOWN
Fig. 55 Remove Transfer Shaft Gear Nut
1 - TRANSFER SHAFT GEAR
2 - OUTPUT GEAR
3 - SPECIAL TOOL 6259
Fig. 56 Transfer Shaft Gear Nut and Coned Washer
1 - TRANSFER SHAFT
2 - LOCK WASHER
3 - NUT
21 - 178 AUTOMATIC - 41TERS
AUTOMATIC - 41TE (Continued)
Page 3143 of 4284
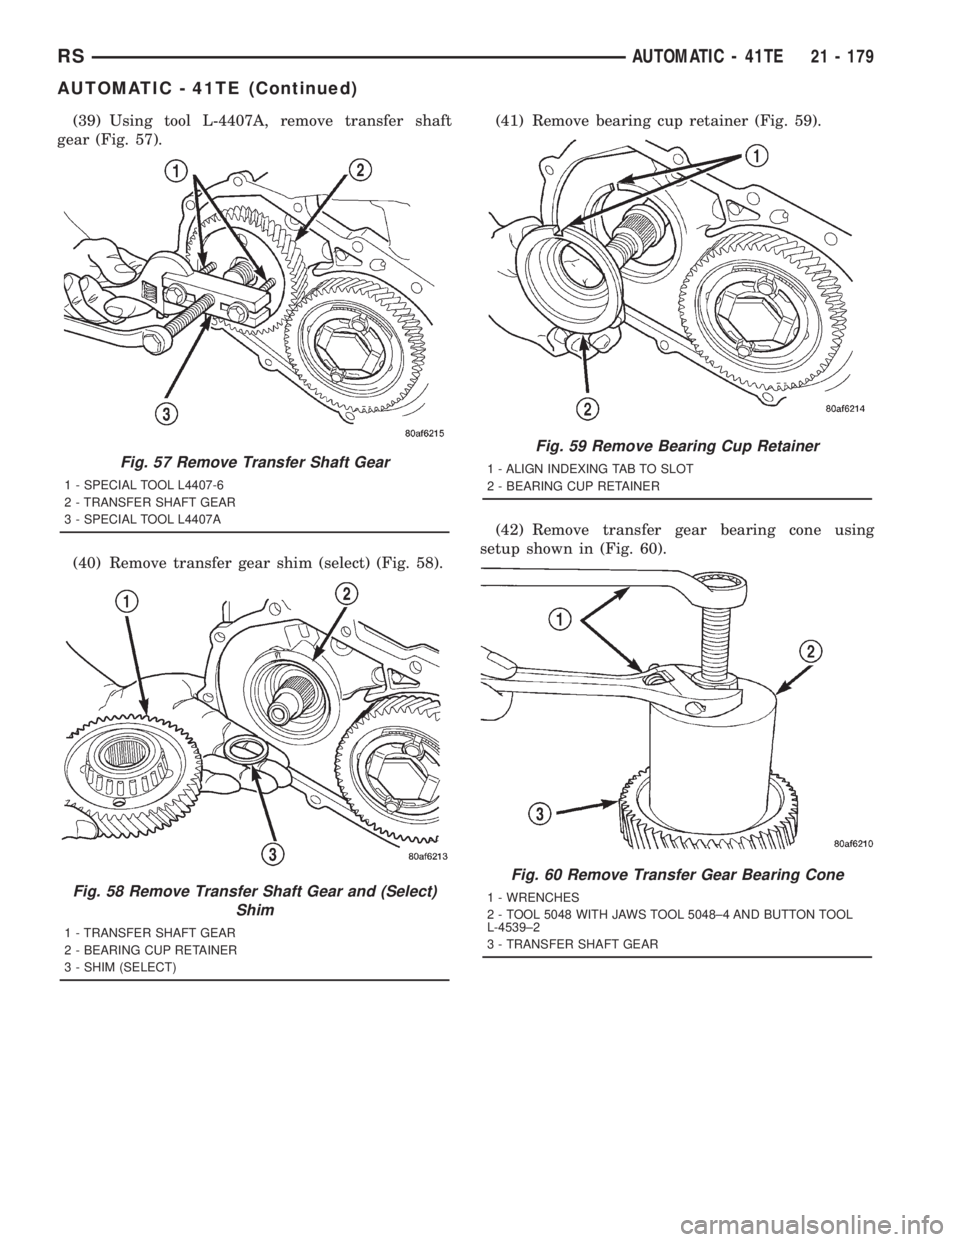
(39) Using tool L-4407A, remove transfer shaft
gear (Fig. 57).
(40) Remove transfer gear shim (select) (Fig. 58).(41) Remove bearing cup retainer (Fig. 59).
(42) Remove transfer gear bearing cone using
setup shown in (Fig. 60).
Fig. 57 Remove Transfer Shaft Gear
1 - SPECIAL TOOL L4407-6
2 - TRANSFER SHAFT GEAR
3 - SPECIAL TOOL L4407A
Fig. 58 Remove Transfer Shaft Gear and (Select)
Shim
1 - TRANSFER SHAFT GEAR
2 - BEARING CUP RETAINER
3 - SHIM (SELECT)
Fig. 59 Remove Bearing Cup Retainer
1 - ALIGN INDEXING TAB TO SLOT
2 - BEARING CUP RETAINER
Fig. 60 Remove Transfer Gear Bearing Cone
1 - WRENCHES
2 - TOOL 5048 WITH JAWS TOOL 5048±4 AND BUTTON TOOL
L-4539±2
3 - TRANSFER SHAFT GEAR
RSAUTOMATIC - 41TE21 - 179
AUTOMATIC - 41TE (Continued)
Page 3144 of 4284
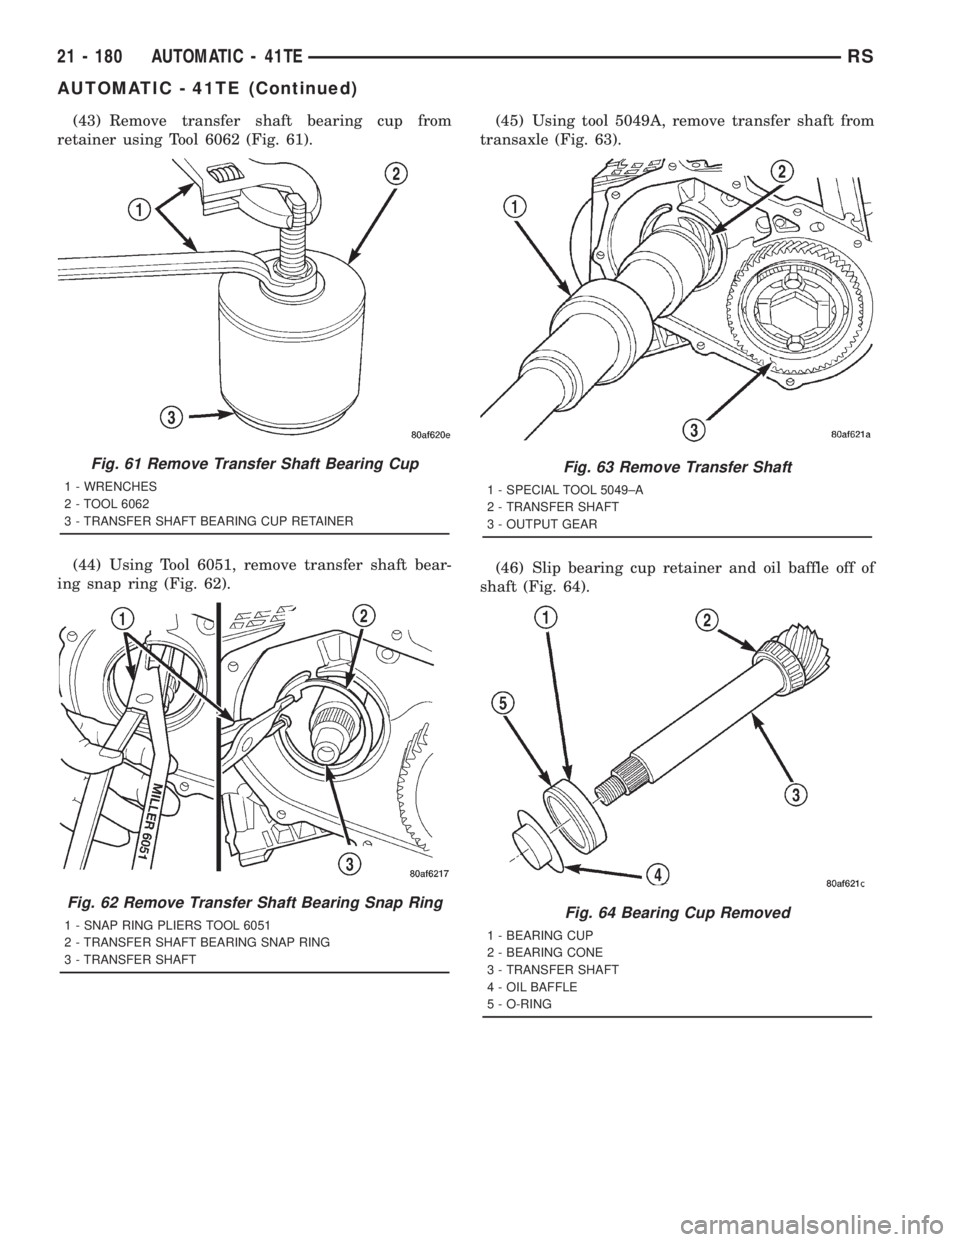
(43) Remove transfer shaft bearing cup from
retainer using Tool 6062 (Fig. 61).
(44) Using Tool 6051, remove transfer shaft bear-
ing snap ring (Fig. 62).(45) Using tool 5049A, remove transfer shaft from
transaxle (Fig. 63).
(46) Slip bearing cup retainer and oil baffle off of
shaft (Fig. 64).
Fig. 61 Remove Transfer Shaft Bearing Cup
1 - WRENCHES
2 - TOOL 6062
3 - TRANSFER SHAFT BEARING CUP RETAINER
Fig. 62 Remove Transfer Shaft Bearing Snap Ring
1 - SNAP RING PLIERS TOOL 6051
2 - TRANSFER SHAFT BEARING SNAP RING
3 - TRANSFER SHAFT
Fig. 63 Remove Transfer Shaft
1 - SPECIAL TOOL 5049±A
2 - TRANSFER SHAFT
3 - OUTPUT GEAR
Fig. 64 Bearing Cup Removed
1 - BEARING CUP
2 - BEARING CONE
3 - TRANSFER SHAFT
4 - OIL BAFFLE
5 - O-RING
21 - 180 AUTOMATIC - 41TERS
AUTOMATIC - 41TE (Continued)
Page 3145 of 4284
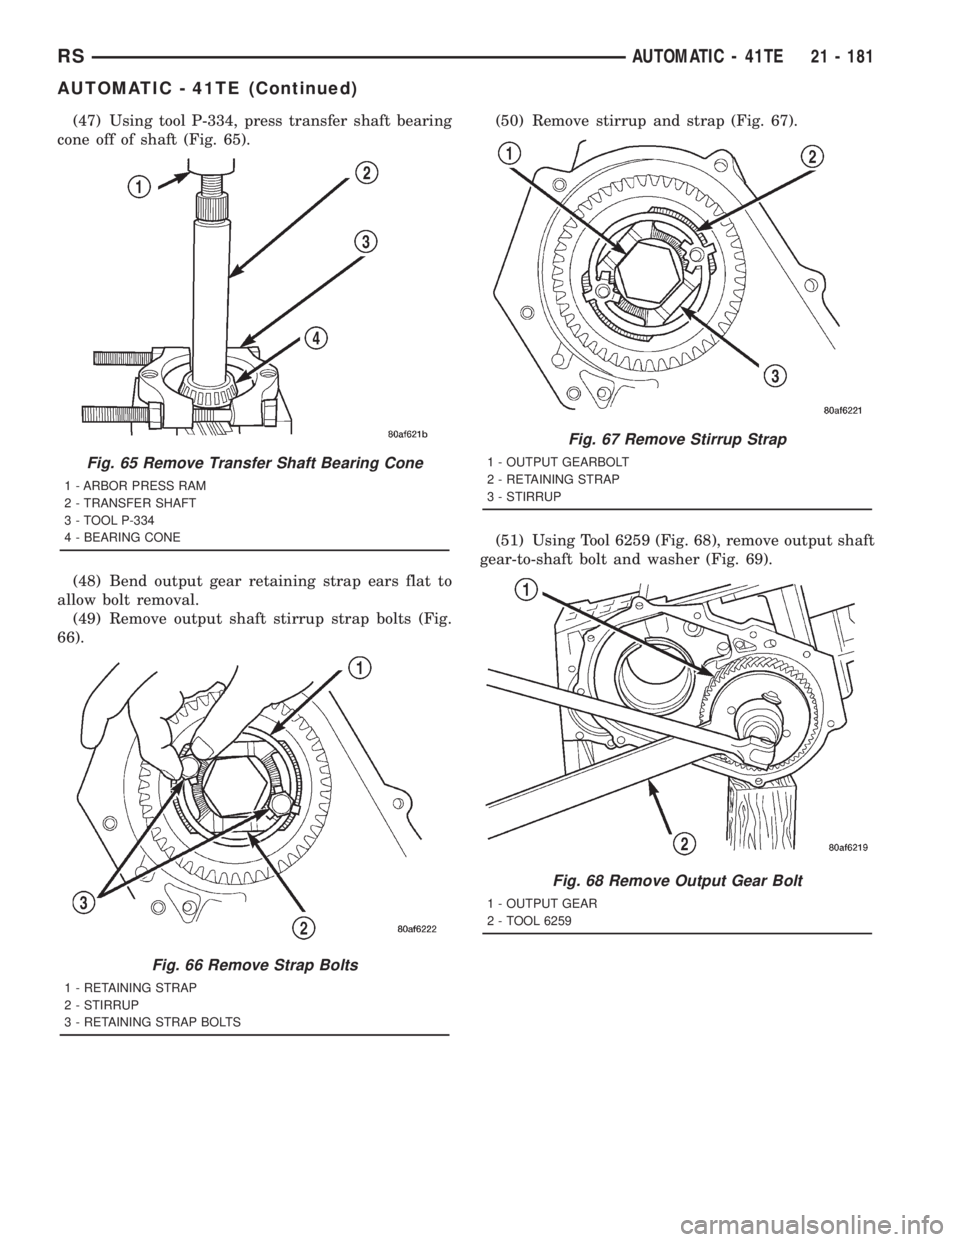
(47) Using tool P-334, press transfer shaft bearing
cone off of shaft (Fig. 65).
(48) Bend output gear retaining strap ears flat to
allow bolt removal.
(49) Remove output shaft stirrup strap bolts (Fig.
66).(50) Remove stirrup and strap (Fig. 67).
(51) Using Tool 6259 (Fig. 68), remove output shaft
gear-to-shaft bolt and washer (Fig. 69).
Fig. 65 Remove Transfer Shaft Bearing Cone
1 - ARBOR PRESS RAM
2 - TRANSFER SHAFT
3 - TOOL P-334
4 - BEARING CONE
Fig. 66 Remove Strap Bolts
1 - RETAINING STRAP
2 - STIRRUP
3 - RETAINING STRAP BOLTS
Fig. 67 Remove Stirrup Strap
1 - OUTPUT GEARBOLT
2 - RETAINING STRAP
3 - STIRRUP
Fig. 68 Remove Output Gear Bolt
1 - OUTPUT GEAR
2 - TOOL 6259
RSAUTOMATIC - 41TE21 - 181
AUTOMATIC - 41TE (Continued)
Page 3146 of 4284
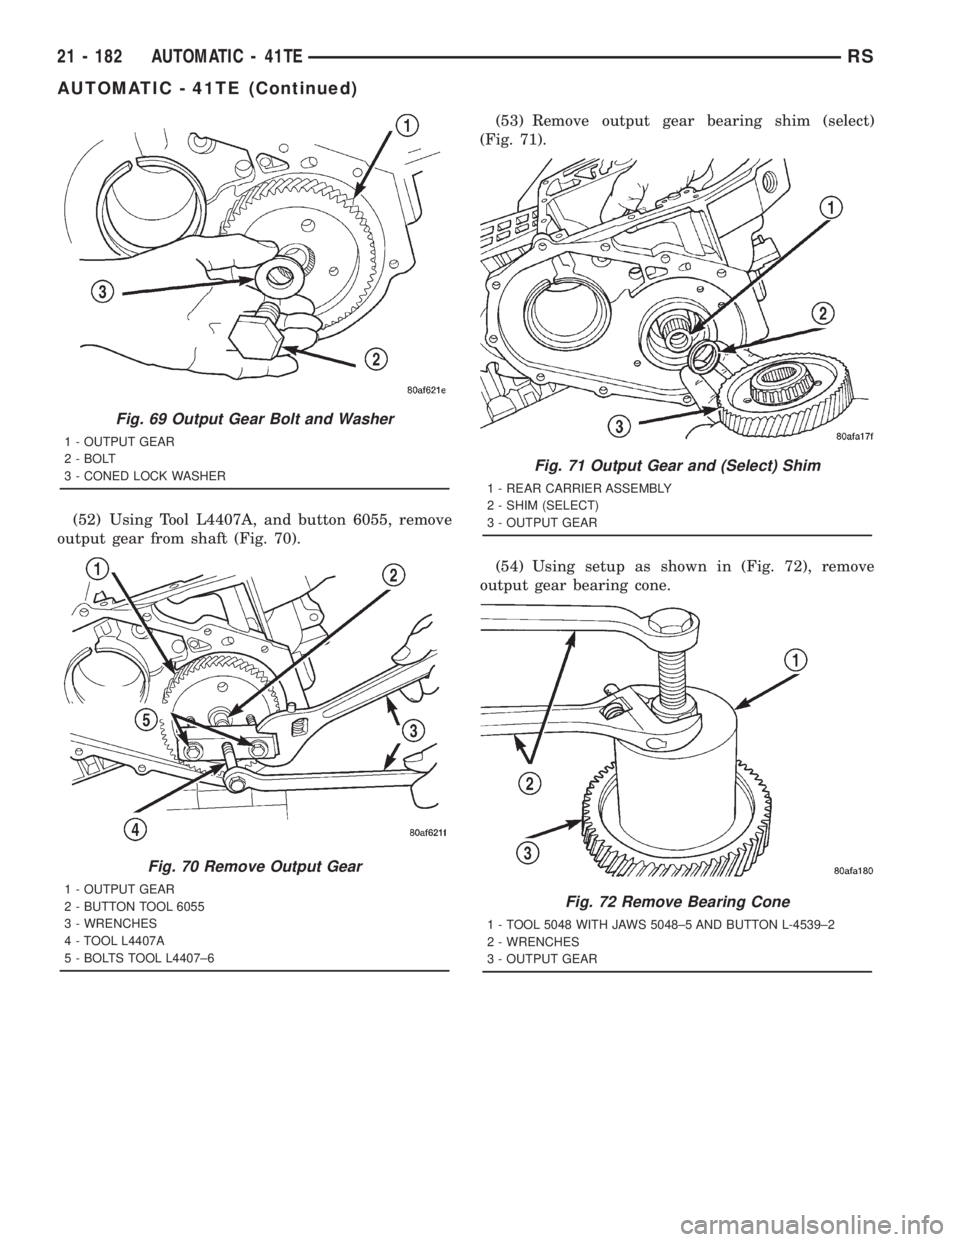
(52) Using Tool L4407A, and button 6055, remove
output gear from shaft (Fig. 70).(53) Remove output gear bearing shim (select)
(Fig. 71).
(54) Using setup as shown in (Fig. 72), remove
output gear bearing cone.
Fig. 69 Output Gear Bolt and Washer
1 - OUTPUT GEAR
2 - BOLT
3 - CONED LOCK WASHER
Fig. 70 Remove Output Gear
1 - OUTPUT GEAR
2 - BUTTON TOOL 6055
3 - WRENCHES
4 - TOOL L4407A
5 - BOLTS TOOL L4407±6
Fig. 71 Output Gear and (Select) Shim
1 - REAR CARRIER ASSEMBLY
2 - SHIM (SELECT)
3 - OUTPUT GEAR
Fig. 72 Remove Bearing Cone
1 - TOOL 5048 WITH JAWS 5048±5 AND BUTTON L-4539±2
2 - WRENCHES
3 - OUTPUT GEAR
21 - 182 AUTOMATIC - 41TERS
AUTOMATIC - 41TE (Continued)
Page 3147 of 4284
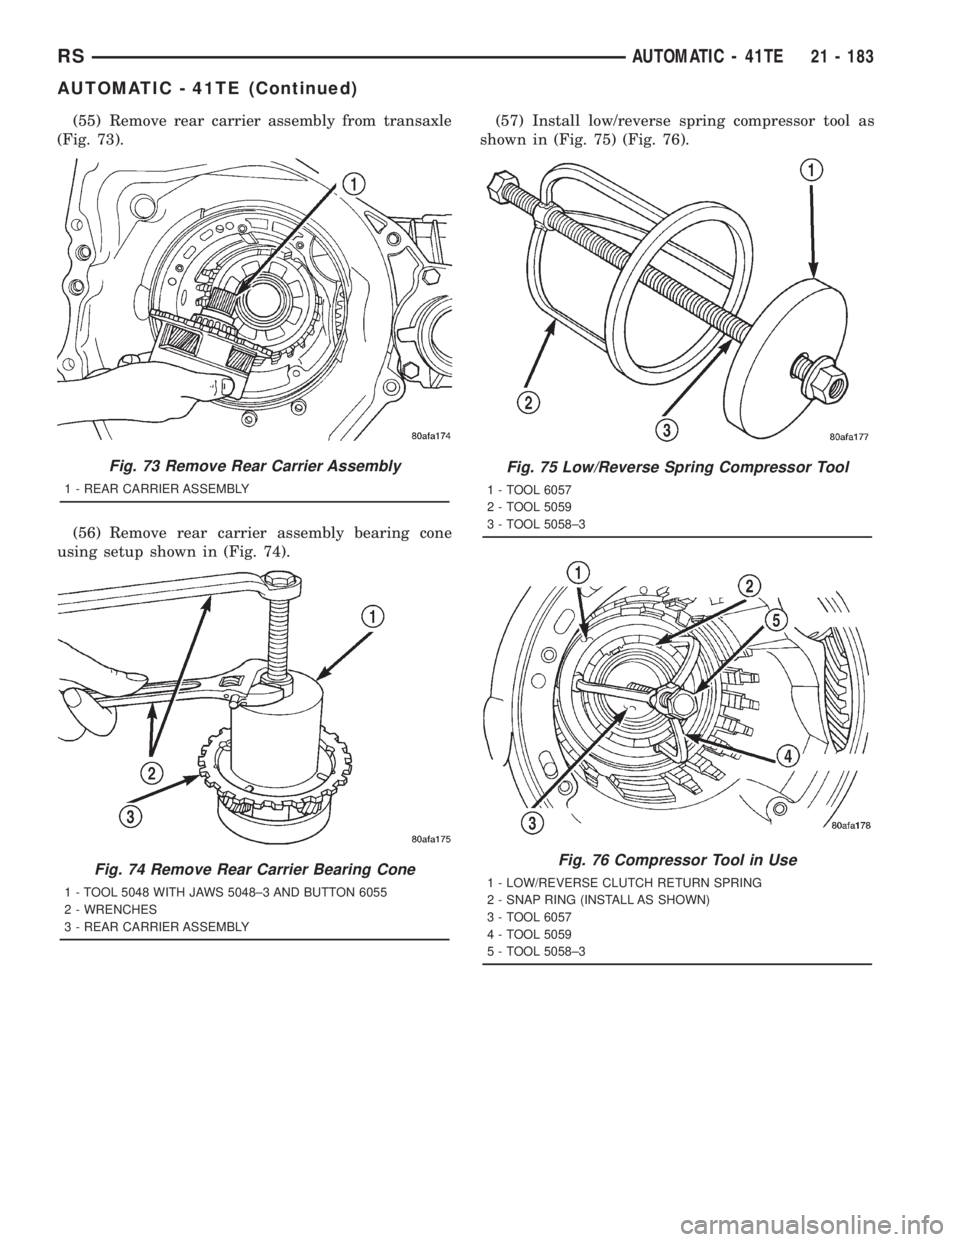
(55) Remove rear carrier assembly from transaxle
(Fig. 73).
(56) Remove rear carrier assembly bearing cone
using setup shown in (Fig. 74).(57) Install low/reverse spring compressor tool as
shown in (Fig. 75) (Fig. 76).
Fig. 73 Remove Rear Carrier Assembly
1 - REAR CARRIER ASSEMBLY
Fig. 74 Remove Rear Carrier Bearing Cone
1 - TOOL 5048 WITH JAWS 5048±3 AND BUTTON 6055
2 - WRENCHES
3 - REAR CARRIER ASSEMBLY
Fig. 75 Low/Reverse Spring Compressor Tool
1 - TOOL 6057
2 - TOOL 5059
3 - TOOL 5058±3
Fig. 76 Compressor Tool in Use
1 - LOW/REVERSE CLUTCH RETURN SPRING
2 - SNAP RING (INSTALL AS SHOWN)
3 - TOOL 6057
4 - TOOL 5059
5 - TOOL 5058±3
RSAUTOMATIC - 41TE21 - 183
AUTOMATIC - 41TE (Continued)
Page 3148 of 4284
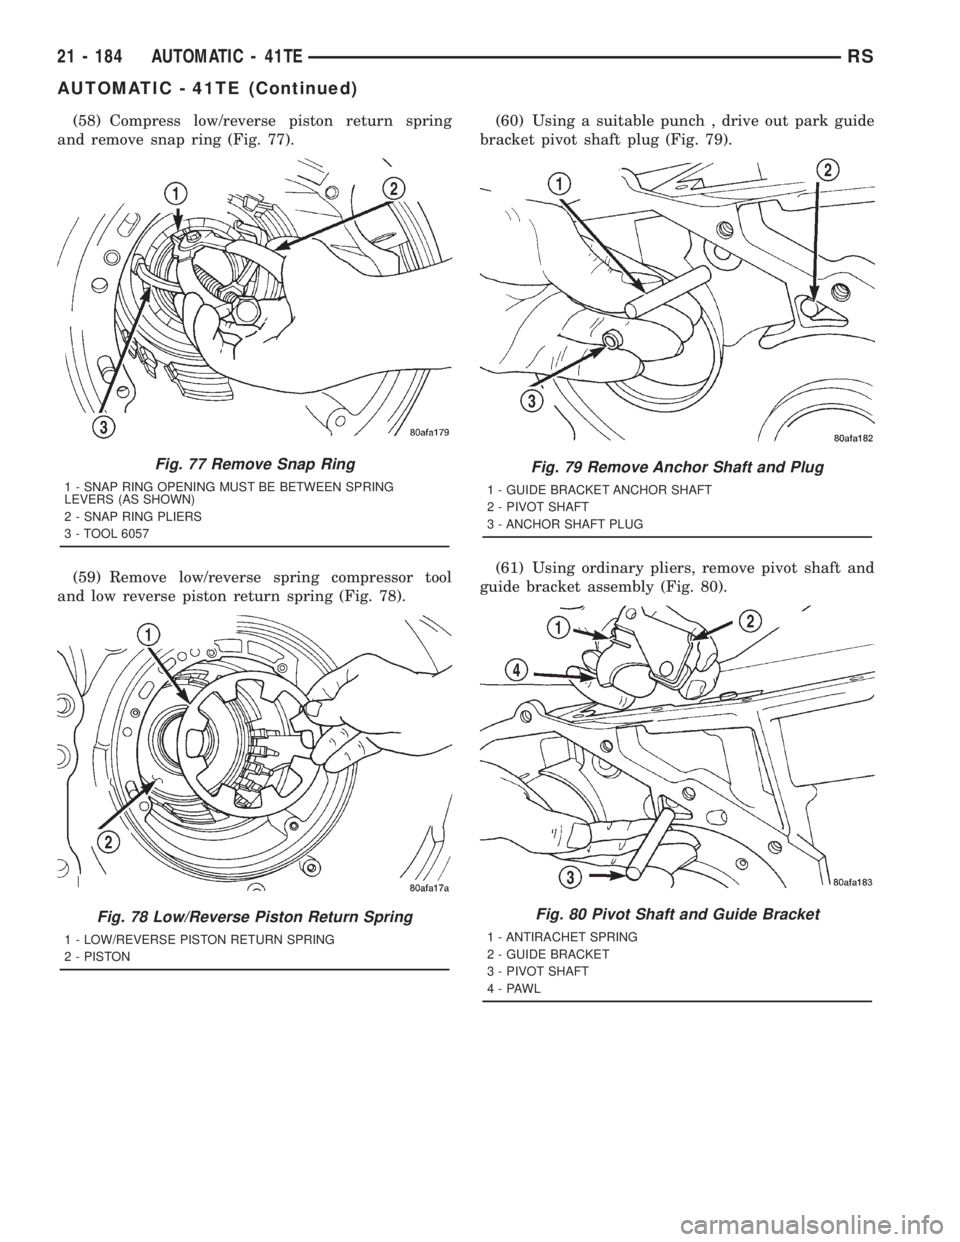
(58) Compress low/reverse piston return spring
and remove snap ring (Fig. 77).
(59) Remove low/reverse spring compressor tool
and low reverse piston return spring (Fig. 78).(60) Using a suitable punch , drive out park guide
bracket pivot shaft plug (Fig. 79).
(61) Using ordinary pliers, remove pivot shaft and
guide bracket assembly (Fig. 80).
Fig. 77 Remove Snap Ring
1 - SNAP RING OPENING MUST BE BETWEEN SPRING
LEVERS (AS SHOWN)
2 - SNAP RING PLIERS
3 - TOOL 6057
Fig. 78 Low/Reverse Piston Return Spring
1 - LOW/REVERSE PISTON RETURN SPRING
2 - PISTON
Fig. 79 Remove Anchor Shaft and Plug
1 - GUIDE BRACKET ANCHOR SHAFT
2 - PIVOT SHAFT
3 - ANCHOR SHAFT PLUG
Fig. 80 Pivot Shaft and Guide Bracket
1 - ANTIRACHET SPRING
2 - GUIDE BRACKET
3 - PIVOT SHAFT
4-PAWL
21 - 184 AUTOMATIC - 41TERS
AUTOMATIC - 41TE (Continued)
Page 3149 of 4284
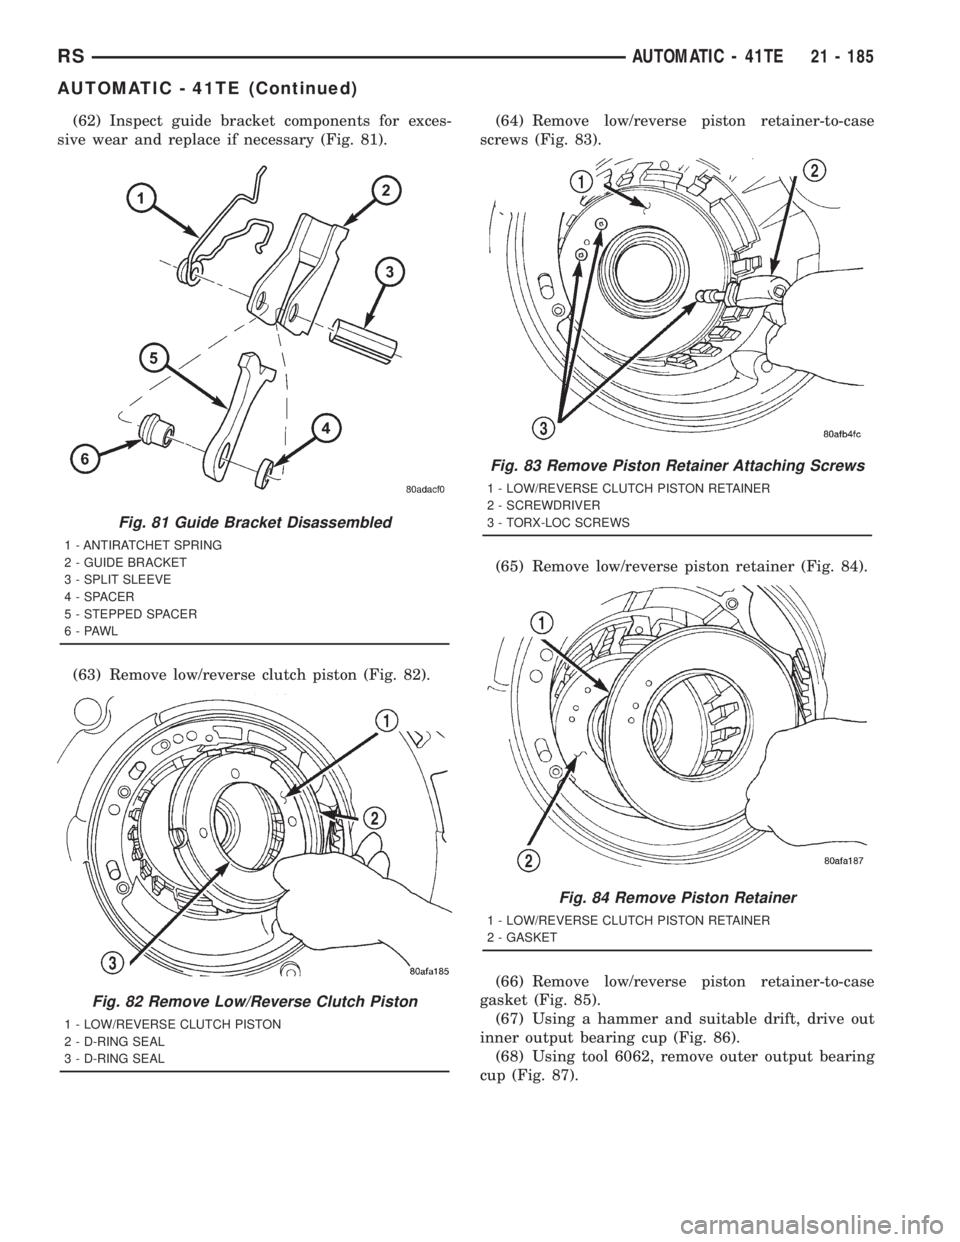
(62) Inspect guide bracket components for exces-
sive wear and replace if necessary (Fig. 81).
(63) Remove low/reverse clutch piston (Fig. 82).(64) Remove low/reverse piston retainer-to-case
screws (Fig. 83).
(65) Remove low/reverse piston retainer (Fig. 84).
(66) Remove low/reverse piston retainer-to-case
gasket (Fig. 85).
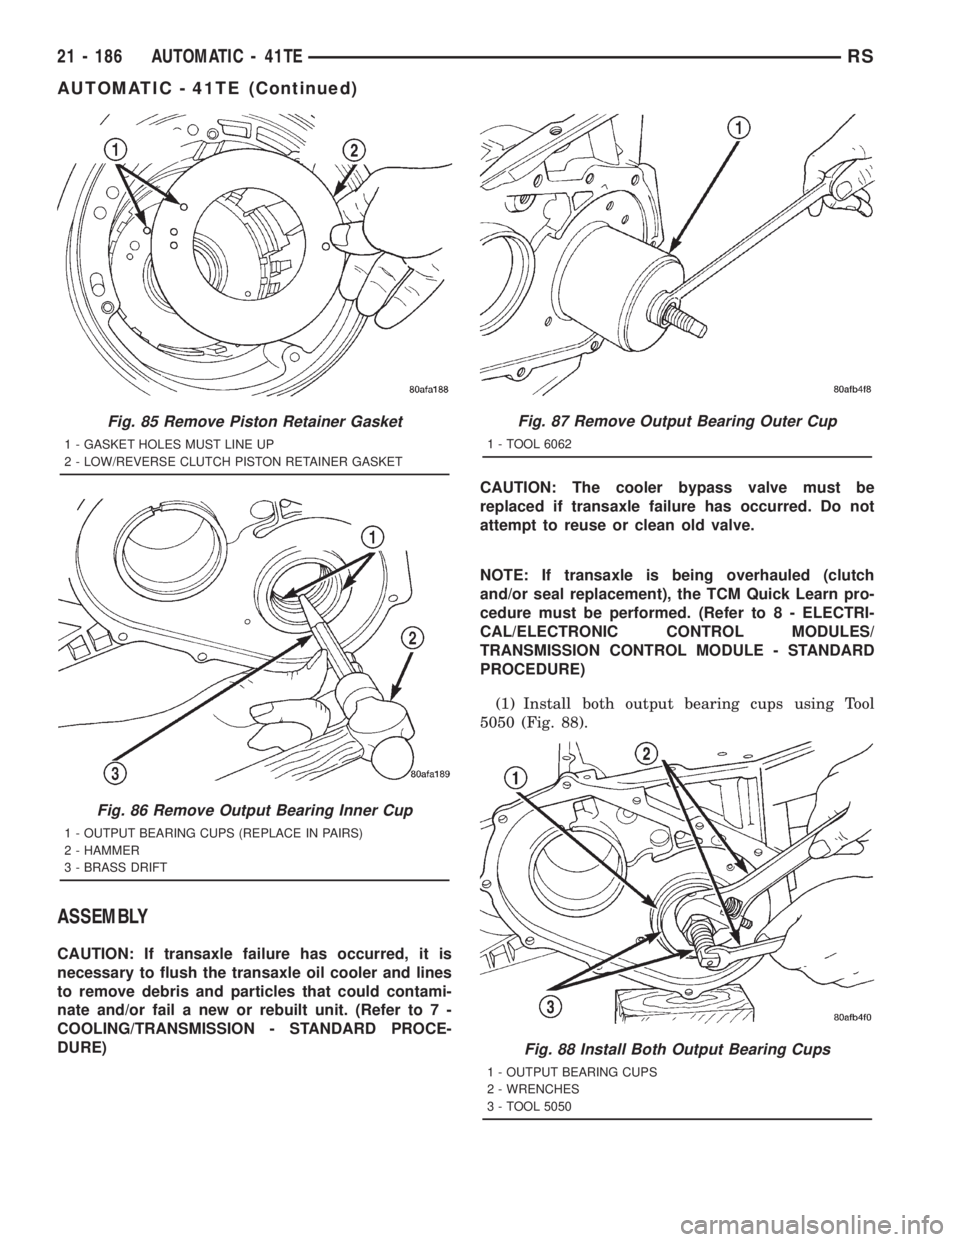
(67) Using a hammer and suitable drift, drive out
inner output bearing cup (Fig. 86).
(68) Using tool 6062, remove outer output bearing
cup (Fig. 87).
Fig. 81 Guide Bracket Disassembled
1 - ANTIRATCHET SPRING
2 - GUIDE BRACKET
3 - SPLIT SLEEVE
4 - SPACER
5 - STEPPED SPACER
6-PAWL
Fig. 82 Remove Low/Reverse Clutch Piston
1 - LOW/REVERSE CLUTCH PISTON
2 - D-RING SEAL
3 - D-RING SEAL
Fig. 83 Remove Piston Retainer Attaching Screws
1 - LOW/REVERSE CLUTCH PISTON RETAINER
2 - SCREWDRIVER
3 - TORX-LOC SCREWS
Fig. 84 Remove Piston Retainer
1 - LOW/REVERSE CLUTCH PISTON RETAINER
2 - GASKET
RSAUTOMATIC - 41TE21 - 185
AUTOMATIC - 41TE (Continued)
Page 3150 of 4284
ASSEMBLY
CAUTION: If transaxle failure has occurred, it is
necessary to flush the transaxle oil cooler and lines
to remove debris and particles that could contami-
nate and/or fail a new or rebuilt unit. (Refer to 7 -
COOLING/TRANSMISSION - STANDARD PROCE-
DURE)CAUTION: The cooler bypass valve must be
replaced if transaxle failure has occurred. Do not
attempt to reuse or clean old valve.
NOTE: If transaxle is being overhauled (clutch
and/or seal replacement), the TCM Quick Learn pro-
cedure must be performed. (Refer to 8 - ELECTRI-
CAL/ELECTRONIC CONTROL MODULES/
TRANSMISSION CONTROL MODULE - STANDARD
PROCEDURE)
(1) Install both output bearing cups using Tool
5050 (Fig. 88).
Fig. 85 Remove Piston Retainer Gasket
1 - GASKET HOLES MUST LINE UP
2 - LOW/REVERSE CLUTCH PISTON RETAINER GASKET
Fig. 86 Remove Output Bearing Inner Cup
1 - OUTPUT BEARING CUPS (REPLACE IN PAIRS)
2 - HAMMER
3 - BRASS DRIFT
Fig. 87 Remove Output Bearing Outer Cup
1 - TOOL 6062
Fig. 88 Install Both Output Bearing Cups
1 - OUTPUT BEARING CUPS
2 - WRENCHES
3 - TOOL 5050
21 - 186 AUTOMATIC - 41TERS
AUTOMATIC - 41TE (Continued)