display CHRYSLER VOYAGER 2001 Service Manual
[x] Cancel search | Manufacturer: CHRYSLER, Model Year: 2001, Model line: VOYAGER, Model: CHRYSLER VOYAGER 2001Pages: 4284, PDF Size: 83.53 MB
Page 3789 of 4284

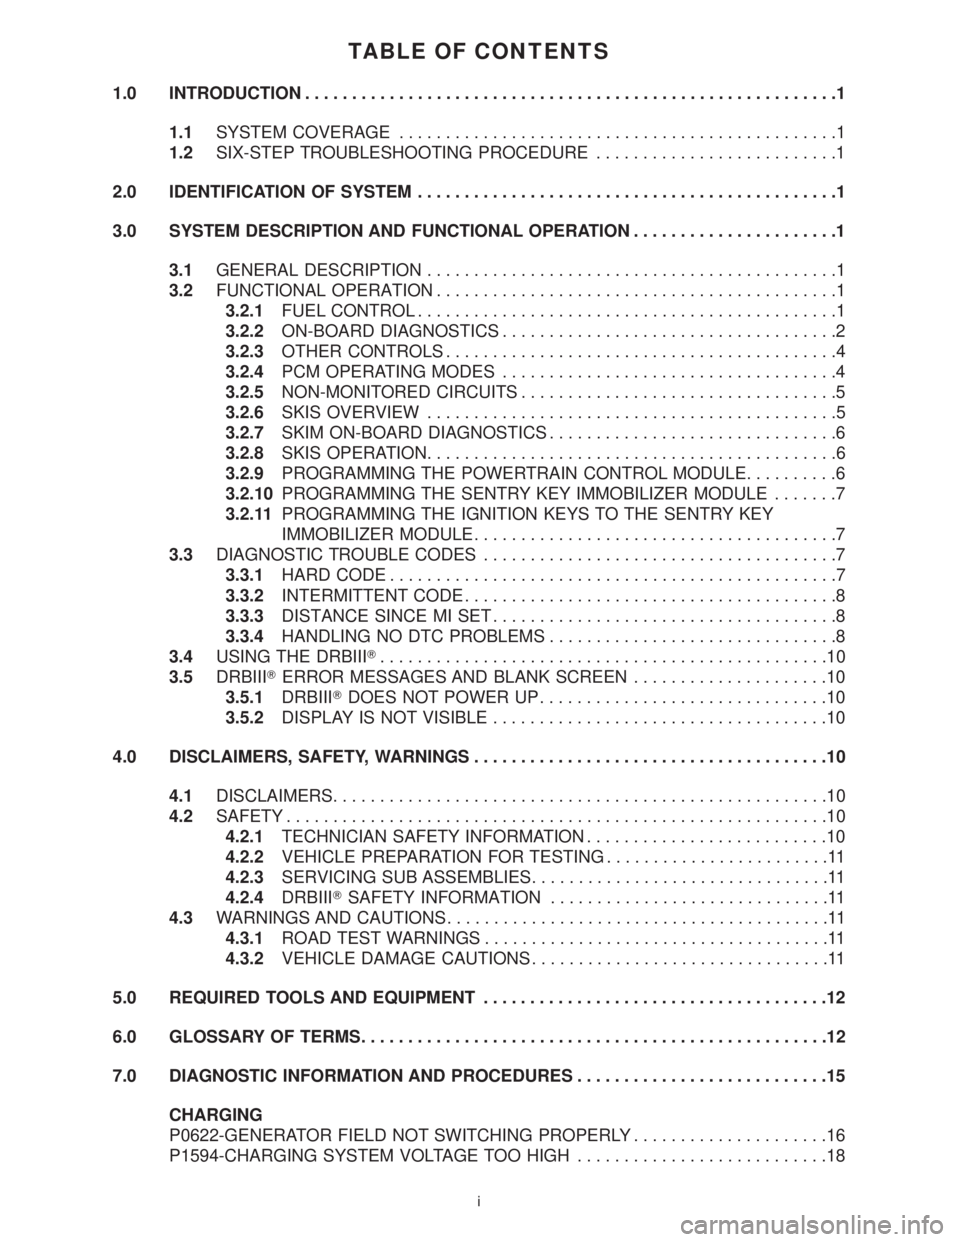
TABLE OF CONTENTS
1.0 INTRODUCTION.........................................................1
1.1SYSTEM COVERAGE...............................................1
1.2SIX-STEP TROUBLESHOOTING PROCEDURE..........................1
2.0 IDENTIFICATION OF SYSTEM.............................................1
3.0 SYSTEM DESCRIPTION AND FUNCTIONAL OPERATION......................1
3.1GENERAL DESCRIPTION............................................1
3.2FUNCTIONAL OPERATION...........................................1
3.2.1FUEL CONTROL.............................................1
3.2.2ON-BOARD DIAGNOSTICS....................................2
3.2.3OTHER CONTROLS..........................................4
3.2.4PCM OPERATING MODES....................................4
3.2.5NON-MONITORED CIRCUITS..................................5
3.2.6SKIS OVERVIEW............................................5
3.2.7SKIM ON-BOARD DIAGNOSTICS...............................6
3.2.8SKIS OPERATION............................................6
3.2.9PROGRAMMING THE POWERTRAIN CONTROL MODULE..........6
3.2.10PROGRAMMING THE SENTRY KEY IMMOBILIZER MODULE.......7
3.2.11PROGRAMMING THE IGNITION KEYS TO THE SENTRY KEY
IMMOBILIZER MODULE.......................................7
3.3DIAGNOSTIC TROUBLE CODES......................................7
3.3.1HARD CODE................................................7
3.3.2INTERMITTENT CODE........................................8
3.3.3DISTANCE SINCE MI SET.....................................8
3.3.4HANDLING NO DTC PROBLEMS...............................8
3.4USING THE DRBIIIT................................................10
3.5DRBIIITERROR MESSAGES AND BLANK SCREEN.....................10
3.5.1DRBIIITDOES NOT POWER UP...............................10
3.5.2DISPLAY IS NOT VISIBLE....................................10
4.0 DISCLAIMERS, SAFETY, WARNINGS......................................10
4.1DISCLAIMERS.....................................................10
4.2SAFETY..........................................................10
4.2.1TECHNICIAN SAFETY INFORMATION..........................10
4.2.2VEHICLE PREPARATION FOR TESTING........................11
4.2.3SERVICING SUB ASSEMBLIES................................11
4.2.4DRBIIITSAFETY INFORMATION..............................11
4.3WARNINGS AND CAUTIONS.........................................11
4.3.1ROAD TEST WARNINGS.....................................11
4.3.2VEHICLE DAMAGE CAUTIONS................................11
5.0 REQUIRED TOOLS AND EQUIPMENT.....................................12
6.0 GLOSSARY OF TERMS..................................................12
7.0 DIAGNOSTIC INFORMATION AND PROCEDURES...........................15
CHARGING
P0622-GENERATOR FIELD NOT SWITCHING PROPERLY.....................16
P1594-CHARGING SYSTEM VOLTAGE TOO HIGH...........................18
i
Page 3795 of 4284

1.0 INTRODUCTION
The procedures contained in this manual include
specifications, instructions, and graphics needed to
diagnose the PCM Powertrain System. The diag-
nostics in this manual are based on the failure
condition or symptom being present at time of
diagnosis.
Please follow the recommendations below when
choosing your diagnostic path.
1. First make sure the DRBIIItis communicating
with the appropriate modules; ie., if the DRBIIIt
displays a No Response condition, you must
diagnose this first before proceeding.
2. Read DTC's (diagnostic trouble codes) with the
DRBIIIt.
3. If no DTC's are present, identify the customer
complaint.
4. Once the DTC or customer complaint is identi-
fied, locate the matching test in the Table of
Contents and begin to diagnose the symptom.
All component location views are in Section 8.0.
All connector pinouts are in Section 9.0. All system
schematics are in Section 10.0.
An * placed before the symptom description indi-
cates a customer complaint.
When repairs are required, refer to the appropri-
ate service information for the proper removal and
repair procedure.
Diagnostic procedures change every year. New
diagnostic systems may be added; carryover sys-
tems may be enhanced. READ THIS DIAGNOSTIC
INFORMATION BEFORE TRYING TO DIAG-
NOSE A VEHICLE CODE. It is recommended that
you review the entire diagnostic information to
become familiar with all new and changed diagnos-
tic procedures.
If you have any comments or recommendations
after reviewing the diagnostic information, please
fill out the form at the back of the book and mail it
back to us.
1.1 SYSTEM COVERAGE
This diagnostic procedures manual covers the
following 2001 Town and Country; Caravan/Grand
Caravan; and Voyager/Grand Voyager vehicles
equipped with the 2.4L and the 3.3L/3.8L engines.
1.2 SIX-STEP TROUBLESHOOTING
PROCEDURE
Diagnosis of the powertrain control module
(PCM) is done in six basic steps:
²verification of complaint
²verification of any related symptoms
²symptom analysis
²problem isolation
²repair of isolated problem
²verification of proper operation
2.0 IDENTIFICATION OF
SYSTEM
The Powertrain Control Module (PCM) monitors
and controls:
²Fuel System
²Idle Air Control System
²Ignition System
²Charging System
²Speed Control System
²Cooling system
3.0 SYSTEM DESCRIPTION AND
FUNCTIONAL OPERATION
3.1 GENERAL DESCRIPTION
These Sequential Fuel Injection (SFI) engine sys-
tems have the latest in technical advances. The
on-board Euro Stage III OBD diagnostics incorpo-
rated with the Powertrain Control Module (PCM)
are intended to assist the field technician in repair-
ing vehicle problems by the quickest means.
3.2 FUNCTIONAL OPERATION
3.2.1 FUEL CONTROL
The PCM controls the air/fuel ratio of the engine
by varying fuel injector on time. Mass air flow is
calculated using the speed density method using
enigne speed, manifold absolute pressure, and air
temperature change.
Different fuel calculation strategies are used de-
pending on the operational state of the engine.
During crank mode, a prime shot fuel pulse is
delivered followed by fuel pulses determined by a
crank time strategy. Cold engine operation is deter-
mined via an open loop strategy until the O2
sensors have reached operating temperature. At
this point, the strategy enters a closed loop mode
where fuel requirements are based upon the state of
the O2 sensors, engine speed, MAP, throttle posi-
tion, air temperature, battery voltage, and coolant
temperature.
1
GENERAL INFORMATION
Page 3799 of 4284

Once the auto shutdown and fuel pump relays
have been energized, the PCM determines the fuel
injector pulse width based on the following:
± engine coolant temperature
± manifold absolute pressure
± intake air temperature
± engine revolutions
± throttle position
The PCM determines the spark advance based on
the following:
± engine coolant temperature
± crankshaft position
± intake air temperature
± manifold absolute pressure
± throttle position
Engine Warm-Up Modeþ This is an open loop
mode. The PCM adjusts injector pulse width and
controls injector synchronization by controlling the
fuel injectors' ground paths. The PCM adjusts igni-
tion timing and engine idle speed. The PCM adjusts
the idle speed by controlling the idle air control
motor.
Cruise or Idle Modeþ When the engine is at
normal operating temperature, this is a closed loop
mode.
Acceleration Modeþ This is a closed loop mode.
The PCM recognizes an increase in throttle position
and a decrease in Manifold Vacuum as engine load
increases. In response, the PCM increases the in-
jector pulse width to meet the increased load. The
A/C compressor may be de-energized for a short
period of time.
Decelerationþ This is a closed loop mode. The
PCM recognizes a decrease in throttle position and
an increase in Manifold Vacuum as engine load
decreases. In response, the PCM decreases the
injector pulse width to meet the decreased load.
Full injector shut off may be obtained during high
speed deceleration.
Wide Open Throttle Modeþ This is an open
loop mode. The throttle position sensor notifies the
PCM of a wide open throttle condition. Once a wide
open throttle is sensed, the PCM de-energizes the
A/C compressor clutch relay for 20 seconds.
3.2.5 NON-MONITORED CIRCUITS
The PCM does not monitor the following circuits,
systems, and conditions even though they could
have malfunctions that result in driveability prob-
lems. A diagnostic code may not be displayed for the
following conditions. However, problems with these
systems may cause a diagnostic code to be displayed
for other systems. For example, a fuel pressure
problem will not register a diagnostic code directly,
but could cause a rich or lean condition. This couldcause an oxygen sensor, fuel system, or misfire
monitor trouble code to be stored in the PCM.
Engine Timingþ The PCM cannot detect an
incorrectly indexed timing chain, camshaft
sprocket, or crankshaft sprocket. The PCM also
cannot detect an incorrectly indexed distributor.(*)
Fuel Pressureþ Fuel pressure is controlled by
the fuel pressure regulator. The PCM cannot detect
a clogged fuel pump inlet filter, clogged in-line filter,
or a pinched fuel supply.(*)
Fuel Injectorsþ The PCM cannot detect if a fuel
injector is clogged, the pintle is sticking, or the
wrong injectors are installed.(*)
Fuel Requirementsþ Poor quality gasoline can
cause problems such as hard starting, stalling, and
stumble. Use of methanol-gasoline blends may re-
sult in starting and driveability problems. See indi-
vidual symptoms and their definitions in Section
6.0 (Glossary of Terms).
PCM Groundsþ The PCM cannot detect a poor
system ground. However, a diagnostic trouble code
may be stored in the PCM as a result of this
condition.
Throttle Body Air Flowþ The PCM cannot
detect a clogged or restricted air cleaner inlet or
filter element.(*)
Exhaust Systemþ The PCM cannot detect a
plugged, restricted, or leaking exhaust system.(*)
Cylinder Compressionþ The PCM cannot de-
tect uneven, low, or high engine cylinder compres-
sion.(*)
Excessive Oil Consumptionþ Although the
PCM monitors the exhaust stream oxygen content
through the oxygen sensor when the system is in a
closed loop, it cannot determine excessive oil con-
sumption.
NOTE: ANY OF THESE CONDITIONS
COULD RESULT IN A RICH OR LEAN
CONDITION CAUSING AN OXYGEN SENSOR
TROUBLE CODE TO BE STORED IN THE
PCM, OR THE VEHICLE MAY EXHIBIT ONE
OR MORE OF THE DRIVEABILITY
SYMPTOMS LISTED IN THE TABLE OF
CONTENTS.
3.2.6 SKIS OVERVIEW
The Sentry Key Immobilizer System (SKIS) is
designed to prevent unauthorized vehicle opera-
tion. The system consists of a Sentry Key Immobi-
lizer Module (SKIM), ignition key(s) equipped with
a transponder chip and PCM. When the ignition
switch is turned on, the SKIM interrogates the
ignition key. If the ignition key is Valid or Invalid,
the SKIM sends a PCI Bus message to the PCM
indicating ignition key status. Upon receiving this
5
GENERAL INFORMATION
Page 3801 of 4284

3. Select PCM REPLACED.
4. Enter secured access mode by entering the vehi-
cle four-digit PIN.
NOTE: IF THREE ATTEMPTS ARE MADE TO
ENTER THE SECURE ACCESS MODE USING
AN INCORRECT PIN, SECURED ACCESS
MODE WILL BE LOCKED OUT FOR ONE
HOUR. TO EXIT THIS LOCKOUT MODE,
TURN THE IGNITION TO THE RUN POSITION
FOR ONE HOUR THEN ENTER THE
CORRECT PIN. (ENSURE ALL ACCESSORIES
ARE TURNED OFF. ALSO MONITOR THE
BATTERY STATE AND CONNECT A BATTERY
CHARGER IF NECESSARY).
5. Press ENTER to transfer the secret key (the
SKIM will send the secret key to the PCM).
3.2.10 PROGRAMMING THE SENTRY KEY
IMMOBILIZER MODULE
NOTE: IF THE PCM AND THE SKIM ARE
REPLACED AT THE SAME TIME, PROGRAM
THE VIN INTO THE PCM FIRST. ALL VEHICLE
KEYS WILL THEN NEED TO BE REPLACED
AND PROGRAMMED TO THE NEW SKIM.
1. Turn the ignition on (transmission in park/
neutral).
2. Use the DRB and select THEFT ALARM, SKIM
then MISCELLANEOUS.
3. Select SKIM MODULE REPLACEMENT (GAS-
OLINE).
4. Program the vehicle four-digit PIN into the
SKIM.
5. Select COUNTRY CODE and enter the correct
country.
NOTE: BE SURE TO ENTER THE CORRECT
COUNTRY CODE. IF THE INCORRECT
COUNTRY CODE IS PROGRAMMED INTO
SKIM, THE SKIM MUST BE REPLACED.
6. Select UPDATE VIN (the SKIM will learn the
VIN from the PCM).
7. Press ENTER to transfer the VIN (the PCM will
send the VIN to the SKIM).
8. The DRB will ask if you want to transfer the
secret key. Select ENTER to transfer secret key
from the PCM. This will ensure the current
vehicle ignition keys will still operate the SKIS
system.
3.2.11 PROGRAMMING THE IGNITION
KEYS TO THE SENTRY KEY
IMMOBILIZER MODULE
1. Turn the ignition on (transmission in park/
neutral).
2. Use the DRB and select THEFT ALARM, SKIM,
then MISCELLANEOUS.
3. Select PROGRAM IGNITION KEYS.
4. Enter secured access mode by entering the vehi-
cle four-digit PIN.
NOTE: A MAXIMUM OF EIGHT KEYS CAN BE
LEARNED TO EACH SKIM AT ONE TIME.
ONCE A KEY IS LEARNED TO A SKIM IT (THE
KEY) CANNOT BE TRANSFERRED TO
ANOTHER VEHICLE.
If ignition key programming is unsuccessful, the
DRB will display one of the following messages:
Programming Not Attempted- The DRB at-
tempts to read the programmed key status and
there are no keys programmed in the SKIM mem-
ory.
Programming Key Failed -(Possible Used Key
From Wrong Vehicle) - SKIM is unable to program
key due to one of the following:
± faulty ignition key transponder
± ignition key is programmed to another vehicle.
8 Keys Already Learned, Programming Not
Done- SKIM transponder ID memory is full.
1. Obtain ignition keys to be programmed from
customer (8 keys maximum)
2. Using the DRB, erase all ignition keys by select-
ing MISCELLANEOUS and ERASE ALL CUR-
RENT IGN. KEYS
3. Program all ignition keys.
Learned Key In Ignition- Ignition key transpon-
der ID is currently programmed in SKIM memory.
3.3 DIAGNOSTIC TROUBLE CODES
Each diagnostic trouble code is diagnosed by
following a specific testing procedure. The diagnos-
tic test procedures contain step-by-step instructions
for determining the cause of trouble codes as well as
no trouble code problems. It is not necessary to
perform all of the tests in this book to diagnose an
individual code.
Always begin by reading the diagnostic trouble
codes using the DRBIIIt.
3.3.1 HARD CODE
A diagnostic trouble code that comes back within
one cycle of the ignition key is a hard code. This
means that the defect is there every time the
7
GENERAL INFORMATION
Page 3804 of 4284

SYMPTOM DIAGNOSTIC TEST
POOR FUEL ECONOMY CHECKING PCM POWER AND GND CKT
CHECKING THE FUEL PRESSURE
CHECKING ECT SENSOR
CHECKING THROTTLE POSITION SENSOR
CHECKING MAP SENSOR
CHECKING IDLE AIR CONTROL MOTOR OPERATION
CHECKING IAT SENSOR
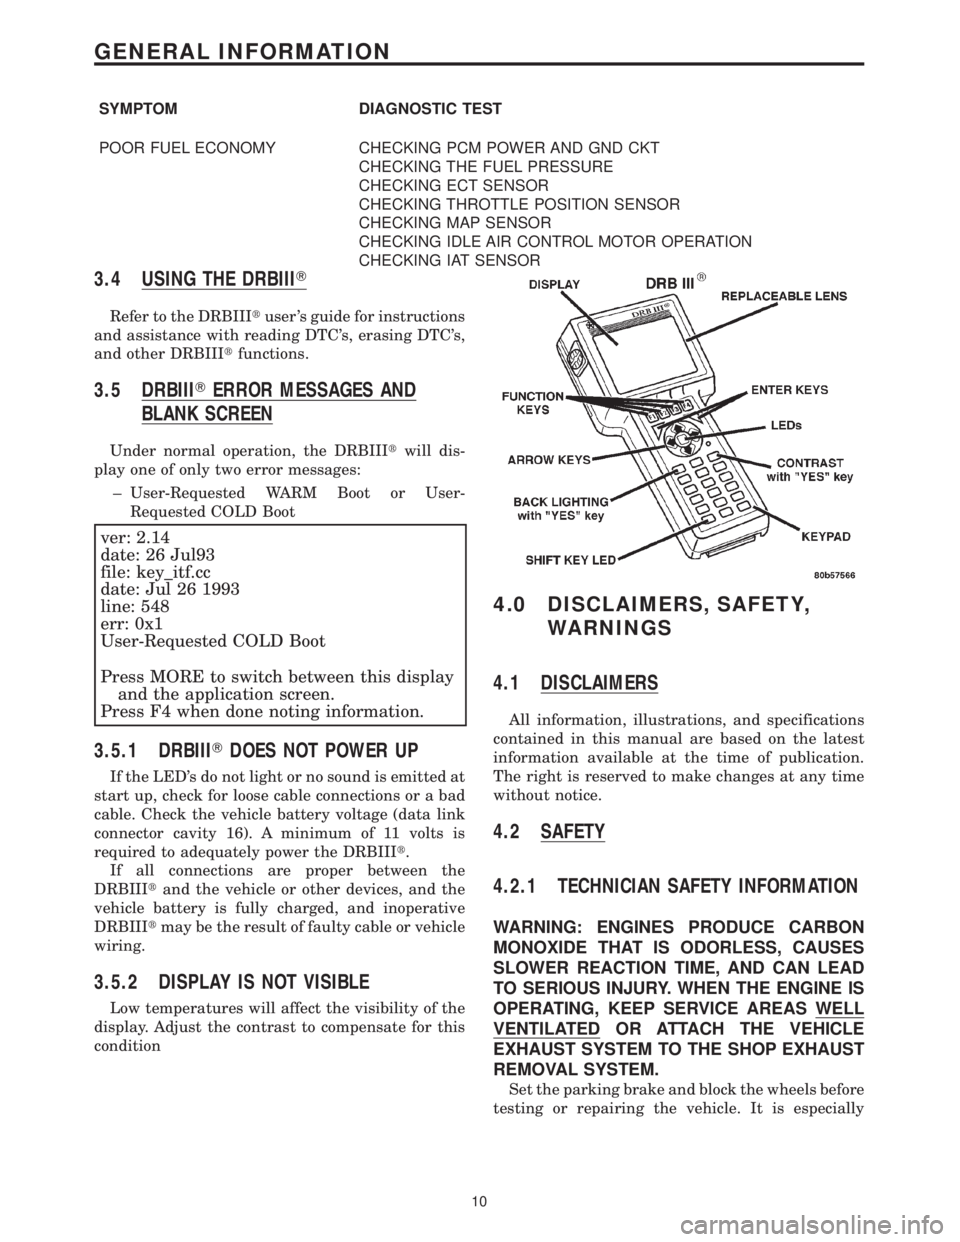
3.4 USING THE DRBIIIT
Refer to the DRBIIItuser 's guide for instructions
and assistance with reading DTC's, erasing DTC's,
and other DRBIIItfunctions.
3.5 DRBIIITERROR MESSAGES AND
BLANK SCREEN
Under normal operation, the DRBIIItwill dis-
play one of only two error messages:
± User-Requested WARM Boot or User-
Requested COLD Boot
ver: 2.14
date: 26 Jul93
file: key_itf.cc
date: Jul 26 1993
line: 548
err: 0x1
User-Requested COLD Boot
Press MORE to switch between this display
and the application screen.
Press F4 when done noting information.
3.5.1 DRBIIITDOES NOT POWER UP
If the LED's do not light or no sound is emitted at
start up, check for loose cable connections or a bad
cable. Check the vehicle battery voltage (data link
connector cavity 16). A minimum of 11 volts is
required to adequately power the DRBIIIt.
If all connections are proper between the
DRBIIItand the vehicle or other devices, and the
vehicle battery is fully charged, and inoperative
DRBIIItmay be the result of faulty cable or vehicle
wiring.
3.5.2 DISPLAY IS NOT VISIBLE
Low temperatures will affect the visibility of the
display. Adjust the contrast to compensate for this
condition
4.0 DISCLAIMERS, SAFETY,
WARNINGS
4.1 DISCLAIMERS
All information, illustrations, and specifications
contained in this manual are based on the latest
information available at the time of publication.
The right is reserved to make changes at any time
without notice.
4.2 SAFETY
4.2.1 TECHNICIAN SAFETY INFORMATION
WARNING: ENGINES PRODUCE CARBON
MONOXIDE THAT IS ODORLESS, CAUSES
SLOWER REACTION TIME, AND CAN LEAD
TO SERIOUS INJURY. WHEN THE ENGINE IS
OPERATING, KEEP SERVICE AREAS WELL
VENTILATED OR ATTACH THE VEHICLE
EXHAUST SYSTEM TO THE SHOP EXHAUST
REMOVAL SYSTEM.
Set the parking brake and block the wheels before
testing or repairing the vehicle. It is especially
10
GENERAL INFORMATION
Page 3818 of 4284

Symptom:
P1685-WRONG OR INVALID KEY MSG RECEIVED FROM SKIM
When Monitored and Set Condition:
P1685-WRONG OR INVALID KEY MSG RECEIVED FROM SKIM
When Monitored: With the ignition on.
Set Condition: The PCM does not receive a Valid Key message from the SKIM.
POSSIBLE CAUSES
INCORRECT VIN IN PCM
INVALID SKIM KEY NOT PRESENT
NO COMMUNICATION WITH SKIM
NO VIN PROGRAMMED IN THE PCM
PCM
SKIM TROUBLE CODES SET
TEST ACTION APPLICABILITY
1 Turn the ignition on.
With the DRB III, read the PCM DTCs. Look for P1685.
Is the Starts Since Set counter for DTC P1685 displayed and equal to 0?All
Ye s®Go To 2
No®Go To 7
2 With the DRB III, attempt to communicate with the SKIM.
Turn the ignition on.
Can the DRB III communicate with the SKIM?All
Ye s®Go To 3
No®Refer to symptom BUS +/- SIGNAL OPEN FROM SKIM in the
COMMUNICATION category.
3 Turn the ignition on.
With the DRB III, check for SKIM DTCs.
Are any DTCs present in the SKIM?All
Ye s®Repair all SKIM DTCs.
Perform SKIS VERIFICATION TEST.
No®Go To 4
4 Turn the ignition on.
With the DRB III, display the VIN that is programmed in the PCM.
Has a VIN been programmed into the PCM?All
Ye s®Go To 5
No®Program the correct VIN into the PCM and retest.
Perform SKIS VERIFICATION TEST.
24
COMMUNICATION
Page 3819 of 4284

TEST ACTION APPLICABILITY
5 Turn the ignition on.
With the DRB III, display the VIN that is programmed in the PCM.
Was the correct VIN programmed into the PCM?All
Ye s®Go To 6
No®Replace and program the Powertrain Control Module in accor-
dance with the Service Information.
Perform SKIS VERIFICATION TEST.
6 Turn the ignition off.
Replace and program the Sentry Key Immobilizer Module in accordance with the
Service Information.
Turn the ignition on.
With the DRB III, erase all SKIM and PCM DTCs.
Attempt to start and idle the engine.
With the DRB III, read the PCM DTCs.
Does the DRB III display this code?All
Ye s®Replace and program the Powertrain Control Module in accor-
dance with the Service Information.
Perform SKIS VERIFICATION TEST.
No®Test Complete.
7NOTE: This DTC could have been set if the SKIM harness connector was
disconnected, or if the SKIM was replaced recently.
NOTE: All keys that the customer uses for this vehicle must be tested to
verify they are operating properly.
Turn the ignition on.
Verify the correct VIN is programmed into the PCM and SKIM.
Turn the ignition off.
With the next customer key turn the ignition key on and crank the engine to start.
With the DRB III, read the PCM DTCs. Look for P1685
Is the Starts Since Set counter for DTC P1685 displayed and equal to 0?All
Ye s®Replace the Ignition Key.
Perform SKIS VERIFICATION TEST.
No®Test Complete.
NOTE: If this DTC cannot be reset, it could have been an actual theft
attempt.
25
COMMUNICATION
P1685-WRONG OR INVALID KEY MSG RECEIVED FROM SKIM Ð
Continued
Page 3821 of 4284

TEST ACTION APPLICABILITY
4 Turn the ignition off.
Replace the Sentry Key Immobilizer Module in accordance with the Service Infor-
mation.
Turn the ignition on.
Display and erase all PCM and SKIM DTCs.
Perform 5 ignition key cycles leaving the ignition key on for 90 seconds per cycle.
With the DRB, display PCM DTCs.
Does the DRB display the same DTC?All
Ye s®Replace and program the PCM in accordance with the Service
Information.
Perform SKIS VERIFICATION TEST.
No®Test Complete.
5WARNING: KEEP CLEAR OF THE ENGINE'S MOVING PARTS.
NOTE: The conditions that set the DTC are not present at this time. The
following list may help in identifying the intermittent condition.
With the engine running and at normal operating temperature, monitor the DRB
parameters related to the DTC while wiggling the wiring harness. Look for param-
eter values to change and/or a DTC to set.
Review the DTC When Monitored and Set Conditions. If possible, try to duplicate the
conditions under which the DTC was set.
Refer to any Technical Service Bulletins (TSB) that may apply.
Visually inspect the related wiring harness. Look for any chafed, pierced, pinched, or
partially broken wires.
Visually inspect the related wiring harness connectors. Look for broken, bent, pushed
out, or corroded terminals.
Were any of the above conditions present?All
Ye s®Repair as necessary
Perform SKIS VERIFICATION TEST.
No®Test Complete.
27
COMMUNICATION
P1686-NO SKIM BUS MESSAGE RECEIVED ÐContinued
Page 3824 of 4284

Symptom List:
P1696-PCM FAILURE EEPROM WRITE DENIED
P1697-PCM FAILURE SRI MILE NOT STORED
Test Note: All symptoms listed above are diagnosed using the same tests.
The title for the tests will be P1696-PCM FAILURE EEPROM
WRITE DENIED.
When Monitored and Set Condition:
P1696-PCM FAILURE EEPROM WRITE DENIED
When Monitored: Ignition key on, Continuous.
Set Condition: An attempt to program/write to the internal EEPROM failed, Also checks
at powerdown.
P1697-PCM FAILURE SRI MILE NOT STORED
When Monitored: Ignition key on, Continuous.
Set Condition: An attempt to program/write to the internal EEPROM failed, Also checks
at powerdown.
POSSIBLE CAUSES
DRB DISPLAYS WRITE FAILURE
DRB DISPLAYS WRITE REFUSED 2ND TIME
DRB DISPLAYS SRI MILEAGE INVALID
COMPARE SRI MILEAGE WITH ODOMETER
TEST ACTION APPLICABILITY
1 With the DRBIIIt, perform the SRI Memory Test.
Does the DRBIIItdisplay Write Failure?All
Ye s®Replace and program the Powertrain Control Module in accor-
dance with the Service Information.
Perform POWERTRAIN VERIFICATION TEST VER-1.
No®Go To 2
2 With the DRBIIIt, perform the SRI Memory Test.
Does the DRBIIItdisplay Write Refused?All
Ye s®Go To 3
No®Go To 4
30
COMMUNICATION
Page 3825 of 4284

TEST ACTION APPLICABILITY
3 With the DRBIIIt, perform the SRI Memory Test a second time.
NOTE: Retest the SRI Memory two more times.
Does the DRBIIItdisplay Write Refused again?All
Ye s®Replace and program the Powertrain Control Module in accor-
dance with the Service Information.
Perform POWERTRAIN VERIFICATION TEST VER-1.
No®Test Complete.
4 With the DRBIIIt, perform the SRI Memory Test.
Does the DRBIIItdisplay SRI Mileage Invalid?All
Ye s®Update the mileage and retest the SRI Memory.
Perform POWERTRAIN VERIFICATION TEST VER-1.
No®Go To 5
5 Compare the SRI Mileage stored with the Instrument Panel Odometer.
Is the mileage within the specified range displayed on the DRBIIIt?All
Ye s®Test Complete.
No®Update the mileage and retest the SRI Memory.
Perform POWERTRAIN VERIFICATION TEST VER-1.
31
COMMUNICATION
P1696-PCM FAILURE EEPROM WRITE DENIED ÐContinued