CHRYSLER VOYAGER 2001 Service Manual
Manufacturer: CHRYSLER, Model Year: 2001, Model line: VOYAGER, Model: CHRYSLER VOYAGER 2001Pages: 4284, PDF Size: 83.53 MB
Page 981 of 4284
Symptom:
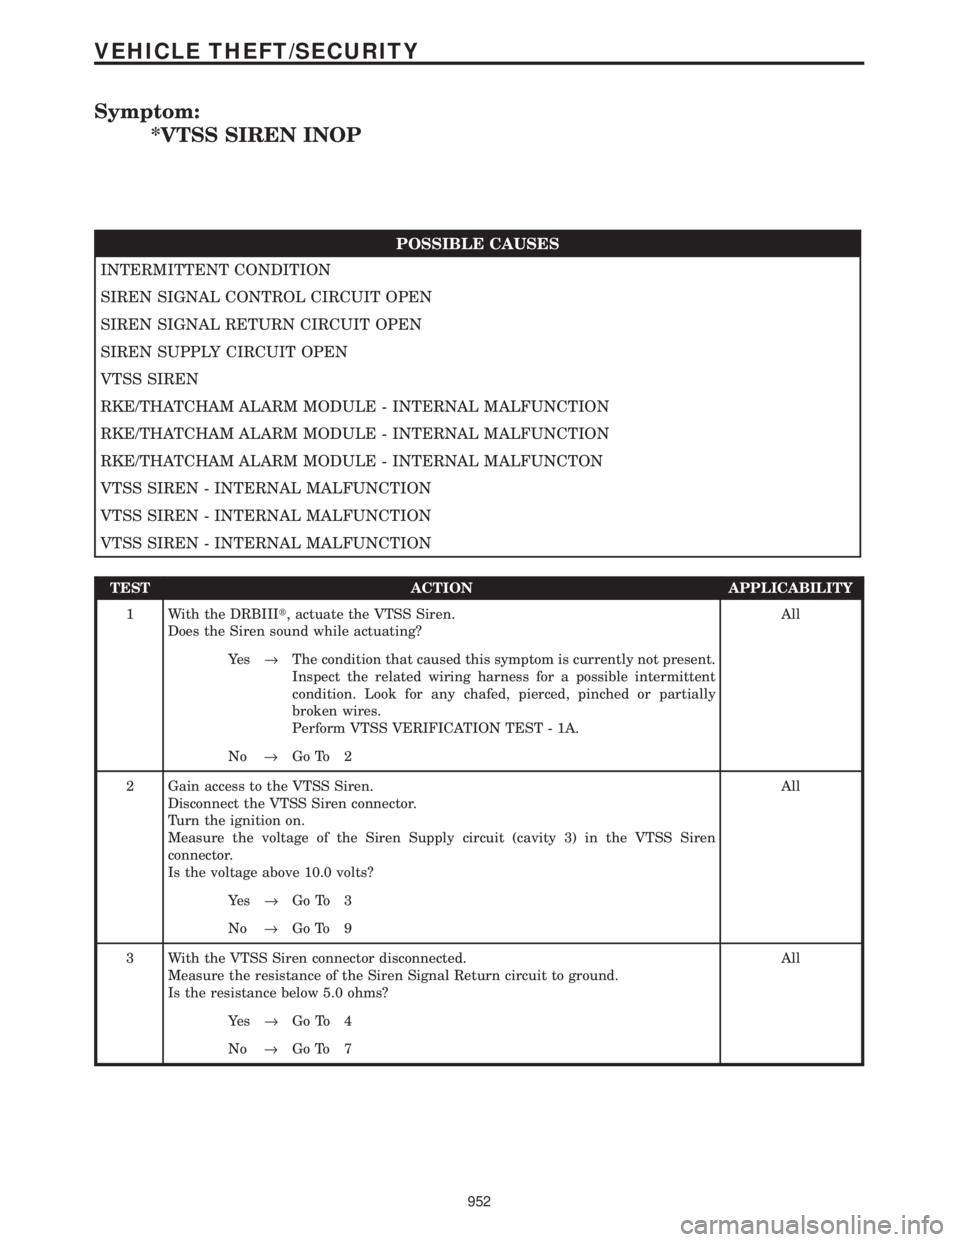
*VTSS SIREN INOP
POSSIBLE CAUSES
INTERMITTENT CONDITION
SIREN SIGNAL CONTROL CIRCUIT OPEN
SIREN SIGNAL RETURN CIRCUIT OPEN
SIREN SUPPLY CIRCUIT OPEN
VTSS SIREN
RKE/THATCHAM ALARM MODULE - INTERNAL MALFUNCTION
RKE/THATCHAM ALARM MODULE - INTERNAL MALFUNCTION
RKE/THATCHAM ALARM MODULE - INTERNAL MALFUNCTON
VTSS SIREN - INTERNAL MALFUNCTION
VTSS SIREN - INTERNAL MALFUNCTION
VTSS SIREN - INTERNAL MALFUNCTION
TEST ACTION APPLICABILITY
1 With the DRBIIIt, actuate the VTSS Siren.
Does the Siren sound while actuating?All
Ye s®The condition that caused this symptom is currently not present.
Inspect the related wiring harness for a possible intermittent
condition. Look for any chafed, pierced, pinched or partially
broken wires.
Perform VTSS VERIFICATION TEST - 1A.
No®Go To 2
2 Gain access to the VTSS Siren.
Disconnect the VTSS Siren connector.
Turn the ignition on.
Measure the voltage of the Siren Supply circuit (cavity 3) in the VTSS Siren
connector.
Is the voltage above 10.0 volts?All
Ye s®Go To 3
No®Go To 9
3 With the VTSS Siren connector disconnected.
Measure the resistance of the Siren Signal Return circuit to ground.
Is the resistance below 5.0 ohms?All
Ye s®Go To 4
No®Go To 7
952
VEHICLE THEFT/SECURITY
Page 982 of 4284
TEST ACTION APPLICABILITY
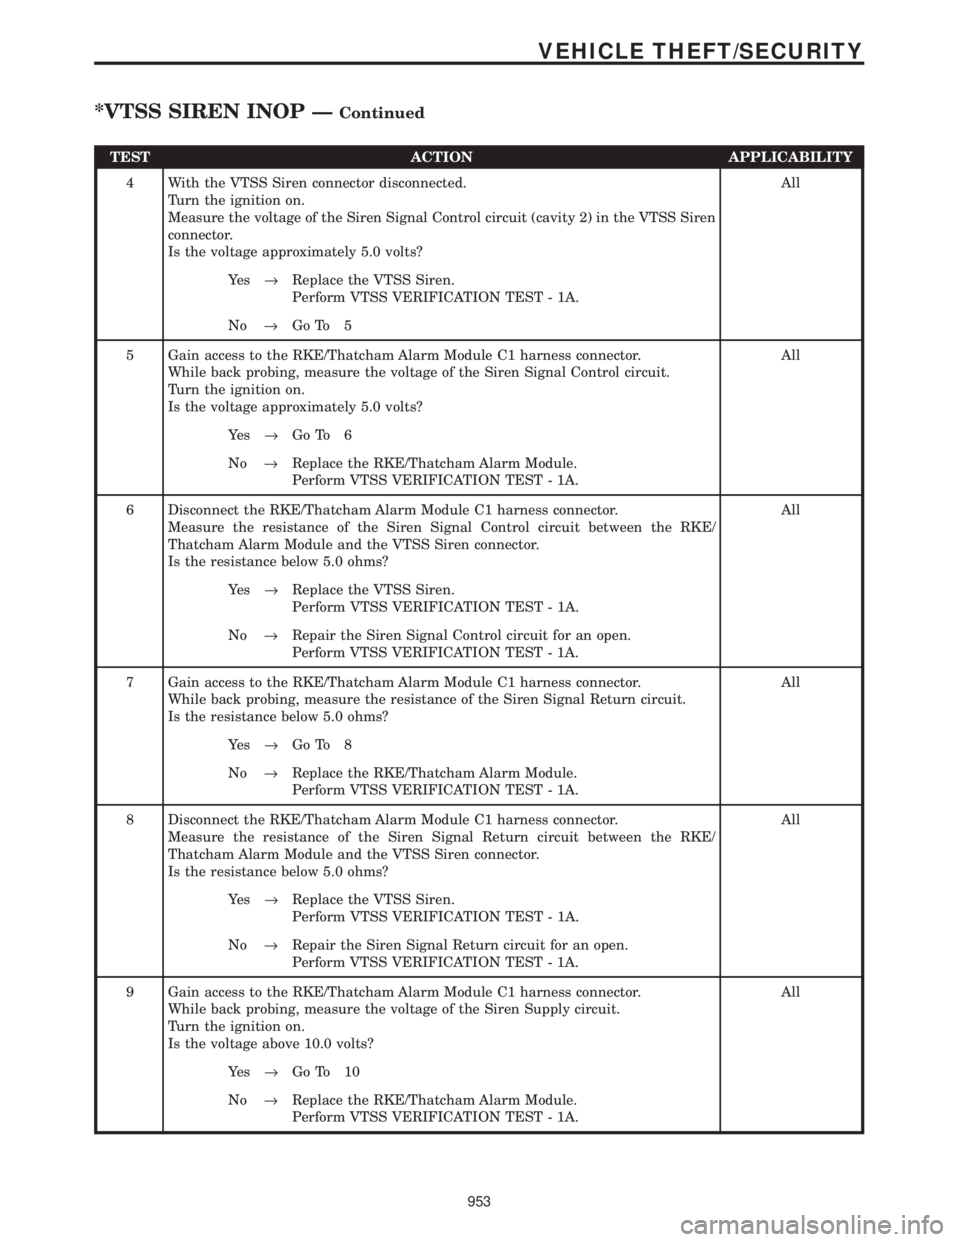
4 With the VTSS Siren connector disconnected.
Turn the ignition on.
Measure the voltage of the Siren Signal Control circuit (cavity 2) in the VTSS Siren
connector.
Is the voltage approximately 5.0 volts?All
Ye s®Replace the VTSS Siren.
Perform VTSS VERIFICATION TEST - 1A.
No®Go To 5
5 Gain access to the RKE/Thatcham Alarm Module C1 harness connector.
While back probing, measure the voltage of the Siren Signal Control circuit.
Turn the ignition on.
Is the voltage approximately 5.0 volts?All
Ye s®Go To 6
No®Replace the RKE/Thatcham Alarm Module.
Perform VTSS VERIFICATION TEST - 1A.
6 Disconnect the RKE/Thatcham Alarm Module C1 harness connector.
Measure the resistance of the Siren Signal Control circuit between the RKE/
Thatcham Alarm Module and the VTSS Siren connector.
Is the resistance below 5.0 ohms?All
Ye s®Replace the VTSS Siren.
Perform VTSS VERIFICATION TEST - 1A.
No®Repair the Siren Signal Control circuit for an open.
Perform VTSS VERIFICATION TEST - 1A.
7 Gain access to the RKE/Thatcham Alarm Module C1 harness connector.
While back probing, measure the resistance of the Siren Signal Return circuit.
Is the resistance below 5.0 ohms?All
Ye s®Go To 8
No®Replace the RKE/Thatcham Alarm Module.
Perform VTSS VERIFICATION TEST - 1A.
8 Disconnect the RKE/Thatcham Alarm Module C1 harness connector.
Measure the resistance of the Siren Signal Return circuit between the RKE/
Thatcham Alarm Module and the VTSS Siren connector.
Is the resistance below 5.0 ohms?All
Ye s®Replace the VTSS Siren.
Perform VTSS VERIFICATION TEST - 1A.
No®Repair the Siren Signal Return circuit for an open.
Perform VTSS VERIFICATION TEST - 1A.
9 Gain access to the RKE/Thatcham Alarm Module C1 harness connector.
While back probing, measure the voltage of the Siren Supply circuit.
Turn the ignition on.
Is the voltage above 10.0 volts?All
Ye s®Go To 10
No®Replace the RKE/Thatcham Alarm Module.
Perform VTSS VERIFICATION TEST - 1A.
953
VEHICLE THEFT/SECURITY
*VTSS SIREN INOP ÐContinued
Page 983 of 4284

TEST ACTION APPLICABILITY
10 Disconnect the RKE/Thatcham Alarm Module C1 harness connector.
Measure the resistance of the Siren Supply circuit between the RKE/Thatcham
Alarm Module and the VTSS Siren connector.
Is the resistance below 5.0 ohms?All
Ye s®Replace the VTSS Siren.
Perform VTSS VERIFICATION TEST - 1A.
No®Repair the Siren Supply circuit for an open.
Perform VTSS VERIFICATION TEST - 1A.
954
VEHICLE THEFT/SECURITY
*VTSS SIREN INOP ÐContinued
Page 984 of 4284
Symptom:
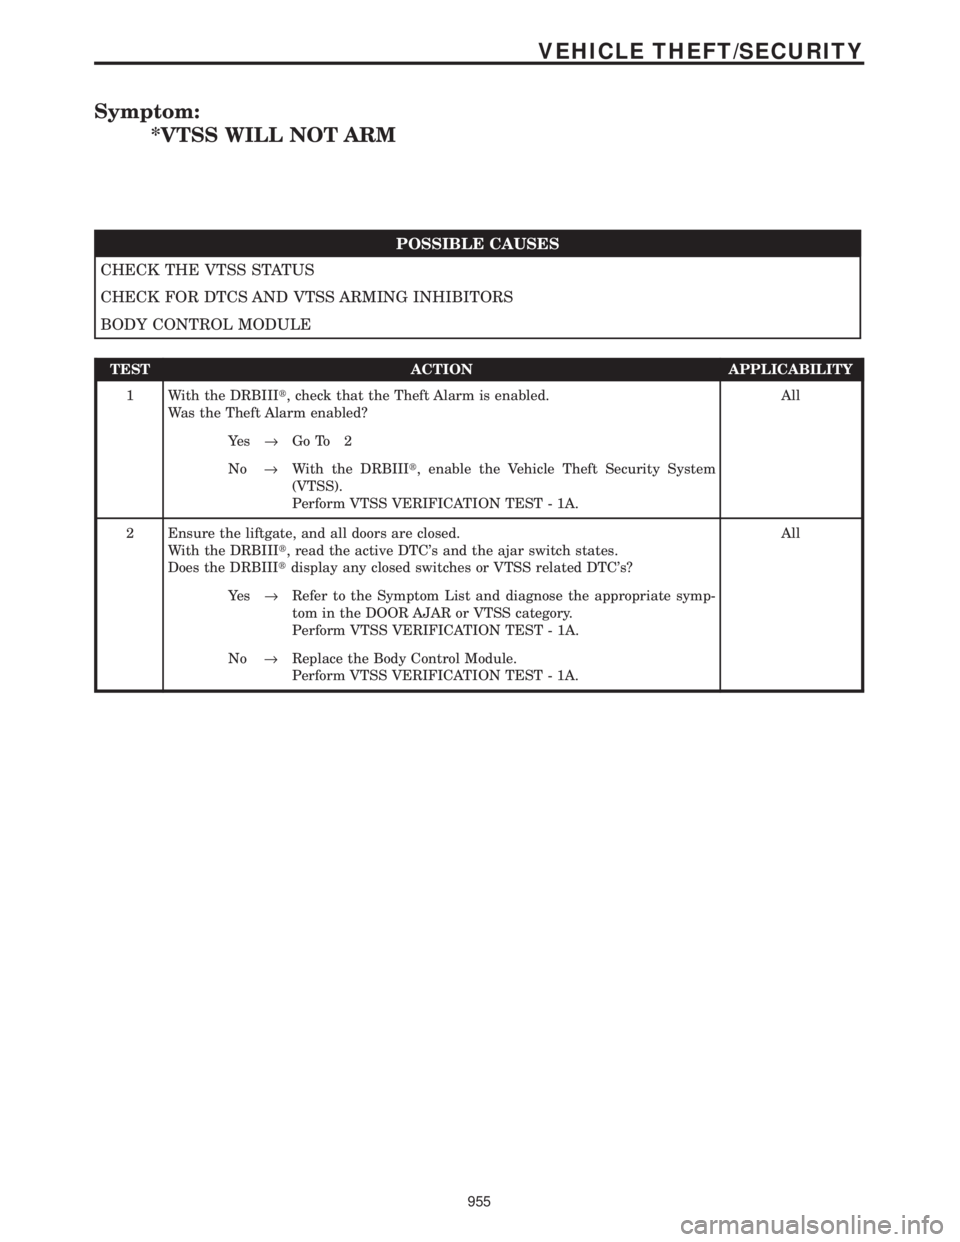
*VTSS WILL NOT ARM
POSSIBLE CAUSES
CHECK THE VTSS STATUS
CHECK FOR DTCS AND VTSS ARMING INHIBITORS
BODY CONTROL MODULE
TEST ACTION APPLICABILITY
1 With the DRBIIIt, check that the Theft Alarm is enabled.
Was the Theft Alarm enabled?All
Ye s®Go To 2
No®With the DRBIIIt, enable the Vehicle Theft Security System
(VTSS).
Perform VTSS VERIFICATION TEST - 1A.
2 Ensure the liftgate, and all doors are closed.
With the DRBIIIt, read the active DTC's and the ajar switch states.
Does the DRBIIItdisplay any closed switches or VTSS related DTC's?All
Ye s®Refer to the Symptom List and diagnose the appropriate symp-
tom in the DOOR AJAR or VTSS category.
Perform VTSS VERIFICATION TEST - 1A.
No®Replace the Body Control Module.
Perform VTSS VERIFICATION TEST - 1A.
955
VEHICLE THEFT/SECURITY
Page 985 of 4284
Symptom:
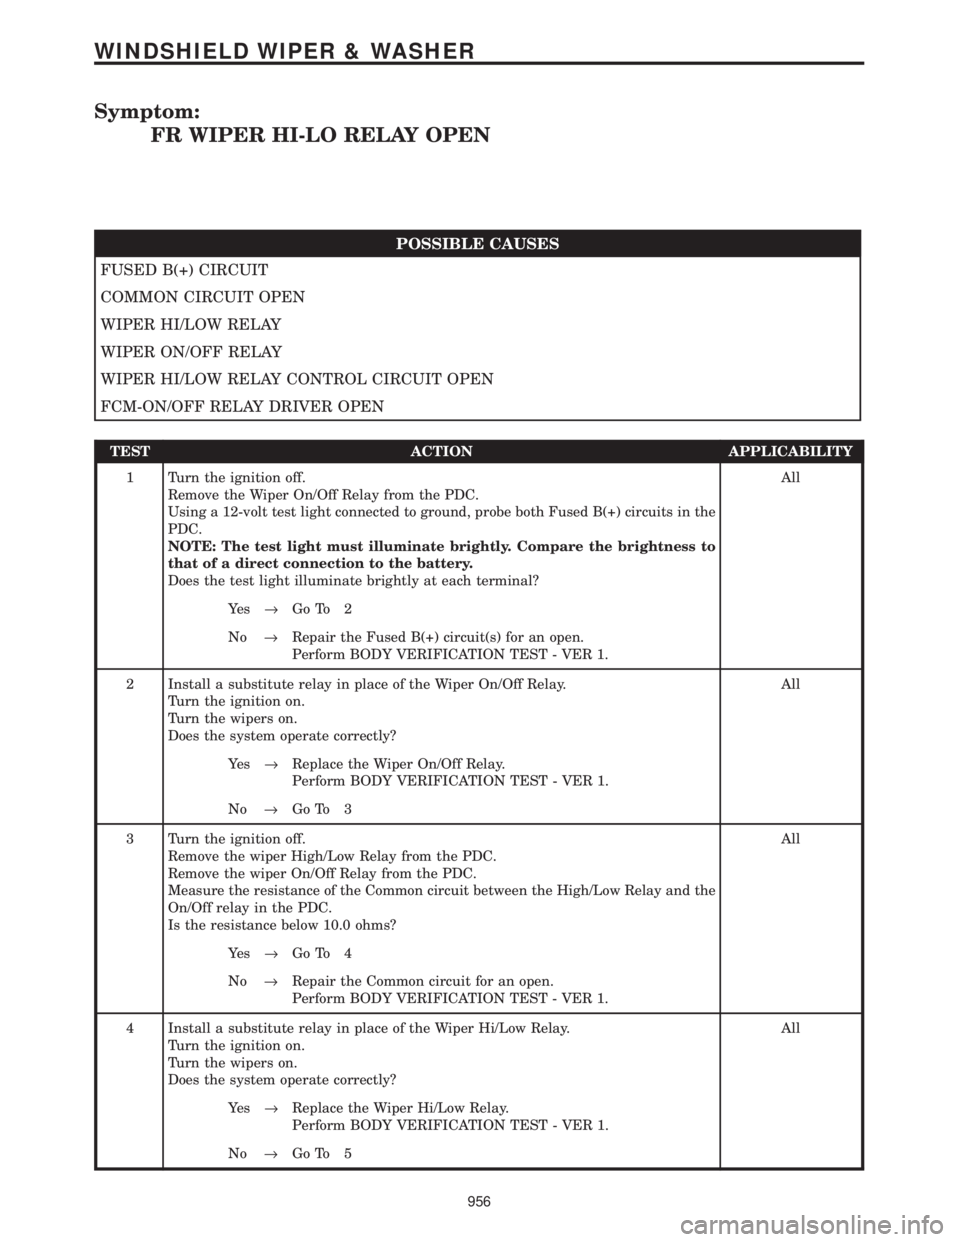
FR WIPER HI-LO RELAY OPEN
POSSIBLE CAUSES
FUSED B(+) CIRCUIT
COMMON CIRCUIT OPEN
WIPER HI/LOW RELAY
WIPER ON/OFF RELAY
WIPER HI/LOW RELAY CONTROL CIRCUIT OPEN
FCM-ON/OFF RELAY DRIVER OPEN
TEST ACTION APPLICABILITY
1 Turn the ignition off.
Remove the Wiper On/Off Relay from the PDC.
Using a 12-volt test light connected to ground, probe both Fused B(+) circuits in the
PDC.
NOTE: The test light must illuminate brightly. Compare the brightness to
that of a direct connection to the battery.
Does the test light illuminate brightly at each terminal?All
Ye s®Go To 2
No®Repair the Fused B(+) circuit(s) for an open.
Perform BODY VERIFICATION TEST - VER 1.
2 Install a substitute relay in place of the Wiper On/Off Relay.
Turn the ignition on.
Turn the wipers on.
Does the system operate correctly?All
Ye s®Replace the Wiper On/Off Relay.
Perform BODY VERIFICATION TEST - VER 1.
No®Go To 3
3 Turn the ignition off.
Remove the wiper High/Low Relay from the PDC.
Remove the wiper On/Off Relay from the PDC.
Measure the resistance of the Common circuit between the High/Low Relay and the
On/Off relay in the PDC.
Is the resistance below 10.0 ohms?All
Ye s®Go To 4
No®Repair the Common circuit for an open.
Perform BODY VERIFICATION TEST - VER 1.
4 Install a substitute relay in place of the Wiper Hi/Low Relay.
Turn the ignition on.
Turn the wipers on.
Does the system operate correctly?All
Ye s®Replace the Wiper Hi/Low Relay.
Perform BODY VERIFICATION TEST - VER 1.
No®Go To 5
956
WINDSHIELD WIPER & WASHER
Page 986 of 4284

TEST ACTION APPLICABILITY
5 Turn the ignition off.
Remove the Wiper Hi/Low Relay from the PDC.
Disconnect the FCM from the IPM.
Connect a jumper wire between the Wiper Hi/Low Relay Control circuit at the IPM
connector to ground.
Measure the resistance between ground and the Wiper Hi/Low Relay Control circuit
in the PDC.
Is the resistance below 5.0 ohms?All
Ye s®Replace the Front Control Module.
Perform BODY VERIFICATION TEST - VER 1.
No®Repair the Wiper Hi/Low Relay Control circuit for an open.
Perform BODY VERIFICATION TEST - VER 1.
957
WINDSHIELD WIPER & WASHER
FR WIPER HI-LO RELAY OPEN ÐContinued
Page 987 of 4284
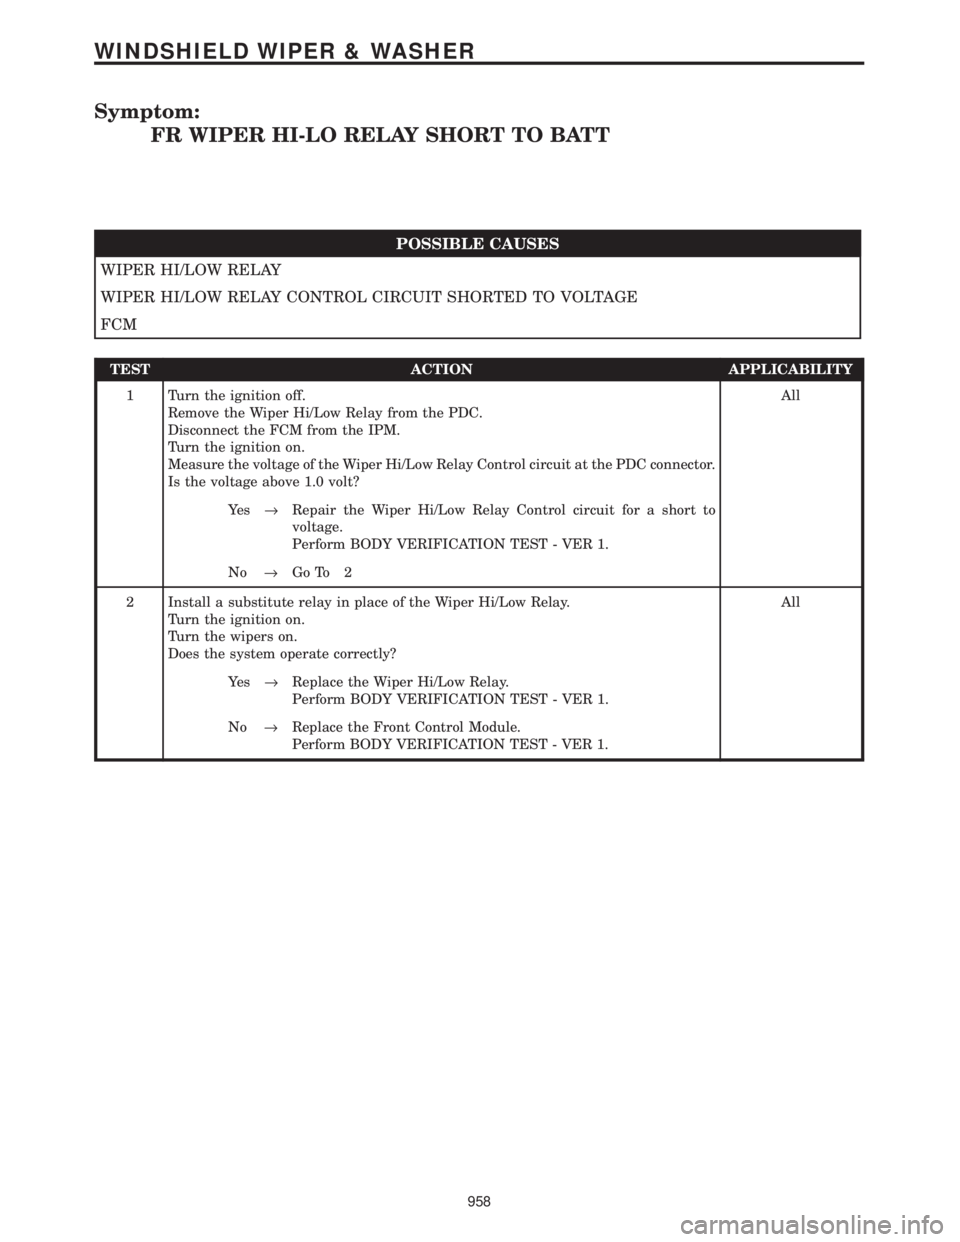
Symptom:
FR WIPER HI-LO RELAY SHORT TO BATT
POSSIBLE CAUSES
WIPER HI/LOW RELAY
WIPER HI/LOW RELAY CONTROL CIRCUIT SHORTED TO VOLTAGE
FCM
TEST ACTION APPLICABILITY
1 Turn the ignition off.
Remove the Wiper Hi/Low Relay from the PDC.
Disconnect the FCM from the IPM.
Turn the ignition on.
Measure the voltage of the Wiper Hi/Low Relay Control circuit at the PDC connector.
Is the voltage above 1.0 volt?All
Ye s®Repair the Wiper Hi/Low Relay Control circuit for a short to
voltage.
Perform BODY VERIFICATION TEST - VER 1.
No®Go To 2
2 Install a substitute relay in place of the Wiper Hi/Low Relay.
Turn the ignition on.
Turn the wipers on.
Does the system operate correctly?All
Ye s®Replace the Wiper Hi/Low Relay.
Perform BODY VERIFICATION TEST - VER 1.
No®Replace the Front Control Module.
Perform BODY VERIFICATION TEST - VER 1.
958
WINDSHIELD WIPER & WASHER
Page 988 of 4284
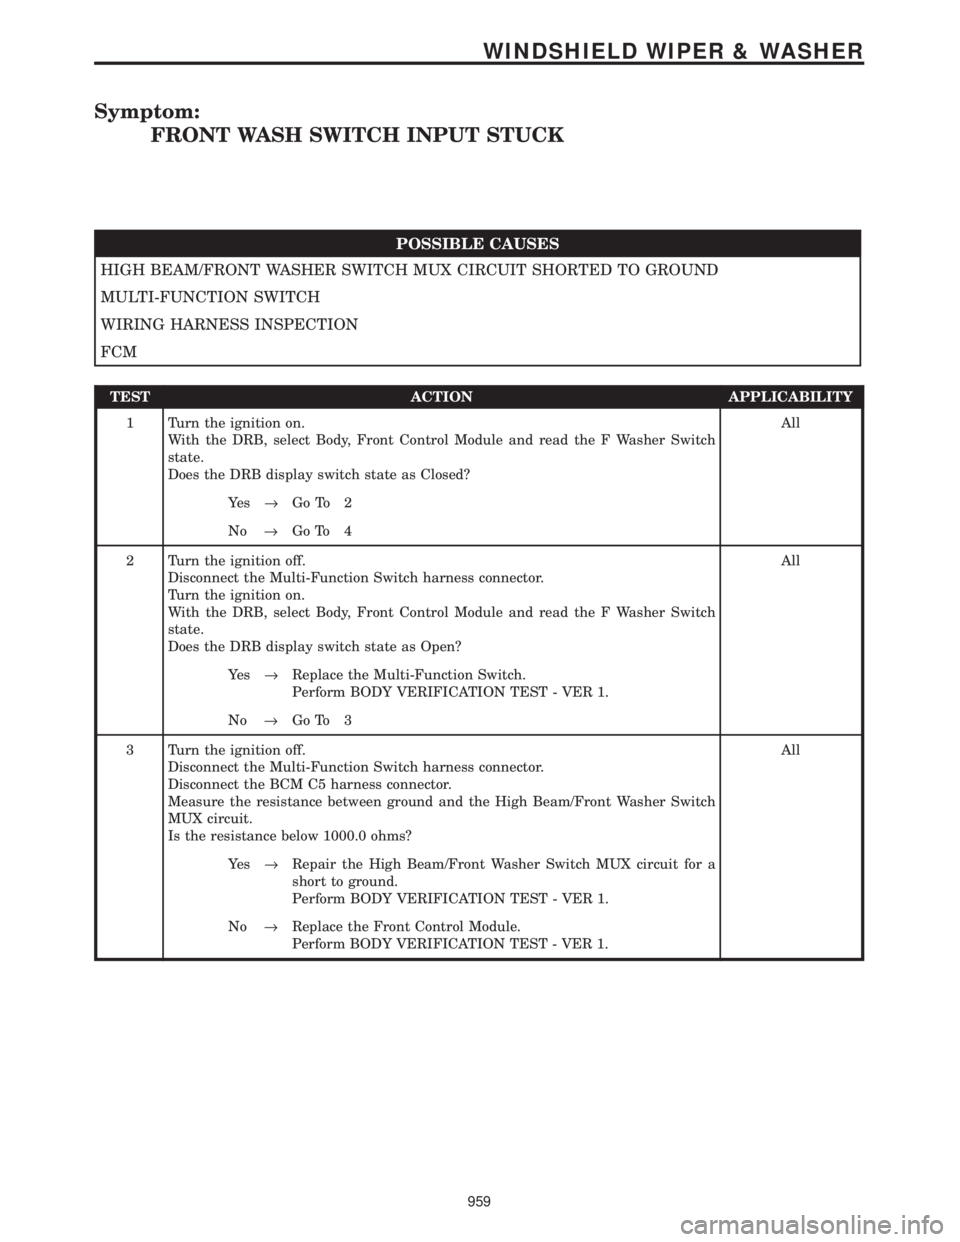
Symptom:
FRONT WASH SWITCH INPUT STUCK
POSSIBLE CAUSES
HIGH BEAM/FRONT WASHER SWITCH MUX CIRCUIT SHORTED TO GROUND
MULTI-FUNCTION SWITCH
WIRING HARNESS INSPECTION
FCM
TEST ACTION APPLICABILITY
1 Turn the ignition on.
With the DRB, select Body, Front Control Module and read the F Washer Switch
state.
Does the DRB display switch state as Closed?All
Ye s®Go To 2
No®Go To 4
2 Turn the ignition off.
Disconnect the Multi-Function Switch harness connector.
Turn the ignition on.
With the DRB, select Body, Front Control Module and read the F Washer Switch
state.
Does the DRB display switch state as Open?All
Ye s®Replace the Multi-Function Switch.
Perform BODY VERIFICATION TEST - VER 1.
No®Go To 3
3 Turn the ignition off.
Disconnect the Multi-Function Switch harness connector.
Disconnect the BCM C5 harness connector.
Measure the resistance between ground and the High Beam/Front Washer Switch
MUX circuit.
Is the resistance below 1000.0 ohms?All
Ye s®Repair the High Beam/Front Washer Switch MUX circuit for a
short to ground.
Perform BODY VERIFICATION TEST - VER 1.
No®Replace the Front Control Module.
Perform BODY VERIFICATION TEST - VER 1.
959
WINDSHIELD WIPER & WASHER
Page 989 of 4284
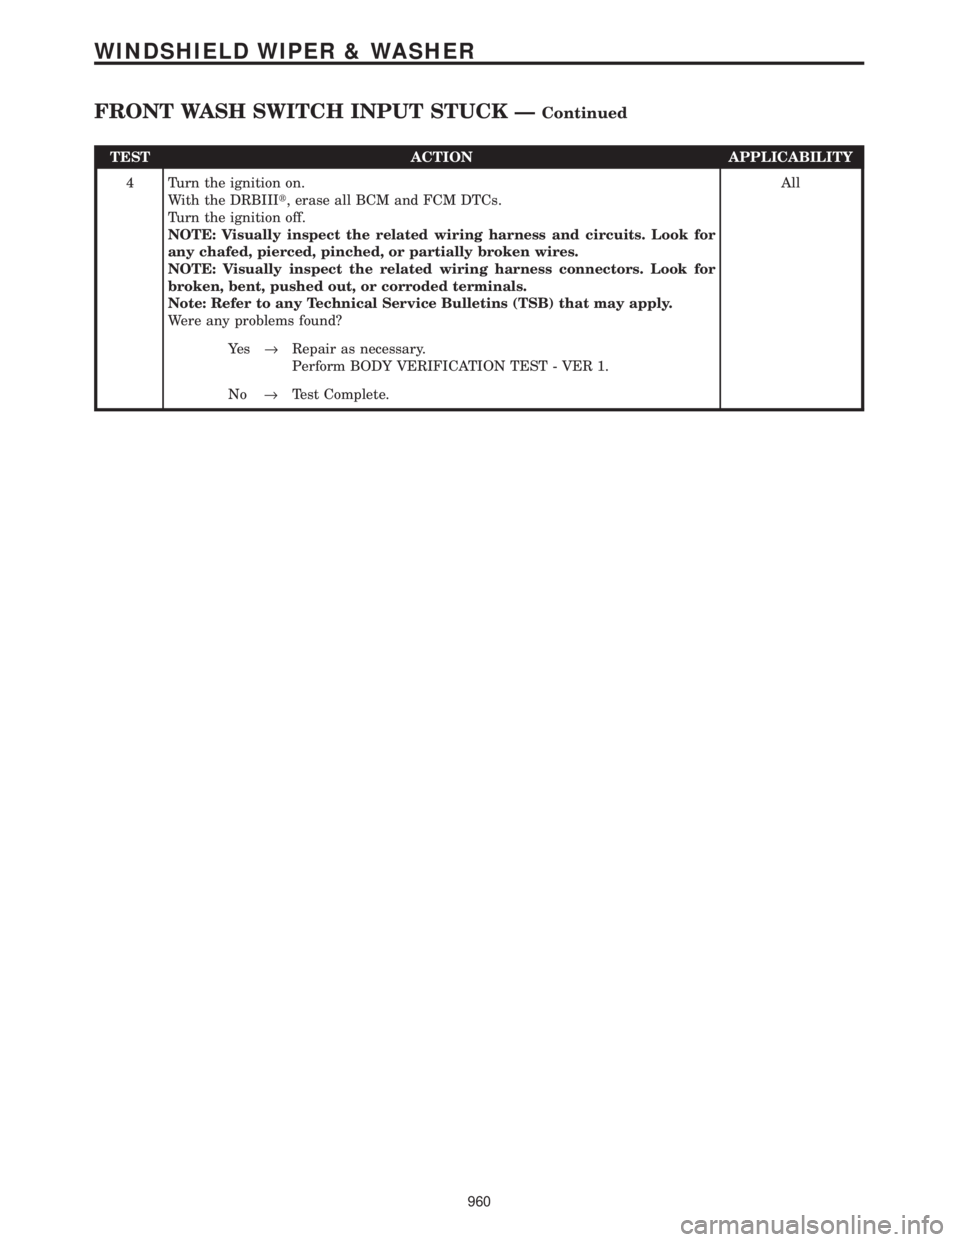
TEST ACTION APPLICABILITY
4 Turn the ignition on.
With the DRBIIIt, erase all BCM and FCM DTCs.
Turn the ignition off.
NOTE: Visually inspect the related wiring harness and circuits. Look for
any chafed, pierced, pinched, or partially broken wires.
NOTE: Visually inspect the related wiring harness connectors. Look for
broken, bent, pushed out, or corroded terminals.
Note: Refer to any Technical Service Bulletins (TSB) that may apply.
Were any problems found?All
Ye s®Repair as necessary.
Perform BODY VERIFICATION TEST - VER 1.
No®Test Complete.
960
WINDSHIELD WIPER & WASHER
FRONT WASH SWITCH INPUT STUCK ÐContinued
Page 990 of 4284

Symptom:
FRONT WASHER OUTPUT OPEN
POSSIBLE CAUSES
INTERMITTENT WIRING AND CONNECTORS
FRONT WASHER MOTOR CONTROL CIRCUIT OPEN
FUSED ACCESSORY RELAY OUTPUT CIRCUIT
FRONT WASHER MOTOR CONTROL CIRCUIT SHORT TO VOLTAGE
FRONT WASHER PUMP MOTOR
FRONT CONTROL MODULE
TEST ACTION APPLICABILITY
1 Ignition on, engine off.
Press the Front Washer Switch.
Does the Front Washer Motor Function?All
Ye s®Go To 2
No®Go To 3
2 Turn the ignition on.
With the DRBIIIt, erase all BCM and FCM DTCs.
Turn the ignition off.
The conditions necessary to set this DTC are not present at this time.
Using the schematics as a guide, inspect the wiring and connectors specific to this
circuit.
Wiggle the wiring while checking for shorts and open circuits.
Were there any problems found?All
Ye s®Repair as necessary.
Perform BODY VERIFICATION TEST - VER 1.
No®Test Complete.
3 Turn the ignition off to the lock position.
Disconnect the Front Washer Pump Motor harness connector.
Note: Check connectors - Clean/repair as necessary.
Ignition on, engine off.
Using a 12-volt test light connected to ground, check the Fused Accessory Relay
Output circuit in the Front Washer Pump Motor harness connector.
Does the test light illuminate brightly?All
Ye s®Go To 4
No®Repair the Fused Accessory Relay Output circuit for an open.
Perform BODY VERIFICATION TEST - VER 1.
961
WINDSHIELD WIPER & WASHER