CHRYSLER VOYAGER 2005 Service Manual
Manufacturer: CHRYSLER, Model Year: 2005, Model line: VOYAGER, Model: CHRYSLER VOYAGER 2005Pages: 2339, PDF Size: 59.69 MB
Page 251 of 2339
WATER PUMP - 2.4L
DESCRIPTION
The water pump has a cast aluminum body and
housing with a stamped steel impeller. The water
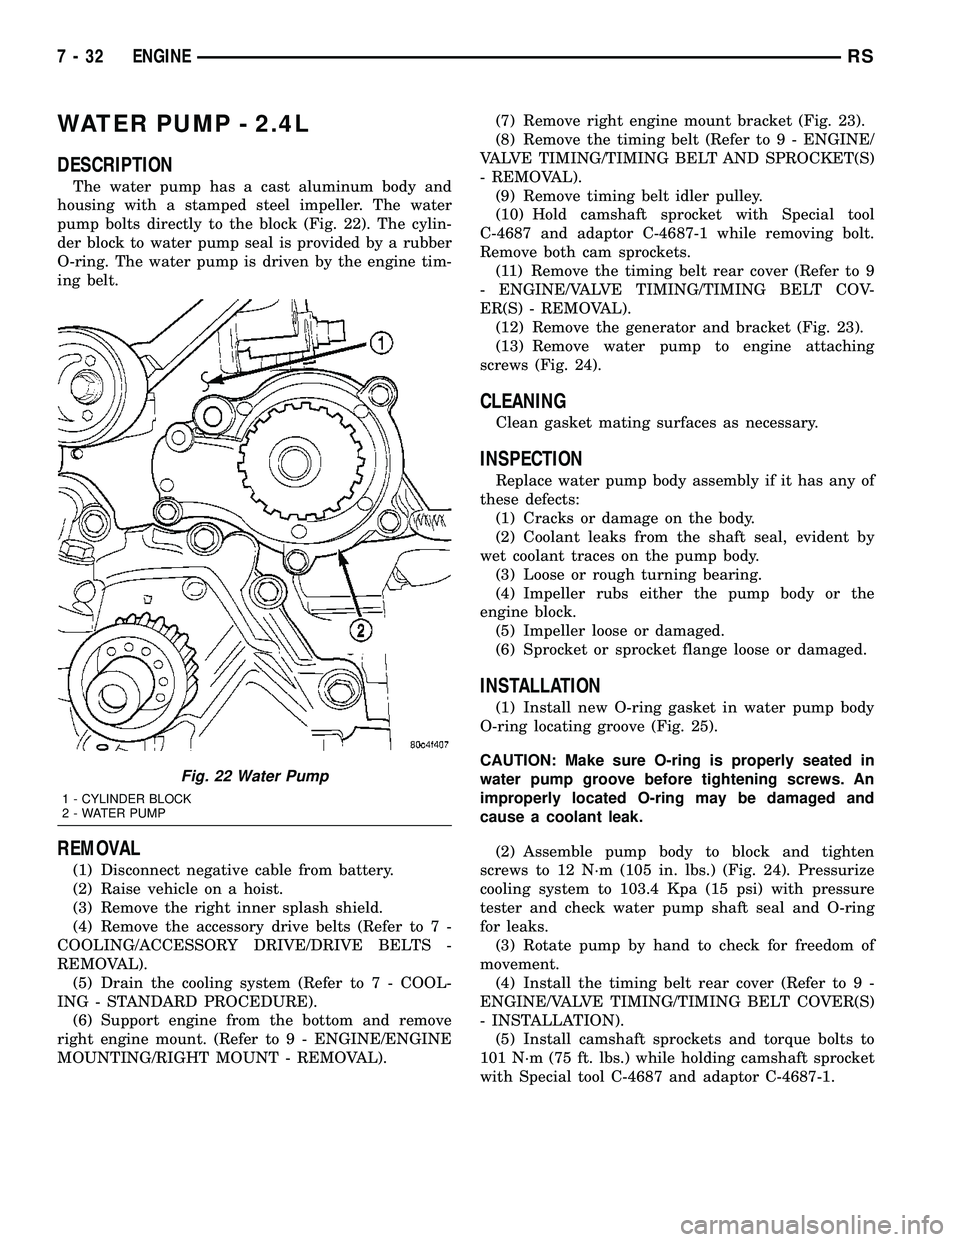
pump bolts directly to the block (Fig. 22). The cylin-
der block to water pump seal is provided by a rubber
O-ring. The water pump is driven by the engine tim-
ing belt.
REMOVAL
(1) Disconnect negative cable from battery.
(2) Raise vehicle on a hoist.
(3) Remove the right inner splash shield.
(4) Remove the accessory drive belts (Refer to 7 -
COOLING/ACCESSORY DRIVE/DRIVE BELTS -
REMOVAL).
(5) Drain the cooling system (Refer to 7 - COOL-
ING - STANDARD PROCEDURE).
(6) Support engine from the bottom and remove
right engine mount. (Refer to 9 - ENGINE/ENGINE
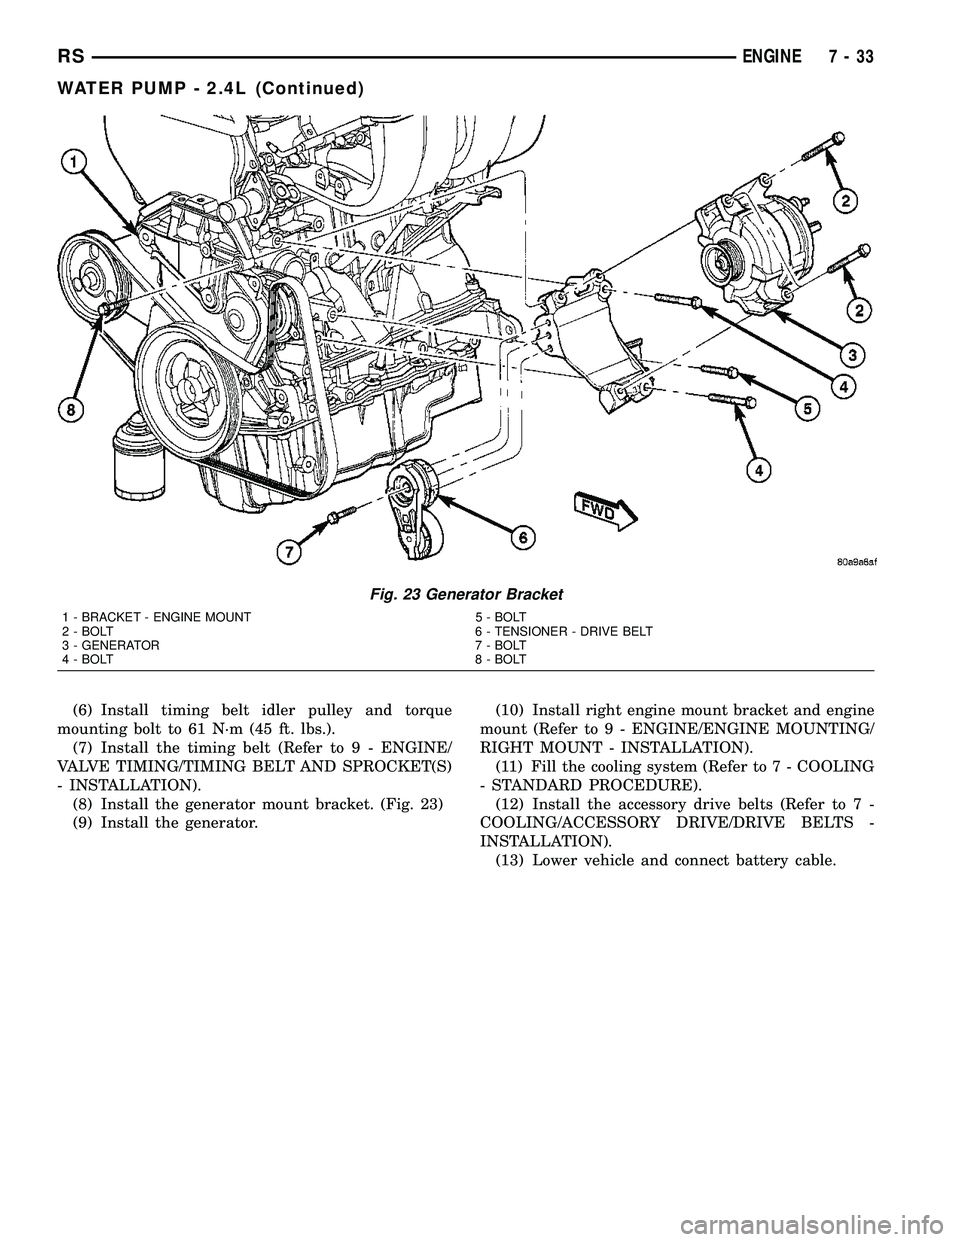
MOUNTING/RIGHT MOUNT - REMOVAL).(7) Remove right engine mount bracket (Fig. 23).
(8) Remove the timing belt (Refer to 9 - ENGINE/
VALVE TIMING/TIMING BELT AND SPROCKET(S)
- REMOVAL).
(9) Remove timing belt idler pulley.
(10) Hold camshaft sprocket with Special tool
C-4687 and adaptor C-4687-1 while removing bolt.
Remove both cam sprockets.
(11) Remove the timing belt rear cover (Refer to 9
- ENGINE/VALVE TIMING/TIMING BELT COV-
ER(S) - REMOVAL).
(12) Remove the generator and bracket (Fig. 23).
(13) Remove water pump to engine attaching
screws (Fig. 24).
CLEANING
Clean gasket mating surfaces as necessary.
INSPECTION
Replace water pump body assembly if it has any of
these defects:
(1) Cracks or damage on the body.
(2) Coolant leaks from the shaft seal, evident by
wet coolant traces on the pump body.
(3) Loose or rough turning bearing.
(4) Impeller rubs either the pump body or the
engine block.
(5) Impeller loose or damaged.
(6) Sprocket or sprocket flange loose or damaged.
INSTALLATION
(1) Install new O-ring gasket in water pump body
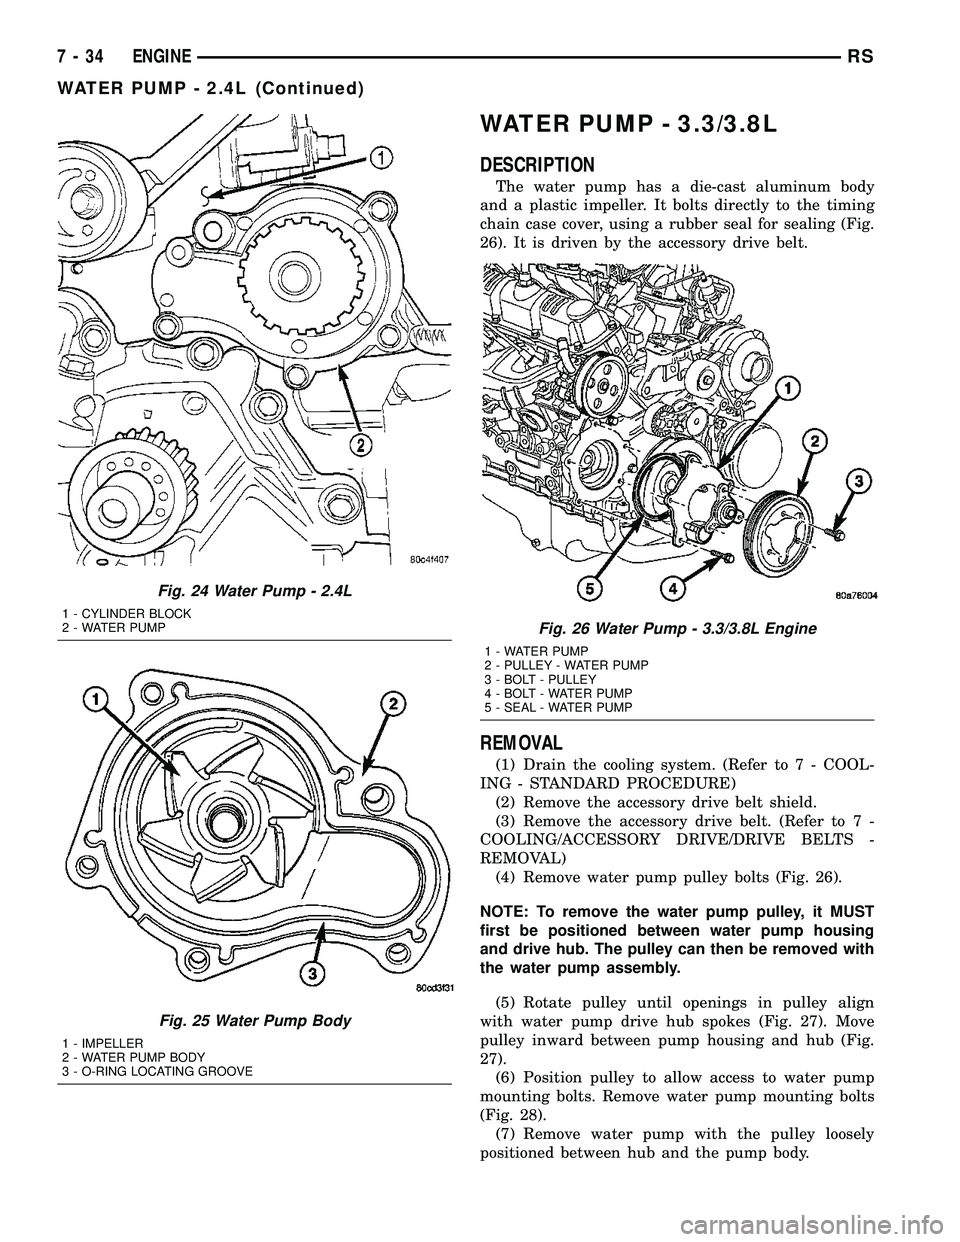
O-ring locating groove (Fig. 25).
CAUTION: Make sure O-ring is properly seated in
water pump groove before tightening screws. An
improperly located O-ring may be damaged and
cause a coolant leak.
(2) Assemble pump body to block and tighten
screws to 12 N´m (105 in. lbs.) (Fig. 24). Pressurize
cooling system to 103.4 Kpa (15 psi) with pressure
tester and check water pump shaft seal and O-ring
for leaks.
(3) Rotate pump by hand to check for freedom of
movement.
(4) Install the timing belt rear cover (Refer to 9 -
ENGINE/VALVE TIMING/TIMING BELT COVER(S)
- INSTALLATION).
(5) Install camshaft sprockets and torque bolts to
101 N´m (75 ft. lbs.) while holding camshaft sprocket
with Special tool C-4687 and adaptor C-4687-1.
Fig. 22 Water Pump
1 - CYLINDER BLOCK
2 - WATER PUMP
7 - 32 ENGINERS
Page 252 of 2339
(6) Install timing belt idler pulley and torque
mounting bolt to 61 N´m (45 ft. lbs.).
(7) Install the timing belt (Refer to 9 - ENGINE/
VALVE TIMING/TIMING BELT AND SPROCKET(S)
- INSTALLATION).
(8) Install the generator mount bracket. (Fig. 23)
(9) Install the generator.(10) Install right engine mount bracket and engine
mount (Refer to 9 - ENGINE/ENGINE MOUNTING/
RIGHT MOUNT - INSTALLATION).
(11) Fill the cooling system (Refer to 7 - COOLING
- STANDARD PROCEDURE).
(12) Install the accessory drive belts (Refer to 7 -
COOLING/ACCESSORY DRIVE/DRIVE BELTS -
INSTALLATION).
(13) Lower vehicle and connect battery cable.
Fig. 23 Generator Bracket
1 - BRACKET - ENGINE MOUNT 5 - BOLT
2 - BOLT 6 - TENSIONER - DRIVE BELT
3 - GENERATOR 7 - BOLT
4 - BOLT 8 - BOLT
RSENGINE7-33
WATER PUMP - 2.4L (Continued)
Page 253 of 2339
WATER PUMP - 3.3/3.8L
DESCRIPTION
The water pump has a die-cast aluminum body
and a plastic impeller. It bolts directly to the timing
chain case cover, using a rubber seal for sealing (Fig.
26). It is driven by the accessory drive belt.
REMOVAL
(1) Drain the cooling system. (Refer to 7 - COOL-
ING - STANDARD PROCEDURE)
(2) Remove the accessory drive belt shield.
(3) Remove the accessory drive belt. (Refer to 7 -
COOLING/ACCESSORY DRIVE/DRIVE BELTS -
REMOVAL)
(4) Remove water pump pulley bolts (Fig. 26).
NOTE: To remove the water pump pulley, it MUST
first be positioned between water pump housing
and drive hub. The pulley can then be removed with
the water pump assembly.
(5) Rotate pulley until openings in pulley align
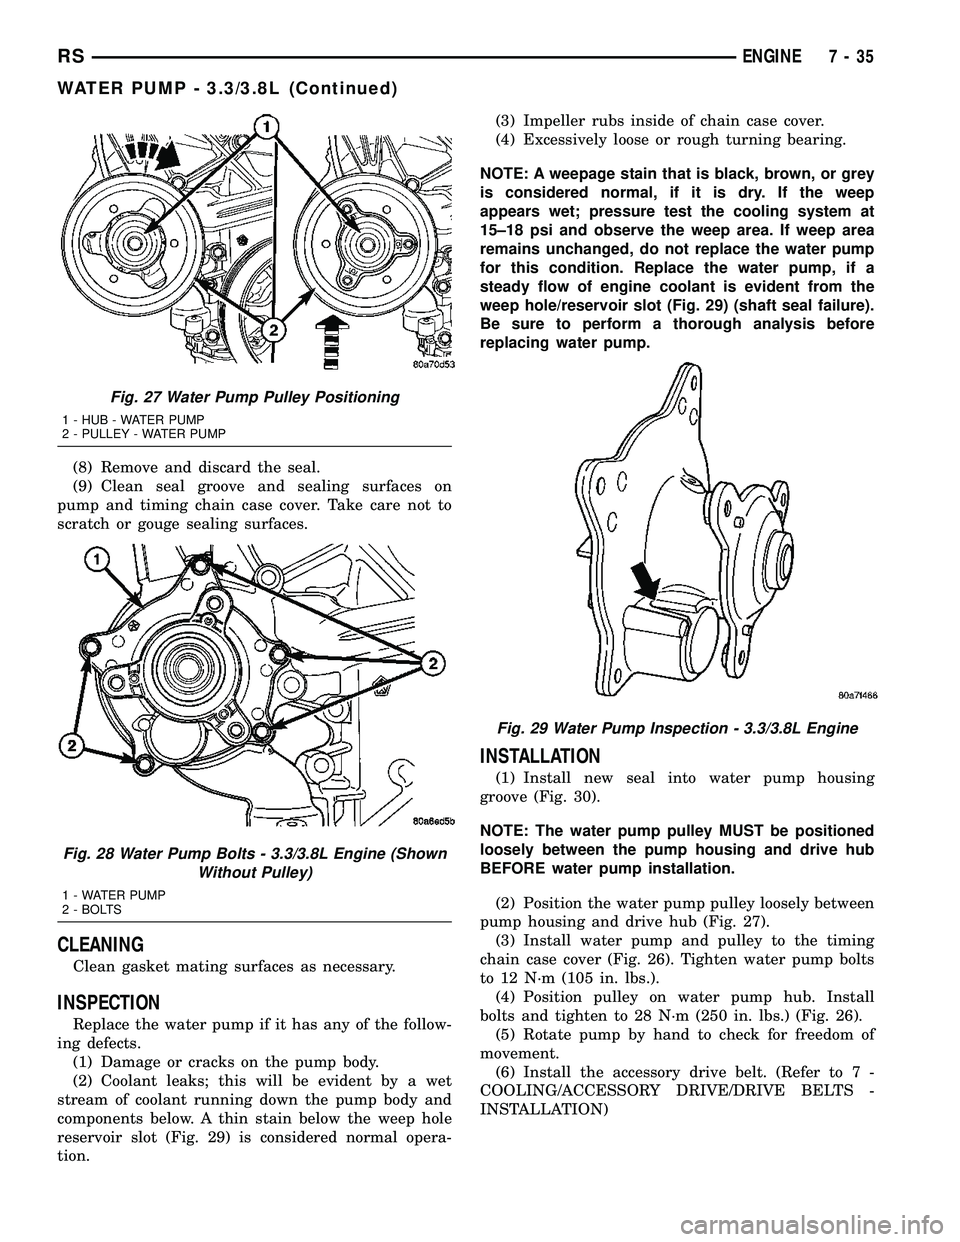
with water pump drive hub spokes (Fig. 27). Move
pulley inward between pump housing and hub (Fig.
27).
(6) Position pulley to allow access to water pump
mounting bolts. Remove water pump mounting bolts
(Fig. 28).
(7) Remove water pump with the pulley loosely
positioned between hub and the pump body.
Fig. 24 Water Pump - 2.4L
1 - CYLINDER BLOCK
2 - WATER PUMP
Fig. 25 Water Pump Body
1 - IMPELLER
2 - WATER PUMP BODY
3 - O-RING LOCATING GROOVE
Fig. 26 Water Pump - 3.3/3.8L Engine
1 - WATER PUMP
2 - PULLEY - WATER PUMP
3 - BOLT - PULLEY
4 - BOLT - WATER PUMP
5 - SEAL - WATER PUMP
7 - 34 ENGINERS
WATER PUMP - 2.4L (Continued)
Page 254 of 2339
(8) Remove and discard the seal.
(9) Clean seal groove and sealing surfaces on
pump and timing chain case cover. Take care not to
scratch or gouge sealing surfaces.
CLEANING
Clean gasket mating surfaces as necessary.
INSPECTION
Replace the water pump if it has any of the follow-
ing defects.
(1) Damage or cracks on the pump body.
(2) Coolant leaks; this will be evident by a wet
stream of coolant running down the pump body and
components below. A thin stain below the weep hole
reservoir slot (Fig. 29) is considered normal opera-
tion.(3) Impeller rubs inside of chain case cover.
(4) Excessively loose or rough turning bearing.
NOTE: A weepage stain that is black, brown, or grey
is considered normal, if it is dry. If the weep
appears wet; pressure test the cooling system at
15±18 psi and observe the weep area. If weep area
remains unchanged, do not replace the water pump
for this condition. Replace the water pump, if a
steady flow of engine coolant is evident from the
weep hole/reservoir slot (Fig. 29) (shaft seal failure).
Be sure to perform a thorough analysis before
replacing water pump.
INSTALLATION
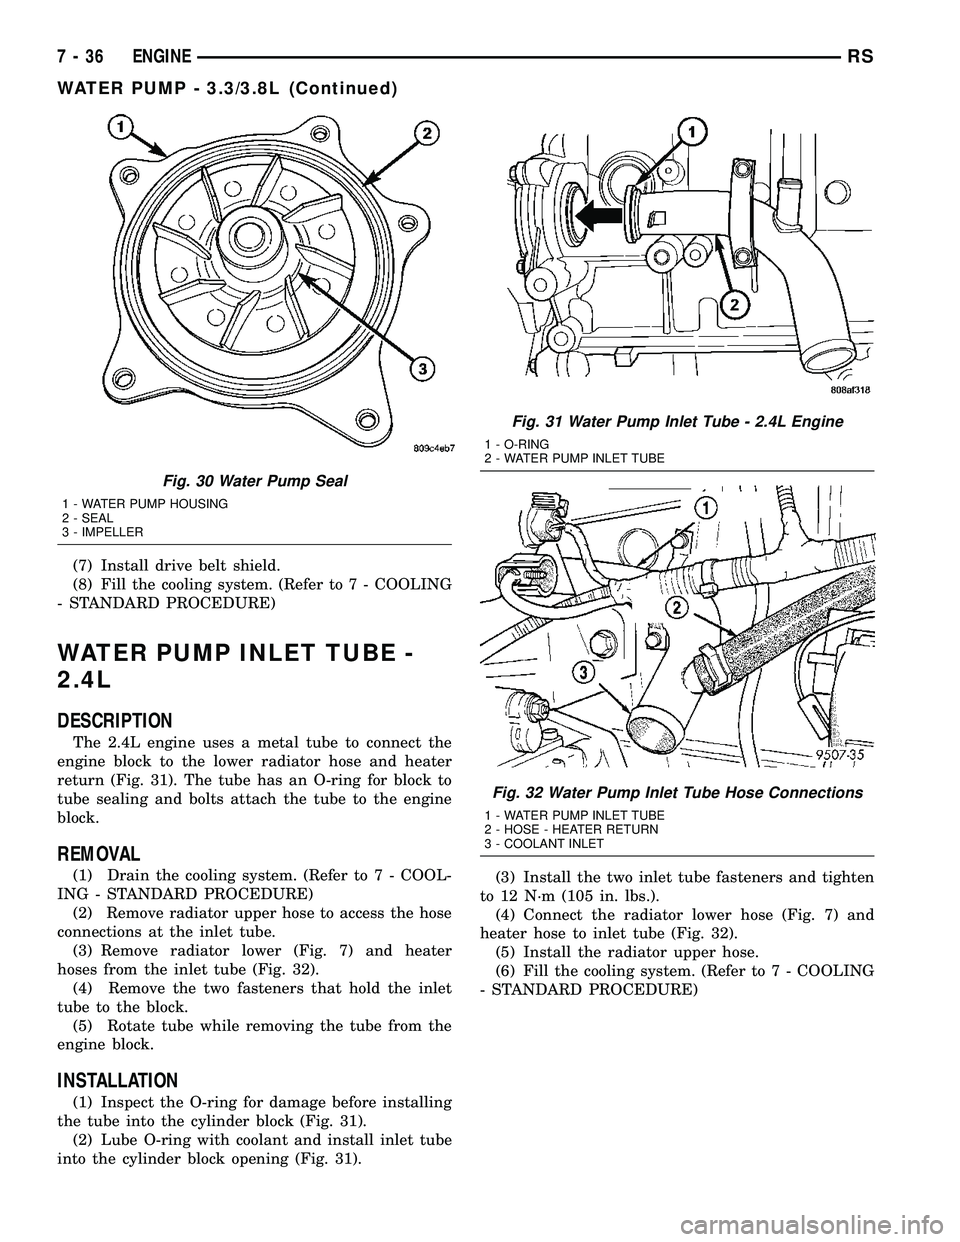
(1) Install new seal into water pump housing
groove (Fig. 30).
NOTE: The water pump pulley MUST be positioned
loosely between the pump housing and drive hub
BEFORE water pump installation.
(2) Position the water pump pulley loosely between
pump housing and drive hub (Fig. 27).
(3) Install water pump and pulley to the timing
chain case cover (Fig. 26). Tighten water pump bolts
to 12 N´m (105 in. lbs.).
(4) Position pulley on water pump hub. Install
bolts and tighten to 28 N´m (250 in. lbs.) (Fig. 26).
(5) Rotate pump by hand to check for freedom of
movement.
(6) Install the accessory drive belt. (Refer to 7 -
COOLING/ACCESSORY DRIVE/DRIVE BELTS -
INSTALLATION)
Fig. 27 Water Pump Pulley Positioning
1 - HUB - WATER PUMP
2 - PULLEY - WATER PUMP
Fig. 28 Water Pump Bolts - 3.3/3.8L Engine (Shown
Without Pulley)
1 - WATER PUMP
2 - BOLTS
Fig. 29 Water Pump Inspection - 3.3/3.8L Engine
RSENGINE7-35
WATER PUMP - 3.3/3.8L (Continued)
Page 255 of 2339
(7) Install drive belt shield.
(8) Fill the cooling system. (Refer to 7 - COOLING
- STANDARD PROCEDURE)
WATER PUMP INLET TUBE -
2.4L
DESCRIPTION
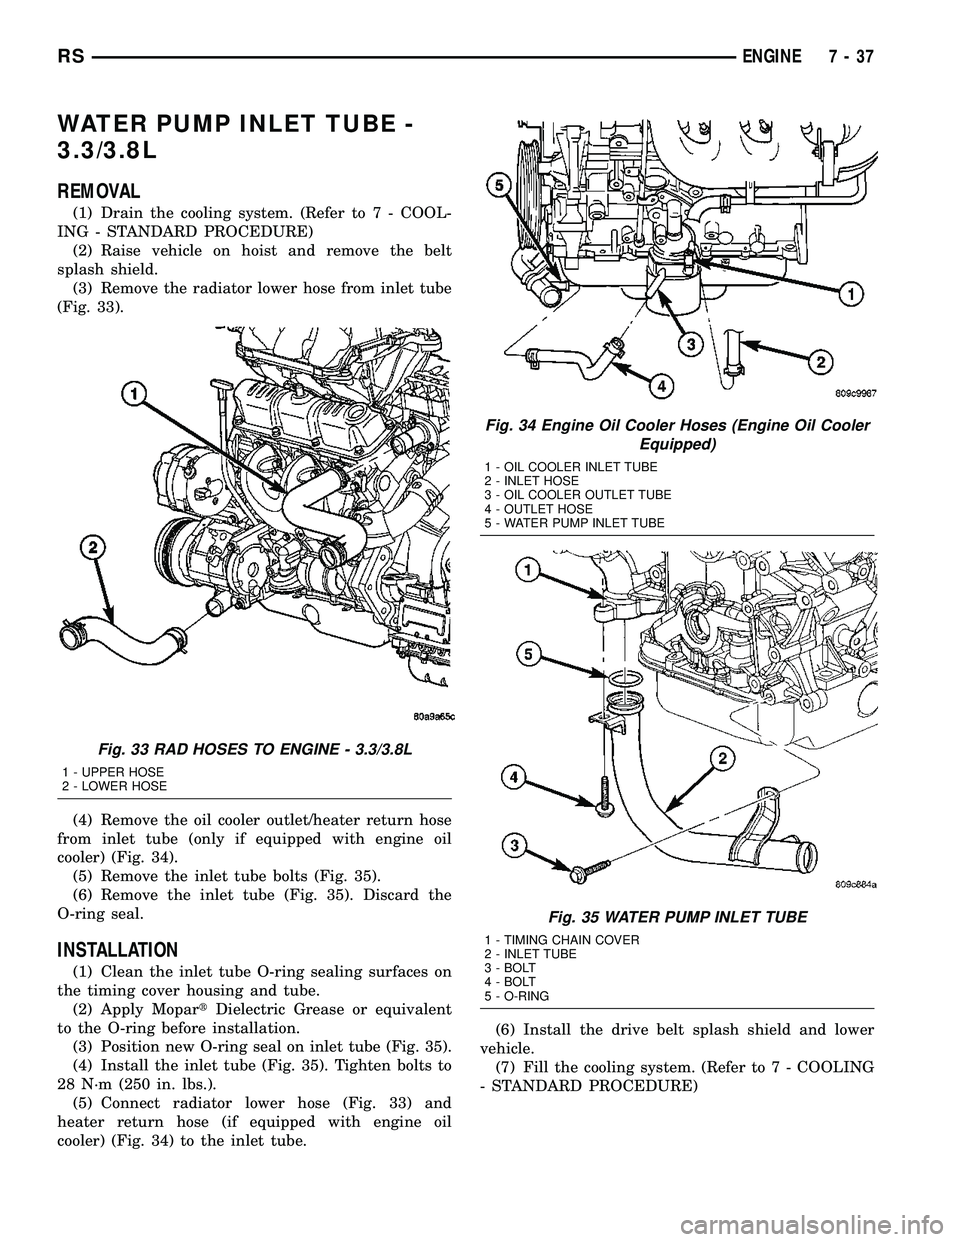
The 2.4L engine uses a metal tube to connect the
engine block to the lower radiator hose and heater
return (Fig. 31). The tube has an O-ring for block to
tube sealing and bolts attach the tube to the engine
block.
REMOVAL
(1) Drain the cooling system. (Refer to 7 - COOL-
ING - STANDARD PROCEDURE)
(2) Remove radiator upper hose to access the hose
connections at the inlet tube.
(3) Remove radiator lower (Fig. 7) and heater
hoses from the inlet tube (Fig. 32).
(4) Remove the two fasteners that hold the inlet
tube to the block.
(5) Rotate tube while removing the tube from the
engine block.
INSTALLATION
(1) Inspect the O-ring for damage before installing
the tube into the cylinder block (Fig. 31).
(2) Lube O-ring with coolant and install inlet tube
into the cylinder block opening (Fig. 31).(3) Install the two inlet tube fasteners and tighten
to 12 N´m (105 in. lbs.).
(4) Connect the radiator lower hose (Fig. 7) and
heater hose to inlet tube (Fig. 32).
(5) Install the radiator upper hose.
(6) Fill the cooling system. (Refer to 7 - COOLING
- STANDARD PROCEDURE)
Fig. 30 Water Pump Seal
1 - WATER PUMP HOUSING
2 - SEAL
3 - IMPELLER
Fig. 31 Water Pump Inlet Tube - 2.4L Engine
1 - O-RING
2 - WATER PUMP INLET TUBE
Fig. 32 Water Pump Inlet Tube Hose Connections
1 - WATER PUMP INLET TUBE
2 - HOSE - HEATER RETURN
3 - COOLANT INLET
7 - 36 ENGINERS
WATER PUMP - 3.3/3.8L (Continued)
Page 256 of 2339
WATER PUMP INLET TUBE -
3.3/3.8L
REMOVAL
(1) Drain the cooling system. (Refer to 7 - COOL-
ING - STANDARD PROCEDURE)
(2) Raise vehicle on hoist and remove the belt
splash shield.
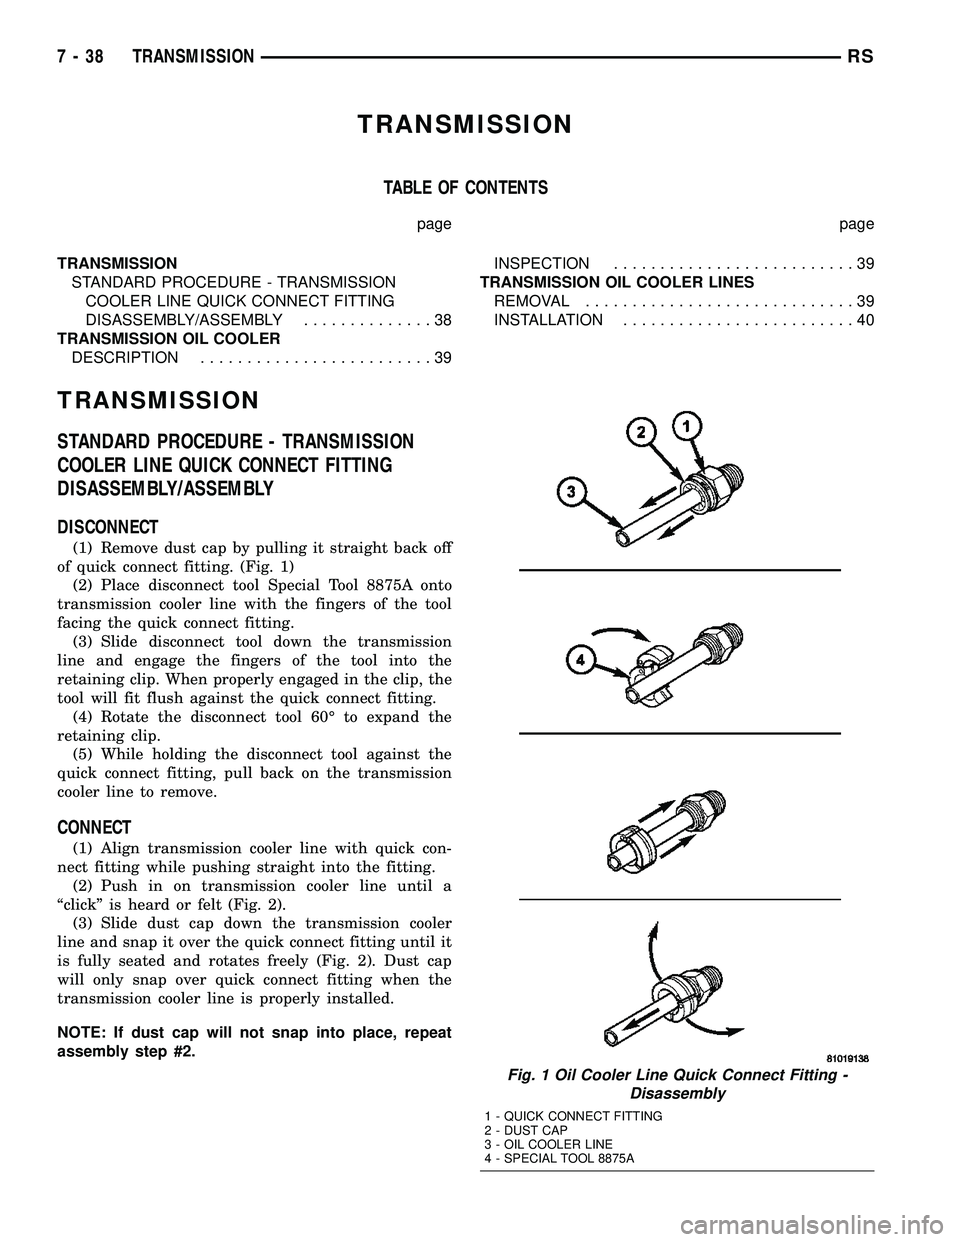
(3) Remove the radiator lower hose from inlet tube
(Fig. 33).
(4) Remove the oil cooler outlet/heater return hose
from inlet tube (only if equipped with engine oil
cooler) (Fig. 34).
(5) Remove the inlet tube bolts (Fig. 35).
(6) Remove the inlet tube (Fig. 35). Discard the
O-ring seal.
INSTALLATION
(1) Clean the inlet tube O-ring sealing surfaces on
the timing cover housing and tube.
(2) Apply MopartDielectric Grease or equivalent
to the O-ring before installation.
(3) Position new O-ring seal on inlet tube (Fig. 35).
(4) Install the inlet tube (Fig. 35). Tighten bolts to
28 N´m (250 in. lbs.).
(5) Connect radiator lower hose (Fig. 33) and
heater return hose (if equipped with engine oil
cooler) (Fig. 34) to the inlet tube.(6) Install the drive belt splash shield and lower
vehicle.
(7) Fill the cooling system. (Refer to 7 - COOLING
- STANDARD PROCEDURE)
Fig. 33 RAD HOSES TO ENGINE - 3.3/3.8L
1 - UPPER HOSE
2 - LOWER HOSE
Fig. 34 Engine Oil Cooler Hoses (Engine Oil Cooler
Equipped)
1 - OIL COOLER INLET TUBE
2 - INLET HOSE
3 - OIL COOLER OUTLET TUBE
4 - OUTLET HOSE
5 - WATER PUMP INLET TUBE
Fig. 35 WATER PUMP INLET TUBE
1 - TIMING CHAIN COVER
2 - INLET TUBE
3 - BOLT
4 - BOLT
5 - O-RING
RSENGINE7-37
Page 257 of 2339
TRANSMISSION
TABLE OF CONTENTS
page page
TRANSMISSION
STANDARD PROCEDURE - TRANSMISSION
COOLER LINE QUICK CONNECT FITTING
DISASSEMBLY/ASSEMBLY..............38
TRANSMISSION OIL COOLER
DESCRIPTION.........................39INSPECTION..........................39
TRANSMISSION OIL COOLER LINES
REMOVAL.............................39
INSTALLATION.........................40
TRANSMISSION
STANDARD PROCEDURE - TRANSMISSION
COOLER LINE QUICK CONNECT FITTING
DISASSEMBLY/ASSEMBLY
DISCONNECT
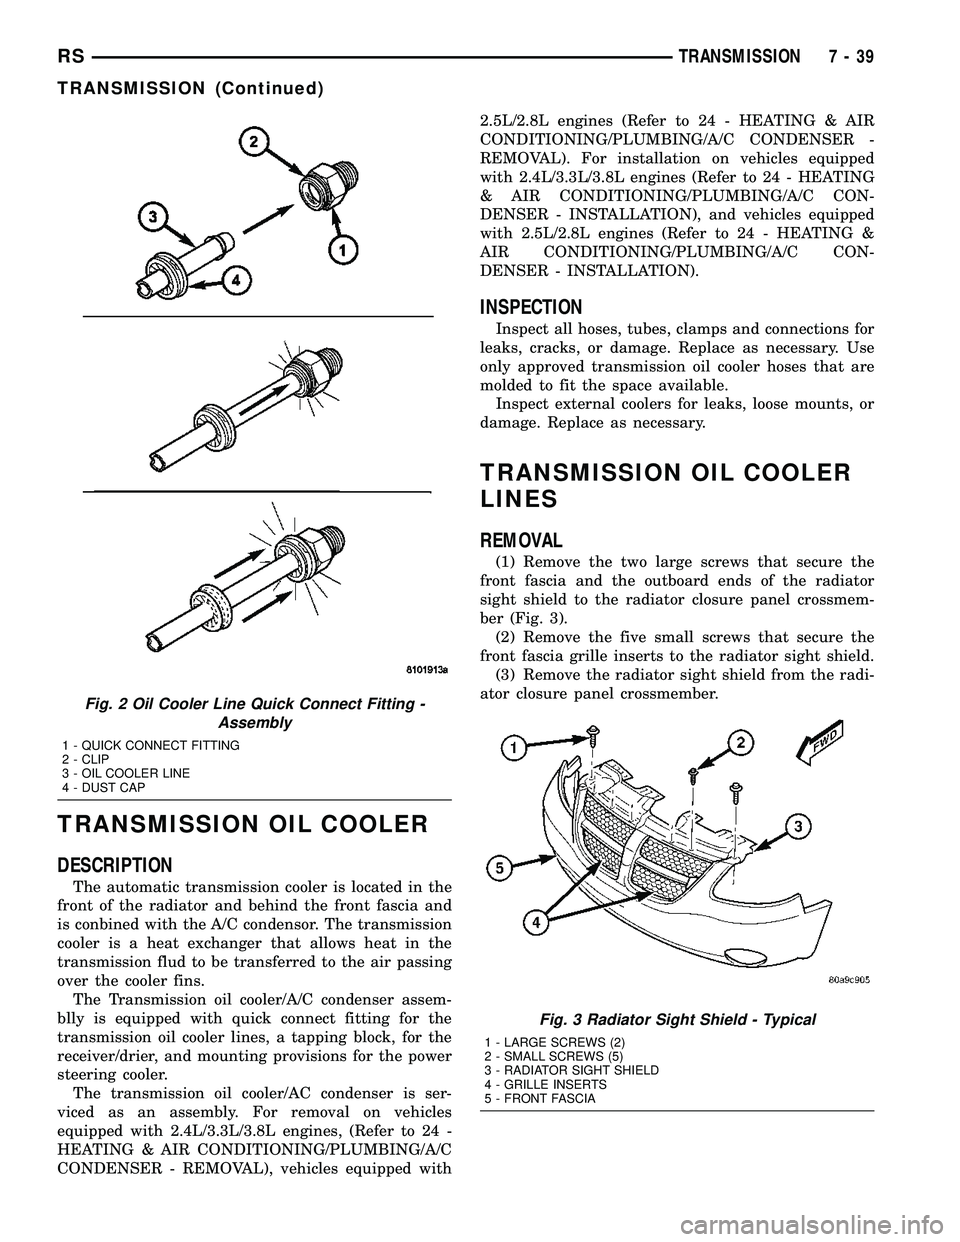
(1) Remove dust cap by pulling it straight back off
of quick connect fitting. (Fig. 1)
(2) Place disconnect tool Special Tool 8875A onto
transmission cooler line with the fingers of the tool
facing the quick connect fitting.
(3) Slide disconnect tool down the transmission
line and engage the fingers of the tool into the
retaining clip. When properly engaged in the clip, the
tool will fit flush against the quick connect fitting.
(4) Rotate the disconnect tool 60É to expand the
retaining clip.
(5) While holding the disconnect tool against the
quick connect fitting, pull back on the transmission
cooler line to remove.
CONNECT
(1) Align transmission cooler line with quick con-
nect fitting while pushing straight into the fitting.
(2) Push in on transmission cooler line until a
ªclickº is heard or felt (Fig. 2).
(3) Slide dust cap down the transmission cooler
line and snap it over the quick connect fitting until it
is fully seated and rotates freely (Fig. 2). Dust cap
will only snap over quick connect fitting when the
transmission cooler line is properly installed.
NOTE: If dust cap will not snap into place, repeat
assembly step #2.
Fig. 1 Oil Cooler Line Quick Connect Fitting -
Disassembly
1 - QUICK CONNECT FITTING
2 - DUST CAP
3 - OIL COOLER LINE
4 - SPECIAL TOOL 8875A
7 - 38 TRANSMISSIONRS
Page 258 of 2339
TRANSMISSION OIL COOLER
DESCRIPTION
The automatic transmission cooler is located in the
front of the radiator and behind the front fascia and
is conbined with the A/C condensor. The transmission
cooler is a heat exchanger that allows heat in the
transmission flud to be transferred to the air passing
over the cooler fins.
The Transmission oil cooler/A/C condenser assem-
blly is equipped with quick connect fitting for the
transmission oil cooler lines, a tapping block, for the
receiver/drier, and mounting provisions for the power
steering cooler.
The transmission oil cooler/AC condenser is ser-
viced as an assembly. For removal on vehicles
equipped with 2.4L/3.3L/3.8L engines, (Refer to 24 -
HEATING & AIR CONDITIONING/PLUMBING/A/C
CONDENSER - REMOVAL), vehicles equipped with2.5L/2.8L engines (Refer to 24 - HEATING & AIR
CONDITIONING/PLUMBING/A/C CONDENSER -
REMOVAL). For installation on vehicles equipped
with 2.4L/3.3L/3.8L engines (Refer to 24 - HEATING
& AIR CONDITIONING/PLUMBING/A/C CON-
DENSER - INSTALLATION), and vehicles equipped
with 2.5L/2.8L engines (Refer to 24 - HEATING &
AIR CONDITIONING/PLUMBING/A/C CON-
DENSER - INSTALLATION).
INSPECTION
Inspect all hoses, tubes, clamps and connections for
leaks, cracks, or damage. Replace as necessary. Use
only approved transmission oil cooler hoses that are
molded to fit the space available.
Inspect external coolers for leaks, loose mounts, or
damage. Replace as necessary.
TRANSMISSION OIL COOLER
LINES
REMOVAL
(1) Remove the two large screws that secure the
front fascia and the outboard ends of the radiator
sight shield to the radiator closure panel crossmem-
ber (Fig. 3).
(2) Remove the five small screws that secure the
front fascia grille inserts to the radiator sight shield.
(3) Remove the radiator sight shield from the radi-
ator closure panel crossmember.
Fig. 2 Oil Cooler Line Quick Connect Fitting -
Assembly
1 - QUICK CONNECT FITTING
2 - CLIP
3 - OIL COOLER LINE
4 - DUST CAP
Fig. 3 Radiator Sight Shield - Typical
1 - LARGE SCREWS (2)
2 - SMALL SCREWS (5)
3 - RADIATOR SIGHT SHIELD
4 - GRILLE INSERTS
5 - FRONT FASCIA
RSTRANSMISSION7-39
TRANSMISSION (Continued)
Page 259 of 2339
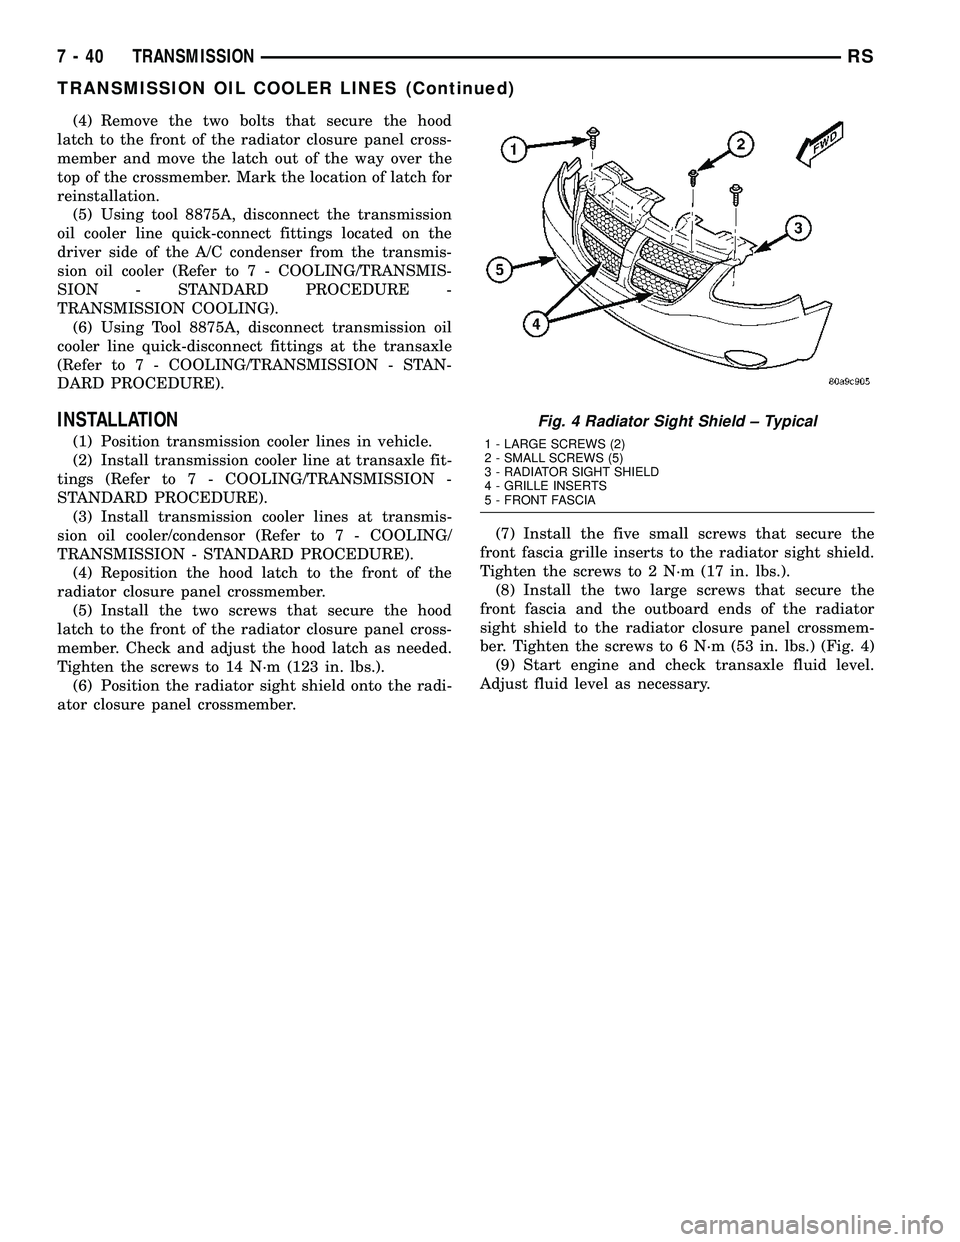
(4) Remove the two bolts that secure the hood
latch to the front of the radiator closure panel cross-
member and move the latch out of the way over the
top of the crossmember. Mark the location of latch for
reinstallation.
(5) Using tool 8875A, disconnect the transmission
oil cooler line quick-connect fittings located on the
driver side of the A/C condenser from the transmis-
sion oil cooler (Refer to 7 - COOLING/TRANSMIS-
SION - STANDARD PROCEDURE -
TRANSMISSION COOLING).
(6) Using Tool 8875A, disconnect transmission oil
cooler line quick-disconnect fittings at the transaxle
(Refer to 7 - COOLING/TRANSMISSION - STAN-
DARD PROCEDURE).
INSTALLATION
(1) Position transmission cooler lines in vehicle.
(2) Install transmission cooler line at transaxle fit-
tings (Refer to 7 - COOLING/TRANSMISSION -
STANDARD PROCEDURE).
(3) Install transmission cooler lines at transmis-
sion oil cooler/condensor (Refer to 7 - COOLING/
TRANSMISSION - STANDARD PROCEDURE).
(4) Reposition the hood latch to the front of the
radiator closure panel crossmember.
(5) Install the two screws that secure the hood
latch to the front of the radiator closure panel cross-
member. Check and adjust the hood latch as needed.
Tighten the screws to 14 N´m (123 in. lbs.).
(6) Position the radiator sight shield onto the radi-
ator closure panel crossmember.(7) Install the five small screws that secure the
front fascia grille inserts to the radiator sight shield.
Tighten the screws to 2 N´m (17 in. lbs.).
(8) Install the two large screws that secure the
front fascia and the outboard ends of the radiator
sight shield to the radiator closure panel crossmem-
ber. Tighten the screws to 6 N´m (53 in. lbs.) (Fig. 4)
(9) Start engine and check transaxle fluid level.
Adjust fluid level as necessary.
Fig. 4 Radiator Sight Shield ± Typical
1 - LARGE SCREWS (2)
2 - SMALL SCREWS (5)
3 - RADIATOR SIGHT SHIELD
4 - GRILLE INSERTS
5 - FRONT FASCIA
7 - 40 TRANSMISSIONRS
TRANSMISSION OIL COOLER LINES (Continued)
Page 260 of 2339
AUDIO/VIDEO
TABLE OF CONTENTS
page page
AUDIO/VIDEO
DESCRIPTION..........................1
DIAGNOSIS AND TESTING
AUDIO/VIDEO.........................2
AMPLIFIER
REMOVAL.............................7
INSTALLATION..........................7
ANTENNA BODY AND CABLE
DESCRIPTION..........................7
OPERATION............................7
DIAGNOSIS AND TESTING
ANTENNA BODY AND CABLE.............8
REMOVAL.............................8
INSTALLATION..........................8
ANTENNA MODULE - EXPORT
DESCRIPTION.........................10
OPERATION...........................10
DIAGNOSIS AND TESTING
ANTENNA MODULE - EXPORT...........10
REMOVAL.............................10
INSTALLATION.........................10
ANTENNA - NAVIGATION RADIO
REMOVAL.............................11
INSTALLATION.........................11
CD CHANGER
DESCRIPTION.........................11
OPERATION...........................11
REMOVAL.............................11
INSTALLATION.........................11
DVD PLAYER
DESCRIPTION.........................12
REMOVAL.............................12
INSTALLATION.........................12
INSTRUMENT PANEL ANTENNA CABLE
REMOVAL.............................12INSTALLATION.........................12
QUARTER GLASS INTEGRAL ANTENNA -
EXPORT
DESCRIPTION.........................13
OPERATION...........................13
DIAGNOSIS AND TESTING
QUARTER GLASS INTEGRAL ANTENNA -
EXPORT............................13
RADIO
DESCRIPTION.........................13
OPERATION...........................14
DIAGNOSIS AND TESTING
RADIO..............................14
REMOVAL.............................14
INSTALLATION.........................15
RADIO NOISE SUPPRESSION COMPONENTS
DESCRIPTION.........................15
OPERATION...........................15
REMOTE SWITCHES
DESCRIPTION.........................16
OPERATION...........................16
DIAGNOSIS AND TESTING
REMOTE SWITCHES..................16
REMOVAL.............................17
INSTALLATION.........................17
SPEAKER
DIAGNOSIS AND TESTING
SPEAKER...........................18
REMOVAL.............................18
INSTALLATION.........................19
VIDEO SCREEN
DESCRIPTION.........................20
OPERATION...........................20
REMOVAL.............................20
INSTALLATION.........................20
AUDIO/VIDEO
DESCRIPTION
An audio system is standard on this model. A rear
seat video system is an available option. Several com-
binations of radio receivers are offered on this model.
The audio/video system uses an ignition switched
source of battery current so that the system will only
operate when the ignition switch is in the RUN or
ACCESSORY/ACCESSORY DELAY positions.
The audio system includes the following compo-
nents:²Amplifier
²Antenna
²CD changer (if equipped)
²DVD player (if equipped)
²Radio noise suppression components
²Radio receiver
²Speakers
²Video screen (if equipped)
Certain functions and features of the audio/video
system rely upon resources shared with other elec-
tronic modules in the vehicle over the Programmable
Communication Interface (PCI) bus network. The
data bus network allows the sharing of sensor infor-
RSAUDIO/VIDEO8A-1