CHRYSLER VOYAGER 2005 Service Manual
Manufacturer: CHRYSLER, Model Year: 2005, Model line: VOYAGER, Model: CHRYSLER VOYAGER 2005Pages: 2339, PDF Size: 59.69 MB
Page 491 of 2339
²Occupant Classification Module- Vehicles
equipped with the Occupant Classification System
(OCS) include an Occupant Classification Module
(OCM) which is secured to a stamped steel mounting
bracket on the underside of the passenger side front
seat cushion frame.
²Occupant Restraint Controller- The Occu-
pant Restraint Controller (ORC) is also sometimes
referred to as the Airbag Control Module (ACM). The
ORC is located on a mount on the floor transmission
tunnel just underneath the instrument panel center
stack (Fig. 3).
²Passenger Airbag- The passenger airbag is
located on the instrument panel, beneath the instru-
ment panel top pad and above the glove box on the
passenger side of the vehicle (Fig. 3).
²Passenger Airbag Disabled (PAD) Indicator
- Vehicles equipped with the Occupant Classification
System (OCS) include a passenger airbag disabled
(PAD) indicator which is located in the instrument
panel center stack (Fig. 3).
²Passenger Knee Blocker- The passenger knee
blocker is a structural reinforcement that is integral
to and concealed within the glove box door (Fig. 3).
²Seat Belt Tensioner- A seat belt tensioner is
integral to both front seat belt buckles. The seat belt
buckles are secured to the inner seat frame sides,
beneath a cushion trim panel.
²Seat Weight Bladder and Pressure Sensor
Assembly- Vehicles equipped with the Occupant
Classification System (OCS) include a seat weight
bladder that is sandwiched between an insulator pad
on the top of the passenger side front seat pan and
the seat cushion foam padding. A short hose connects
the bladder to a pressure sensor which is secured to
the Occupant Classification Module (OCM) mounting
bracket on the underside of the passenger side front
seat cushion frame.
²Side Impact Sensors- Six side impact sensors
are used on vehicles equipped with the curtain air-
bags, three left side and three right side. The first
row side impact sensor is located in the B-pillar, just
above the front seat belt retractor. The second row
side impact sensor is located in the sliding side door
track opening, just in front of the C-pillar. The third
row side impact sensor is located behind the quarter
trim panel, above the rear tire wheel well, between
the C and D-pillars.
The ORC, the OCM, and the cluster each contain a
microprocessor and programming that allow them to
communicate with each other using the Programma-
ble Communications Interface (PCI) data bus net-
work. This method of communication is used by the
ORC for control of the airbag indicators.OPERATION
ACTIVE RESTRAINTS
The primary passenger restraints in this or any
other vehicle are the seat belts and child restraint
anchors. Seat belts and child restraint anchors are
referred to as an active restraint because the vehicle
occupants are required to physically fasten and prop-
erly adjust these restraints in order to benefit from
them. See the owner's manual in the vehicle glove
box for more information on the features, use and
operation of all of the active restraints.
PASSIVE RESTRAINTS
The passive restraints are referred to as a supple-
mental restraint system because they were designed
and are intended to enhance the protection for the
occupants of the vehicleONLYwhen used in con-
junction with the seat belts. They are referred to as
passive restraints because the vehicle occupants are
not required to do anything to make them operate;
however, the vehicle occupants must be wearing their
seat belts in order to obtain the maximum safety
benefit from the supplemental restraint system.
The supplemental restraint system electrical cir-
cuits are continuously monitored and controlled by a
microprocessor and software contained within the
Occupant Restraint Controller (ORC). An airbag indi-
cator in the ElectroMechanical Instrument Cluster
(EMIC) illuminates for about seven seconds as a bulb
test each time the ignition switch is turned to the
ON or START positions. Following the bulb test, the
airbag indicator is turned ON or OFF by the ORC to
indicate the status of the supplemental restraint sys-
tem. If the airbag indicator comes ON at any time
other than during the bulb test, it indicates that
there is a problem in the supplemental restraint sys-
tem electrical circuits. Such a problem may cause air-
bags not to deploy when required, or to deploy when
not required.
Deployment of the supplemental restraints
depends upon the angle and severity of an impact.
Deployment is not based upon vehicle speed; rather,
deployment is based upon the rate of deceleration as
measured by the forces of gravity (G force) upon the
impact sensors. When an impact is severe enough,
the microprocessor in the ORC signals the inflator of
the appropriate airbag units to deploy their airbag
cushions. The front seat belt tensioners are provided
with a deployment signal by the ORC in conjunction
with the front airbags. During a frontal vehicle
impact, the knee blockers work in concert with prop-
erly fastened and adjusted seat belts to restrain both
the driver and the front seat passenger in the proper
position for an airbag deployment. The knee blockers
also absorb and distribute the crash energy from the
8O - 4 RESTRAINTSRS
RESTRAINTS (Continued)
Page 492 of 2339
driver and the front seat passenger to the structure
of the instrument panel (Refer to 8 - ELECTRICAL/
RESTRAINTS/KNEE BLOCKER AIRBAG -
DESCRIPTION). The seat belt tensioners remove the
slack from the front seat belts to provide further
assurance that the driver and front seat passenger
are properly positioned and restrained for an airbag
deployment.
When the ORC monitors a problem in any of the
dual front airbag system circuits or components,
including the seat belt tensioners, it stores a Diag-
nostic Trouble Code (DTC) in its memory and sends
an electronic message to the EMIC to turn on the
airbag indicator. Proper testing of the supplemental
restraint system components, the Programmable
Communications Interface (PCI) data bus, the elec-
tronic message inputs to and outputs from the EMIC
or the ORC, as well as the retrieval or erasure of a
DTC from the ORC or the EMIC requires the use of
a scan tool. Refer to the appropriate diagnostic infor-
mation.
OCCUPANT CLASSIFICATION SYSTEM
The Occupant Classification System (OCS) auto-
matically suppresses or enables passenger airbag and
seat belt tensioner operation based upon whether or
not the passenger side front seat is occupied and, if
the seat is occupied, classifies the size of the occu-
pant and whether the seat is occupied by a child
seat.
The OCS has an Occupant Classification Module
(OCM) that monitors inputs from the seat weight
bladder pressure sensor under the passenger side
front seat cushion and from the belt tension sensor
on the passenger side front seat belt lower anchor.
Based upon those inputs the microprocessor within
the OCM classifies the occupant of the passenger
side front seat. The OCM then sends electronic occu-
pant classification messages to the ORC. The micro-
processor and programming of the ORC uses these
occupant classification messages to determine
whether to enable or disable the deployment circuits
for the passenger airbag and seat belt tensioner.
The OCS electrical circuits and components are
continuously monitored by the OCM, and the OCM is
continuously monitored by the ORC. A passenger air-
bag ON/OFF indicator is located in the instrument
panel center stack area. This indicator receives bat-
tery current whenever the ignition switch is in the
ON or START positions, and illuminates only when
the ORC pulls the indicator control circuit to ground.
The indicator illuminates for about seven seconds as
a bulb test each time the ignition switch is turned to
the ON or START positions. Following the bulb test,
the indicator is turned ON or OFF by the ORC based
upon the electronic occupant classification messagesreceived from the OCM. This indicator is illuminated
whenever the passenger airbag and seat belt ten-
sioner operation has been suppressed, and is turned
OFF whenever they are enabled or when the passen-
ger seat is classified as empty.
When the OCM monitors a problem in any of the
OCS circuits or components, it stores a fault code or
DTC in its memory circuit and sends an electronic
message to the ORC. The ORC then sends an elec-
tronic message to the EMIC to turn ON the airbag
indicator. If for any reason the OCM is unable to
classify the occupant it sends an electronic message
to the ORC, and the ORC suppresses passenger air-
bag and seat belt tensioner operation. Proper testing
of the OCS components, the Programmable Commu-
nications Interface (PCI) data bus, the electronic
message inputs to and outputs from the OCM, the
EMIC or the ORC, as well as the retrieval or erasure
of a DTC's, requires the use of a scan tool. Refer to
the appropriate diagnostic information.
WARNING
WARNINGS
Disconnect and isolate the battery negative
cable before beginning any airbag system com-
ponent diagnosis, testing, removal, or installa-
tion procedures. Allow system capacitor to
discharge for two minutes before beginning any
component testing or service. This will disable
the airbag system. Failure to disconnect the
battery negative cable may result in accidental
airbag deployment, personal injury, or death.
Do not place an intact undeployed airbag
face down on a solid surface. The airbag will
propel into the air if accidentally deployed and
may result in personal injury or death.
When carrying or handling an undeployed
airbag, the trim side (face) of the airbag should
be pointing towards the body to minimize pos-
sibility of injury if accidental deployment
occurs. Failure to do this may result in per-
sonal injury or death.
Replace airbag system components with
Mopartreplacement parts. Substitute parts
may appear interchangeable, but internal dif-
ferences may result in inferior occupant protec-
tion. Failure to do so may result in occupant
personal injury or death.
Wear safety glasses, rubber gloves, and long
sleeved clothing when cleaning powder residue
from vehicle after airbag deployment. Sodium
hydroxide powder residue emitted from a
deployed airbag can cause skin irritation.
Flush affected area with cool water if irritation
is experienced. If nasal or throat irritation is
RSRESTRAINTS8O-5
RESTRAINTS (Continued)
Page 493 of 2339
experienced, exit the vehicle for fresh air until
the irritation ceases. If irritation continues, see
a physician.
Do not use a replacement airbag that is not in
the original packaging. This may result in
improper deployment, personal injury, or
death.
The factory installed fasteners, screws and
bolts used to fasten airbag components have a
special coating and are specifically designed
for the airbag system. Do not use substitute fas-
teners. Use only original equipment fasteners
listed in the parts catalog when fastener
replacement is required.
During, and following, any child restraint
anchor service, due to impact event or vehicle
repair, carefully inspect all mounting hard-
ware, tether straps, and anchors for proper
installation, operation, or damage. If a child
restraint anchor is found damaged in any way,
the anchor must be replaced. Failure to do this
may result in personal injury or death.
Deployed and nondeployed airbags may or
may not have live pyrotechnic material within
the airbag inflator. Do not dispose of driver/
passenger/seat/curtain/knee blocker airbags or
seat belt tensioners unless you are sure of com-
plete deployment. Refer to the Hazardous Sub-
stance Control System for proper disposal.
Dispose of deployed airbags and tensioners
consistent with state, provincial, local, and fed-
eral regulations.
After any airbag component testing or ser-
vice, do not connect the battery negative cable
(Refer to 8 - ELECTRICAL/RESTRAINTS -
DIAGNOSIS AND TESTING - AIRBAG SYSTEM).
Personal injury or death may result if the sys-
tem test is not performed first.
If the vehicle is equipped with the Occupant
Classification System (OCS), do not connect the
battery negative cable before performing the
OCS Verification Test using the scan tool and
the appropriate diagnostic information. Per-
sonal injury or death may result if the system
test is not performed properly.
Never replace both the Occupant Restraint
Controller (ORC) and the Occupant Classifica-
tion Module (OCM) at the same time. If both
require replacement, replace one, then perform
the Airbag System test (Refer to 8 - ELECTRI-
CAL/RESTRAINTS - DIAGNOSIS AND TESTING
- AIRBAG SYSTEM) before replacing the other.
Both the ORC and the OCM store Occupant
Classification System (OCS) calibration data,
which they transfer to one another when one of
them is replaced. If both are replaced at thesame time, an irreversible fault will be set in
both modules and the OCS may malfunction
and cause personal injury or death.
DIAGNOSIS AND TESTING - AIRBAG SYSTEM
(1) With the battery negative remote cable discon-
nected, connect the scan tool to the Data Link Con-
nector (DLC).
(2) Turn the ignition key to the ON position, then
exit vehicle with the scan tool.
(3) After checking that no one is inside the vehicle,
connect the battery negative remote terminal.
(4) Read and record theACTIVEDiagnostic Trou-
ble Code (DTC) data.
(5) Read and record anySTOREDDTC's.
(6) Refer to the proper diagnostic information if
any DTC's are found in Step 4 and Step 5.
(7) If the airbag warning lamp either fails to light,
or goes ON and stays ON, there is a system malfunc-
tion. To test the airbag warning lamp (bulb) opera-
tion in the cluster (Refer to 8 - ELECTRICAL/
INSTRUMENT CLUSTER - DIAGNOSIS AND
TESTING). Refer to the proper diagnostic informa-
tion for any other system problems.
STANDARD PROCEDURE
STANDARD PROCEDURE - HANDLING
AIRBAGS
DEPLOYED AIRBAG
WARNING: The vehicle interior may contain a very
small amount of powder, a by-product of airbag
deployment. This powder can irritate the skin, eyes,
nose and throat. Wear safety glasses, rubber
gloves, and long sleeved clothing when cleaning
any of the powder residue from the vehicle. If you
find that the cleanup is irritating your skin, run cool
water over the affected area. Also, if you experience
nasal or throat irritation, exit the vehicle for fresh
air until the irritation ceases. If irritation continues,
see a physician.
8O - 6 RESTRAINTSRS
RESTRAINTS (Continued)
Page 494 of 2339
UNDEPLOYED AIRBAG
WARNING: The airbags must be stored in its origi-
nal special container until used for service. At no
time should a source of electricity be permitted
near the inflator on the back of an airbag. When
carrying or handling an undeployed airbag, the trim
side of the airbag should be pointing toward the
body to minimize the possibility of personal injury
or death if accidental deployment occurs. Do not
place undeployed airbag face down on a solid sur-
face, the airbag will propel into the air if accidental
deployment occurs.
STANDARD PROCEDURE - SERVICE AFTER AN
AIRBAG DEPLOYMENT
DRIVER AIRBAG
After a Driver Airbag has been deployed due to a
collision, the followingMUSTbe replaced:
²Driver Airbag
²Clockspring Assembly
²Steering Wheel
²Complete Steering Column Assembly w/Lower
Steering Column Coupler
All other airbag and vehicle components should be
closely inspected following any airbag deployment,
and should be replaced when visible damage is
incurred.
WARNING: Do not connect the battery negative
cable (Refer to 8 - ELECTRICAL/RESTRAINTS -
DIAGNOSIS AND TESTING - AIRBAG SYSTEM). Per-
sonal injury or death may result if the system test
is not performed first.
PASSENGER AIRBAG
After a Passenger Airbag has been deployed due to
a collision. the followingMUSTbe replaced:
²Passenger Airbag
²Instrument Panel and Pad Assembly
All other airbag and vehicle components should be
closely inspected following any airbag deployment,
and should be replaced when visible damage is
incurred.
WARNING: Do not connect the battery negative
cable (Refer to 8 - ELECTRICAL/RESTRAINTS -
DIAGNOSIS AND TESTING - AIRBAG SYSTEM). Per-
sonal injury or death may result if the system test
is not performed first.
KNEE BLOCKER AIRBAG
After a Knee Blocker Airbag has been deployed due
to a collision. the followingMUSTbe replaced:
²Knee Blocker Airbag
²Instrument Panel and Pad Assembly
All other airbag and vehicle components should be
closely inspected following any airbag deployment,
and should be replaced when visible damage is
incurred.
WARNING: Do not connect the battery negative
cable (Refer to 8 - ELECTRICAL/RESTRAINTS -
DIAGNOSIS AND TESTING - AIRBAG SYSTEM). Per-
sonal injury or death may result if the system test
is not performed first.
CURTAIN AIRBAG
After a Curtain Airbag has been deployed due to a
collision. the followingMUSTbe replaced:
²Curtain Airbag Assembly
²Headliner
²A, B, and C-Pillar Trim on deployed side.
All other airbag and vehicle components should be
closely inspected following any airbag deployment,
and should be replaced when visible damage is
incurred.
WARNING: Do not connect the battery negative
cable (Refer to 8 - ELECTRICAL/RESTRAINTS -
DIAGNOSIS AND TESTING - AIRBAG SYSTEM). Per-
sonal injury or death may result if the system test
is not performed first.
OCCUPANT CLASSIFICATION SYSTEM (OCS)
After an impact event, either front, rear, or side,
the OCS system components need to be inspected
and replaced if found to be damaged.
This includes:
²Belt Tension Sensor
²Occupant Classification Module (OCM)
²Passenger Airbag ON/Off Indicator
²Seat Weight Bladder and Sensor
RSRESTRAINTS8O-7
RESTRAINTS (Continued)
Page 495 of 2339
WARNING: Never replace both the Occupant Restraint
Controller (ORC) and the Occupant Classification Mod-
ule (OCM) at the same time. If both require replace-
ment, replace one, then perform the Airbag System
test (Refer to 8 - ELECTRICAL/RESTRAINTS - DIAGNO-
SIS AND TESTING - AIRBAG SYSTEM) before replac-
ing the other. Both the ORC and the OCM store
Occupant Classification System (OCS) calibration
data, which they transfer to one another when one of
them is replaced. If both are replaced at the same
time, an irreversible fault will be set in both modules
and the OCS may malfunction and result in personal
injury or death.
Whether replaced or not, the OCS must be re-ze-
roed to make sure that the system in within proper
parameters to sense the occupants weight correctly.
WARNING: Do not connect the battery negative
cable (Refer to 8 - ELECTRICAL/RESTRAINTS -
DIAGNOSIS AND TESTING - AIRBAG SYSTEM). Per-
sonal injury or death may result if the system test
is not performed first.
WARNING: Following successful completion of the
Airbag System test procedure, the Occupant Classi-
fication System Verification Test must be done
using a scan tool and the appropriate diagnostic
information. Personal injury or death may result if
the system test is not performed.
SEAT BELTS AND TENSIONERS
After a frontal impact where an airbag has been
deployed due to a collision. the followingMUSTbe
replaced:
²Front Seat Belt Buckle (driver and passenger)
with integral Tensioners.
WARNING: Do not connect the battery negative
cable (Refer to 8 - ELECTRICAL/RESTRAINTS -
DIAGNOSIS AND TESTING - AIRBAG SYSTEM). Per-
sonal injury or death may result if the system test
is not performed first.
All other seat belts should be closely inspected for
cuts, tears, fraying, or damage in any way following
any frontal impact or airbag deployment. The other
seat belts are to be replaced when visible damage is
incurred. Inspect the Lower Anchors and Tether for
CHildren (LATCH) child restraint anchors for dam-
age after an impact event and replace as needed.
CLEAN UP PROCEDURE
Roll or fold the airbag towards its mounting point
(i.e. instrument panel, steering wheel, knee blocker,curtain, or seat back). Then tape the ripped cover
over the deployed airbag if applicable.
Use a vacuum cleaner to remove any residual pow-
der from the vehicle interior. Work from the outside
in to avoid kneeling or sitting in a contaminated
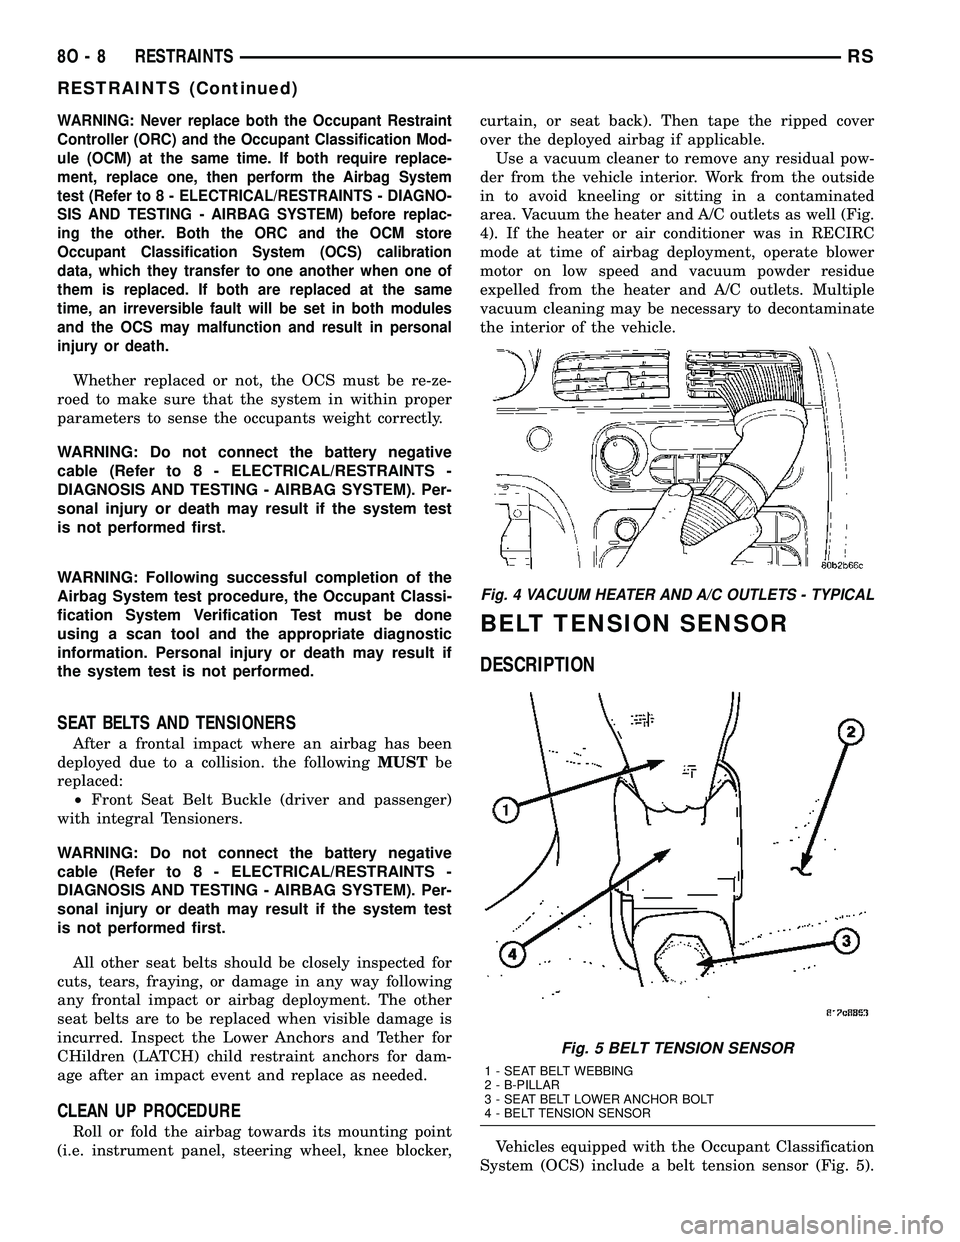
area. Vacuum the heater and A/C outlets as well (Fig.
4). If the heater or air conditioner was in RECIRC
mode at time of airbag deployment, operate blower
motor on low speed and vacuum powder residue
expelled from the heater and A/C outlets. Multiple
vacuum cleaning may be necessary to decontaminate
the interior of the vehicle.
BELT TENSION SENSOR
DESCRIPTION
Vehicles equipped with the Occupant Classification
System (OCS) include a belt tension sensor (Fig. 5).
Fig. 4 VACUUM HEATER AND A/C OUTLETS - TYPICAL
Fig. 5 BELT TENSION SENSOR
1 - SEAT BELT WEBBING
2 - B-PILLAR
3 - SEAT BELT LOWER ANCHOR BOLT
4 - BELT TENSION SENSOR
8O - 8 RESTRAINTSRS
RESTRAINTS (Continued)
Page 496 of 2339
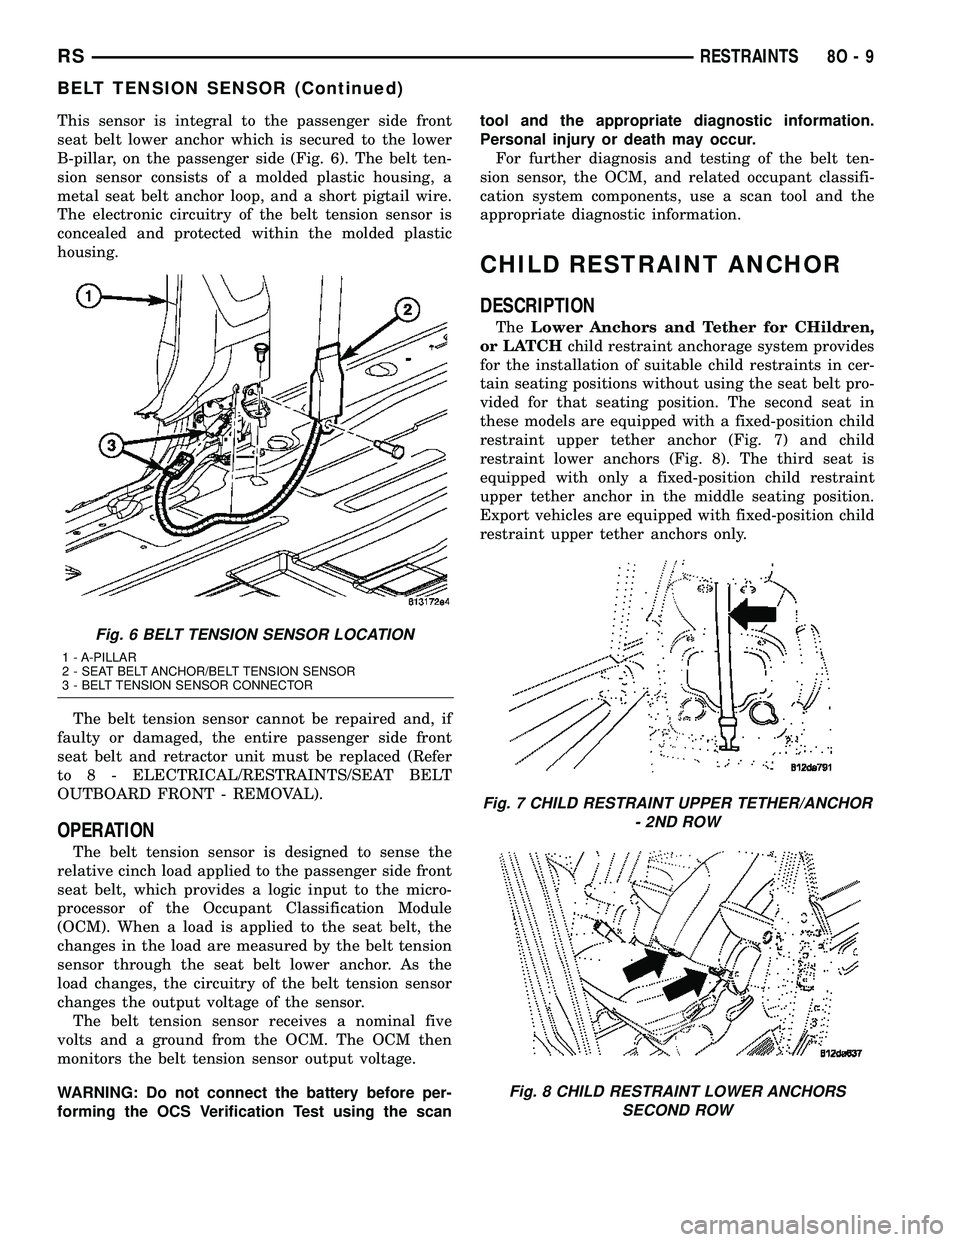
This sensor is integral to the passenger side front
seat belt lower anchor which is secured to the lower
B-pillar, on the passenger side (Fig. 6). The belt ten-
sion sensor consists of a molded plastic housing, a
metal seat belt anchor loop, and a short pigtail wire.
The electronic circuitry of the belt tension sensor is
concealed and protected within the molded plastic
housing.
The belt tension sensor cannot be repaired and, if
faulty or damaged, the entire passenger side front
seat belt and retractor unit must be replaced (Refer
to 8 - ELECTRICAL/RESTRAINTS/SEAT BELT
OUTBOARD FRONT - REMOVAL).
OPERATION
The belt tension sensor is designed to sense the
relative cinch load applied to the passenger side front
seat belt, which provides a logic input to the micro-
processor of the Occupant Classification Module
(OCM). When a load is applied to the seat belt, the
changes in the load are measured by the belt tension
sensor through the seat belt lower anchor. As the
load changes, the circuitry of the belt tension sensor
changes the output voltage of the sensor.
The belt tension sensor receives a nominal five
volts and a ground from the OCM. The OCM then
monitors the belt tension sensor output voltage.
WARNING: Do not connect the battery before per-
forming the OCS Verification Test using the scantool and the appropriate diagnostic information.
Personal injury or death may occur.
For further diagnosis and testing of the belt ten-
sion sensor, the OCM, and related occupant classifi-
cation system components, use a scan tool and the
appropriate diagnostic information.
CHILD RESTRAINT ANCHOR
DESCRIPTION
TheLower Anchors and Tether for CHildren,
or LATCHchild restraint anchorage system provides
for the installation of suitable child restraints in cer-
tain seating positions without using the seat belt pro-
vided for that seating position. The second seat in
these models are equipped with a fixed-position child
restraint upper tether anchor (Fig. 7) and child
restraint lower anchors (Fig. 8). The third seat is
equipped with only a fixed-position child restraint
upper tether anchor in the middle seating position.
Export vehicles are equipped with fixed-position child
restraint upper tether anchors only.
Fig. 6 BELT TENSION SENSOR LOCATION
1 - A-PILLAR
2 - SEAT BELT ANCHOR/BELT TENSION SENSOR
3 - BELT TENSION SENSOR CONNECTOR
Fig. 7 CHILD RESTRAINT UPPER TETHER/ANCHOR
- 2ND ROW
Fig. 8 CHILD RESTRAINT LOWER ANCHORS
SECOND ROW
RSRESTRAINTS8O-9
BELT TENSION SENSOR (Continued)
Page 497 of 2339
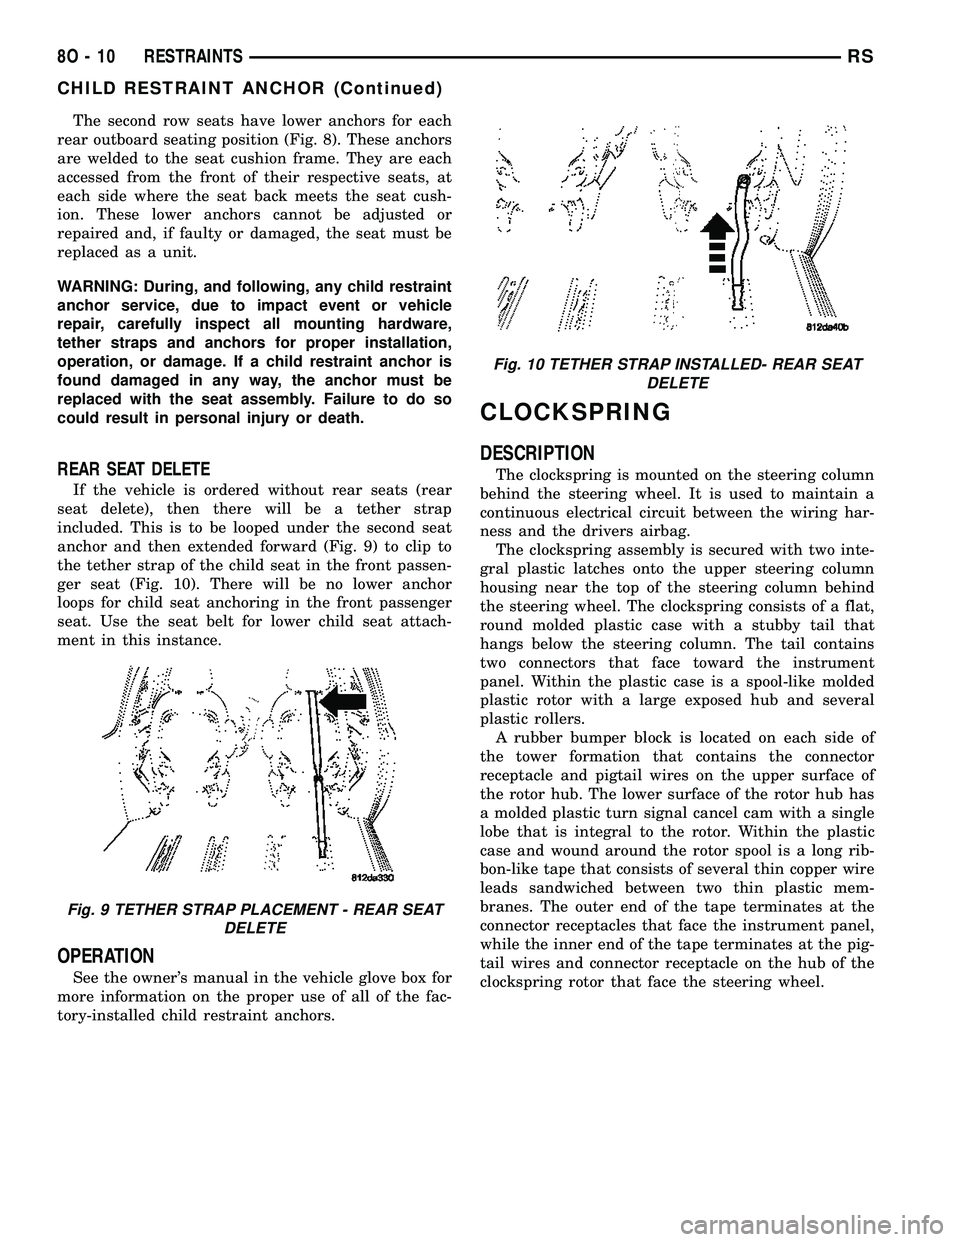
The second row seats have lower anchors for each
rear outboard seating position (Fig. 8). These anchors
are welded to the seat cushion frame. They are each
accessed from the front of their respective seats, at
each side where the seat back meets the seat cush-
ion. These lower anchors cannot be adjusted or
repaired and, if faulty or damaged, the seat must be
replaced as a unit.
WARNING: During, and following, any child restraint
anchor service, due to impact event or vehicle
repair, carefully inspect all mounting hardware,
tether straps and anchors for proper installation,
operation, or damage. If a child restraint anchor is
found damaged in any way, the anchor must be
replaced with the seat assembly. Failure to do so
could result in personal injury or death.
REAR SEAT DELETE
If the vehicle is ordered without rear seats (rear
seat delete), then there will be a tether strap
included. This is to be looped under the second seat
anchor and then extended forward (Fig. 9) to clip to
the tether strap of the child seat in the front passen-
ger seat (Fig. 10). There will be no lower anchor
loops for child seat anchoring in the front passenger
seat. Use the seat belt for lower child seat attach-
ment in this instance.
OPERATION
See the owner's manual in the vehicle glove box for
more information on the proper use of all of the fac-
tory-installed child restraint anchors.
CLOCKSPRING
DESCRIPTION
The clockspring is mounted on the steering column
behind the steering wheel. It is used to maintain a
continuous electrical circuit between the wiring har-
ness and the drivers airbag.
The clockspring assembly is secured with two inte-
gral plastic latches onto the upper steering column
housing near the top of the steering column behind
the steering wheel. The clockspring consists of a flat,
round molded plastic case with a stubby tail that
hangs below the steering column. The tail contains
two connectors that face toward the instrument
panel. Within the plastic case is a spool-like molded
plastic rotor with a large exposed hub and several
plastic rollers.
A rubber bumper block is located on each side of
the tower formation that contains the connector
receptacle and pigtail wires on the upper surface of
the rotor hub. The lower surface of the rotor hub has
a molded plastic turn signal cancel cam with a single
lobe that is integral to the rotor. Within the plastic
case and wound around the rotor spool is a long rib-
bon-like tape that consists of several thin copper wire
leads sandwiched between two thin plastic mem-
branes. The outer end of the tape terminates at the
connector receptacles that face the instrument panel,
while the inner end of the tape terminates at the pig-
tail wires and connector receptacle on the hub of the
clockspring rotor that face the steering wheel.
Fig. 9 TETHER STRAP PLACEMENT - REAR SEAT
DELETE
Fig. 10 TETHER STRAP INSTALLED- REAR SEAT
DELETE
8O - 10 RESTRAINTSRS
CHILD RESTRAINT ANCHOR (Continued)
Page 498 of 2339
Service replacement clocksprings are shipped pre-
centered and with a molded plastic shield that snaps
onto the rotor over the release button. The release
button secures the centered clockspring rotor to the
clockspring case and the shield prevents the release
button from being inadvertently depressed during
shipment and handling, but the shield must be
removed from the clockspring after it is installed on
the steering column (Refer to 8 - ELECTRICAL/RE-
STRAINTS/CLOCKSPRING - STANDARD PROCE-
DURE).
The clockspring cannot be repaired. If the clock-
spring is faulty, damaged, or if the driver airbag has
been deployed, the clockspring must be replaced.
OPERATION
The clockspring is a mechanical electrical circuit
component that is used to provide continuous electri-
cal continuity between the fixed instrument panel
wire harness and the electrical components mounted
on or in the rotating steering wheel. The rotating
electrical components include the driver airbag, the
horn switch, the speed control switches, and the
remote radio switches, if the vehicle is so equipped.
The clockspring case is positioned and secured to the
upper steering column housing near the top of the
steering column. The connector receptacles on the
tail of the clockspring case connect the clockspring to
the vehicle electrical system through two connectors
from the instrument panel wire harness.
The clockspring rotor is movable and is keyed by
the tower formation that is molded onto the upper
surface of the rotor hub to an opening that is cast
into the steering wheel armature. Rubber bumper
blocks on either side of the clockspring tower forma-
tion eliminate contact noise between the clockspring
tower and the steering wheel. The lobe of the turn
signal cancel cam on the lower surface of the clock-
spring rotor hub contacts a turn signal cancel actua-
tor of the multi-function switch to provide automatic
turn signal cancellation. The yellow or black-sleeved
pigtail wires on the upper surface of the clockspring
rotor connect the clockspring to the driver airbag,
while a steering wheel wire harness connects the
connector receptacle on the upper surface of the
clockspring rotor to the horn switch and, if the vehi-
cle is so equipped, to the optional speed control
switches and remote radio switches on the steering
wheel.
The clockspring tape has travel limits and can be
damaged by being wound too tightly during full stop-
to-stop steering wheel rotation. To prevent this from
occurring, the clockspring is centered when it is
installed on the steering column. Centering the clock-
spring indexes the clockspring tape to the movable
steering components so that the tape can operatewithin its designed travel limits. However, if the
clockspring is removed from the steering column or if
the steering shaft is disconnected from the steering
gear, the clockspring spool can change position rela-
tive to the movable steering components and must be
re-centered following completion of the service or the
tape may be damaged (Refer to 8 - ELECTRICAL/
RESTRAINTS/CLOCKSPRING - STANDARD PRO-
CEDURE).
Service replacement clocksprings are shipped pre-
centered and with a plastic shield installed over the
clockspring release button. This shield should not be
removed and the release button should not be
depressed until the clockspring has been installed on
the steering column. If the release button is
depressed before the clockspring is installed on a
steering column, the clockspring centering procedure
must be performed (Refer to 8 - ELECTRICAL/RE-
STRAINTS/CLOCKSPRING - STANDARD PROCE-
DURE).
STANDARD PROCEDURE - CLOCKSPRING
CENTERING
If the rotating tape (wire coil) in the clockspring is
not positioned properly with the steering wheel and
the front wheels, the clockspring may fail. The fol-
lowing procedure MUST BE USED to center the
clockspring if it is not known to be properly posi-
tioned, or if the front wheels were moved from the
straight ahead position.
(1) Position steering wheel and front wheels
straight ahead.
(2) Release hood latch and open hood.
(3) Disconnect and isolate the battery negative
cable.
(4) Wait two minutes for the system reserve capac-
itor to discharge before beginning any airbag compo-
nent service.
(5) Remove driver airbag from steering wheel
(Refer to 8 - ELECTRICAL/RESTRAINTS/DRIVER
AIRBAG - REMOVAL).
(6) Disconnect wire connectors from back of driver
airbag.
(7) Disconnect the 2±way connector from remote
radio control harness (if equipped).
(8) Disconnect the 4±way harness connector from
the speed control (if equipped)/horn harness to the
clockspring.
(9) Remove steering wheel (Refer to 19 - STEER-
ING/COLUMN/STEERING WHEEL - REMOVAL).
(10) Rotate the clockspring rotor clockwise until
the rotor stops. Do not apply excessive force.
(11) From the end of travel, rotate the rotor two
turns counterclockwise until the wires end up at the
top.
RSRESTRAINTS8O-11
CLOCKSPRING (Continued)
Page 499 of 2339
(12) Install the steering wheel (Refer to 19 -
STEERING/COLUMN/STEERING WHEEL -
INSTALLATION).
(13) Connect the 4±way harness connector to the
speed control/horn harness to the clockspring.
(14) Connect the 2±way connector to the remote
radio control harness.
(15) Install the driver airbag (Refer to 8 - ELEC-
TRICAL/RESTRAINTS/DRIVER AIRBAG - INSTAL-
LATION). Torque the two screws to 10 N´m (90 in.
lbs.).
WARNING: Do not connect the battery negative
cable (Refer to 8 - ELECTRICAL/RESTRAINTS -
DIAGNOSIS AND TESTING). Personal injury or
death may result if the system test is not performed
properly.
REMOVAL
(1) Position steering wheel and front wheels
straight ahead.
(2) Release hood latch and open hood.
(3) Disconnect and isolate the battery negative
cable.
(4)
WARNING: Wait two minutes for the airbag system
reserve capacitor to discharge before beginning
any airbag system or component service. Failure to
do so may result in accidental airbag deployment,
personal injury or death.
(5) Remove driver airbag from steering wheel
(Refer to 8 - ELECTRICAL/RESTRAINTS/DRIVER
AIRBAG - REMOVAL).
(6) Disconnect wire connectors from back of driver
airbag.
(7) Disconnect the 2±way connector from remote
radio control harness.
(8) Disconnect the 4±way harness connector from
the speed control/horn harness to the clockspring.
(9) Remove steering wheel (Refer to 19 - STEER-
ING/COLUMN/STEERING WHEEL - REMOVAL).
(10) Remove steering column shrouds and discon-
nect traction control wire connector (if equipped)
(Refer to 19 - STEERING/COLUMN/LOWER
SHROUD - REMOVAL).
(11) Disconnect 4-way and 6-way connectors
between the clockspring and the instrument panel
wiring harness.
(12) Remove clockspring from column assembly by
removing the two retaining screws that attach the
clock spring to the column.
INSTALLATION
(1) Install the clockspring on the column.
(2) Connect the 4-way and 6-way connectors
between the clockspring and the instrument panel
wiring harness.
(3) Install the steering column shrouds and con-
nect traction control wire connector (if equipped)
(Refer to 19 - STEERING/COLUMN/LOWER
SHROUD - INSTALLATION).
(4) Install the steering wheel (Refer to 19 -
STEERING/COLUMN/STEERING WHEEL -
INSTALLATION).
(5) Connect the 4±way harness connector to the
speed control/horn harness to the clockspring.
(6) Connect the 2±way connector to the remote
radio control harness (if equipped).
(7) Install the driver airbag (Refer to 8 - ELEC-
TRICAL/RESTRAINTS/DRIVER AIRBAG - INSTAL-
LATION). Torque the two screws to 10 N´m (90 in.
lbs.).
WARNING: Do not connect the battery negative
cable (Refer to 8 - ELECTRICAL/RESTRAINTS -
DIAGNOSIS AND TESTING - AIRBAG SYSTEM). Per-
sonal injury or death may result if the system test
is not performed first.
CURTAIN AIRBAG
DESCRIPTION
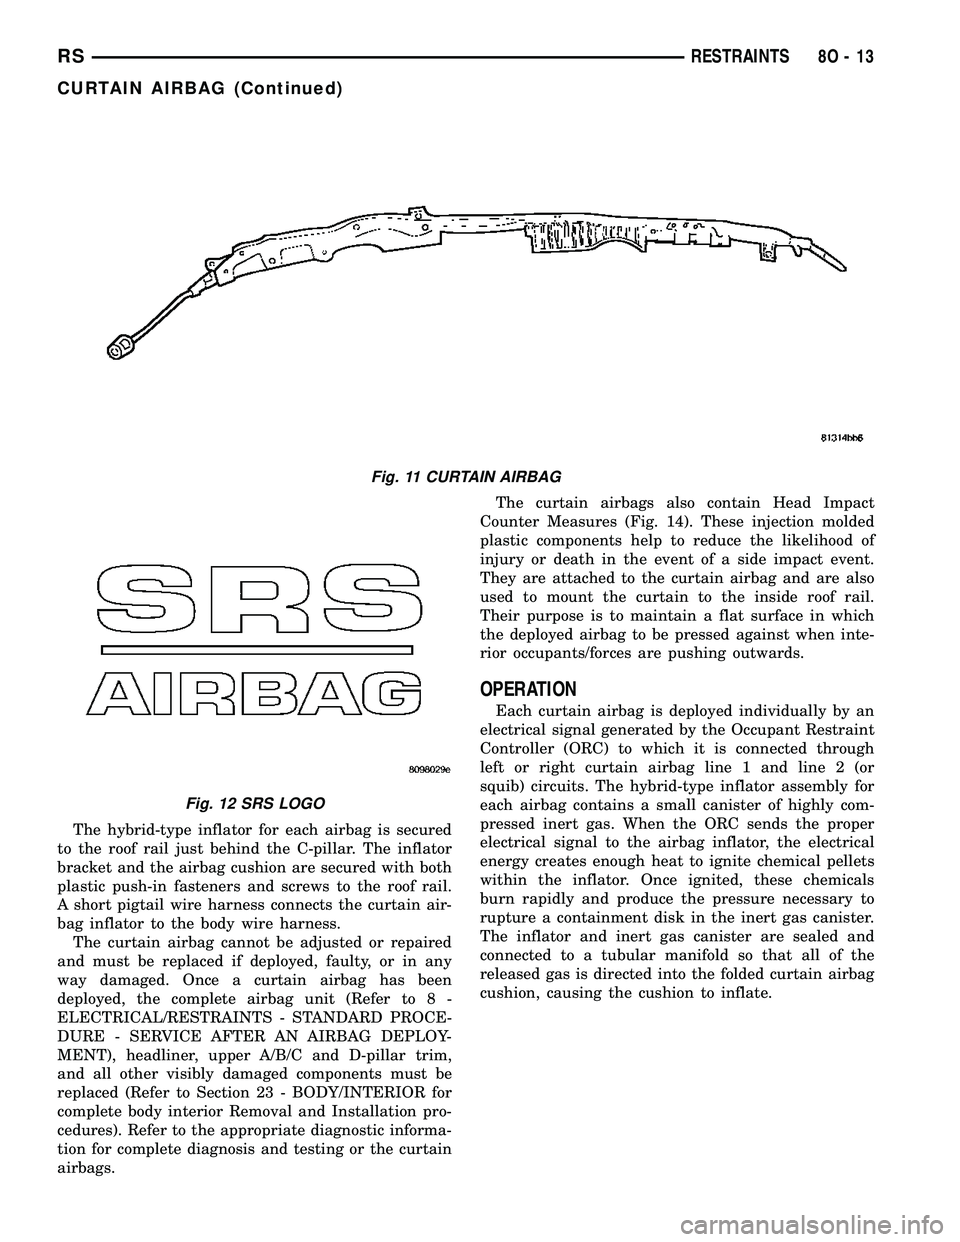
Curtain Airbags (Fig. 11) are available when it is
also equipped with dual front airbags. These airbags
are passive and inflatable, Supplemental Restraint
System (SRS) components, and vehicles with this
equipment can be readily identified by a molded
identification trim button with the ªSRS - AIRBAGº
logo (Fig. 12) located on the B-pillar and C-pillar
upper trim panels. This system is designed to reduce
injuries to the vehicle occupants in the event of a
side impact collision.
Curtain airbags have two individually controlled
curtain airbag units. These airbag units are con-
cealed and mounted above the headliner where they
are each secured to one of the roof side rails (Fig.
13). Each airbag cushion is contained within a fabric
wrap that extends along the roof rail from the A-pil-
lar at the front of the vehicle to just behind the
D-pillar at the rear of the vehicle. One tether extends
down the A-pillar from the front of the airbag cush-
ion, and a second tether extends to the roof rail at
the D-pillar. The end of the A-pillar tether is secured
to a slot in the sheet metal with a metal hook
retained by a bolt. The D-pillar tether is attached to
the d-pillar.
8O - 12 RESTRAINTSRS
CLOCKSPRING (Continued)
Page 500 of 2339
The hybrid-type inflator for each airbag is secured
to the roof rail just behind the C-pillar. The inflator
bracket and the airbag cushion are secured with both
plastic push-in fasteners and screws to the roof rail.
A short pigtail wire harness connects the curtain air-
bag inflator to the body wire harness.
The curtain airbag cannot be adjusted or repaired
and must be replaced if deployed, faulty, or in any
way damaged. Once a curtain airbag has been
deployed, the complete airbag unit (Refer to 8 -
ELECTRICAL/RESTRAINTS - STANDARD PROCE-
DURE - SERVICE AFTER AN AIRBAG DEPLOY-
MENT), headliner, upper A/B/C and D-pillar trim,
and all other visibly damaged components must be
replaced (Refer to Section 23 - BODY/INTERIOR for
complete body interior Removal and Installation pro-
cedures). Refer to the appropriate diagnostic informa-
tion for complete diagnosis and testing or the curtain
airbags.The curtain airbags also contain Head Impact
Counter Measures (Fig. 14). These injection molded
plastic components help to reduce the likelihood of
injury or death in the event of a side impact event.
They are attached to the curtain airbag and are also
used to mount the curtain to the inside roof rail.
Their purpose is to maintain a flat surface in which
the deployed airbag to be pressed against when inte-
rior occupants/forces are pushing outwards.
OPERATION
Each curtain airbag is deployed individually by an
electrical signal generated by the Occupant Restraint
Controller (ORC) to which it is connected through
left or right curtain airbag line 1 and line 2 (or
squib) circuits. The hybrid-type inflator assembly for
each airbag contains a small canister of highly com-
pressed inert gas. When the ORC sends the proper
electrical signal to the airbag inflator, the electrical
energy creates enough heat to ignite chemical pellets
within the inflator. Once ignited, these chemicals
burn rapidly and produce the pressure necessary to
rupture a containment disk in the inert gas canister.
The inflator and inert gas canister are sealed and
connected to a tubular manifold so that all of the
released gas is directed into the folded curtain airbag
cushion, causing the cushion to inflate.
Fig. 11 CURTAIN AIRBAG
Fig. 12 SRS LOGO
RSRESTRAINTS8O-13
CURTAIN AIRBAG (Continued)