Frame CHRYSLER VOYAGER 2005 Service Manual
[x] Cancel search | Manufacturer: CHRYSLER, Model Year: 2005, Model line: VOYAGER, Model: CHRYSLER VOYAGER 2005Pages: 2339, PDF Size: 59.69 MB
Page 1 of 2339
GROUP TAB LOCATOR
Introduction
0Lubrication & Maintenance
2Suspension
3Differential & Driveline
5Brakes
7Cooling
8AAudio
8BChime/Buzzer
8EElectronic Control Modules
8FEngine Systems
8GHeated Systems
8HHorn
8IIgnition Control
8JInstrument Cluster
8LLamps
8MMessage Systems
8NPower Systems
8ORestraints
8PSpeed Control
8QVehicle Theft Security
8RWipers/Washers
8TNavigation/Telecommunication
8WWiring
9Engine
11Exhaust System
13Frame & Bumpers
14Fuel System
19Steering
21Transmission/Transaxle
22Tires/Wheels
23Body
24Heating & Air Conditioning
25Emissions Control
Component and System Index
Service Manual Comment Forms (Rear of Manual)
Page 38 of 2339
JUMP STARTING
STANDARD PROCEDURE - JUMP STARTING
WARNING: REVIEW ALL SAFETY PRECAUTIONS
AND WARNINGS. (Refer to 8 - ELECTRICAL/BAT-
TERY SYSTEM/BATTERY - STANDARD PROCE-
DURE).
WARNING: DO NOT JUMP START A FROZEN BAT-
TERY, PERSONAL INJURY CAN RESULT.
WARNING: DO NOT JUMP START WHEN MAINTE-
NANCE FREE BATTERY INDICATOR DOT IS BRIGHT
COLOR.
WARNING: DO NOT ALLOW JUMPER CABLE
CLAMPS TO TOUCH EACH OTHER WHEN CON-
NECTED TO A BOOSTER SOURCE.
WARNING: DO NOT USE OPEN FLAME NEAR BAT-
TERYWARNING: REMOVE METALLIC JEWELRY WORN
ON HANDS OR WRISTS TO AVOID INJURY BY
ACCIDENTAL ARCING OF BATTERY CURRENT.
WARNING: WHEN USING A HIGH OUTPUT BOOST-
ING DEVICE, DO NOT ALLOW BATTERY VOLTAGE
TO EXCEED 16 VOLTS.
WARNING: REFER TO INSTRUCTIONS PROVIDED
WITH DEVICE BEING USED.
CAUTION: DO NOT ATTEMPT TO PUSH OR TOW
THE VEHICLE TO START IT. THE VEHICLE CANNOT
BE STARTED THIS WAY. PUSHING WITH ANOTHER
VEHICLE MAY DAMAGE THE TRANSAXLE OR THE
REAR OF THE VEHICLE.
(1) Raise hood on disabled vehicle and visually
inspect engine compartment for:
²Battery cable clamp condition, clean if necessary.
²Frozen battery.
²Clear or bright color test indicator, if equipped.
²Generator drive belt condition and tension.
²Fuel fumes or leakage, correct if necessary.
CAUTION: If the cause of starting problem on dis-
abled vehicle is severe, damage to booster vehicle
charging system can result.
(2) When using another vehicle as a booster
source, park the booster vehicle within cable reach.
Turn off all accessories, set the parking brake, place
the automatic transmission in PARK or the manual
transmission in NEUTRAL and turn the ignition
OFF.
(3) On disabled vehicle, place gear selector in park
or neutral and set park brake. Turn off all accesso-
ries.
(4) Connect jumper cables to booster battery. RED
clamp to positive terminal (+). BLACK clamp to neg-
ative terminal (-). DO NOT allow clamps at opposite
end of cables to touch, electrical arc will result.
Review all warnings in this procedure.
(5) On disabled vehicle, connect RED jumper cable
clamp to positive (+) terminal. Connect BLACK
jumper cable clamp to engine ground as close to the
ground cable attaching point as possible (Fig. 6).
(Refer to 8 - ELECTRICAL/BATTERY SYSTEM/BAT-
TERY - STANDARD PROCEDURE).
(6) Start the engine in the vehicle which has the
booster battery, let the engine idle a few minutes,
then start the engine in the vehicle with the dis-
charged battery.
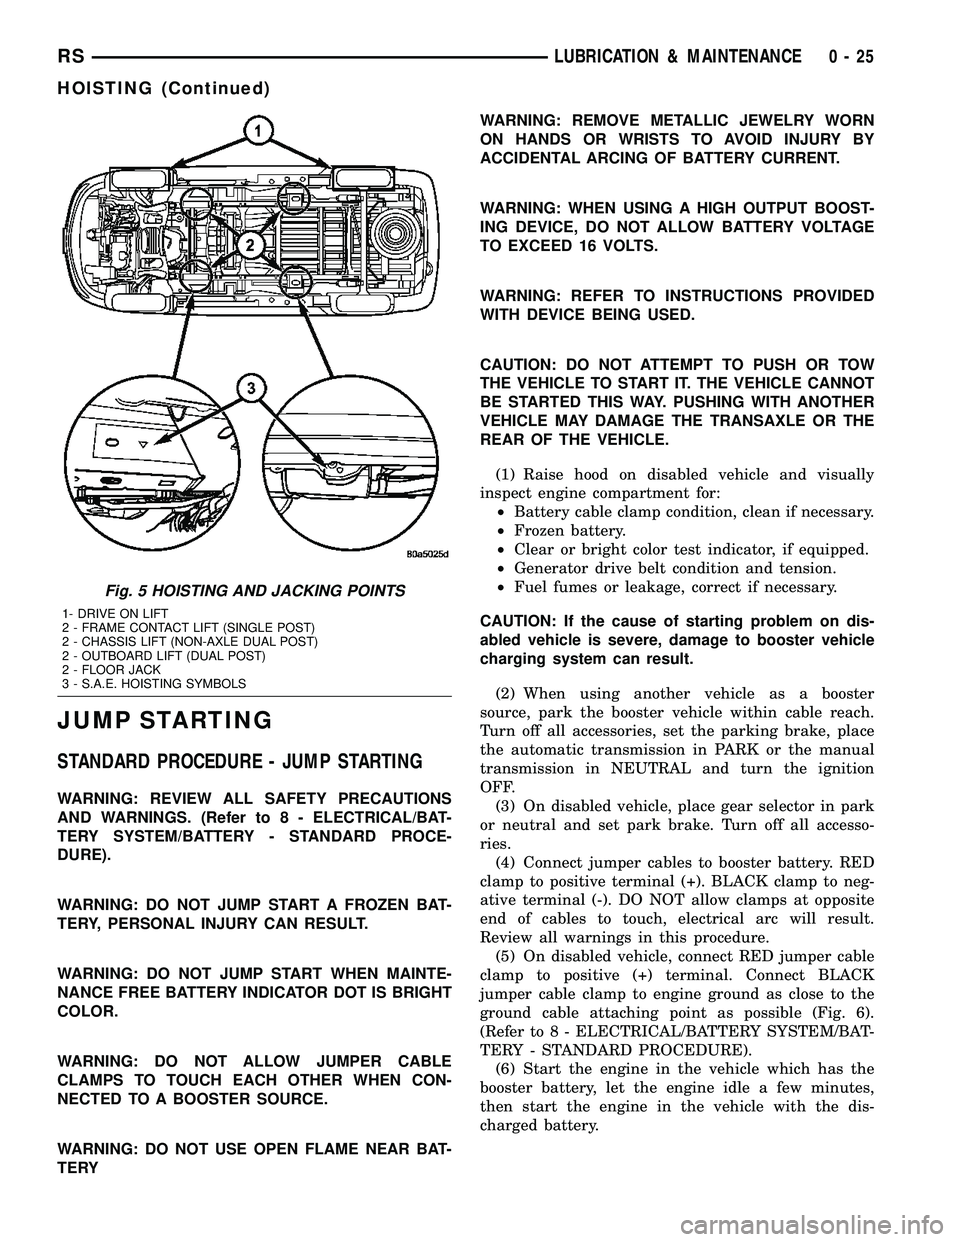
Fig. 5 HOISTING AND JACKING POINTS
1- DRIVE ON LIFT
2 - FRAME CONTACT LIFT (SINGLE POST)
2 - CHASSIS LIFT (NON-AXLE DUAL POST)
2 - OUTBOARD LIFT (DUAL POST)
2 - FLOOR JACK
3 - S.A.E. HOISTING SYMBOLS
RSLUBRICATION & MAINTENANCE0-25
HOISTING (Continued)
Page 69 of 2339
SPECIFICATIONS
REAR SUSPENSION FASTENER TORQUE
DESCRIPTION N´mFt.
Lbs.In.
Lbs.
Hub And Bearing Mounting
Bolts129 95 Ð
Hub And Bearing Axle Hub
Nut244 180 Ð
Jounce Bumper Mounting
Bolt33 24 290
Leaf Spring Front Mount-To-
Body Bolts61 45 Ð
Leaf Spring Front Pivot Bolt 156 115 Ð
Leaf Spring Plate-To-Axle
Bolts95 70 Ð
Leaf Spring Rear Mount-To-
Body Bolts61 45 Ð
Leaf Spring Shackle Plate
Nuts61 45 Ð
Shock Absorber Mounting
Bolts88 65 Ð
Stabilizer Bar Bushing
Retainer Bolts61 45 Ð
Stabilizer Bar Link Nuts 61 45 Ð
Stabilizer Bar Link Frame
Bracket Mounting Bolts61 45 Ð
Track Bar Bracket-To-Body
Mount Bolts61 45 Ð
Track Bar Pivot Bolts 95 70 Ð
Wheel Mounting (Lug) Nut 135 100 Ð
SPECIAL TOOLS
REAR SUSPENSION
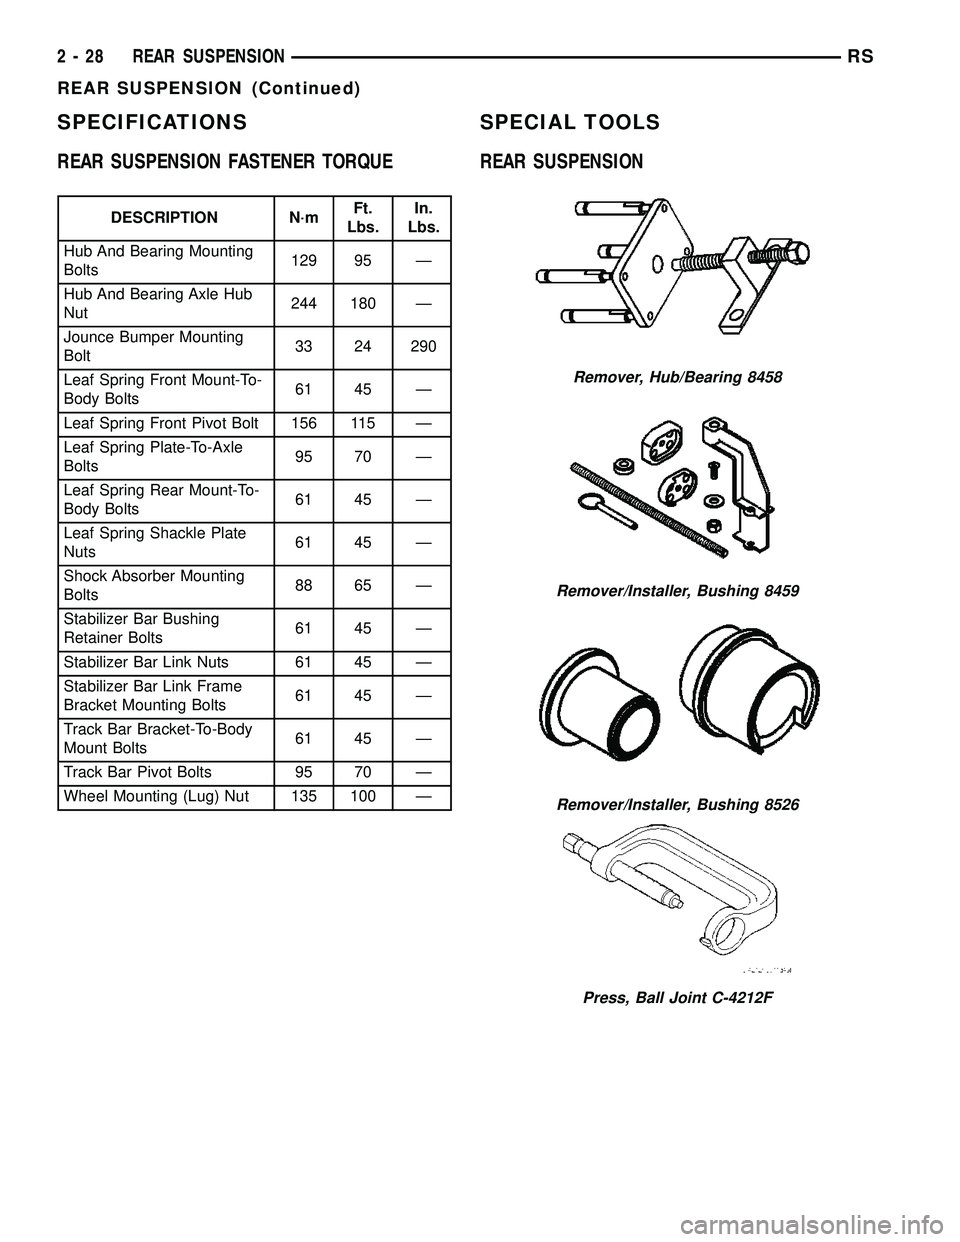
Remover, Hub/Bearing 8458
Remover/Installer, Bushing 8459
Remover/Installer, Bushing 8526
Press, Ball Joint C-4212F
2 - 28 REAR SUSPENSIONRS
REAR SUSPENSION (Continued)
Page 70 of 2339
BUSHING - LEAF SPRING
FRONT
REMOVAL
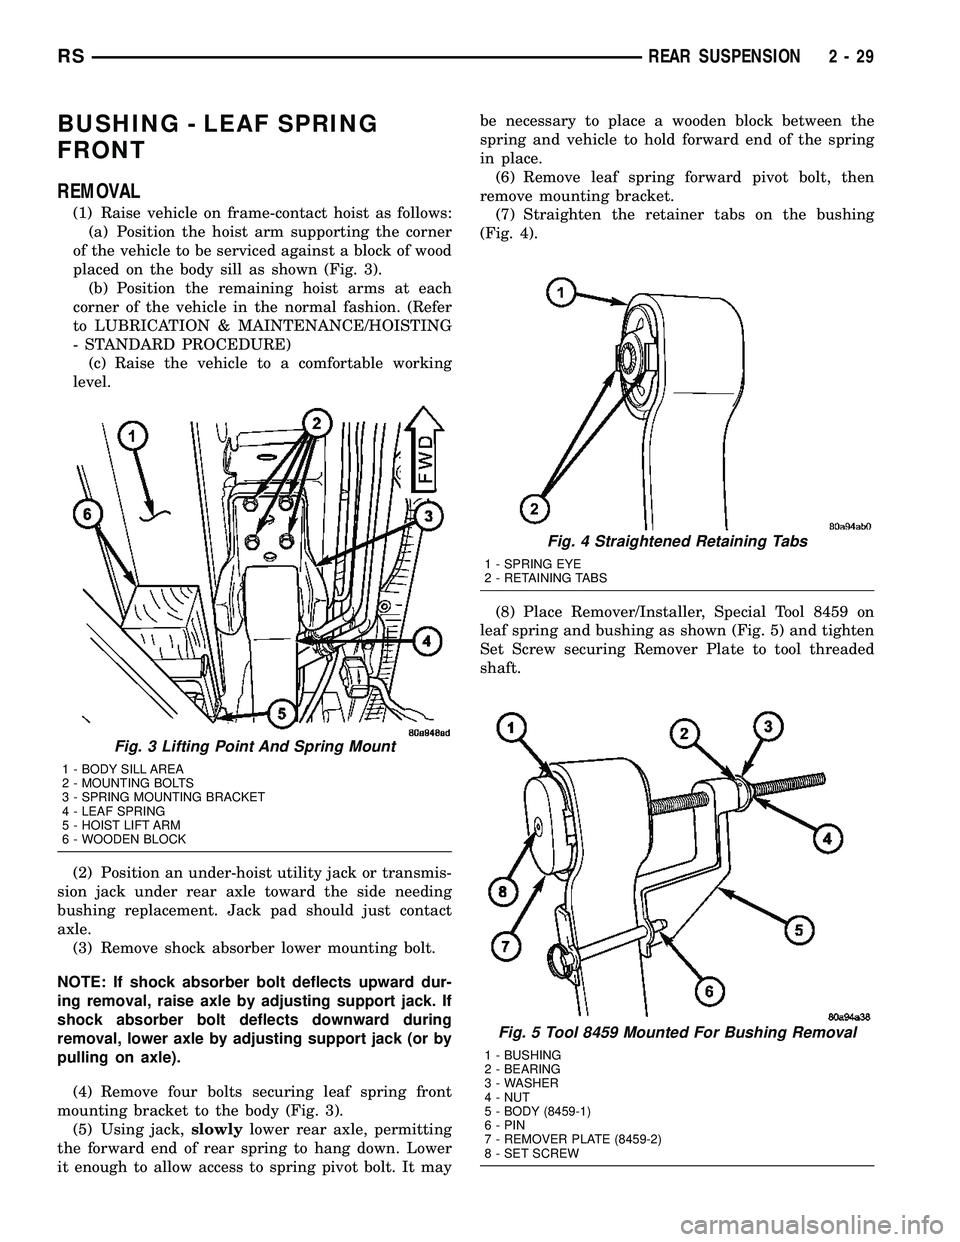
(1) Raise vehicle on frame-contact hoist as follows:
(a) Position the hoist arm supporting the corner
of the vehicle to be serviced against a block of wood
placed on the body sill as shown (Fig. 3).
(b) Position the remaining hoist arms at each
corner of the vehicle in the normal fashion. (Refer
to LUBRICATION & MAINTENANCE/HOISTING
- STANDARD PROCEDURE)
(c) Raise the vehicle to a comfortable working
level.
(2) Position an under-hoist utility jack or transmis-
sion jack under rear axle toward the side needing
bushing replacement. Jack pad should just contact
axle.
(3) Remove shock absorber lower mounting bolt.
NOTE: If shock absorber bolt deflects upward dur-
ing removal, raise axle by adjusting support jack. If
shock absorber bolt deflects downward during
removal, lower axle by adjusting support jack (or by
pulling on axle).
(4) Remove four bolts securing leaf spring front
mounting bracket to the body (Fig. 3).
(5) Using jack,slowlylower rear axle, permitting
the forward end of rear spring to hang down. Lower
it enough to allow access to spring pivot bolt. It maybe necessary to place a wooden block between the
spring and vehicle to hold forward end of the spring
in place.
(6) Remove leaf spring forward pivot bolt, then
remove mounting bracket.
(7) Straighten the retainer tabs on the bushing
(Fig. 4).
(8) Place Remover/Installer, Special Tool 8459 on
leaf spring and bushing as shown (Fig. 5) and tighten
Set Screw securing Remover Plate to tool threaded
shaft.
Fig. 3 Lifting Point And Spring Mount
1 - BODY SILL AREA
2 - MOUNTING BOLTS
3 - SPRING MOUNTING BRACKET
4 - LEAF SPRING
5 - HOIST LIFT ARM
6 - WOODEN BLOCK
Fig. 4 Straightened Retaining Tabs
1 - SPRING EYE
2 - RETAINING TABS
Fig. 5 Tool 8459 Mounted For Bushing Removal
1 - BUSHING
2 - BEARING
3 - WASHER
4 - NUT
5 - BODY (8459-1)
6 - PIN
7 - REMOVER PLATE (8459-2)
8 - SET SCREW
RSREAR SUSPENSION2-29
Page 76 of 2339
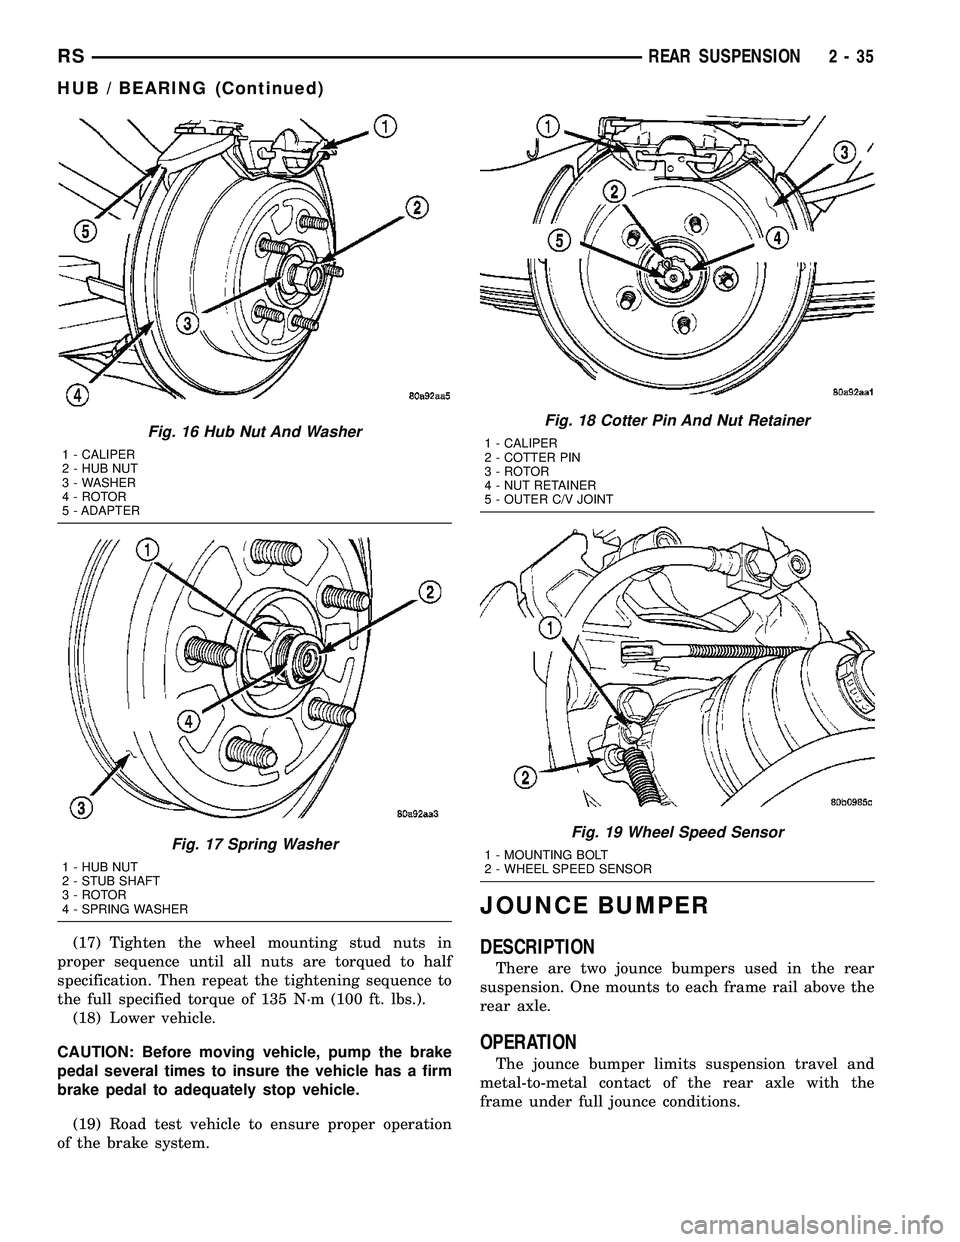
(17) Tighten the wheel mounting stud nuts in
proper sequence until all nuts are torqued to half
specification. Then repeat the tightening sequence to
the full specified torque of 135 N´m (100 ft. lbs.).
(18) Lower vehicle.
CAUTION: Before moving vehicle, pump the brake
pedal several times to insure the vehicle has a firm
brake pedal to adequately stop vehicle.
(19) Road test vehicle to ensure proper operation
of the brake system.
JOUNCE BUMPER
DESCRIPTION
There are two jounce bumpers used in the rear
suspension. One mounts to each frame rail above the
rear axle.
OPERATION
The jounce bumper limits suspension travel and
metal-to-metal contact of the rear axle with the
frame under full jounce conditions.
Fig. 16 Hub Nut And Washer
1 - CALIPER
2 - HUB NUT
3 - WASHER
4 - ROTOR
5 - ADAPTER
Fig. 17 Spring Washer
1 - HUB NUT
2 - STUB SHAFT
3 - ROTOR
4 - SPRING WASHER
Fig. 18 Cotter Pin And Nut Retainer
1 - CALIPER
2 - COTTER PIN
3 - ROTOR
4 - NUT RETAINER
5 - OUTER C/V JOINT
Fig. 19 Wheel Speed Sensor
1 - MOUNTING BOLT
2 - WHEEL SPEED SENSOR
RSREAR SUSPENSION2-35
HUB / BEARING (Continued)
Page 77 of 2339
REMOVAL
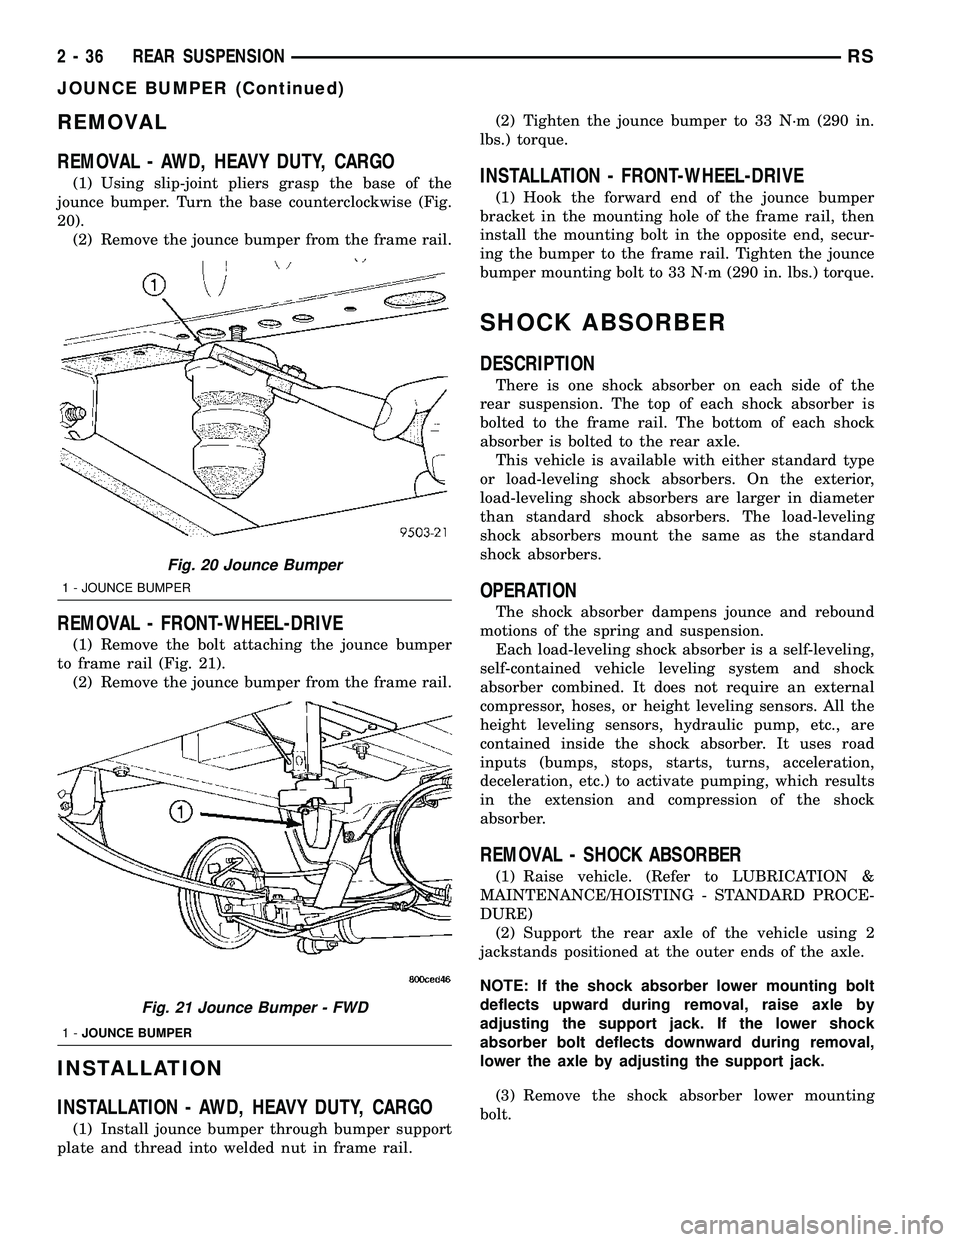
REMOVAL - AWD, HEAVY DUTY, CARGO
(1) Using slip-joint pliers grasp the base of the
jounce bumper. Turn the base counterclockwise (Fig.
20).
(2) Remove the jounce bumper from the frame rail.
REMOVAL - FRONT-WHEEL-DRIVE
(1) Remove the bolt attaching the jounce bumper
to frame rail (Fig. 21).
(2) Remove the jounce bumper from the frame rail.
INSTALLATION
INSTALLATION - AWD, HEAVY DUTY, CARGO
(1) Install jounce bumper through bumper support
plate and thread into welded nut in frame rail.(2) Tighten the jounce bumper to 33 N´m (290 in.
lbs.) torque.
INSTALLATION - FRONT-WHEEL-DRIVE
(1) Hook the forward end of the jounce bumper
bracket in the mounting hole of the frame rail, then
install the mounting bolt in the opposite end, secur-
ing the bumper to the frame rail. Tighten the jounce
bumper mounting bolt to 33 N´m (290 in. lbs.) torque.
SHOCK ABSORBER
DESCRIPTION
There is one shock absorber on each side of the
rear suspension. The top of each shock absorber is
bolted to the frame rail. The bottom of each shock
absorber is bolted to the rear axle.
This vehicle is available with either standard type
or load-leveling shock absorbers. On the exterior,
load-leveling shock absorbers are larger in diameter
than standard shock absorbers. The load-leveling
shock absorbers mount the same as the standard
shock absorbers.
OPERATION
The shock absorber dampens jounce and rebound
motions of the spring and suspension.
Each load-leveling shock absorber is a self-leveling,
self-contained vehicle leveling system and shock
absorber combined. It does not require an external
compressor, hoses, or height leveling sensors. All the
height leveling sensors, hydraulic pump, etc., are
contained inside the shock absorber. It uses road
inputs (bumps, stops, starts, turns, acceleration,
deceleration, etc.) to activate pumping, which results
in the extension and compression of the shock
absorber.
REMOVAL - SHOCK ABSORBER
(1) Raise vehicle. (Refer to LUBRICATION &
MAINTENANCE/HOISTING - STANDARD PROCE-
DURE)
(2) Support the rear axle of the vehicle using 2
jackstands positioned at the outer ends of the axle.
NOTE: If the shock absorber lower mounting bolt
deflects upward during removal, raise axle by
adjusting the support jack. If the lower shock
absorber bolt deflects downward during removal,
lower the axle by adjusting the support jack.
(3) Remove the shock absorber lower mounting
bolt.
Fig. 20 Jounce Bumper
1 - JOUNCE BUMPER
Fig. 21 Jounce Bumper - FWD
1-JOUNCE BUMPER
2 - 36 REAR SUSPENSIONRS
JOUNCE BUMPER (Continued)
Page 79 of 2339
(6) Install the shock absorber on the vehicle. Refer
to REMOVAL AND INSTALLATION in this section
for the procedure.
INSTALLATION - SHOCK ABSORBER
(1) While holding shock absorber in position
against the frame rail, install the shock absorber
upper mounting bolt.
(2) Install the shock absorber lower mounting bolt
securing the lower end of the shock absorber to the
axle.
(3) Remove the support jack.
(4) Lower the vehicle to the ground so the full curb
weight of the vehicle is supported by the suspension.
(5) Tighten the upper and lower shock absorber
mounting bolt to a torque of 88 N´m (65 ft. lbs.).
SPRING - AWD
REMOVAL
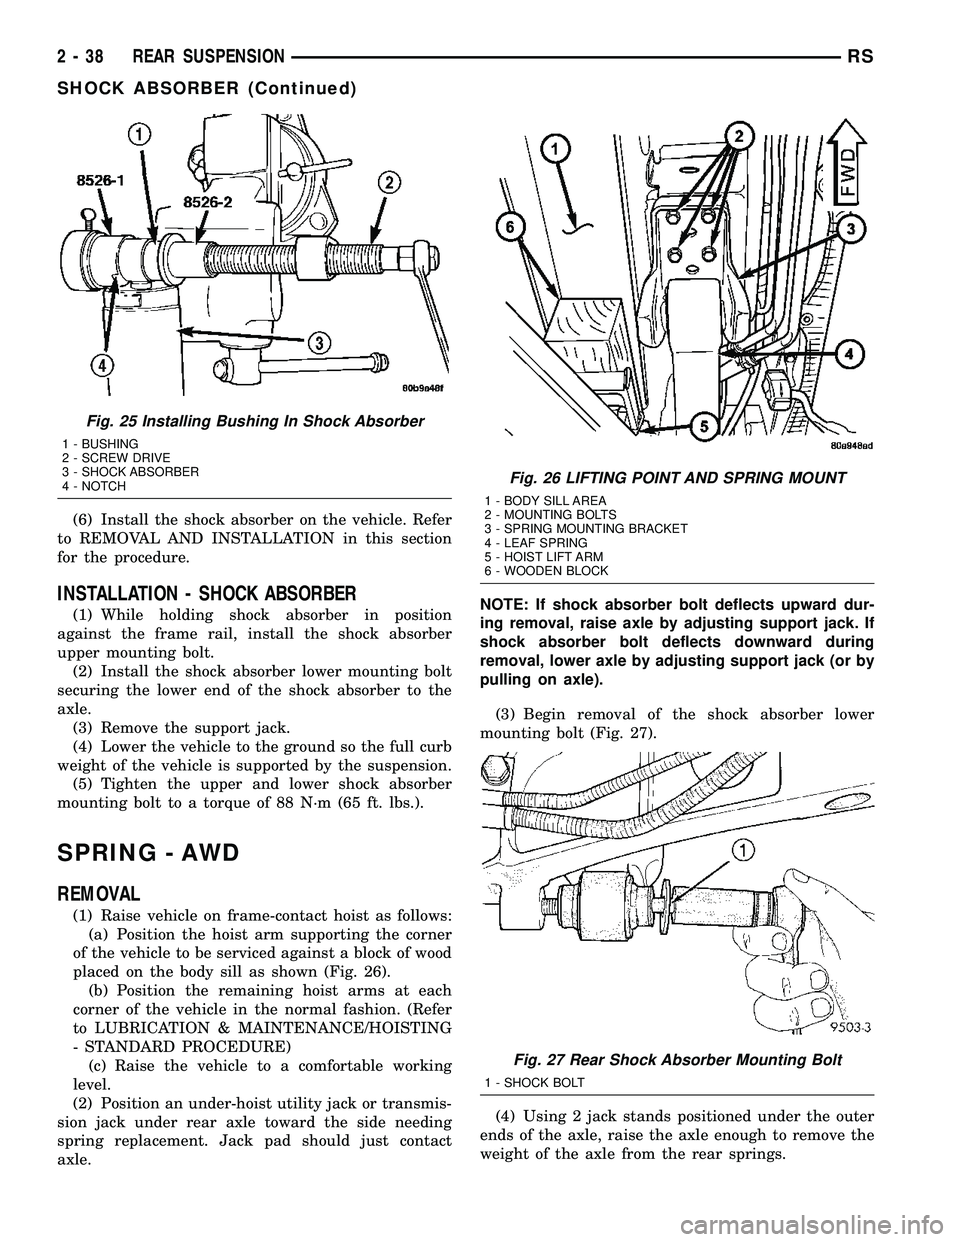
(1) Raise vehicle on frame-contact hoist as follows:
(a) Position the hoist arm supporting the corner
of the vehicle to be serviced against a block of wood
placed on the body sill as shown (Fig. 26).
(b) Position the remaining hoist arms at each
corner of the vehicle in the normal fashion. (Refer
to LUBRICATION & MAINTENANCE/HOISTING
- STANDARD PROCEDURE)
(c) Raise the vehicle to a comfortable working
level.
(2) Position an under-hoist utility jack or transmis-
sion jack under rear axle toward the side needing
spring replacement. Jack pad should just contact
axle.NOTE: If shock absorber bolt deflects upward dur-
ing removal, raise axle by adjusting support jack. If
shock absorber bolt deflects downward during
removal, lower axle by adjusting support jack (or by
pulling on axle).
(3) Begin removal of the shock absorber lower
mounting bolt (Fig. 27).
(4) Using 2 jack stands positioned under the outer
ends of the axle, raise the axle enough to remove the
weight of the axle from the rear springs.
Fig. 25 Installing Bushing In Shock Absorber
1 - BUSHING
2 - SCREW DRIVE
3 - SHOCK ABSORBER
4 - NOTCH
Fig. 26 LIFTING POINT AND SPRING MOUNT
1 - BODY SILL AREA
2 - MOUNTING BOLTS
3 - SPRING MOUNTING BRACKET
4 - LEAF SPRING
5 - HOIST LIFT ARM
6 - WOODEN BLOCK
Fig. 27 Rear Shock Absorber Mounting Bolt
1 - SHOCK BOLT
2 - 38 REAR SUSPENSIONRS
SHOCK ABSORBER (Continued)
Page 81 of 2339
CAUTION: The following sequence must be fol-
lowed when tightening the pin nuts on the rear
hanger for the rear leaf spring. First the hanger pin
nuts must be tightened to the specified torque
shown below. Then tighten the retaining bolts for
the inner to outer half of the spring hanger to the
torque specification listed below. This sequence
must be followed to properly seat the bushings into
the springs and to avoid bending the spring hanger.
(8) Tighten the spring front pivot bolt to 156 N´m
(115 ft. lbs.) torque.
(9) Tighten rear spring shackle pin nuts to 61 N´m
(45 ft. lbs.) torque.
(10) Tighten rear spring shackle inner to outer
half retaining bolts to 61 N´m (45 ft. lbs.) torque.
(11) Tighten the lower shock absorber mounting
bolt to 102 N´m (75 ft. lbs.) torque.
SPRING - CARGO
REMOVAL
(1) Raise vehicle on frame-contact hoist as follows:
(a) Position the hoist arm supporting the corner
of the vehicle to be serviced against a block of wood
placed on the body sill as shown (Fig. 26).
(b) Position the remaining hoist arms at each
corner of the vehicle in the normal fashion. (Refer
to LUBRICATION & MAINTENANCE/HOISTING
- STANDARD PROCEDURE)
(c) Raise the vehicle to a comfortable working
level.
(2) Position an under-hoist utility jack or transmis-
sion jack under rear axle toward the side needing
spring replacement. Jack pad should just contact
axle.
NOTE: If shock absorber bolt deflects upward dur-
ing removal, raise axle by adjusting support jack. If
shock absorber bolt deflects downward during
removal, lower axle by adjusting support jack (or by
pulling on axle).
(3) Begin removal of the shock absorber lower
mounting bolt (Fig. 27).
(4) Using 2 jack stands positioned under the outer
ends of the axle, raise the axle enough to remove the
weight of the axle from the rear springs.
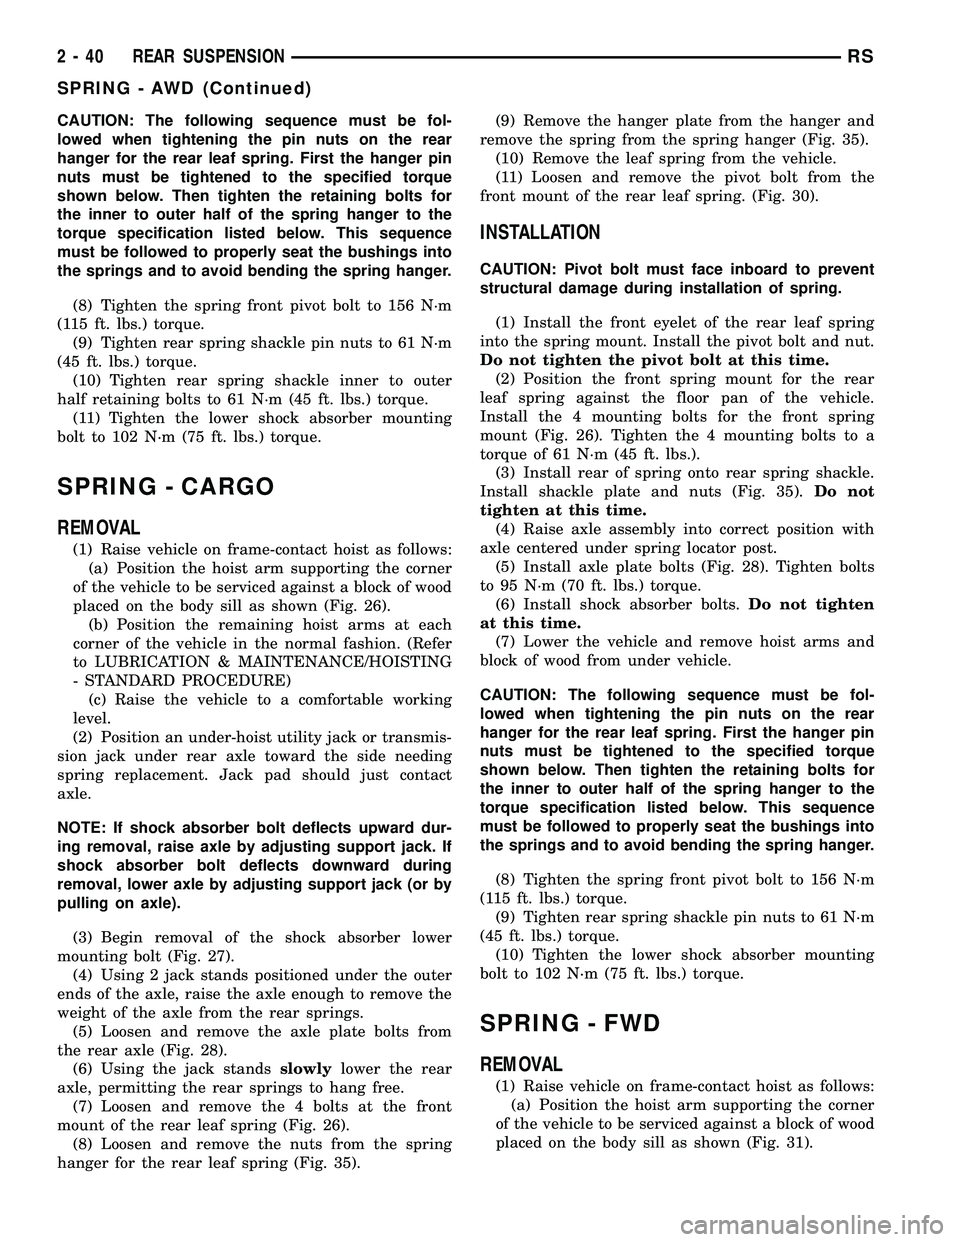
(5) Loosen and remove the axle plate bolts from
the rear axle (Fig. 28).
(6) Using the jack standsslowlylower the rear
axle, permitting the rear springs to hang free.
(7) Loosen and remove the 4 bolts at the front
mount of the rear leaf spring (Fig. 26).
(8) Loosen and remove the nuts from the spring
hanger for the rear leaf spring (Fig. 35).(9) Remove the hanger plate from the hanger and
remove the spring from the spring hanger (Fig. 35).
(10) Remove the leaf spring from the vehicle.
(11) Loosen and remove the pivot bolt from the
front mount of the rear leaf spring. (Fig. 30).
INSTALLATION
CAUTION: Pivot bolt must face inboard to prevent
structural damage during installation of spring.
(1) Install the front eyelet of the rear leaf spring
into the spring mount. Install the pivot bolt and nut.
Do not tighten the pivot bolt at this time.
(2) Position the front spring mount for the rear
leaf spring against the floor pan of the vehicle.
Install the 4 mounting bolts for the front spring
mount (Fig. 26). Tighten the 4 mounting bolts to a
torque of 61 N´m (45 ft. lbs.).
(3) Install rear of spring onto rear spring shackle.
Install shackle plate and nuts (Fig. 35).Do not
tighten at this time.
(4) Raise axle assembly into correct position with
axle centered under spring locator post.
(5) Install axle plate bolts (Fig. 28). Tighten bolts
to 95 N´m (70 ft. lbs.) torque.
(6) Install shock absorber bolts.Do not tighten
at this time.
(7) Lower the vehicle and remove hoist arms and
block of wood from under vehicle.
CAUTION: The following sequence must be fol-
lowed when tightening the pin nuts on the rear
hanger for the rear leaf spring. First the hanger pin
nuts must be tightened to the specified torque
shown below. Then tighten the retaining bolts for
the inner to outer half of the spring hanger to the
torque specification listed below. This sequence
must be followed to properly seat the bushings into
the springs and to avoid bending the spring hanger.
(8) Tighten the spring front pivot bolt to 156 N´m
(115 ft. lbs.) torque.
(9) Tighten rear spring shackle pin nuts to 61 N´m
(45 ft. lbs.) torque.
(10) Tighten the lower shock absorber mounting
bolt to 102 N´m (75 ft. lbs.) torque.
SPRING - FWD
REMOVAL
(1) Raise vehicle on frame-contact hoist as follows:
(a) Position the hoist arm supporting the corner
of the vehicle to be serviced against a block of wood
placed on the body sill as shown (Fig. 31).
2 - 40 REAR SUSPENSIONRS
SPRING - AWD (Continued)
Page 83 of 2339
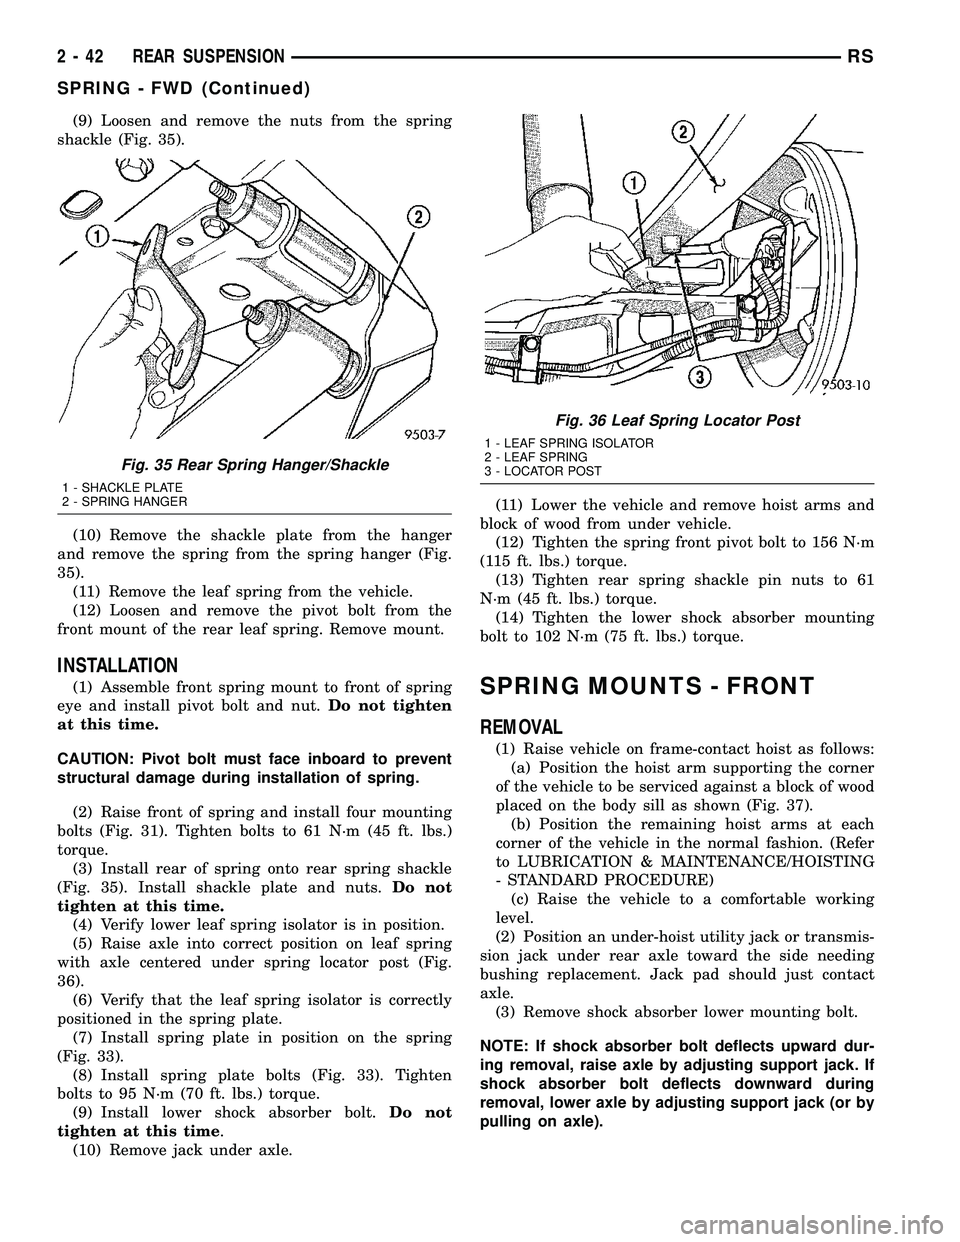
(9) Loosen and remove the nuts from the spring
shackle (Fig. 35).
(10) Remove the shackle plate from the hanger
and remove the spring from the spring hanger (Fig.
35).
(11) Remove the leaf spring from the vehicle.
(12) Loosen and remove the pivot bolt from the
front mount of the rear leaf spring. Remove mount.
INSTALLATION
(1) Assemble front spring mount to front of spring
eye and install pivot bolt and nut.Do not tighten
at this time.
CAUTION: Pivot bolt must face inboard to prevent
structural damage during installation of spring.
(2) Raise front of spring and install four mounting
bolts (Fig. 31). Tighten bolts to 61 N´m (45 ft. lbs.)
torque.
(3) Install rear of spring onto rear spring shackle
(Fig. 35). Install shackle plate and nuts.Do not
tighten at this time.
(4) Verify lower leaf spring isolator is in position.
(5) Raise axle into correct position on leaf spring
with axle centered under spring locator post (Fig.
36).
(6) Verify that the leaf spring isolator is correctly
positioned in the spring plate.
(7) Install spring plate in position on the spring
(Fig. 33).
(8) Install spring plate bolts (Fig. 33). Tighten
bolts to 95 N´m (70 ft. lbs.) torque.
(9) Install lower shock absorber bolt.Do not
tighten at this time.
(10) Remove jack under axle.(11) Lower the vehicle and remove hoist arms and
block of wood from under vehicle.
(12) Tighten the spring front pivot bolt to 156 N´m
(115 ft. lbs.) torque.
(13) Tighten rear spring shackle pin nuts to 61
N´m (45 ft. lbs.) torque.
(14) Tighten the lower shock absorber mounting
bolt to 102 N´m (75 ft. lbs.) torque.SPRING MOUNTS - FRONT
REMOVAL
(1) Raise vehicle on frame-contact hoist as follows:
(a) Position the hoist arm supporting the corner
of the vehicle to be serviced against a block of wood
placed on the body sill as shown (Fig. 37).
(b) Position the remaining hoist arms at each
corner of the vehicle in the normal fashion. (Refer
to LUBRICATION & MAINTENANCE/HOISTING
- STANDARD PROCEDURE)
(c) Raise the vehicle to a comfortable working
level.
(2) Position an under-hoist utility jack or transmis-
sion jack under rear axle toward the side needing
bushing replacement. Jack pad should just contact
axle.
(3) Remove shock absorber lower mounting bolt.
NOTE: If shock absorber bolt deflects upward dur-
ing removal, raise axle by adjusting support jack. If
shock absorber bolt deflects downward during
removal, lower axle by adjusting support jack (or by
pulling on axle).
Fig. 35 Rear Spring Hanger/Shackle
1 - SHACKLE PLATE
2 - SPRING HANGER
Fig. 36 Leaf Spring Locator Post
1 - LEAF SPRING ISOLATOR
2 - LEAF SPRING
3 - LOCATOR POST
2 - 42 REAR SUSPENSIONRS
SPRING - FWD (Continued)
Page 85 of 2339

(2) Install the shackle mounting nuts on the
hanger pins, but DO NOT TIGHTEN AT THIS
TIME.
(3) AWD only ± Install, BUT DO NOT TIGHTEN,
retaining bolts fastening inner to outer halves of leaf
spring hanger at this time (Fig. 39).
(4) Using a jack, raise the leaf spring into
mounted position.
(5) Install the rear spring mount-to-body bolts
(Fig. 40). Tighten rear spring mount bolts to 61 N´m
(45 ft. lbs.) torque.
(6) Install the lower mounting bolt fastening the
shock absorber to the axle. DO NOT TIGHTEN THE
BOLT AT THIS TIME.
(7) Remove the jack from under axle.(8) Lower the vehicle so that the full weight of the
vehicle is on all four tires (curb height).
CAUTION: AWD only ± In order to avoid bending the
spring shackles, the shackle pin nuts must be tight-
ened to the specified torque before the inboard-to-
outboard shackle half bolts can be tightened.
(9) Tighten shackle mounting nuts to 61 N´m (45
ft. lbs.) torque.
(10) If equipped with AWD, tighten shackle-to-
shackle mounting bolts to 61 N´m (45 ft. lbs.) torque.
(11) Tighten shock absorber lower mounting bolt to
88 N´m (65 ft. lbs.) torque.
SPRING SHACKLE
REMOVAL
(Refer to 2 - SUSPENSION/REAR/SPRING
MOUNTS - REMOVAL)
INSTALLATION
(Refer to 2 - SUSPENSION/REAR/SPRING
MOUNTS - INSTALLATION)
STABILIZER BAR
DESCRIPTION
Some front-wheel-drive models use a stabilizer bar.
It is mounted behind the rear axle. All-wheel-drive
models use a stabilizer bar that is mounted in front
of the rear axle.
The stabilizer bar interconnects both sides of the
rear axle and attaches to the rear frame rails using 2
rubber isolated link arms.
Both type stabilizer bars have the same basic com-
ponents. Attachment to the rear axle tube, and rear
frame rails is through rubber-isolated bushings.
The 2 rubber isolated links are connected to the
rear frame rails by brackets. These brackets are
bolted to the bottom of the frame rails.
OPERATION
Jounce and rebound movements affecting one
wheel are partially transmitted to the opposite wheel
to reduce body roll.
REMOVAL
REMOVAL - AWD
(1) Raise vehicle. (Refer to LUBRICATION &
MAINTENANCE/HOISTING - STANDARD PROCE-
DURE)
Fig. 39 All-Wheel-Drive Rear Suspension
1 - SHACKLE
2 - REAR MOUNT (HANGER)
3 - LEAF SPRING (MULTI-LEAF)
4 - AWD REAR AXLE
Fig. 40 Rear Spring Mount (Typical)
1 - LEAF SPRING MOUNT
2 - 44 REAR SUSPENSIONRS
SPRING MOUNTS - REAR (Continued)