hood release CHRYSLER VOYAGER 2023 Owners Manual
[x] Cancel search | Manufacturer: CHRYSLER, Model Year: 2023, Model line: VOYAGER, Model: CHRYSLER VOYAGER 2023Pages: 256, PDF Size: 13.97 MB
Page 16 of 256
14GETTING TO KNOW YOUR VEHICLE
REMOTE START — IF EQUIPPED
This system uses the key fob to start the engine
conveniently from outside the vehicle while still
maintaining security. The system has a range
of 328 ft (100 m).
Remote Start is used to defrost windows in cold weather
and to reach a comfortable climate in all ambient
conditions before the customer enters the vehicle.
NOTE:Obstructions between the vehicle and key fob may reduce
this range Úpage 244.
HOW TO USE REMOTE START
Push and release the Remote Start button on the key fob
twice within five seconds. The vehicle doors will lock, the
parking lights will flash, and the horn will chirp twice
(if programmed). Then, the engine will start, and the
vehicle will remain in the Remote Start mode for a
15 minute cycle. Pushing the Remote Start button a third time shuts the
engine off.
To drive the vehicle, push the unlock button and place the
ignition in the ON/RUN position.
NOTE:
With Remote Start, the engine will only run for
15 minutes.
Remote Start can only be used twice.
If an engine fault is present or fuel level is low, the
vehicle will start and then shut down in 10 seconds.
The parking lights will turn on and remain on during
Remote Start mode.
For security, power window operations are disabled
when the vehicle is in the Remote Start mode.
The ignition must be placed in the ON/RUN position
before the Remote Start sequence can be repeated for
a third cycle.
All of the following conditions must be met before the
engine will Remote Start:
Gear selector in PARK
Doors closed
Hood closed
Liftgate closed
Hazard switch off
Brake switch inactive (brake pedal not pressed)
Battery at an acceptable charge level
Panic button not pushed
System not disabled from previous Remote Start event
Vehicle Security system indicator flashing
Ignition in OFF position
Fuel level meets minimum requirement
Vehicle Security system is not signaling an intrusion
Malfunction Indicator Light (MIL) is not illuminated
TO EXIT REMOTE START MODE
To drive the vehicle after starting the Remote Start system,
either push and release the unlock button on the key fob to
unlock the doors, or unlock the vehicle using Keyless Enter ‘n
Go™ — Passive Entry via the door handles, and disarm the
Vehicle Security system (if equipped). Then, prior to the end of
the 15 minute cycle, push and release the START/STOP ignition
button.
The Remote Start system will turn the engine off if the
Remote Start button on the key fob is pushed again, or if
the engine is allowed to run for the entire 15 minute cycle.
Once the ignition is placed in the ON/RUN position, the
climate controls will resume previously set operations
(temperature, blower control, etc.).
WARNING!
Do not start or run an engine in a closed garage
or confined area. Exhaust gas contains carbon
monoxide (CO) which is odorless and colorless.
Carbon monoxide is poisonous and can cause
serious injury or death when inhaled.
Keep key fobs away from children. Operation of the
Remote Start system, windows, door locks or other
controls could cause serious injury or death.
23_RUV_OM_EN_US_t.book Page 14
Page 58 of 256
56GETTING TO KNOW YOUR VEHICLE
HOOD
OPENING
The hood release lever (to open the primary latch) and
safety latch (to open the secondary latch) must be
released to open the hood.
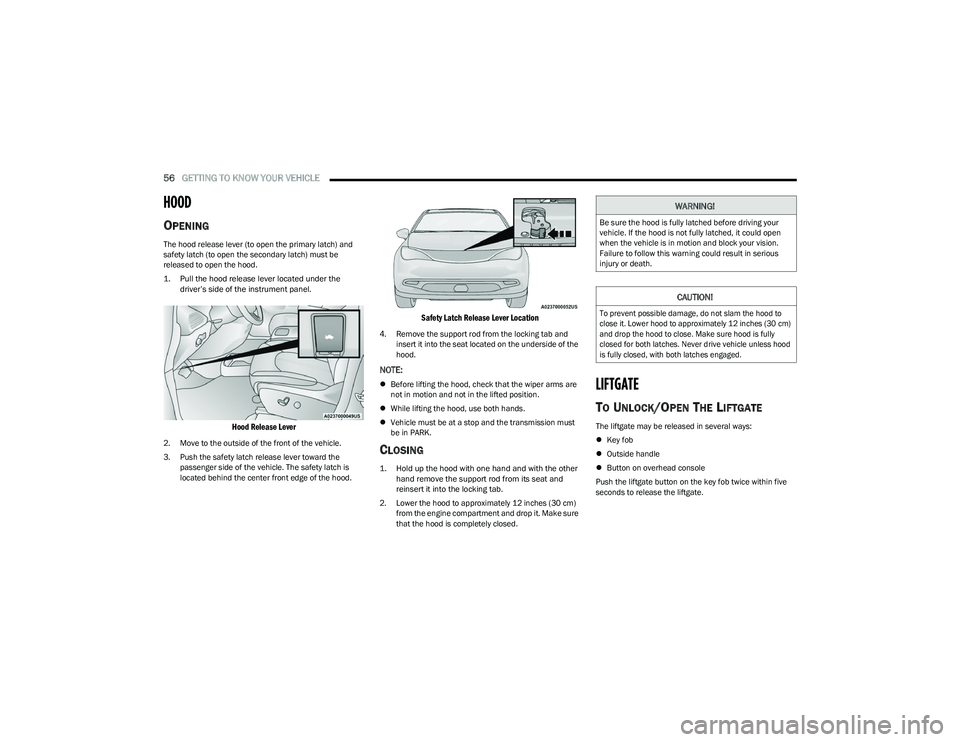
1. Pull the hood release lever located under the
driver’s side of the instrument panel.
Hood Release Lever
2. Move to the outside of the front of the vehicle.
3. Push the safety latch release lever toward the passenger side of the vehicle. The safety latch is
located behind the center front edge of the hood.
Safety Latch Release Lever Location
4. Remove the support rod from the locking tab and insert it into the seat located on the underside of the
hood.
NOTE:
Before lifting the hood, check that the wiper arms are
not in motion and not in the lifted position.
While lifting the hood, use both hands.
Vehicle must be at a stop and the transmission must
be in PARK.
CLOSING
1. Hold up the hood with one hand and with the other
hand remove the support rod from its seat and
reinsert it into the locking tab.
2. Lower the hood to approximately 12 inches (30 cm) from the engine compartment and drop it. Make sure
that the hood is completely closed.
LIFTGATE
TO UNLOCK/OPEN THE LIFTGATE
The liftgate may be released in several ways:
Key fob
Outside handle
Button on overhead console
Push the liftgate button on the key fob twice within five
seconds to release the liftgate.
WARNING!
Be sure the hood is fully latched before driving your
vehicle. If the hood is not fully latched, it could open
when the vehicle is in motion and block your vision.
Failure to follow this warning could result in serious
injury or death.
CAUTION!
To prevent possible damage, do not slam the hood to
close it. Lower hood to approximately 12 inches (30 cm)
and drop the hood to close. Make sure hood is fully
closed for both latches. Never drive vehicle unless hood
is fully closed, with both latches engaged.
23_RUV_OM_EN_US_t.book Page 56
Page 80 of 256

78STARTING AND OPERATING
TO TURN OFF THE ENGINE USING
ENGINE START/STOP B
UTTON
1. Place the gear selector in PARK, then push and
release the ENGINE START/STOP button.
2. The ignition switch will return to the OFF position.
3. If the gear selector is not in PARK, the ENGINE START/STOP button must be held for two seconds or
three short pushes in a row with the vehicle speed
above 5 mph (8 km/h) before the engine will shut off.
The ignition switch position will remain in the ACC
position until the gear selector is in PARK and the
button is pushed twice to the OFF position. If the gear
selector is not in PARK and the ENGINE START/STOP
button is pushed once, the instrument cluster will
display a “Vehicle Not In Park” message and the
engine will remain running. Never leave a vehicle out
of the PARK position, or it could roll.
NOTE:If the ignition switch is left in the ACC or RUN (engine not
running) position and the transmission is in PARK, the
system will automatically time out after 30 minutes of
inactivity and the ignition will switch to the OFF position.
ENGINE BLOCK HEATER — IF EQUIPPED
The engine block heater warms the engine and permits
quicker starts in cold weather.
Connect the cord to a 110-115 Volt AC electrical outlet
with a grounded, three-wire extension cord. For ambient temperatures below 0°F (-18°C), the engine
block heater is recommended. For ambient temperatures
below -20°F (-29°C), the engine block heater is required.
The engine block heater cord is routed under the hood,
behind to the passenger’s side headlamp. See the
following steps to properly use the engine block heater:
1. Locate the engine block heater cord (behind the
passenger’s side headlamp).
2. Undo the hook-and-loop strap that secures the heater cord in place.
3. Pull the cord to the front of the vehicle and plug it into a grounded, three-wire extension cord.
4. After the vehicle is running, reattach the cord to the hook-and-loop strap and properly stow it away behind
the passenger’s side headlamp.
NOTE:
The engine block heater cord is a factory installed
option. If your vehicle is not equipped, heater cords are
available from an authorized dealer.
The engine block heater will require 110 Volt AC and
6.5 Amps to activate the heater element.
The engine block heater must be plugged in at least
one hour to have an adequate warming effect on the
engine.
ENGINE BREAK-IN RECOMMENDATIONS
A long break-in period is not required for the engine and
drivetrain (transmission and axle) in your vehicle.
Drive moderately during the first 300 miles (500 km).
After the initial 60 miles (100 km), speeds up to 50 or
55 mph (80 or 90 km/h) are desirable.
While cruising, brief full-throttle acceleration within the
limits of local traffic laws contributes to a good break-in.
Wide-open throttle acceleration in low gear can be
detrimental and should be avoided.
The engine oil installed in the engine at the factory is a
high-quality energy conserving type lubricant. Oil changes
should be consistent with anticipated climate conditions
under which vehicle operations will occur. For the
recommended viscosity and quality grades
Úpage 197.
NOTE:A new engine may consume some oil during its first few
thousand miles (kilometers) of operation. This should be
considered a normal part of the break-in and not inter -
preted as a problem.
WARNING!
Remember to disconnect the engine block heater cord
before driving. Damage to the 110-115 Volt electrical
cord could cause electrocution.
CAUTION!
Never use Non-Detergent Oil or Straight Mineral Oil in
the engine or damage may result.
23_RUV_OM_EN_US_t.book Page 78
Page 87 of 256
STARTING AND OPERATING85
STOP/START SYSTEM — IF EQUIPPED
The Stop/Start function is designed to reduce fuel
consumption. The system will stop the engine automatically
during a vehicle stop if the required conditions are met.
Releasing the brake pedal, pressing the accelerator pedal or
shifting out of DRIVE (D) will automatically re-start the engine.
This vehicle has been upgraded with a heavy-duty starter,
enhanced battery, and other upgraded engine parts to
handle the additional engine starts.
AUTOSTOP MODE
The Stop/Start feature is enabled after every normal
customer engine start. At that time, the system will go into
STOP/START READY and if all other conditions are met,
can go into a STOP/START AUTOSTOP ACTIVE.
To Activate Auto STOP/START, The Following Must Occur:
The system must be in STOP/START READY state.
A STOP/START READY message will be displayed in
the instrument cluster within the Stop/Start section
Úpage 67.
The vehicle must be completely stopped.
The gear selector must be in a forward gear and the
brake pedal pressed.
The engine will shut down, the tachometer will move to the
zero position and the Stop/Start telltale will illuminate
indicating you are in Autostop. Customer settings will be
maintained throughout the Auto Stop/Start process.
POSSIBLE REASONS THE ENGINE DOES
N
OT AUTOSTOP
Prior to engine shut down, the system will check many
safety and comfort conditions for Stop/Start and ensure
they are fulfilled. Detailed information about the operation
of the Stop/Start system may be viewed in the instrument
cluster display Stop/Start screen. In the following
situations the engine will not stop:
If Stop/Start is manually disabled by the Stop/Start
OFF button.
Driver’s seat belt is not buckled.
Driver’s door is not closed.
Battery temperature is too warm or cold.
Battery charge is low. During this time a message will
display "Stop/Start Not Ready Battery Charging".
The vehicle is on a steep grade.
Cabin heating or cooling is in process and an accept -
able cabin temperature has not been achieved.
HVAC is set to full defrost mode at a high blower speed.
HVAC is set to MAX A/C.
Engine has not reached normal operating temperature.
The transmission is not in a forward gear.
Hood is open.
Brake pedal is not pressed with sufficient pressure.
Accelerator pedal input.
Engine temperature is too high.
5 mph (8 km/h) threshold has not been achieved from
previous Autostop.
Steering angle is beyond threshold.
It may be possible for the vehicle to be driven several
times without the Stop/Start system going into a
STOP/START READY state under more extreme conditions
of the items previously listed.
TO START THE ENGINE WHILE IN AUTO
S
TOP/START
While in a forward gear, the engine will start when the
brake pedal is released or the accelerator pedal is
pressed. The transmission will automatically re-engage
upon engine restart.
Conditions That Will Cause The Engine To Start
Automatically While In Auto Stop/Start:
The transmission selector is moved out of DRIVE.
To maintain cabin temperature comfort.
HVAC is set to full defrost mode.
HVAC system temperature or fan speed is manually
adjusted.
Battery voltage drops too low. During this time a
message will display "Stop/Start Not Ready Battery
Charging".
Stop/Start OFF switch is pushed.
A Stop/Start system error occurs.
Steering angle beyond threshold.
4
23_RUV_OM_EN_US_t.book Page 85
Page 189 of 256
IN CASE OF EMERGENCY187
REFUELING IN EMERGENCY – IF EQUIPPED
The vehicle is equipped with a refueling funnel for a
Cap-Less Fuel System Úpage 174. If refueling is
necessary, while using an approved gas can, insert the
refueling funnel into the filler neck opening. Take care
to open both flappers with the funnel to avoid spills.
NOTE:In certain cold conditions, ice may prevent the fuel door
from opening. If this occurs, lightly push on the fuel door
to break the ice buildup. Then push on the rear center
edge of the fuel door to re-release. Do not pry on the door.
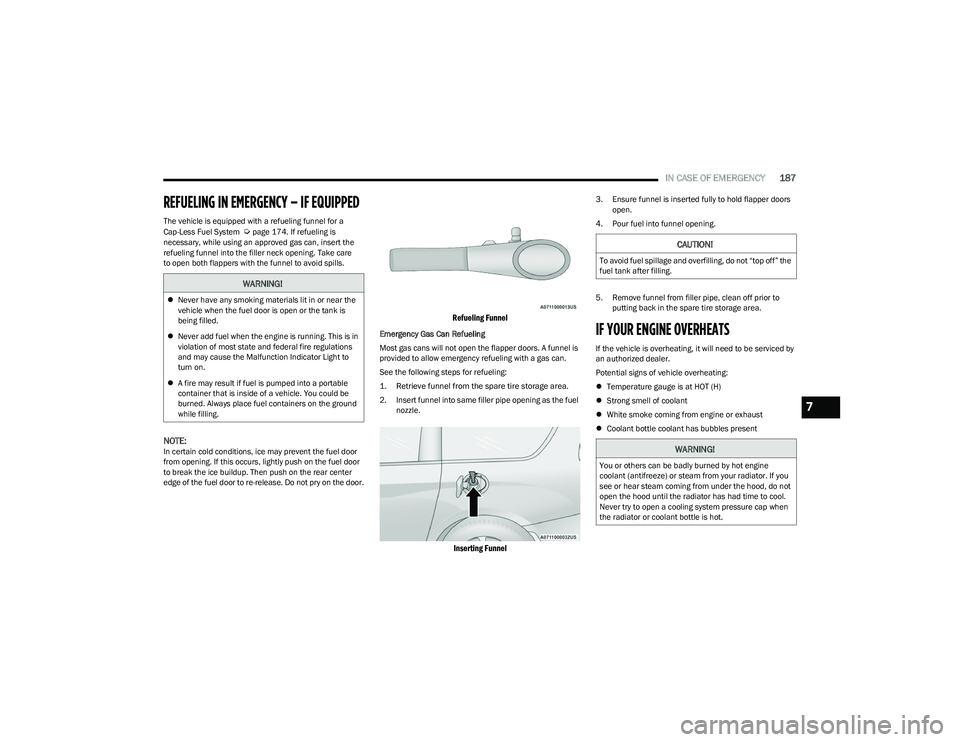
Refueling Funnel
Emergency Gas Can Refueling
Most gas cans will not open the flapper doors. A funnel is
provided to allow emergency refueling with a gas can.
See the following steps for refueling:
1. Retrieve funnel from the spare tire storage area.
2. Insert funnel into same filler pipe opening as the fuel nozzle.
Inserting Funnel
3. Ensure funnel is inserted fully to hold flapper doors open.
4. Pour fuel into funnel opening.
5. Remove funnel from filler pipe, clean off prior to putting back in the spare tire storage area.
IF YOUR ENGINE OVERHEATS
If the vehicle is overheating, it will need to be serviced by
an authorized dealer.
Potential signs of vehicle overheating:
Temperature gauge is at HOT (H)
Strong smell of coolant
White smoke coming from engine or exhaust
Coolant bottle coolant has bubbles present
WARNING!
Never have any smoking materials lit in or near the
vehicle when the fuel door is open or the tank is
being filled.
Never add fuel when the engine is running. This is in
violation of most state and federal fire regulations
and may cause the Malfunction Indicator Light to
turn on.
A fire may result if fuel is pumped into a portable
container that is inside of a vehicle. You could be
burned. Always place fuel containers on the ground
while filling.
CAUTION!
To avoid fuel spillage and overfilling, do not “top off” the
fuel tank after filling.
WARNING!
You or others can be badly burned by hot engine
coolant (antifreeze) or steam from your radiator. If you
see or hear steam coming from under the hood, do not
open the hood until the radiator has had time to cool.
Never try to open a cooling system pressure cap when
the radiator or coolant bottle is hot.
7
23_RUV_OM_EN_US_t.book Page 187
Page 202 of 256
200SERVICING AND MAINTENANCE
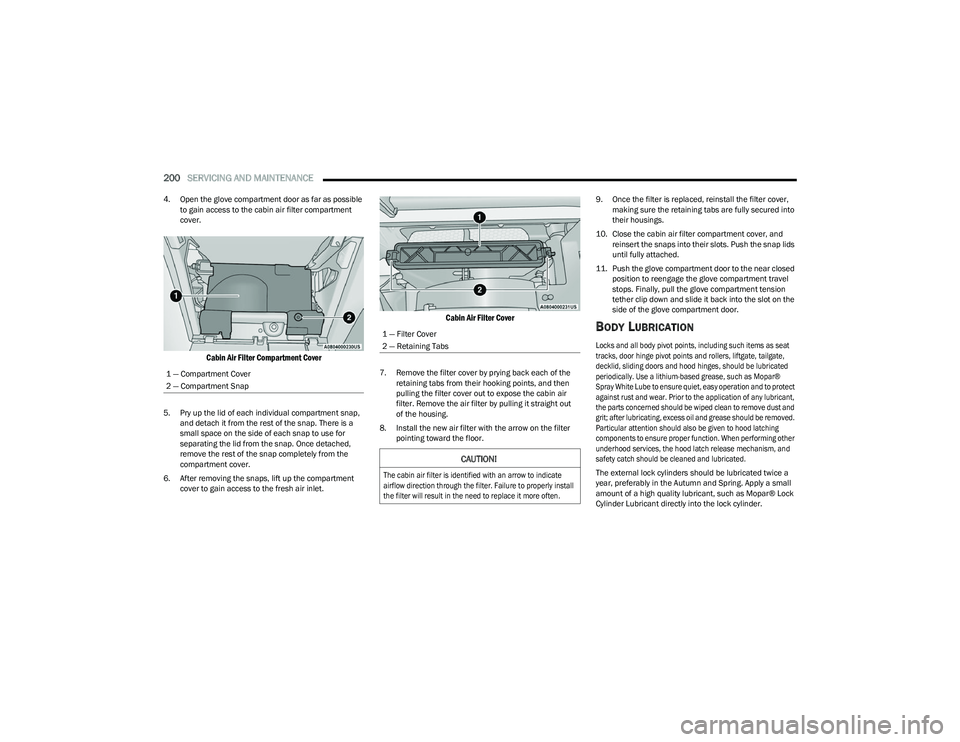
4. Open the glove compartment door as far as possible
to gain access to the cabin air filter compartment
cover.
Cabin Air Filter Compartment Cover
5. Pry up the lid of each individual compartment snap, and detach it from the rest of the snap. There is a
small space on the side of each snap to use for
separating the lid from the snap. Once detached,
remove the rest of the snap completely from the
compartment cover.
6. After removing the snaps, lift up the compartment cover to gain access to the fresh air inlet.
Cabin Air Filter Cover
7. Remove the filter cover by prying back each of the retaining tabs from their hooking points, and then
pulling the filter cover out to expose the cabin air
filter. Remove the air filter by pulling it straight out
of the housing.
8. Install the new air filter with the arrow on the filter pointing toward the floor. 9. Once the filter is replaced, reinstall the filter cover,
making sure the retaining tabs are fully secured into
their housings.
10. Close the cabin air filter compartment cover, and reinsert the snaps into their slots. Push the snap lids
until fully attached.
11. Push the glove compartment door to the near closed position to reengage the glove compartment travel
stops. Finally, pull the glove compartment tension
tether clip down and slide it back into the slot on the
side of the glove compartment door.
BODY LUBRICATION
Locks and all body pivot points, including such items as seat
tracks, door hinge pivot points and rollers, liftgate, tailgate,
decklid, sliding doors and hood hinges, should be lubricated
periodically. Use a lithium-based grease, such as Mopar®
Spray White Lube to ensure quiet, easy operation and to protect
against rust and wear. Prior to the application of any lubricant,
the parts concerned should be wiped clean to remove dust and
grit; after lubricating, excess oil and grease should be removed.
Particular attention should also be given to hood latching
components to ensure proper function. When performing other
underhood services, the hood latch release mechanism, and
safety catch should be cleaned and lubricated.
The external lock cylinders should be lubricated twice a
year, preferably in the Autumn and Spring. Apply a small
amount of a high quality lubricant, such as Mopar® Lock
Cylinder Lubricant directly into the lock cylinder.
1 — Compartment Cover
2 — Compartment Snap1 — Filter Cover
2 — Retaining Tabs
CAUTION!
The cabin air filter is identified with an arrow to indicate
airflow direction through the filter. Failure to properly install
the filter will result in the need to replace it more often.
23_RUV_OM_EN_US_t.book Page 200
Page 249 of 256
247
Checking Oil Level .................................................. 196Compartment .......................................................... 195
Compartment Identification ................................... 195Coolant (Antifreeze) ................................................ 238
Cooling..................................................................... 204
Exhaust Gas Caution .............................................. 169
Fails To Start .............................................................. 77
Flooded, Starting ....................................................... 77
Fuel Requirements ................................................. 236 Oil .................................................................... 197
, 238
Oil Filler Cap ............................................................ 195
Oil Filter ................................................................... 197
Oil Selection ................................................... 197
, 238
Oil Synthetic ............................................................ 197
Overheating ............................................................. 187
Starting ....................................................................... 75
Enhanced Accident Response Feature ............. 152
, 191
Ethanol.......................................................................... 236
Exhaust Gas Cautions.................................................. 169
Exhaust System ................................................... 169
, 203
Exterior Lighting .................................................... 39, 216
Exterior Lights......................................39, 168, 215, 216
FFilters Air Cleaner ............................................................... 198Air Conditioning................................................ 49
, 199
Engine Oil ....................................................... 197, 238
Engine Oil Disposal ................................................. 197
Flashers Hazard Warning ...................................................... 170
Turn Signals ..................................... 39
, 72, 168, 216 Flash-To-Pass ........................................................... 39
, 40
Flat Tire Changing ...................................... 173, 217, 228
Flat Tire Stowage ....................................... 180, 217, 228
Flooded Engine Starting ................................................. 77
Fluid Capacities ............................................................238
Fluid Leaks ....................................................................168
Fluid Level Checks Brake ........................................................................ 206
Engine Oil ................................................................. 196
Fluid, Brake ...................................................................239
Fog Lights ........................................................................ 39
Fold In Floor (Stow ‘n Go) Seating ................................. 30
Fold-Flat Seats ................................................................ 23
Forward Collision Warning ...........................................129
Freeing A Stuck Vehicle................................................ 189
Front Position Light....................................................... 216
Fuel ................................................................................ 236 Additives...................................................................237Clean Air ...................................................................236Ethanol .....................................................................236
Filler Cap (Gas Cap)................................................... 93
Gasoline ...................................................................236 Materials Added ...................................................... 237
Methanol .................................................................. 236
Octane Rating ................................................ 236
, 238
Requirements .......................................................... 236
Specifications .......................................................... 238
Tank Capacity .......................................................... 238
Fuses .............................................................................208
GGas Cap (Fuel Filler Cap) ............................................... 93
Gasoline, (Fuel) ............................................................ 236
Gasoline, Clean Air ....................................................... 236
Gasoline, Reformulated ............................................... 236
Gear Ranges ................................................................... 82
Glass Cleaning .............................................................. 234
Gross Axle Weight Rating ............................................... 95
Gross Vehicle Weight Rating ......................................... 94 GVWR .............................................................................. 93
HHazard Driving Through Flowing, Rising, Or Shallow Standing Water .................................................. 103
Hazard Warning Flashers............................................. 170
Head Restraints.............................................................. 35 Headlights ....................................................................... 39 Cleaning ................................................................... 232
High Beam/Low Beam Select Switch ...................... 39
Lights On Reminder ........................................... 39
, 41
Passing ............................................................... 39, 40
Switch ........................................................................ 39
Time Delay ................................................................. 39
Heated Mirrors ........................................................ 38
, 39
Heated Seats .................................................................. 34
Heater, Engine Block...................................................... 78
Hill Start Assist ............................................................. 124
Hitches Trailer Towing ............................................................ 96
Hood Prop ....................................................................... 56
Hood Release ................................................................. 56
11
23_RUV_OM_EN_US_t.book Page 247
Page 250 of 256

248 I
Ignition .............................................................................12 Switch .........................................................................12
Inside Rearview Mirror.......................................... 38
, 170
Instrument Cluster ...................................................60, 62
Descriptions ............................................................... 72
Display ........................................................................62
Display Controls .........................................................62
KeySense Message ...................................................64
Menu Items ................................................................64
Instrument Panel Lens Cleaning ................................. 234
Interior And Instrument Lights .......................................41
Interior Appearance Care ............................................ 233
Interior Lights ..................................................................41
JJack Location................................................................ 174
Jack Operation ............................................................. 173
Jacking And Tire Changing — If Equipped
b
........... 173
Jump Starting ............................................................... 185
KKey Fob ............................................................................10 Arm The System .........................................................16
Disarm The Alarm ...................................................... 16
Programming Additional Key Fobs ...........................12
Key Fob Battery Service (Remote Keyless Entry) .........11
Key Fob Programming (Remote Keyless Entry) ............ 12
Keyless Enter 'n Go™ ...................................................... 18 Passive Entry .............................................................. 18
Keys .................................................................................10
LLane Change And Turn Signals...................................... 39 Lane Change Assist ................................................. 39, 41
Lap/Shoulder Belts ...................................................... 135
Latches .......................................................................... 168 Hood ........................................................................... 56
Lead Free Gasoline....................................................... 236
Leaks, Fluid ...................................................................168
Life Of Tires ...................................................................226
Liftgate ............................................................................ 56 Power ......................................................................... 57
Light Bulbs .......................................................... 168
, 216
Lights .............................................................................168 Air Bag ..................................................... 67
, 143, 167
Battery Saver ............................................................. 41
Brake Assist Warning .............................................. 124 Brake Warning ........................................................... 68
Bulb Replacement......................................... 215
, 216
Cruise ......................................................................... 72
Daytime Running ....................................................... 39
Dimmer Switch, Headlight ........................................ 39
Engine Temperature Warning................................... 69
Exterior ........................................................... 168
, 216
Headlights ........................................................... 39, 40
High Beam/Low Beam Select .................................. 39
Instrument Cluster .................................................... 39
Intensity Control ........................................................ 42
Interior........................................................................ 41
Lights On Reminder............................................ 39
, 41
Malfunction Indicator (Check Engine)...................... 70
Park ............................................................................ 72 Passing ............................................................... 39
, 40
Reading...................................................................... 41
Seat Belt Reminder ................................................... 69
Security Alarm ........................................................... 70
Service ..................................................................... 215 Side Marker ............................................................. 216
Traction Control ....................................................... 124Turn Signals...................................... 39
, 72, 168, 216
Warning Instrument Cluster Descriptions ........ 69, 72
Load Floor, Cargo ........................................................... 58
Load Shed Battery Saver Mode..................................... 66
Load Shed Battery Saver On ......................................... 66 Load Shed Electrical Load Reduction ........................... 66Load Shed Intelligent Battery Sensor ........................... 66Loading Vehicle ....................................................... 58
, 93
Tires ......................................................................... 221
Locks Child Protection ......................................................... 16
Manual ....................................................................... 16
Power Door ................................................................ 16
Low Tire Pressure System............................................ 131
Lubrication, Body.......................................................... 200
Lug Nuts ........................................................................ 235
MMaintenance Free Battery ........................................... 196
Maintenance Schedule ................................................ 192
Malfunction Indicator Light (Check Engine) .......... 70
, 74
Manual Park Release ........................................................... 188
Service ..................................................................... 243
23_RUV_OM_EN_US_t.book Page 248
Page 251 of 256
249
Map/Reading Lights ....................................................... 41
Marker Lights, Side ...................................................... 216
Media Hub ....................................................................... 52Methanol ...................................................................... 236
Mirrors .............................................................................38 Automatic Dimming ...................................................38
Exterior Folding ..........................................................39
Heated .................................................................38
, 39
Outside ....................................................................... 38
Rearview ........................................................... 38
, 170
Vanity ..........................................................................38
Modifications/Alterations Vehicle .......................................................................... 7
Monitor, Tire Pressure System .................................... 131
Mopar Parts .................................................................. 242
MP3 Control ....................................................................52
Multi-Function Control Lever ..........................................39
NNew Vehicle Break-In Period ..........................................78
OOccupant Restraints .................................................... 134
Octane Rating, Gasoline (Fuel) .......................... 236, 238
Oil Change Indicator ....................................................... 63 Reset ..........................................................................63
Oil Filter, Change .......................................................... 197
Oil Filter, Selection ....................................................... 197
Oil Life Reset
b
............................................................63
Oil Pressure Light ............................................................69 Oil, Engine ........................................................... 197
, 238
Capacity ...................................................................238 Checking .................................................................. 196
Dipstick ....................................................................196Disposal ...................................................................197Filter ............................................................... 197
, 238
Filter Disposal .......................................................... 197
Identification Logo...................................................197
Materials Added To ................................................. 197
Pressure Warning Light............................................. 69
Recommendation .......................................... 197
, 238
Synthetic .................................................................. 197
Viscosity ...................................................................238
Onboard Diagnostic System........................................... 73
Operating Precautions.................................................... 73 Operator Manual Owner's Manual ....................................................... 243
Outside Rearview Mirrors............................................... 38
Overheating, Engine ..................................................... 187
PPaint Care...................................................................... 232
Parking Brake ................................................................. 79
ParkSense System, Rear................................................ 87
Passive Entry................................................................... 18 Pets ................................................................................ 167
Placard, Tire And Loading Information ........................ 221
Power Brakes ...................................................................... 235
Mirrors ........................................................................ 39
Outlet (Auxiliary Electrical Outlet) ............................. 52
Seats .......................................................................... 33
Steering ...................................................................... 84 Power Seats
Down .......................................................................... 33
Forward ...................................................................... 33
Rearward ................................................................... 33
Up ............................................................................... 33
Power Sliding Door On / Off Switch ................................................... 20
, 57
Pregnant Women And Seat Belts ................................ 140
Preparation For Jacking ............................................... 173
Pretensioners Seat Belts ................................................................ 141
RRadial Ply Tires ............................................................. 225
Radiator Cap (Coolant Pressure Cap) ......................... 205
Radio Operation ........................................................... 120
Rear Air Conditioning ..................................................... 47
Rear Cross Path............................................................ 128
Rear ParkSense System ................................................ 87Rear Seat Reminder ..................................................... 121
Rear View ........................................................................ 38
Reclining Front Seats ..................................................... 24
Recreational Towing ..................................................... 101
Reformulated Gasoline ................................................ 236
Refrigerant .................................................................... 199
Release, Hood ................................................................ 56
Reminder, Lights On....................................................... 39Reminder, Seat Belt ..................................................... 135
Remote Control Starting System ......................................................... 14
Remote Keyless Entry Arm The Alarm ........................................................... 16
Disarm The Alarm ..................................................... 16
Programming Additional Key Fobs ........................... 12
11
23_RUV_OM_EN_US_t.book Page 249