Citroen BERLINGO FIRST 2011 1.G Repair Manual
Manufacturer: CITROEN, Model Year: 2011, Model line: BERLINGO FIRST, Model: Citroen BERLINGO FIRST 2011 1.GPages: 136, PDF Size: 5.94 MB
Page 61 of 136
59 LIFE ON BOARD-
FRONT LAYOUT
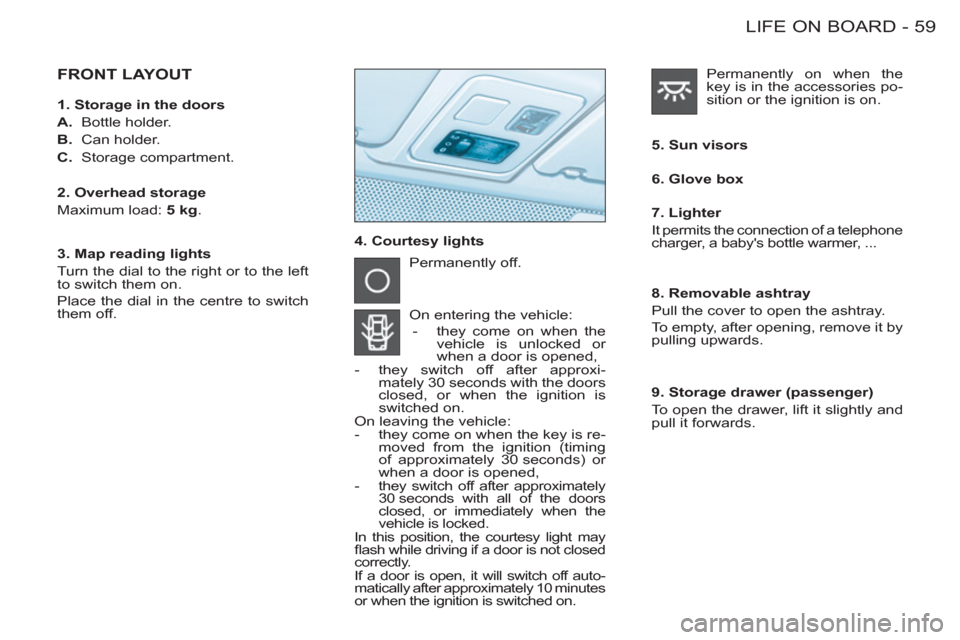
4. Courtesy lights
5. Sun visors
Permanently off.
On entering the vehicle:
- they come on when the
vehicle is unlocked or
when a door is opened,
- they switch off after approxi-
mately 30 seconds with the doors
closed, or when the ignition is
switched on.
On leaving the vehicle:
- they come on when the key is re-
moved from the ignition (timing
of approximately 30 seconds) or
when a door is opened,
-
they switch off after approximately
30 seconds with all of the doors
closed, or immediately when the
vehicle is locked.
In this position, the courtesy light may
fl ash while driving if a door is not closed
correctly.
If a door is open, it will switch off auto-
matically after approximately 10 minutes
or when the ignition is switched on.
Permanently on when the
key is in the accessories po-
sition or the ignition is on.
1. Storage in the doors
A.
Bottle holder.
B.
Can holder.
C.
Storage compartment.
2. Overhead storage
Maximum load: 5 kg
.
3. Map reading lights
Turn the dial to the right or to the left
to switch them on.
Place the dial in the centre to switch
them off.
6. Glove box
7. Lighter
It permits the connection of a telephone
charger, a baby's bottle warmer, ...
8. Removable ashtray
Pull the cover to open the ashtray.
To empty, after opening, remove it by
pulling upwards.
9. Storage drawer (passenger)
To open the drawer, lift it slightly and
pull it forwards.
Page 62 of 136
LIFE ON BOARD
60 -
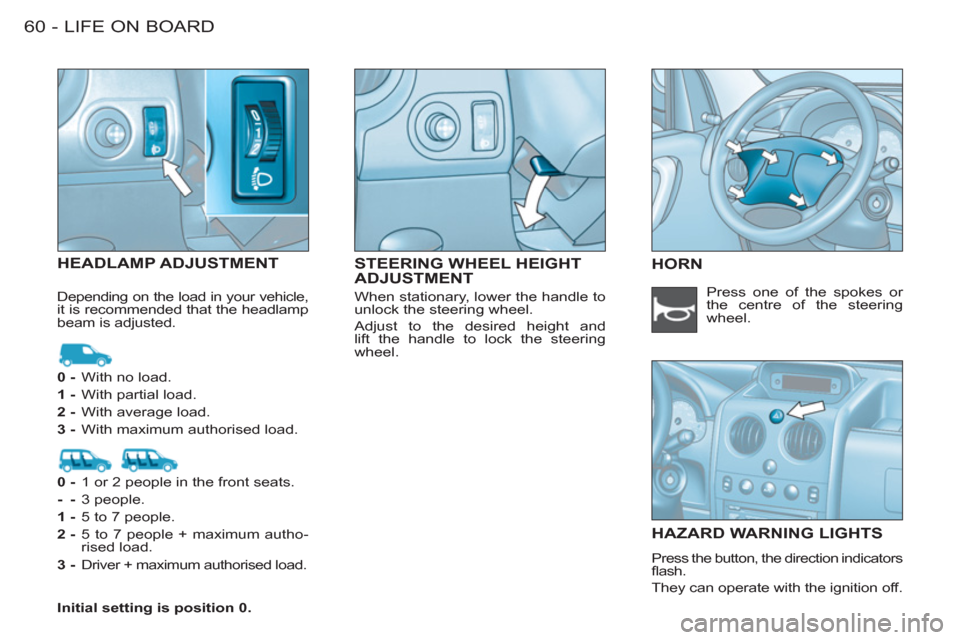
STEERING WHEEL HEIGHT
ADJUSTMENT HEADLAMP ADJUSTMENT
HORN
HAZARD WARNING LIGHT
S
Press the button, the direction indicators
fl ash.
They can operate with the ignition off. Press one of the spokes or
the centre of the steering
wheel.
0 -
With no load.
1 -
With partial load.
2 -
With average load.
3 -
With maximum authorised load.
0
- 1 or 2 people in the front seats.
-
- 3 people.
1
- 5 to 7 people.
2 -
5 to 7 people + maximum autho-
rised load.
3 -
Driver + maximum authorised load.
Initial setting is position 0.
Depending on the load in your vehicle,
it is recommended that the headlamp
beam is adjusted. When stationary, lower the handle to
unlock the steering wheel.
Adjust to the desired height and
lift the handle to lock the steering
wheel.
Page 63 of 136
61 LIFE ON BOARD-
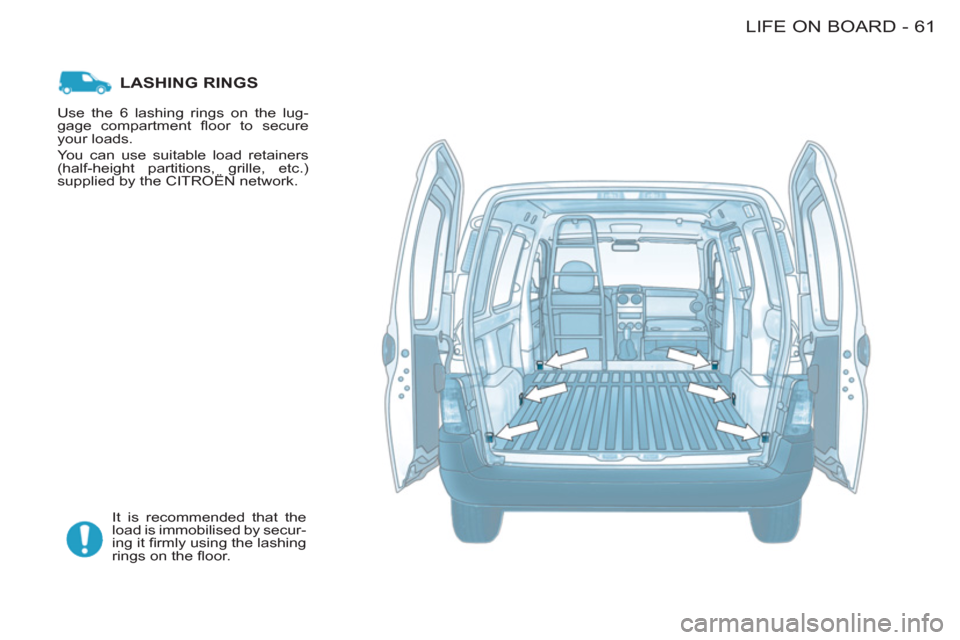
LASHING RINGS
It is recommended that the
load is immobilised by secur-
ing it fi rmly using the lashing
rings on the fl oor. Use the 6 lashing rings on the lug-
gage compartment fl oor to secure
your loads.
You can use suitable load retainers
(half-height partitions, grille, etc.)
supplied by the CITROËN network.
Page 64 of 136
LIFE ON BOARD
62 -
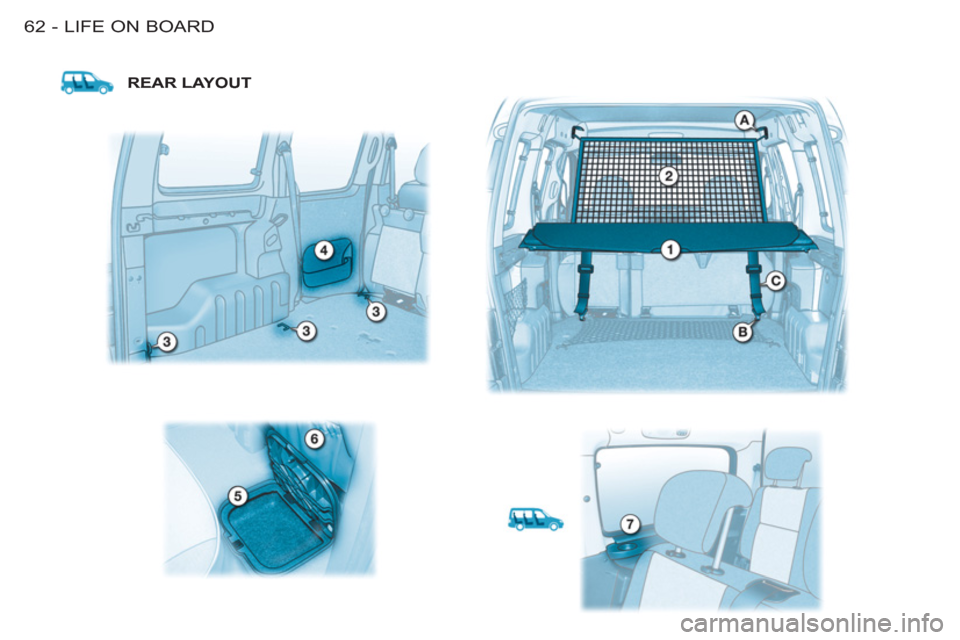
REAR LAYOUT
Page 65 of 136
63 LIFE ON BOARD-
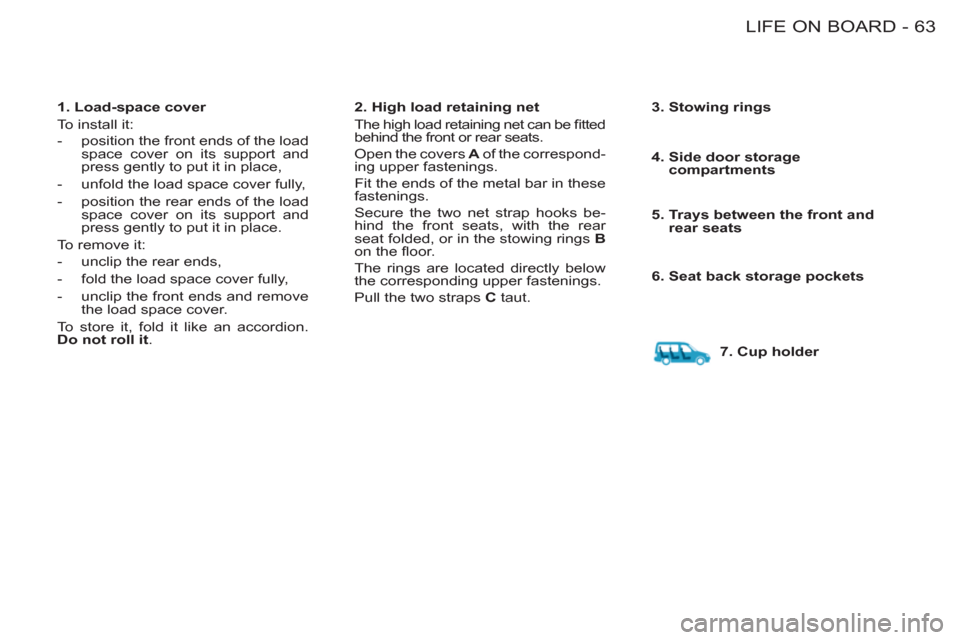
1. Load-space cover
To install it:
- position the front ends of the load
space cover on its support and
press gently to put it in place,
- unfold the load space cover fully,
- position the rear ends of the load
space cover on its support and
press gently to put it in place.
To remove it:
- unclip the rear ends,
- fold the load space cover fully,
- unclip the front ends and remove
the load space cover.
To store it, fold it like an accordion.
Do not roll it
.
2. High load retaining net
The high load retaining net can be fi tted
behind the front or rear seats.
Open the covers A
of the correspond-
ing upper fastenings.
Fit the ends of the metal bar in these
fastenings.
Secure the two net strap hooks be-
hind the front seats, with the rear
seat folded, or in the stowing rings B
on the fl oor.
The rings are located directly below
the corresponding upper fastenings.
Pull the two straps C
taut.
3. Stowing rings
4. Side door storage
compartments
5. Trays between the front and
rear seats
6. Seat back storage pockets
7. Cup holder
Page 66 of 136
DRIVING64 -
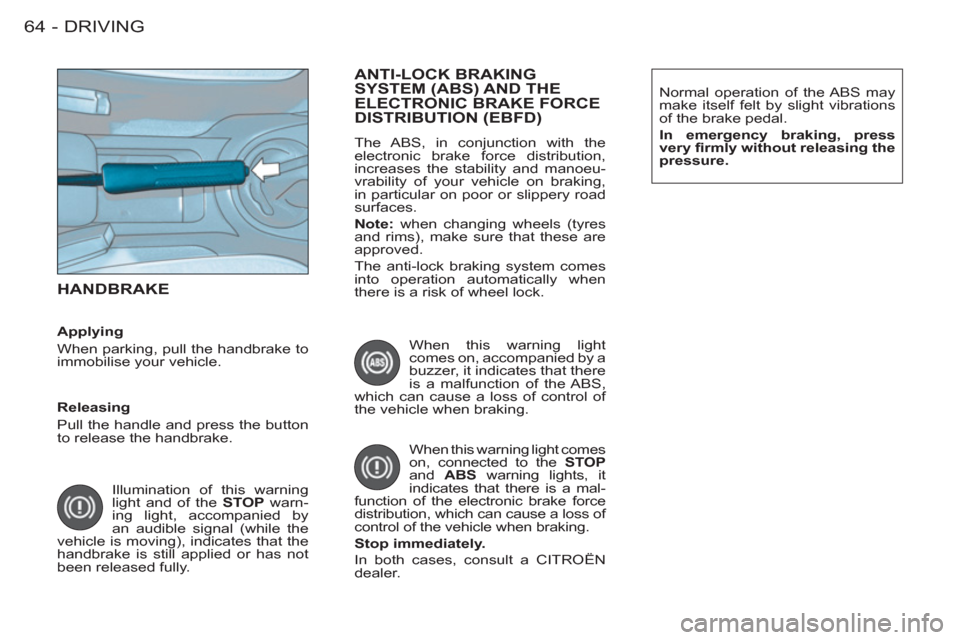
HANDBRAKE
Illumination of this warning
light and of the STOP
warn-
ing light, accompanied by
an audible signal (while the
vehicle is moving), indicates that the
handbrake is still applied or has not
been released fully.
ANTI-LOCK BRAKING
SYSTEM (ABS) AND THE ELECTRONIC BRAKE FORCEDISTRIBUTION (EBFD)
The ABS, in conjunction with the
electronic brake force distribution,
increases the stability and manoeu-
vrability of your vehicle on braking,
in particular on poor or slippery road
surfaces.
Note:
when changing wheels (tyres
and rims), make sure that these are
approved.
The anti-lock braking system comes
into operation automatically when
there is a risk of wheel lock.
When this warning light comes
on, connected to the STOP
and ABS
warning lights, it
indicates that there is a mal-
function of the electronic brake force
distribution, which can cause a loss of
control of the vehicle when braking.
Stop immediately.
In both cases, consult a CITROËN
dealer. When this warning light
comes on, accompanied by a
buzzer, it indicates that there
is a malfunction of the ABS,
which can cause a loss of control of
the vehicle when braking. Normal operation of the ABS may
make itself felt by slight vibrations
of the brake pedal.
In emergency braking, press
very fi rmly without releasing the
pressure.
Releasing
Pull the handle and press the button
to release the handbrake.
Applying
When parking, pull the handbrake to
immobilise your vehicle.
Page 67 of 136
65 DRIVING
-
SPEED LIMITER *
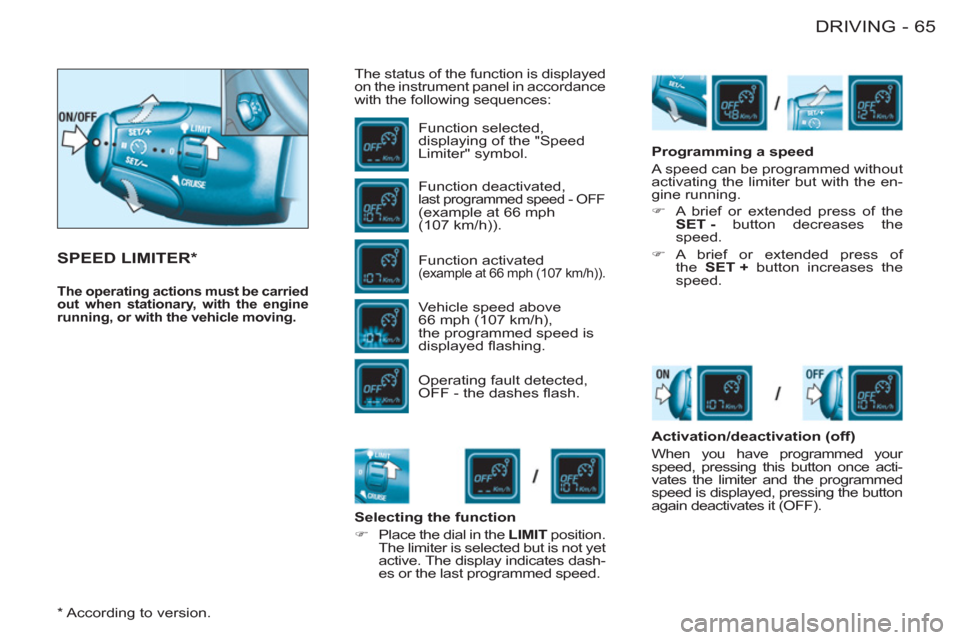
The status of the function is displayed
on the instrument panel in accordance
with the following sequences:
Function selected,
displaying of the "Speed
Limiter" symbol.
Function deactivated,
last programmed speed - OFF
(example at 66 mph
(107 km/h)).
Function activated (example at 66 mph (107 km/h)).
Vehicle speed above
66 mph (107 km/h),
the programmed speed is
displayed fl ashing.
Operating fault detected,
OFF - the dashes fl ash.
Selecting the function
�)
Place the dial in the LIMIT
position.
The limiter is selected but is not yet
active. The display indicates dash-
es or the last programmed speed.
Programming a speed
A speed can be programmed without
activating the limiter but with the en-
gine running.
�)
A brief or extended press of the
SET -
button decreases the
speed.
�)
A brief or extended press of
the SET +
button increases the
speed.
Activation/deactivation (off)
When you have programmed your
speed, pressing this button once acti-
vates the limiter and the programmed
speed is displayed, pressing the button
again deactivates it (OFF).
The operating actions must be carried
out when stationary, with the engine
running, or with the vehicle moving.
*
According to version.
Page 68 of 136
66 -
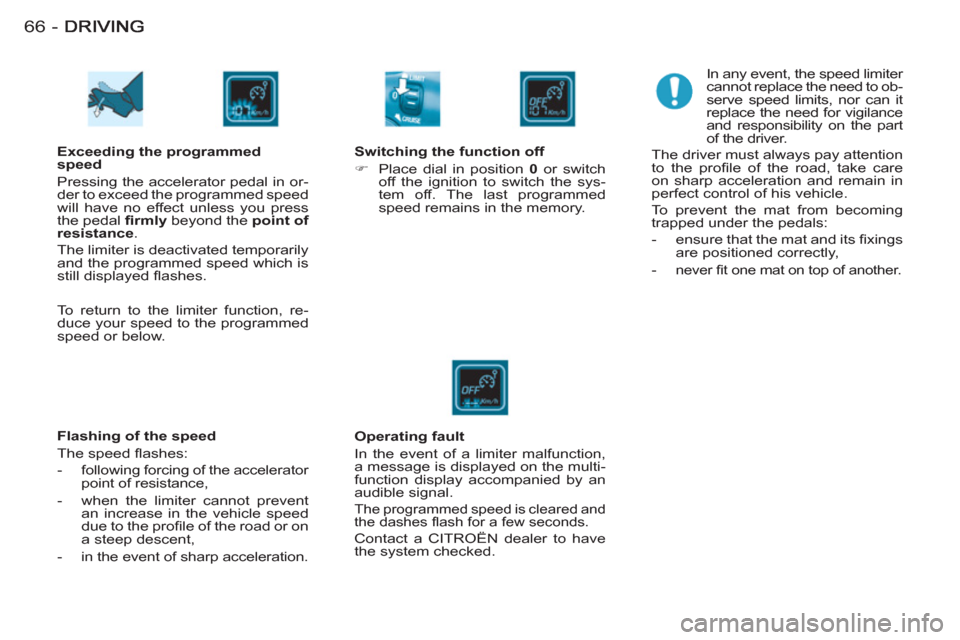
Exceeding the programmed
speed
Pressing the accelerator pedal in or-
der to exceed the programmed speed
will have no effect unless you press
the pedal fi rmly
beyond the point of
resistance
.
The limiter is deactivated temporarily
and the programmed speed which is
still displayed fl ashes.
Flashing of the speed
The speed fl ashes:
- following forcing of the accelerator
point of resistance,
- when the limiter cannot prevent
an increase in the vehicle speed
due to the profi le of the road or on
a steep descent,
- in the event of sharp acceleration.
In any event, the speed limiter
cannot replace the need to ob-
serve speed limits, nor can it
replace the need for vigilance
and responsibility on the part
of the driver.
The driver must always pay attention
to the profi le of the road, take care
on sharp acceleration and remain in
perfect control of his vehicle.
To prevent the mat from becoming
trapped under the pedals:
- ensure that the mat and its fi xings
are positioned correctly,
-
never fi t one mat on top of another.
Switching the function off
�)
Place dial in position 0
or switch
off the ignition to switch the sys-
tem off. The last programmed
speed remains in the memory.
Operating fault
In the event of a limiter malfunction,
a message is displayed on the multi-
function display accompanied by an
audible signal.
The programmed speed is cleared and
the dashes fl ash for a few seconds.
Contact a CITROËN dealer to have
the system checked. To return to the limiter function, re-
duce your speed to the programmed
speed or below.
Page 69 of 136
67 DRIVING
-
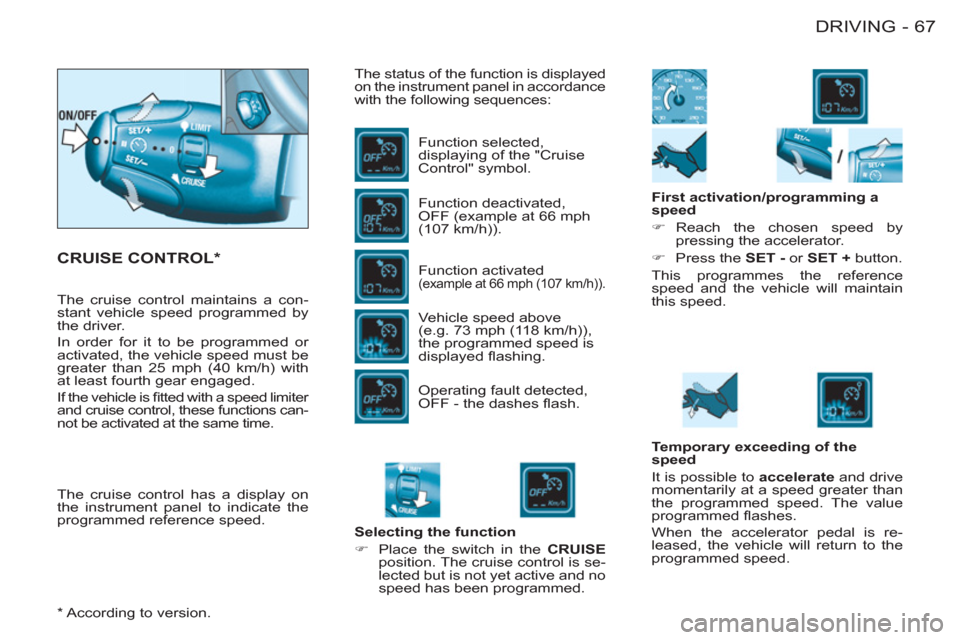
CRUISE CONTROL *
The status of the function is displayed
on the instrument panel in accordance
with the following sequences:
Function selected,
displaying of the "Cruise
Control" symbol.
Function deactivated,
OFF (example at 66 mph
(107 km/h)).
Function activated (example at 66 mph (107 km/h)).
Vehicle speed above
(e.g. 73 mph (118 km/h)),
the programmed speed is
displayed fl ashing.
Operating fault detected,
OFF - the dashes fl ash.
Selecting the function
�)
Place the switch in the CRUISE
position. The cruise control is se-
lected but is not yet active and no
speed has been programmed.
First activation/programming a
speed
�)
Reach the chosen speed by
pressing the accelerator.
�)
Press the SET -
or SET +
button.
This programmes the reference
speed and the vehicle will maintain
this speed.
Temporary exceeding of the
speed
It is possible to accelerate
and drive
momentarily at a speed greater than
the programmed speed. The value
programmed fl ashes.
When the accelerator pedal is re-
leased, the vehicle will return to the
programmed speed. The cruise control has a display on
the instrument panel to indicate the
programmed reference speed. The cruise control maintains a con-
stant vehicle speed programmed by
the driver.
In order for it to be programmed or
activated, the vehicle speed must be
greater than 25 mph (40 km/h) with
at least fourth gear engaged.
If the vehicle is fi tted with a speed limiter
and cruise control, these functions can-
not be activated at the same time.
*
According to version.
Page 70 of 136
DRIVING68 -
When changing the pro-
grammed reference speed
by means of a maintained
press, pay attention as the
speed can increase or de-
crease rapidly.
Do not use the cruise control on slip-
pery roads or in heavy traffi c.
In the event of a steep slope, the
cruise control cannot prevent the
vehicle from exceeding the pro-
grammed speed.
In any event, the cruise control can-
not replace the need to observe the
speed limits, nor can it replace the
need for vigilance and responsibility
on the part of the driver.
It is advisable to leave your feet near
the pedals.
To prevent the mat from becoming
trapped under the pedals:
- ensure that the mat and its fi xings
are positioned correctly,
-
never fi t one mat on top of another.
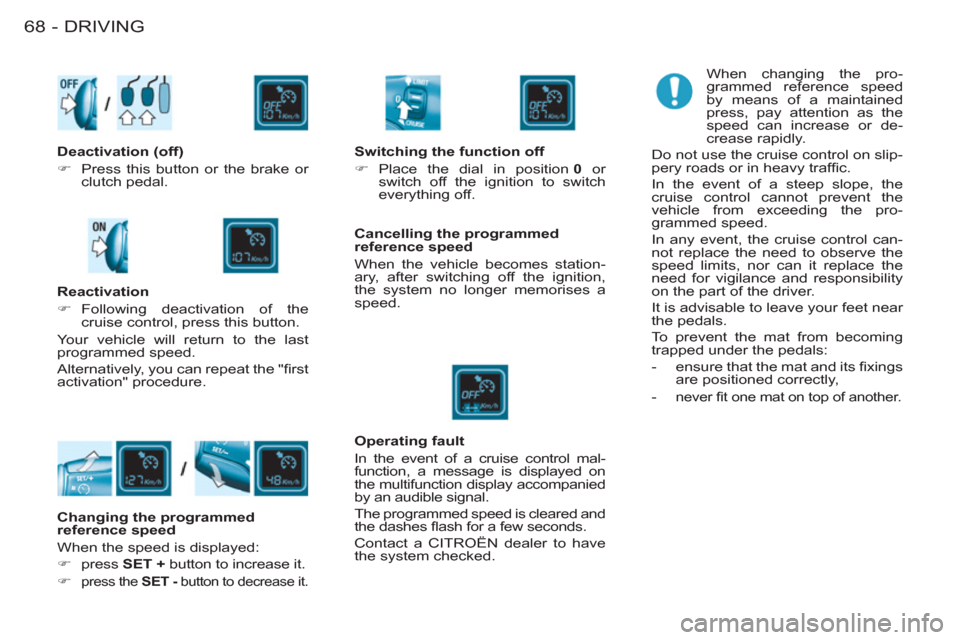
Deactivation (off)
�)
Press this button or the brake or
clutch pedal.
Changing the programmed
reference speed
When the speed is displayed:
�)
press SET +
button to increase it.
�)
press the SET -
button to decrease it.
Reactivation
�)
Following deactivation of the
cruise control, press this button.
Your vehicle will return to the last
programmed speed.
Alternatively, you can repeat the "fi rst
activation" procedure.
Switching the function off
�)
Place the dial in position 0
or
switch off the ignition to switch
everything off.
Operating fault
In the event of a cruise control mal-
function, a message is displayed on
the multifunction display accompanied
by an audible signal.
The programmed speed is cleared and
the dashes fl ash for a few seconds.
Contact a CITROËN dealer to have
the system checked.
Cancelling the programmed
reference speed
When the vehicle becomes station-
ary, after switching off the ignition,
the system no longer memorises a
speed.