reset CITROEN C-ELYSÉE 2015 User Guide
[x] Cancel search | Manufacturer: CITROEN, Model Year: 2015, Model line: C-ELYSÉE, Model: CITROEN C-ELYSÉE 2015Pages: 285, PDF Size: 13.42 MB
Page 234 of 285

232
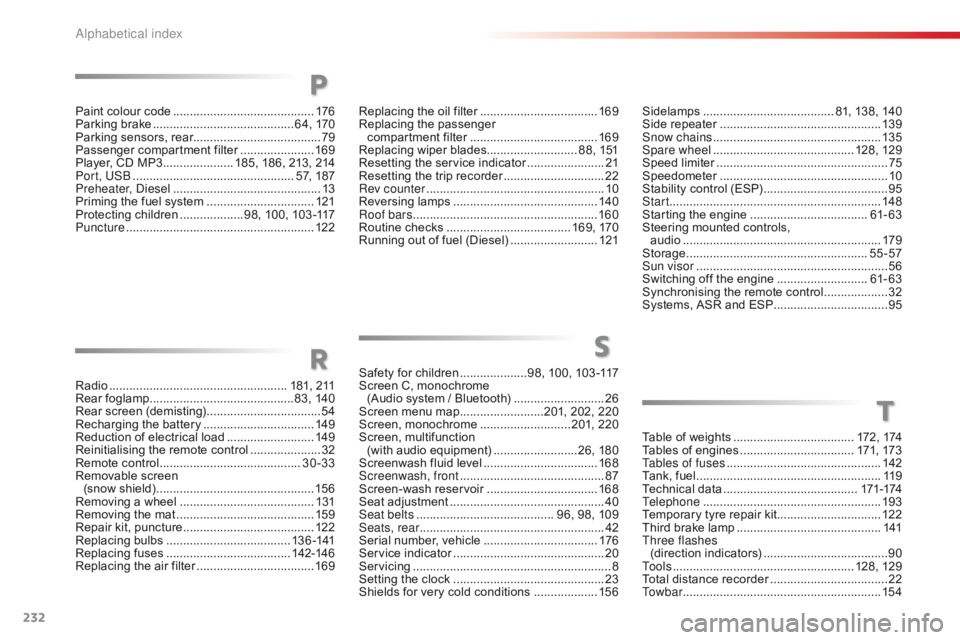
Table of weights ....................................17 2 , 174
Tables of engines ............................... ...171, 173
Tables of fuses
.............................................. 14
2
Tank, fuel
...............................
........................11 9
Technical data
........................................ 17
1-174
Telephone
..................................................... 19
3
Temporary tyre repair kit............................... 12 2
Third brake lamp
........................................... 1
41
Three flashes (direction indicators)
..................................... 90
T
o o l s
................
...................................... 128, 129
Total distance recorder
...................................2
2
To w b a r
................
........................................... 15 4
T
Paint colour code ..........................................17 6
Parking brake .......................................... 6 4, 170
Parking sensors, rear...................................... 79
Passenger compartment filter
...................... 16
9
Player, CD MP3
..................... 1
85, 186, 213, 214
Port, US
b
................................................ 5
7, 187
Preheater,
d
i
esel
..............................
..............13
Priming the fuel system
................................12
1
Protecting children
...................9
8, 100, 103 -117
Puncture
................
........................................ 12 2
Radio
...............
...................................... 181, 211
Rear foglamp ...........................................83, 140
Rear screen (demisting)
.................................. 54
R
echarging the battery
.................................14
9
Reduction of electrical load
..........................14
9
Reinitialising the remote control
.....................32
R
emote control
.......................................... 3
0-33
Removable screen (snow shield)
...............................
................15 6
Removing a wheel
..............................
..........131
Removing the mat
...............................
..........159
Repair kit, puncture
....................................... 12
2
Replacing bulbs
..............................
.......13 6 -141
Replacing fuses
..............................
.......142-146
Replacing the air filter
...................................16
9Safety for children
....................9
8, 100, 103 -117
Screen C, monochrome (Audio system / Bluetooth)
...........................26
S
creen menu map
.........................2
01, 202, 220
Screen, monochrome
...........................2
01, 220
Screen, multifunction
(with audio equipment)
.........................2
6, 180
Screenwash fluid level
..................................16
8
Screenwash, front
........................................... 87
S
creen-wash reservoir
.................................16
8
Seat adjustment
...............................
...............40
Seat belts
......................................... 9
6, 98, 109
Seats, rear
....................................................... 42
S
erial number, vehicle
..................................17
6
Service indicator
............................................. 20
S
ervicing
...............................
............................ 8
Setting the clock
.............................................23
S
hields for very cold conditions
...................15
6
RS
Sidelamps ....................................... 81, 138, 140
Side repeater .............................. ..................13 9
Snow chains
.................................................. 13
5
Spare wheel
...............................
...........128, 129
Speed limiter
...............................
....................75
Speedometer
..............................
....................10
Stability control (ESP)
..................................... 95
S
tart
...............................
................................148
Starting the engine
................................... 61
- 63
Steering mounted controls, audio
...............
............................................ 179
Storage
................
...................................... 55-57
Sun visor
......................................................... 56
S
witching off the engine
...........................61
- 63
Synchronising the remote control
...................32
S
ystems, ASR and ESP
..................................95
P
Replacing the oil filter ................................... 16 9
Replacing the passenger
compartment filter
...................................... 16
9
Replacing wiper blades........................... 88, 151 Resetting the service indicator
.......................21
R
esetting the trip recorder
..............................2
2
Rev counter
..................................................... 10
R
eversing lamps
........................................... 14
0
Roof bars
....................................................... 16
0
Routine checks
..................................... 1
69, 170
Running out of fuel (Diesel)
..........................12
1
alphabetical index
Page 244 of 285

1
1
Monitoring
C-Elysee-add_en_Chap01_controle-de-marche_ed01-2014
Instrument panel for petrol - Diesel
1. Rev counter (x 1 000 rpm). 2. Screen. 3. Speedometer (mph or km/h).
A. Electronic or automatic gearbox information. Gear shift indicator .B. Time. C. Range for the fuel or AdBlue additive and the SCR system (miles or km) or Trip distance recorder. D. Foot on the clutch / Fuel gauge / Diesel preheater. E. Service indicator (miles or km)
then, total distance recorder. These two functions are displayed successively when switching on the ignition F. Speed limiter or cruise control settings.
4. Reminder of service information Reset the selected function to zero (trip distance recorder or service indicator) Adjust the time.
Dials Screen
Page 248 of 285

1
5
Monitoring
C-Elysee-add_en_Chap01_controle-de-marche_ed01-2014
Service indicator
The point at which the next service is due is calculated from the last indicator zero reset, depending on the distance travelled and the time elapsed since the last service.
System which informs the driver when the next service is due, in accordance with the manufacturer's servicing schedule.
Between 600 miles (1 000 km) and 1 800 miles (3 000 km) remain before the next service is due
For 5 seconds after the ignition is switched on, the spanner symbolising the service operations comes on. The distance recorder display line indicates the distance remaining before the next service is due. Example: 1 739 miles (2 800 km) remain before the next service is due. For 5 seconds after the ignition is switched on, the screen indicates:
5 seconds after the ignition is switched on, the spanner goes off ; the distance recorder the spanner goes off ; the distance recorder the spanner goes offresumes its normal operation. The screen then indicates the total distance.
Less than 600 miles (1 000 km) remain before the next service is due
Example: 560 miles (900 km) remain before the next service is due. For 5 seconds after the ignition is switched on, the screen indicates:
5 seconds after the ignition is switched on, the distance recorder resumes its normal operation. The spanner remains on to indicate that a service must be carried out soon.
For BlueHDi Diesel versions, the degree of deterioration of the engine oil is also taken into account (depending on the country of sale).
More than 1 800 miles (3 000 km) remain before the next service is due
When the ignition is switched on, no service information appears in the screen.
Page 267 of 285

.
Audio and Telematics 5
301-add-2_en_Chap12_RDE2_ed01-2014
First steps
On / Off, volume adjustment.
Select the source: Radio: FM1, FM2, AM, CD, USB, AUX, Streaming. Telephone: accept an incoming call. Telephone, press and hold: end a call, access the calls log for the connected telephone.
Display the list of stations received,
the CD/USB tracks or folders. Press and hold: update the list of stations received.
Automatic search for a lower radio frequency. Select the previous CD, USB track. Navigation in a list. Press and hold: fast back.
Automatic search for a higher radio frequency. Select the next CD, USB track. Navigation in a list. Press and hold: fast for ward.
Adjust audio settings: sound ambience, treble, bass, loudness, distribution, left/right balance, front/rear balance, automatic volume.
Abandon the current operation. Go up one level (menu or folder).
Select a preset radio station. Radio, press and hold: preset a radio station. Other than radio: see the corresponding sections.
Eject CD.
Open the main menu.
Page 268 of 285

Audio and Telematics
6
Steering mounted controls
Radio: select the previous / next preset station. CD / USB: select the genre / artist / folder / playlist from the list depending on classification. Select the previous / next item in a menu.
Volume decrease.
Radio: automatic search for a higher frequency. CD / MP3 / USB: select the next track. CD / USB: press and hold: fast forward.
Mute: cut the sound by simultaneously pressing the volume increase and decrease buttons. Restore the sound: by pressing one of the two volume buttons.
Radio: automatic search for a lower frequency. CD / MP3 / USB: select the previous track. CD / USB: press and hold: fast back.
Change the audio sound. Confirm a selection. Start /end call with the telephone. Press and hold: access to the call log.
Volume increase.
Page 269 of 285

.
Audio and Telematics 7
301-add-2_en_Chap12_RDE2_ed01-2014
Radio
Presetting a station
Selecting a station
Managing a list Entering a frequency
Press SRC/TEL repeatedly to select the FM1, FM2 or AM waveband.
Press and hold one of the buttons to
preset the station being listened to. The name of the station is displayed and an audible signal confirms the preset.
Press a button to listen to the
corresponding preset station.
Select "Radio" .
Select "Write freq." .
Press + .
or
or press - to select the desired
frequency.
Briefly press one of the buttons to change to the next or previous letter.
Press and hold on LIST to build or update the list of stations; audio reception is cut momentarily.
Press LIST to display the list of stations received in alphabetical o r d e r.
Select the desired radio station using one of the buttons.
Confirm with "OK" .
Confirm with "OK" .
The exterior environment (hills, buildings, tunnel, car park, below ground...) may prevent reception, even in RDS station tracking (alternative frequencies) mode. This phenomenon is normal in the propagation of radio waves and is in no way indicative of a fault with the audio system.
Press on MENU .
Page 281 of 285

.
Audio and Telematics 19
301-add-2_en_Chap12_RDE2_ed01-2014
Frequently asked questions
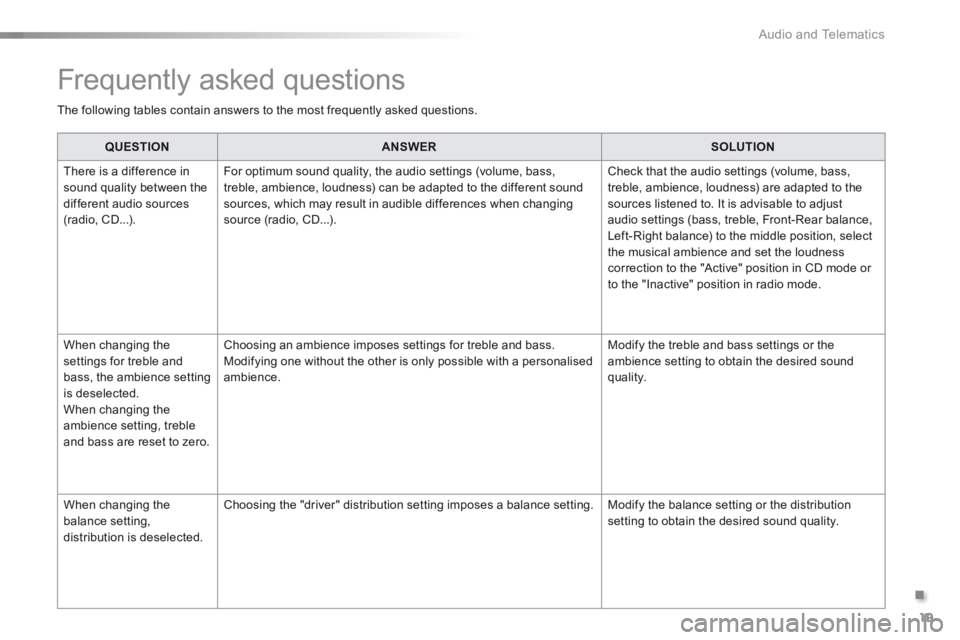
The following tables contain answers to the most frequently asked questions.
QUESTIONANSWERSOLUTION
There is a difference in sound quality between the different audio sources (radio, CD...).
For optimum sound quality, the audio settings (volume, bass, treble, ambience, loudness) can be adapted to the different sound sources, which may result in audible differences when changing source (radio, CD...).
Check that the audio settings (volume, bass, treble, ambience, loudness) are adapted to the sources listened to. It is advisable to adjust audio settings (bass, treble, Front-Rear balance, Left-Right balance) to the middle position, select the musical ambience and set the loudness correction to the "Active" position in CD mode or to the "Inactive" position in radio mode.
When changing the settings for treble and bass, the ambience setting is deselected. When changing the ambience setting, treble and bass are reset to zero.
Choosing an ambience imposes settings for treble and bass. Modifying one without the other is only possible with a personalised ambience.
Modify the treble and bass settings or the ambience setting to obtain the desired sound quality.
When changing the balance setting,
distribution is deselected.
Choosing the "driver" distribution setting imposes a balance setting. Modify the balance setting or the distribution setting to obtain the desired sound quality.