CITROEN C-ELYSÉE 2015 Owners Manual
Manufacturer: CITROEN, Model Year: 2015, Model line: C-ELYSÉE, Model: CITROEN C-ELYSÉE 2015Pages: 285, PDF Size: 13.42 MB
Page 211 of 285
209
Audio system
01 First steps
For safety reasons, the driver must only carry out
operations which require prolonged attention while the
vehicle is stationary.
When the engine is switched off and to prevent
discharging of the battery, the system switches off after
activation of economy mode.
CONTENTS
02
Audio
system
03
Audio
settings
04
Screen
menu map(s)
Frequently asked questions p.
p.
p.
p.
p.
210
2 11
219
220
221
Page 212 of 285
01FIRST STEPS
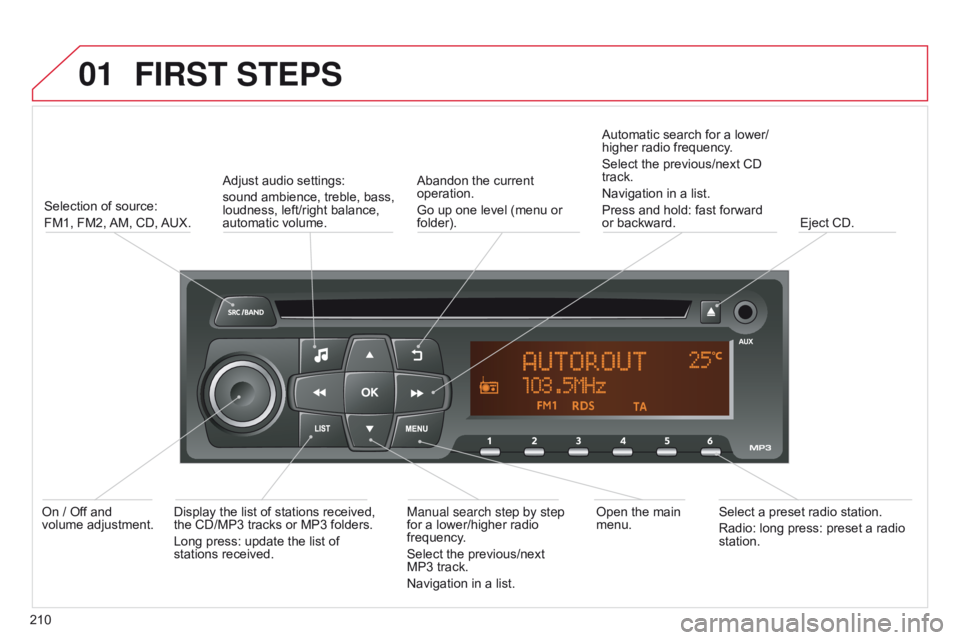
210Selection of source:
FM1, FM2, AM, CD, AUX.
Adjust audio settings:
sound ambience, treble, bass,
loudness, left/right balance,
automatic volume. Abandon the current
operation.
Go up one level (menu or
folder).Automatic search for a lower/
higher radio frequency.
Select the previous/next CD
track.
Navigation in a list.
Press and hold: fast forward
or backward.
Eject CD.
Manual search step by step
for a lower/higher radio
frequency.
Select the previous/next
MP3 track.
Navigation in a list. Open the main
menu.
Select a preset radio station.
Radio: long press: preset a radio
station.
Display the list of stations received,
the CD/MP3 tracks or MP3 folders.
Long press: update the list of
stations received.
On / Off and
volume adjustment.
Page 213 of 285
02
2 11
AUDIO
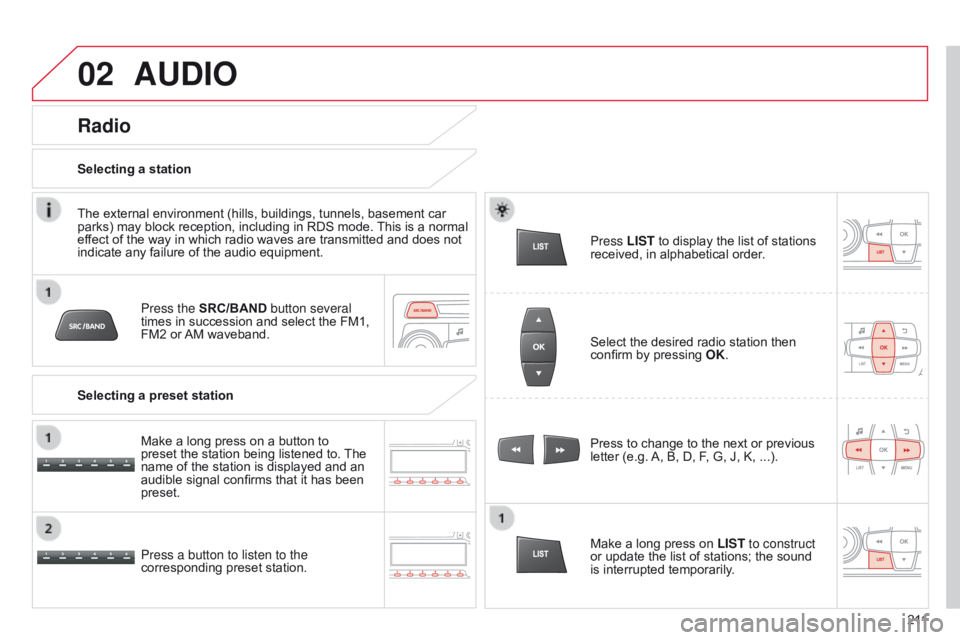
Press the SRC/BAND button several
times in succession and select the FM1,
FM2 or AM waveband.
Press a button to listen to the
corresponding preset station. Press to change to the next or previous
letter (e.g. A, B, D, F, G, J, K, ...).
Radio
Select the desired radio station then
confirm by pressing
OK.
Selecting a station
Make a long press on LIST to construct
or update the list of stations; the sound
is interrupted temporarily.
The external environment (hills, buildings, tunnels, basement car
parks) may block reception, including in RDS mode. This is a normal
effect of the way in which radio waves are transmitted and does not
indicate any failure of the audio equipment.
Selecting a preset station
Make a long press on a button to
preset the station being listened to. The
name of the station is displayed and an
audible signal confirms that it has been
preset. Press LIST
to display the list of stations
received, in alphabetical order.
Page 214 of 285
02
212RDS, if displayed, enables you to continue listening to the same
station by automatic retuning to alternative frequencies. However
, in
certain conditions, coverage by an RDS station may not be assured
throughout the country as radio stations do not cover 100 % of the
territory. This explains the loss of reception of the station during a
journey.
AUDIO
RDS
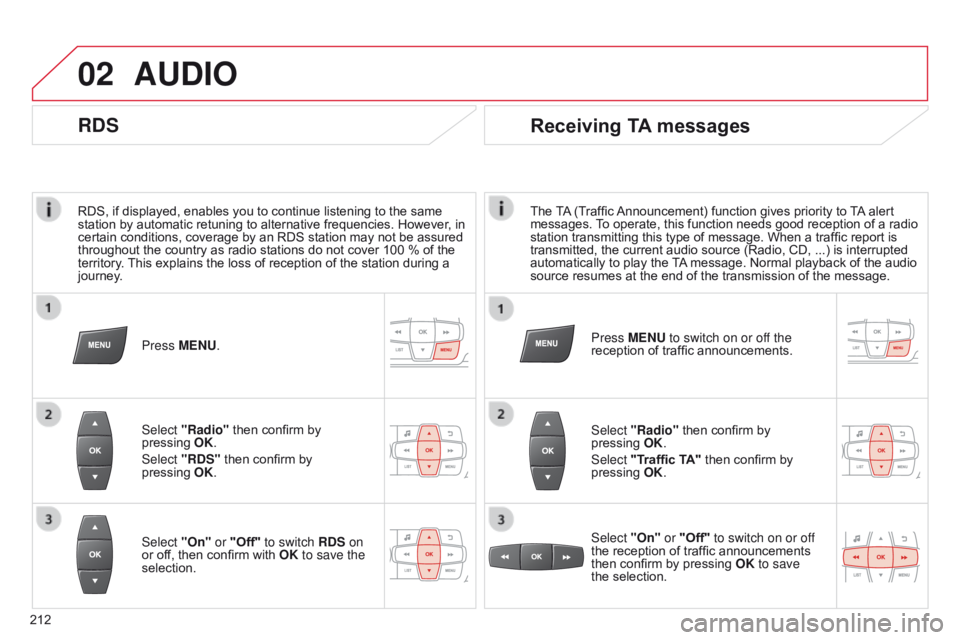
Press MENU.
Select "Radio" then confirm by
pressing
OK
.
Select "RDS" then confirm by
pressing
OK
.
Select "On" or "Off" to switch RDS on
or off, then confirm with OK to save the
selection.
Receiving TA messages
The TA (Traffic Announcement) function gives priority to TA alert
messages. To operate, this function needs good reception of a radio
station transmitting this type of message. When a traffic report is
transmitted, the current audio source (Radio, CD, ...) is interrupted
automatically to play the TA message. Normal playback of the audio
source resumes at the end of the transmission of the message.
Select "Radio" then confirm by
pressing OK.
Select "Traffic TA" then confirm by
pressing OK.
Select "On" or "Off" to switch on or off
the reception of traffic announcements
then confirm by pressing OK to save
the selection. Press MENU to switch on or off the
reception of traffic announcements.
Page 215 of 285
02
213
AUDIO
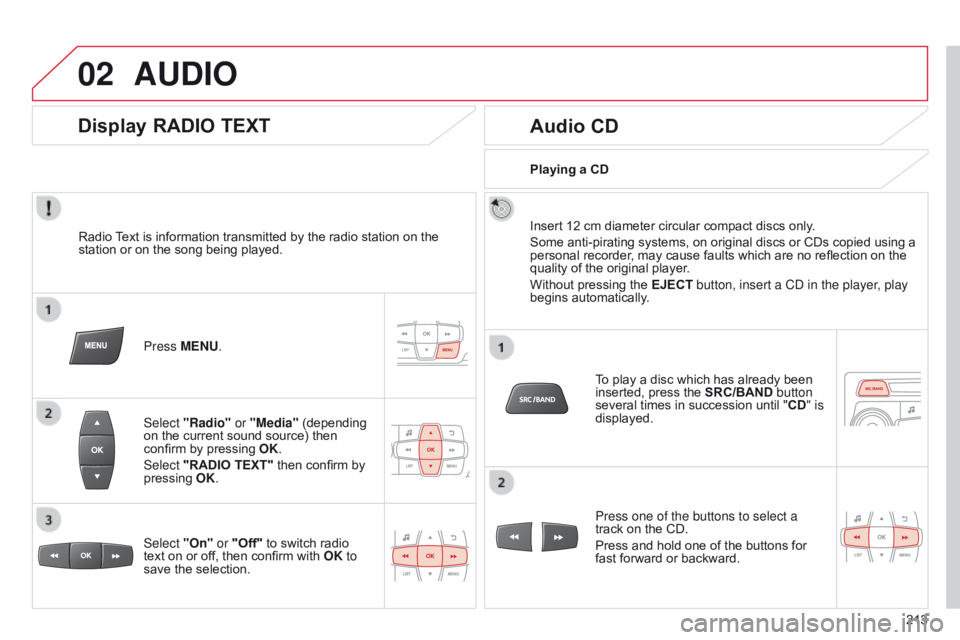
Radio Text is information transmitted by the radio station on the
station or on the song being played.Press MENU.
Select "Radio" or "Media" (depending
on the current sound source) then
confirm by pressing OK.
Select "RADIO TEXT" then confirm by
pressing OK.
Display RADIO TEXT
Audio CD
Insert 12 cm diameter circular compact discs only.
Some anti-pirating systems, on original discs or CDs copied using a
personal recorder, may cause faults which are no reflection on the
quality of the original player.
Without pressing the EJECT button, insert a C
d in the player, play
begins automatically.
To play a disc which has already been
inserted, press the SRC/BAND button
several times in succession until " CD" is
displayed.
Press one of the buttons to select a
track on the CD.
Press and hold one of the buttons for
fast forward or backward.
Playing a CD
Select "On" or "Off" to switch radio
text on or off, then confirm with OK to
save the selection.
Page 216 of 285
02
214
AUDIO
CD
Information and adviceOn a given disc, the CD player can read up to 255 MP3 files spread
over 8 levels. However, it is advisable to keep to a limit of two levels to
reduce the access time before the CD is played.
The folder structure is not observed during playback.
In order to be able to play a recorded CDR or CDRW, when recording
it is preferable to select standards ISO 9660 level 1.2 or Joliet.
If the disc is recorded in another format, it may not be played correctly.
It is recommended that the same recording standard is always used
for a given disc, with as low a speed as possible (4x maximum) for
optimum sound quality.
In the particular case of a multi-session CD, the Joliet standard is
recommended.
The audio system can only play files with ".mp3", ".wma" or ".wav"
extensions.
A high compression level can degrade the sound quality.
Playlists accepted are types .m3u and .pls.
The system can recognise up to 5 000 files in 500 folders on 8 levels. It is advisable to restrict file names to 20 characters without using
special characters (e.g. " ? ; ù) to avoid any playing or displaying
problems.
Page 217 of 285
02
215
CD
AUDIO
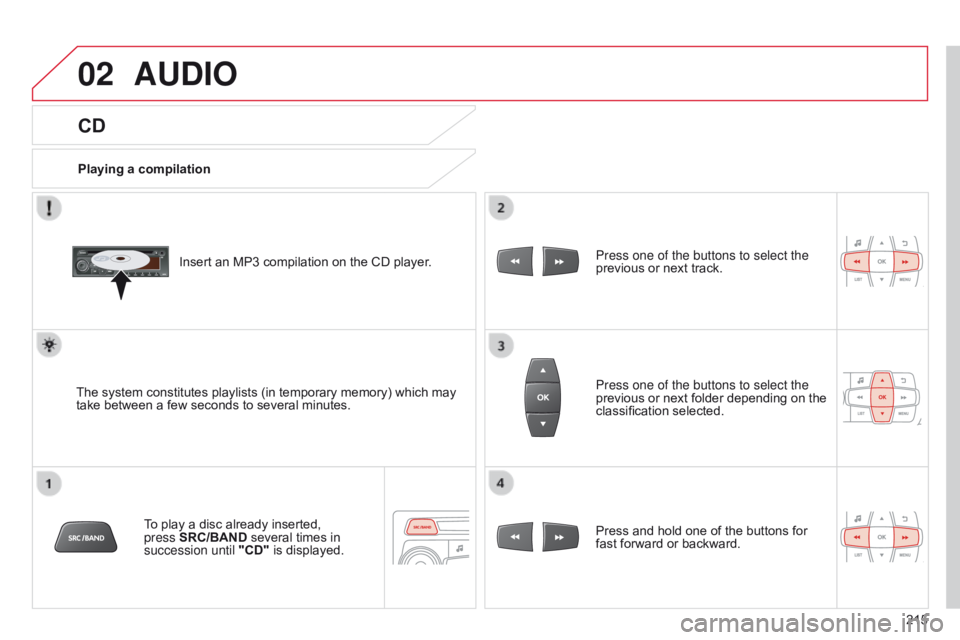
Playing a compilationInsert an MP3 compilation on the CD player.
The system constitutes playlists (in temporary memory) which may
take between a few seconds to several minutes. To play a disc already inserted,
press
SRC/BAND several times in
succession until "CD" is displayed. Press one of the buttons to select the
previous or next track.
Press one of the buttons to select the
previous or next folder depending on the
classification selected.
Press and hold one of the buttons for
fast forward or backward.
Page 218 of 285
02
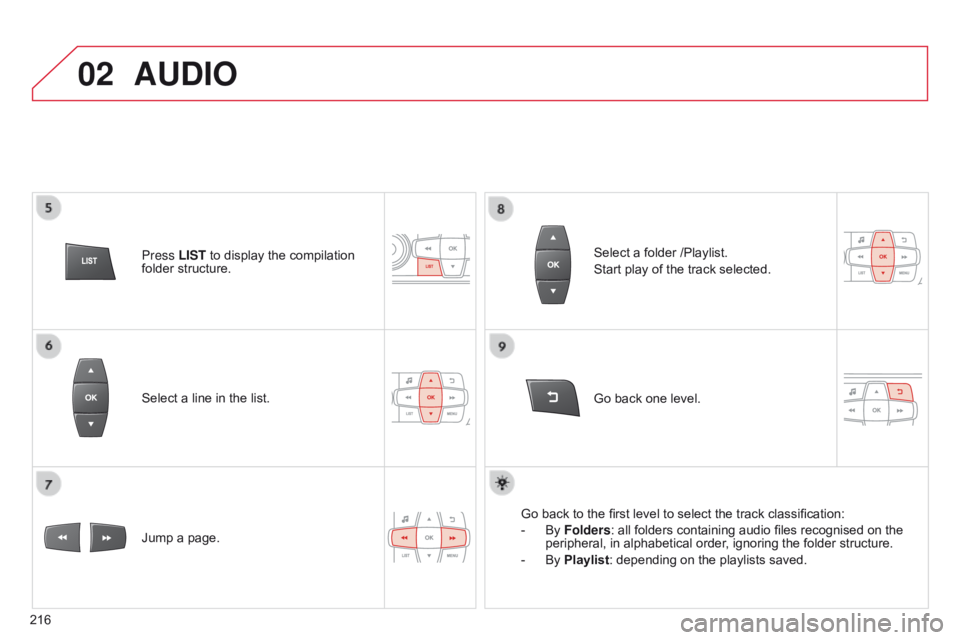
216Select a line in the list.
Jump a page.
Go back one level. Select a folder /Playlist.
Start play of the track selected.
Go back to the first level to select the track classification:
-
By
Folders: all folders containing audio files recognised on the
peripheral, in alphabetical order, ignoring the folder structure.
-
By
Playlist: depending on the playlists saved.
Press LIST
to display the compilation
folder structure.
AUDIO
Page 219 of 285
02
217
AUDIO
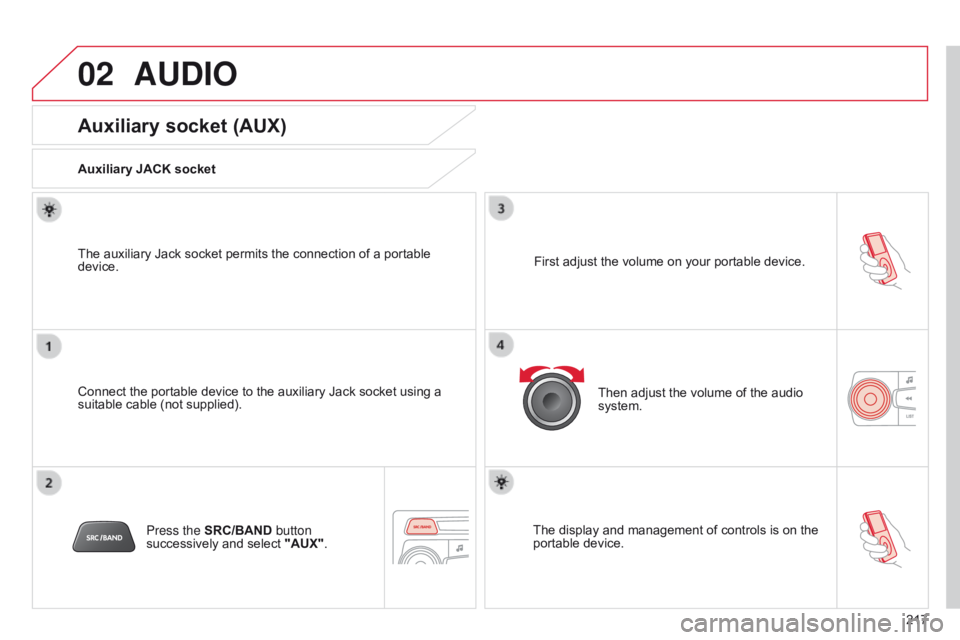
Auxiliary socket (AUX)
Auxiliary JACK socket
Connect the portable device to the auxiliary Jack socket using a
suitable cable (not supplied). The auxiliary Jack socket permits the connection of a portable
device.Press the SRC/BAND button
successively and select "AUX". First adjust the volume on your portable device.
Then adjust the volume of the audio
system.
The display and management of controls is on the
portable device.
Page 220 of 285
02
218
AUDIO
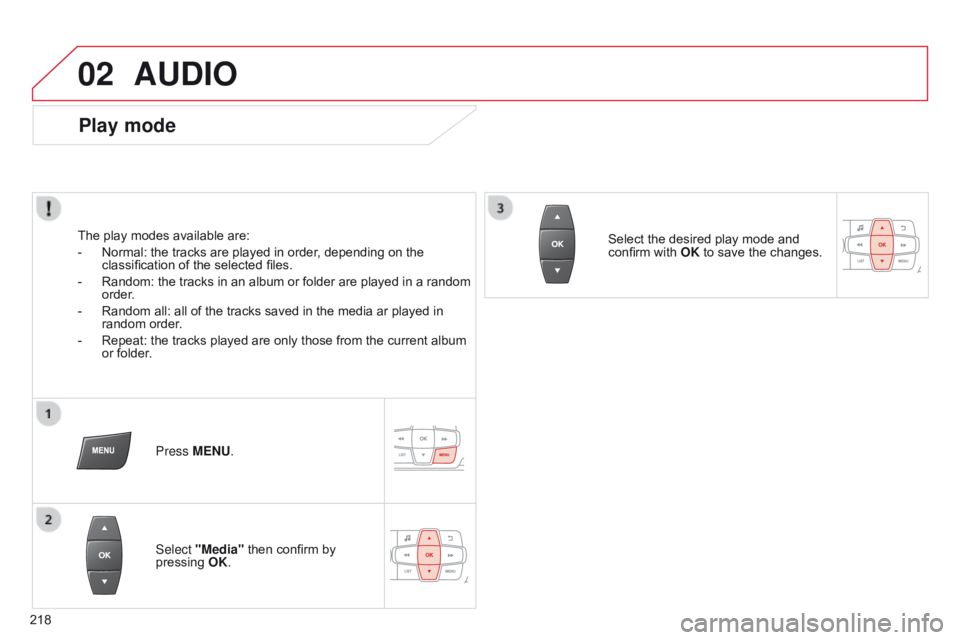
Play mode
The play modes available are:
-
Normal: the tracks are played in order
, depending on the
classification of the selected files.
-
Random: the tracks in an album or folder are played in a random
order
.
-
Random all: all of the tracks saved in the media ar played in
random order
.
-
Repeat: the tracks played are only those from the current album
or folder
.Press MENU.
Select "Media" then confirm by
pressing OK. Select the desired play mode and
confirm with OK to save the changes.