buttons CITROEN C-ELYSÉE 2016 Owners Manual
[x] Cancel search | Manufacturer: CITROEN, Model Year: 2016, Model line: C-ELYSÉE, Model: CITROEN C-ELYSÉE 2016Pages: 260, PDF Size: 7.11 MB
Page 28 of 260
26
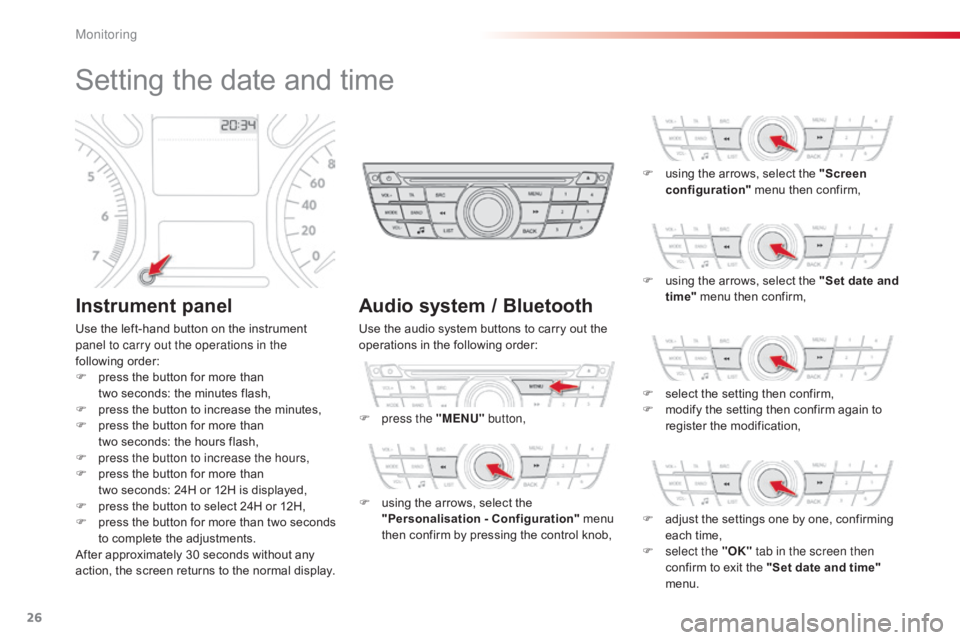
Setting the date and time
Instrument panel
Use the left-hand button on the instrument panel to carry out the operations in the
following
or
der:
F
p
ress the button for more than
t
wo seconds: the minutes flash,
F
p
ress the button to increase the minutes,
F
p
ress the button for more than
t
wo seconds: the hours flash,
F
p
ress the button to increase the hours,
F
p
ress the button for more than
t
wo seconds: 24H or 12H is displayed,
F
p
ress the button to select 24H or 12H,
F
p
ress
t
he
b
utton
f
or
m
ore
t
han
t
wo
s
econds
t
o complete the adjustments.
After
approximately 30 seconds without any
a
ction, the screen returns to the normal display.
Audio system / Bluetooth
Use the audio system buttons to carry out the operations in the following order:
F
p
ress the "MENU" button,
F
u
sing the arrows, select the
"
Personalisation - Configuration"
menu
t
hen confirm by pressing the control knob,F
u
sing the arrows, select the "Screen
configuration"
menu then confirm,
F
u
sing the arrows, select the "Set date and
time"
menu then confirm,
F
s
elect the setting then confirm,
F
m
odify the setting then confirm again to
r
egister the modification,
F
a
djust the settings one by one, confirming
e
ach time,
F
s
elect the "OK" tab in the screen then
confirm
to exit the "Set date and time"
menu.
Monitoring
Page 31 of 260
29
C-elysee_en_Chap01_controle-de-marche_ed01-2016
C-elysee_en_Chap01_controle-de-marche_ed01-2016
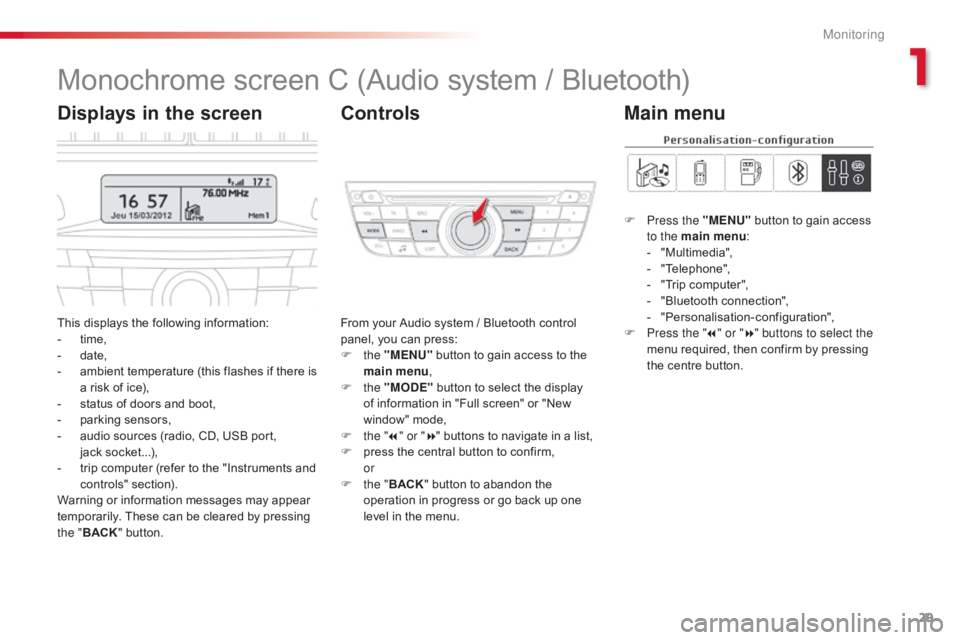
Monochrome screen C (Audio system / Bluetooth)
This displays the following information:
- t ime,
-
d
ate,
-
a
mbient temperature (this flashes if there is
a
risk of ice),
-
s
tatus of doors and boot,
-
p
arking sensors,
-
a
udio sources (radio, CD, USB port,
j
ack socket...),
-
t
rip computer (refer to the "Instruments and
c
ontrols"
s
ection).
Warning
or information messages may appear
t
emporarily. These can be cleared by pressing
t
he " BACK "
button. From
your Audio system / Bluetooth control p
anel, you can press:
F
the "MENU"
button to gain access to the
m
ain menu,
F
the "MODE"
button to select the display
o
f information in "Full screen" or "New
w
indow" mode,
F
t
he "7" or " 8"
buttons to navigate in a list,
F
p
ress the central button to confirm,
or
F
t
he "BACK "
button to abandon the
o
peration in progress or go back up one
l
evel in the menu.
Displays in the screenControls
F Press the "MENU" button to gain access t
o the main menu :
-
"
Multimedia",
-
"
Telephone",
-
"
Trip computer",
-
"
Bluetooth connection",
-
"
Personalisation-configuration",
F
P
ress the " 7" or " 8" buttons to select the
menu
required, then confirm by pressing
t
he centre button.
Main menu
1
Monitoring
Page 38 of 260
36
C-elysee_en_Chap02_ouvertures_ed01-2016
Lost keys
Go to a CITROËN dealer with the vehicle's registration document, your personal identification documents and if possible the key code label.
The
CITROËN dealer will be able to look up the key code and the transponder code
r
equired to order a new key.
Remote control
The high frequency remote control is a sensitive system; do not operate it while it is in your pocket as there is a possibility that it may unlock the vehicle, without you being aware of it.
Do
not repeatedly press the buttons of your remote control out of range and out of sight of
y
our vehicle. You run the risk of stopping it from working and the remote control would have
t
o be reinitialised.
No
remote control can operate when the key is in the ignition switch, even when the ignition
i
s switched off, except for reinitialisation.
Locking the vehicle
Driving with the doors locked may make access to the passenger compartment by the emergency services more difficult in an emergency.
As
a safety precaution, never leave children alone in the vehicle, except for a very short
p
eriod.
In
all cases, it is essential to remove the key from the ignition switch when leaving the vehicle.
Anti-theft protection
Do not make any modifications to the electronic engine immobiliser system; this could cause m alfunctions.
When purchasing a second-hand vehicle
Have the pairing of all of the keys in your possession checked by a CITROËN dealer, to ensure that only your keys can be used to open and start the vehicle.Do
not throw the remote control
b
atteries away, they contain metals
w
hich are harmful to the environment.
Take them to an approved collection
po
int.
Ac
Page 55 of 260
53
C-elysee_en_Chap03_confort_ed01-2016
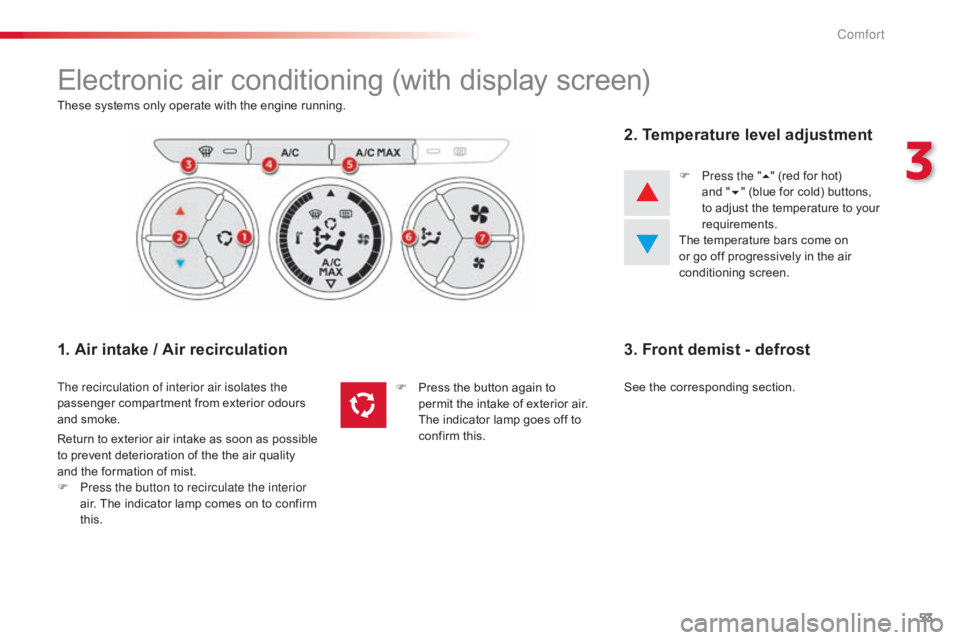
Electronic air conditioning (with display screen)
These systems only operate with the engine running.
1. Air intake / Air recirculation
The recirculation of interior air isolates the
passenger compartment from exterior odours
a
nd smoke.
2. Temperature level adjustment
F Press the " 5" (red for hot) a
nd "6"
(blue for cold) buttons,
t
o adjust the temperature to your
r
equirements.
The
temperature bars come on
o
r go off progressively in the air
c
onditioning
s
creen.
Return
to
exterior
air
intake
as
soon
as
possible
t
o
prevent
deterioration
of
the
the
air
quality
a
nd
the
formation
of
mist.
F
P
ress the button to recirculate the interior
air.
The
indicator
lamp
comes
on
to
confirm
t
his. F
P
ress
the
button
again
to
p
ermit
the
intake
of
exterior
air.
T
he indicator
lamp
goes
off
to
c
onfirm
this.
3. Front demist - defrost
See the corresponding section.
3
Comfort
Page 88 of 260

86
C-elysee_en_Chap05_conduite_ed01-2016
F Turn thumb wheel 1 to the
"LIMIT" position:
the speed limiter
m
ode is selected but is not switched on
(
PAUS E).
You
do not have to switch the speed limiter
o
n in order to set the speed.
Programming Leaving limiter mode
F Turn thumb wheel 1 to the "0" position: t
he speed limiter mode is deselected. The
d
isplay returns to the distance recorder.
On
a steep descent or in the event of
s
harp acceleration, the speed limiter
w
ill not be able to prevent the vehicle
from
exceeding the programmed speed.
To
avoid any risk of jamming of the
ped
als:
-
e
nsure that the mat is secured
c
o r r e c t l y,
-
d
o not fit one mat on top of another.
In
the event of a speed limiter fault, the speed
i
s cleared and the dashes then flash.
Have
it checked by a CITROËN dealer or a
q
ualified
w
orkshop.
Operating fault
F Set the speed value by pressing button 2 or 3 (e.g.: 55 mph (
90 km/h)).
You
can then change the programmed speed using buttons 2 and 3:
-
b
y + or - 1 mph (km/h) = short press,
-
b
y + or - 5 mph (km/h) = long press,
-
i
n steps of + or - 5 mph (km/h) = maintained press.
Exceeding the programmed speed
Pressing the accelerator pedal to exceed the programmed speed will not have any effect unless you press the pedal firmly past the point of
resistance .
The
speed
limiter
is
deactivated
temporarily
and
the
programmed
speed,
w
hich is still displayed, flashes, accompanied by an audible signal.
Returning
to the programmed speed, by means of intentional or
u
nintentional deceleration of the vehicle, automatically cancels the
f
lashing of the programmed speed and the audible signal stops.
F
S
witch the speed limiter back on by pressing button 4
ag
ain.
F
S
witch the speed limiter on by pressing button 4
.
F
S
witch the speed limiter off by pressing button 4
: the display
c
onfirms that it has been switched off (PAUSE).
Driving
Page 90 of 260

88
C-elysee_en_Chap05_conduite_ed01-2016
F Turn thumb wheel 1 to the
"CRUISE" position:
the cruise control
m
ode is selected but is not switched on
(
PAUS E).
Programming
You can then change the programmed speed using buttons 2 and 3:
- b y + or - 1 mph (km/h) = short press,
-
b
y + or - 5 mph (km/h) = long press,
-
i
n steps of + or - 5 mph (km/h) = maintained press. When
the cruise control is switched on,
b
e careful if you maintain the pressure
o
n one of the programmed speed
c
hanging buttons: this may result in a
v
ery rapid change in the speed of your
v
ehicle.
Do not use the cruise control on
slippery
roads or in heavy traffic.
On
a steep descent, the cruise control
w
ill not be able to prevent the vehicle
from
exceeding the programmed speed.
To
avoid any risk of jamming of the
ped
als:
-
e
nsure that the mat is secured
c
o r r e c t l y,
-
n
ever fit one mat on top of another.
In
the event of a cruise control malfunction,
t
he speed is cleared resulting in flashing of the d
ashes. Have it checked by a CITROËN dealer o
r a qualified workshop.
Operating fault
Leaving cruise control mode
F Turn thumb wheel 1 to the "0" position: the cruise control mode is d
eselected. The display returns to the distance recorder.
Exceeding the programmed speed
Intentional or unintentional exceeding of the programmed speed results in flashing of this speed in the screen.
Return
to the programmed speed, by means of intentional or
u
nintentional deceleration of the vehicle, automatically cancels the
f
lashing of the speed.F
S
et the programmed speed by
a
ccelerating to the required speed,
t
hen press button 2 or 3 (e.g.: 70 mph
(
110 km/h)).
F
S
witch off the cruise control by pressing button 4
: the screen
c
onfirms that it has been switched off (PAUSE).
F
S
witch the cruise control back on by pressing button 4
ag
ain.
Driving
Page 199 of 260

02
197
C-elysee_en_Chap12a_RD5(RD45)_ed01-2016
STEERING MOUNTED CONTROLS
Radio: automatic search for a higher frequency.
CD / MP3 / USB: selection of the next track.
CD
/ USB: continuous press: fast forwards play.
Move
in the list. Change
audio source.
Confirm
a selection.
Call/end
call on the telephone.
Press
for more than 2 seconds:
telephone
main menu.
Radio:
automatic search for a lower
frequency
.
CD
/ MP3 / USB: selection of the
previous
track.
CD
/ USB: continuous press: fast
reverse.
Move
in the list.
Radio:
select
the
previous/next
pre-set
station.
USB:
select
genre
/
artist
/
folder
from
the
classification
list.
Select
the
previous/next
item
in
a
menu. Volume
increase.
Volume
decrease.Mute:
press the volume
increase
and decrease
buttons
simultaneously.
The
sound is restored
by
pressing one of the
two volume
buttons.
Page 204 of 260
04
202
C-elysee_en_Chap12a_RD5(RD45)_ed01-2016
AUDIO
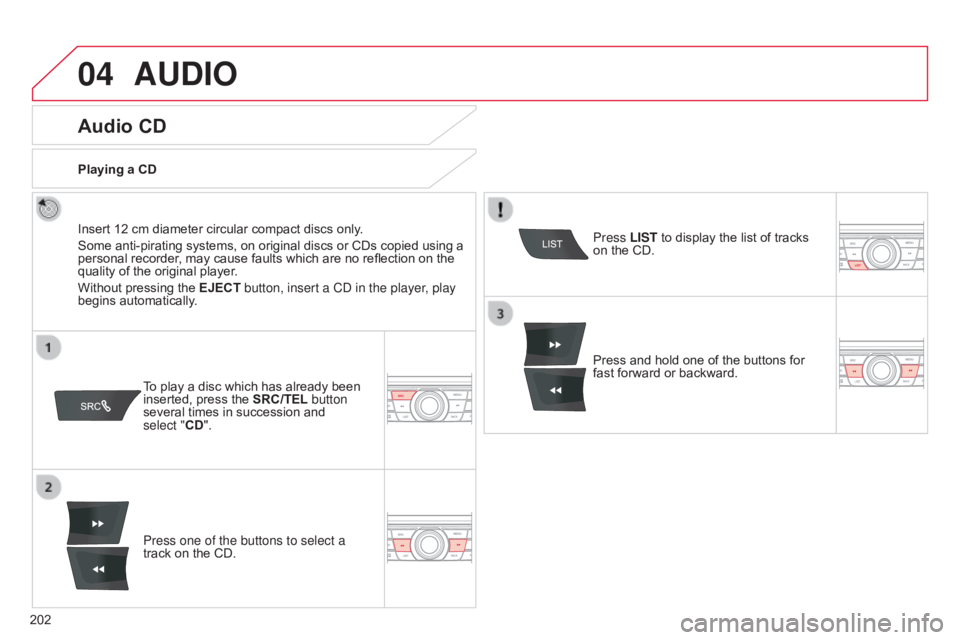
Audio CD
Insert 12 cm diameter circular compact discs only.
Some anti-pirating systems, on original discs or CDs copied using a
personal
recorder, may cause faults which are no reflection on the
quality
of the original player.
Without
pressing the EJECT button, insert a CD in the player, play
begins
automatically.
To
play a disc which has already been
inserted,
press the SRC/TEL button
several
times in succession and
select
"CD".
Press one of the buttons to select a
track
on the CD.
Playing a CD
Press LIST to display the list of tracks
on
the CD.
Press
and hold one of the buttons for
fast
forward or backward.
Page 206 of 260
04
204
C-elysee_en_Chap12a_RD5(RD45)_ed01-2016
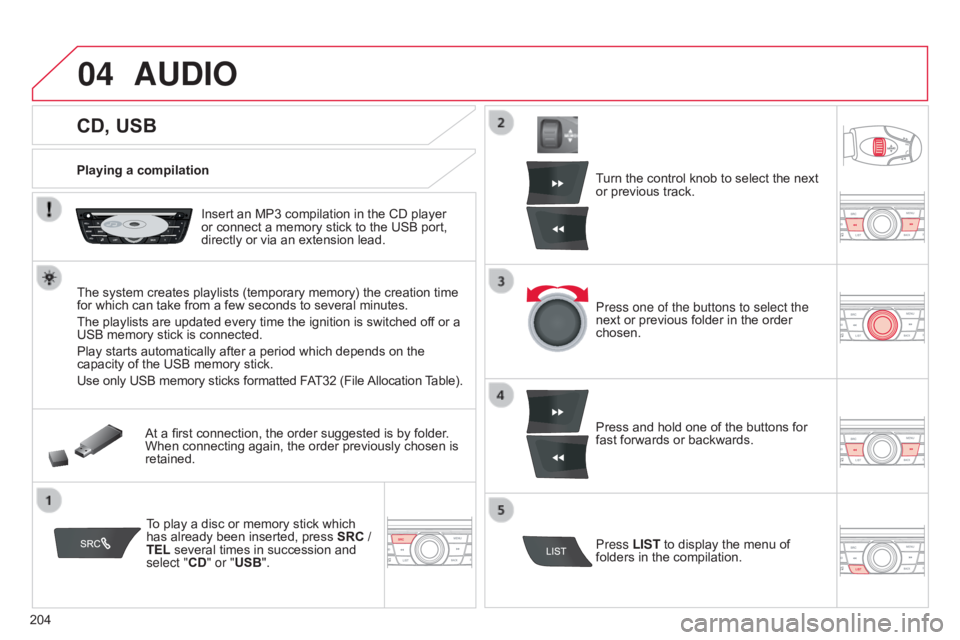
CD, USB
AUDIO
Playing a compilationInsert an MP3 compilation in the CD player
or
connect a memory stick to the USB port,
directly
or via an extension lead.
The
system creates playlists (temporary memory) the creation time
for
which can take from a few seconds to several minutes.
The
playlists are updated every time the ignition is switched off or a
USB
memory stick is connected.
Play
starts automatically after a period which depends on the
capacity
of the USB memory stick.
Use
only USB memory sticks formatted FAT32 (File
Allocation
T
able).
At
a first connection, the order suggested is by folder.
When
connecting again, the order previously chosen is
retained.T
o play a disc or memory stick which
has
already been inserted, press
SRC
/
TEL
several times in succession and
select "
CD" or "USB". Turn
the control knob to select the next
or
previous track.
Press one of the buttons to select the
next
or previous folder in the order
chosen.
Press
and hold one of the buttons for
fast
forwards or backwards.
Press LIST
to display the menu of
folders
in the compilation.
Page 215 of 260
05
213
C-elysee_en_Chap12a_RD5(RD45)_ed01-2016
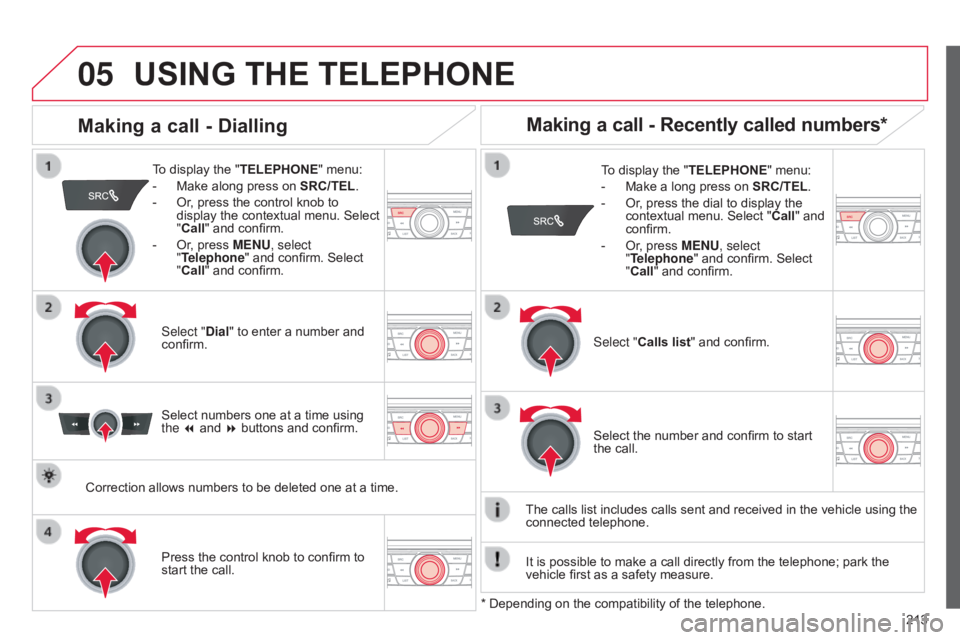
USING THE TELEPHONE
To display the "TELEPHONE " menu:
-
Make
along press on
SRC/TEL
.
-
Or
, press the control knob to
display
the contextual menu. Select
"
Call" and confirm.
-
Or
, press MENU, select
"Telephone"
and confirm. Select
"
Call" and confirm.
Select "Dial"
to enter a number and
confirm. T
o display the "TELEPHONE"
menu:
-
Make
a long press on
SRC/TEL
.
-
Or
, press the dial to display the
contextual
menu. Select "Call"
and
confirm.
-
Or
, press MENU, select
"Telephone"
and confirm. Select
"
Call" and confirm.
Press
the control knob to confirm to
start
the call. Select "Calls list"
and confirm.
Making a call - Dialling
Select numbers one at a time using the 7 and 8 buttons and confirm.
Making a call - Recently called numbers*
Select the number and confirm to start the call.
The
calls
list includes calls sent and received in the vehicle using the
connected
telephone.
*
Depending
on
the
compatibility of the telephone.
Correction
allows
numbers
to
be
deleted
one
at
a
time.
It
is
possible to make a call directly from the telephone; park the
vehicle
first
as a safety measure.