boot CITROEN C-ELYSÉE 2022 Handbook (in English)
[x] Cancel search | Manufacturer: CITROEN, Model Year: 2022, Model line: C-ELYSÉE, Model: CITROEN C-ELYSÉE 2022Pages: 260, PDF Size: 8.4 MB
Page 52 of 260

50
Mats
Removable carpet protection.
Fitting
When fitting the mat for the first time, on the
driver's side use only the fixings provided in the
wallet attached.
The other mats are simply placed on the
carpet.
Removing
To remove the mat on the driver's side:
F M ove the seat as far back as possible.
F
U
nclip the fixings.
F
R
emove the mat.
Refitting
To refit the mat on the driver's side:
F P osition the mat correctly. To avoid any risk of jamming of the pedals:
-
O
nly use mats which are suited to the
fixings already present in the vehicle;
these fixings must be used.
-
D
o not fit one mat on top of another.
The use of mats not approved by
CITROËN may inter fere with access to
the pedals and hinder the operation of the
cruise control / speed limiter.
F
R
efit the fixings by pressing.
F
C
heck that the mat is secured correctly.
Storage box
F Raise the boot floor to access the storage
box.
This has areas for the storage of a box of spare
bulbs, a first aid kit, two warning triangles, etc.
It also houses the vehicle tools, the temporary
puncture repair kit, etc.
Ease of use and comfort
Page 56 of 260

54
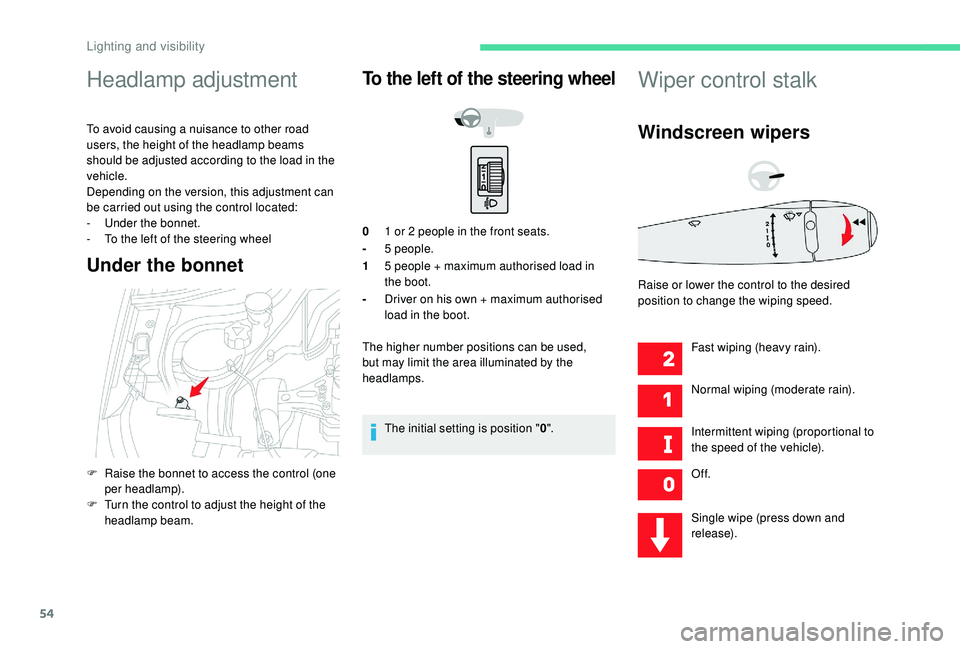
Headlamp adjustment
To avoid causing a nuisance to other road
users, the height of the headlamp beams
should be adjusted according to the load in the
vehicle.
Depending on the version, this adjustment can
be carried out using the control located:
-
U
nder the bonnet.
-
T
o the left of the steering wheel
Under the bonnet
To the left of the steering wheel
01 or 2 people in the front seats.
- 5
people.
1 5
people + maximum authorised load in
the boot.
- Driver on his own + maximum authorised
load in the boot.
The higher number positions can be used,
but may limit the area illuminated by the
headlamps.
The initial setting is position " 0".
Wiper control stalk
Windscreen wipers
Fast wiping (heavy rain).
Normal wiping (moderate rain).
Intermittent wiping (proportional to
the speed of the vehicle).
Of f.
Single wipe (press down and
release).
F
R
aise the bonnet to access the control (one
per headlamp).
F
T
urn the control to adjust the height of the
headlamp beam. Raise or lower the control to the desired
position to change the wiping speed.
Lighting and visibility
Page 101 of 260

99
Reversing camera
The reversing camera is activated automatically
when reverse gear is engaged.
The image is displayed on the touch screen.
The reversing camera function may be
supplemented with parking sensors.
The superimposed representation of guide
lines helps with the manoeuvre.
They are represented by lines marked "on
the ground" and do not allow the position of
the vehicle to be determined relative to tall
obstacles (for example: other vehicles, etc.).
Some distortion of the image is normal.The blue lines represent the general direction
of the vehicle (the gap represents the width of
your vehicle except for the door mirrors).
The red lines represent a distance of about
30
cm beyond the edge of your vehicle's rear
b u m p e r.
The green lines represent distances of about
1 and 2 metres beyond the edge of your
vehicle's rear bumper.
The turquoise blue cur ves represent the
maximum turning circle.
The reversing camera is only an aid and
the driver must remain cautious at all times.
High pressure jet wash
When washing your vehicle, do not direct
the lance within 30
cm of the camera lens.
Opening the boot lid causes the display to
disappear.
Clean the reversing camera regularly
using a soft, dry cloth.
6
Driving
Page 107 of 260

105
Procedure
Before topping up, ensure that the vehicle is
parked on a flat and level sur face.
In wintry conditions, ensure that the
temperature of the vehicle is above -11°C.
Otherwise the AdBlue
® may freeze and so
cannot be poured into its tank. Park your
vehicle in a warmer area for a few hours to
allow the top-up to be carried out.
F
S
witch off the ignition and remove the key.
F
U
nclip the plastic valve. F
C
arefully lift off the cap, without letting go
of it.
F
F
or access to the AdBlue
® tank, open the
boot, remove the boot floor and then lift out
the storage box containing the tools.
F
I
nsert your fingers into the aperture and turn
the blue cap 1/6
th of a turn anti-clockwise. F
G
et a bottle of AdBlue
®. After first checking
the use-by date, read the instructions on
use on the label carefully before pouring
the contents of the bottle into your vehicle's
AdBlue
® tank.
Important: if your vehicle's AdBlue
® tank is
completely empty – which is confirmed by
the alert displays and the impossibility of
starting the engine – you must add at least
3.8
litres (so two 1.89
litre bottles).
F
A
fter emptying the bottle, wipe away any
spillage around the tank filler using a damp
cloth. If any additive is spilt or splashed, wash
immediately with cold water or wipe with a
damp cloth.
If the additive has crystallised, clean it off
using a sponge and hot water.
F
R
efit the blue cap to the tank and turn it 1/6
th
of a turn clockwise, to its stop.
F
R
eplace the plastic valve, clipping it in the
opening.
F
R
eturn the storage box containing the tools
to its location.
F
R
eplace the boot floor and close the boot. Never dispose of AdBlue
® additive
bottles in the household waste. Place
them in a container provided for this
purpose or take them to your dealer.
Important: if topping up after
running out of Adblue , you must wait
approximately 5 minutes before switching
on the ignition, without opening the
driver's door , unlocking the vehicle or
inser ting the key in the ignition .
Switch on the ignition, then, after
10
seconds, start the engine.
7
Practical information
Page 120 of 260

118
Running out of fuel
(Diesel)
On vehicles fitted with an HDi engine, the fuel
system must be primed if you run out of fuel.
For more information about the Engines, in
particular the location of the different parts
under the bonnet, refer to the corresponding
section.
For more information on Diesel misfuel
prevention , refer to the corresponding section.
If the engine does not start the first time,
don't keep trying, but start the procedure
again from the beginning.
HDi 92 engine
F If the engine does not start after a few
attempts, operate the priming pump again
then start the engine.
F
C
lose the bonnet.
BlueHDi engines
F Fill the fuel tank with at least five litres of Diesel.
F
S
witch on the ignition (without starting the
engine).
F
W
ait around 6 seconds and switch off the
ignition.
F
R
epeat the operation 10
times.
F
O
perate the starter to run the engine.
Temporary puncture
repair kit
Comprising a compressor and a sealant
cartridge, it allows the temporary repair of
a tyre so that you can drive to the nearest
garage.
It is designed to repair most punctures which
could affect the tyre, located on the tyre tread
or shoulder.
Access to the kit
F Fill the fuel tank with at least five litres of diesel.
F
O
pen the bonnet.
F
O
perate the priming pump repeatedly until
resistance is felt (there may be resistance at
the first press).
F
O
perate the starter until the engine starts (if
the engine does not start at the first attempt,
wait around 15
seconds before trying
again). This kit is installed in the storage box, under
the boot floor.
In the event of a breakdown
Page 124 of 260

122
Spare wheel
Procedure for changing a damaged wheel with
the spare wheel using the tools provided with
the vehicle.
Access to tooling
List of tools
1Wheelbrace.
For removing the hub cap and removing
the wheel bolts.
2 Jack with integrated crank.
Used to raise the vehicle.
3 Wheel bolt cover removal tool.
Removes the wheel bolt covers on alloy
wheels.
4 Towing eye.
For more information on Towing the vehicle ,
refer to the corresponding section. All of these tools are specific to your
vehicle and may vary according to the
level of equipment.
Do not use them for any other purposes.
The jack must only be used to change a
wheel with a damaged or punctured tyre.
Do not use any jack other than the one
supplied with this vehicle.
If the vehicle does not have its original jack,
contact a CITROËN dealer or a qualified
workshop to obtain the correct jack for it.
The jack meets European standards,
as defined in the Machinery Directive
2006/42/EC.
The jack does not require any
maintenance.
The tools are installed in the boot under the
f l o o r.
F
O
pen the boot.
F
L
ift the floor and remove it.
F
R
emove the storage box containing the
tools. These tools are specific to your vehicle and
may vary according to the equipment. Do not
use them for purposes other than those listed
below.
In the event of a breakdown
Page 125 of 260

123
Access to the spare wheel
Taking out the wheel
F Unclip the tool storage box (standard spare wheel).
Putting the wheel back in place
If there is no wheel in the well, the
fastening device (nut and bolt) cannot be
refitted.
The spare wheel is installed in the boot, under
t h e f l o o r.
Depending on the engine, the spare wheel is
a standard wheel or the "space-saver" type
(BlueHDi 100). F
U
nscrew the central nut.
F
R
emove the fixing parts (nut and bolt).
F
R
aise the spare wheel towards you from the
r e a r.
F
T
ake the wheel out of the boot.
F
P
ut the wheel back in its housing.
F
G
ive the nut a few turns to loosen it.
F
P
osition the fastening device (nut and bolt)
in the middle of the wheel.
F
T
ighten fully until the central nut clicks, to
retain the wheel correctly. F
C
lip the tool storage box back into place
(standard spare wheel).
8
In the event of a breakdown
Page 127 of 260

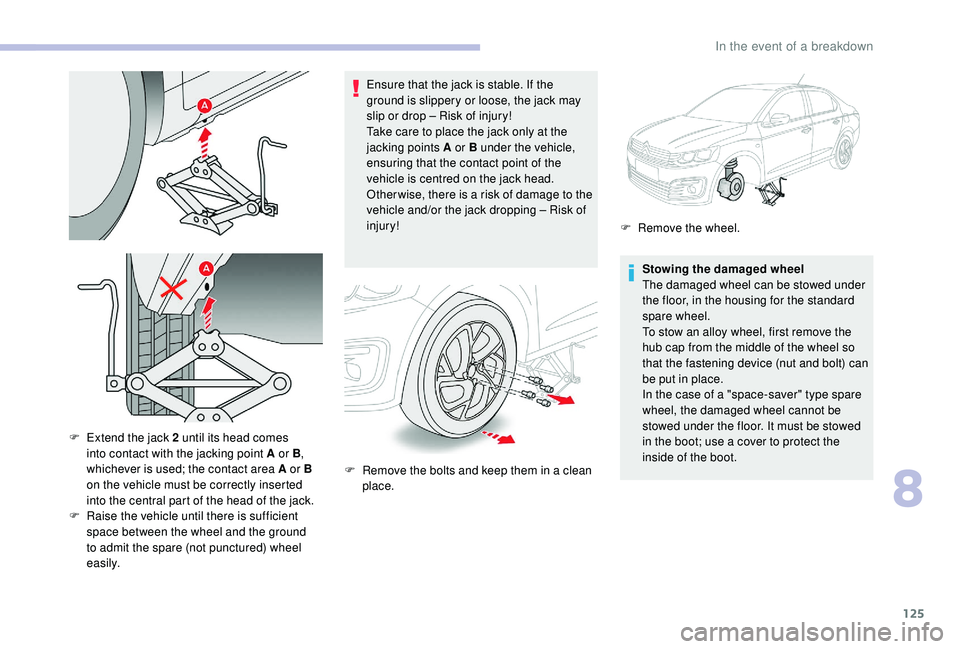
125
Ensure that the jack is stable. If the
ground is slippery or loose, the jack may
slip or drop – Risk of injury!
Take care to place the jack only at the
jacking points A or B under the vehicle,
ensuring that the contact point of the
vehicle is centred on the jack head.
Other wise, there is a risk of damage to the
vehicle and/or the jack dropping – Risk of
injury!Stowing the damaged wheel
The damaged wheel can be stowed under
the floor, in the housing for the standard
spare wheel.
To stow an alloy wheel, first remove the
hub cap from the middle of the wheel so
that the fastening device (nut and bolt) can
be put in place.
In the case of a "space-saver" type spare
wheel, the damaged wheel cannot be
stowed under the floor. It must be stowed
in the boot; use a cover to protect the
inside of the boot.
F
E
xtend the jack 2
until its head comes
into contact with the jacking point A or B ,
whichever is used; the contact area A or B
on the vehicle must be correctly inserted
into the central part of the head of the jack.
F
Ra
ise the vehicle until there is sufficient
space between the wheel and the ground
to admit the spare (not punctured) wheel
easily. F
R
emove the bolts and keep them in a clean
place. F
R
emove the wheel.
8
In the event of a breakdown
Page 132 of 260

130
Rear lampsThird brake lamp
(W5W)
You must access the housing located on the
rear shelf from the rear seats:
F
U
nclip the bulb holder by lifting the two lugs
and remove it.
F
C
hange the faulty bulb.
F
P
ull the housing cover towards you and up
to disengage it.
F
D
isconnect the lamp connector.
F
L
oosen and remove the nut.
F
F
rom the outside, carefully remove the lamp
unit straight from its housing.
These bulbs are changed from inside the boot:
F
O
pen the boot.
F
R
emove the access grille from the
corresponding side trim panel.
F
D
isconnect the lamp connector. F
R
emove the four screws and lift off the bulb
h o l d e r.
F
T
urn the faulty bulb a quarter of a turn and
change it.
For reassembly, carry out these operations in
reverse order.
Take care to engage the lamp unit in its guides,
while keeping it in line with the vehicle.
Tighten sufficiently to ensure sealing, but
without damaging the lamp.
1 Brake lamp / sidelamps (P21/5W).
2
Direction indicators (PY21W).
3 Reversing lamp (W16W).
4 Foglamp (P21/5W).
In the event of a breakdown
Page 140 of 260

138
Never try to charge a frozen battery – risk
of explosion!
If the battery has frozen, have it checked
by a CITROËN dealer or by a qualified
workshop who will check that the internal
components have not been damaged and
that the container has not cracked, which
would mean a risk of toxic and corrosive
acid leaking.
Disconnecting the battery
In order to maintain an adequate state
of charge for starting the engine, it is
recommended that the battery be disconnected
if the vehicle is taken out of ser vice for a long
period.
Before disconnecting the battery:
F
C
lose all accesses (doors, boot, windows).
F
S
witch off all electrical connsumers (audio
system, wipers, lighting, etc.).
F
S
witch off the ignition and wait for four
minutes.
After accessing the battery, you only have to
disconnect the (+) terminal.
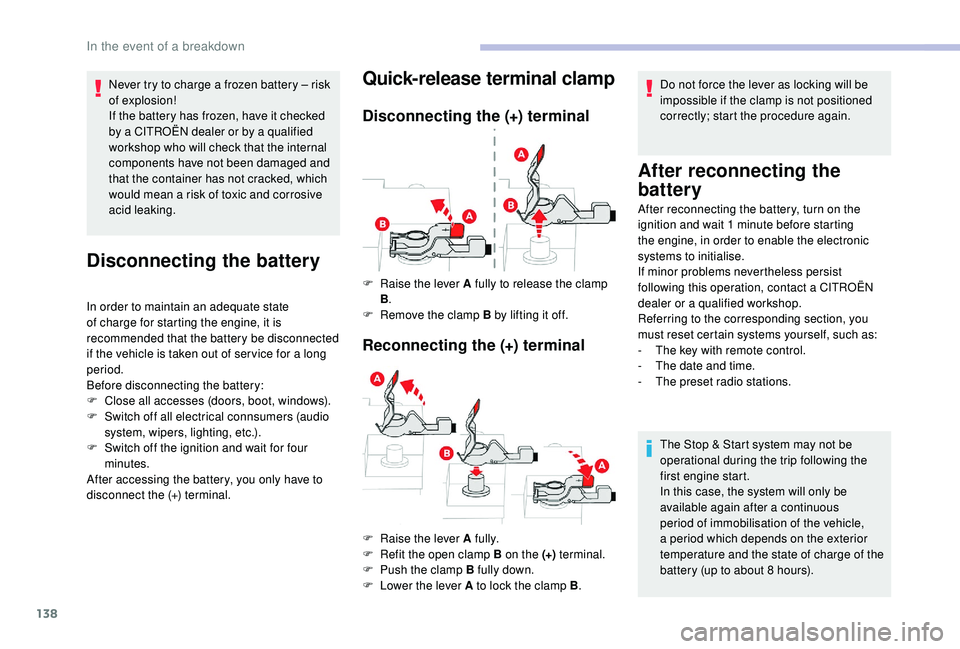
Quick-release terminal clamp
Disconnecting the (+) terminal
Reconnecting the (+) terminal
Do not force the lever as locking will be
impossible if the clamp is not positioned
correctly; start the procedure again.
After reconnecting the
battery
F Raise the lever A fully to release the clamp B.
F
R
emove the clamp B by lifting it off.
F
Ra
ise the lever A fully.
F
R
efit the open clamp B on the (+) terminal.
F
P
ush the clamp B fully down.
F
L
ower the lever A to lock the clamp B .After reconnecting the battery, turn on the
ignition and wait 1
minute before starting
the engine, in order to enable the electronic
systems to initialise.
If minor problems nevertheless persist
following this operation, contact a CITROËN
dealer or a qualified workshop.
Referring to the corresponding section, you
must reset certain systems yourself, such as:
-
T
he key with remote control.
-
T
he date and time.
-
T
he preset radio stations.
The Stop & Start system may not be
operational during the trip following the
first engine start.
In this case, the system will only be
available again after a continuous
period of immobilisation of the vehicle,
a period which depends on the exterior
temperature and the state of charge of the
battery (up to about 8
hours).
In the event of a breakdown