instrument panel CITROEN C-ELYSÉE 2022 Handbook (in English)
[x] Cancel search | Manufacturer: CITROEN, Model Year: 2022, Model line: C-ELYSÉE, Model: CITROEN C-ELYSÉE 2022Pages: 260, PDF Size: 8.4 MB
Page 90 of 260

88
Gear shift indicator
System which reduces fuel consumption by
advising the driver when to change up.With an automatic gearbox, the system is
only active in manual mode.
Operation
Depending on the driving situation and your
vehicle's equipment, the system may advise
you to skip one (or more) gear(s). You can
follow this instruction without engaging the
intermediate gears.
Gearshift recommendations should not be
considered obligatory. The configuration of the
road, the amount of traffic and safety remain
determining factors when choosing the best
gear. The driver thus remains responsible
for deciding whether to follow or ignore the
system's instructions.
This function cannot be deactivated.
Example:
-
Y
ou are in third gear.
-
Y
ou press the accelerator pedal. -
T
he system may suggest that you engage a
higher gear.
The information appears in the instrument
panel in the form of an arrow. With a manual gearbox, the arrow may be
accompanied by the gear recommended.
The system adapts its gear change
recommendation according to driving
conditions (slope, load, etc.) and driver
actions (power demand, acceleration,
b r a k i n g , e t c .) .
The system never suggests:
-
e
ngaging first gear,
-
enga
ging reverse gear,
-
d
own shifting.
Stop & Start
The Stop & Start system puts the engine
temporarily into standby – STOP mode – during
stops in the traffic (red lights, traffic jams, etc.).
The engine restarts automatically – START
mode – as soon as you want to move off.
The restart takes place instantly, quickly and
silently.
Per fect for urban use, the Stop & Start system
reduces fuel consumption and exhaust
emissions as well as the noise level when
stationary.The Stop & Start requires the use of a
12
V battery of special specification and
technology. All work on this type of battery
must only be carried out by a CITROËN
dealer or a qualified workshop. For more
information on the 12
V batter y, refer to
the corresponding section.
Driving
Page 91 of 260
89
Operation
Going into engine STOP mode
For your convenience during parking
manoeuvres, STOP mode is not available
for a few seconds after coming out of
reverse gear.
The Stop & Start does not affect the
functionality of the vehicle, such as for
example, braking, power steering, etc.
A slight delay between the vehicle
stopping and the engine cutting out may
be noticed.
Never refuel with the engine in STOP
mode; you must switch off the ignition with
the button.With a manual gearbox , when the
vehicle speed is below 12 mph
(20 km/h) or the vehicle is stationary
(depending on the engine), the Stop
& Start warning lamp comes on in
the instrument panel and the engine
goes into standby automatically
when you place the gear lever in
neutral and you release the clutch
pedal.
Special cases: STOP mode not
available
STOP mode is not activated when:
- T he driver's door is open.
-
T
he driver's seat belt is not fastened.
-
T
he engine is needed to maintain a
comfortable temperature in the passenger
compartment.
-
D
emisting is active.
-
C
ertain special conditions (battery charge,
engine temperature, braking assistance,
climate control, etc.) require the engine to
control the system.
The Stop & Start warning lamp
flashes for a few seconds, then
stops.
This operation is perfectly normal.
Going into engine START mode
With a manual gearbox , the Stop
& Start warning lamp goes off on
the instrument panel and the engine
restarts automatically when you
press the clutch pedal fully down to
t h e f l o o r.
Special cases: START mode
activated automatically
As a safety measure or to maintain comfort
levels in the vehicle, START mode is activated
automatically when:
-
Y
ou open the driver's door.
-
Y
ou unfasten the driver's seat belt.
-
T
he speed of the vehicle exceeds 2 mph
(3
km/h) with an electronic gearbox.
-
C
ertain specific conditions (battery charge,
engine temperature, braking assistance,
climate control, etc.) require the engine to
control the system or the vehicle.
The Stop & Start warning lamp
flashes for a few seconds, then
stops.
This operation is perfectly normal.
Deactivation / Manual
reactivation
In certain cases, such as the need to maintain
a comfortable temperature in the passenger
compartment, it may be useful to deactivate the
Stop & Start system.
The system can be deactivated at any time,
once the ignition is switched on.
6
Driving
Page 92 of 260

90
If the engine is in STOP mode, it restarts
immediately.
The Stop & Start system is reactivated
automatically every time the ignition is switched
on.
With button
Press this button to deactivate the system.
Deactivation is confirmed by the illumination of
the button indicator lamp and the display of a
message.
Pressing this button again reactivates the
function.
The button indicator lamp goes off and a
message is displayed.
With touch screen
The Stop & Start setting can be
configured in the menu Driving /
Vehicle. Opening the bonnet
Before doing anything under the bonnet,
deactivate the Stop & Start system to
avoid the risk of injury related to an
automatic change to START mode.
Driving on flooded roads
Before driving through a flooded road, it is
strongly recommended that you deactivate
the Stop & Start.
For more information on Driving
recommendations
, particularly on
flooded roads, refer to the corresponding
section.
Malfunction
In the event of a fault in the system,
the indicator lamp in the "ECO OFF"
button flashes for a moment, then
illuminates continuously.
Have them checked by a CITROËN dealer or a
qualified workshop. In the event of a fault in STOP mode, the
vehicle may stall. All of the instrument panel
warning lamps come on. It is then necessary to
switch the ignition off and to restart the engine
using the key.
The Stop & Start system requires a
12 V battery of specific technology and
specification.
All work on this type of battery must be
carried out only by a CITROËN dealer or a
qualified workshop.
For more information on the 12 V batter y
,
refer to the corresponding section.
Driving
Page 95 of 260

93
Operating fault
The flashing and then fixed illumination of the
under-inflation warning lamp accompanied
by illumination of the Ser vice warning lamp
indicates a fault with the system.
A message appears, accompanied by an
audible signal.
In this case, under-inflation monitoring of the
tyres is no longer assured.
Have the system checked by a CITROËN
dealer or a qualified workshop.Before doing anything to the system,
the pressure of the four tyres must be
checked and the system reinitialised.
Speed limiter
System which prevents the
vehicle from exceeding the speed
programmed by the driver.
Once the speed limit is reached, the
accelerator pedal no longer has any effect.
The speed limiter is switched on manually:
it requires a programmed speed of at least
20
mph (30 km/h).
The speed limiter is switched off by manual
operation of the control.
The programmed speed can be exceeded
temporarily by pressing the accelerator firmly.
To return to the set speed, simply slow down to
a speed below the programmed speed.
The set speed remains in the system memory
when the ignition is switched off.
The speed limiter cannot in any
circumstances replace the need to respect
speed limits, or the vigilance of the driver.
Steering mounted controls
1.Speed limiter mode selection wheel.
2. Value decrease button.
3. Value increase button.
4. Speed limiter on/off button.
Displays on the instrument
panel
The programmed information is grouped
together in the instrument panel screen.
5Speed limiter on / off indication.
6 Speed limiter mode selected.
7 Programmed speed value.
6
Driving
Page 98 of 260

96
5Cruise control off/resume indication.
6 Cruise control selection indication.
7 Programmed speed value.
Programming
F Turn thumb wheel 1 to the "CRUISE"
position: the cruise control mode is selected
but is not switched on (PAUSE).
F
S
et the programmed speed by
accelerating to the required
speed, then press button 2
or 3
(e.g. 65 mph (110 km/h)).
Pause
F Switch off the cruise control by pressing button 4: a confirmation message appears
on the screen (PAUSE).
You can change the programmed speed further
using buttons 2
and 3
:
-
B
y +/- 1 mph (1 km/h) = short press.
-
B
y +/- 5 mph (5 km/h) = long press.
-
I
n steps of +/- 5 mph (5 km/h) = press and
hold. F
S
witch the cruise control back on by
pressing button 4 again.
Exceeding the programmed
speed
Intentional or unintentional exceeding of the
programmed speed results in flashing of this
speed on the display.
Returning to the programmed speed, by means
of intentional or unintentional deceleration of
the vehicle, automatically cancels the flashing
of the programmed speed.
Leaving cruise control
mode
F Turn thumb wheel 1
to the 0 position:
the cruise control mode is deselected.
The display returns to the total distance
recorder.
Displays on the instrument panel
The programmed information is grouped
together in the instrument panel screen.
Driving
Page 100 of 260
98
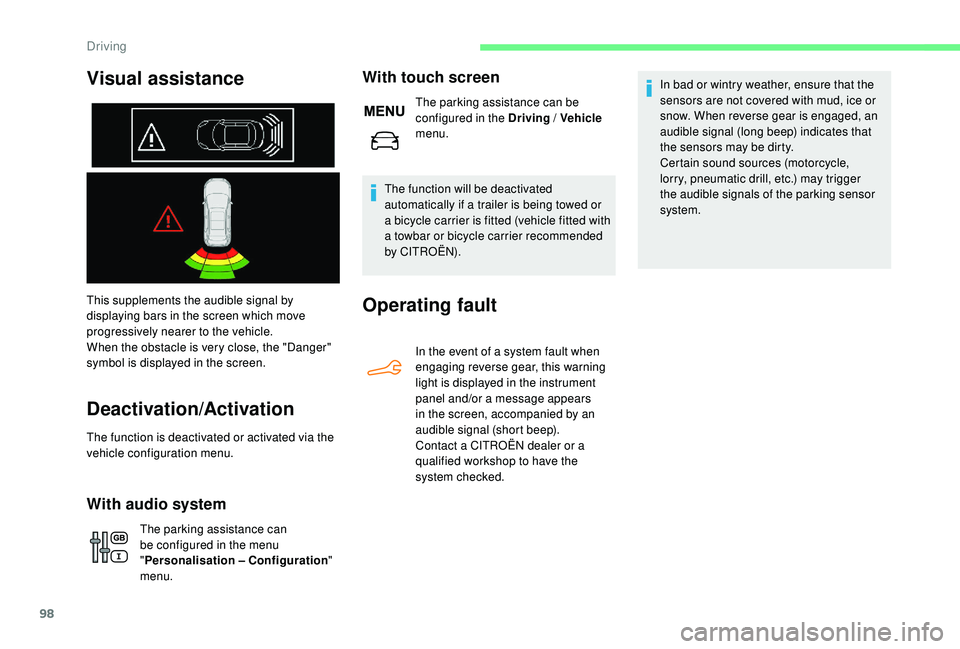
This supplements the audible signal by
displaying bars in the screen which move
progressively nearer to the vehicle.
When the obstacle is very close, the "Danger"
symbol is displayed in the screen.
Deactivation/Activation
The function is deactivated or activated via the
vehicle configuration menu.
With audio system
The parking assistance can
be configured in the menu
"Personalisation – Configuration "
menu.
With touch screen
The parking assistance can be
configured in the Driving / Vehicle
menu.
The function will be deactivated
automatically if a trailer is being towed or
a bicycle carrier is fitted (vehicle fitted with
a towbar or bicycle carrier recommended
by CITROËN).
Operating fault
In the event of a system fault when
engaging reverse gear, this warning
light is displayed in the instrument
panel and/or a message appears
in the screen, accompanied by an
audible signal (short beep).
Contact a CITROËN dealer or a
qualified workshop to have the
system checked. In bad or wintry weather, ensure that the
sensors are not covered with mud, ice or
snow. When reverse gear is engaged, an
audible signal (long beep) indicates that
the sensors may be dirty.
Certain sound sources (motorcycle,
lorry, pneumatic drill, etc.) may trigger
the audible signals of the parking sensor
system.
Visual assistance
Driving
Page 102 of 260

100
Fuel
Tank capacity: approximately 50 litres.
Low fuel level
When the low fuel level is reached,
this warning lamp comes on in the
instrument panel.
When it first comes on, around 5
litres of fuel
remain in the tank.
You must refuel as soon as possible to avoid
running out of fuel.
For more information on Running out of fuel
(Diesel) , refer to the corresponding section.
Opening RefuellingOpening the filler cap may create a noise
caused by an inrush of air. This vacuum is
entirely normal, resulting from the sealing
of the fuel system.
F
O
pen the filler cap by turning it a 1/4 turn to
the left. If you have put in the wrong fuel for
your vehicle, you must have the tank
drained and refilled with the correct
fuel before you star t the engine.
Fuel cut- of f
Your vehicle is equipped with a safety device
which cuts off the fuel supply in the event of a
collision.
F
Ra
ise the lever. A self-adhesive label on the inner face of the
filler flap reminds you of the type of fuel to use,
depending on your engine.
Additions of fuel must be of at least 5
litres, in
order to be registered by the fuel gauge. F
R
emove the filler cap and hang it on its
holder (on the filler flap).
F
F
ill the tank. Do not continue past the third
cut-off of the nozzle, as this may cause
malfunctions.
F
R
efit the filler cap turning it a 1/4 turn to the
right.
F
P
ush the filler flap to close it.
Practical information
Page 126 of 260
124
Removing a wheel
Parking the vehicle
* Position P for the automatic gearbox
Park the vehicle where it does not block
traffic: the ground must be level, stable
and non-slippery.
Apply the parking brake, switch off the
ignition and engage first gear* so as to
block the wheels.
Check that the parking brake warning
lamp comes on fixed in the instrument
panel.
The occupants must get out of the vehicle
and wait where they are safe.
Make sure that the jack is correctly
positioned at one of the vehicle's jacking
points.
Incorrect use of the jack could cause the
vehicle to collapse.
Never go underneath a vehicle raised
using a jack; use an axle stand.
Do not use a jack other than the one
supplied by the manufacturer.
Wheel with hub cap
When removing the wheel
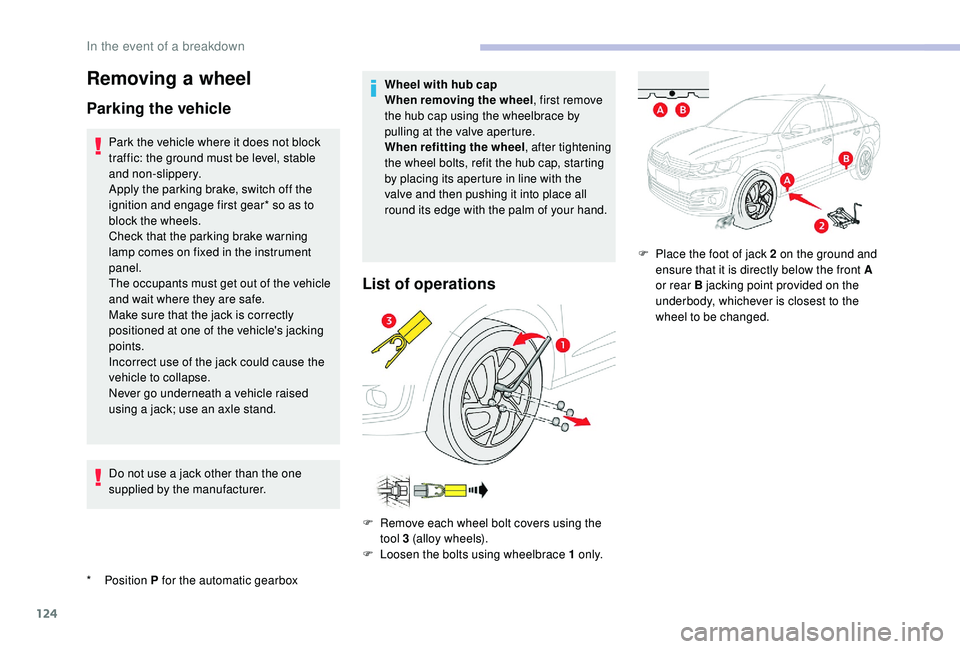
, first remove
the hub cap using the wheelbrace by
pulling at the valve aperture.
When refitting the wheel , after tightening
the wheel bolts, refit the hub cap, starting
by placing its aperture in line with the
valve and then pushing it into place all
round its edge with the palm of your hand.
List of operations
F Remove each wheel bolt covers using the tool 3 (alloy wheels).
F
L
oosen the bolts using wheelbrace 1 o n l y.F
P
lace the foot of jack 2 on the ground and
ensure that it is directly below the front A
or rear B jacking point provided on the
underbody, whichever is closest to the
wheel to be changed.
In the event of a breakdown
Page 150 of 260
2
12:13
18,5 21,5
23 °CFirst steps
With the engine running, a press
mutes the sound.
With the ignition off, a press turns
the system on.
Adjustment of the volume.
Use the buttons either side of or below the
touch screen for access to the menus, then
press the virtual buttons in the touch screen.
Depending on the model, use the "Source" or
"Menu" buttons either side of the touch screen
for access to the menus, then press the virtual
buttons in the touch screen.
You can display the menu at any time by
pressing the screen briefly with three fingers.
All of the touch areas of the screen are white.
Press the cross to go back a level.
Press "OK" to confirm. The touch screen is of the "capacitive"
type.
To clean the screen, use a soft, non-
abrasive cloth (spectacles cloth) with no
additional product.
Do not use sharp objects on the screen.
Do not touch the screen with wet hands.
*
D
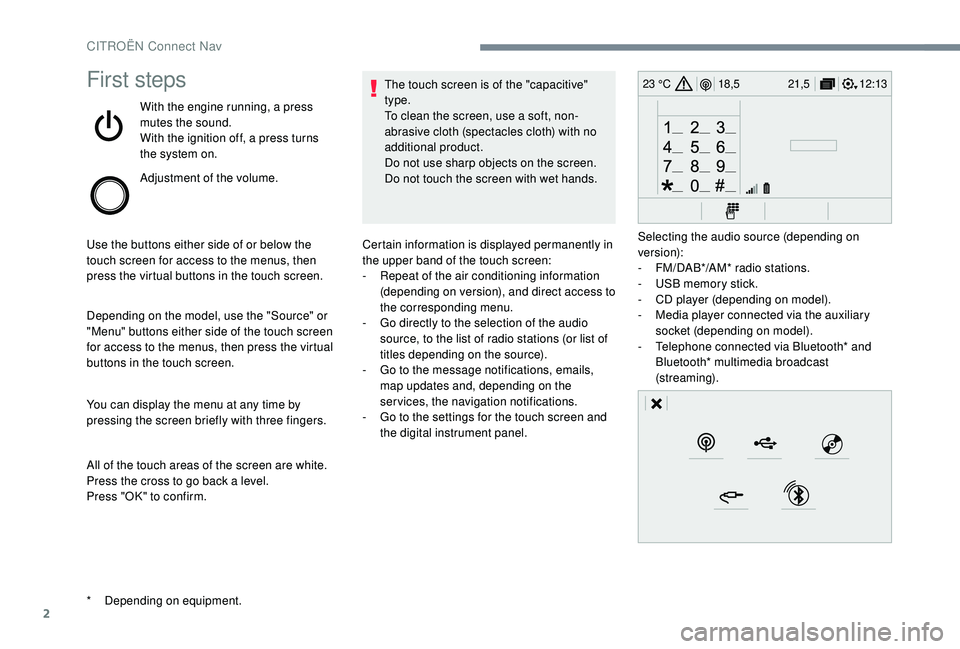
epending on equipment. Certain information is displayed permanently in
the upper band of the touch screen:
-
R
epeat of the air conditioning information
(depending on version), and direct access to
the corresponding menu.
-
G
o directly to the selection of the audio
source, to the list of radio stations (or list of
titles depending on the source).
-
G
o to the message notifications, emails,
map updates and, depending on the
services, the navigation notifications.
-
G
o to the settings for the touch screen and
the digital instrument panel. Selecting the audio source (depending on
version):
-
F
M/DAB*/AM* radio stations.
-
U
SB memory stick.
-
C
D player (depending on model).
-
M
edia player connected via the auxiliary
socket (depending on model).
-
T
elephone connected via Bluetooth* and
Bluetooth* multimedia broadcast
(streaming).
CITROËN Connect Nav
Page 183 of 260
35
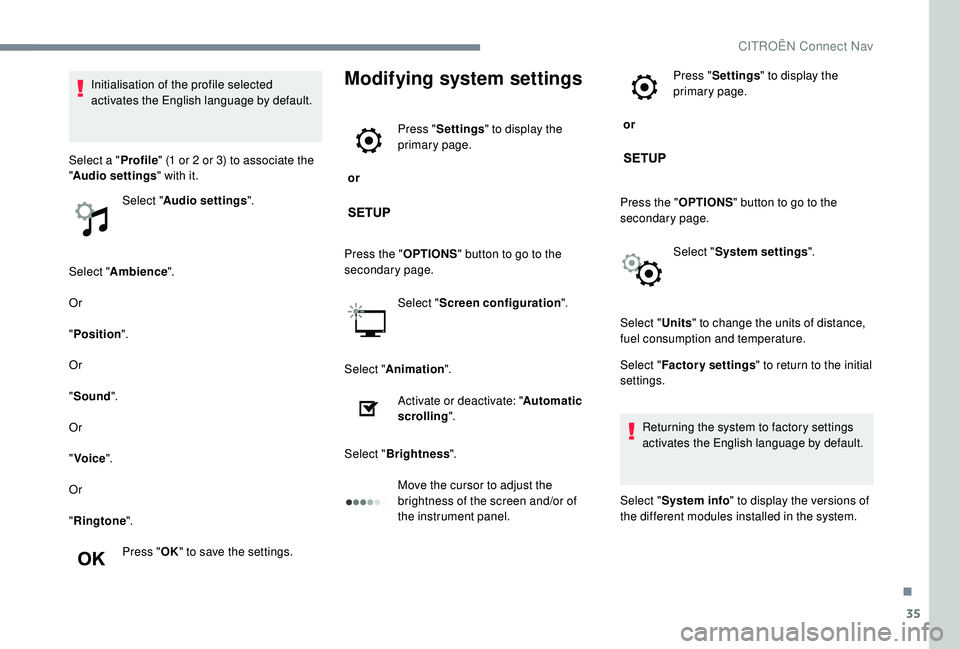
Select "Ambience ".
Or
" Position ".
Or
" Sound ".
Or
" Voice ".
Or
" Ringtone ".
Press " OK" to save the settings.
Modifying system settings
or Press "
Settings " to display the
primary page.
Press the " OPTIONS" button to go to the
secondary page.
Select "Screen configuration ".
Select " Animation ".
Activate or deactivate: " Automatic
scrolling ".
Select " Brightness ".
Move the cursor to adjust the
brightness of the screen and/or of
the instrument panel. or
Press "
Settings " to display the
primary page.
Press the " OPTIONS" button to go to the
secondary page.
Select "System settings ".
Initialisation of the profile selected
activates the English language by default.
Select a " Profile" (1
or 2
or 3) to associate the
" Audio settings " with it.
Select " Audio settings ".
Select "Units" to change the units of distance,
fuel consumption and temperature.
Select " Factory settings " to return to the initial
settings.
Returning the system to factory settings
activates the English language by default.
Select " System info " to display the versions of
the different modules installed in the system.
.
CITROËN Connect Nav