ESP Citroen C ZERO 2014.5 1.G User Guide
[x] Cancel search | Manufacturer: CITROEN, Model Year: 2014.5, Model line: C ZERO, Model: Citroen C ZERO 2014.5 1.GPages: 176, PDF Size: 5.22 MB
Page 37 of 176
35
Mirrors
Adjustment
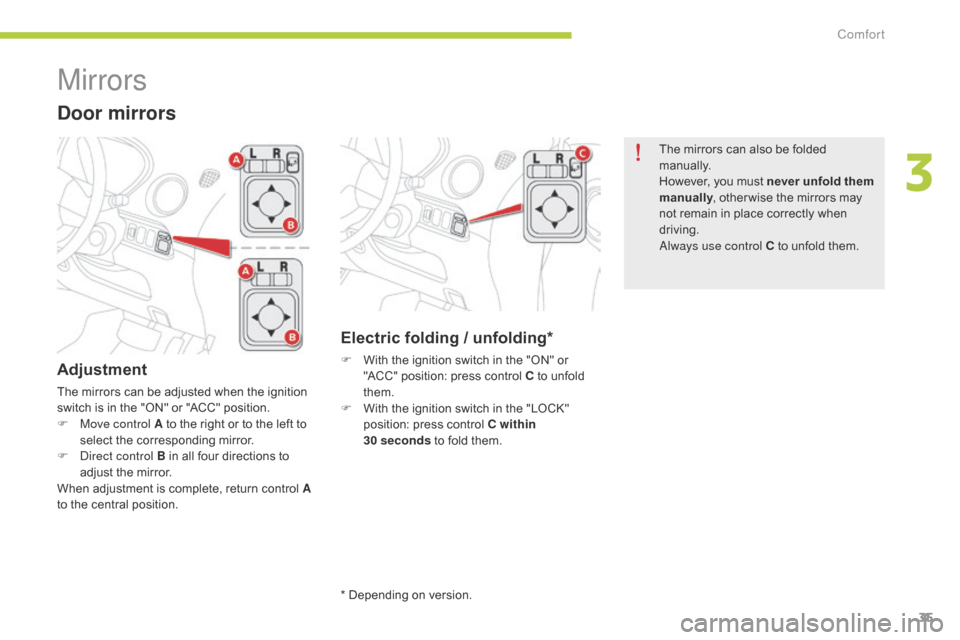
The mirrors can be adjusted when the ignition
switch is in the "ON" or "ACC" position.
F
M
ove control A to the right or to the left to
select the corresponding mirror.
F
d
i
rect control B in all four directions to
adjust the mirror.
When adjustment is complete, return control A
to the central position.
Door mirrors
The mirrors can also be folded
manually.
However, you must never unfold them
manually , other wise the mirrors may
not remain in place correctly when
driving.
al
ways use control C to unfold them.
Electric folding / unfolding*
F With the ignition switch in the "ON" or "ACC" position: press control C to unfold
them.
F
W
ith the ignition switch in the "LOCK"
position: press control C within
30
seconds to fold them.
* Depending on version.
3
Comfort
Page 46 of 176
44
6. Air conditioning On / Off
S witching on
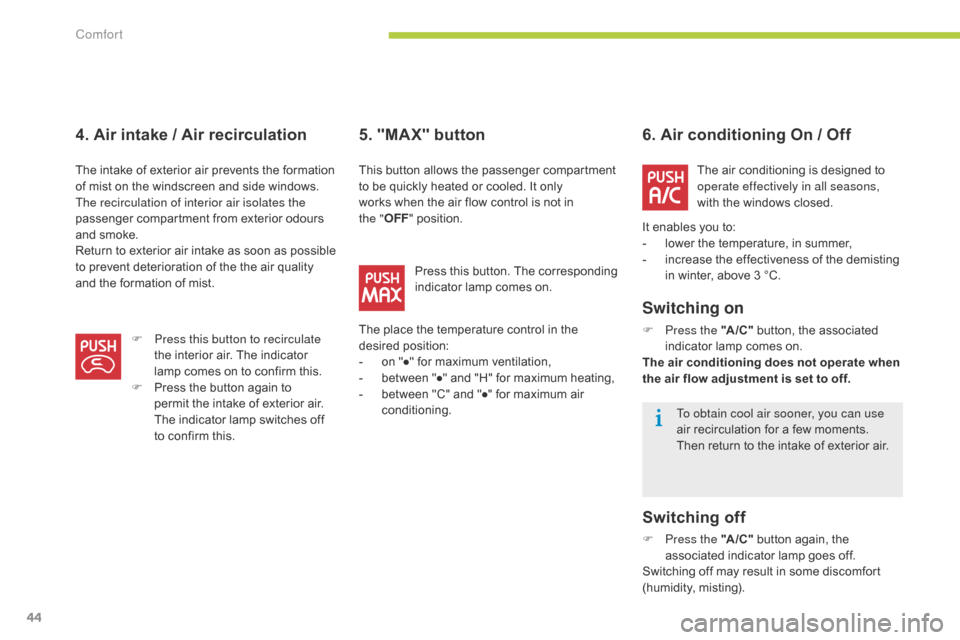
F Press the "A /C " button, the associated
indicator lamp comes on.
The air conditioning does not operate when
the air flow adjustment is set to off.
Switching off
F Press the "A /C " button again, the
associated indicator lamp goes off.
Switching off may result in some discomfort
(humidity, misting).
5. "MAX" button
The air conditioning is designed to
operate effectively in all seasons,
with the windows closed.
It enables you to:
-
l
ower the temperature, in summer,
-
i
ncrease the effectiveness of the demisting
in winter, above 3 °C.
This button allows the passenger compartment
to be quickly heated or cooled. It only
works when the air flow control is not in
the
" OFF "
position.
Press this button. The corresponding
indicator lamp comes on.
The place the temperature control in the
desired position:
-
o
n "●" for maximum ventilation,
-
b
etween "●" and "H" for maximum heating,
-
b
etween "C" and "●" for maximum air
conditioning. To obtain cool air sooner, you can use
air recirculation for a few moments.
Then return to the intake of exterior air.
4. Air intake / Air recirculation
The intake of exterior air prevents the formation
of mist on the windscreen and side windows.
The recirculation of interior air isolates the
passenger compartment from exterior odours
and smoke.
Return to exterior air intake as soon as possible
to prevent deterioration of the the air quality
and the formation of mist.
F
P
ress this button to recirculate
the interior air. The indicator
lamp comes on to confirm this.
F
P
ress the button again to
permit the intake of exterior air.
The
indicator lamp switches off
to confirm this.
Comfort
Page 51 of 176
49
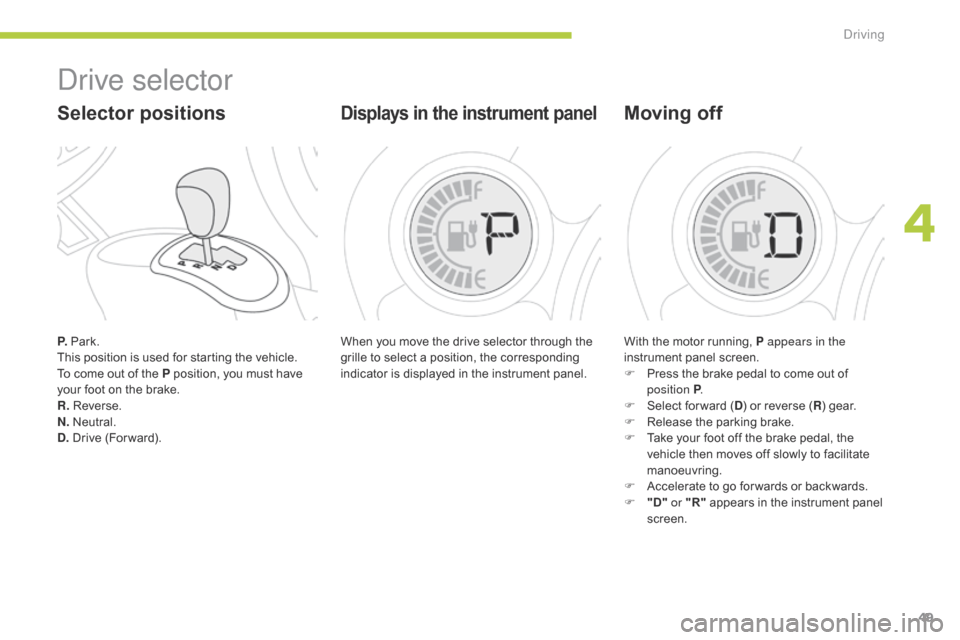
P. Park.
This position is used for starting the vehicle.
To come out of the P position, you must have
your foot on the brake.
R. Reverse.
N. Neutral.
D. Drive (For ward).
drive selector
Selector positions
When you move the drive selector through the
grille to select a position, the corresponding
indicator is displayed in the instrument panel.
Displays in the instrument panel
With the motor running, P appears in the
instrument panel screen.
F
P
ress the brake pedal to come out of
position P .
F
S
elect for ward ( D) or reverse ( R) gear.
F
R
elease the parking brake.
F
T
ake your foot off the brake pedal, the
vehicle then moves off slowly to facilitate
manoeuvring.
F
A
ccelerate to go for wards or backwards.
F
"
D" or "R" appears in the instrument panel
screen.
Moving off
4
Driving
Page 53 of 176
51
Lighting controls
Main lighting
The various front and rear lamps of the vehicle
are designed to adapt the lighting progressively
in relation to the climatic conditions and so
ensure the best visibility for the driver:
-
s
idelamps, to be seen,
-
d
ipped beam headlamps to see without
dazzling other drivers,
-
m
ain beam headlamps to see clearly when
the road is clear.
Additional lighting
Other lamps are provided to fulfil the
requirements of particular driving conditions:
-
a r
ear foglamp to be seen from a distance,
-
f
ront foglamps for even better visibility,
-
d
aytime running lamps to be seen during
the day.
Selection ring for main lighting
mode
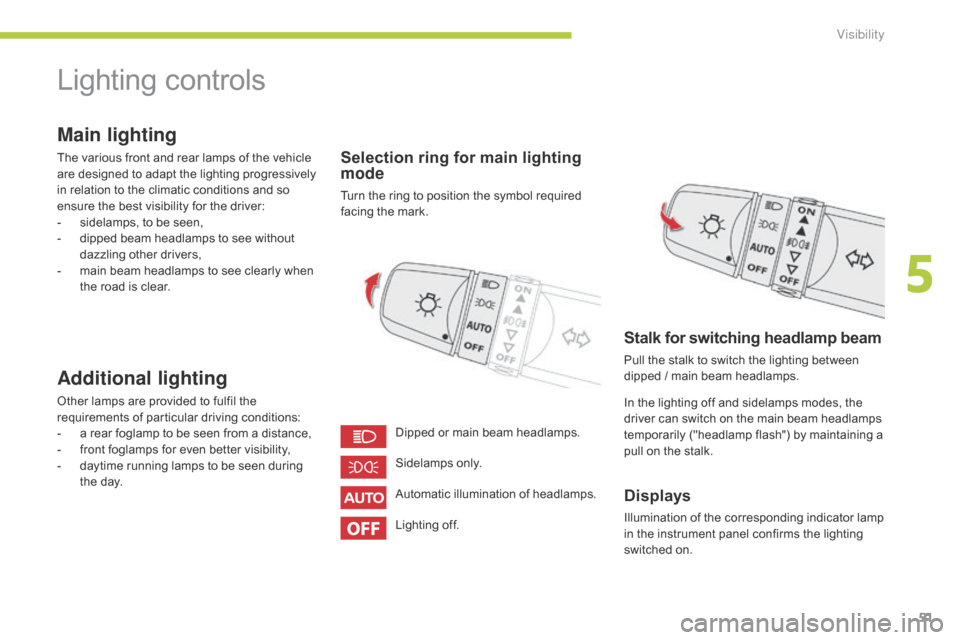
Turn the ring to position the symbol required
facing the mark.
Automatic illumination of headlamps. Sidelamps only.
Dipped or main beam headlamps.
Stalk for switching headlamp beam
Pull the stalk to switch the lighting between
dipped / main beam headlamps.
In the lighting off and sidelamps modes, the
driver can switch on the main beam headlamps
temporarily ("headlamp flash") by maintaining a
pull on the stalk.
Displays
Illumination of the corresponding indicator lamp
in the instrument panel confirms the lighting
switched on.
Lighting off.
5
Visibility
Page 66 of 176
64
Anti-slip regulation (ASR)
and electronic stability
programme (ESP)
Trajectory control systems
Deactivation
In exceptional conditions (starting a vehicle
which is bogged down, stuck in snow, on soft
ground, ...), it may be advisable to deactivate
the ASR and ESP systems to regain grip.
F
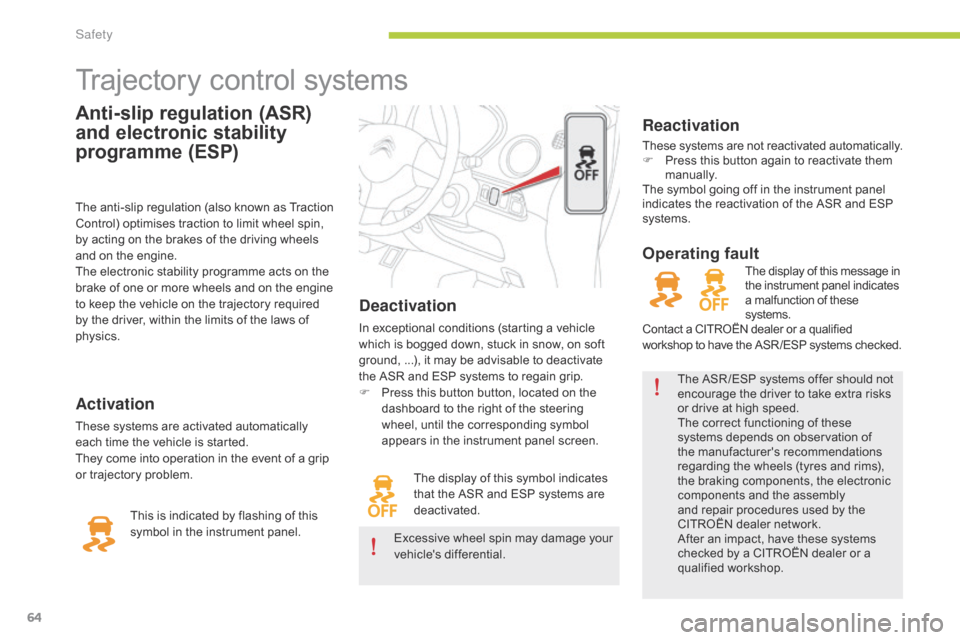
P
ress this button button, located on the
dashboard to the right of the steering
wheel, until the corresponding symbol
appears in the instrument panel screen.
Activation
These systems are activated automatically
each time the vehicle is started.
They come into operation in the event of a grip
or trajectory problem. The display of this symbol indicates
that the ASR and ESP systems are
deactivated.
Reactivation
These systems are not reactivated automatically.
F
P ress this button again to reactivate them
manually.
The symbol going off in the instrument panel
indicates the reactivation of the ASR and ESP
systems.
The anti-slip regulation (also known as Traction
Control) optimises traction to limit wheel spin,
by acting on the brakes of the driving wheels
and on the engine.
The electronic stability programme acts on the
brake of one or more wheels and on the engine
to keep the vehicle on the trajectory required
by the driver, within the limits of the laws of
physics.
This is indicated by flashing of this
symbol in the instrument panel. The ASR /ESP systems offer should not
encourage the driver to take extra risks
or drive at high speed.
The correct functioning of these
systems depends on observation of
the manufacturer's recommendations
regarding the wheels (tyres and rims),
the braking components, the electronic
components and the assembly
and repair procedures used by the
CITROËN dealer network.
After an impact, have these systems
checked by a CITROËN dealer or a
qualified workshop.
Operating fault
The display of this message in
the instrument panel indicates
a malfunction of these
systems.
Contact a CITROËN dealer or a qualified
workshop to have the ASR /ESP systems checked.
Excessive wheel spin may damage your
vehicle's differential.
Safety
Page 72 of 176
70
Lateral airbags
Deployment
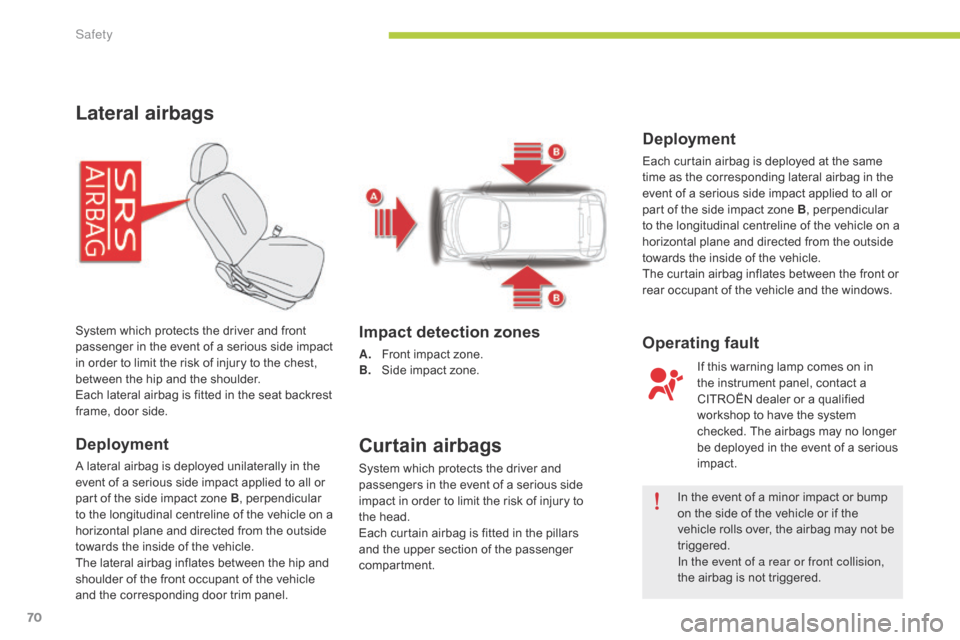
A lateral airbag is deployed unilaterally in the
event of a serious side impact applied to all or
part of the side impact zone B, perpendicular
to the longitudinal centreline of the vehicle on a
horizontal plane and directed from the outside
towards the inside of the vehicle.
The lateral airbag inflates between the hip and
shoulder of the front occupant of the vehicle
and the corresponding door trim panel. System which protects the driver and front
passenger in the event of a serious side impact
in order to limit the risk of injury to the chest,
between the hip and the shoulder.
Each lateral airbag is fitted in the seat backrest
frame, door side.
Impact detection zones
A. Front impact zone.
B. Side impact zone.
Curtain airbags
System which protects the driver and
passengers in the event of a serious side
impact in order to limit the risk of injury to
the
hea
d.
Each curtain airbag is fitted in the pillars
and the upper section of the passenger
compartment. In the event of a minor impact or bump
on the side of the vehicle or if the
vehicle rolls over, the airbag may not be
triggered.
In the event of a rear or front collision,
the airbag is not triggered.
Deployment
Each curtain airbag is deployed at the same
time as the corresponding lateral airbag in the
event of a serious side impact applied to all or
part of the side impact zone B, perpendicular
to the longitudinal centreline of the vehicle on a
horizontal plane and directed from the outside
towards the inside of the vehicle.
The curtain airbag inflates between the front or
rear occupant of the vehicle and the windows.
If this warning lamp comes on in
the instrument panel, contact a
CITROËN dealer or a qualified
workshop to have the system
checked. The airbags may no longer
be deployed in the event of a serious
impact.
Operating fault
Safety
Page 78 of 176
aR
b
G
НИКОГА НЕ инсталирайте детско столче на седалка с АКТИВИРАНА предна ВЪЗДУШНА ВЪЗГЛАВНИЦ А. Това може да причини
СМЪРТ или СЕРИОЗНО НАРАНЯВАНЕ на детето.
CSNIKDY neumisťujte dětské zádržné zařízení orientované směrem dozadu na sedadlo chráněné AKTIVOVANÝM čelním AIRBAGEM. Hrozí
nebezpečí SMRTI DÍTĚTE nebo VÁ ŽNÉHO ZR ANĚNÍ.
daBrug ALDRIG en bagudvendt barnestol på et sæde, der er beskyttet af en AKTIV AIRBAG. BARNET risikerer at blive ALVORLIGT
K VÆSTET eller DR ÆBT.
dEMontieren Sie auf einem Sitz mit AKTIVIERTEM Front-Airbag NIEMALS einen Kindersitz oder eine Babyschale entgegen der Fahr trichtung,
das Kind könnte schwere oder sogar tödliche Verletzungen erleiden.
ELΜη χρησιμοποιείτε ΠΟΤΕ παιδικό κάθισμα με την πλάτη του προς το εμπρός μέρος του αυτοκινήτου, σε μια θέση που προστατεύεται από
ΜΕΤΩΠΙΚΟ αερόσακο που είναι ΕΝΕΡΓΟΣ. Αυτό μπορεί να έχει σαν συνέπεια το ΘΑΝΑΤΟ ή το ΣΟΒΑΡΟ ΤΡΑΥΜΑΤΙΣΜΟ του ΠΑΙΔΙΟΥ
EnNEVER use a rear ward facing child restraint on a seat protected by an ACTIVE AIRBAG in front of it, DEATH or SERIOUS INJURY to the
CHILd can occur
ESNO INSTALAR NUNCA un sistema de retención para niños de espaldas al sentido de la marcha en un asiento protegido mediante un
AIRBAG frontal ACTIVADO, ya que podría causar lesiones GR AVES o incluso la MUERTE del niño.
ETÄrge MITTE KUNAGI paigaldage “seljaga sõidusuunas“ lapseistet juhi kõr valistmele, mille ESITURVAPADI on AKTIVEERITUD. Tur vapadja
avanemine võib last TÕSISELT või ELUOHTLIKULT vigastada.
FIÄLÄ KOSK A AN aseta lapsen tur vaistuinta selkä ajosuuntaan istuimelle, jonka edessä suojana on käyttöön aktivoitu TURVAT Y YNY. Sen
laukeaminen voi aiheuttaa LAPSEN KUOLEMAN tai VAK AVAN LOUKK A ANTUMISEN.
FRNE JAMAIS installer de système de retenue pour enfants faisant face vers l’arrière sur un siège protégé par un COUSSIN GONFLABLE
frontal ACTIVÉ.
Cela peut provoquer la MORT de l’ENFANT ou le BLESSER GR AVEMENT
HRNIK ADA ne postavljati dječju sjedalicu leđima u smjeru vožnje na sjedalo zaštićeno UKLJUČENIM prednjim ZR AČNIM JASTUKOM. To bi
moglo uzrokovati SMRT ili TEŠKU OZLJEDU djeteta.
HUSOHA ne használjon menetiránynak háttal beszerelt gyermekülést AKTIVÁLT (BEK APCSOLT) FRONTLÉGZSÁKK AL védett ülésen. Ez a
gyermek HALÁLÁT vagy SÚLYOS SÉRÜLÉSÉT okozhatja.
ITNON installare MAI seggiolini per bambini posizionati in senso contrario a quello di marcia su un sedile protetto da un AIRBAG frontale
ATTIVATO. Ciò potrebbe provocare la MORTE o FERITE GR AVI al bambino.
LTNIEK ADA neįrenkite vaiko prilaikymo priemonės su atgal atgręžtu vaiku ant sėdynės, kuri saugoma VEIKIANČIOS priekinės ORO
PAGALVĖS. Išsiskleidus oro pagalvei vaikas gali būti MIRTINAI arba SUNKIAI TR AUMUOTAS.
LVNEK AD NEuzstādiet uz aizmuguri vērstu bērnu sēdeklīti priekšējā pasažiera sēdvietā, kurā ir AKTIVIZĒTS priekšējais DROŠĪBAS GAISA
S P I LV E N S .
Tas var izraisīt BĒRNA NĀVI vai radīt NOPIETNUS IEVAINOJUMUS.
76
Child safety
Page 92 of 176

90
Using a public charging point for normal charging
Some public charging points include a charging cable.
In this case, use the cable provided.
Several types of electrical socket may be available for charging your vehicle.
Before starting the charging procedure, use the table below to identify the correct type of socket and use the corresponding charging cable.
Domestic power point "Mode 3 - Type 2" socket "Mode 3 - Type 3" socket
"Mode 2" cable (supplied with your vehicle) "Mode 3 - Type 2" cable
(available as an accessory) "Mode 3 - Type 3" cable
(available as an accessory)
Practical information
Page 116 of 176
114
Changing a fuse
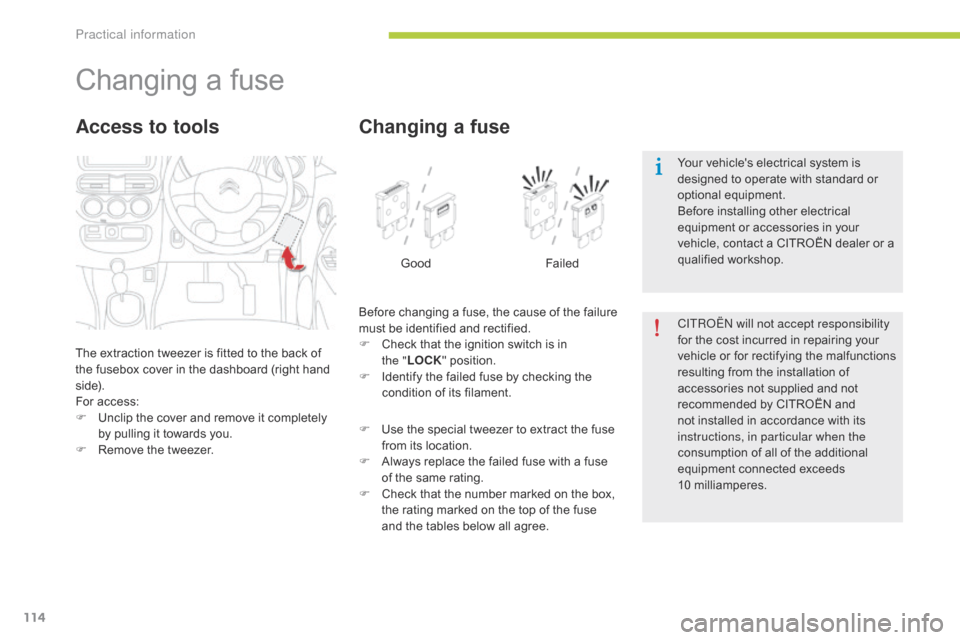
The extraction tweezer is fitted to the back of
the fusebox cover in the dashboard (right hand
side).
For access:
F
U
nclip the cover and remove it completely
by pulling it towards you.
F
R
emove the tweezer.
Access to tools
Before changing a fuse, the cause of the failure
must be identified and rectified.
F
C
heck that the ignition switch is in
the
"LOCK " position.
F
I
dentify the failed fuse by checking the
condition of its filament.
Changing a fuse
Good Failed
F
U
se the special tweezer to extract the fuse
from its location.
F
A
lways replace the failed fuse with a fuse
of the same rating.
F
C
heck that the number marked on the box,
the rating marked on the top of the fuse
and the tables below all agree. CITR
oËn
will not accept responsibility
for the cost incurred in repairing your
vehicle or for rectifying the malfunctions
resulting from the installation of
accessories not supplied and not
recommended by CITROËN and
not installed in accordance with its
instructions, in particular when the
consumption of all of the additional
equipment connected exceeds
10
mil
liamperes.
Your vehicle's electrical system is
designed to operate with standard or
optional equipment.
Before installing other electrical
equipment or accessories in your
vehicle, contact a CITROËN dealer or a
qualified workshop.
Practical information
Page 120 of 176
118
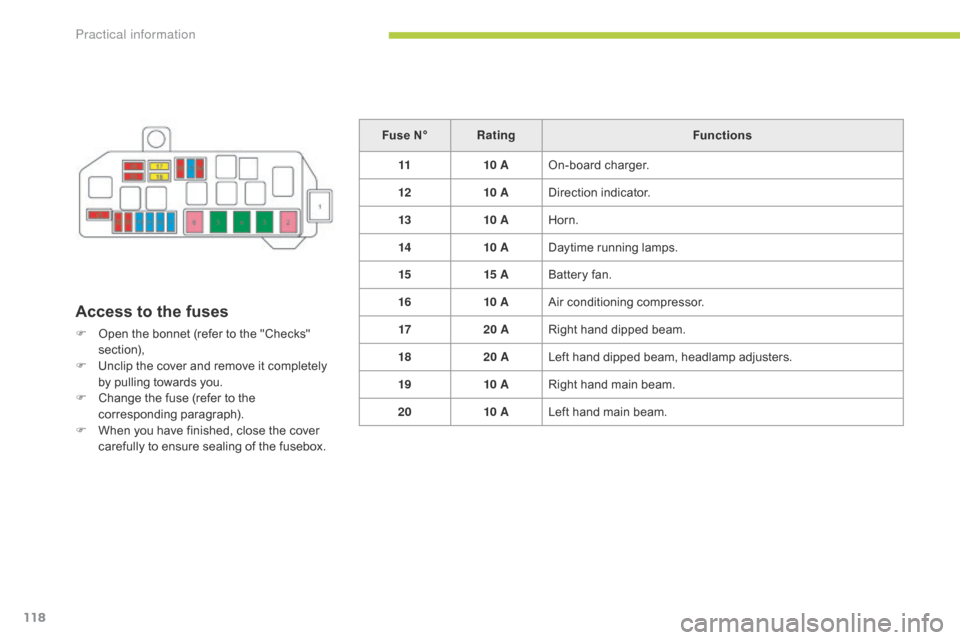
Access to the fuses
F Open the bonnet (refer to the "Checks" section),
F
U
nclip the cover and remove it completely
by pulling towards you.
F
C
hange the fuse (refer to the
corresponding paragraph).
F
W
hen you have finished, close the cover
carefully to ensure sealing of the fusebox. Fuse N°
Rating Functions
11 10 AOn-board charger.
12 10 ADirection indicator.
13 10 AHorn.
14 10 ADaytime running lamps.
15 15 ABattery fan.
16 10 AAir conditioning compressor.
17 20 ARight hand dipped beam.
18 20 ALeft hand dipped beam, headlamp adjusters.
19 10 ARight hand main beam.
20 10 ALeft hand main beam.
Practical information