ESP Citroen C ZERO 2014.5 1.G Owner's Manual
[x] Cancel search | Manufacturer: CITROEN, Model Year: 2014.5, Model line: C ZERO, Model: Citroen C ZERO 2014.5 1.GPages: 176, PDF Size: 5.22 MB
Page 6 of 176
85
91
64
97
4
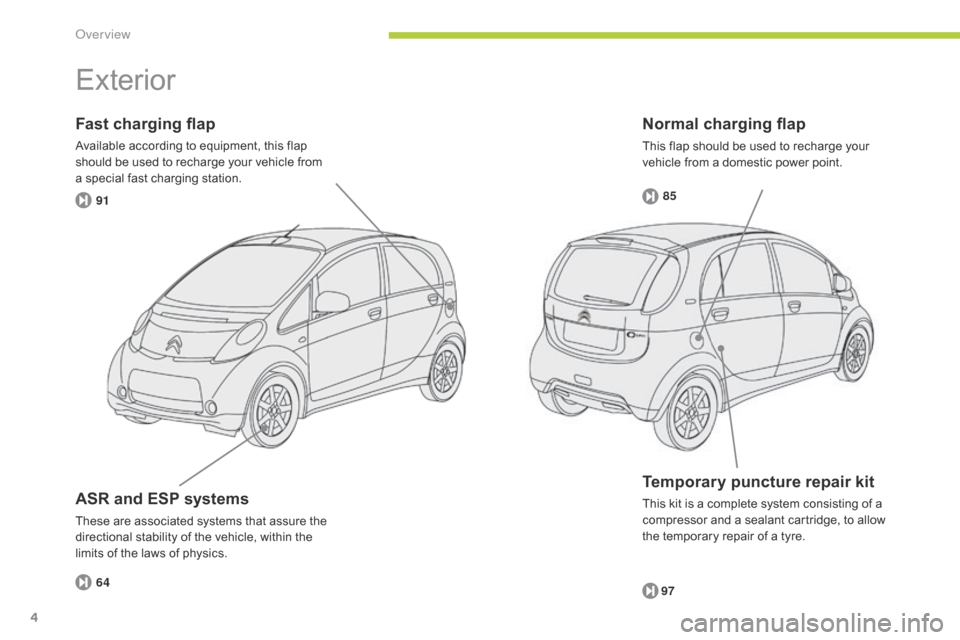
Normal charging flap
This flap should be used to recharge your
vehicle from a domestic power point.
Fast charging flap
Available according to equipment, this flap
should be used to recharge your vehicle from
a
special fast charging station.
Temporary puncture repair kit
This kit is a complete system consisting of a
compressor and a sealant cartridge, to allow
the temporary repair of a tyre.
Exterior
ASR and ESP systems
These are associated systems that assure the
directional stability of the vehicle, within the
limits of the laws of physics.
Over view
Page 8 of 176
6
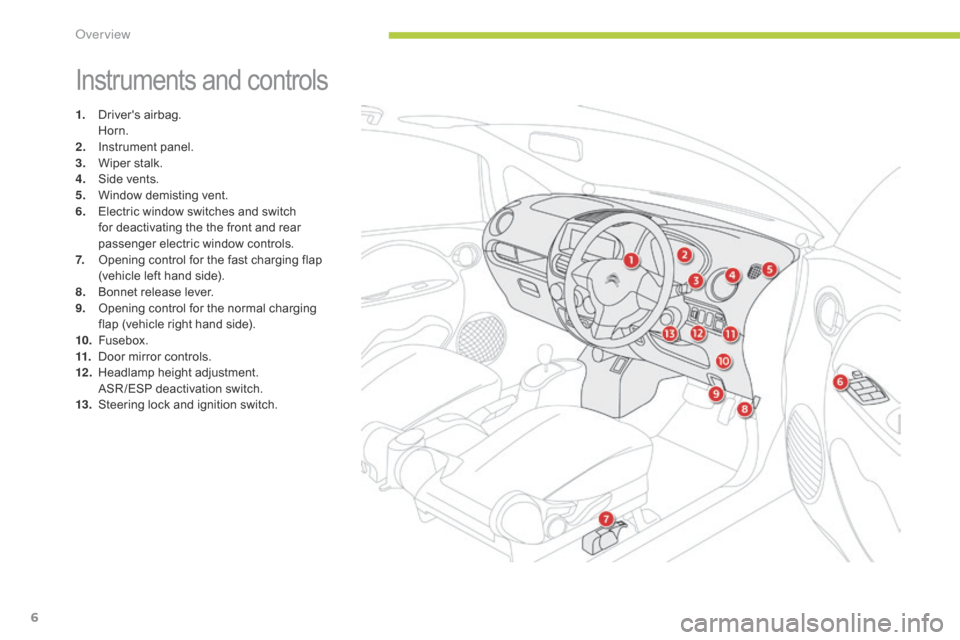
Instruments and controls
1. Driver's airbag. Horn.
2.
I
nstrument panel.
3.
W
iper stalk.
4.
S
ide vents.
5.
W
indow demisting vent.
6.
E
lectric window switches and switch
for deactivating the the front and rear
passenger electric window controls.
7.
O
pening control for the fast charging flap
(vehicle left hand side).
8.
B
onnet release lever.
9.
O
pening control for the normal charging
flap (vehicle right hand side).
10.
F
usebox.
11.
D
oor mirror controls.
12 .
H
eadlamp height adjustment.
A
SR /ESP deactivation switch.
13.
S
teering lock and ignition switch.
Over view
Page 11 of 176
9
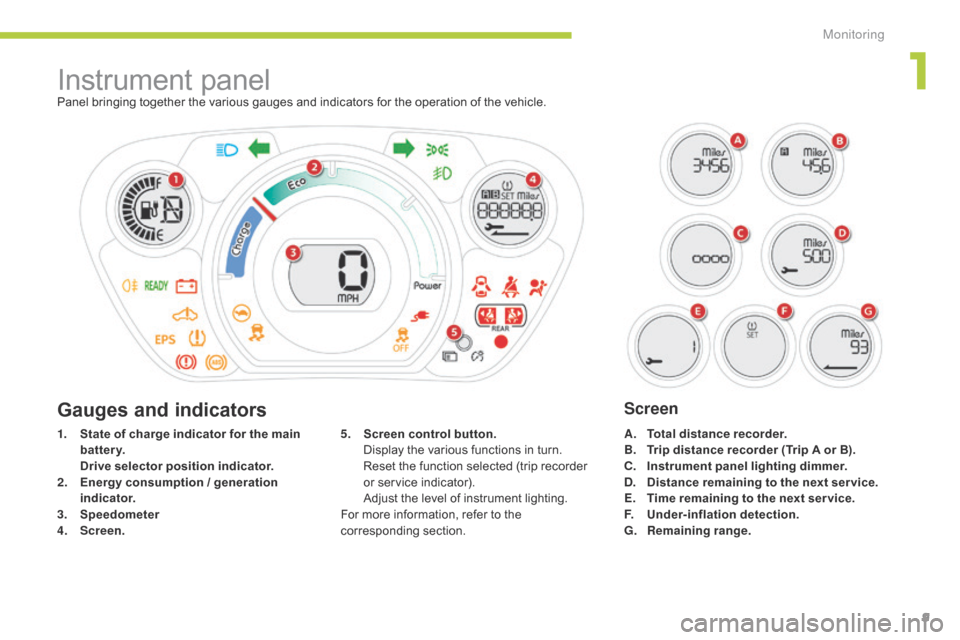
Instrument panelPanel bringing together the various gauges and indicators for the operation of the vehicle.
1.
S
tate of charge indicator for the main
battery.
D
rive selector position indicator.
2.
E
nergy consumption / generation
indicator.
3.
S
peedometer
4.
S
creen. A.
T
otal distance recorder.
B.
T
rip distance recorder (Trip A or B).
C.
I
nstrument panel lighting dimmer.
D.
D
istance remaining to the next ser vice.
E.
T
ime remaining to the next ser vice.
F.
U
nder-inflation detection.
G.
R
emaining range.
5.
S
creen control button.
D
isplay the various functions in turn.
R
eset the function selected (trip recorder
or service indicator).
A
djust the level of instrument lighting.
For more information, refer to the
corresponding section.
Gauges and indicatorsScreen
1
Monitoring
Page 13 of 176
11
Warning / indicator lampSt ateCause Action / Observations
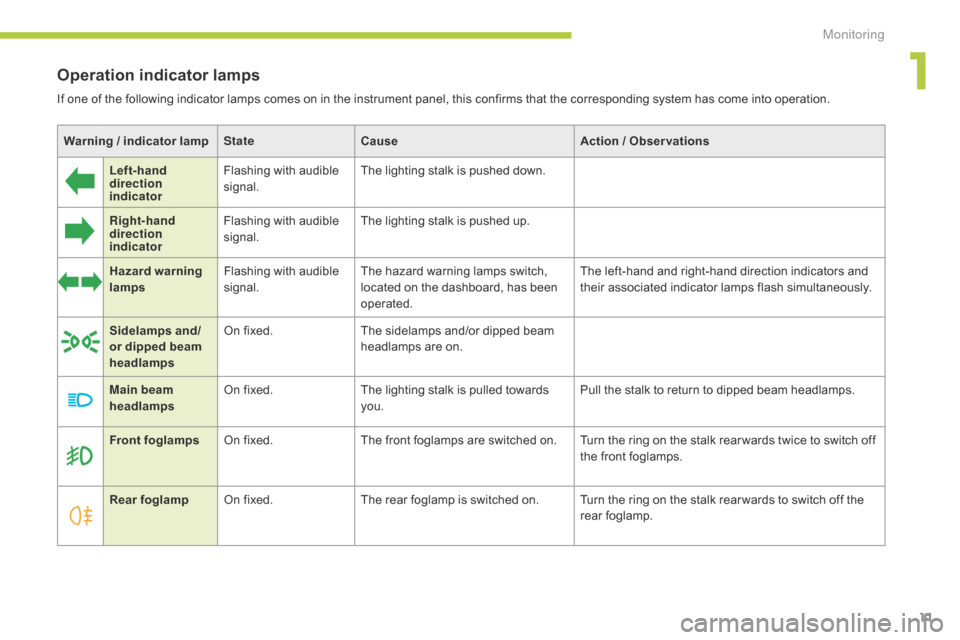
Left-hand
direction
indicato r Flashing with audible
signal.
The lighting stalk is pushed down.
Right-hand
direction
indicator Flashing with audible
signal.
The lighting stalk is pushed up.
Hazard warning
lamps Flashing with audible
signal. The hazard warning lamps switch,
located on the dashboard, has been
operated. The left-hand and right-hand direction indicators and
their associated indicator lamps flash simultaneously.
Sidelamps and/
or dipped beam
headlamps On fixed.
The sidelamps and/or dipped beam
headlamps are on.
Front foglamps On fixed. The front foglamps are switched on. Turn the ring on the stalk rear wards twice to switch off
the front foglamps.
Rear foglamp On fixed. The rear foglamp is switched on. Turn the ring on the stalk rear wards to switch off the
rear foglamp.
Main beam
headlamps
On fixed.
The lighting stalk is pulled towards
you. Pull the stalk to return to dipped beam headlamps.
Operation indicator lamps
If one of the following indicator lamps comes on in the instrument panel, this confirms that the corresponding system has come into operation.
1
Monitoring
Page 14 of 176
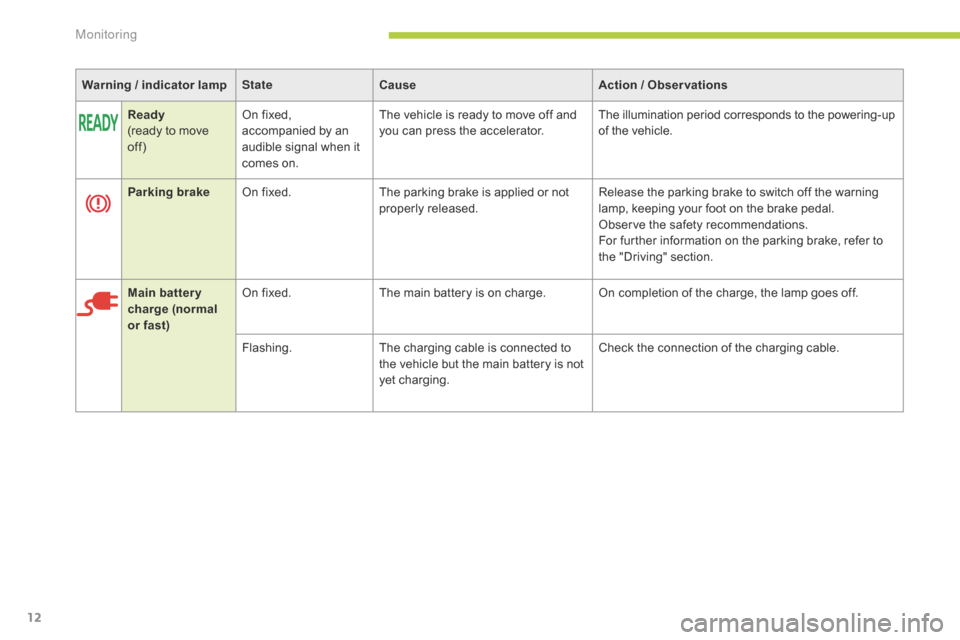
12
Warning / indicator lampSt ateCause Action / Observations
Ready
(ready to move
off) On fixed,
accompanied by an
audible signal when it
comes on. The vehicle is ready to move off and
you can press the accelerator.
The illumination period corresponds to the powering-up
of the vehicle.
Parking brake On fixed. The parking brake is applied or not
properly released. Release the parking brake to switch off the warning
lamp, keeping your foot on the brake pedal.
Observe the safety recommendations.
For further information on the parking brake, refer to
the "Driving" section.
Main batter y
charge (normal
or fast) On fixed.
The main battery is on charge. On completion of the charge, the lamp goes off.
Flashing. The charging cable is connected to
the vehicle but the main battery is not
yet charging. Check the connection of the charging cable.
Monitoring
Page 15 of 176
13
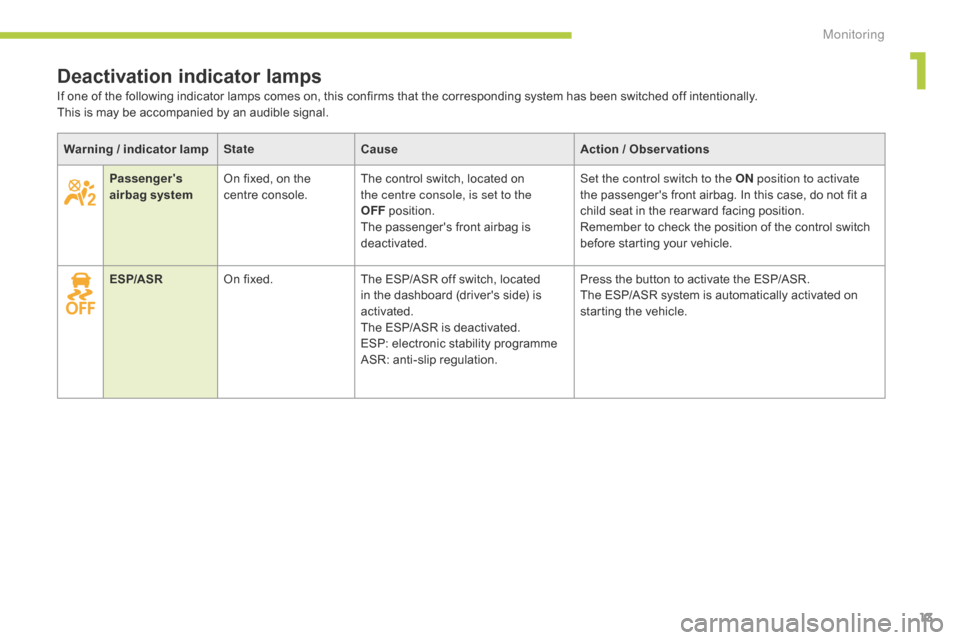
Deactivation indicator lamps
Warning / indicator lampSt ateCause Action / Observations
Passenger's
airbag system On fixed, on the
centre console. The control switch, located on
the centre console, is set to the
OFF
p
osition.
The passenger's front airbag is
deactivated. Set the control switch to the ON
position to activate
the passenger's front airbag. In this case, do not fit a
child seat in the rear ward facing position.
Remember to check the position of the control switch
before starting your vehicle.
ESP/ASR On fixed. The ESP/ASR off switch, located
in the dashboard (driver's side) is
activated.
The ESP/ASR is deactivated.
ESP: electronic stability programme
ASR: anti-slip regulation. Press the button to activate the ESP/ASR.
The ESP/ASR system is automatically activated on
starting the vehicle.
If one of the following indicator lamps comes on, this confirms that the corresponding system has been switched off intentionally.
This is may be accompanied by an audible signal.
1
Monitoring
Page 17 of 176
15
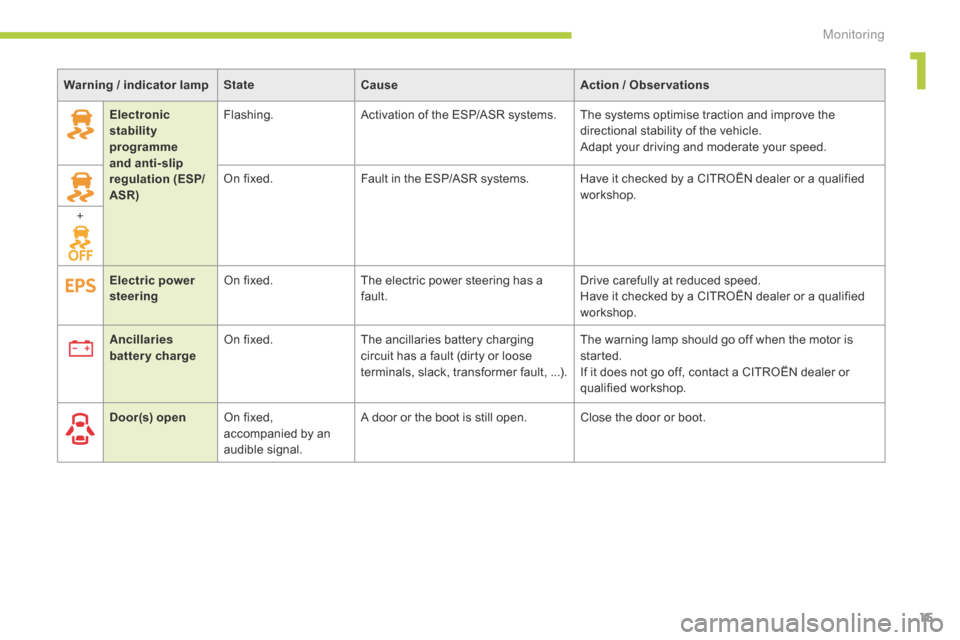
Electronic
stability
programme
and anti-slip
regulation (ESP/
ASR)Flashing.
Activation of the ESP/ASR systems. The systems optimise traction and improve the
directional stability of the vehicle.
Adapt your driving and moderate your speed.
On fixed. Fault in the ESP/ASR systems. Have it checked by a CITROËN dealer or a qualified
workshop.
+
Door(s) open On fixed,
accompanied by an
audible signal. A door or the boot is still open. Close the door or boot.
Ancillaries
battery charge
On fixed.
The ancillaries battery charging
circuit has a fault (dirty or loose
terminals, slack, transformer fault, ...). The warning lamp should go off when the motor is
started.
If it does not go off, contact a CITROËN dealer or
qualified workshop.
Electric power
steering
On fixed.
The electric power steering has a
fault. Drive carefully at reduced speed.
Have it checked by a CITROËN dealer or a qualified
workshop.
Warning
/ indicator lamp
State Cause Action
/
Observations
1
Monitoring
Page 22 of 176
20
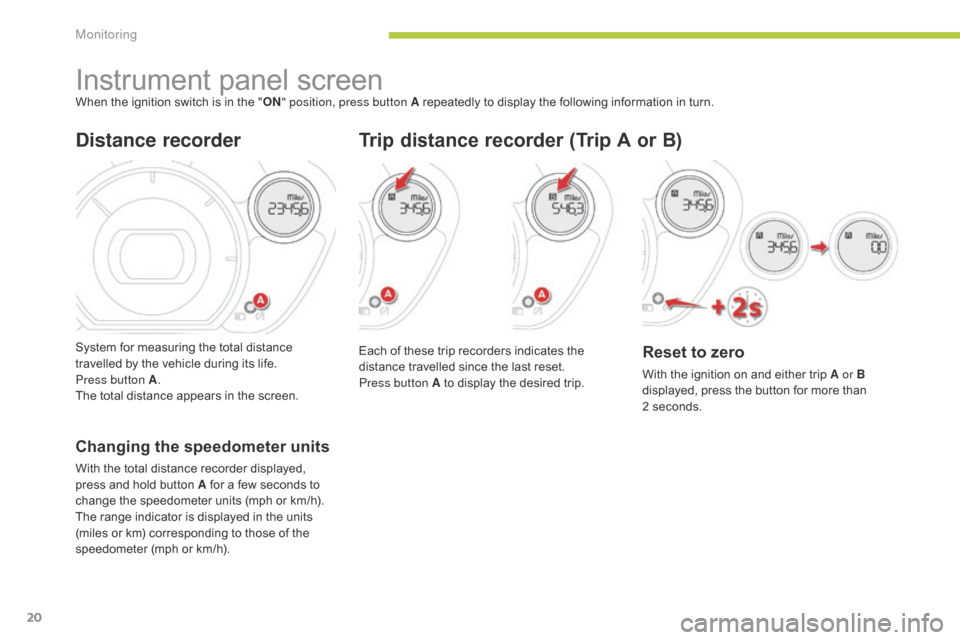
Instrument panel screenWhen the ignition switch is in the "ON" position, press button A repeatedly to display the following information in turn.
Distance recorder
System for measuring the total distance
travelled by the vehicle during its life.
Press button A .
The total distance appears in the screen.Reset to zero
With the ignition on and either trip A or B
displayed, press the button for more than
2
seconds.
Trip distance recorder (Trip A or B)
Each of these trip recorders indicates the
distance travelled since the last reset.
Press button A to display the desired trip.
Changing the speedometer units
With the total distance recorder displayed,
press and hold button A for a few seconds to
change the speedometer units (mph or km/h).
The range indicator is displayed in the units
(miles or km) corresponding to those of the
speedometer (mph or km/h).
Monitoring
Page 25 of 176
23
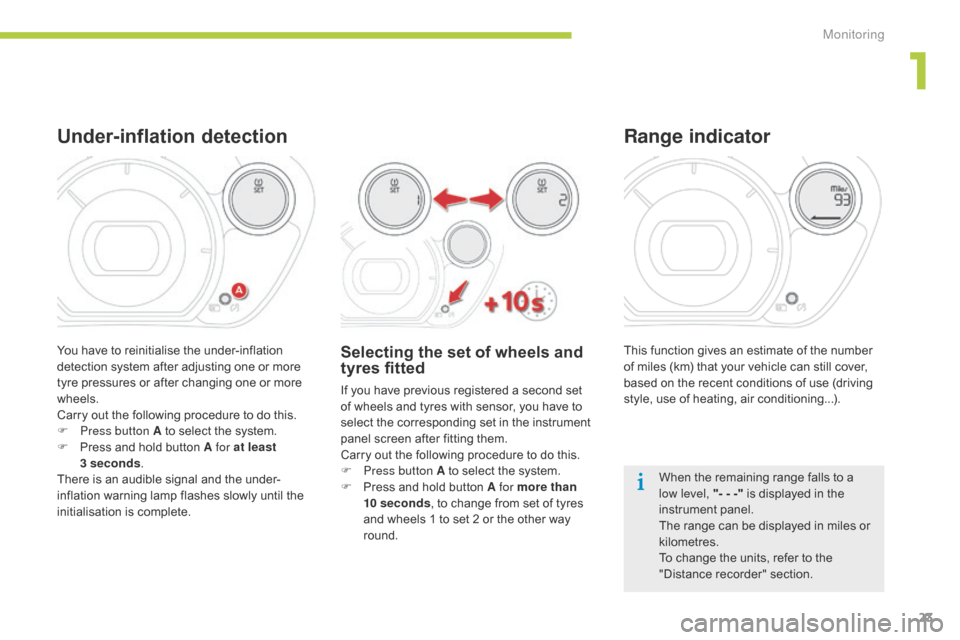
This function gives an estimate of the number
of miles (km) that your vehicle can still cover,
based on the recent conditions of use (driving
style, use of heating, air conditioning...).
Range indicator
When the remaining range falls to a
low level, "- - -" is displayed in the
instrument panel.
The range can be displayed in miles or
kilometres.
To change the units, refer to the
"Distance recorder" section.
Under-inflation detection
Selecting the set of wheels and
tyres fitted
If you have previous registered a second set
of wheels and tyres with sensor, you have to
select the corresponding set in the instrument
panel screen after fitting them.
Carry out the following procedure to do this.
F
P
ress button A to select the system.
F
P
ress and hold button A for more than
10
seconds , to change from set of tyres
and wheels 1 to set 2 or the other way
round.
You have to reinitialise the under-inflation
detection system after adjusting one or more
tyre pressures or after changing one or more
wheels.
Carry out the following procedure to do this.
F
P
ress button A to select the system.
F
P
ress and hold button A for at least
3
seconds .
There is an audible signal and the under-
inflation warning lamp flashes slowly until the
initialisation is complete.
1
Monitoring
Page 31 of 176
29
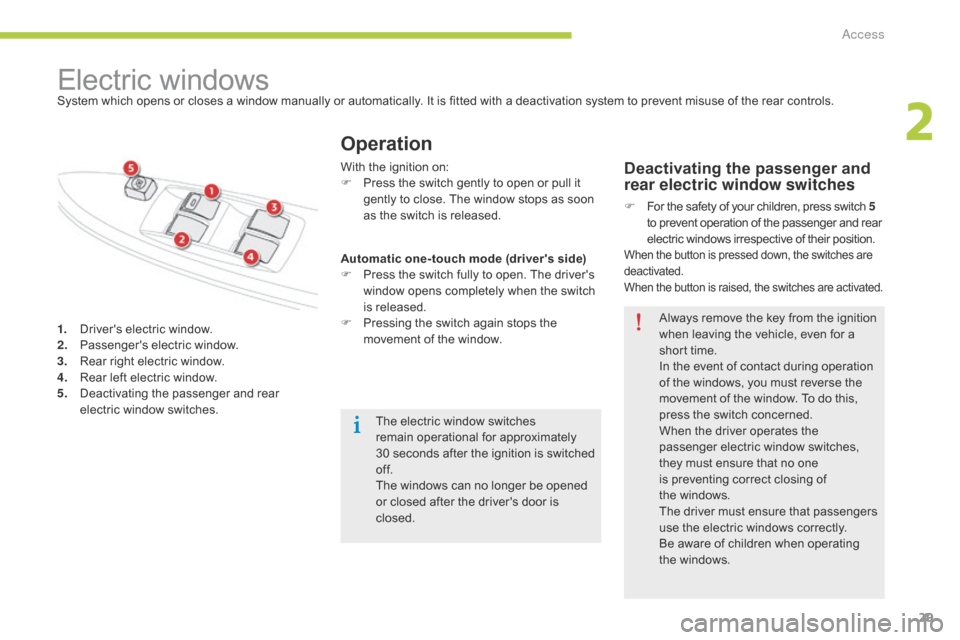
1. Driver's electric window.
2. Passenger's electric window.
3.
R
ear right electric window.
4.
R
ear left electric window.
5.
D
eactivating the passenger and rear
electric window switches.
Electric windows
Operation
Deactivating the passenger and
rear electric window switches
F For the safety of your children, press switch 5
to prevent operation of the passenger and rear
electric windows irrespective of their position.
When the button is pressed down, the switches are
deactivated.
When the button is raised, the switches are activated.
System which opens or closes a window manually or automatically. It is fitted with a deactivation system to prevent misuse of the rear controls.
The electric window switches
remain operational for approximately
30
seconds after the ignition is switched
of f.
The windows can no longer be opened
or closed after the driver's door is
closed.
With the ignition on:
F
P
ress the switch gently to open or pull it
gently to close. The window stops as soon
as the switch is released.
Always remove the key from the ignition
when leaving the vehicle, even for a
short time.
In the event of contact during operation
of the windows, you must reverse the
movement of the window. To do this,
press the switch concerned.
When the driver operates the
passenger electric window switches,
they must ensure that no one
is preventing correct closing of
the
w
indows.
The driver must ensure that passengers
use the electric windows correctly.
Be aware of children when operating
the windows.
Automatic one-touch mode (driver's side)
F
P
ress the switch fully to open. The driver's
window opens completely when the switch
is released.
F
P
ressing the switch again stops the
movement of the window.
2
Access