Citroen C ZERO 2014.5 1.G Service Manual
Manufacturer: CITROEN, Model Year: 2014.5, Model line: C ZERO, Model: Citroen C ZERO 2014.5 1.GPages: 176, PDF Size: 5.22 MB
Page 41 of 176
39
When connected to the USB port, the portable
device charges automatically.For more information on the use of
this system, refer to the "Audio and
Telematics" section.
USB Player
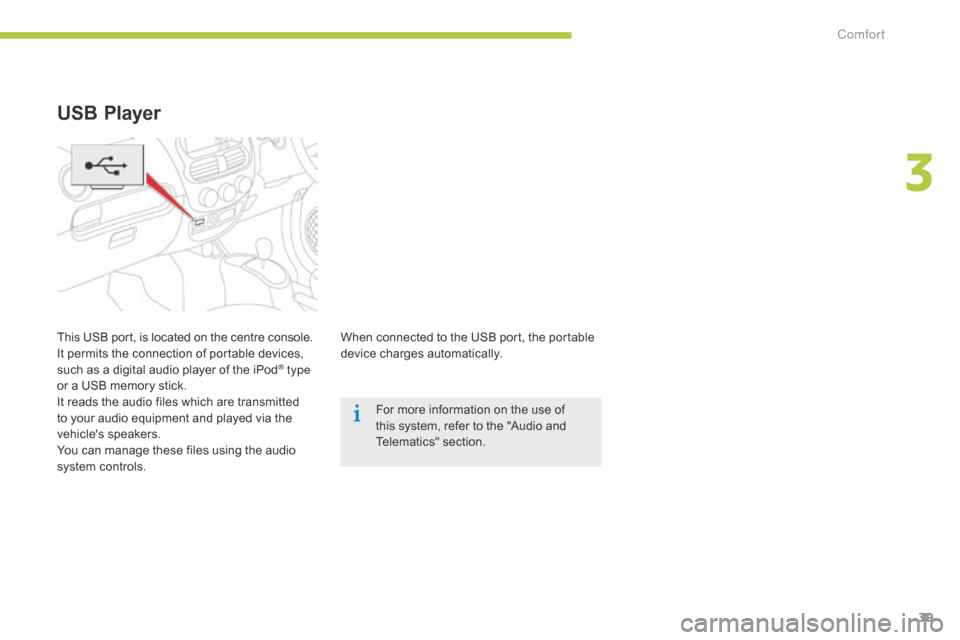
This USB port, is located on the centre console.
It permits the connection of portable devices,
such as a digital audio player of the iPod
® type
or a USB memory stick.
It reads the audio files which are transmitted
to your audio equipment and played via the
vehicle's speakers.
You can manage these files using the audio
system controls.
3
Comfort
Page 42 of 176
40
Ventilation
Air intake
The air circulating in the passenger compartment
is filtered and originates either from the outside via
the grille located at the base of the windscreen or
from the inside in air recirculation mode. System which creates and maintains good
conditions of comfort and visibility in the
vehicle's passenger compartment.
Controls
The incoming air follows various routes
depending on the controls selected.
The temperature control enables you to obtain
the level of comfort required by mixing the air of
the various circuits.
The air distribution control enables you to
select the air vents used in the passenger
compartment.
The air flow control enables you to increase or
reduce the speed of the ventilation fan.
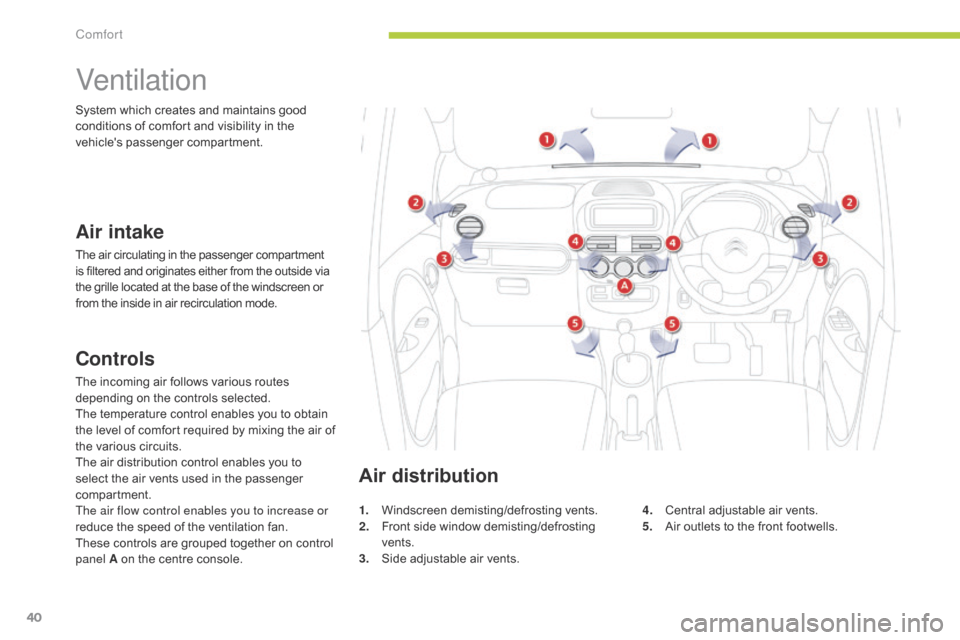
These controls are grouped together on control
panel A on the centre console.
Air distribution
1. Windscreen demisting/defrosting vents.
2. Front side window demisting/defrosting
vents.
3.
S
ide adjustable air vents. 4. C
entral adjustable air vents.
5. A ir outlets to the front footwells.
Comfort
Page 43 of 176
41
In order for these systems to be fully effective, follow the operation and maintenance
guidelines below:
F
I
f the interior temperature remains very high after the vehicle has been parked in the
sun for a considerable time, first ventilate the passenger compartment for a few minutes
by opening the windows.
P
lace the air flow control at a sufficient level to provide an adequate renewal of air in
the passenger compartment.
F
C
ondensation created by the air conditioning results in a discharge of water under the
vehicle when stationary, which is per fectly normal.
F
T
o obtain an even air distribution, take care not to obstruct the exterior air intake grilles
located at the base of the windscreen, the nozzles, the vents and the air outlets, as well
as the air extractor located in the boot.
F
U
se in preference the intake of exterior air as prolonged use of the air recirculation may
cause misting of the windows and side windows.
F
O
perate the air conditioning system for 5 to 10 minutes, once or twice a month to keep it
in good working order.
F
E
nsure that the passenger compartment filter is in good condition and have the filter
elements replaced regularly (refer to "Checks").
F
T
o ensure correct operation of the air conditioning system, you are also advised to have
it checked regularly.
F
I
f the system does not produce cold air, do not use it and contact a CITROËN dealer or
a qualified workshop.
Recommendations for ventilation and air conditioning
The heating and air conditioning use
energy from the main battery. Their use
increases electrical consumption and
reduces the range of the vehicle.
Remember to switch off the heating
or air conditioning as soon as it is no
longer needed.
3
C
Page 44 of 176
42
Air conditioning
The air conditioning can be used as soon as the "Ready" lamp is on.
Adjustments can be made manually or automatically.
Heating / Ventilation
The heating and ventilation can be used as soon as the "Ready" lamp
is on.
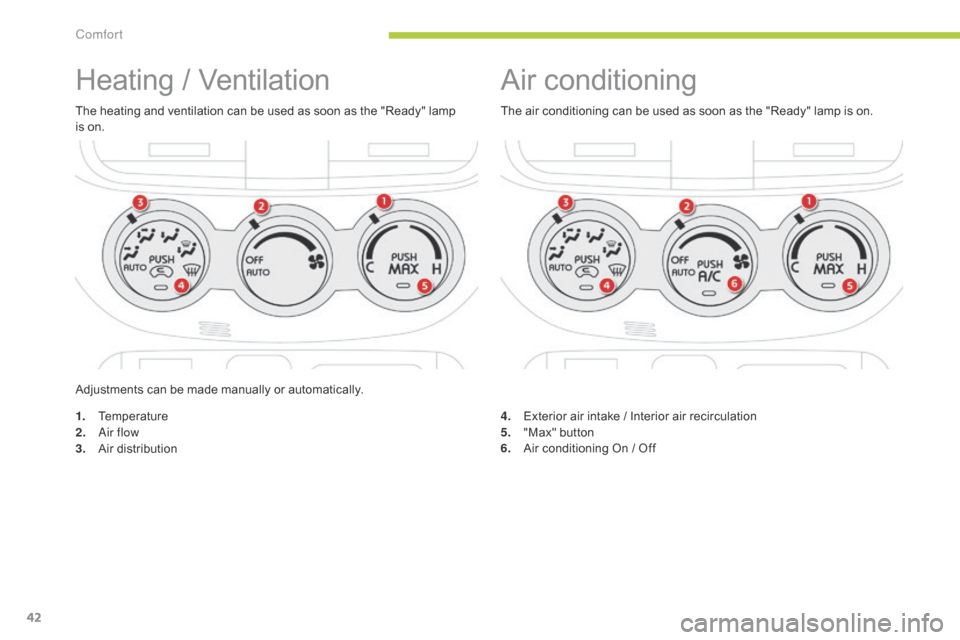
1.
T
emperature
2.
a
i
r flow
3.
A
ir distribution 4.
E
xterior air intake / Interior air recirculation
5.
"
Max" button
6.
A
ir conditioning On / Off
Comfort
Page 45 of 176
43
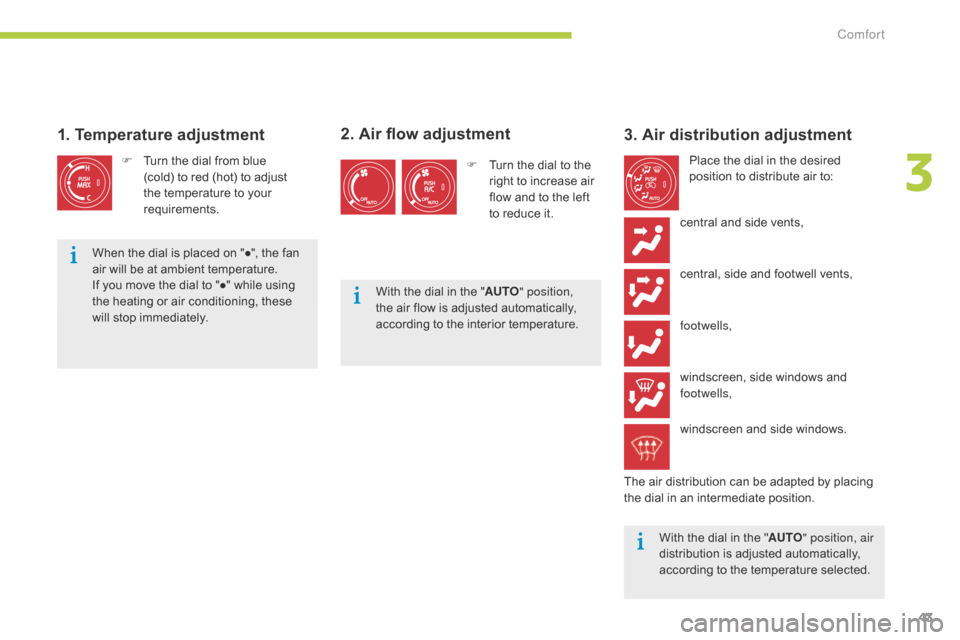
3. Air distribution adjustment
Place the dial in the desired
position to distribute air to:
central and side vents,
central, side and footwell vents,
footwells,
windscreen, side windows and
footwells,
windscreen and side windows.
The air distribution can be adapted by placing
the dial in an intermediate position. With the dial in the " AUTO" position, air
distribution is adjusted automatically,
according to the temperature selected.
2. Air flow adjustment
F Turn the dial to the right to increase air
flow and to the left
to reduce it.
With the dial in the " AUTO" position,
the air flow is adjusted automatically,
according to the interior temperature.
1. Temperature adjustment
F Turn the dial from blue (cold) to red (hot) to adjust
the temperature to your
requirements.
When the dial is placed on "●", the fan
air will be at ambient temperature.
If you move the dial to "●" while using
the heating or air conditioning, these
will stop immediately.
3
Comfort
Page 46 of 176
44
6. Air conditioning On / Off
S witching on
F Press the "A /C " button, the associated
indicator lamp comes on.
The air conditioning does not operate when
the air flow adjustment is set to off.
Switching off
F Press the "A /C " button again, the
associated indicator lamp goes off.
Switching off may result in some discomfort
(humidity, misting).
5. "MAX" button
The air conditioning is designed to
operate effectively in all seasons,
with the windows closed.
It enables you to:
-
l
ower the temperature, in summer,
-
i
ncrease the effectiveness of the demisting
in winter, above 3 °C.
This button allows the passenger compartment
to be quickly heated or cooled. It only
works when the air flow control is not in
the
" OFF "
position.
Press this button. The corresponding
indicator lamp comes on.
The place the temperature control in the
desired position:
-
o
n "●" for maximum ventilation,
-
b
etween "●" and "H" for maximum heating,
-
b
etween "C" and "●" for maximum air
conditioning. To obtain cool air sooner, you can use
air recirculation for a few moments.
Then return to the intake of exterior air.
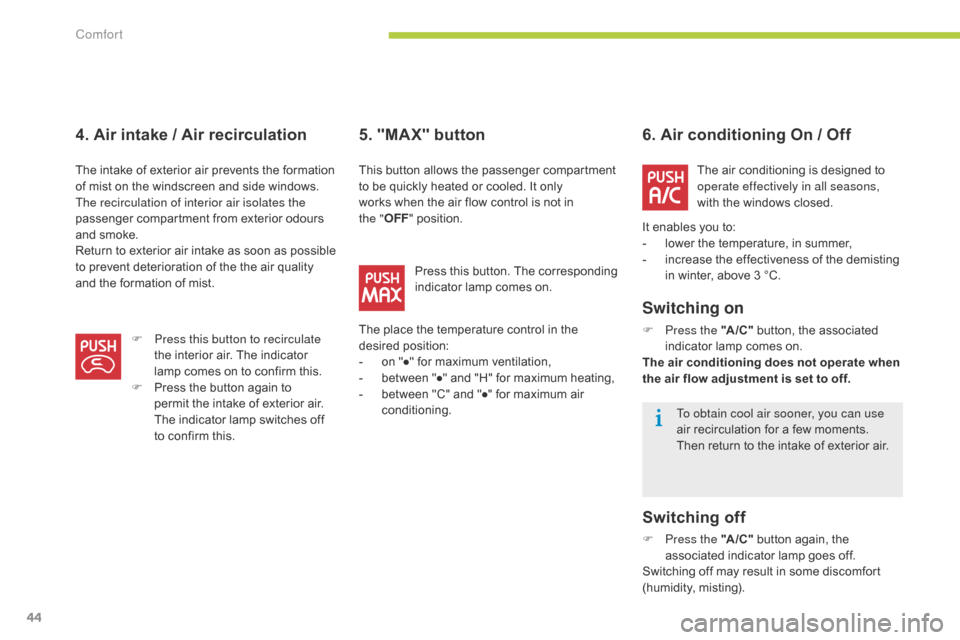
4. Air intake / Air recirculation
The intake of exterior air prevents the formation
of mist on the windscreen and side windows.
The recirculation of interior air isolates the
passenger compartment from exterior odours
and smoke.
Return to exterior air intake as soon as possible
to prevent deterioration of the the air quality
and the formation of mist.
F
P
ress this button to recirculate
the interior air. The indicator
lamp comes on to confirm this.
F
P
ress the button again to
permit the intake of exterior air.
The
indicator lamp switches off
to confirm this.
Comfort
Page 47 of 176
45
Switch off the demisting/defrosting
of the rear screen and door mirrors
as soon as appropriate, so as to limit
electrical consumption and optimise
the range of the vehicle.
Front demist -
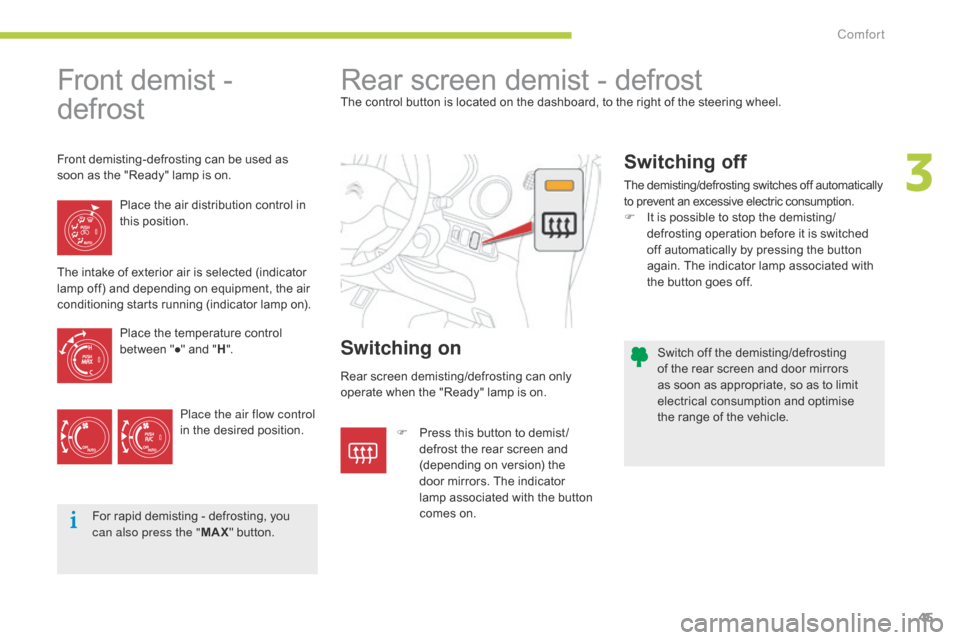
defrost Rear screen demist - defrostThe control button is located on the dashboard, to the right of the steering wheel.
F
P
ress this button to demist /
defrost the rear screen and
(depending on version) the
door mirrors. The indicator
lamp associated with the button
comes on.
Place the air distribution control in
this position.
Switching on
Switching off
The demisting/defrosting switches off automatically
to prevent an excessive electric consumption.
F
I
t is possible to stop the demisting/
defrosting operation before it is switched
off automatically by pressing the button
again. The indicator lamp associated with
the button goes off.
For rapid demisting - defrosting, you
can also press the " MAX" button.
The intake of exterior air is selected (indicator
lamp off) and depending on equipment, the air
conditioning starts running (indicator lamp on).
Place the temperature control
between "●" and " H".
Place the air flow control
in the desired position.
Front demisting-defrosting can be used as
soon as the "Ready" lamp is on.
Rear screen demisting/defrosting can only
operate when the "Ready" lamp is on.
3
Comfort
Page 48 of 176
46
A few driving recommendations
Observe the driving regulations at all times and
remain vigilant whatever the traffic conditions.
Pay close attention to the traffic and keep your
hands on the wheel so that you are ready to
react at any time to any eventuality.
On a long journey, a break every two hours is
strongly recommended.
In difficult weather, drive smoothly, anticipate
the need to brake and increase the distance
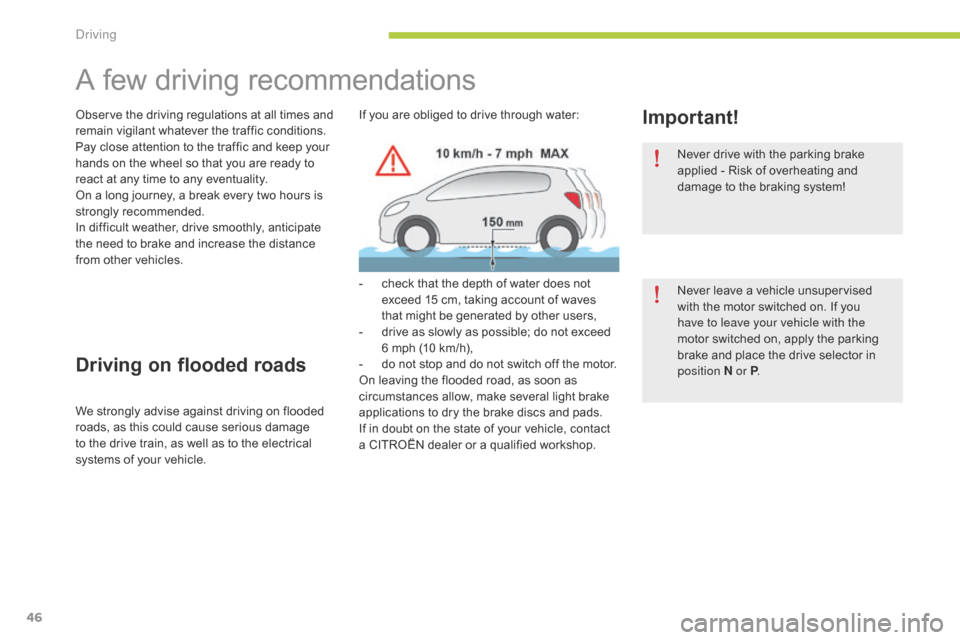
from other vehicles.If you are obliged to drive through water:
-
c
heck that the depth of water does not
exceed 15 cm, taking account of waves
that might be generated by other users,
-
d
rive as slowly as possible; do not exceed
6 mph (10 km/h),
-
d
o not stop and do not switch off the motor.
On leaving the flooded road, as soon as
circumstances allow, make several light brake
applications to dry the brake discs and pads.
If in doubt on the state of your vehicle, contact
a CITROËN dealer or a qualified workshop.Important!
Driving on flooded roads
We strongly advise against driving on flooded
roads, as this could cause serious damage
to the drive train, as well as to the electrical
systems of your vehicle. Never drive with the parking brake
applied - Risk of overheating and
damage to the braking system!
Never leave a vehicle unsupervised
with the motor switched on. If you
have to leave your vehicle with the
motor switched on, apply the parking
brake and place the drive selector in
position
N or P
.
driving
Page 49 of 176
47
Starting - stopping the vehicle
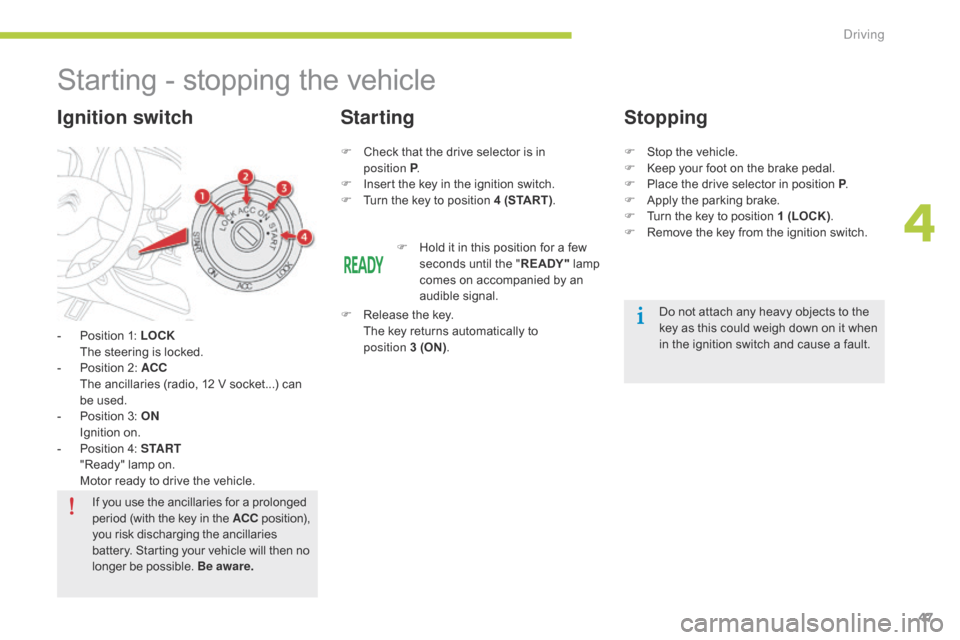
- Position 1: LOCK The steering is locked.
-
P
osition 2: ACC
T
he ancillaries (radio, 12 V socket...) can
be used.
-
P
osition 3: ON
I
gnition on.
-
P
osition 4: S TA R T
"
Ready" lamp on.
M
otor ready to drive the vehicle.
Ignition switch
F Check that the drive selector is in position P.
F
I
nsert the key in the ignition switch.
F
T
urn the key to position 4 (START) .
StartingStopping
F Stop the vehicle.
F
K eep your foot on the brake pedal.
F
P
lace the drive selector in position P .
F
A
pply the parking brake.
F
T
urn the key to position 1 (LOCK) .
F
R
emove the key from the ignition switch.
F
H
old it in this position for a few
seconds until the " RE ADY " lamp
comes on accompanied by an
audible signal.
F
R
elease the key.
T
he key returns automatically to
position
3
(ON) . Do not attach any heavy objects to the
key as this could weigh down on it when
in the ignition switch and cause a fault.
If you use the ancillaries for a prolonged
period (with the key in the ACC position),
you risk discharging the ancillaries
battery. Starting your vehicle will then no
longer be possible. Be aware.
4
Driving
Page 50 of 176
48
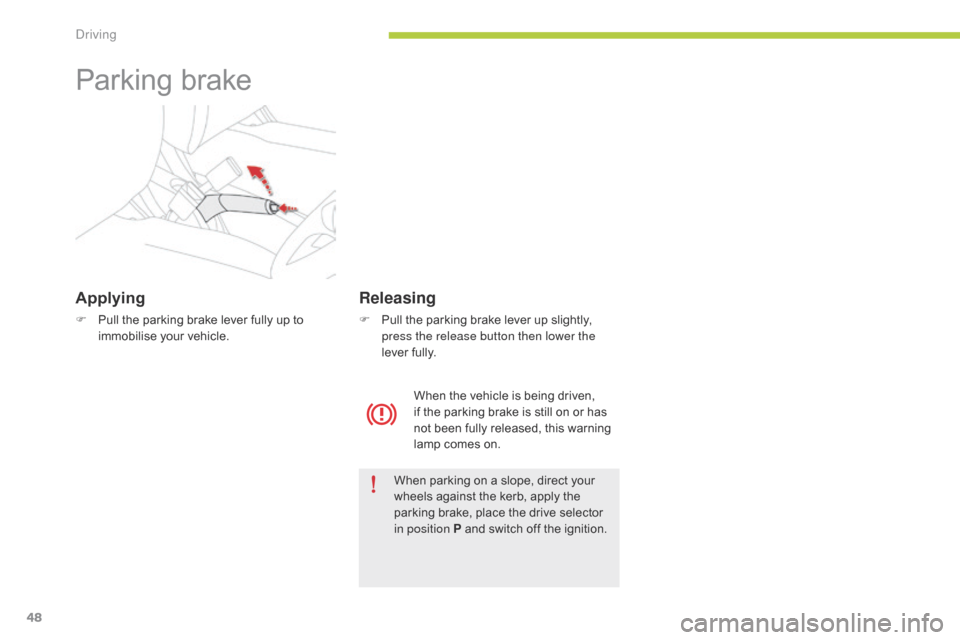
Parking brake
Applying
F Pull the parking brake lever fully up to immobilise your vehicle.
When parking on a slope, direct your
wheels against the kerb, apply the
parking brake, place the drive selector
in position P and switch off the ignition.
Releasing
F Pull the parking brake lever up slightly, press the release button then lower the
lever fully.
When the vehicle is being driven,
if the parking brake is still on or has
not been fully released, this warning
lamp comes on.
driving