change time CITROEN C3 AIRCROSS 2021 Handbook (in English)
[x] Cancel search | Manufacturer: CITROEN, Model Year: 2021, Model line: C3 AIRCROSS, Model: CITROEN C3 AIRCROSS 2021Pages: 244, PDF Size: 6.29 MB
Page 115 of 244

11 3
Driving
6
Deactivation / Activation
The system is activated every time the ignition
is switched on.
OFF
► To deactivate the system, press this button.Deactivation is signalled by the lighting
of the indicator lamp on the button and
this warning lamp on the instrument panel.
Reactivation is carried out via another press; the
indicator lamp on the button and the warning
lamp go out.
Detection
If an unexpected change of direction is detected, this warning lamp flashes in the
instrument panel accompanied by an audible
signal.
No warning is transmitted while the direction
indicator is activated and for approximately 20 seconds after the direction indicator is switched
off.
Malfunction
In the event of a malfunction, this warning lamp comes on on the
instrument panel, accompanied by the display of
a message and an audible signal.
Contact a CITROËN dealer or a qualified
workshop.
Blind Spot Monitoring
System
Refer to the General recommendations on the
use of driving and manoeuvring aids .
This system includes sensors, placed on the
sides of the bumpers, and warns the driver of
the potentially dangerous presence of another
vehicle (car, truck, motorcycle) in the blind spot
areas of their vehicle (areas hidden from the driver's field of vision).
The warning is given by a fixed warning lamp
that appears in the door mirror on the side in
question:
– immediately, when being overtaken;– after a delay of about one second, when overtaking a vehicle slowly.
Activation / Deactivation
It is set via the Driving / Vehicle touch
screen menu.
When starting the vehicle, the warning lamp
comes on in each mirror to indicate that the
system is activated.
The state of the system stays in the memory
when switching off the ignition.
The system is automatically deactivated when towing with a towing device
approved by CITROËN.
Conditions for operation
– All vehicles are moving in the same direction and in adjacent lanes.– The speed of your vehicle must be between 7 and 87 mph (12 and 140 km/h).
Page 118 of 244

11 6
Driving
Operating limits
If the boot is heavily loaded, the vehicle may tilt,
affecting distance measurements.
Malfunction
In the event of a malfunction when shifting to reverse, this warning lamp comes on
on the instrument panel, accompanied by the
display of a message and an audible signal
(short beep).
Contact a CITROËN dealer or a qualified
workshop to have the system checked.
Top Rear Vision
Refer to the General recommendations on the
use of driving and manoeuvring aids .
As soon as reverse gear is engaged with the
engine running, this system displays views of
your vehicle’s close surroundings on the touch screen using a camera located at the rear of the
vehicle.
The screen is divided into two parts with a
contextual view and a view from above the
vehicle in its close surroundings.
The parking sensors supplement the information
on the view from above the vehicle.
Various contextual views may be displayed:
– Standard view
.
– 180° view.– Zoom view .AUTO mode is activated by default.
In this mode, the system chooses to display the
best view (standard or zoom).
You can change the type of view at any time
during a manoeuvre.
The state of the function is not saved when the
ignition is switched off.
Principle of operation
Using the rear camera, the vehicle's close
surroundings are recorded during manoeuvres
at low speed.
An image from above your vehicle in its close
surroundings is reconstructed (represented
between the brackets) in real time and as the
manoeuvre progresses.
It facilitates the alignment of your vehicle when
parking and allows obstacles close to the vehicle
to be seen. It is automatically deleted if the
vehicle remains stationary for too long.
Rear vision
To activate the camera, located on the tailgate,
engage reverse and keep the speed of the
vehicle below 6 mph (10 km/h).The system is deactivated:– Automatically, at speeds above approximately 6 mph (10 km/h),– Automatically, if the tailgate is opened.– Upon changing out of reverse gear (the image remains displayed for 7 seconds).– By pressing the white arrow in the upper-left corner of the touch screen.
Page 120 of 244
11 8
Driving
Obstacles may appear further away than
they actually are in reality.
It is important to check the sides of the
vehicle during the manoeuvre, using the
mirrors.
The rear parking sensors also provide
information on the vehicle's surroundings.
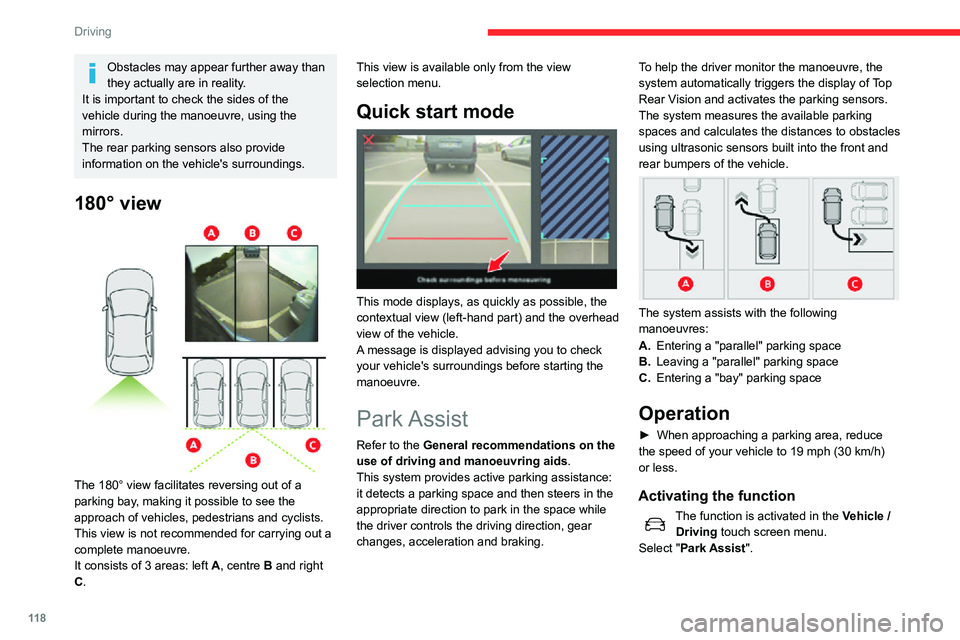
180° view
The 180° view facilitates reversing out of a
parking bay, making it possible to see the
approach of vehicles, pedestrians and cyclists.
This view is not recommended for carrying out a
complete manoeuvre.
It consists of 3 areas: left A, centre B and right
C. This view is available only from the view
selection menu.
Quick start mode
This mode displays, as quickly as possible, the
contextual view (left-hand part) and the overhead
view of the vehicle.
A message is displayed advising you to check
your vehicle's surroundings before starting the
manoeuvre.
Park Assist
Refer to the General recommendations on the
use of driving and manoeuvring aids .
This system provides active parking assistance:
it detects a parking space and then steers in the
appropriate direction to park in the space while
the driver controls the driving direction, gear
changes, acceleration and braking. To help the driver monitor the manoeuvre, the
system automatically triggers the display of T
op Rear Vision and activates the parking sensors.
The system measures the available parking
spaces and calculates the distances to obstacles
using ultrasonic sensors built into the front and
rear bumpers of the vehicle.
The system assists with the following
manoeuvres:
A.Entering a "parallel" parking space
B. Leaving a "parallel" parking space
C. Entering a "bay" parking space
Operation
► When approaching a parking area, reduce the speed of your vehicle to 19 mph (30 km/h) or less.
Activating the function
The function is activated in the Vehicle /
Driving touch screen menu.
Select "Park Assist ".
Activating the function deactivates the Blind Spot Monitoring System.
You can deactivate the function at any
time until the parking space entry or exit
manoeuvre begins, by pressing the arrow
located in the top left-hand corner of the
display page.
Selecting the type of manoeuvre
A manoeuvre selection page is displayed on the
touch screen: by default, the "Entry" page if the
vehicle has been running since the ignition was
switched on, otherwise, the "Exit" page.
► Select the type and side of the manoeuvre to activate the parking space search.
The selected manoeuvre can be changed at
any time, even while searching for an available
space.
Page 121 of 244

11 9
Driving
6Activating the function deactivates the Blind Spot Monitoring System.
You can deactivate the function at any time until the parking space entry or exit
manoeuvre begins, by pressing the arrow
located in the top left-hand corner of the
display page.
Selecting the type of manoeuvre
A manoeuvre selection page is displayed on the
touch screen: by default, the "Entry" page if the
vehicle has been running since the ignition was
switched on, otherwise, the "Exit" page.
► Select the type and side of the manoeuvre to activate the parking space search.
The selected manoeuvre can be changed at
any time, even while searching for an available
space.
Parking space search
► You should drive at a distance of between 0.50 m and 1.50 m from the row of parked vehicles, without ever exceeding 19 mph (30 km/h), until the system finds an available space.
The parking space search is suspended at
higher speeds. The function is automatically
deactivated if the vehicle speed exceeds 31 mph
(50 km/h).
For "parallel" parking, the space must
measure at least the length of your
vehicle plus 0.60 m.
For "bay" parking, the space must be at least
as wide as your vehicle plus 0.70 m.
If the parking sensors function has been
deactivated in the Driving/Vehicle touch
screen menu, it will be automatically
reactivated when the system is activated.
When the system finds an available space, " OK"
is displayed on the parking view, accompanied
by an audible signal.
Preparing for the manoeuvre
► Move very slowly until the request to stop the vehicle is displayed: " Stop the vehicle“,
accompanied by the “ STOP” sign and an audible
signal.
Once the vehicle has stopped, an instructions
page is displayed on the screen.
► To prepare for the manoeuvre, follow the instructions.
The start of the manoeuvre is indicated by the
"Manoeuvre under way" onscreen message
and an accompanying audible signal.
Reversing is indicated by this message:
“Release the steering wheel, reverse ”.
The Top Rear Vision and the parking sensors
are automatically activated to help you monitor
the area immediately surrounding your vehicle
during the manoeuvre.
During the manoeuvre
The system controls the vehicle’s steering. It gives instructions on the manoeuvring direction
when starting "parallel" entry and exit parking
manoeuvres, and for all "bay" entry manoeuvres.
These instructions are displayed as a symbol
accompanied by a message:
"Reverse".
Page 136 of 244
134
Practical information
For more information on the precautions
to take before any work on the 12 V battery, refer to the corresponding section.
Versions equipped with Stop & Start are fitted with a 12 V lead-acid battery of specific technology and specification.
Its replacement should be carried out only by
a CITROËN dealer or a qualified workshop.
Passenger compartment
filter
Depending on the environment and the use of the vehicle (e.g. dusty atmosphere,
city driving), change it twice as often, if
necessary .
A clogged passenger compartment filter
can adversely affect air conditioning
system performance and generate
undesirable odours.
Air filter
Depending on the environment and the use of the vehicle (e.g. dusty atmosphere,
city driving), change it twice as often, if
necessary .
Oil filter
Change the oil filter each time the engine oil is changed.
Particle filter (Diesel)
When the particle filter is approaching saturation, this warning lamp comes on
temporarily, accompanied by a message warning
of the risk of filter clogging.
As soon as the traffic conditions permit,
regenerate the filter by driving at a speed of at
least 37 mph (60 km/h) until the warning lamp goes off.
If the warning lamp stays on, this
indicates a low Diesel additive level.
For more information on Checking levels,
refer to the corresponding section.
Following prolonged operation of the
vehicle at very low speed or at idle, you
may, in exceptional circumstances, notice the
emission of water vapour at the exhaust while
accelerating. This has no impact on the
vehicle’s behaviour or the environment.
New vehicle
During the first few particle filter
regeneration operations, you may notice a
"burning" smell. This is perfectly normal.
Manual gearbox
The gearbox does not require any maintenance (no oil change).
Automatic gearbox
The gearbox does not require any maintenance (no oil change).
Brake pads
Brake wear depends on the style of driving, particularly in the case of vehicles
used in town, over short distances. It may be
necessary to have the condition of the brakes
checked, even between vehicle services.
Unless there is a leak in the circuit, a drop in the
brake fluid level indicates that the brake pads
are worn.
After washing the vehicle, moisture, or in wintry conditions, ice can form on the
brake discs and pads: braking efficiency may
be reduced. Gently dab the brakes to dry and
defrost them.
Brake disc wear
For information on checking brake disc
wear, contact a CITROËN dealer or a
qualified workshop.
Manual parking brake
If you notice excessive brake lever travel or decreased effectiveness, the parking
brake must be adjusted, even between two
services.
This system must be checked by a CITROËN
dealer or a qualified workshop.
Wheels and tyres
The inflation pressure of all tyres, including the spare wheel, must be
checked on "cold” tyres.
The pressures indicated on the tyre pressure
label are valid for "cold" tyres. If you have driven
for more than 10 minutes or more than 6 miles
(10 kilometres) at over 31 mph (50 km/h), add 0.3 bar (30 kPa) to the values indicated on the
label.
Under-inflation increases fuel
consumption. Non-compliant tyre
pressure causes premature wear on tyres and
has an adverse effect on the vehicle's road
holding - risk of an accident!
Driving with worn or damaged tyres reduces the
braking and road holding performance of the
vehicle. It is recommended to regularly check the
condition of the tyres (tread and sidewalls) and
wheel rims as well as the presence of the valves.
When the wear indicators no longer appear set
back from the tread, the depth of the grooves is
less than 1.6 mm; it is imperative to replace the
tyres.
Using different size wheels and tyres from those
specified can affect the lifetime of tyres, wheel
rotation, ground clearance, the speedometer
reading and have an adverse effect on road
holding.
Fitting different tyres on the front and rear axles
can cause the ESC to mistime.
Page 170 of 244
168
Bluetooth® audio system
When the radio station is displayed in the
screen , press "OK" to display the
contextual menu.
(Frequency search (RDS), DAB / FM auto tracking, RadioText (TXT) display, Information
on the station, etc.)
DAB / FM station tracking
"DAB" does not have 100% coverage of
the country.
When the digital signal is weak, "DAB / FM auto tracking" allows you to continue
listening to the same station, by automatically
switching to the corresponding analogue FM
station (if it exists).
When the "DAB / FM auto tracking" is active, the DAB station will be selected automatically.
Press the MENU button.
Select "Multimedia" and confirm.
Select "DAB / FM auto tracking" and
confirm.
If "DAB / FM auto tracking" tracking is enabled, there is a lag of a few seconds
when the system switches to the analogue
FM station sometimes with a change in
volume.
If the "DAB" station you are listening to is
not available on FM (" DAB/FM" option
struck out), or if "DAB / FM auto tracking" is not on, the sound will be cut when the digital
signal is too weak.
Media
USB port
Insert the USB memory stick into the USB port or connect the USB device to the
USB port using a suitable cable (not supplied).
The system changes automatically to "USB"
source.
To protect the system, do not use a USB hub.
Any additional devices connected to the system must comply with the standard
applicable to the product and/or the standard
IEC 60950-1.
The system builds playlists (in temporary
memory); this operation can take from a
few seconds to several minutes at the first
connection.
Reduce the number of non-music files and the
number of folders to reduce the waiting time.
Playlists are updated every time a new USB
memory stick is connected.
When the USB port is used, the portable
device charges automatically.
Play mode
The play modes available are:– Normal: the tracks are played in order,
depending on the classification of the selected
files.
– Random: the tracks in an album or folder are
played in a random order.
– Random on all media : all of the tracks saved
in the media are played in random order.
– Repeat: the tracks played are only those from
the current album or folder.
Press this button to display the contextual menu for the Media function.Press this button to select the chosen
play mode.
Press this button to confirm.
The choice made is displayed at the top of the
screen.
Choosing a track to play
Press one of these buttons to go to the
previous / next track.
Press one of these buttons to go to the
previous / next folder.
File classification
Make a long press on this button to display the different classifications.
Select by "Folder" / " Artist" / "Genre" /
"Playlist".
Depending on availability and type of device
used.
Press OK to select the desired
classification, then press OK again to
confirm.
Playing files
Make a short press on this button to display the chosen classification.Navigate in the list using the left / right
and up / down buttons.
Confirm the selection by pressing OK.
Press one of these buttons to go to the
previous / next track in the list.
Press and hold one of these buttons for fast
forward or rewind.
Press one of these buttons to go to the
previous / next "Folder" / " Artist" /
"Genre" / " Playlist"* in the list.
Input AUX socket (AUX)
Depending on equipmentConnect a portable device (MP3 player, etc.) to the auxiliary jack socket using an
audio cable (not supplied).
Any additional devices connected to the system must comply with the standard
* Depending on availability and the type of device used.
Page 179 of 244
177
CITROËN Connect Radio
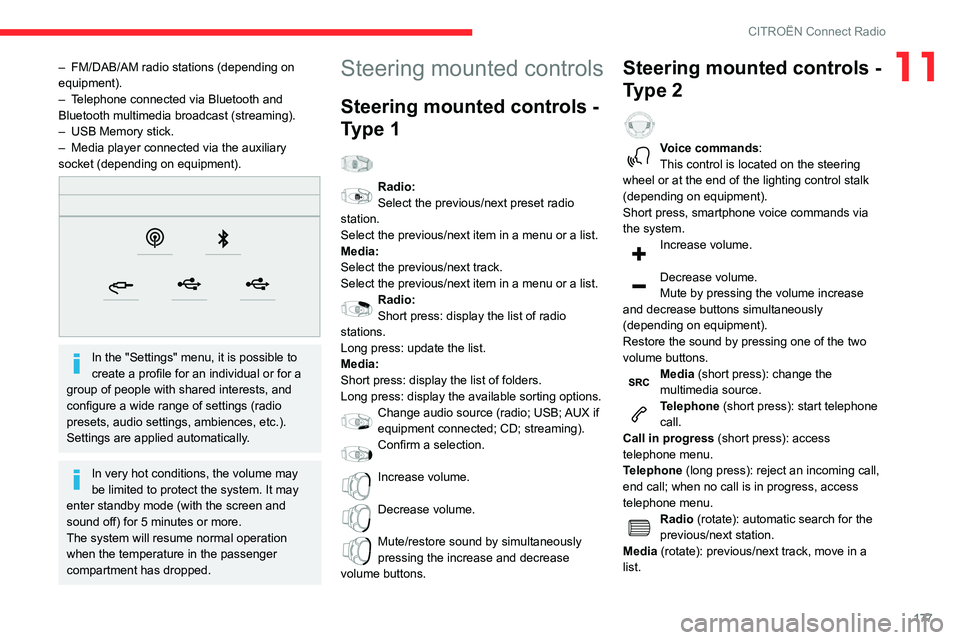
11– FM/DAB/AM radio stations (depending on equipment).– Telephone connected via Bluetooth and Bluetooth multimedia broadcast (streaming).– USB Memory stick.– Media player connected via the auxiliary socket (depending on equipment).
In the "Settings" menu, it is possible to
create a profile for an individual or for a
group of people with shared interests, and
configure a wide range of settings (radio
presets, audio settings, ambiences, etc.).
Settings are applied automatically.
In very hot conditions, the volume may
be limited to protect the system. It may
enter standby mode (with the screen and
sound off) for 5 minutes or more.
The system will resume normal operation
when the temperature in the passenger
compartment has dropped.
Steering mounted controls
Steering mounted controls -
Type 1
Radio:Select the previous/next preset radio
station.
Select the previous/next item in a menu or a list.
Media:
Select the previous/next track.
Select the previous/next item in a menu or a list.
Radio:Short press: display the list of radio
stations.
Long press: update the list.
Media:
Short press: display the list of folders.
Long press: display the available sorting options.
Change audio source (radio; USB; AUX if equipment connected; CD; streaming).
Confirm a selection.
Increase volume.
Decrease volume.
Mute/restore sound by simultaneously pressing the increase and decrease
volume buttons.
Steering mounted controls -
Type 2
Voice commands:
This control is located on the steering
wheel or at the end of the lighting control stalk
(depending on equipment).
Short press, smartphone voice commands via
the system.
Increase volume.
Decrease volume.
Mute by pressing the volume increase
and decrease buttons simultaneously
(depending on equipment).
Restore the sound by pressing one of the two
volume buttons.
Media (short press): change the
multimedia source.
Telephone (short press): start telephone
call.
Call in progress (short press): access
telephone menu.
Telephone (long press): reject an incoming call,
end call; when no call is in progress, access
telephone menu.
Radio (rotate): automatic search for the
previous/next station.
Media (rotate): previous/next track, move in a
list.
Page 183 of 244
181
CITROËN Connect Radio
11Select the "Tone", "Balance", "Sound",
"Voice" or "Ringtones" tab to configure
the sound settings.
Press the back arrow to confirm.
In the "Tone" tab, the Ambience, Bass ,
Medium and Treble sound settings are
different and independent for each audio
source.
In the "Balance” tab, the All passengers,
Driver and Front only settings are common
to all sources.
In the "Sound ” tab, activate or deactivate
"Volume linked to speed ", "Auxiliary input"
and "Touch tones ".
The balance/distribution (or spatialisation
with the Arkamys© system) uses audio
processing to adjust the sound quality
according to the number of passengers in the
vehicle.
Onboard audio: Arkamys Sound Staging©
optimises the sound distribution inside
the passenger compartment.
DAB (Digital Audio
Broadcasting) radio
Terrestrial Digital Radio
Digital radio provides higher quality sound.
The various "multiplexes/ensembles" offer a
choice of radio stations organised in alphabetical
order.
Press Radio Media to display the main
page.
Press the "OPTIONS " button to access the
secondary page.
Press "Band" to select "DAB band".
Press in the shaded area to confirm.
FM-DAB Follow-up
"DAB" does not cover 100 % of the country.When the digital radio signal is poor, the
"FM-DAB Follow-up" enables you to continue
listening to the same station by automatically
switching to the corresponding "FM" analogue
station (if there is one).
Press Radio Media to display the main
page.
Press the "OPTIONS " button to access the
secondary page.
Activate/deactivate "FM-DAB Follow-up ".
Press in the shaded area to confirm.
If "FM-DAB Follow-up" is activated, there
may be a time offset of a few seconds
when the system switches to "FM" analogue
radio, and in some cases a change in volume.
When the digital signal quality is restored, the
system automatically changes back to "DAB".
If the "DAB" station being listened to is
not available on "FM", or if "FM-DAB
Follow-up" is not activated, the sound will cut
out while the digital signal is too weak.
Media
USB port
Insert the USB memory stick into the USB port or connect the USB device to the
USB port using a suitable cable (not supplied).
To protect the system, do not use a USB hub.
The system builds playlists (in temporary
memory); this operation can take from a
few seconds to several minutes at the first
connection.
Reduce the number of non-music files and the
number of folders to reduce the waiting time.
Page 184 of 244
182
CITROËN Connect Radio
Playlists are updated whenever the ignition
is switched off or a USB memory stick is
connected. The audio system memorises these
lists, which will subsequently load faster if they
have not been changed.
Auxiliary (AUX) jack socket
Depending on equipmentConnect a portable device (MP3 player, etc.) to the auxiliary jack socket using an
audio cable (not supplied).
This source is only available if "Auxiliary input"
has been selected in the audio settings.
First adjust the volume on the portable device
(to a high level). Then adjust the volume of the
audio system.
Controls are managed via the portable device.
Selecting the source
Press Radio Media to display the main
page.
Press the "SOURCES" button.
Select the source.
BluetoothStreaming®
Streaming allows you to listen to the audio feed
from your smartphone.
The Bluetooth profile must be activated.
First adjust the volume on the portable device
(to a high level). Then adjust the volume of the
system.
If play does not start automatically, it may be
necessary to start the audio playback from the
smartphone.
Control is from the portable device or by using
the system's touch buttons.
Once connected in Streaming mode, the
smartphone is considered to be a media
source.
Connecting Apple® players
Connect the Apple® player to the USB socket
using a suitable cable (not supplied).
Play starts automatically.
Control is via the audio system.
The classifications available are those of the portable device connected (artists/
albums/genres/playlists/audio books/
podcasts). It is also possible to use a
classification structured in the form of a
library.
The default classification used is by artist. To
modify the classification used, return to the
first level of the menu then select the desired
classification (playlists for example) and
confirm to go down through the menu to the
desired track.
The version of software in the audio system may
not be compatible with the generation of the
Apple
® player.
Information and advice
The system supports USB mass storage
devices, BlackBerry® devices or Apple® players
via the USB ports. The adapter cable is not
supplied.
Devices are managed using the audio system
controls.
Other devices, not recognised on connection,
must be connected to the auxiliary socket using
a jack cable (not supplied) or via Bluetooth
streaming, if compatible.
To protect the system, do not use a USB hub.
The audio system will only play audio files with
".wav", ".wma", ".aac", ".ogg" and ".mp3" file
extensions, at bit rates between 32 Kbps and
320 Kbps.
It also supports VBR (Variable Bit Rate) mode.
No other file types (".mp4", etc.) can be read.
All ".wma" files must be standard WMA 9 files.
The supported sampling rates are 11, 22, 44 and
48 KHz.
To avoid reading and display problems, we
recommend choosing file names less than 20
characters long that do not contain any special
characters (e.g. “ ? . ; ù).Use only USB memory sticks in FAT32 format
(File Allocation Table).
We recommend using the original USB
cable for the portable device.
Telephone
USB sockets
Depending on equipment, for more information
on the USB sockets compatible with the
CarPlay
®, MirrorLinkTM or Android Auto
applications, refer to the "Ease of use and
comfort" section.
The synchronisation of a smartphone allows users to display applications
adapted to the CarPlay
®, MirrorLinkTM or Android Auto technology of the smartphone on the vehicle screen. For the CarPlay®
technology, the CarPlay® function must be
activated on the smartphone beforehand.
For the communication process between
the smartphone and the system to work, it is
essential in all cases that the smartphone is
unlocked.
As the principles and standards are
constantly changing, it is recommended
that you keep the smartphone's operating
system up-to-date, as well as the date and
time of the smartphone and of the system .
For the list of eligible smartphones, go to the
Brand's national website.
Page 186 of 244
184
CITROËN Connect Radio
Press "CarPlay" to display the CarPlay®
interface.
On connecting the USB cable, the
CarPlay® function deactivates the
system's Bluetooth® mode.
When the USB cable is disconnected
and the ignition is switched off then back
on, the system will not automatically switch to
Radio Media mode; the source must be
changed manually.
The CarPlay® navigation can be accessed
at any time by pressing the system's
Navigation button.
Android Auto smartphone connection
On the smartphone, download the Android Auto application.
The "Android Auto" function requires the
use of a compatible smartphone and
applications.
Telephone not connected by
Bluetooth®
Connect a USB cable. The smartphone charges when connected by a USB cable.From the system, press "Telephone" to
display the main page.
Press "Android Auto" to start the
application in the system.
Depending on the smartphone, it may be
necessary to activate the "Android Auto"
function.
During the procedure, several screen pages relating to certain features are
displayed.
Accept to start and complete the connection.
When connecting a smartphone to the system, we recommend enabling
Bluetooth® on the smartphone.
Telephone connected by Bluetooth®
From the system, press "Telephone" to
display the main page.
Press the "PHONE" button to display the
secondary page.
Press "Android Auto" to start the
application in the system.
Access to the different audio sources remains
available in the margin of the Android Auto
display, using the touch buttons located in the
upper bar.
Access to the menus for the system is possible
at any time using the dedicated buttons.
There may be a pause before applications become available,
depending on the quality of the network.
Pairing a Bluetooth®
telephone
The services available depend on the
network, the SIM card and the
compatibility of the Bluetooth devices used.
Consult the telephone user guide and the
service provider to check which services are
available.
The Bluetooth function must be activated and the telephone configured as "Visible
to all” (in the telphone settings).
To complete the pairing, whichever procedure is
used (from the telephone or from the system),
ensure that the code is the same in the system
and in the telephone.
If the pairing procedure fails, we
recommend deactivating and then
reactivating the Bluetooth function on the
telephone.
Procedure from the telephone
Select the name of the system in the list of detected devices.
In the system, accept the connection request
from the telephone.
Procedure from the system
Press Telephone to display the main
page.
Press "Bluetooth search".
The list of detected telephones is
displayed.
Select the name of the chosen telephone in the list.
Connection sharing
The system offers to connect the telephone with
3 profiles:
– "Telephone" (hands-free kit, telephone only),– “Streaming" (streaming: wireless playing of
audio files on the telephone),
– "Mobile internet data ".Select one or more profiles.
Press "OK" to confirm.
Depending on the type of telephone, you may by
prompted to accept the transfer of contacts and
messages.
The ability of the system to connect just one profile depends on the telephone.
All three profiles may connect by default.
The profiles compatible with the system are: HFP, OPP, PBAP, A2DP, AVRCP,
MAP and PAN.