tow bar CITROEN C3 AIRCROSS 2021 Handbook (in English)
[x] Cancel search | Manufacturer: CITROEN, Model Year: 2021, Model line: C3 AIRCROSS, Model: CITROEN C3 AIRCROSS 2021Pages: 244, PDF Size: 6.29 MB
Page 5 of 244
3
Contents
bit.ly/helpPSA
Blind Spot Monitoring System 11 3
Parking sensors 11 4
Top Rear Vision 11 6
Park Assist 11 8
7Practical information
Compatibility of fuels 123
Refuelling 123
Misfuel prevention (Diesel) 124
Snow chains 124
Towbar with quickly detachable towball 125
Towing device 128
Energy economy mode 128
Roof bars 129
Bonnet 130
Engine compartment 131
Checking levels 131
Checks 133
AdBlue® (BlueHDi) 135
Advice on care and maintenance 137
8In the event of a breakdown
Running out of fuel (Diesel) 139
Tool kit 139
Temporary puncture repair kit 140
Spare wheel 143
Changing a bulb 146
Changing a fuse 150
12 V battery 152
Towing 156
9Technical data
Engine technical data and towed loads 158
Petrol engines 159
Diesel engines 161
Dimensions 162
Identification markings 162
10Bluetooth® audio system
First steps 164
Steering mounted controls 164
Menus 165
Radio 166
DAB (Digital Audio Broadcasting) radio 167
Media 168
Telephone 170
Frequently asked questions 173
11CITROËN Connect Radio
First steps 176
Steering mounted controls 177
Menus 178
Applications 179
Radio 179
DAB (Digital Audio Broadcasting) radio 181
Media 181
Telephone 183
Settings 186
Frequently asked questions 188
12CITROËN Connect Nav
First steps 190
Steering mounted controls 191
Menus 192
Voice commands 193
Navigation 195
Connected navigation 197
Applications 199
Radio 202
DAB (Digital Audio Broadcasting) radio 203
Media 204
Telephone 205
Settings 208
Frequently asked questions 210
■
Alphabetical index
Access to additional videos
Page 28 of 244
26
Access
document and, if possible, the label bearing the key code.
The CITROËN dealer will be able to retrieve the
key code and the transponder code required to
order a new key.
Complete unlocking /
locking of the vehicle with
the key
These procedures should be used in the
following cases:
– remote control battery flat,– remote control fault,– vehicle in an area subject to strong electromagnetic interference.
In the first case, you can also replace the remote
control battery.
Refer to the corresponding section.
In the second case, you can also reinitialise the
remote control.
Refer to the corresponding section.
► Insert the key in the door lock barrel.► Turn the key towards the front of the vehicle to unlock it, or towards the rear to lock it.
the front door handles (at the markings) to lock
the vehicle.
It is not possible to lock the vehicle if one of the
keys is left inside the vehicle.
The flashing of the direction indicators for
a few seconds signals:
– unlocking of the vehicle for versions without alarm;– deactivation of the alarm for other versions.
Deadlocking
Deadlocking renders the interior door
controls inoperative. It also deactivates
the central locking button.
The horn remains operational.
Never leave anyone inside the vehicle when it
is deadlocked.
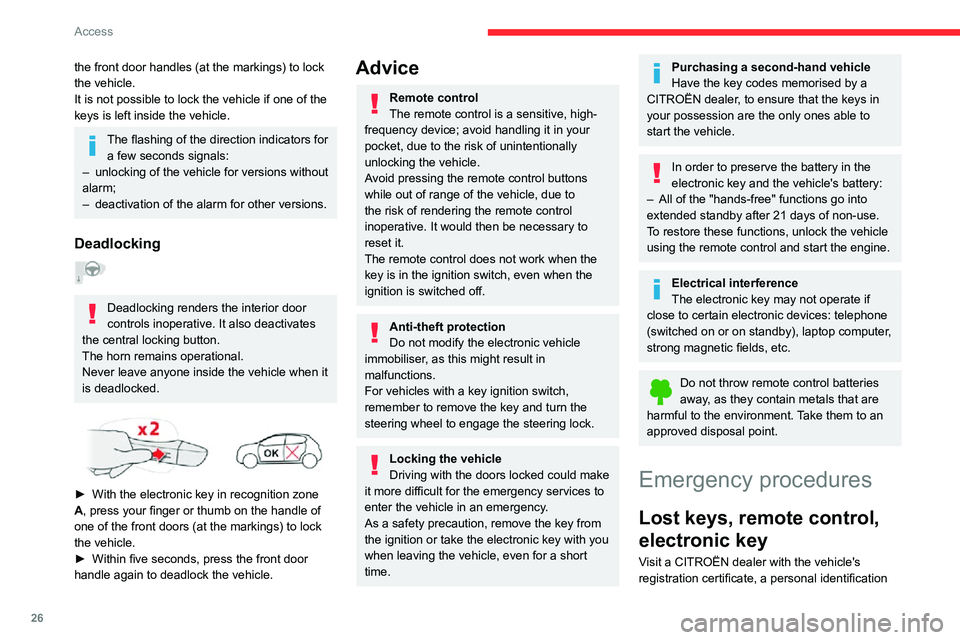
► With the electronic key in recognition zone A, press your finger or thumb on the handle of
one of the front doors (at the markings) to lock
the vehicle.
► Within five seconds, press the front door handle again to deadlock the vehicle.
Advice
Remote control
The remote control is a sensitive, high-
frequency device; avoid handling it in your
pocket, due to the risk of unintentionally
unlocking the vehicle.
Avoid pressing the remote control buttons
while out of range of the vehicle, due to
the risk of rendering the remote control
inoperative. It would then be necessary to
reset it.
The remote control does not work when the key is in the ignition switch, even when the
ignition is switched off.
Anti-theft protection
Do not modify the electronic vehicle
immobiliser, as this might result in
malfunctions.
For vehicles with a key ignition switch,
remember to remove the key and turn the
steering wheel to engage the steering lock.
Locking the vehicle
Driving with the doors locked could make
it more difficult for the emergency services to
enter the vehicle in an emergency.
As a safety precaution, remove the key from
the ignition or take the electronic key with you
when leaving the vehicle, even for a short
time.
Purchasing a second-hand vehicle
Have the key codes memorised by a
CITROËN dealer, to ensure that the keys in
your possession are the only ones able to
start the vehicle.
In order to preserve the battery in the
electronic key and the vehicle's battery:
– All of the "hands-free" functions go into extended standby after 21 days of non-use.
To restore these functions, unlock the vehicle
using the remote control and start the engine.
Electrical interference
The electronic key may not operate if
close to certain electronic devices: telephone
(switched on or on standby), laptop computer,
strong magnetic fields, etc.
Do not throw remote control batteries away, as they contain metals that are
harmful to the environment. Take them to an
approved disposal point.
Emergency procedures
Lost keys, remote control,
electronic key
Visit a CITROËN dealer with the vehicle's
registration certificate, a personal identification
Page 29 of 244
27
Access
2document and, if possible, the label bearing the
key code.
The CITROËN dealer will be able to retrieve the
key code and the transponder code required to
order a new key.
Complete unlocking /
locking of the vehicle with
the key
These procedures should be used in the
following cases:
– remote control battery flat,– remote control fault,– vehicle in an area subject to strong electromagnetic interference.
In the first case, you can also replace the remote
control battery.
Refer to the corresponding section.
In the second case, you can also reinitialise the
remote control.
Refer to the corresponding section.
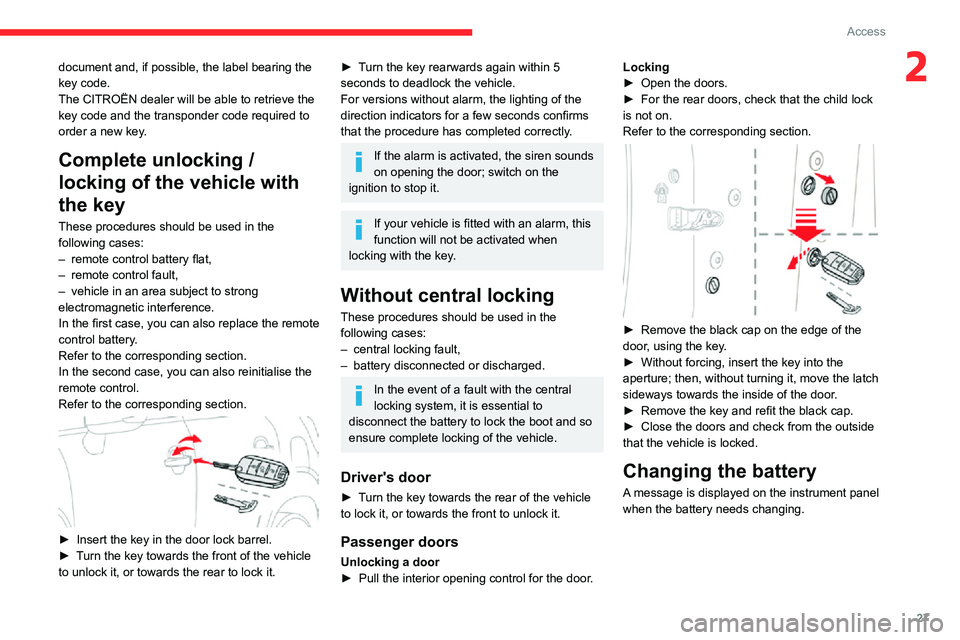
► Insert the key in the door lock barrel.► Turn the key towards the front of the vehicle to unlock it, or towards the rear to lock it.
► Turn the key rearwards again within 5 seconds to deadlock the vehicle.
For versions without alarm, the lighting of the
direction indicators for a few seconds confirms
that the procedure has completed correctly.
If the alarm is activated, the siren sounds
on opening the door; switch on the
ignition to stop it.
If your vehicle is fitted with an alarm, this
function will not be activated when
locking with the key.
Without central locking
These procedures should be used in the
following cases:
– central locking fault,– battery disconnected or discharged.
In the event of a fault with the central
locking system, it is essential to
disconnect the battery to lock the boot and so
ensure complete locking of the vehicle.
Driver's door
► Turn the key towards the rear of the vehicle to lock it, or towards the front to unlock it.
Passenger doors
Unlocking a door► Pull the interior opening control for the door .
Locking► Open the doors.► For the rear doors, check that the child lock is not on.
Refer to the corresponding section.
► Remove the black cap on the edge of the door, using the key.► Without forcing, insert the key into the aperture; then, without turning it, move the latch
sideways towards the inside of the door.
► Remove the key and refit the black cap.► Close the doors and check from the outside that the vehicle is locked.
Changing the battery
A message is displayed on the instrument panel
when the battery needs changing.
Page 38 of 244
36
Ease of use and comfort
Correct driving position
For safety reasons, adjustments must
only be made when the vehicle is
stationary.
Before taking to the road and to make the most
of the ergonomic layout of the instruments and
controls, carry out these adjustments in the
following order:
– head restraint height.– seat backrest angle.– seat cushion height.– longitudinal seat position.– steering wheel height and reach.– rear view mirror and door mirrors.
Once these adjustments have been
made, check that the instrument panel
can be viewed correctly from your driving
position.
Front head restraints
Height adjustment
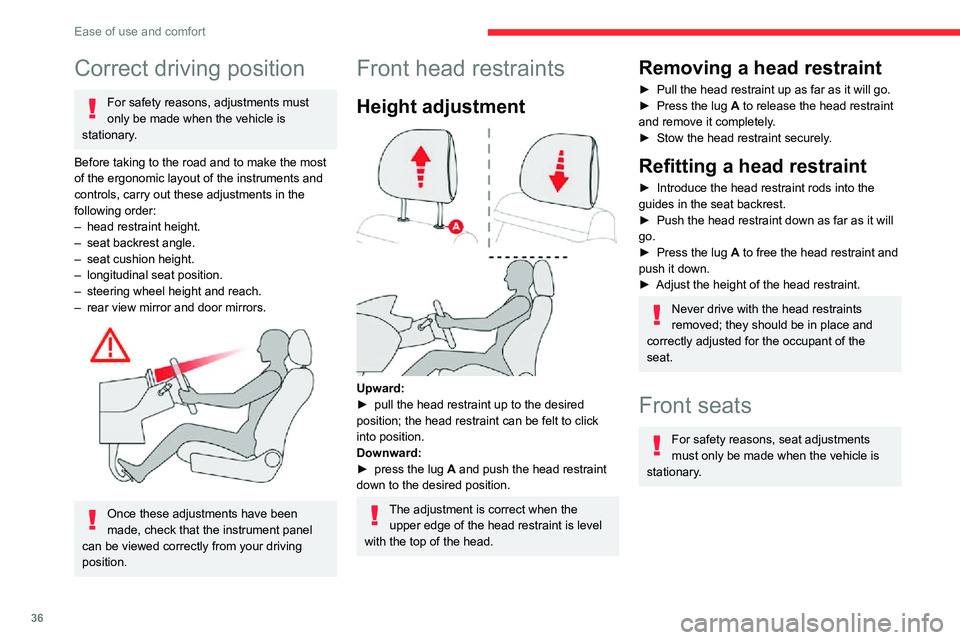
Upward:► pull the head restraint up to the desired position; the head restraint can be felt to click
into position.
Downward:
► press the lug A and push the head restraint
down to the desired position.
The adjustment is correct when the upper edge of the head restraint is level
with the top of the head.
Removing a head restraint
► Pull the head restraint up as far as it will go.► Press the lug A to release the head restraint
and remove it completely.
► Stow the head restraint securely .
Refitting a head restraint
► Introduce the head restraint rods into the guides in the seat backrest.► Push the head restraint down as far as it will go.► Press the lug A to free the head restraint and
push it down.
► Adjust the height of the head restraint.
Never drive with the head restraints
removed; they should be in place and
correctly adjusted for the occupant of the
seat.
Front seats
For safety reasons, seat adjustments
must only be made when the vehicle is
stationary.
Adjustments
Forwards-backwards
► Raise the control bar and slide the seat forwards or backwards.► Release the bar to lock the seat in position on one of the notches.
Before moving the seat backwards,
ensure that there is no person or object
that might prevent the full travel of the seat.
There is a risk of trapping or pinching
passengers if present in the rear seats or of
jamming the seat if large objects are placed
on the floor behind the seat.
Height
(driver only)
Page 111 of 244

109
Driving
6
This system:– warns the driver that their vehicle is at risk of collision with the vehicle in front or a pedestrian.– reduces the vehicle's speed to avoid a collision or limit its severity.
This system is comprised of three functions:
– Collision Risk Alert.
– Intelligent emergency braking assistance.– Active Safety Brake (automatic emergency braking).
The vehicle has a camera located at the top of
the windscreen.
This system does not avoid the need for
vigilance on the part of the driver.
This system is designed to assist the driver
and improve road safety.
It is the driver's responsibility to continuously
monitor the state of the traffic, observing the
driving regulations.
As soon as the system detects a potential obstacle, it prepares the braking
circuit in case automatic braking is needed.
This may cause a slight noise and a slight
sensation of deceleration.
Deactivation / Activation
By default, the system is automatically activated
at every engine start-up.
The system can be deactivated or activated via
the vehicle settings menu.
Deactivation of the system is signalled by the illumination of this indicator lamp,
accompanied by the display of a message.
Without audio system
► In the "DRIVE ASSIST" menu on the
instrument panel display, activate/deactivate
"COLLISION ALT" (Automatic emergency
braking).
With audio system
► In the "Personalisation-
configuration " menu, activate/deactivate
"Auto. emergency braking".
With touch screen
► In the Driving / Vehicle menu, select
the "Vehicle settings" tab, then
"Security" and activate/deactivate " Automatic
emergency braking".
Operating conditions and
limits
ESC system in working order.
ASR system activated.
Seat belts fastened for all passengers.
Stabilised speed on unwinding roads.
In the following cases, deactivating the system
via the vehicle's configuration menu is advised:
– Towing a trailer.– Carrying long objects on roof bars.– Vehicles with snow chains fitted.– Before using an automatic car wash, with the engine running.– Before placing the vehicle on a rolling road in a workshop.– Towed vehicle, engine running.– When a "space-saver" type spare wheel is fitted (depending on version).– If the brake lamps are not working.– Following impact to the windscreen close to the detection camera.
It is possible that warnings are not given,
are given too late or seem unjustified.
The driver must always stay in control of the
vehicle and be prepared to react at any time
to avoid an accident.
After an impact, the function automatically stops operating. Contact a
CITROËN dealer or a qualified workshop to
have the system checked.
Page 117 of 244

11 5
Driving
6Using sensors located in the bumper, this
system signals the proximity of obstacles
(e.g. pedestrian, vehicle, tree, barrier) present in their field of detection.
Rear parking sensors
The system is switched on by engaging reverse
gear, which is confirmed by an audible signal.
The system is switched off when disengaging
reverse gear.
Audible assistance
The system signals the presence of obstacles
within the sensors’ detection zone.
The proximity information is given by an
intermittent audible signal, the frequency of
which increases as the vehicle approaches the
obstacle.
When the distance between the vehicle and
the obstacle becomes less than about thirty
centimetres, the audible signal becomes
continuous.
The sound emitted by the speaker (right or
left) indicates the side on which the obstacle is
located.
Visual assistance
This supplements the audible signal by
displaying bars on the screen that represent the
distance between the obstacle and the vehicle
(white: more distant, orange: close, red: very
close).
When the obstacle is very close, the "Danger"
symbol is displayed on the screen.
Front parking sensors
In addition to the rear parking sensors, the front
parking sensors are triggered when an obstacle
is detected in front and the speed of the vehicle
is still below 6 mph (10 km/h).
The front parking sensors are interrupted if the
vehicle stops for more than three seconds in
forward gear, if no further obstacles are detected
or when the speed of the vehicle exceeds 6 mph
(10 km/h).
The sound emitted by the speaker (front or rear) indicates whether the obstacle is
in front or behind.
Deactivation / Activation
With / Without audio system
► To deactivate or activate the system, press this button.
The indicator lamp is lit when the system is
deactivated.
With touch screen
► In the Driving / Vehicle menu, select
“Driving functions ”, then “Parking
sensors”.
The state of the system stays in the memory
when the ignition is switched off.
The rear parking sensors system will be deactivated automatically if a trailer or
bicycle carrier is connected to a towing device
installed in accordance with the
manufacturer's recommendations.
Page 123 of 244

121
Driving
6obstacles that are very low (pavements, studs,
etc.) or very thin (trees, posts, wire fences, etc.).
– Certain obstacles located in the sensors’ blind spots may not be detected or may no longer be
detected during the manoeuvre.
– Certain materials (fabrics) absorb sound waves: pedestrians may not be detected.– A front or rear impact to the vehicle can upset the sensors’ settings, which is not always
detected by the system: distance measurements
may be distorted.
– If the boot is heavily loaded, the vehicle may tilt, affecting distance measurements.
The vehicle's sensors and camera(s) may be
impaired by:
– accumulated snow or fallen leaves on the road,– adverse weather conditions (heavy rain, thick fog, falling snow),– noise interference from noisy vehicles and machinery (lorries, pneumatic drills, etc.).
Do not use the function under the
following exterior conditions:
– Alongside a soft shoulder (e.g. ditch) or quay or on the edge of a drop.– When the road surface is slippery (e.g. ice).
If any of the following malfunctions
occurs, do not use the system:
– If a tyre is under-inflated.– If one of the bumpers is damaged.– If one of the cameras is faulty.
If the vehicle has undergone any of the
following modifications, do not use the
function:
– When carrying an object extending beyond the dimensions of the vehicle (ladder on the
roof bars, bicycle carrier on the tailgate, etc.).
– With a non-approved towball in place.– With snow chains fitted.– When driving on a small-diameter or "space-saver" type spare wheel.– When the wheels fitted are a different size from the original ones.– After modifying one or both bumpers (added protection).– If the sensors have been repainted other than by the CITROËN dealer network.– With sensors not approved for the vehicle.
Malfunctions
If the parking sensor malfunction occurs during use, indicated by this warning lamp
coming on, it causes the function to deactivate.
In the event of a malfunction, have the system
checked by a CITROËN dealer or a qualified
workshop.
In the event of a power steering malfunction, this warning lamp is
displayed on the instrument panel, accompanied
by a warning message.
You must stop as soon as it is safe to do so.
Contact a CITROËN dealer or a qualified
workshop.
Page 127 of 244

125
Practical information
7Use only the chains designed to be fitted to the
type of wheel fitted to the vehicle:
Original tyre sizeChain types
195/65 R15
Maximum 9 mm link
195/60 R16
205/60 R16 Cannot be fitted with
chains
215/50 R17
For more information on snow chains, contact a
CITROËN dealer or a qualified workshop.
Installation tips
► To fit the chains during a journey, stop the vehicle on a flat surface on the side of the road.► Apply the parking brake and position any wheel chocks under the wheels to prevent
movement of the vehicle.
► Fit the chains following the instructions provided by the manufacturer.► Move off gently and drive for a few moments, without exceeding 31 mph (50 km/h).► Stop the vehicle and check that the snow chains are correctly tightened.
It is strongly recommended that before
you leave, you practise fitting the snow
chains on a level and dry surface.
Avoid driving with snow chains on roads that have been cleared of snow to avoid
damaging the vehicle's tyres and the road
surface. If the vehicle is fitted with alloy
wheels, check that no part of the chain or its
fixings is in contact with the wheel rim.
Towbar with quickly detachable towball
No tools are required to install or remove the
towball on this genuine towbar system.
Presentation
This genuine towing device can be fitted and
removed with no need for tools.
1. Carrier
2. Protective plug
3. Connection socket
4. Safety eye
5. Detachable towball
6. Locking/unlocking wheel
7. Security key lock
8.Label to note the key references
A.Locked position (green mark opposite the
white mark); the wheel is in contact with the
towball (no gap).
B. Unlocked position (red mark opposite the
white mark); the wheel is no longer in contact
with the towball (gap of around 5 mm).
Trailers with LED lamps are not
compatible with the wiring harness of this
device.
To ensure complete safety while driving with a Towing device , refer to the
corresponding section.
Before each use
Check that the towball is correctly fitted,
verifying the follow points:
Page 128 of 244

126
Practical information
– the green mark on the star wheel is in line
with the white mark on the ball joint,
– the locking wheel is in contact with the towball (position A),– the security key lock is on and the key removed; the locking wheel can no longer be
operated,
– the towball must not be able to move in its carrier; test by shaking it with your hand.
If the towball is not locked, the trailer can
detach - accident risk!
During use
Never release the locking system with a
trailer or load carrier on the towball.
Never exceed the maximum authorised
weight for the vehicle - the Gross Train
Weight or GTW.
It is essential that the maximum authorised
load be complied with on the towing device:
if it is exceeded, this device may detach from
the vehicle, which is a serious accident risk.
Check that the trailer lamps work correctly.
Before setting off, check the adjustment of the
headlamp beam height.
For more information on Headlamp
adjustment, refer to the corresponding
section.
Following use
When travelling without a trailer or load
on a towbar-mounted carrier, the towball
must be removed and the protective plug
inserted in the carrier. This measure applies
particularly where the towball might obscure
visibility of the number plate or its lighting.
Fitting the towball
► Below the rear bumper , remove the protective plug 2 from the towball carrier 1.
► Insert the end of towball 5 into carrier 1 and
push it upwards; the locking will take place
automatically.
► The locking wheel 6 turns a quarter of a turn
anti-clockwise ; take care to keep your hands
clear!
► Check that the mechanism has correctly locked into place and that the green mark on the
star wheel is in line with the white mark on the
towball (position A).
► Close the lock 7 using the key.
Page 130 of 244
128
Practical information
► Refit protective plug 2 to carrier 1.► Carefully stow the towball in its bag away from knocks and dirt.
Maintenance
Correct operation is only possible if the towball
and its carrier are kept clean.
Before cleaning the vehicle with a high-pressure
jet wash, the towball must be removed and the
protective plug fitted to the carrier.
Apply the label provided to a clearly visible area, close to the carrier or in the
boot.
Go to a CITROËN dealer or a qualified
workshop for any work on the towbar system.
Towing device
Load distribution► Distribute the load in the trailer so that the heaviest items are as close as possible to the
axle, and the nose weight approaches the
maximum permitted without exceeding it.
Air density decreases with altitude, thus reducing
engine performance. The maximum load which
can be towed must be reduced by 10% per
1,000 metres of altitude.
Use towing devices and their genuine
wiring harnesses approved by CITROËN.
It is recommended that the installation be
performed by a CITROËN dealer or a
qualified workshop.
If not fitted by a CITROËN dealer, it
must still be fitted in accordance with the
manufacturer's instructions.
Certain driving or manoeuvring aid functions
are automatically deactivated if an approved
towing system is used.
Observe the maximum authorised
towable weight, indicated on the vehicle's
registration certificate, the manufacturer's
label as well as in the Technical data section
of this guide.
Complying with the maximum authorised
nose weight (towball) also includes the
use of accessories (bicycle carriers, tow
boxes, etc.).
Observe the legislation in force in the
country where you are driving.
Load reduction mode
System which manages the use of certain
functions according to the level of charge
remaining in the battery.
When the vehicle is being driven, the load
reduction function temporarily deactivates certain
functions, such as air conditioning, heated rear
screen, etc.
The deactivated functions are reactivated
automatically as soon as conditions permit.
Energy economy mode
This system manages the duration of use of
certain functions, in order to conserve a sufficient
level of charge in the battery with the ignition off.
After switching off the engine, you can still
use functions such as the audio and telematic
system, the wipers and the dipped beam
headlamps or courtesy lamps, for a combined
duration of approximately 40 minutes.
Switching to this mode
A message appears in the instrument panel
screen indicating that the vehicle has switched to
economy mode and the active functions are put
on standby.
If a telephone call is being made at this
time, it will be maintained for around 10
minutes with the Bluetooth hands-free system
of your audio system.
Exiting the mode
These functions are automatically reactivated the
next time the vehicle is used.
To restore the use of these functions
immediately, start the engine and let it run:
– For less than 10 minutes, to use the equipment for approximately 5 minutes.
– For more than 10 minutes, to use the equipment for approximately 30 minutes.
Let the engine run for the specified duration to
ensure that the battery charge is sufficient.
To recharge the battery, avoid repeatedly or
continuously restarting the engine.
A flat battery prevents the engine from
starting.
For more information on the
12 V battery,
refer to the corresponding section.
Roof bars
For safety reasons and to avoid
damaging the roof, it is essential to use
the transverse bars approved for your vehicle.
Observe the fitting instructions and the
conditions of use in the guide supplied
with the roof bars.