Citroen C4 2016 2.G Manual Online
Manufacturer: CITROEN, Model Year: 2016, Model line: C4, Model: Citroen C4 2016 2.GPages: 396, PDF Size: 10.22 MB
Page 81 of 396
79
C4-2_en_Chap02_ouvertures_ed02-2015
Boot
Opening
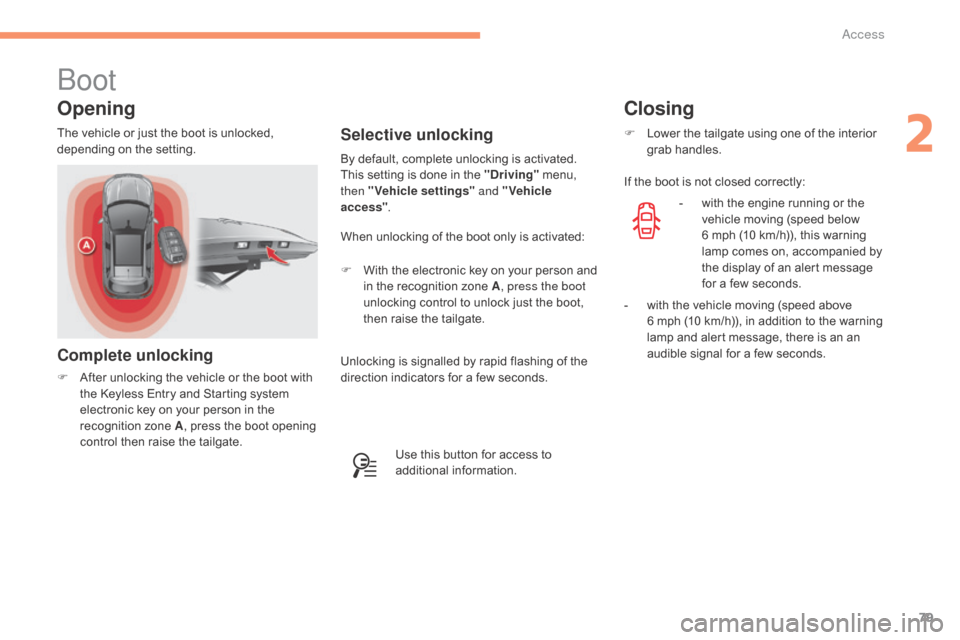
Complete unlocking
F After unlocking the vehicle or the boot with t
he Keyless Entry and Starting system
e
lectronic key on your person in the
r
ecognition zone A,
press the boot opening
c
ontrol then raise the tailgate.
Selective unlocking
When unlocking of the boot only is activated:
F
W
ith the electronic key on your person and
i
n the recognition zone A, press the boot
unlocking
control to unlock just the boot,
t
hen raise the tailgate.
By
default, complete unlocking is activated.
This setting is done in the "Driving"
menu,
t
hen "Vehicle settings"
and "Vehicle
access" .
The
vehicle
or
just
the
boot
is
unlocked,
d
epending
o
n
t
he
se
tting.
Use this button for access to
a
dditional
in
formation.
Closing
F Lower the tailgate using one of the interior g
rab han dles.
If
the boot is not closed correctly:
-
w
ith the engine running or the
v
ehicle moving (speed below
6
mph (10 km/h)), this warning
l
amp comes on, accompanied by
t
he display of an alert message
f
or a few seconds.
-
w
ith the vehicle moving (speed above
6 m
ph (10 km/h)), in addition to the warning
l
amp and alert message, there is an an
a
udible signal for a few seconds.
Unlocking
is
signalled
by
rapid
flashing
of
the
d
irection
indicators
for
a
few
seconds.
2
Access
Page 82 of 396
80
C4-2_en_Chap02_ouvertures_ed02-2015
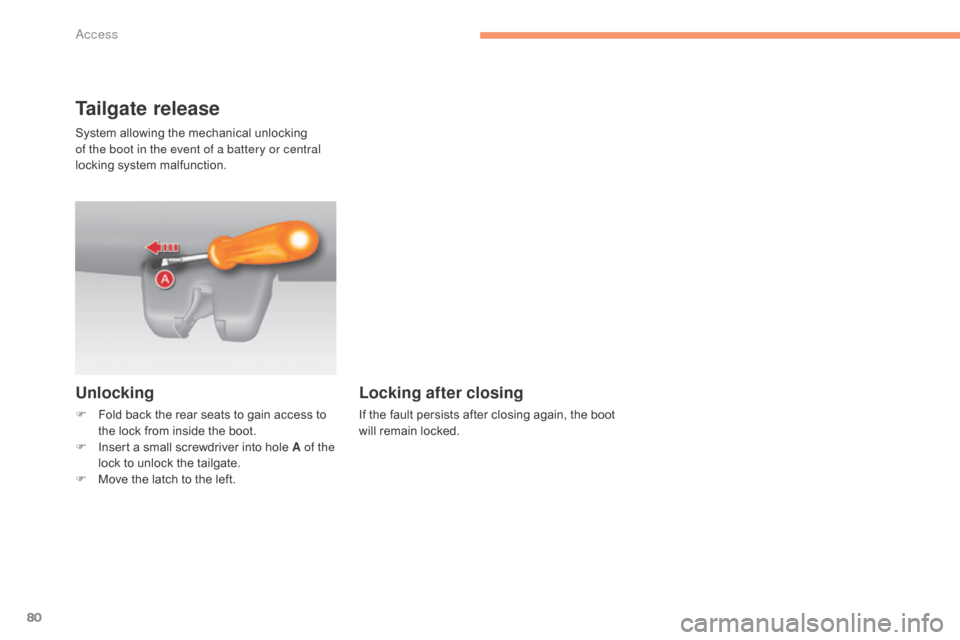
Tailgate release
Unlocking
F Fold back the rear seats to gain access to t
he lock from inside the boot.
F
I
nsert a small screwdriver into hole A of the
lock
to unlock the tailgate.
F
M
ove the latch to the left.
Locking after closing
If the fault persists after closing again, the boot will remain locked.
System
allowing
the
mechanical
unlocking
o
f the boot in the event of a battery or central
locking
system
malfunction.
Access
Page 83 of 396
81
C4-2_en_Chap03_ergonomie-et-confort_ed02-2015
Front seats
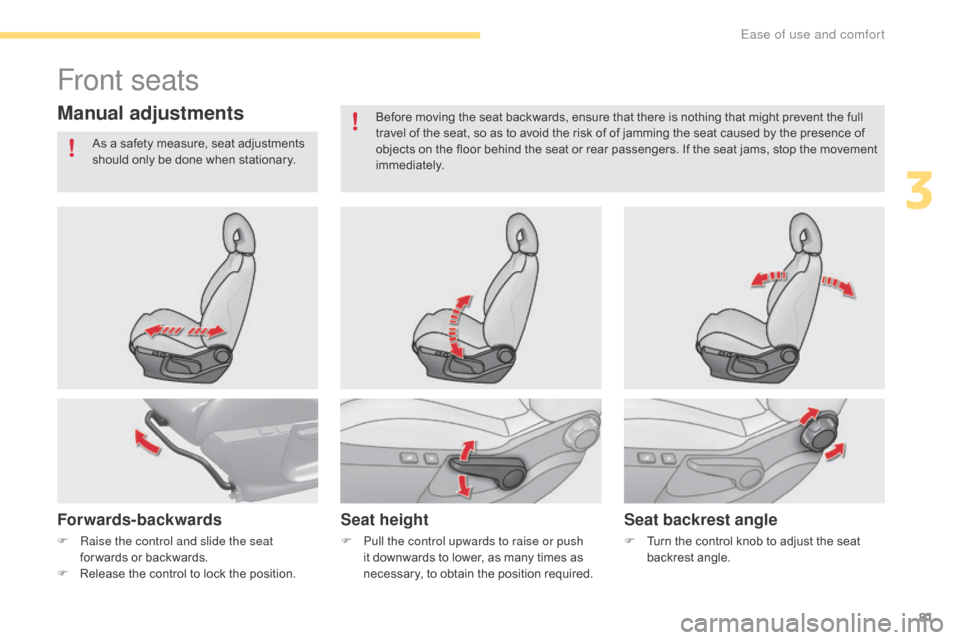
Manual adjustments
Forwards-backwardsSeat heightSeat backrest angle
F Raise the control and slide the seat
for wards or backwards.
F
R
elease the control to lock the position.F
P ull the control upwards to raise or push
it downwards to lower, as many times as
n
ecessary, to obtain the position required.F
T urn the control knob to adjust the seat b
ackrest angle.
As
a safety measure, seat adjustments
s
hould only be done when stationary.
Before moving the seat backwards, ensure that there is nothing that might prevent the full
t
ravel of the seat, so as to avoid the risk of of jamming the seat caused by the presence of
o
bjects on the floor behind the seat or rear passengers. If the seat jams, stop the movement
i
mmediately.
3
Ease of use and comfort
Page 84 of 396
82
C4-2_en_Chap03_ergonomie-et-confort_ed02-2015
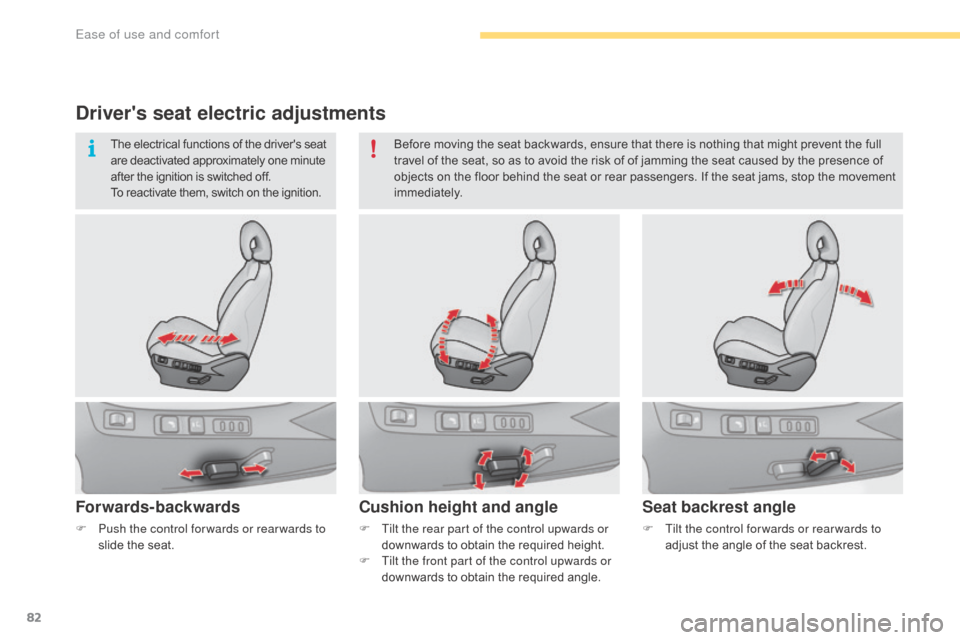
Driver's seat electric adjustments
Forwards-backwards
F Tilt the rear part of the control upwards or downwards to obtain the required height.
F
T
ilt the front part of the control upwards or
downwards
to obtain the required angle.
Cushion height and angle
F Tilt the control for wards or rear wards to adjust the angle of the seat backrest.
Seat backrest angle
F Push the control for wards or rear wards to slide the seat. Before
moving the seat backwards, ensure that there is nothing that might prevent the full
t
ravel of the seat, so as to avoid the risk of of jamming the seat caused by the presence of
o
bjects on the floor behind the seat or rear passengers. If the seat jams, stop the movement
i
mmediately.
The electrical functions of the driver's seat
a
re deactivated approximately one minute
a
fter the ignition is switched off.
To reactivate them, switch on the ignition.
Ease of use and comfort
Page 85 of 396
83
C4-2_en_Chap03_ergonomie-et-confort_ed02-2015
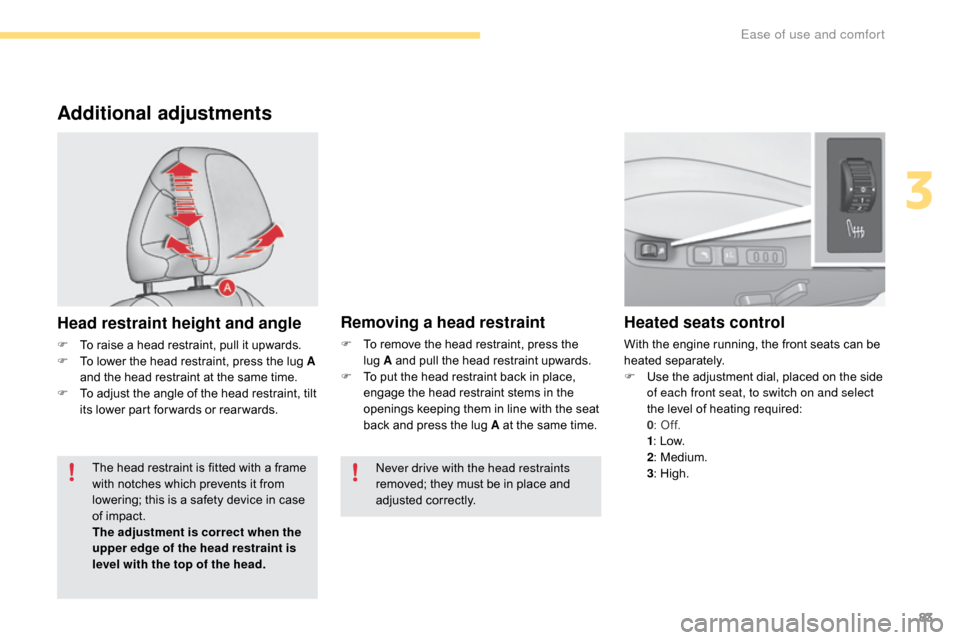
Additional adjustments
Head restraint height and angle
F To raise a head restraint, pull it upwards.
F T o lower the head restraint, press the lug A
and
the head restraint at the same time.
F
T
o adjust the angle of the head restraint, tilt
i
ts lower part for wards or rear wards.
Heated seats control
With the engine running, the front seats can be heated s eparately.
F
U
se the adjustment dial, placed on the side
o
f each front seat, to switch on and select
the
level of heating required:
0:
Off.
1:
Low.
2:
Medium.
3:
High.
Removing a head restraint
F To remove the head restraint, press the l
ug A and pull the head restraint upwards.
F
T
o put the head restraint back in place,
e
ngage the head restraint stems in the
o
penings keeping them in line with the seat
b
ack and press the lug A at the same time.
The
head
restraint
is
fitted
with
a
frame
w
ith
notches
which
prevents
it
from
l
owering;
this
is
a
safety
device
in
case
o
f
impact.
The adjustment is correct when the
upper edge of the head restraint is
level with the top of the head. Never drive with the head restraints
removed;
they must be in place and
adj
usted
c
orrectly.
3
Ease of use and comfort
Page 86 of 396
84
C4-2_en_Chap03_ergonomie-et-confort_ed02-2015
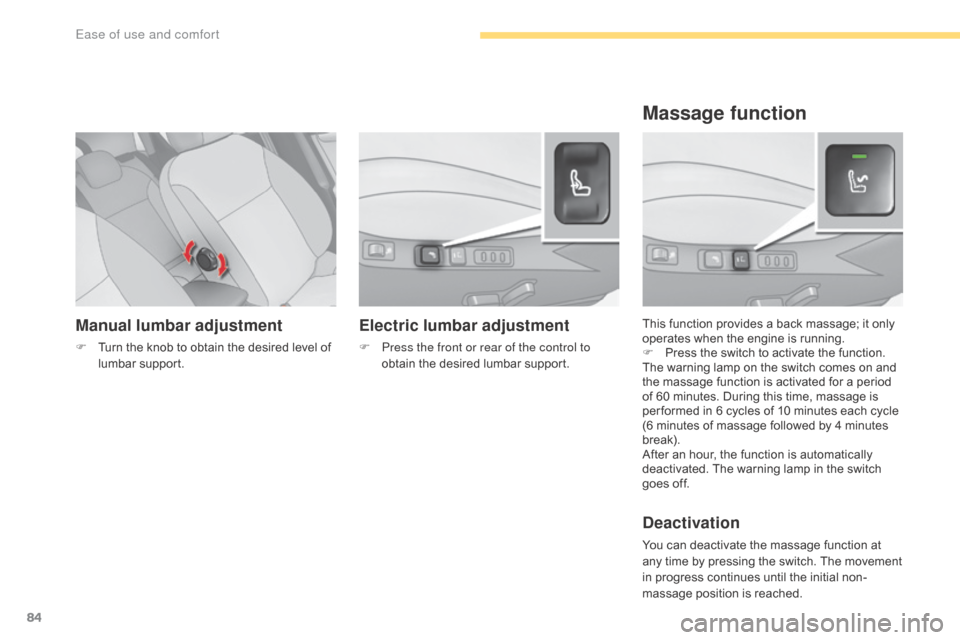
Manual lumbar adjustment
F Turn the knob to obtain the desired level of l
umbar sup port. This
function provides a back massage; it only o
perates when the engine is running.
F P ress the switch to activate the function.
The
warning lamp on the switch comes on and
t
he massage function is activated for a period
o
f 60 minutes. During this time, massage is
p
er formed in 6 cycles of 10 minutes each cycle
(
6 minutes of massage followed by 4 minutes
b
reak).
After
an hour, the function is automatically
d
eactivated. The warning lamp in the switch
g
oes off.
Deactivation
You can deactivate the massage function at any time by pressing the switch. The movement
i
n progress continues until the initial non-
massage
position is reached.
Massage function
Electric lumbar adjustment
F Press the front or rear of the control to obtain the desired lumbar support.
Ease of use and comfort
Page 87 of 396
85
C4-2_en_Chap03_ergonomie-et-confort_ed02-2015
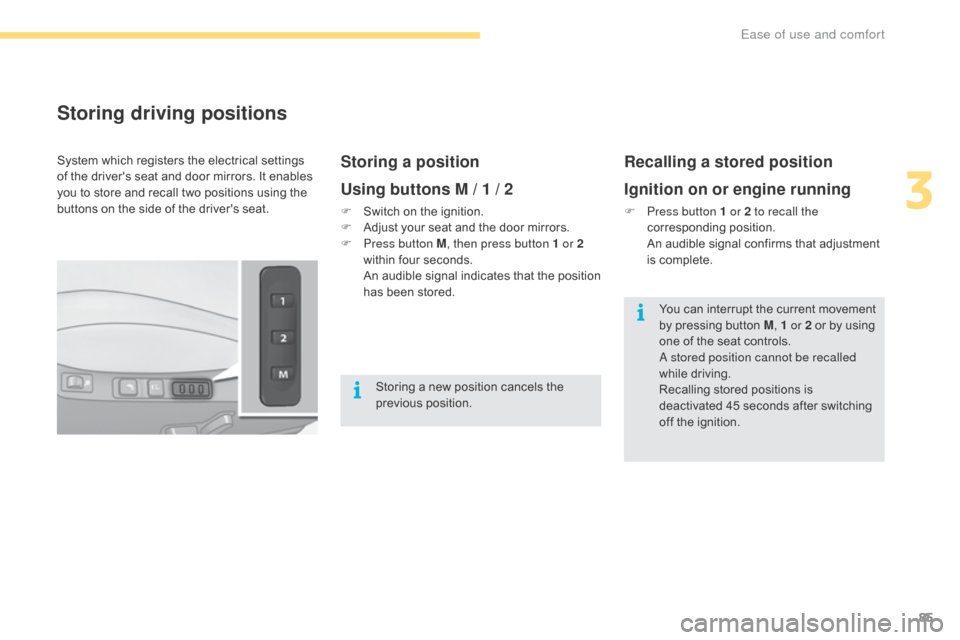
Storing driving positions
Storing a position
Using buttons M / 1 / 2
F Switch on the ignition.
F A djust your seat and the door mirrors.
F
P
ress button M , then press button 1 or 2
within
four seconds.
A
n audible signal indicates that the position
h
as been stored.
Recalling a stored position
Ignition on or engine running
F Press button 1 or 2 to recall the corresponding p osition.
A
n audible signal confirms that adjustment
i
s complete.
System
which
registers
the
electrical
settings
o
f
the
driver's
seat
and
door
mirrors.
It
enables
y
ou
to
store
and
recall
two
positions
using
the
b
uttons
on
the
side
of
the
driver's
seat.
Storing
a
new
position
cancels
the
p
revious
p
osition. You
can interrupt the current movement
b
y pressing button M, 1 or 2
or by using
o
ne of the seat controls.
A stored position cannot be recalled
while
driving.
Recalling
stored positions is
d
eactivated 45 seconds after switching
o
ff the ignition.
3
Ease of use and comfort
Page 88 of 396
86
C4-2_en_Chap03_ergonomie-et-confort_ed02-2015
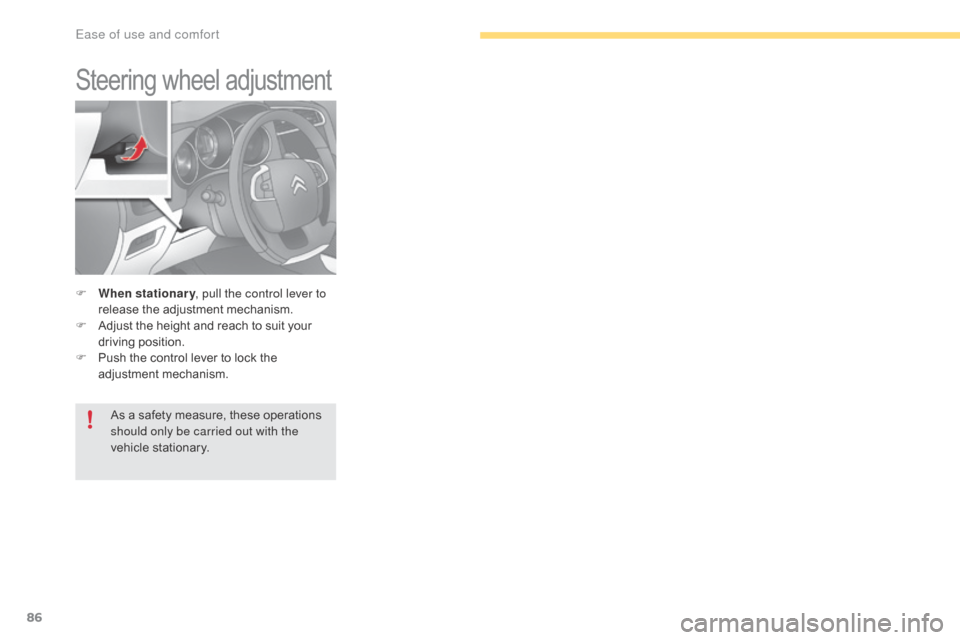
Steering wheel adjustment
F When stationary , pull the control lever to
release the adjustment mechanism.
F
A
djust the height and reach to suit your
d
riving position.
F
P
ush the control lever to lock the
a
djustment
m
echanism.
As
a safety measure, these operations
s
hould only be carried out with the
vehicle
stationary.
Ease of use and comfort
Page 89 of 396
87
C4-2_en_Chap03_ergonomie-et-confort_ed02-2015
Mirrors
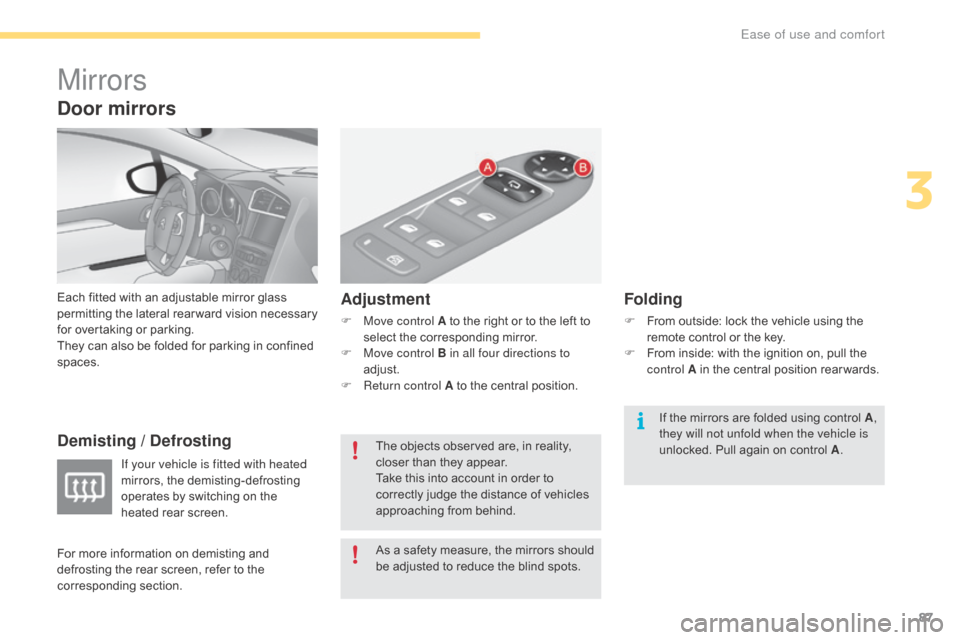
Each fitted with an adjustable mirror glass permitting t he la teral r earward v ision n ecessary f
or overtaking or parking.
They
can also be folded for parking in confined
spa
ces.
Demisting / Defrosting Adjustment
F Move control A
to the right or to the left to s
elect the corresponding mirror.
F
M
ove control B in all four directions to
adjust.
F
R
eturn control A to the central position.
Folding
F From outside: lock the vehicle using the r
emote control or the key.
F
F
rom inside: with the ignition on, pull the
c
ontrol A in the central position rear wards.
If your vehicle is fitted with heated
mirrors,
the
demisting-defrosting
o
perates
by
switching
on
the
h
eated
rear
screen. As
a
safety
measure,
the
mirrors
should
b
e
adjusted
to
reduce
the
blind
spots.
The
objects
observed
are,
in
reality,
c
loser
than
they
appear.
Take
this
into
account
in
order
to
c
orrectly
judge
the
distance
of
vehicles
a
pproaching
from
behind. If
the mirrors are folded using control A,
they will not unfold when the vehicle is
unlocked.
Pull again on control A.
Door mirrors
For more information on demisting and d
efrosting the rear screen, refer to the
c
orresponding
s
ection.
3
Ease of use and comfort
Page 90 of 396
88
C4-2_en_Chap03_ergonomie-et-confort_ed02-2015
Automatic tilting in reverse gear
System which provides a view of the ground during parking manoeuvres in reverse gear.
Programming
F With the engine running, engage reverse g
e a r.
F
S
elect and adjust the left-hand and right-
hand
mirrors in succession.
The
adjustment is stored immediately.
Switching on
F With the engine running, engage reverse g
e a r.
F
M
ove control A to the right or to the left to
s
elect the corresponding mirror.
The
glass of the mirror selected tilts
d
ownwards, in accordance with its
programming.
Switching off
F Exit reverse gear and wait ten seconds.
or
F
R
eturn control A to the central position.
The
mirror glass returns to its initial position.
The
mirror glass also returns to its initial
p
osition:
-
i
f the speed exceeds 6 mph (10 km/h),
-
i
f the engine is switched off.
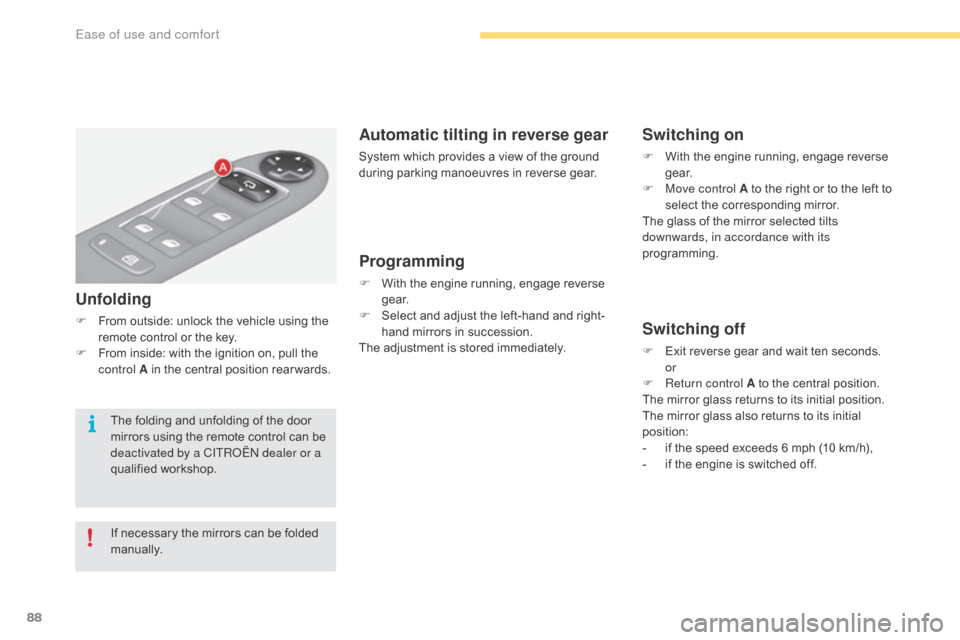
Unfolding
F From outside: unlock the vehicle using the r
emote control or the key.
F
F
rom inside: with the ignition on, pull the
c
ontrol A in the central position rear wards.
If
necessary the mirrors can be folded
m
anually.
The
folding and unfolding of the door
m
irrors using the remote control can be
d
eactivated by a CITROËN dealer or a
qualified
w
orkshop.
Ease of use and comfort