headlamp CITROEN C4 2019 Owners Manual
[x] Cancel search | Manufacturer: CITROEN, Model Year: 2019, Model line: C4, Model: CITROEN C4 2019Pages: 317, PDF Size: 9.31 MB
Page 4 of 317
.
.
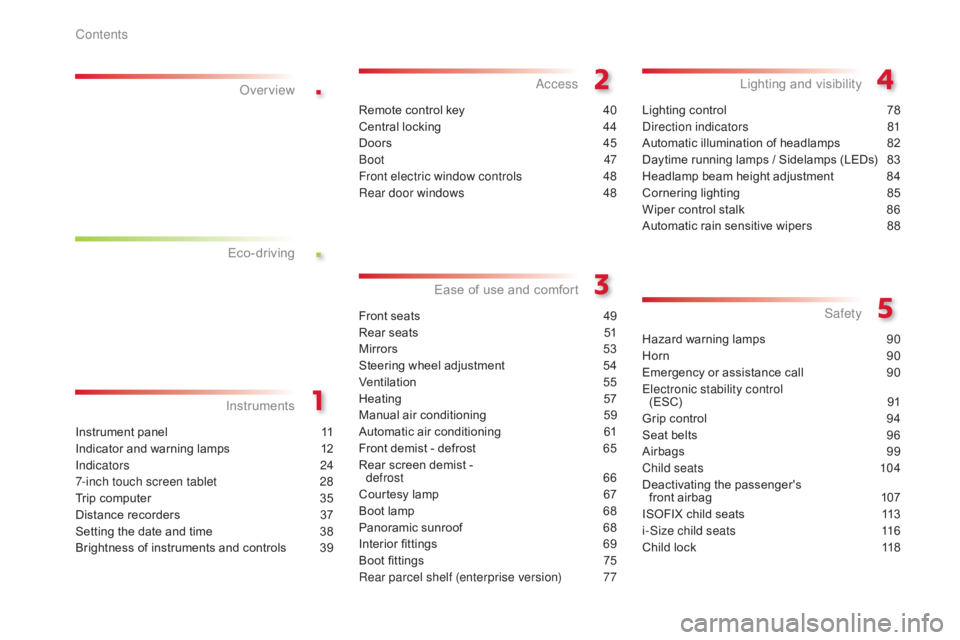
C4-cactus_en_Chap00a_sommaire_ed01-2016
Instrument panel 11
Indicator and warning lamps
1
2
Indicators
2
4
7-inch touch screen tablet
2
8
Trip
computer
3
5
Distance
recorders
3
7
Setting
the date and time
3
8
Brightness
of instruments and controls
3
9
InstrumentsOver view
Remote control key 4
0
Central locking
4
4
Doors
4
5
Boot
47
Front electric window controls
4
8
Rear door windows
4
8
Access
Front seats 49
Rear seats
5
1
Mirrors
5
3
Steering
wheel adjustment
5
4
Ventilation
5
5
Heating
5
7
Manual
a
ir
c
onditioning
5
9
Automatic
air conditioning
6
1
Front
demist - defrost
6
5
Rear
screen demist -
d
efrost 66
Courtesy
lamp
6
7
Boot
lamp
6
8
Panoramic
sunroof
6
8
Interior
fittings
6
9
Boot
fittings
7
5
Rear parcel shelf (enterprise version)
7
7
Ease of use a nd c omfort
Lighting control 7 8
Direction indicators
8
1
Automatic
illumination of headlamps
8
2
Daytime
running lamps / Sidelamps (LEDs)
8
3
Headlamp
beam height adjustment
8
4
Cornering
lighting
8
5
Wiper
control stalk
8
6
Automatic
rain sensitive wipers
8
8
Lighting and v isibility
Hazard warning lamps 9 0
Horn
9
0
Emergency
or assistance call
9
0
Electronic stability control (ESC)
9
1
Grip
control
9
4
Seat
belts
9
6
Airbags
9
9
Child seats
1
04
Deactivating
t
he
p
assenger's
f
ront airbag
1
07
ISOFIX
child seats
1
13
i-Size child seats
1
16
Child
lock
1
18
Safety
Eco-driving
Contents
Page 6 of 317
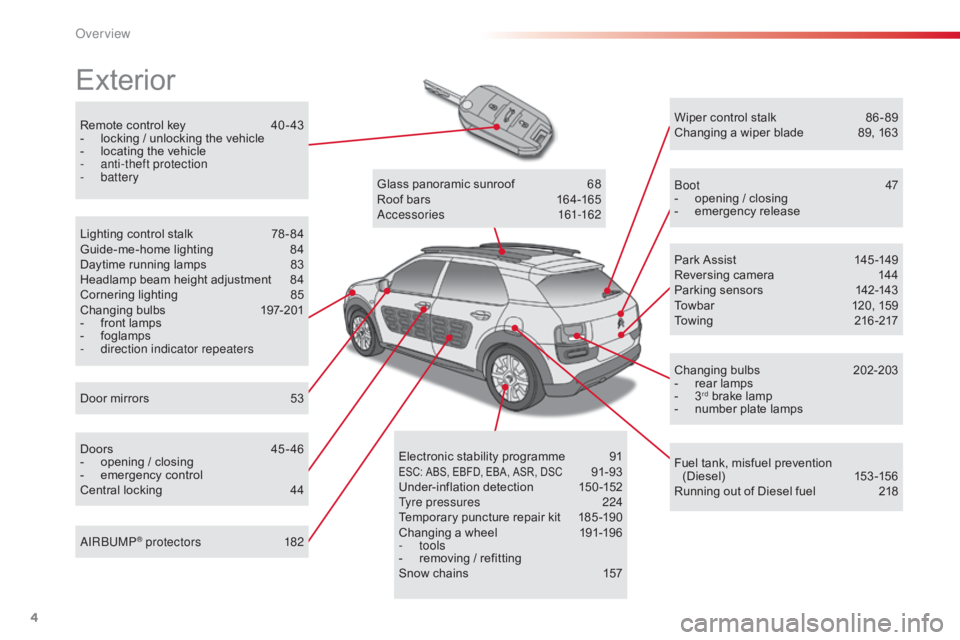
4
C4-cactus_en_Chap00b_vue-ensemble_ed01-2016
Remote control key 40 - 43
- l ocking / unlocking the vehicle
-
l
ocating the vehicle
-
a
nti-theft protection
-
battery
Exterior
Door mirrors 5 3
Lighting control stalk
7
8 - 84
Guide-me-home lighting
8
4
Daytime running lamps
8
3
Headlamp beam height adjustment
8
4
Cornering lighting
8
5
Changing
bu
lbs
1
97-201
-
f
ront lamps
-
fo
glamps
-
d
irection indicator repeaters
Doors
4
5 - 46
-
o
pening / closing
-
em
ergency
c
ontrol
Central
locking
4
4Glass
panoramic sunroof
6
8
Roof bars
1
64-165
Accessories
1
61-162
Wiper control stalk
8
6 - 89
Changing a wiper blade
8
9, 163
Boot
47
-
o
pening / closing
-
em
ergency
r
elease
Park Assist
1
45 -149
Reversing camera
1
44
Parking sensors
1
42-143
Towbar
1
20, 159
Towing
21
6 -217
Changing
bu
lbs
2
02-203
- r ear lamps
- 3rd brake lamp
-
n
umber plate lamps
Fuel
tank, misfuel prevention
(
Diesel)
15
3 -15 6
Running
out of Diesel fuel
2
18
Electronic
s
tability
pro
gramme
9
1
ESC: ABS, EBFD, EBA, ASR, DSC 91-93
Under-inflation d
etection 1 50-152
Tyre pressures
2
24
Temporary
puncture
repair
kit
1
85 -190
Changing
a
wheel
1
91-196
-
tools
-
r
emoving
/
refitting
Snow
chains
1
57
AIRBUMP
® protectors 1
82
Over view
Page 9 of 317
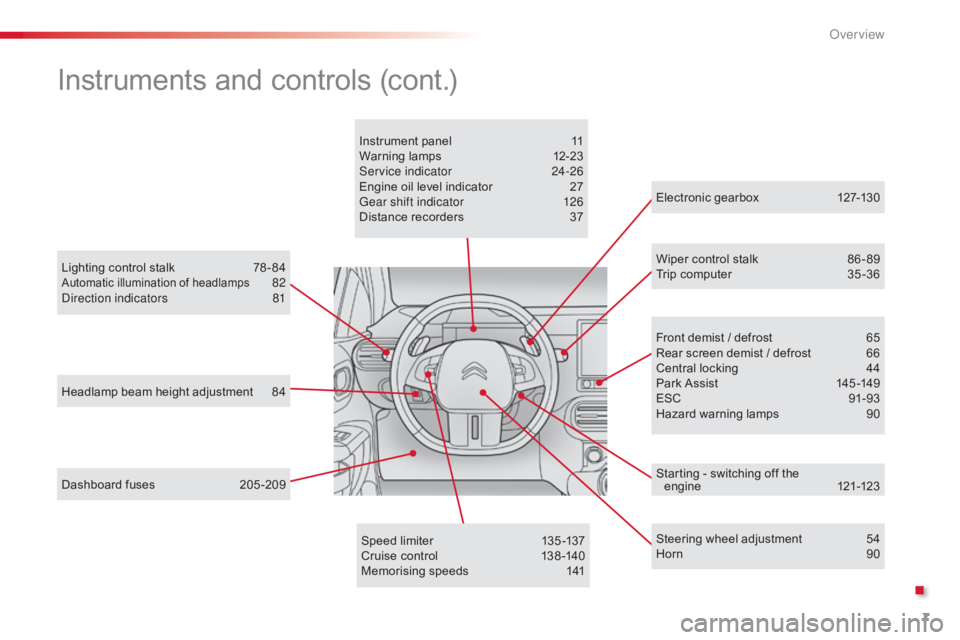
7
C4-cactus_en_Chap00b_vue-ensemble_ed01-2016
Headlamp beam height adjustment 84
Lighting control stalk
7
8 - 84
Automatic illumination of headlamps 82
D
irection indicators 8 1
Dashboard
fuses
2
05 -209 Electronic
gearbox
1
27-130
Wiper control stalk
8
6 - 89
Trip computer 3 5 -36
Speed limiter
1
35 -137
Cruise
control
1
38 -140
Memorising
speeds
1
41Front
demist / defrost
6
5
Rear
screen demist / defrost
6
6
Central
locking
4
4
Park
Assist
1
45 -149
ESC
9
1-93
Hazard
warning lamps
9
0
Instrument
panel
1
1
Warning
lam
ps
1
2-23
Service indicator
2
4-26
Engine oil level indicator
2
7
Gear shift indicator
1
26
Distance recorders
3
7
Steering wheel adjustment
5
4
Horn
9
0
Instruments and controls (cont.)
Starting - switching off the engine 12 1-123
.
Over view
Page 11 of 317
9
C4-cactus_en_Chap00c_eco-conduite_ed01-2016
Optimise the use of your gearbox
With a manual gearbox, move off gently and change up without waiting. During acceleration change up early.
The
gear efficiency indicator invites you engage the most suitable gear:
a
s soon as the indication is displayed in the instrument panel, follow it
s
traight away.
Control the use of your electrical
equipment
Before moving off, if the passenger compartment is too warm, ventilate it by opening the windows and air vents before using the air conditioning.
Above
30 mph (50 km/h), close the windows and leave the air vents
ope
n.
Remember
to make use of equipment that can help keep the
t
emperature in the passenger compartment down (sunroof and window
b
linds...).
To
save energy, do not set the air conditioning at too low a temperature.
As
soon as the desired temperature has been reached, limit the use of
t
he air conditioning, except if regulation is automatic.
Switch
off the demisting and defrosting controls as soon as you consider
p
ossible.
Switch
off the heated seat as soon as possible.
Switch
off the headlamps and foglamp when the level of light does not
r
equire their use.
Avoid
running the engine before moving off, particularly in winter; your
v
ehicle will warm up much faster while driving.
As
a passenger, if you avoid connecting your multimedia devices
(
film, music, video game...), you will contribute towards limiting the
c
onsumption of electrical energy, and so of fuel.
Disconnect
your portable devices before leaving the vehicle.
Eco-driving
Eco-driving is a range of everyday practices that allow the motorist to optimise their fuel consumption and CO2 emissions.
With
an
electronic
gearbox,
do
not
press
the
accelerator
pedal
heavily
o
r
s
uddenly.
Drive smoothly
Maintain a safe distance between vehicles, use engine braking rather t han the brake pedal, and press the accelerator progressively. These
p
ractices contribute towards a reduction in fuel consumption and CO
2
emissions
and
also
help
reduce
the
background
traffic
noise.
If
your
vehicle
has
cruise
control,
make
use
of
the
system
at
speeds
a
bove
25
mph
(40
km/h)
when
the
traffic
is
flowing
well.
.
Eco-driving
Page 15 of 317
13
C4-cactus_en_Chap01_Instruments-de-bord_ed01-2016
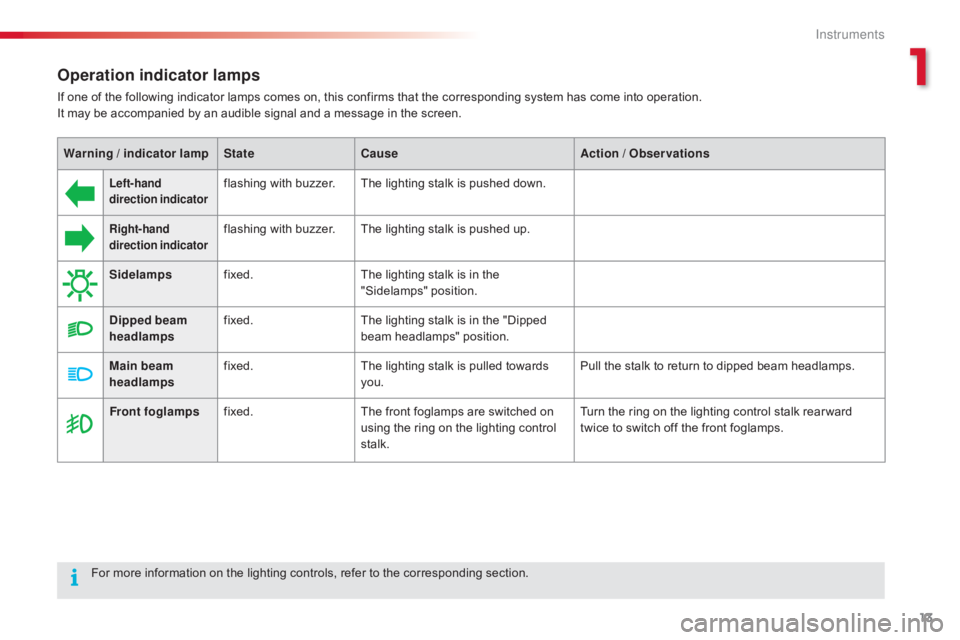
Operation indicator lamps
If one of the following indicator lamps comes on, this confirms that the corresponding system has come into operation.
I t may be accompanied by an audible signal and a message in the screen.
Left-hand
direction indicatorflashing with buzzer.The lighting stalk is pushed down.
Right-hand
direction indicatorflashing with buzzer.The lighting stalk is pushed up.
Sidelamps fixed. The
lighting stalk is in the
"
Sidelamps"
p
osition.
Dipped beam
headlamps fixed.
The
lighting stalk is in the "Dipped
b
eam headlamps" position.
Main beam
headlamps fixed.
The
lighting stalk is pulled towards
yo
u. Pull
the stalk to return to dipped beam headlamps.
Front foglamps fixed. The
front foglamps are switched on
u
sing the ring on the lighting control
st
alk. Turn
the ring on the lighting control stalk rear ward
t
wice to switch off the front foglamps.
For
more
information
on
the lighting controls, refer to the corresponding section.
Warning / indicator lamp
StateCause Action / Observations
1
Instruments
Page 56 of 317
54
C4-cactus_en_Chap03_Ergonomie-et-confort_ed01-2016
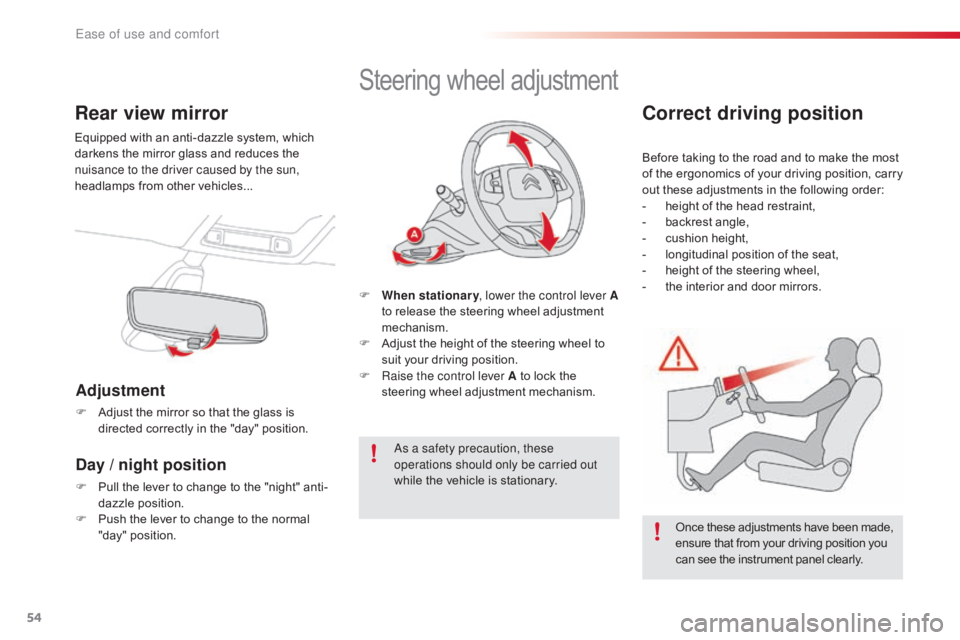
Rear view mirror
Equipped with an anti-dazzle system, which darkens the mirror glass and reduces the
n
uisance to the driver caused by the sun,
headlamps
from other vehicles...
Adjustment
F Adjust the mirror so that the glass is d
irected correctly in the "day" position.
Day / night position
F Pull the lever to change to the "night" anti-
dazzle position.
F
P
ush the lever to change to the normal
"
day" position.
Steering wheel ad justment
F When stationary , lower the control lever A
to release the steering wheel adjustment
m
echanism.
F
A
djust the height of the steering wheel to
s
uit your driving position.
F
Ra
ise the control lever A to lock the
s
teering wheel adjustment mechanism.
As a safety precaution, these
operations should only be carried out
while
the vehicle is stationary.
Correct driving position
Before taking to the road and to make the most of t he e rgonomics o f y our d riving p osition, c arry
o
ut these adjustments in the following order:
-
h
eight of the head restraint,
-
b
ackrest angle,
-
c
ushion height,
-
l
ongitudinal position of the seat,
-
h
eight of the steering wheel,
-
t
he interior and door mirrors.
Once
these adjustments have been made,
e
nsure that from your driving position you
c
an see the instrument panel clearly.
Ease of use and comfort
Page 80 of 317
78
C4-cactus_en_Chap04_Eclairage-et-visibilite_ed01-2016
Lighting control
Main lighting
The various front and rear lamps of the vehicle are designed to adapt the driver's visibility
p
rogressively according to the climatic
c
onditions:
-
s
idelamps, to be seen,
-
d
ipped beam headlamps to see without
d
azzling
o
ther
d
rivers,
-
m
ain beam headlamps to see clearly when
t
he road is clear.
Additional lighting
Other lamps are provided to meet the requirements of particular driving conditions:
-
a
rear foglamp,
-
f
ront foglamps with cornering lighting,
-
d
aytime running lamps to be more visible
d
uring the day,
-
g
uide-me-home lighting to facilitate your
e
xit from the vehicle,
-
p
arking lamps as vehicle position markers.
In
the event of the failure of one or more
b
ulbs, a message advises you to check
t
he lamp(s) in question.Travelling abroad
The design of the dipped beam headlamps allows, without modification,
d
riving in a country that drives on the
o
ther side of the road to the country in
which
your vehicle was sold.
Lighting and visibility
Page 81 of 317
79
C4-cactus_en_Chap04_Eclairage-et-visibilite_ed01-2016
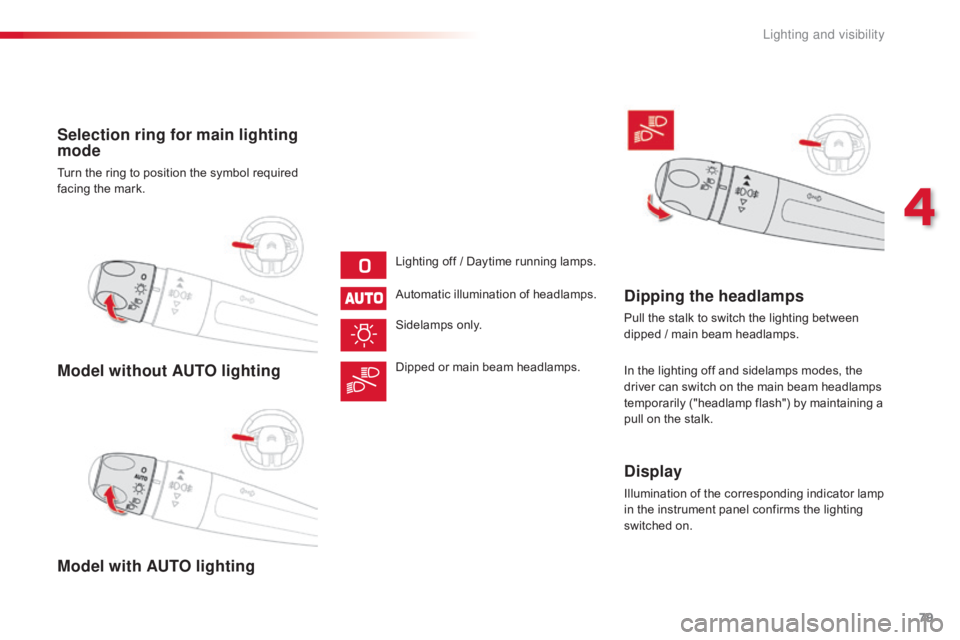
Model without AUTO lighting
Model with AUTO lighting Selection ring for main lighting
mode
Turn the ring to position the symbol required facing the mark.
Lighting
off / Daytime running lamps.
Automatic
illumination of headlamps.
Sidelamps
o
nly.
Dipped
or main beam headlamps.
Dipping the headlamps
Pull the stalk to switch the lighting between dipped / main beam headlamps.
In
the lighting off and sidelamps modes, the
d
river can switch on the main beam headlamps
t
emporarily ("headlamp flash") by maintaining a
p
ull on the stalk.
Display
Illumination of the corresponding indicator lamp in the instrument panel confirms the lighting
s
witched on.
4
Lighting and visibility
Page 82 of 317
80
C4-cactus_en_Chap04_Eclairage-et-visibilite_ed01-2016
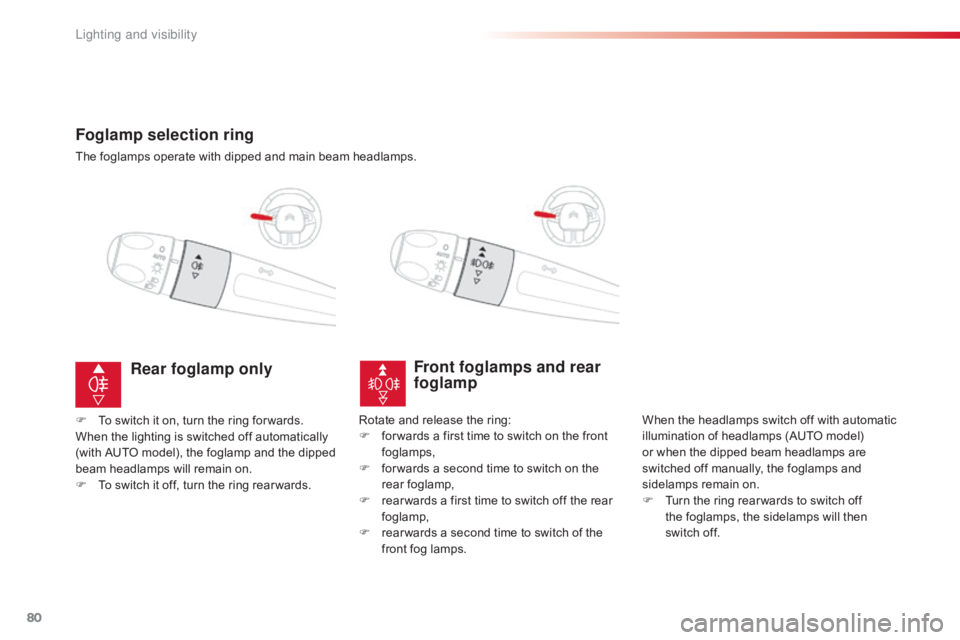
Foglamp selection ring
The foglamps operate with dipped and main beam headlamps.
Front foglamps and rear
foglamp
When the headlamps switch off with automatic illumination of headlamps (AUTO model)
o
r when the dipped beam headlamps are
s
witched off manually, the foglamps and
si
delamps
re
main
o
n.
F
T
urn the ring rear wards to switch off
t
he foglamps, the sidelamps will then
s
witch off.
Rear foglamp only
F To switch it on, turn the ring for wards.
When the lighting is switched off automatically
(
with AUTO model), the foglamp and the dipped
b
eam headlamps will remain on.
F
T
o switch it off, turn the ring rear wards.Rotate
and release the ring:
F f or wards a first time to switch on the front
fo
glamps,
F
f
or wards a second time to switch on the
r
ear
fo
glamp,
F
r
ear wards a first time to switch off the rear
fo
glamp,
F
r
ear wards a second time to switch of the
f
ront fog lamps.
Lighting and visibility
Page 83 of 317
81
C4-cactus_en_Chap04_Eclairage-et-visibilite_ed01-2016
In good or rainy weather, both day and night, the front foglamps and the
r
ear foglamp are prohibited. In these
s
ituations, the power of their beams
m
ay dazzle other drivers. They should
o
nly be used in fog or snow.
In these weather conditions, it is your
responsibility
to switch on the foglamps
a
nd dipped beam headlamps manually
a
s the sunshine sensor may detect
s
ufficient light.
Do
not forget to switch off the front
f
oglamps and the rear foglamp when
t
hey are no longer necessary.Switching off the lamps when
the ignition is switched off
On switching off the ignition, all of the lamps turn off immediately, except for
d
ipped beam if guide-me-home lighting
i
s activated.
Switching on the lamps
after the ignition is
switched off
To reactivate the lighting control, rotate the ring to the "0" position - lamps off,
t
hen to the desired position.
On
opening the driver's door a
t
emporary audible signal warns the
d
river that the lighting is on.
The
lamps, with the exception of the
s
idelamps, switch off automatically after
a
maximum duration of thirty minutes to
p
revent discharging of the battery.
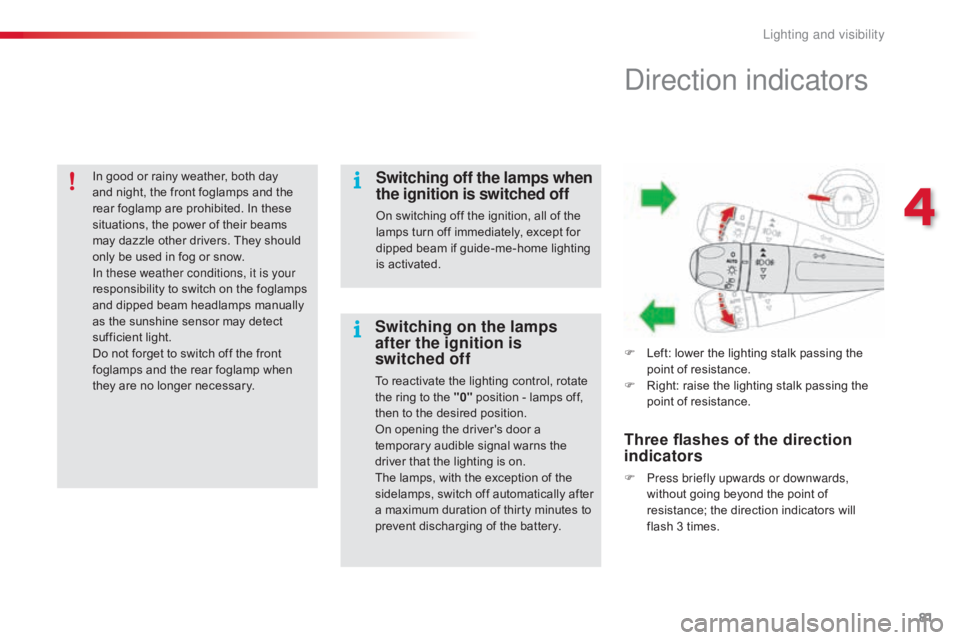
Direction indicators
F Left: lower the lighting stalk passing the p
oint of resistance.
F
R
ight: raise the lighting stalk passing the
p
oint of resistance.
Three flashes of the direction
indicators
F Press briefly upwards or downwards, without going beyond the point of
r
esistance; the direction indicators will
f
lash 3 times.
4
Lighting and visibility