height CITROEN C4 2019 Owners Manual
[x] Cancel search | Manufacturer: CITROEN, Model Year: 2019, Model line: C4, Model: CITROEN C4 2019Pages: 317, PDF Size: 9.31 MB
Page 4 of 317
.
.
C4-cactus_en_Chap00a_sommaire_ed01-2016
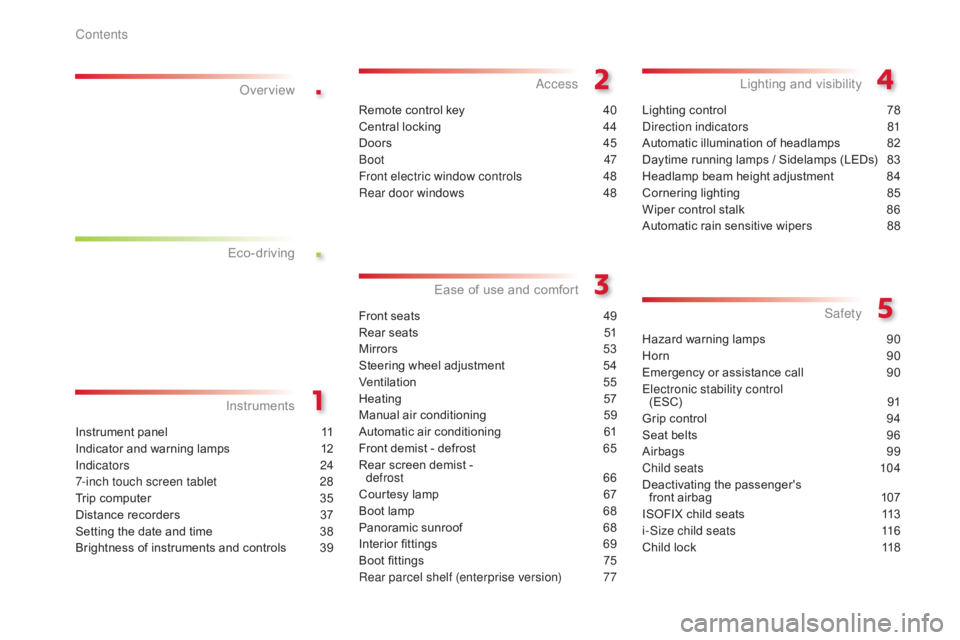
Instrument panel 11
Indicator and warning lamps
1
2
Indicators
2
4
7-inch touch screen tablet
2
8
Trip
computer
3
5
Distance
recorders
3
7
Setting
the date and time
3
8
Brightness
of instruments and controls
3
9
InstrumentsOver view
Remote control key 4
0
Central locking
4
4
Doors
4
5
Boot
47
Front electric window controls
4
8
Rear door windows
4
8
Access
Front seats 49
Rear seats
5
1
Mirrors
5
3
Steering
wheel adjustment
5
4
Ventilation
5
5
Heating
5
7
Manual
a
ir
c
onditioning
5
9
Automatic
air conditioning
6
1
Front
demist - defrost
6
5
Rear
screen demist -
d
efrost 66
Courtesy
lamp
6
7
Boot
lamp
6
8
Panoramic
sunroof
6
8
Interior
fittings
6
9
Boot
fittings
7
5
Rear parcel shelf (enterprise version)
7
7
Ease of use a nd c omfort
Lighting control 7 8
Direction indicators
8
1
Automatic
illumination of headlamps
8
2
Daytime
running lamps / Sidelamps (LEDs)
8
3
Headlamp
beam height adjustment
8
4
Cornering
lighting
8
5
Wiper
control stalk
8
6
Automatic
rain sensitive wipers
8
8
Lighting and v isibility
Hazard warning lamps 9 0
Horn
9
0
Emergency
or assistance call
9
0
Electronic stability control (ESC)
9
1
Grip
control
9
4
Seat
belts
9
6
Airbags
9
9
Child seats
1
04
Deactivating
t
he
p
assenger's
f
ront airbag
1
07
ISOFIX
child seats
1
13
i-Size child seats
1
16
Child
lock
1
18
Safety
Eco-driving
Contents
Page 6 of 317
4
C4-cactus_en_Chap00b_vue-ensemble_ed01-2016
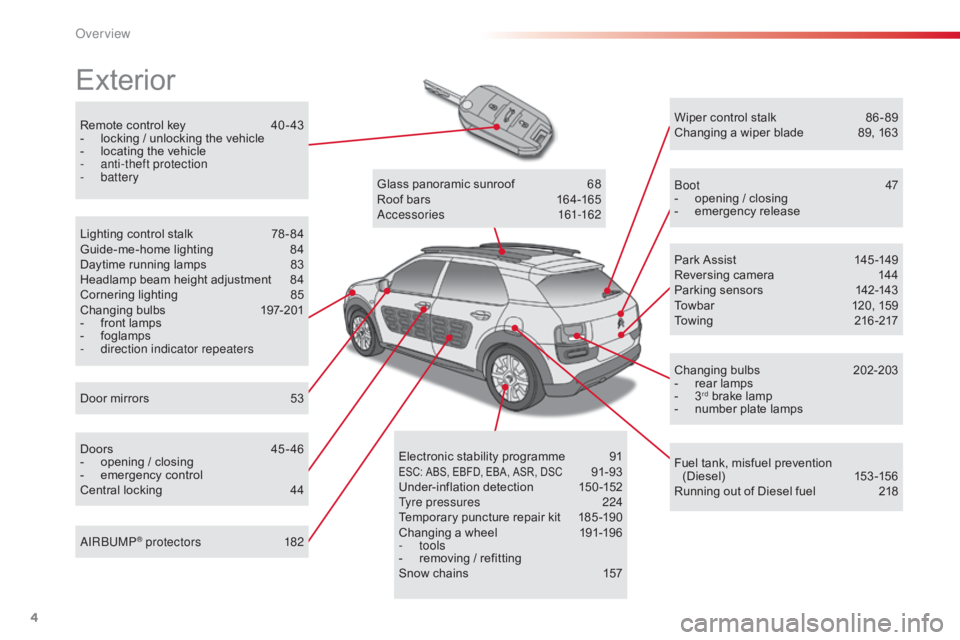
Remote control key 40 - 43
- l ocking / unlocking the vehicle
-
l
ocating the vehicle
-
a
nti-theft protection
-
battery
Exterior
Door mirrors 5 3
Lighting control stalk
7
8 - 84
Guide-me-home lighting
8
4
Daytime running lamps
8
3
Headlamp beam height adjustment
8
4
Cornering lighting
8
5
Changing
bu
lbs
1
97-201
-
f
ront lamps
-
fo
glamps
-
d
irection indicator repeaters
Doors
4
5 - 46
-
o
pening / closing
-
em
ergency
c
ontrol
Central
locking
4
4Glass
panoramic sunroof
6
8
Roof bars
1
64-165
Accessories
1
61-162
Wiper control stalk
8
6 - 89
Changing a wiper blade
8
9, 163
Boot
47
-
o
pening / closing
-
em
ergency
r
elease
Park Assist
1
45 -149
Reversing camera
1
44
Parking sensors
1
42-143
Towbar
1
20, 159
Towing
21
6 -217
Changing
bu
lbs
2
02-203
- r ear lamps
- 3rd brake lamp
-
n
umber plate lamps
Fuel
tank, misfuel prevention
(
Diesel)
15
3 -15 6
Running
out of Diesel fuel
2
18
Electronic
s
tability
pro
gramme
9
1
ESC: ABS, EBFD, EBA, ASR, DSC 91-93
Under-inflation d
etection 1 50-152
Tyre pressures
2
24
Temporary
puncture
repair
kit
1
85 -190
Changing
a
wheel
1
91-196
-
tools
-
r
emoving
/
refitting
Snow
chains
1
57
AIRBUMP
® protectors 1
82
Over view
Page 9 of 317
7
C4-cactus_en_Chap00b_vue-ensemble_ed01-2016
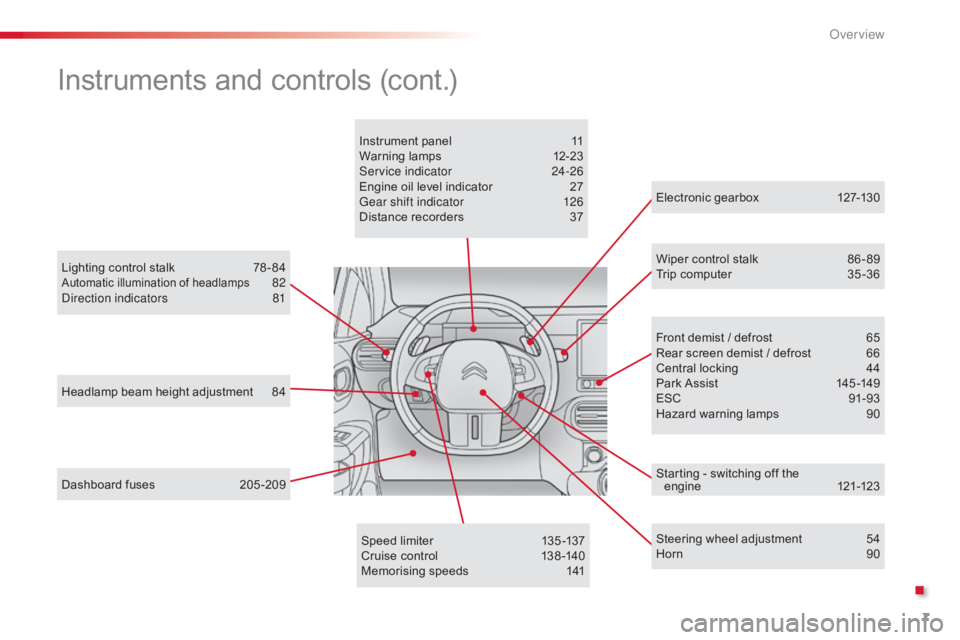
Headlamp beam height adjustment 84
Lighting control stalk
7
8 - 84
Automatic illumination of headlamps 82
D
irection indicators 8 1
Dashboard
fuses
2
05 -209 Electronic
gearbox
1
27-130
Wiper control stalk
8
6 - 89
Trip computer 3 5 -36
Speed limiter
1
35 -137
Cruise
control
1
38 -140
Memorising
speeds
1
41Front
demist / defrost
6
5
Rear
screen demist / defrost
6
6
Central
locking
4
4
Park
Assist
1
45 -149
ESC
9
1-93
Hazard
warning lamps
9
0
Instrument
panel
1
1
Warning
lam
ps
1
2-23
Service indicator
2
4-26
Engine oil level indicator
2
7
Gear shift indicator
1
26
Distance recorders
3
7
Steering wheel adjustment
5
4
Horn
9
0
Instruments and controls (cont.)
Starting - switching off the engine 12 1-123
.
Over view
Page 51 of 317
49
C4-cactus_en_Chap03_Ergonomie-et-confort_ed01-2016
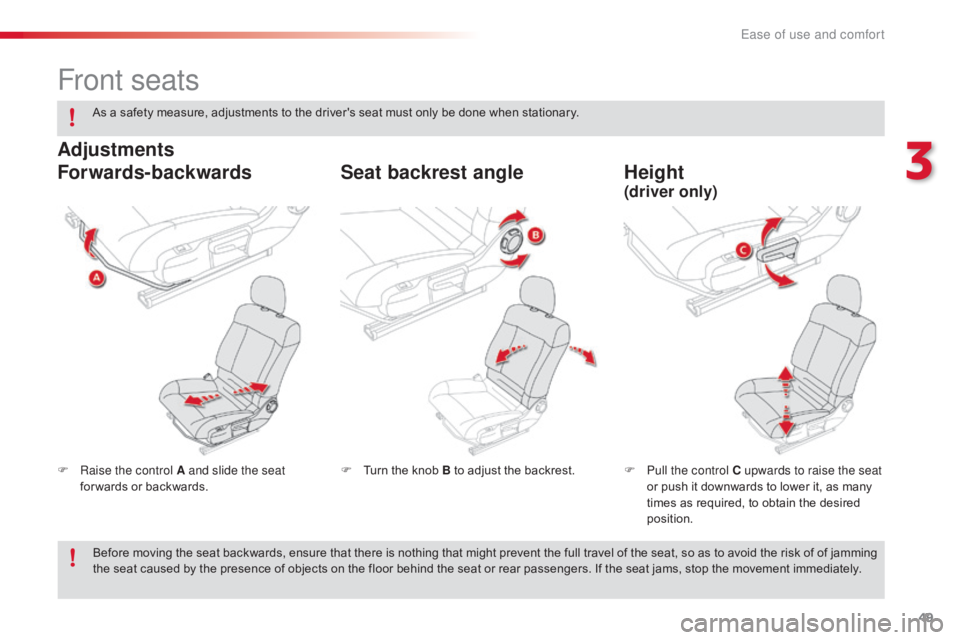
Front seats
F Raise the control A and slide the seat for wards or backwards. F
P ull the control C upwards to raise the seat
or push it downwards to lower it, as many
t
imes as required, to obtain the desired
p
osition.
F
T urn the knob B to adjust the backrest.
Forwards-backwards
Height
Seat backrest angle
Adjustments
(driver only)
As a safety measure, adjustments to the driver's seat must only be done when stationary.
B efore moving the seat backwards, ensure that there is nothing that might prevent the full travel of the seat, so as to avoid the risk of of jamming
t
he seat caused by the presence of objects on the floor behind the seat or rear passengers. If the seat jams, stop the movement immediately.
3
Ease of use and comfort
Page 52 of 317
50
C4-cactus_en_Chap03_Ergonomie-et-confort_ed01-2016
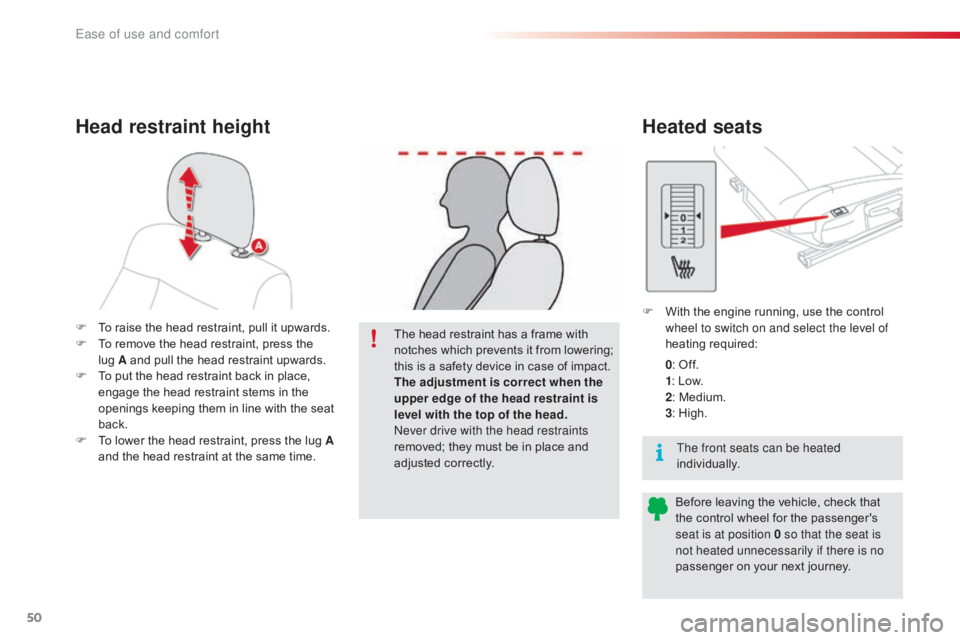
F To raise the head restraint, pull it upwards.
F T o remove the head restraint, press the
lug
A and pull the head restraint upwards.
F
T
o put the head restraint back in place,
e
ngage the head restraint stems in the
o
penings keeping them in line with the seat
b
ack.
F
T
o lower the head restraint, press the lug A
and
the head restraint at the same time.The
head restraint has a frame with
n
otches
which
prevents
it
from
lowering;
t
his is a safety device in case of impact.
The adjustment is correct when the
upper edge of the head restraint is
level with the top of the head.
Never drive with the head restraints
removed;
they must be in place and
adj
usted
c
orrectly.
Head restraint heightHeated seats
F With the engine running, use the control w
heel to switch on and select the level of
heating
r
equired:
0 :
Off.
1 :
Low.
2 :
Medium.
3 :
High.
Before
leaving the vehicle, check that
t
he control wheel for the passenger's
s
eat is at position 0 so that the seat is
not heated unnecessarily if there is no
passenger
on your next journey.
The front seats can be heated
individually.
Ease of use and comfort
Page 56 of 317
54
C4-cactus_en_Chap03_Ergonomie-et-confort_ed01-2016
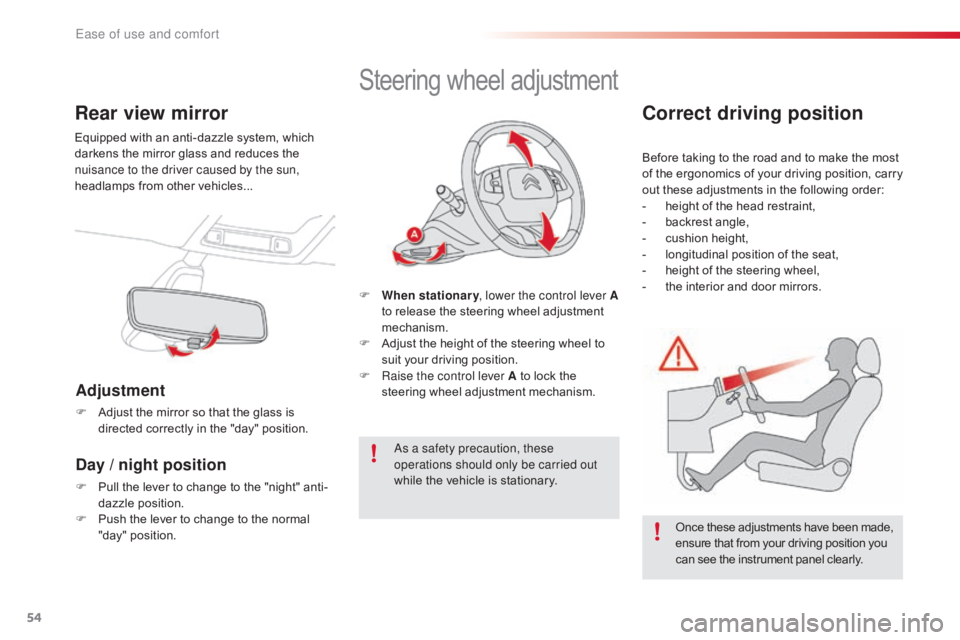
Rear view mirror
Equipped with an anti-dazzle system, which darkens the mirror glass and reduces the
n
uisance to the driver caused by the sun,
headlamps
from other vehicles...
Adjustment
F Adjust the mirror so that the glass is d
irected correctly in the "day" position.
Day / night position
F Pull the lever to change to the "night" anti-
dazzle position.
F
P
ush the lever to change to the normal
"
day" position.
Steering wheel ad justment
F When stationary , lower the control lever A
to release the steering wheel adjustment
m
echanism.
F
A
djust the height of the steering wheel to
s
uit your driving position.
F
Ra
ise the control lever A to lock the
s
teering wheel adjustment mechanism.
As a safety precaution, these
operations should only be carried out
while
the vehicle is stationary.
Correct driving position
Before taking to the road and to make the most of t he e rgonomics o f y our d riving p osition, c arry
o
ut these adjustments in the following order:
-
h
eight of the head restraint,
-
b
ackrest angle,
-
c
ushion height,
-
l
ongitudinal position of the seat,
-
h
eight of the steering wheel,
-
t
he interior and door mirrors.
Once
these adjustments have been made,
e
nsure that from your driving position you
c
an see the instrument panel clearly.
Ease of use and comfort
Page 86 of 317
84
C4-cactus_en_Chap04_Eclairage-et-visibilite_ed01-2016
Switching on
F W ith the ignition off, "flash" the headlamps
u
sing the lighting stalk.
F
A
further "headlamp flash" switches the
f
unction off.
Switching off
The
manual guide-me-home lighting switches
o
ff automatically after a set time.
The
temporary illumination of the dipped beam
h
eadlamps after the vehicle's ignition has been
s
witched off makes the driver's exit easier
w
hen the light is poor.
Guide-me-home
lighting
Automatic
When the automatic illumination of headlamps i
s activated, if the ambient light level is
l
ow, the dipped beam headlamps come on
a
utomatically when switching off the ignition.
Activation
or deactivation of the system, as well
a
s the period for the guide-me-home lighting is
s
et in the touch screen tablet.
F
Sel
ect the "Driving assistance "
menu,
then "Vehicle settings ".
Manual
Headlamp beam
h
eight
ad
justment
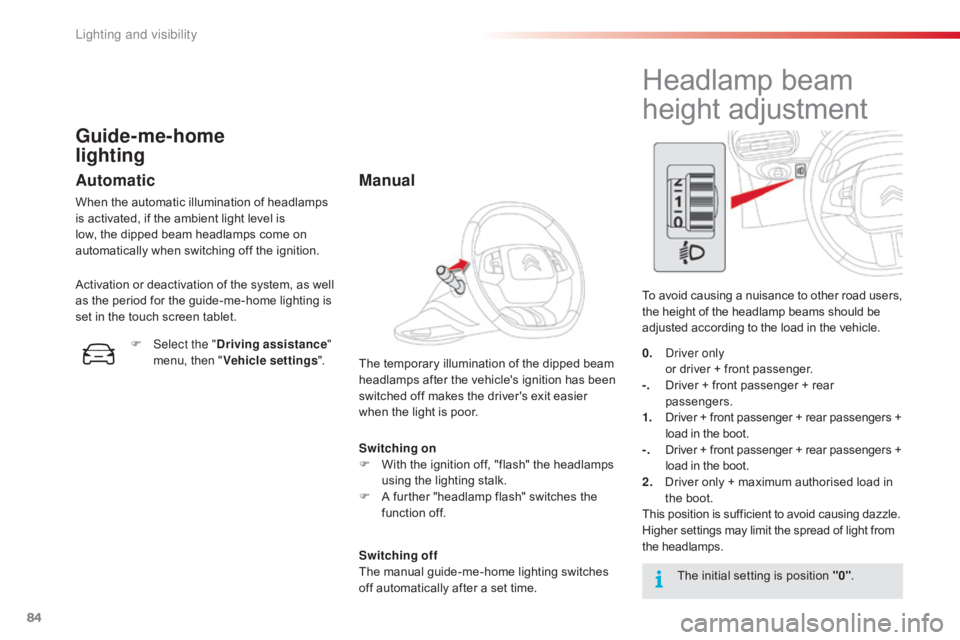
To avoid causing a nuisance to other road users, t
he height of the headlamp beams should be a
djusted according to the load in the vehicle.
The
initial setting is position "0".
0.
D
river only
o
r driver + front passenger.
-.
D
river + front passenger + rear
p
assengers.
1.
D
river + front passenger + rear passengers +
l
oad in the boot.
-.
D
river + front passenger + rear passengers +
l
oad in the boot.
2.
D
river only + maximum authorised load in
t
he boot.
This
position is sufficient to avoid causing dazzle.
Higher
settings may limit the spread of light from
t
he
hea
dlamps.
Lighting and visibility
Page 113 of 317
111
C4-cactus_en_Chap05_securite_ed01-2016
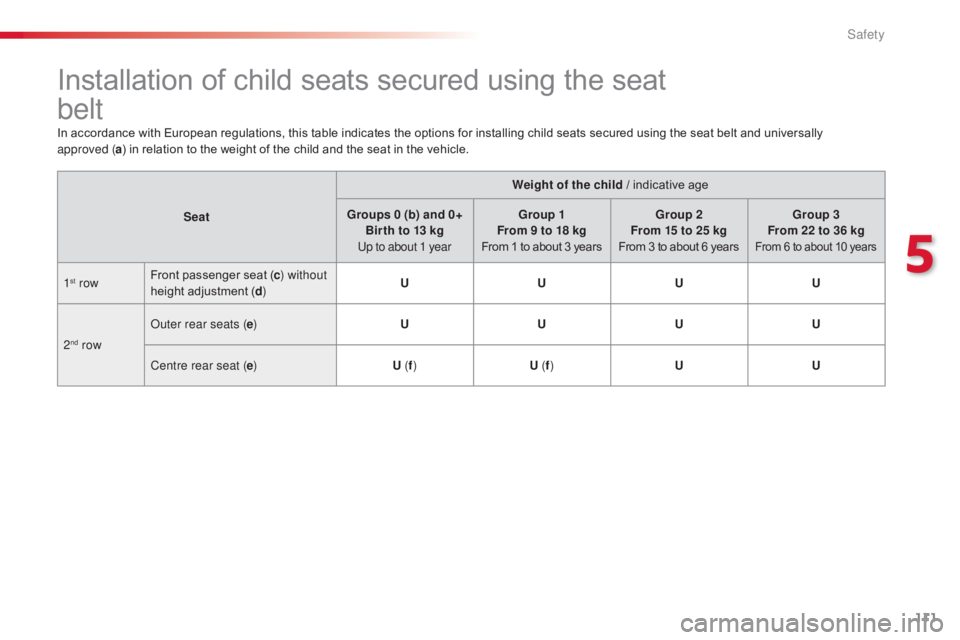
Installation of child seats secured using the seat
bel t
In accordance with European regulations, this table indicates the options for installing child seats secured using the seat belt and universally a
pproved (a )
in relation to the weight of the child and the seat in the vehicle.
Seat Weight of the child /
indicative age
Groups 0 (b) and 0+ Bir th to 13 kg
Up to about 1 year Group 1
From 9 to 18 kg
From
1 to about 3 yearsGroup 2
From 15 to 25 kg
From
3 to about 6 yearsGroup 3
From 22 to 36 kg
From 6 to about 10 years
1st row Front passenger seat (
c ) without
height adjustment (d ) U
UUU
2
nd row Outer rear seats (
e) UUUU
Centre rear seat ( e) U (f) U (f) U U
5
Safety
Page 122 of 317
120
C4-cactus_en_Chap06_conduite_ed01-2016
When towing
Distribution of loads
F Distribute the load in the trailer so that the heaviest items are as close as possible to
t
he axle and the nose weight approaches
t
he maximum permitted without
e
xceeding it.
Air density decreases with altitude, thus
reducing
engine per formance. Above
1 0
00 metres, the maximum towed load must
b
e reduced by 10 % for every 1 000 metres of
al
titude.
For
more information on weights (and the
t
owed loads which apply to your vehicle) refer
to
the corresponding section.
Side wind
F Take into account the increased sensitivity t
o side wind.
Cooling
Towing a trailer on a slope increases the temperature of the coolant.
As
the fan is electrically controlled, its cooling
c
apacity is not dependent on the engine speed.
F
T
o lower the engine speed, reduce your
s
peed.
The
maximum towed load on a long incline
d
epends on the gradient and the ambient
t
emperature.
In
all cases, keep a check on the coolant
t
emperature. F
I
f the warning lamp and the
S
TOP
warning lamp come on,
s
top the vehicle and switch off
the
engine as soon as possible.
Braking
Towing a trailer increases the braking distance.
T o avoid overheating of the brakes, the use of
e
ngine braking is recommended.
Ty r e s
F Check the tyre pressures of the towing v
ehicle and of the trailer, observing the
re
commended
p
ressures.
Lighting
F Check the electrical lighting and signalling o
n the trailer and the hadlamp beam height
o
f your vehicle.
For
more information on adjusting the
h
eadlamp beam height, refer to the
c
orresponding
s
ection.
The
rear parking sensors will be
d
eactivated automatically if a genuine
C
ITROËN towbar is used.
Driving
Page 167 of 317
165
C4-cactus_en_Chap07_info-pratiques_ed01-2016
Maximum load, distributed over the roof bars, for a loading height not exceeding
4
0 cm: 80 kg.
This
value is subject to change, please
c
heck the maximum load stated in the
i
nstructions provided with he roof bars.
If
the height exceeds 40 cm, adapt the
s
peed of the vehicle to the profile of the
road
to avoid damaging the roof bars
a
nd the fixings on the vehicle.
Please
refer to national legislation so as
t
o meet the requirements on carrying
o
bjects that are longer than the vehicle.
Recommendations
F Distribute the load evenly, avoiding ov
erloading on one side.
F
A
rrange the heaviest part of the load as
c
lose as possible to the roof.
F
A
nchor the load securely and fit a warning
f
lag if part of it overhangs the vehicle.
F
D
rive gently, as the vehicle will be more
l
iable to the effects of side winds (vehicle
stability
may be affected).
F
R
emove the roof bars as soon as they are
n
o
lon
ger
n
eeded.
7
Practical information