Screen Citroen C4 CACTUS 2016 1.G Manual PDF
[x] Cancel search | Manufacturer: CITROEN, Model Year: 2016, Model line: C4 CACTUS, Model: Citroen C4 CACTUS 2016 1.GPages: 308, PDF Size: 7.96 MB
Page 214 of 308
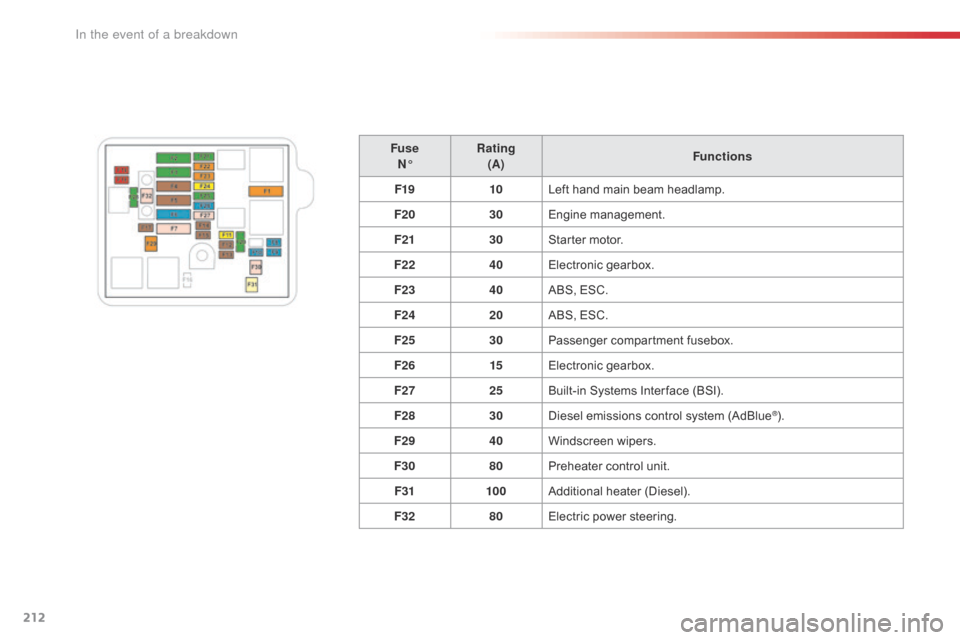
212
FuseN° Rating
(A) Functions
F19 10Left
hand main beam headlamp.
F20 30Engine
m
anagement.
F21 30Starter
motor.
F22 40Electronic
g
earbox.
F23 40ABS,
ESC.
F24 20ABS,
ESC.
F25 30Passenger
c
ompartment
f
usebox.
F26 15Electronic
g
earbox.
F27 25Built-in
Systems Inter face (BSI).
F28 30Diesel
emissions control system (AdBlue
®).
F29 40Windscreen
w
ipers.
F30 80Preheater
control
unit.
F31 100Additional
hea
ter
(
Diesel).
F32 80Electric
power
steering.
In the event of a breakdown
Page 227 of 308
225
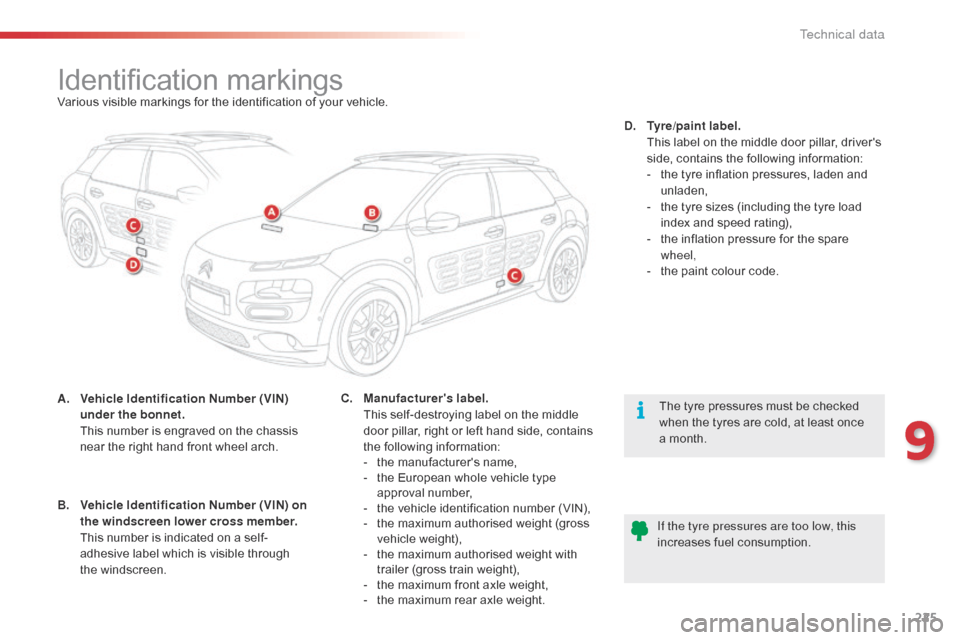
Identification markingsVarious visible markings for the identification of your vehicle.
A.
V
ehicle Identification Number (VIN)
under the bonnet.
T
his number is engraved on the chassis
n
ear the right hand front wheel arch. The
tyre pressures must be checked
w
hen the tyres are cold, at least once
a
month.
If the tyre pressures are too low, this
increases
fuel consumption.
C.
M
anufacturer's label.
T
his self-destroying label on the middle
d
oor pillar, right or left hand side, contains
th
e
f
ollowing
i
nformation:
-
t
he manufacturer's name,
-
t
he European whole vehicle type
a
pproval number,
-
t
he vehicle identification number (VIN),
-
t
he maximum authorised weight (gross
ve
hicle
w
eight),
-
t
he maximum authorised weight with
t
railer (gross train weight),
-
t
he maximum front axle weight,
-
t
he maximum rear axle weight.D.
T
yre/paint label.
T
his label on the middle door pillar, driver's
s
ide, contains the following information:
-
t
he tyre inflation pressures, laden and
u
nladen,
-
t
he tyre sizes (including the tyre load
i
ndex and speed rating),
-
t
he inflation pressure for the spare
w
heel,
-
t
he paint colour code.
B.
V
ehicle Identification Number (VIN) on
the windscreen lower cross member.
T
his number is indicated on a self-
adhesive
label which is visible through
t
he windscreen.
9
Technical data
Page 231 of 308

229
7-inch touch screen tablet
GPS satellite navigation - Multimedia audio - Bluetooth® telephone
Contents
First
steps
2 30
Steering
mounted
controls
2
33
Menus
2
34
Media
23
6
Radio
2
42
DAB
(Digital
Audio
Broadcasting)
radio
2
44
Music
2
46
Navigation
2
50
Navigation
-
Guidance
2
58
Traffic
26
2
Configuration
26
4
Connected
services
2
72
CITROËN
Multicity
Connect
2
73
Telephone
2
74
Frequently
asked
questions
2
82
The
system
is
protected
in
such
a
way
that
it
will
only
operate
in
y
our
vehicle. As
a
safety
measure,
the
driver
should
only
carry
out
operations
w
hich
require
prolonged
attention
while
the
vehicle
is
stationary.
The
display
of
an
energy
economy
mode
message
signals
that
e
lectrical
systems
operating
are
going
into
standby.
Refer
to
the
energy
economy
mode
section.
.
Audio and Telematics
Page 232 of 308
230
First steps
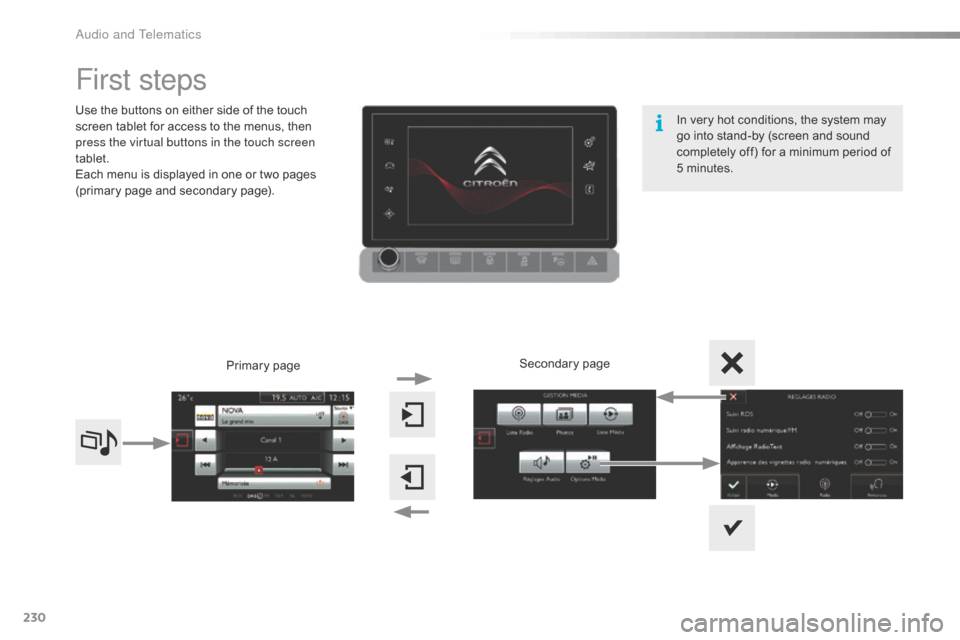
Use the buttons on either side of the touch screen tablet for access to the menus, then
p
ress the virtual buttons in the touch screen
tablet.
Each
menu is displayed in one or two pages
(
primary page and secondary page).
Secondary
p
age
Primary
pag
e In
very hot conditions, the system may
g
o into stand-by (screen and sound
c
ompletely off) for a minimum period of
5 m
inutes.
Audio and Telematics
Page 233 of 308
231
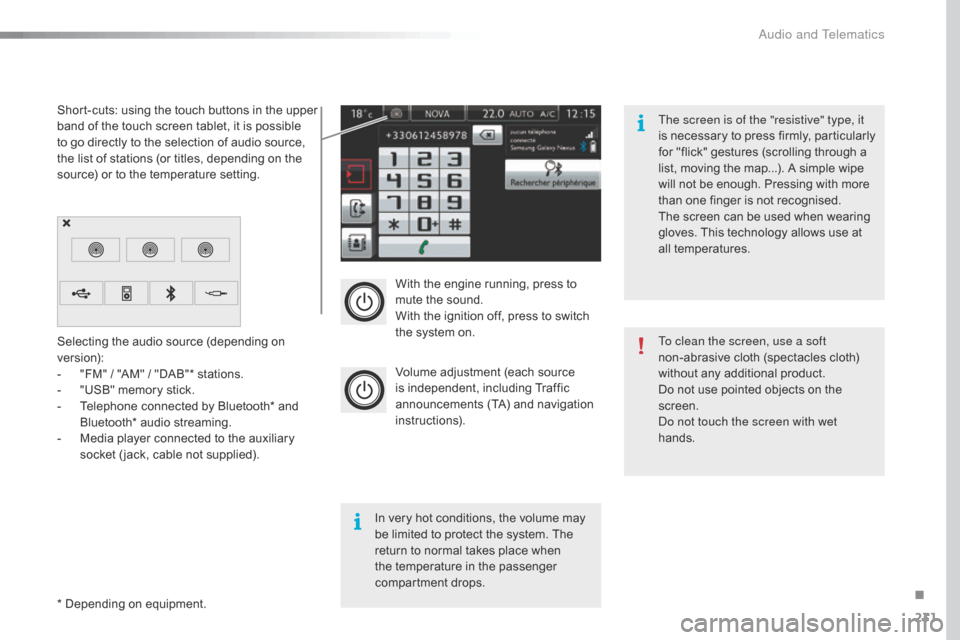
With the engine running, press to mute the sound.
With
the ignition off, press to switch
t
he system on.
Volume
adjustment (each source
i
s
i
ndependent,
i
ncluding
T
raffic
a
nnouncements (TA) and navigation
i
nstructions).
Selecting
the
audio
source
(depending
on
ve
rsion):
-
"
FM"
/
"AM"
/
"DAB"*
stations.
-
"
USB"
memory
stick.
-
T
elephone
connected
by
Bluetooth*
and
B
luetooth*
audio
streaming.
-
M
edia
player
connected
to
the
auxiliary
s
ocket
( jack,
cable
not
supplied).
*
Depending
on
equipment.
Short-cuts:
using
the
touch
buttons
in
the
upper
b
and
of
the
touch
screen
tablet,
it
is
possible
t
o
go
directly
to
the
selection
of
audio
source,
t
he
list
of
stations
(or
titles,
depending
on
the
s
ource)
or
to
the
temperature
setting.
The screen is of the "resistive" type, it
is
n
ecessary
t
o
p
ress
f
irmly,
p
articularly
f
or "flick" gestures (scrolling through a
l
ist, moving the map...). A simple wipe
w
ill not be enough. Pressing with more
t
han one finger is not recognised.
The screen can be used when wearing
g
loves. This technology allows use at
a
ll
t
emperatures.
In
very hot conditions, the volume may
b
e
limited to protect the system. The
r
eturn to normal takes place when
t
he
temperature in the passenger
c
ompartment drops. To clean the screen, use a soft
non-abrasive
cloth (spectacles cloth)
w
ithout any additional product.
Do
not use pointed objects on the
sc
reen.
Do not touch the screen with wet
hands.
.
Audio and Telematics
Page 241 of 308
239
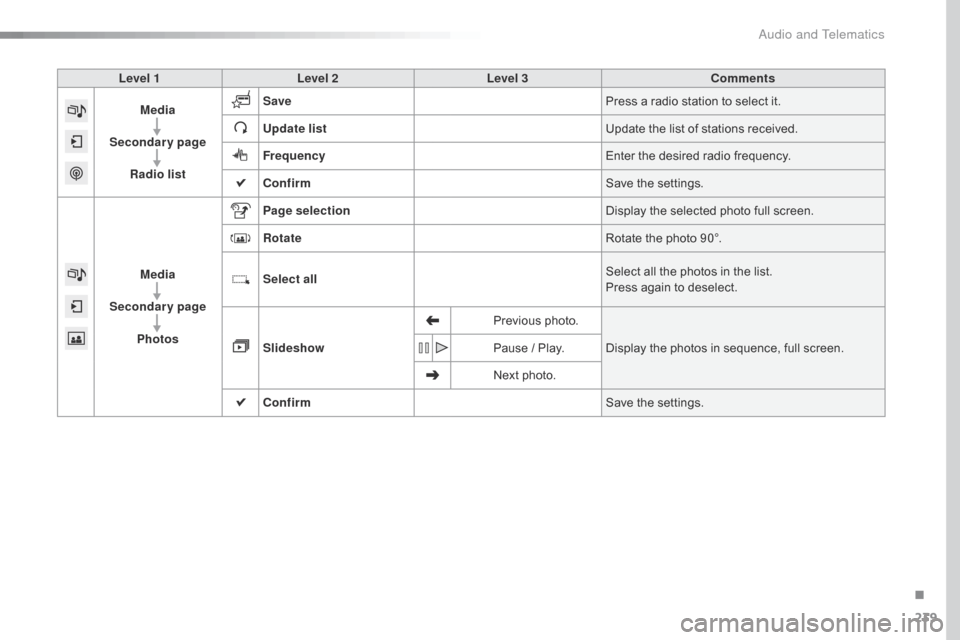
Level 1Level 2 Level 3 Comments
Media
Secondary page Radio list Save
Press
a radio station to select it.
Update list Update
the list of stations received.
Frequency Enter
the desired radio frequency.
Confirm Save
the settings.
Media
Secondary page Photos Page selection
Display
the selected photo full screen.
Rotate Rotate
the photo 90°.
Select all Select
all the photos in the list.
Press
again to deselect.
Slideshow Previous
pho
to.Display
the photos in sequence, full screen.
Pause
/ Play.
Next
photo.
Confirm Save
the settings.
.
Audio and Telematics
Page 253 of 308
251
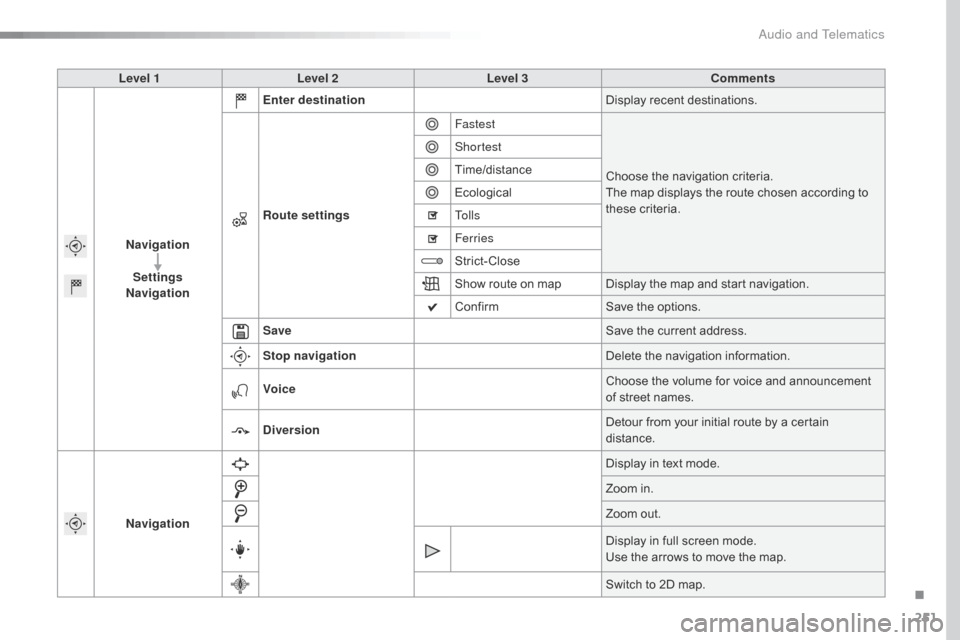
Level 1Level 2 Level 3 Comments
Navigation Settings
Navigation Enter destination
Display
recent destinations.
Route settings Fastest
Choose
the navigation criteria.
The
map displays the route chosen according to
t
hese
c
riteria.
Shortest
Time/distance
Ecological
To l l s
Ferries
Strict-Close
Show
route on map Display the map and start navigation.
Confirm Save
the options.
Save Save
the current address.
Stop navigation Delete
the navigation information.
Voice Choose
the volume for voice and announcement
o
f street names.
Diversion Detour
from your initial route by a certain
di
stance.
Navigation Display
in text mode.
Zoom
in.
Zoom
out.
Display
in full screen mode.
Use
the arrows to move the map.
Switch
to 2D map.
.
Audio and Telematics
Page 267 of 308

265
Level 1Level 2 Level 3 Comments
Configuration
Audio settings Ambience
Choose
the sound ambience.
Balance Set
the position of the sound in the vehicle using
t
he Arkamys
® system.
S
ound effects Set
the
volume or activate the link to vehicle
s
peed.
Ringtones Set
the
telephone ringtone and volume.
Voice Set
the
volume and voice for speaking street
nam
es
Confirm Save
the
settings.
Configuration
Turn off screen Turn
off
the
display (black screen). A press on the
b
lack
screen
restores the display.
Configuration
Interactive help Back
Consult
the
Interactive help.
Driving assistance
-
Equipment
Warning lamps
Audio communication
GPS Navigation
Previous page
Next page
.
Audio and Telematics
Page 268 of 308
266
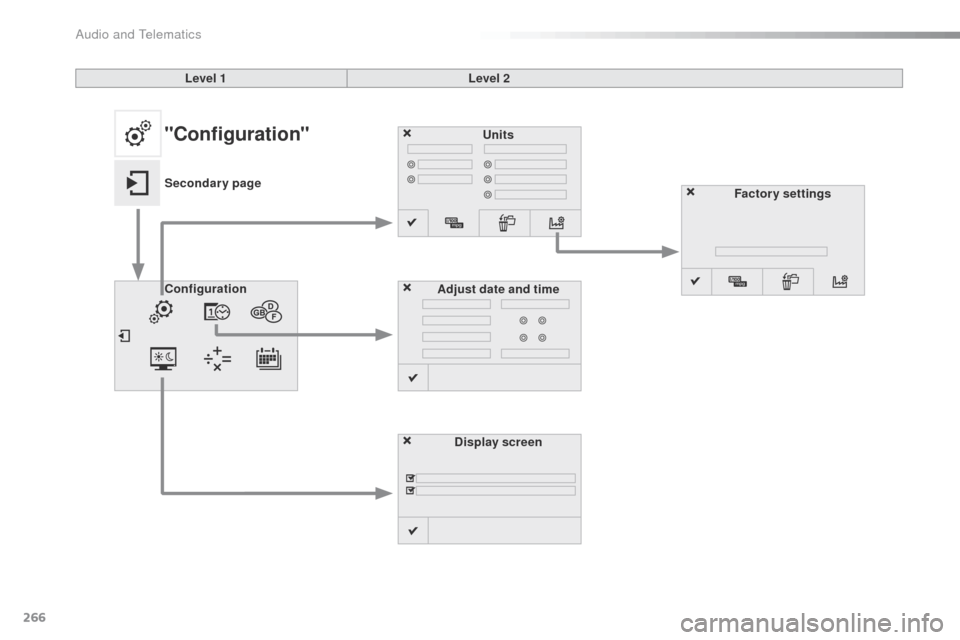
Units
Display screen
Configuration
Adjust date and time Factory settings
Level 1
Level 2"Configuration"
Secondary page
Audio and Telematics
Page 269 of 308
267
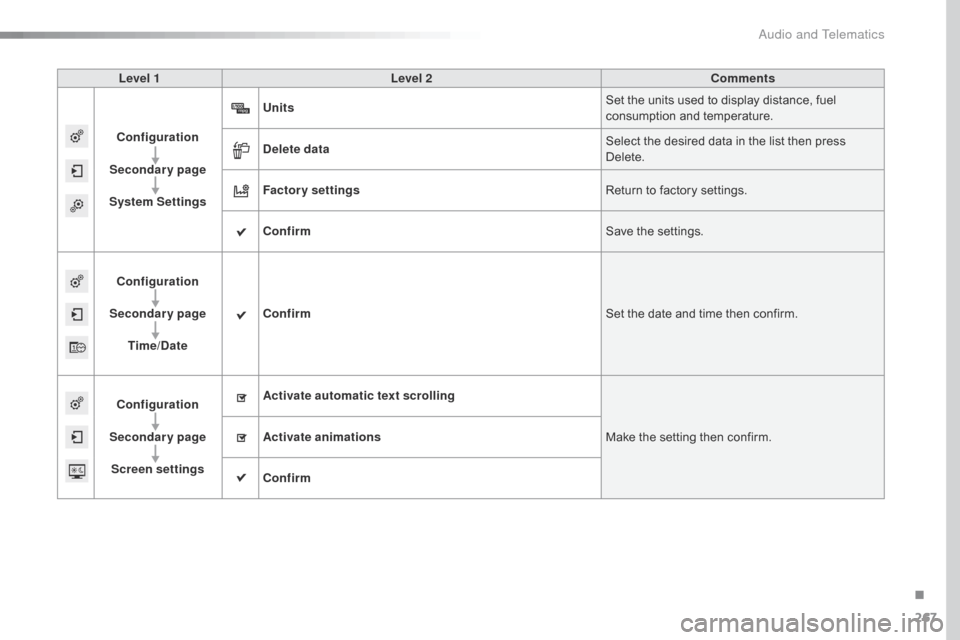
Level 1Level 2 Comments
Configuration
Secondary page
System Settings Units
Set
the units used to display distance, fuel
c
onsumption and temperature.
Delete data Select
the desired data in the list then press
D
elete.
Factory settings Return
to factory settings.
Confirm Save
the settings.
Configuration
Secondary page Time/Date Confirm
Set
the date and time then confirm.
Configuration
Secondary page Screen settings Activate automatic text scrolling
Make
the setting then confirm.
Activate animations
Confirm
.
Audio and Telematics