Citroen C4 DAG 2014.5 2.G Owner's Manual
Manufacturer: CITROEN, Model Year: 2014.5, Model line: C4 DAG, Model: Citroen C4 DAG 2014.5 2.GPages: 340, PDF Size: 12.89 MB
Page 171 of 340
99
169ô
C4-2_en_Chap09_conduite_ed01-2014
Inô additionô to ô the ô rear ô parking ô sensors,ô the
ô front ô parking ô sensors ô are ô triggeredô when
ô
an
ô
obstacle
ô
is
ô
detected
ô
in
ô
frontô and
ô
the
ô
speed
ô
of
ô
the
ô
vehicle
ô
is
ô
still
ô
belowô 6
ô mph ô (10 ô km/h).
The
ô front ô parking ô sensors ô are ô interrupted
ô if
ô
the
ô
vehicle
ô
stops
ô
for
ô
more
ô
than
ô
threeô seconds
ô
in
ô
forward
ô
gear
, ô
if
ô
no
ô
further
ô
ob
-
stacles
ô
are
ô
detected
ô
or
ô
when
ô
the
ô
speedô of
ô the ô vehicle ô exceeds ô 6 ô mph ô (10 ô km/h).
Front parking sensorsDeactivation/Activation of the front
and rear parking sensors
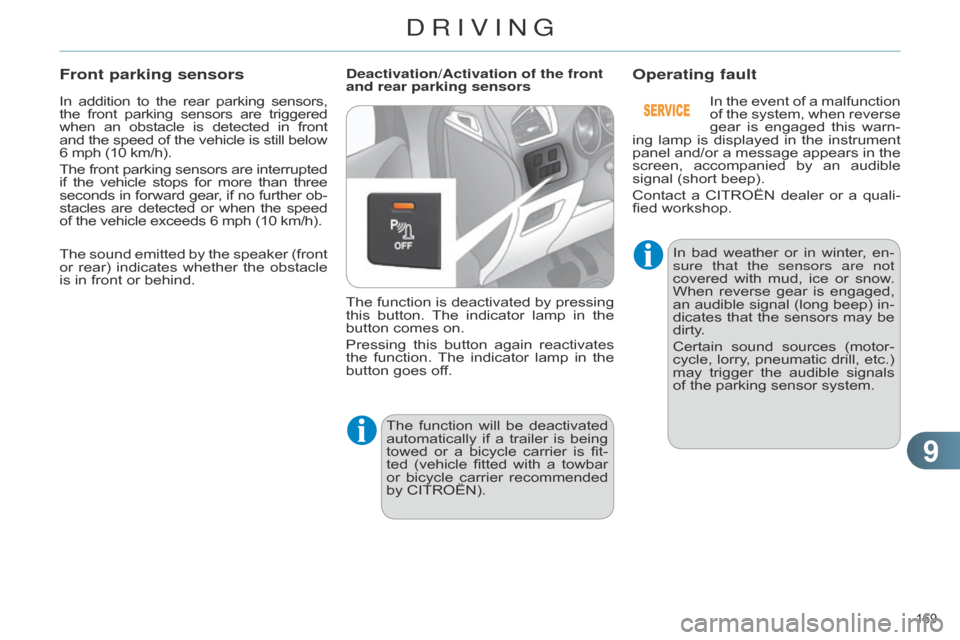
The
ô
function
ô
is
ô
deactivated
ô
by
ô
pressing
ô
this
ô
button.
ô
The
ô
indicator
ô
lamp
ô
in
ô
the
ô
button
ô comes ô on.
Pressing
ô
this
ô
button
ô
again
ô
reactivates
ô
the
ô
function.
ô
The
ô
indicator
ô
lamp
ô
in
ô
the
ô
button
ô goes ô off.Operating fault
Theô function ô will ô be ô deactivated ô automatically
ô if ô a ô trailer ô is ô being ô
towed
ô
or
ô
a
ô
bicycle
ô
carrier
ô
is
ô
fit
-
ted
ô
(vehicle
ô
fitted
ô
with
ô
a
ô
towbar
ô
or
ô
bicycle
ô
carrier
ô
recommended
ô
by
ô CITROûN). In
ô
bad
ô
weather
ô
or
ô
in
ô
winter
, ô
en
-
sure that the sensors are not
covered ô
with
ô
mud,
ô
ice
ô
or
ô
snow
. ô
When
ô
reverse
ô
gear
ô
is
ô
engaged,
ô
an
ô
audible
ô
signal
ô
(long
ô
beep)
ô
in
-
dicates ô
that
ô
the
ô
sensors
ô
may
ô
be
ô
dirty
.
Certain ô
sound
ô
sources
ô
(motor
-
cycle, ô
lorry
, ô
pneumatic
ô
drill,
ô
etc.)
ô
may
ô
trigger
ô
the
ô
audible
ô
signals
ô
of
ô the ô parking ô sensor ô system.
In ô
the
ô
event
ô
of
ô
a
ô
malfunction
ô
of
ô
the
ô
system,
ô
when
ô
reverse
ô
gear
ô
is
ô
engaged
ô
this
ô
warn
-
ing ô
lamp
ô
is
ô
displayed
ô
in
ô
the
ô
instrument
ô
panel
ô
and/or
ô
a
ô
message
ô
appears
ô
in
ô
the
ô
screen,
ô
accompanied
ô
by
ô
an
ô
audible
ô
signal
ô (short ô beep).
Contact ô
a
ô
CITROûN
ô
dealer
ô
or
ô
a
ô
quali
-
fied ô workshop.
The
ô
sound
ô
emitted
ô
by
ô
the
ô
speaker
ô
(front
ô
or
ô
rear)
ô
indicates
ô
whether
ô
the
ô
obstacle
ô
is
ô
in
ô
front
ô
or
ô
behind.
DRIVING
Page 172 of 340
1010
170ô
C4-2_en_Chap10_verification_ed01-2014
TOTAL & CITROûN
Partners in performance and
protecting the environment
Innovation in the search for
performance
Forô
over
ô
40
ô
year
, ô
the
ô
T
OTAL
ô Research
ô
and
ô
Development
ô
departments
ô
have
ô
developed
ô
for
ô
CITROûN,
ô
lubricants
ô
to
ô
match
ô
the
ô
latest technical innovations on CITR
o û n
vehicles,
ô
both
ô
for
ô
competition
ô
and
ô
for
ô
everyday
ô motoring.
For you, this is an assurance that you will
obtain
ô
of
ô
the
ô
best
ô
performance
ô
for
ô
your
ô
engine.
Optimum protection for your
engine
By
ô
having
ô
your
ô
CITROûN
ô
vehicleô serviced
ô
with
ô
T
OTAL
ô lubricants,ô you
ô
are
ô
contributing
ô
towards
ô
im
-
proving
ô
the
ô
life
ô
and
ô
performancesô of
ô
your
ô
engine,
ô
while
ô
also
ô
protect
-
ing
ô the ô environment.
prefers
CHECKS
Page 173 of 340
1010
171ô
C4-2_en_Chap10_verification_ed01-2014
FUEL TANK
Capacity of the tank: approximately
60 litres.
When the low fuel level in the
tank
ô
is
ô
reached,
ô
this
ô
warning
ô
lamp
ô
comes
ô
on
ô
in
ô
the
ô
instru
-
ment
ô
panel,
ô
accompanied
ô
by
ô
an
ô
audible
ô
warning
ô
and
ô
the
ô
dis
-
play
ô
of
ô
an
ô
alert
ô
message.
ô
When
ô
it
ô
first
ô
comes
ô
on,
ô
around
6 li-
tres
ô of ô fuel ô remain ô in ô the ô tank.
Until
ô
sufficient
ô
fuel
ô
has
ô
been
ô
added,
ô
ev
-
ery
ô
time
ô
the
ô
ignition
ô
is
ô
switched
ô
on,
ô
this
ô
warning
ô
lamp
ô
appears,
ô
accompanied
ô
by
ô
an
ô
audible
ô
signal
ô
and
ô
an
ô
alert
ô
mes
-
sage.
ô
When
ô
driving,
ô
this
ô
audible
ô
signal
ô
and
ô
the
ô
display
ô
of
ô
this
ô
alert
ô
message
ô
are
ô
repeated
ô
with
ô
increasing
ô
frequency
, ô
as
ô the ô level ô drops ô towards ô 0.
You
ô
must
ô
refuel
ô
as
ô
soon
ô
as
ô
possible
ô
to
ô
avoid
ô running ô out.
If you run out of fuel (
d iesel), refer also
to
ô "Checks".
Low fuel level Refuelling
Additionsô of
ô fuel ô must ô be ô of ô at ô least ô
5ô litres ô to ô be ô registered ô by ô the ô fuel ô
gauge.
Opening
ô
the
ô
filler
ô
cap
ô
may
ô
result
ô
in
ô
an
ô
inrush
ô
of
ô
air
. ô
This
ô
vacuum
ô
is
ô
entirely
ô
normal
ô
and
ô
results
ô
from
ô
the
ô
sealing
ô
of
ô
the
ô fuel ô system.
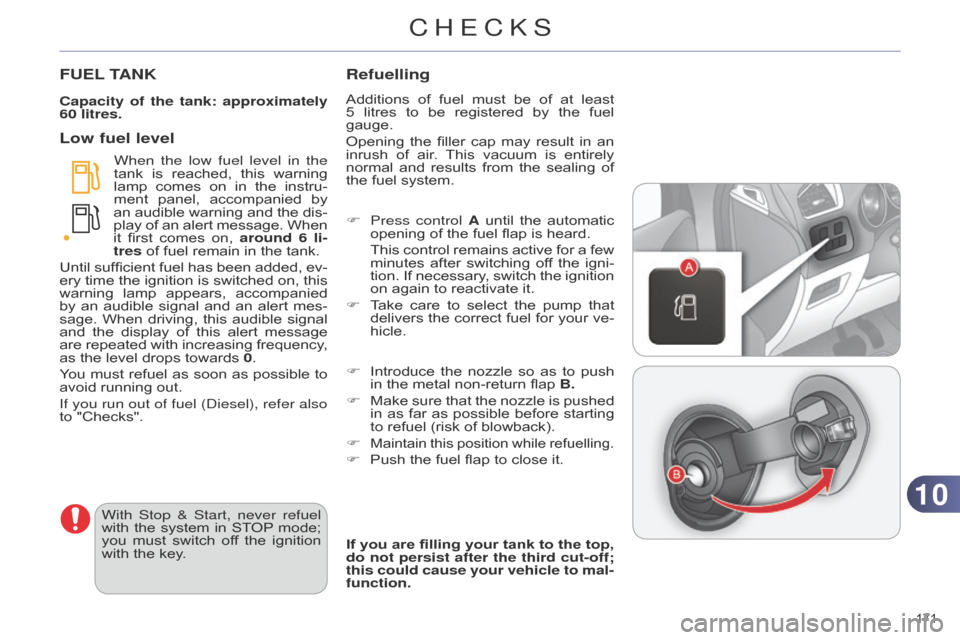
F
Press control
A ô
until
ô
the
ô
automatic
ô
opening
ô of ô the ô fuel ô flap ô is ô heard.
ô This
ô
control
ô
remains
ô
active
ô
for
ô
a
ô
few
ô
minutes
ô
after
ô
switching
ô
of
f ô
the
ô
igni
-
tion.
ô
If
ô
necessary
, ô
switch
ô
the
ô
ignition
ô
on
ô again ô to ô reactivate ô it.
F
ô
T
ake ô
care
ô
to
ô
select
ô
the
ô
pump
ô
that
ô
delivers
ô
the
ô
correct
ô
fuel
ô
for
ô
your
ô
ve
-
hicle.
If you are filling your tank to the top,
do not persist after the third cut-off;
this could cause your vehicle to mal-
function.
With Stop & Start, never refuel
with
ô
the
ô
system
ô
in
ô
ST
OP
ô mode;
ô
you
ô
must
ô
switch
ô
of
f
ô
the
ô
ignition
ô
with
ô
the
ô
key. F
ô
Introduce
ô
the
ô
nozzle
ô
so
ô
as
ô
to
ô
push
ô
in
ô the ô metal ô non-return ô flap ô B.
F
ô
Make
ô
sure
ô
that
ô
the
ô
nozzle
ô
is
ô
pushed
ô
in
ô
as
ô
far
ô
as
ô
possible
ô
before
ô
starting
ô
to
ô refuel ô (risk ô of ô blowback).
F
Maintainô this ô position ô while ô refuelling.
Fô Pushô the ô fuel ô flap ô to ô close ô it.
CHECKS
Page 174 of 340
1010
172ô
C4-2_en_Chap10_verification_ed01-2014
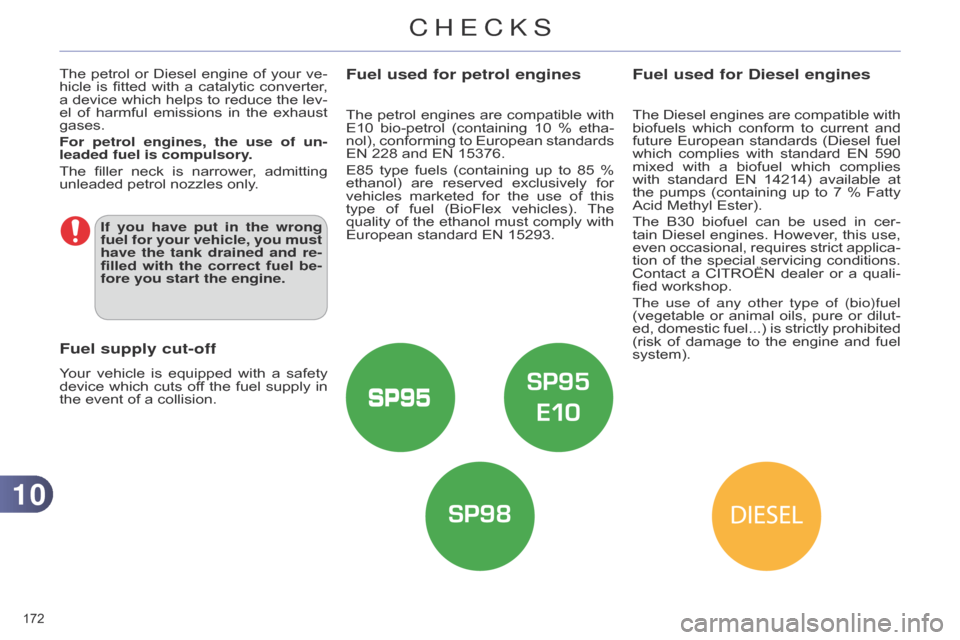
Fuel used for petrol engines
Theô petrolô engines ô are ô compatible ô with ô E10
ô bio-petrol ô (containing ô 10 ô % ô etha -
nol),
ô
conforming
ô
to
ô
European
ô
standards
ô
EN
ô 228 ô and ô EN ô 15376.
E85
ô
type
ô
fuels
ô
(containing
ô
up
ô
to
ô
85
ô
%
ô
ethanol)
ô
are
ô
reserved
ô
exclusively
ô
for
ô
vehicles
ô
marketed
ô
for
ô
the
ô
use
ô
of
ô
this
ô
type
ô
of
ô
fuel
ô
(BioFlex
ô
vehicles).
ô
The
ô
quality
ô
of
ô
the
ô
ethanol
ô
must
ô
comply
ô
with
ô
European
ô standard ô EN ô 15293.
Fuel used for Diesel engines
Theô Dieselô engines ô are ô compatible ô with ô biofuels
ô which ô conform ô to ô current ô and ô
future
ô
European
ô
standards
ô
(Diesel
ô
fuel
ô
which
ô
complies
ô
with
ô
standard
ô
EN
ô
590
ô
mixed
ô
with
ô
a
ô
biofuel
ô
which
ô
complies
ô
with
ô
standard
ô
EN
ô
14214)
ô
available
ô
at
ô
the
ô
pumps
ô
(containing
ô
up
ô
to
ô
7
ô
%
ô
Fatty
ô
Acid
ô Methyl ô Ester).
The
ô
B30
ô
biofuel
ô
can
ô
be
ô
used
ô
in
ô
cer
-
tain
ô
Diesel
ô
engines.
ô
However
, ô
this
ô
use,
ô
even
ô
occasional,
ô
requires
ô
strict
ô
applica
-
tion
ô
of
ô
the
ô
special
ô
servicing
ô
conditions.
ô
Contact
ô
a
ô
CITROûN
ô
dealer
ô
or
ô
a
ô
quali
-
fied
ô workshop.
The use of any other type of (bio)fuel
(vegetable
ô
or
ô
animal
ô
oils,
ô
pure
ô
or
ô
dilu
t-
ed,
ô
domestic
ô
fuel...)
ô
is
ô
strictly
ô
prohibited
ô
(risk
ô
of
ô
damage
ô
to
ô
the
ô
engine
ô
and
ô
fuel
ô
system).
The
ô
petrol
ô
or
ô
Diesel
ô
engine
ô
of
ô
your
ô
ve
-
hicle
ô
is
ô
fitted
ô
with
ô
a
ô
catalytic
ô
converter
,
ô a
ô device
ô which
ô helps
ô to
ô reduce
ô the
ô lev
-
el
ô of
ô harmful
ô emissions
ô in
ô the
ô exhaust
ô gases.
For petrol engines, the use of un
-
leaded fuel is compulsory.
The
ô
filler
ô
neck
ô
is
ô
narrower
,
ô
admitting
ô
unleaded
ô
petrol
ô
nozzles
ô
only.
Fuel supply cut-off
Yourô vehicle ô is ô equipped ô with ô a ô safety ô device
ô which ô cuts ô of f ô the ô fuel ô supply ô in ô
the
ô event ô of ô a ô collision.
If you have put in the wrong
fuel for your vehicle, you must
have the tank drained and re-
filled with the correct fuel be-
fore you start the engine.
CHECKS
Page 175 of 340
1010
173ô
C4-2_en_Chap10_verification_ed01-2014
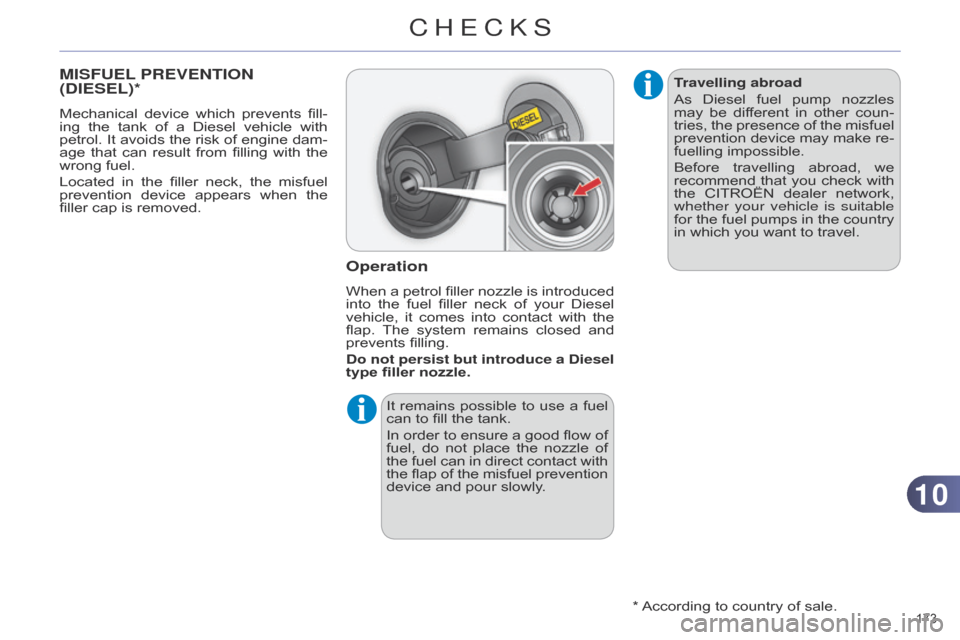
MISFUEL PREVENTION
(D IESEL )*
Mechanicalô device ô which ô prevents ô fill -
ing ô the ô tank ô of ô a ô Diesel ô vehicle ô with ô
petrol.
ô
It
ô
avoids
ô
the
ô
risk
ô
of
ô
engine
ô
dam
-
age
ô
that
ô
can
ô
result
ô
from
ô
fillin
g ô
with
ô
the
ô
wrong
ô fuel.
Located
ô
in
ô
the
ô
filler
ô
neck,
ô
the
ô
misfuel
ô
prevention
ô
device
ô
appears
ô
when
ô
the
ô
filler
ô cap ô is ô removed.
Operation
Whenô aô petrol ô filler ô nozzle ô is ô introduced ô into
ô the ô fuel ô filler ô neck ô of ô your ô Diesel ô
vehicle,
ô
it
ô
comes
ô
into
ô
contact
ô
with
ô
the
ô
flap.
ô
The
ô
system
ô
remains
ô
closed
ô
and
ô
prevents
ô filling.
Do not persist but introduce a Diesel
type filler nozzle.
It
ô
remains
ô
possible
ô
to
ô
use
ô
a
ô
fuel
ô
can
ô to ô fill ô the ô tank.
In
ô
order
ô
to
ô
ensure
ô
a
ô
good
ô
flow
ô
of
ô
fuel,
ô
do
ô
not
ô
place
ô
the
ô
nozzle
ô
of
ô
the
ô
fuel
ô
can
ô
in
ô
direct
ô
contact
ô
with
ô
the
ô
flap
ô
of
ô
the
ô
misfuel
ô
prevention
ô
device
ô and ô pour ô slowly.*
ô
According
ô to ô country ô of ô sale.
Travelling abroad
As
ô
Diesel
ô
fuel
ô
pump
ô
nozzles
ô
may
ô
be
ô
dif
ferent ô
in
ô
other
ô
coun
-
tries, ô
the
ô
presence
ô
of
ô
the
ô
misfuel
ô
prevention
ô
device
ô
may
ô
make
ô
re
-
fuelling ô impossible.
Before ô
travelling
ô
abroad,
ô
we
ô
recommend
ô
that
ô
you
ô
check
ô
with
ô
the
ô
CITROûN
ô
dealer
ô
network,
ô
whether your vehicle is suitable
for
ô
the
ô
fuel
ô
pumps
ô
in
ô
the
ô
country
ô
in
ô which ô you ô want ô to ô travel.
CHECKS
Page 176 of 340
1010
174ô
C4-2_en_Chap10_verification_ed01-2014
RUNNING OUT OF FUEL
(D IESEL )
1.6 HDi engine
Fô Fillô the ô fuel ô tank ô with ô at ô least ô five ô li -
tres ô of ô diesel.
F
ô
Open
ô the ô bonnet.
F
ô
If
ô
necessary
, ô
unclip
ô
the
ô
styling
ô
cover
ô
for
ô access ô to ô the ô priming ô pump.
F
ô
Squeeze
ô
and
ô
release
ô
the
ô
priming
ô
pump
ô
repeatedly
ô
until
ô
resistance
ô
is
ô
felt
ô
(there
ô
may
ô
be
ô
resistance
ô
at
ô
the
ô
first
ô press).
F
ô
Operate
ô
the
ô
starter
ô
until
ô
the
ô
engine
ô
starts
ô
(if
ô
the
ô
engine
ô
does
ô
not
ô
start
ô
at
ô
the
ô
first
ô
attempt,
ô
wait
ô
around
ô
15ô seconds
ô before ô trying ô again).
F
ô
If
ô
the
ô
engine
ô
does
ô
not
ô
start
ô
after
ô
a
ô
few
ô
attempts,
ô
operate
ô
the
ô
priming
ô
pump
ô again ô then ô start ô the ô engine.
F
ô
Refit
ô
the
ô
styling
ô
cover
ô
and
ô
clip
ô
it
ô
in
ô
place.
F
ô
Close
ô the ô bonnet.
2.0 HDi engine
Fô Fillô the ô fuel ô tank ô with ô at ô least ô five ô li -
tres ô of ô Diesel.
F
ô
Open
ô the ô bonnet.
F
If necessary
, unclip the style cover
for
ô access ô to ô the ô priming ô pump.
F
ô
Slacken
ô the ô bleed ô screw.
F
ô
Squeeze
ô
and
ô
release
ô
the
ô
priming
ô
pump
ô
repeatedly
ô
until
ô
fuel
ô
appears
ô
in
ô the ô transparent ô pipe.
F
ô
T
ighten ô the ô bleed ô screw.
F
ô
Operate
ô
the
ô
starter
ô
until
ô
the
ô
engine
ô
starts
ô
(if
ô
the
ô
engine
ô
fails
ô
to
ô
start
ô
at
ô
the
ô
first
ô
attempt,
ô
wait
ô
around
ô
15ô seconds
ô before ô trying ô again).
F
ô
If
ô
the
ô
engine
ô
fails
ô
to
ô
start
ô
after
ô
a
ô
few
ô
attempts,
ô
operate
ô
the
ô
priming
ô
pump
ô
again,
ô then ô the ô starter.
F
ô
Put
ô
the
ô
style
ô
cover
ô
back
ô
in
ô
position
ô
and
ô
clip
ô
it
ô
in
ô
place,
ô
ensuring
ô
that
ô
it
ô
has
ô clipped ô correctly.
F
ô
Close
ô the ô bonnet.
If
ô
the
ô
engine
ô
does
ô
not
ô
start
ô
first
ô
time,
ô
don't
ô
keep
ô
trying
ô
but
ô
start
ô
the
ô
procedure
ô
again
ô
from
ô
the
ô
be
-
ginning.
On
ô
vehicles
ô
fitted
ô
with
ô
HDi
ô
engines,
ô
the
ô fuel
ô system
ô must
ô be
ô primed
ô if
ô you
ô run
ô out
ô of
ô fuel;
ô refer
ô to
ô the
ô corresponding
ô engine
ô
compartment
ô
view.
If
ô
the
ô
tank
ô
on
ô
your
ô
vehicle
ô
is
ô
fitted
ô
with
ô
a
ô
misfuel
ô
prevention
ô
device,
ô
refer
ô
to
ô
the
ô
"Misfuel
ô
prevention
ô
(Diesel)"
ô
section.
1.6 BlueHDi engine
Fô Fill ô the ô fuel ô tank ô with ô at ô least ô five ô li -
tres ô of ô Diesel.
F
ô
Switch
ô
on
ô
the
ô
ignition
ô
(without
ô
start
-
ing
ô the ô engine).
F
ô
W
ait ô
around
ô
6
ô
seconds
ô
and
ô
switch
ô
of
f ô the ô ignition.
F
ô
Repeat
ô the ô operation ô 10 ô times.
F
o perate the starter to run the en-
gine.
CHECKS
Page 177 of 340
1010
175ô
C4-2_en_Chap10_verification_ed01-2014
BONNET
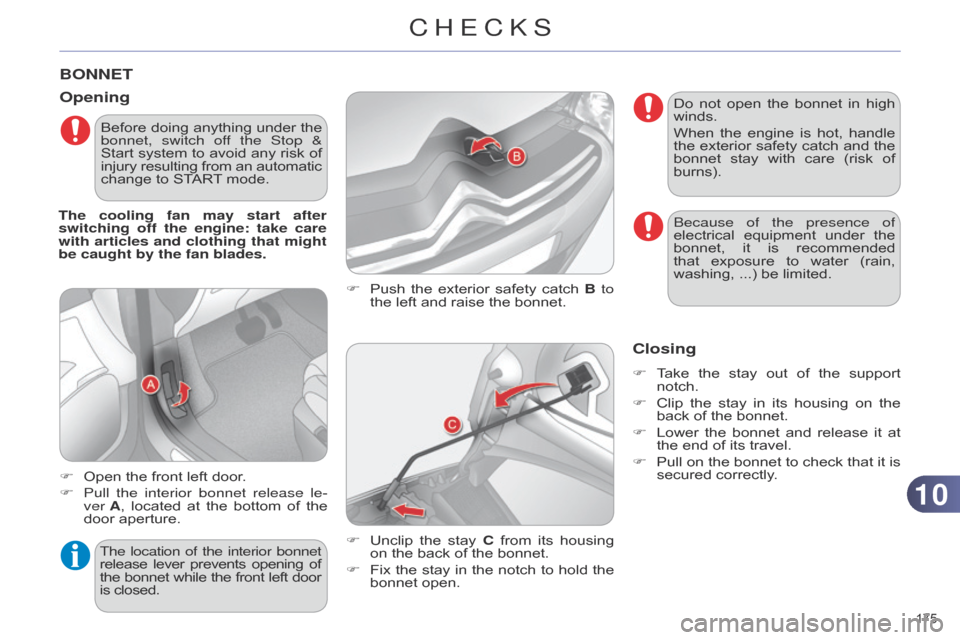
Fô Pushô the ô exterior ô safety ô catch ô B to
the ô left ô and ô raise ô the ô bonnet.
Opening
Fô Openô the ô front ô left ô door.
F
Pull
the interior bonnet release le-
ver
A, ô
located
ô
at
ô
the
ô
bottom
ô
of
ô
the
ô
door
ô aperture. F
ô
Unclip
ô
the
ô
stay
ô
C
ô
from
ô
its
ô
housing
ô
on
ô the ô back ô of ô the ô bonnet.
F
ô
Fix
ô
the
ô
stay
ô
in
ô
the
ô
notch
ô
to
ô
hold
ô
the
ô
bonnet
ô open.
The location of the interior bonnet
release
ô
lever
ô
prevents
ô
opening
ô
ofô the
ô
bonnet
ô
while
ô
the
ô
front
ô
left
ô
doorô is
ô closed.
Closing
Fô Take ô the ô stay ô out ô of ô the ô support ô notch.
F
ô
Clip
ô
the
ô
stay
ô
in
ô
its
ô
housing
ô
on
ô
the
ô
back
ô of ô the ô bonnet.
F
ô
Lower
ô
the
ô
bonnet
ô
and
ô
release
ô
it
ô
at
ô
the
ô end ô of ô its ô travel.
F
ô
Pull
ô
on
ô
the
ô
bonnet
ô
to
ô
check
ô
that
ô
it
ô
is
ô
secured
ô correctly.
Do
ô
not
ô
open
ô
the
ô
bonnet
ô
in
ô
high
ô
winds.
When
ô
the
ô
engine
ô
is
ô
hot,
ô
handle
ô
the
ô
exterior
ô
safety
ô
catch
ô
and
ô
the
ô
bonnet
ô
stay
ô
with
ô
care
ô
(risk
ô
of
ô
burns).
Before
ô
doing
ô
anything
ô
under
ô
the
ô
bonnet, switch of
f the Stop &
Start
ô
system
ô
to
ô
avoid
ô
any
ô
risk
ô
of
ô
injury
ô
resulting
ô
from
ô
an
ô
automaticô change
ô
to
ô
START
ô
mode.
The cooling fan may start after
switching off the engine: take care
with articles and clothing that might
be caught by the fan blades.
b
ecause of the presence of
electrical ô
equipment
ô
under
ô
the
ô
bonnet,
ô
it
ô
is
ô
recommended
ô
that
ô
exposure
ô
to
ô
water
ô
(rain,
ô
ô
washing,
ô ...) ô be ô limited.
CHECKS
Page 178 of 340
1010
176ô
C4-2_en_Chap10_verification_ed01-2014
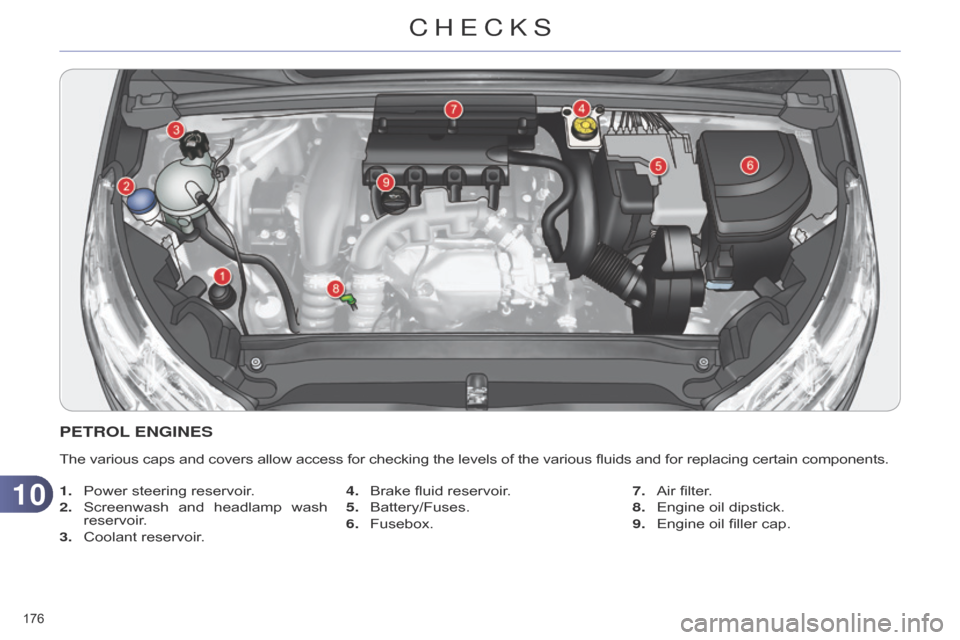
PETROL ENGINES
Theô variousô capsô andô coversô allowô accessô forô checkingô theô levelsô ofô theô variousô fluidsô andô forô replacingô certainô components.
1. ô
Power
ô steering ô reservoir.
2.
ô
Screenwash
ô
and
ô
headlamp
ô
wash
ô
reservoir
.
3.
ô
Coolant
ô reservoir. 4.
ô
Brake
ô fluid ô reservoir.
5.
ô
Battery/Fuses.
6.
ô
Fusebox.7.
ô
Air
ô filter.
8.
ô
Engine
ô oil ô dipstick.
9.
ô
Engine
ô oil ô filler ô cap.
CHECKS
Page 179 of 340
1010
177ô
C4-2_en_Chap10_verification_ed01-2014
*ô Accordingô to ô engine.
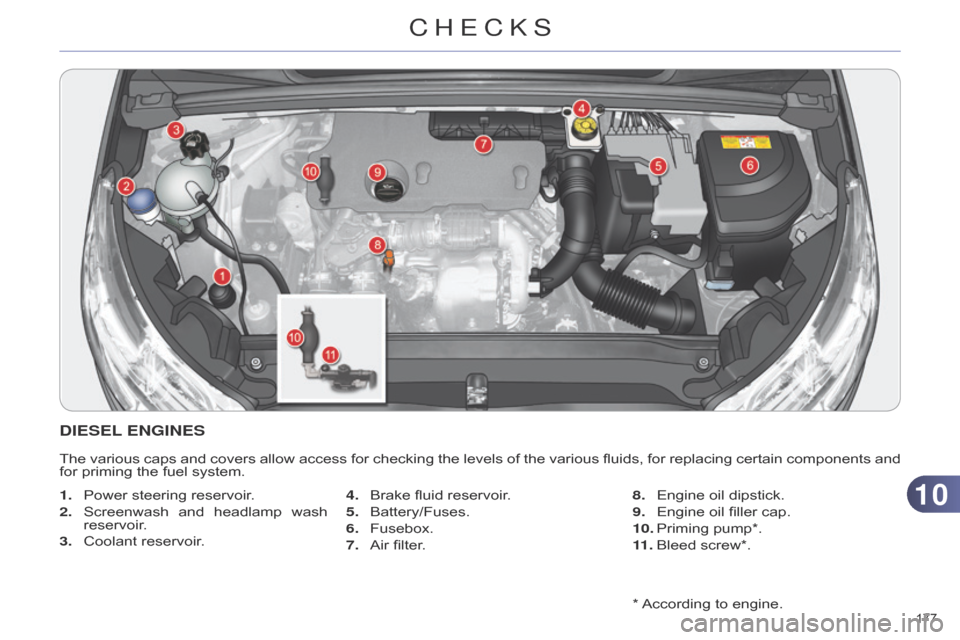
DIESEL ENGINES
Theô various ô caps ô and ô covers ô allow ô access ô for ô checking ô the ô levels ô of ô the ô various ô fluids, ô for ô replacing ô certain ô components ô and ô for
ô priming ô the ô fuel ô system.
1.
ô
Power
ô steering ô reservoir.
2.
ô
Screenwash
ô
and
ô
headlamp
ô
wash
ô
reservoir
.
3.
ô
Coolant
ô reservoir. 4.
ô
Brake
ô fluid ô reservoir.
5.
ô
Battery/Fuses.
6.
ô
Fusebox.
7.
ô
Air
ô filter.8.
ô
Engine
ô oil ô dipstick.
9.
ô
Engine
ô oil ô filler ô cap.
10.
ô
Priming
ô pump*.
11 .
ô Bleed
ô screw*.
CHECKS
Page 180 of 340
1010
178ô
C4-2_en_Chap10_verification_ed01-2014
CHECKING LEVELS
Takeô careô when ô working ô under ô the bonnet, as certain areas of
the
ô
engine
ô
may
ô
be
ô
extremely
ô
hot
ô
(risk
ô
of
ô
burns)
ô
and
ô
the
ô
cooling
ô
fan
ô
could
ô
start
ô
at
ô
any
ô
time
ô
(even
ô
with
ô the ô ignition ô off).
The
ô
check
ô
is
ô
carried
ô
out
ô
either
ô
when
ô
the
ô
ignition
ô
is
ô
switched
ô
on
ô
using
ô
the
ô
oil
ô
level
ô
indicator
ô
in
ô
the
ô
instrument
ô
panel
ô
for
ô
ve
-
hicles with an electric oil level
gauge,
ô or ô using ô the ô dipstick.
Engine oil level
Checking using the dipstick
Referô
to
ô
the
ô
"Petrol
ô
engine"
ô
or
ô
"Diesel
ô
engine"
ô
section
ô
for
ô
the
ô
location
ô
of
ô
the
ô
dipstick
ô
in
ô
the
ô
engine
ô
compartment
ô
of
ô
your
ô vehicle.
F
ô
T
ake ô
the
ô
dipstick
ô
by
ô
its
ô
coloured
ô
grip
ô
and
ô remove ô it ô completely.
F
ô
Wipe
ô
the
ô
end
ô
of
ô
the
ô
dipstick
ô
using
ô
a
ô
clean
ô non-fluffy ô cloth.
F
ô
Refit
ô
the
ô
dipstick
ô
and
ô
push
ô
fully
ô
down,
ô
then
ô
pull
ô
it
ô
out
ô
again
ô
to
ô
make
ô
the
ô
visual
ô
check:
ô
the
ô
correct
ô
level
ô
is
ô
between
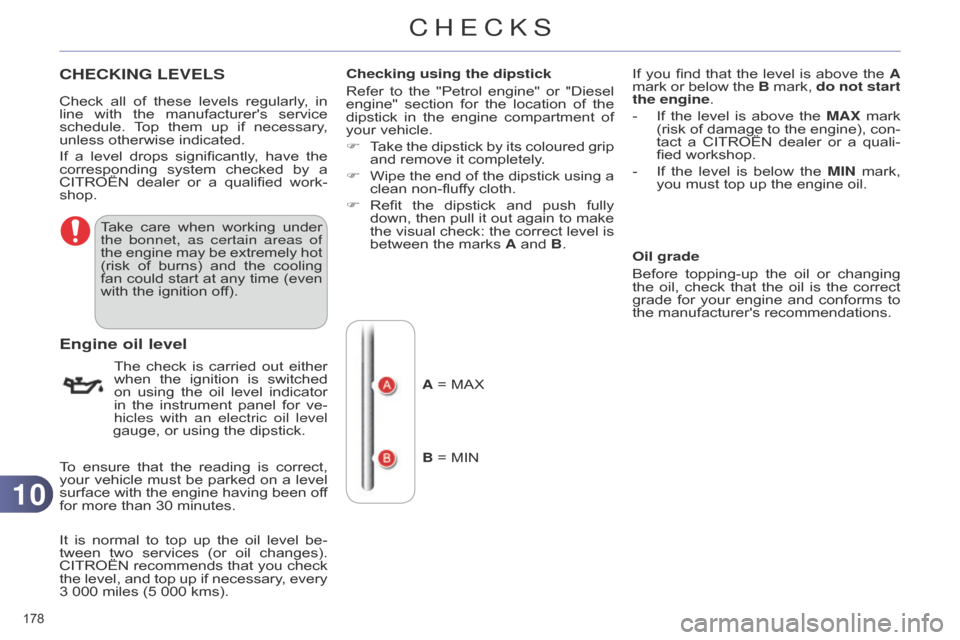
ô the ô marks ô A ô and ô B.
Check
ô
all
ô
of
ô
these
ô
levels
ô
regularly
,
ô
in
ô
line
ô
with
ô
the
ô
manufacturer's
ô
service
ô
schedule.
ô
T
op
ô
them
ô
up
ô
if
ô
necessary
,
ô
unless
ô
otherwise
ô
indicated.
If
ô
a
ô
level
ô
drops
ô
significantly
,
ô
have
ô
the
ô
corresponding
ô
system
ô
checked
ô
by
ô
a
ô
CITROûN
ô
dealer
ô
or
ô
a
ô
qualified
ô
work
-
shop.
To
ô
ensure
ô
that
ô
the
ô
reading
ô
is
ô
correct,
ô
your
ô
vehicle
ô
must
ô
be
ô
parked
ô
on
ô
a
ô
level
ô
surface
ô
with
ô
the
ô
engine
ô
having
ô
been
ô
of
f
ô
for
ô
more
ô
than
ô
30
ô
minutes.
It
ô
is
ô
normal
ô
to
ô
top
ô
up
ô
the
ô
oil
ô
level
ô
be
-
tween
ô
two
ô
services
ô
(or
ô
oil
ô
changes).
ô
CITROûN
ô
recommends
ô
that
ô
you
ô
check
ô
the
ô
level,
ô
and
ô
top
ô
up
ô
if
ô
necessary
,
ô
every
ô
3
ô
000
ô
miles
ô
(5
ô
000
ô
kms). A
ô = ô MAX
B
ô = ô MIN If
ô you ô find ô that ô the ô level ô is ô above ô the ô A
mark ô or ô below ô the ô B ô mark, ô do not start
the engine.
-
ô
If
ô
the
ô
level
ô
is
ô
above
ô
the
ô
MAX
ô
mark
ô
(risk
ô
of
ô
damage
ô
to
ô
the
ô
engine),
ô
con
-
tact
ô
a
ô
CITROûN
ô
dealer
ô
or
ô
a
ô
quali
-
fied
ô workshop.
-
ô
If
ô
the
ô
level
ô
is
ô
below
ô
the
ô
MIN
ô
mark,
ô
you
ô must ô top ô up ô the ô engine ô oil.
Oil grade
Before
ô
topping-up
ô
the
ô
oil
ô
or
ô
changing
ô
the
ô
oil,
ô
check
ô
that
ô
the
ô
oil
ô
is
ô
the
ô
correct
ô
grade
ô
for
ô
your
ô
engine
ô
and
ô
conforms
ô
to
ô
the
ô manufacturer's ô recommendations.
CHECKS