display Citroen C4 DAG 2014.5 2.G Manual PDF
[x] Cancel search | Manufacturer: CITROEN, Model Year: 2014.5, Model line: C4 DAG, Model: Citroen C4 DAG 2014.5 2.GPages: 340, PDF Size: 12.89 MB
Page 244 of 340
03
242
C4-2_en_Chap13b_RT6_ed01-2014
A press on the knob gives access to
short-cut menus according to the
display
in the screen.
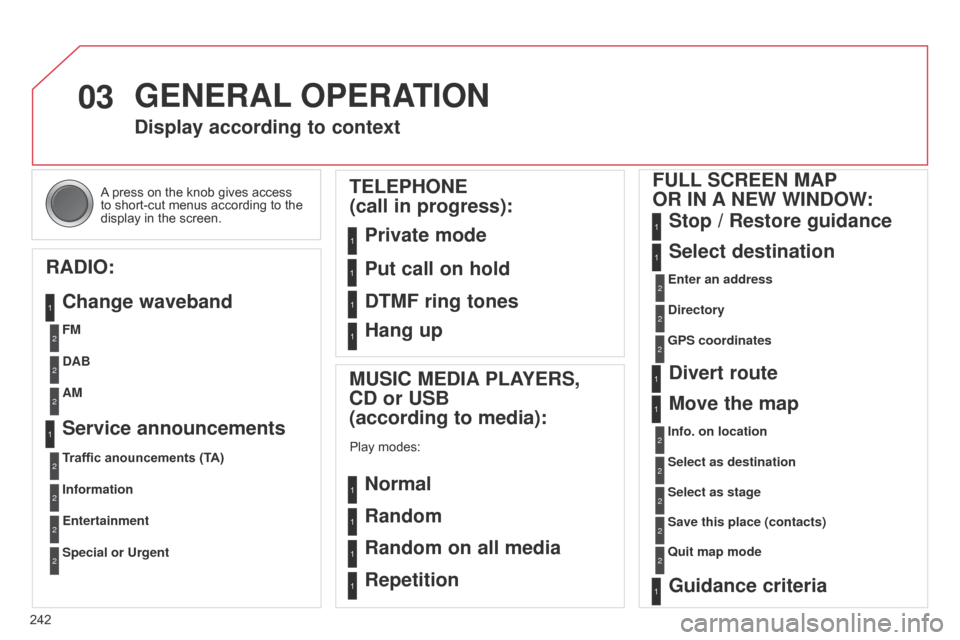
GENERAL OPERATION
Display according to context
RADIO: Change waveband
MUSIC MEDIA PLAYERS,
CD or USB
(according to media):
Play modes:
Normal
Random
Random on all media
Repetition
TELEPHONE
(call in progress):
Private mode FULL SCREEN MAP
OR IN A NEW WINDOW:
Stop / Restore guidance
Select destination
Enter an address
Directory
GPS coordinates
Divert route
Move the map
Info. on location
Select as destination Select as stage
Save this place (contacts)
q
uit map mode
Guidance criteria
Put call on hold
DTMF ring tones
Hang up
FM
Traffic anouncements (TA) DAB
Information AM
Entertainment
Special or Urgent
Service announcements
1
1
1
1
1
1
1
2
2
2
2
2
1
2
2
2
1
1
1
1
1
12
2
2
2
2
2
2
1
Page 246 of 340
04
244
C4-2_en_Chap13b_RT6_ed01-2014
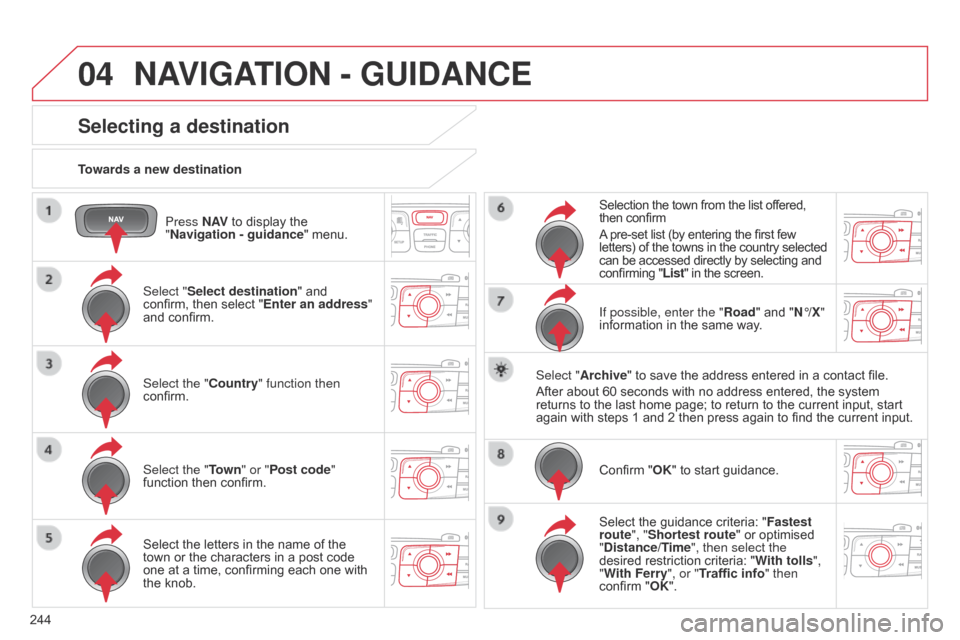
Press N AV to display the "
Navigation - guidance "
menu.
Towards a new destination
NAVIGATION - GUIDANCE
Selecting a destination
Select "Select destination" and confirm,
then select "Enter an address"
and
confirm.
Select the "Country" function then
confirm.
Select the "Town " or "Post code"
function
then confirm.
Select
the letters in the name of the
town
or the characters in a post code
one
at a time, confirming each one with
the
knob. Selection
the town from the list offered,
then
confirm
A
pre-set list (by entering the first few
letters)
of the towns in the country selected
can
be accessed directly by selecting and
confirming
"List" in the screen.
If possible, enter the "Road" and "N°/X"
information
in the same way.
Select "Archive"
to save the address entered in a contact file.
After
about 60 seconds with no address entered, the system
returns
to the last home page; to return to the current input, start
again
with steps 1 and 2 then press again to find the current input.
Confirm
"OK" to start guidance.
Select
the guidance criteria: "Fastest
route", "Shortest route"
or optimised
"
Distance/Time", then select the
desired
restriction criteria: "With tolls ",
"With Ferry", or "Traffic info" then
confirm
"OK".
Page 247 of 340
04
245
C4-2_en_Chap13b_RT6_ed01-2014
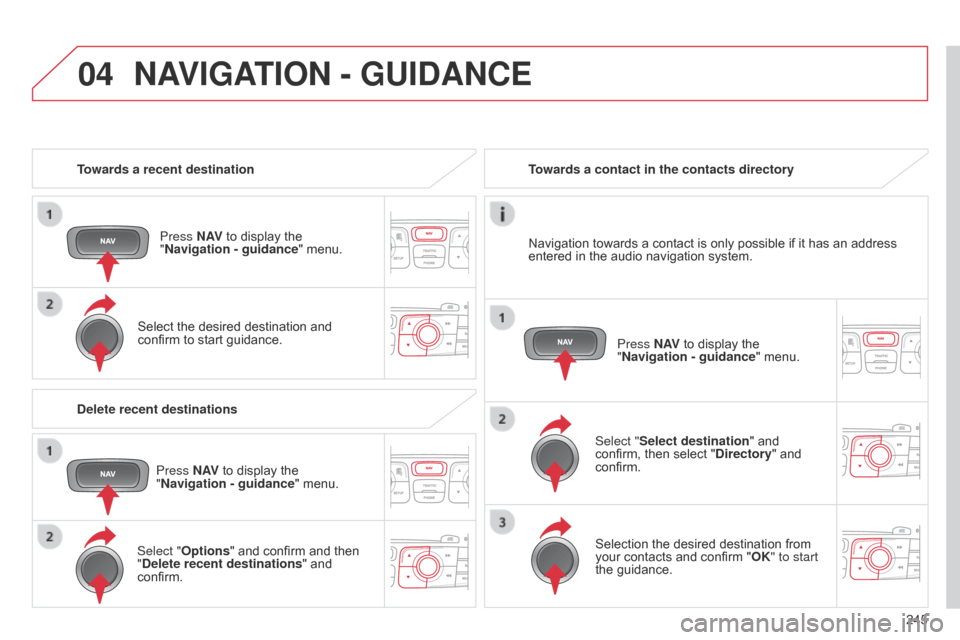
Towards a recent destinationPress N AV
to display the
"
Navigation - guidance "
menu.
Select
the desired destination and
confirm
to start guidance. Towards a contact in the contacts directory
Select "Select destination" and
confirm,
then select "Directory"
and
confirm.Selection
the desired destination from
your
contacts and confirm "OK" to start
the
guidance.Press N AV
to display the
"
Navigation - guidance"
menu.
Navigation
towards a contact is only possible if it has an address
entered
in the audio navigation system.
Delete recent destinations Press N AV
to display the
"
Navigation - guidance "
menu.
Select "Options "
and confirm and then
"
Delete recent destinations" and
confirm.
NAVIGATION - GUIDANCE
Page 248 of 340
04
246
C4-2_en_Chap13b_RT6_ed01-2014
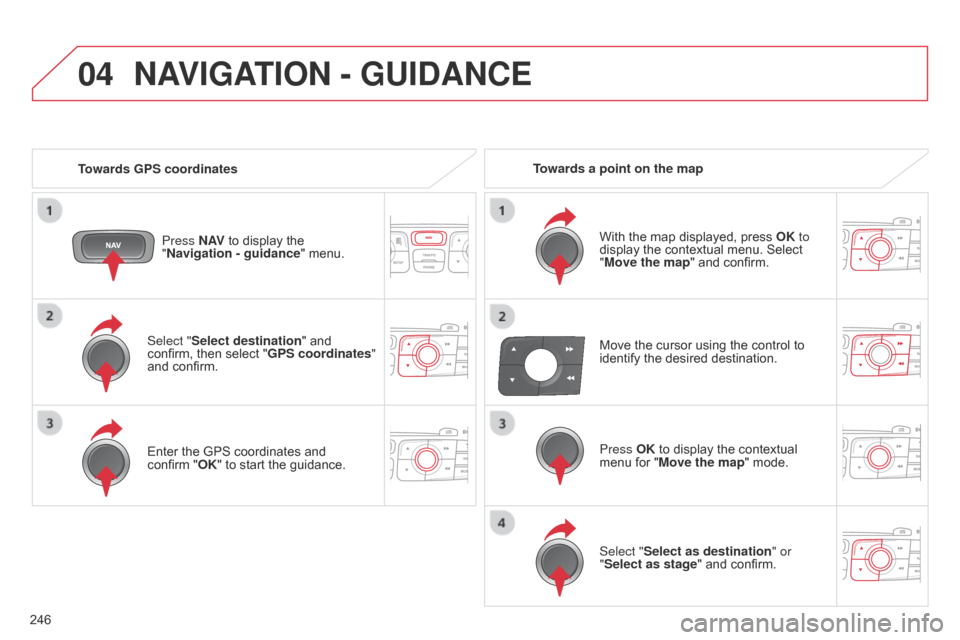
Select "Select destination" and confirm, then select "GPS coordinates"
and
confirm.
Enter
the GPS coordinates and
confirm
"OK" to start the guidance.
Press N AV
to display the
"
Navigation - guidance
" menu.
NAVIGATION - GUIDANCE
Towards GPS coordinates
Towards a point on the map
With the map displayed, press
OK
to
display
the contextual menu. Select
"
Move the map" and confirm.
Press OK
to display the contextual
menu
for "Move the map" mode.
Select "Select as destination" or
"Select as stage"
and confirm.
Move
the cursor using the control to
identify
the desired destination.
Page 249 of 340
04
247
C4-2_en_Chap13b_RT6_ed01-2014
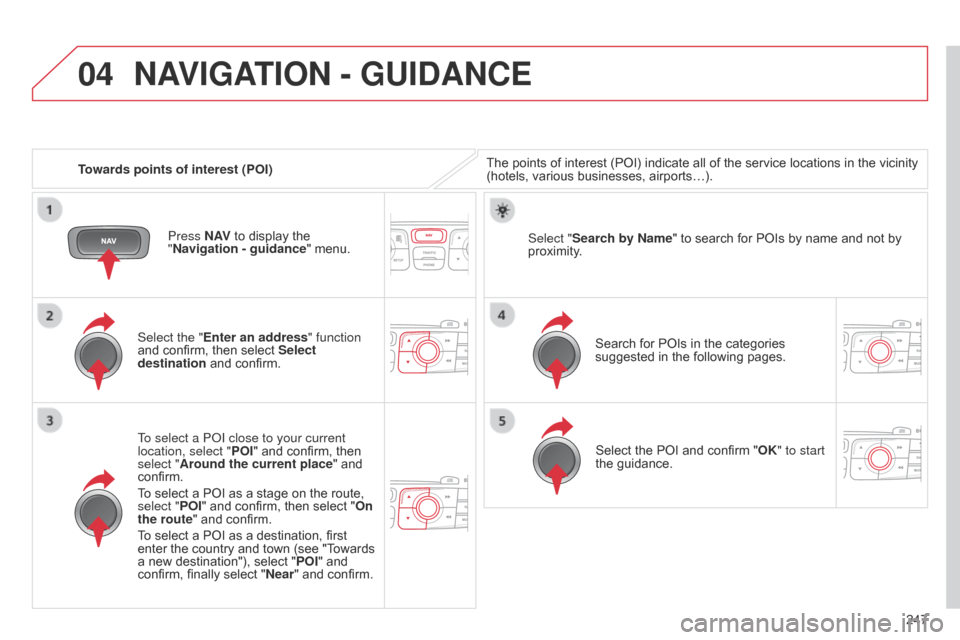
Towards points of interest (POI)
NAVIGATION - GUIDANCE
The points of interest (POI) indicate all of the service locations in the vicinity (hotels, various businesses, airports…).
Select the "Enter an address" function
and
confirm,
then
select
Select
destination
and
confirm.
To select a P
o
I close to your current
location, select " POI"
and
confirm,
then
select "
Around the current place"
and
confirm.
T
o
select
a
POI
as
a
stage
on
the
route,
select "
POI"
and
confirm,
then
select
"On
the route"
and
confirm.
To
select
a
POI
as
a
destination,
first
enter
the
country
and
town
(see
"T
owards
a
new
destination"),
select
" POI"
and
confirm,
finally
select
" Near "
and
confirm. Search
for POIs in the categories
suggested
in the following pages.
Select "Search by Name
"
to search for POIs by name and not by
proximity
.
Select
the POI and confirm "OK" to start
the
guidance.
Press N AV
to
display
the
"
Navigation - guidance "
menu.
Page 251 of 340
04
249
C4-2_en_Chap13b_RT6_ed01-2014
NAVIGATION - GUIDANCE
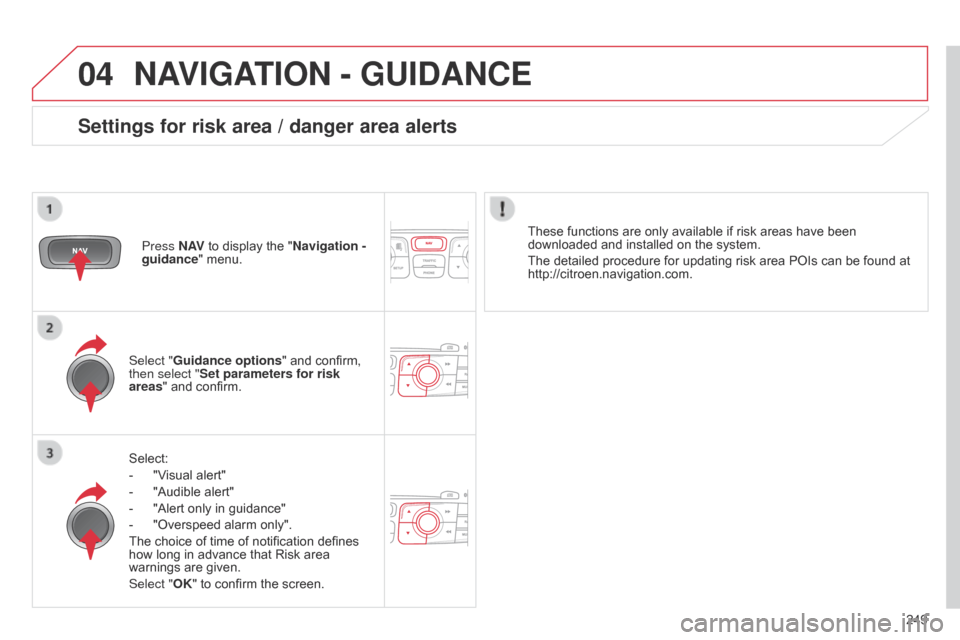
Select:
-
"V
isual alert"
-
"Audible
alert"
-
"Alert
only in guidance"
-
"Overspeed
alarm only".
The
choice of time of notification defines
how
long in advance that Risk area
warnings
are given.
Select "OK"
to confirm the screen.
Select "Guidance options
" and confirm,
then select "
Set parameters for risk
areas " and confirm.
Press N AV
to display the "Navigation -
guidance" menu.
These functions are only available if risk areas have been
downloaded
and installed on the system.
The detailed procedure for updating risk area POIs can be found at
http://citroen.navigation.com.
Settings for risk area / danger area alerts
Page 252 of 340
04
250
C4-2_en_Chap13b_RT6_ed01-2014
NAVIGATION - GUIDANCE
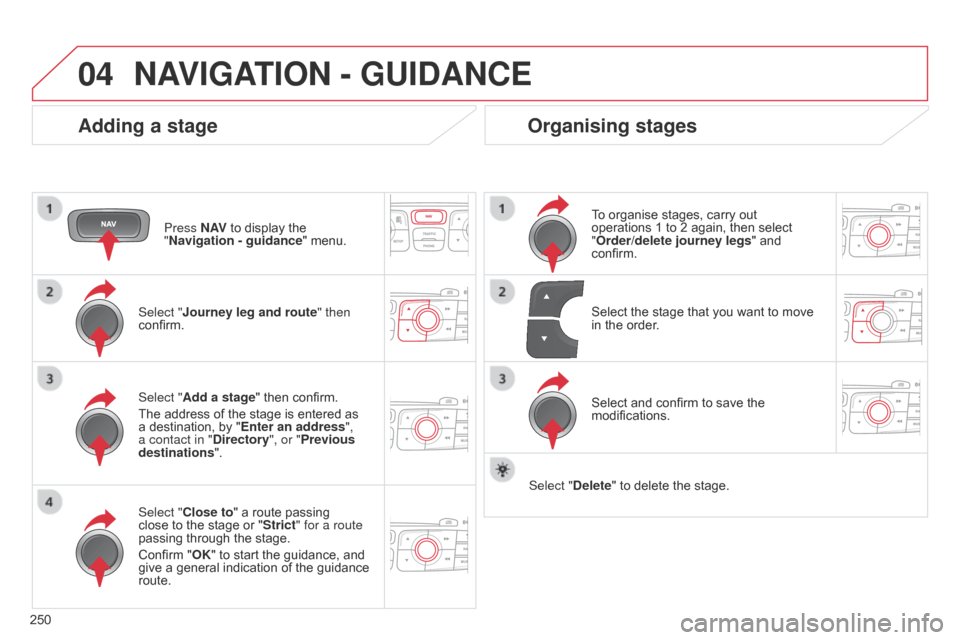
Adding a stage
Press N AV to display the "
Navigation - guidance "
menu.
Select "
j ourney leg and route " then
confirm.
Select "Close to"
a route passing
close
to the stage or "Strict" for a route
passing
through the stage.
Confirm
"OK" to start the guidance, and
give
a general indication of the guidance
route. Select "
Add a stage" then confirm.
The
address of the stage is entered as
a
destination, by "Enter an address",
a contact in "Directory ", or "Previous
destinations".
Organising stages
To organise stages, carry out operations 1 to 2 again, then select
"
Order/delete journey legs" and
confirm.
Select
and confirm to save the
modifications. Select
the stage that you want to move
in
the order.
Select "Delete"
to delete the stage.
Page 253 of 340
04
251
C4-2_en_Chap13b_RT6_ed01-2014
NAVIGATION - GUIDANCE
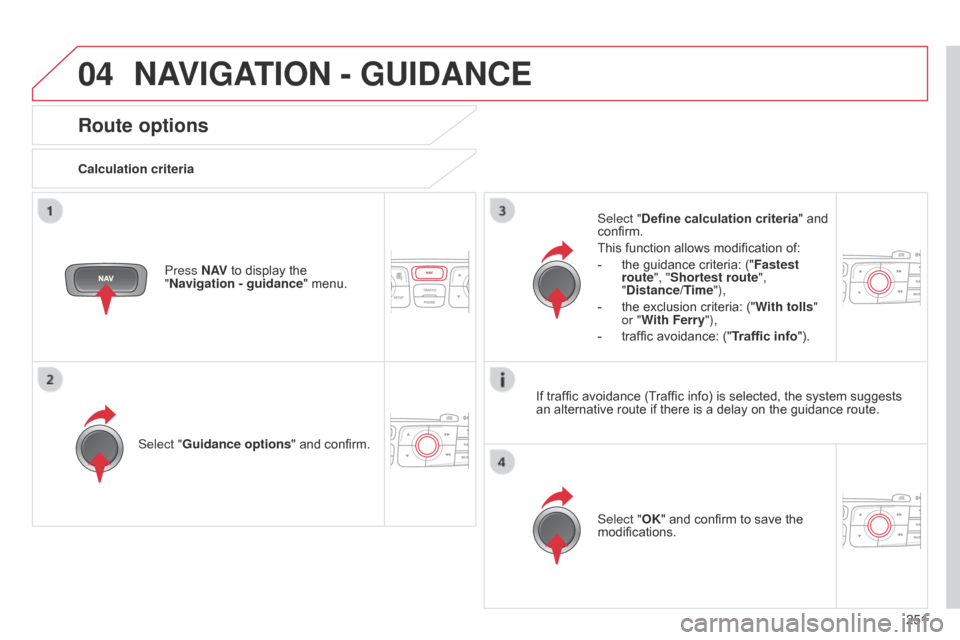
Route options
Calculation criteriaSelect "Guidance options "
and confirm. Select "OK"
and confirm to save the
modifications.
Select "
Define calculation criteria" and
confirm.
This
function allows modification of:
-
the
guidance criteria: ("Fastest
route", "Shortest route",
"Distance/Time"),
-
the
exclusion criteria: ("With tolls "
or "With Ferry"),
-
traffic
avoidance: ("Traffic info").
Press N AV
to display the
"
Navigation - guidance "
menu.If
traffic avoidance (Traffic info) is selected, the system suggests
an
alternative route if there is a delay on the guidance route.
Page 254 of 340
04
252
C4-2_en_Chap13b_RT6_ed01-2014
NAVIGATION - GUIDANCE
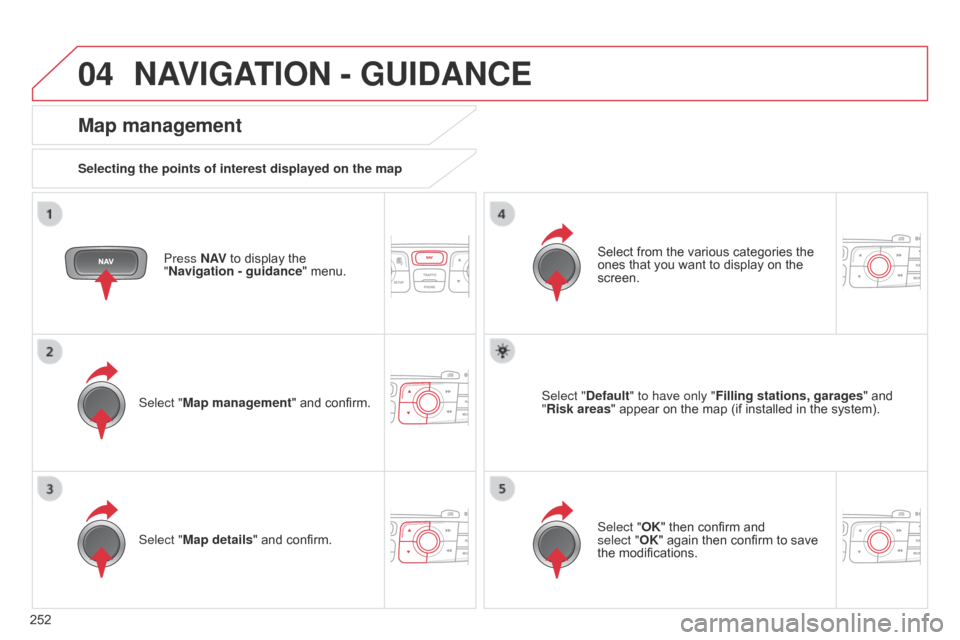
Press N AV to display the "
Navigation - guidance "
menu.
Map management
Selecting the points of interest displayed on the map
Select "Map management" and confirm. Select
from the various categories the
ones
that you want to display on the
screen.
Select "
Map details" and confirm. Select "Default" to have only "Filling stations, garages
"
and
"
Risk areas"
appear on the map (if installed in the system).
Select "OK"
then confirm and
select
"OK" again then confirm to save
the
modifications.
Page 255 of 340
04
253
C4-2_en_Chap13b_RT6_ed01-2014
NAVIGATION - GUIDANCE
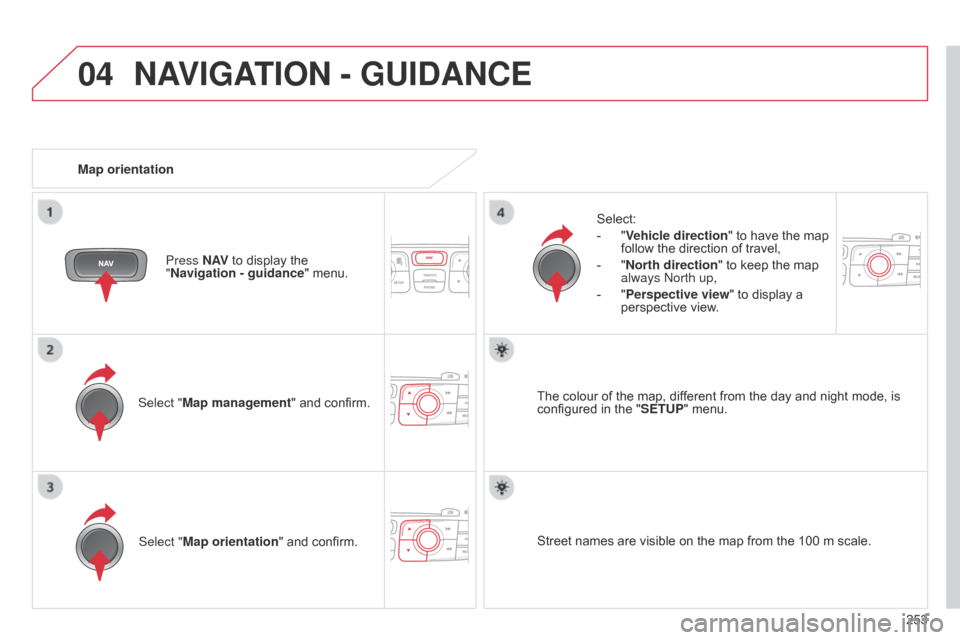
Select "Map management" and confirm.Select:
-
"
Vehicle direction
" to have the map
follow
the direction of travel,
-
"
North direction
" to keep the map
always
n orth up,
-
"
Perspective view" to display a
perspective
view.
Select "Map orientation "
and confirm. The
colour of the map, different from the day and night mode, is configured
in the "SETUP"
menu.
Map orientation
Press N AV
to display the
"
Navigation - guidance
" menu.
Street names are visible on the map from the 100 m scale.