Citroen C4 PICASSO DAG 2009 1.G Repair Manual
Manufacturer: CITROEN, Model Year: 2009, Model line: C4 PICASSO DAG, Model: Citroen C4 PICASSO DAG 2009 1.GPages: 337, PDF Size: 12.85 MB
Page 61 of 337
57
III
C O M F O R T
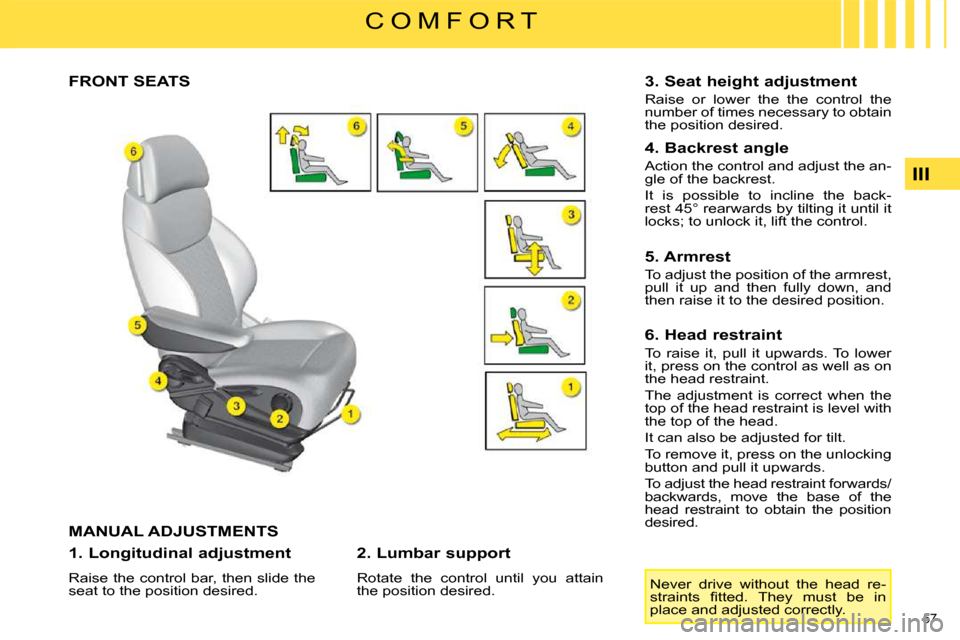
FRONT SEATS
MANUAL ADJUSTMENTS
1. Longitudinal adjustment
Raise the control bar, then slide the
seat to the position desired. 2. Lumbar support
Rotate the control until you attain
the position desired. 3. Seat height adjustment
Raise or lower the the control the
number of times necessary to obtain
the position desired.
4. Backrest angle
Action the control and adjust the an-
gle of the backrest.
It is possible to incline the back-
rest 45° rearwards by tilting it until it
locks; to unlock it, lift the control.
5. Armrest
To adjust the position of the armrest,
pull it up and then fully down, and
then raise it to the desired position.
6. Head restraint
To raise it, pull it upwards. To lower
it, press on the control as well as on
the head restraint.
The adjustment is correct when the
top of the head restraint is level with
the top of the head.
It can also be adjusted for tilt.
To remove it, press on the unlocking
button and pull it upwards.
To adjust the head restraint forwards/
backwards, move the base of the
head restraint to obtain the position
desired.
Never drive without the head re-
�s�t�r�a�i�n�t�s� �fi� �t�t�e�d�.� �T�h�e�y� �m�u�s�t� �b�e� �i�n�
place and adjusted correctly.
Page 62 of 337
58
III
C O M F O R T
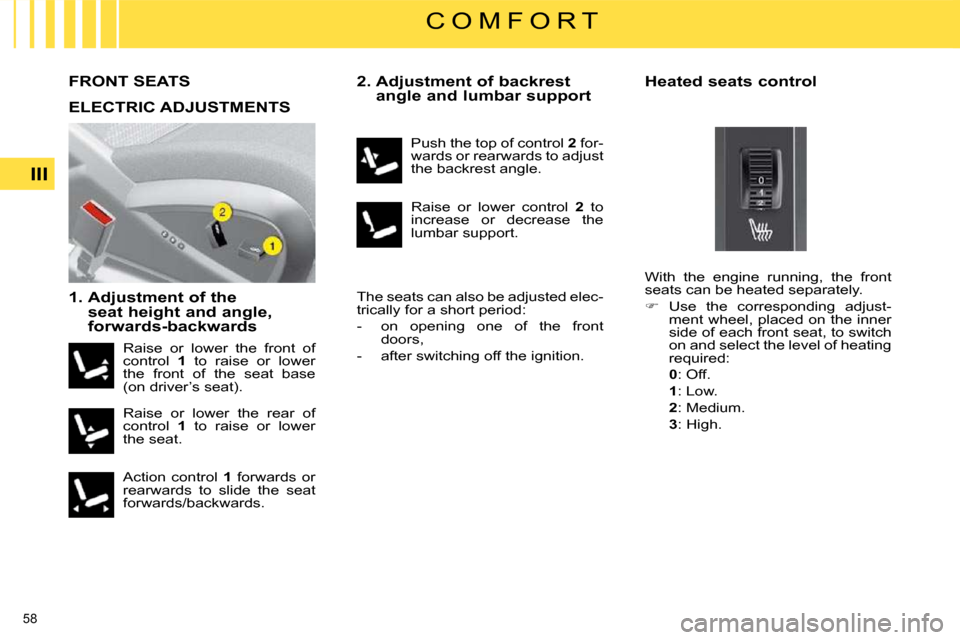
FRONT SEATS
1. Adjustment of the
seat height and angle,
forwards-backwards 2.
Adjustment of backrest
angle and lumbar support
The seats can also be adjusted elec-
trically for a short period:
- on opening one of the front doors,
- after switching off the ignition. Heated seats control
ELECTRIC ADJUSTMENTS
Raise or lower the front of
control
1 to raise or lower
the front of the seat base
(on driver’s seat).
Raise or lower the rear of
control 1 to raise or lower
the seat.
Action control 1 forwards or
rearwards to slide the seat
forwards/backwards. Push the top of control
2 for-
wards or rearwards to adjust
the backrest angle.
Raise or lower control 2 to
increase or decrease the
lumbar support.
With the engine running, the front
seats can be heated separately.
� Use the corresponding adjust-
ment wheel, placed on the inner
side of each front seat, to switch
on and select the level of heating
required:
0 : Off.
1 : Low.
2 : Medium.
3 : High.
Page 63 of 337
59
III
C O M F O R T
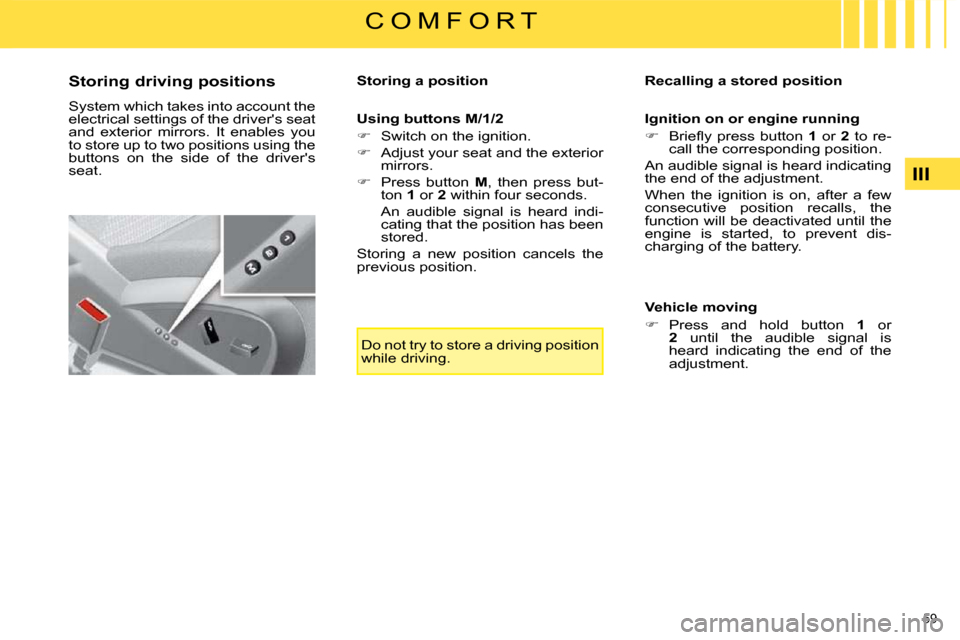
Storing driving positions
System which takes into account the
electrical settings of the driver's seat
and exterior mirrors. It enables you
to store up to two positions using the
buttons on the side of the driver's
seat. Storing a position
Using buttons M/1/2
� Switch on the ignition.
� Adjust your seat and the exterior
mirrors.
� Press button M , then press but-
ton 1 or 2 within four seconds.
An audible signal is heard indi- cating that the position has been
stored.
Storing a new position cancels the
previous position. Recalling a stored position
Ignition on or engine running
� � � �B�r�i�e�fl� �y� �p�r�e�s�s� �b�u�t�t�o�n� � 1 or 2 to re-
call the corresponding position.
An audible signal is heard indicating
the end of the adjustment.
When the ignition is on, after a few
consecutive position recalls, the
function will be deactivated until the
engine is started, to prevent dis-
charging of the battery.
Vehicle moving
� Press and hold button 1 or
2 until the audible signal is
heard indicating the end of the
adjustment.
Do not try to store a driving position
while driving.
Page 64 of 337
60
III
C O M F O R T
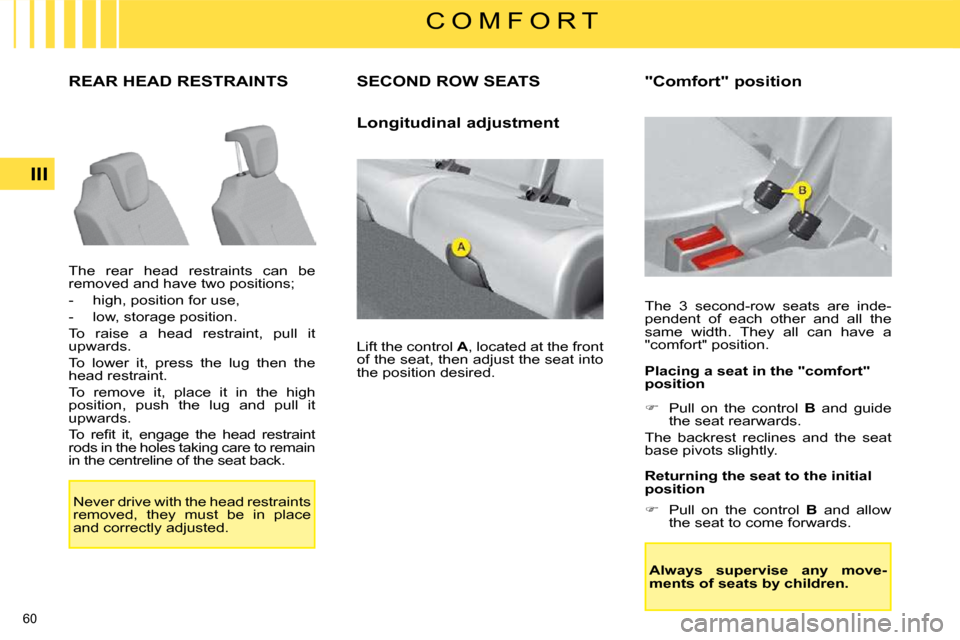
REAR HEAD RESTRAINTS
The rear head restraints can be
removed and have two positions;
- high, position for use,
- low, storage position.
To raise a head restraint, pull it
upwards.
To lower it, press the lug then the
head restraint.
To remove it, place it in the high
position, push the lug and pull it
upwards.
� �T�o� �r�e�fi� �t� �i�t�,� �e�n�g�a�g�e� �t�h�e� �h�e�a�d� �r�e�s�t�r�a�i�n�t�
rods in the holes taking care to remain
in the centreline of the seat back.
SECOND ROW SEATS
Longitudinal adjustment
Lift the control A , located at the front
of the seat, then adjust the seat into
the position desired. "Comfort" position
The 3 second-row seats are inde-
pendent of each other and all the
same width. They all can have a
"comfort" position.
Placing a seat in the "comfort"
position
� Pull on the control B and guide
the seat rearwards.
The backrest reclines and the seat
base pivots slightly.
Returning the seat to the initial
position
� Pull on the control B and allow
the seat to come forwards.
Always supervise any move-
ments of seats by children.
Never drive with the head restraints
removed, they must be in place
and correctly adjusted.
Page 65 of 337
60
III
C O M F O R T
REAR HEAD RESTRAINTS
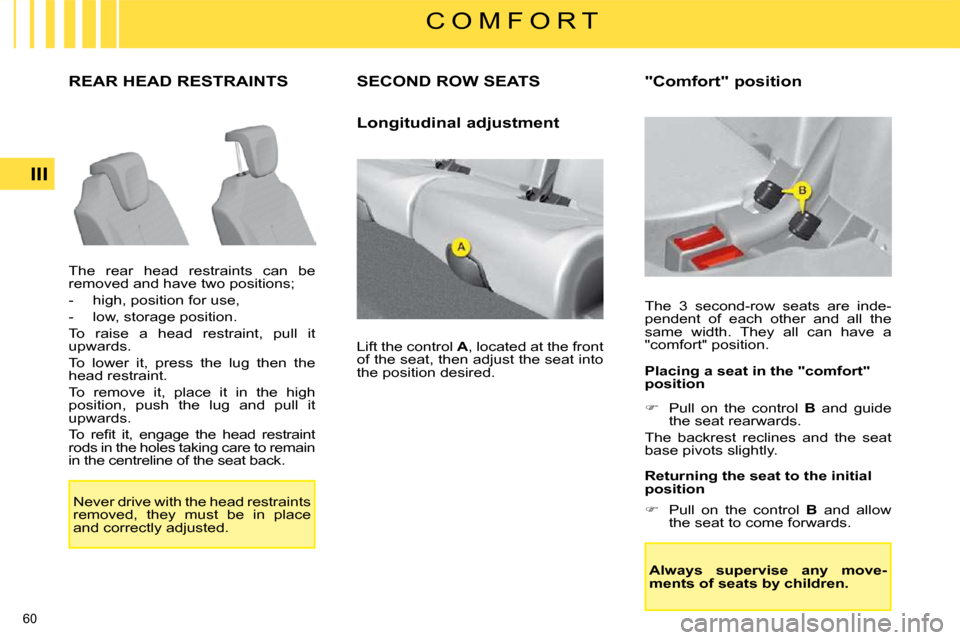
The rear head restraints can be
removed and have two positions;
- high, position for use,
- low, storage position.
To raise a head restraint, pull it
upwards.
To lower it, press the lug then the
head restraint.
To remove it, place it in the high
position, push the lug and pull it
upwards.
� �T�o� �r�e�fi� �t� �i�t�,� �e�n�g�a�g�e� �t�h�e� �h�e�a�d� �r�e�s�t�r�a�i�n�t�
rods in the holes taking care to remain
in the centreline of the seat back.
SECOND ROW SEATS
Longitudinal adjustment
Lift the control A , located at the front
of the seat, then adjust the seat into
the position desired. "Comfort" position
The 3 second-row seats are inde-
pendent of each other and all the
same width. They all can have a
"comfort" position.
Placing a seat in the "comfort"
position
� Pull on the control B and guide
the seat rearwards.
The backrest reclines and the seat
base pivots slightly.
Returning the seat to the initial
position
� Pull on the control B and allow
the seat to come forwards.
Always supervise any move-
ments of seats by children.
Never drive with the head restraints
removed, they must be in place
and correctly adjusted.
Page 66 of 337
61
III
C O M F O R T
SECOND ROW SEATS (C4 PICASSO)
Folding the seat
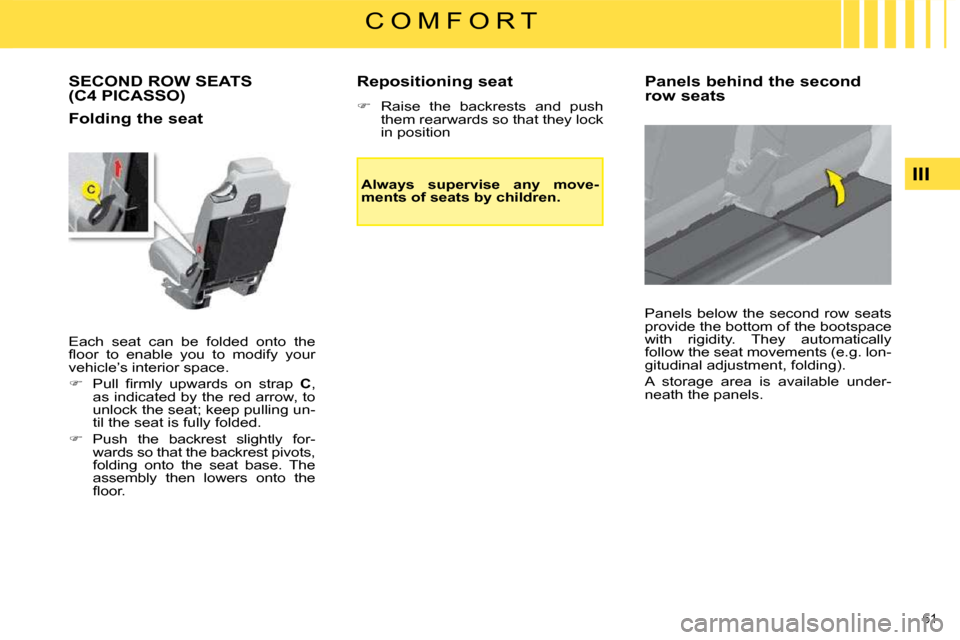
Each seat can be folded onto the
�fl� �o�o�r� �t�o� �e�n�a�b�l�e� �y�o�u� �t�o� �m�o�d�i�f�y� �y�o�u�r�
vehicle’s interior space.
� � � �P�u�l�l� �fi� �r�m�l�y� �u�p�w�a�r�d�s� �o�n� �s�t�r�a�p� � C ,
as indicated by the red arrow, to
unlock the seat; keep pulling un-
til the seat is fully folded.
� Push the backrest slightly for-
wards so that the backrest pivots,
folding onto the seat base. The
assembly then lowers onto the
�fl� �o�o�r�.� � Repositioning seat
� Raise the backrests and push
them rearwards so that they lock
in position
Always supervise any move-
ments of seats by children. Panels behind the second
row seats
Panels below the second row seats
provide the bottom of the bootspace
with rigidity. They automatically
follow the seat movements (e.g. lon-
gitudinal adjustment, folding).
A storage area is available under-
neath the panels.
Page 67 of 337
62
III
C O M F O R T
SECOND ROW SEATS (GRAND C4 PICASSO)
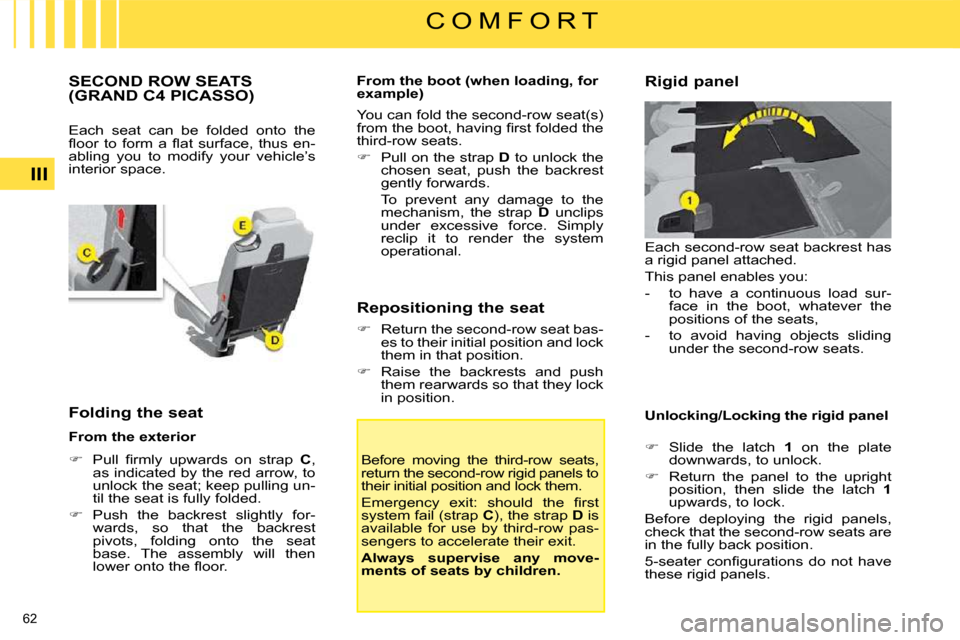
Each seat can be folded onto the
�fl� �o�o�r� �t�o� �f�o�r�m� �a� �fl� �a�t� �s�u�r�f�a�c�e�,� �t�h�u�s� �e�n�-
abling you to modify your vehicle’s
interior space.
Folding the seat
From the exterior
� � � �P�u�l�l� �fi� �r�m�l�y� �u�p�w�a�r�d�s� �o�n� �s�t�r�a�p� � C ,
as indicated by the red arrow, to
unlock the seat; keep pulling un-
til the seat is fully folded.
� Push the backrest slightly for-
wards, so that the backrest
pivots, folding onto the seat
base. The assembly will then
�l�o�w�e�r� �o�n�t�o� �t�h�e� �fl� �o�o�r�.� � � � From the boot (when loading, for
example)
You can fold the second-row seat(s)
�f�r�o�m� �t�h�e� �b�o�o�t�,� �h�a�v�i�n�g� �fi� �r�s�t� �f�o�l�d�e�d� �t�h�e�
third-row seats.
� Pull on the strap D to unlock the
chosen seat, push the backrest
gently forwards.
To prevent any damage to the mechanism, the strap D unclips
under excessive force. Simply
reclip it to render the system
operational.
Repositioning the seat
� Return the second-row seat bas-
es to their initial position and lock
them in that position.
� Raise the backrests and push
them rearwards so that they lock
in position.
Before moving the third-row seats,
return the second-row rigid panels to
their initial position and lock them.
� �E�m�e�r�g�e�n�c�y� �e�x�i�t�:� �s�h�o�u�l�d� �t�h�e� �fi� �r�s�t�
system fail (strap C ), the strap D is
available for use by third-row pas-
sengers to accelerate their exit.
Always supervise any move-
ments of seats by children. Rigid panel
Each second-row seat backrest has
a rigid panel attached.
This panel enables you:
- to have a continuous load sur-
face in the boot, whatever the
positions of the seats,
- to avoid having objects sliding under the second-row seats.
Unlocking/Locking the rigid panel
� Slide the latch 1 on the plate
downwards, to unlock.
� Return the panel to the upright
position, then slide the latch 1
upwards, to lock.
Before deploying the rigid panels,
check that the second-row seats are
in the fully back position.
�5�-�s�e�a�t�e�r� �c�o�n�fi� �g�u�r�a�t�i�o�n�s� �d�o� �n�o�t� �h�a�v�e�
these rigid panels.
Page 68 of 337
63
III
C O M F O R T
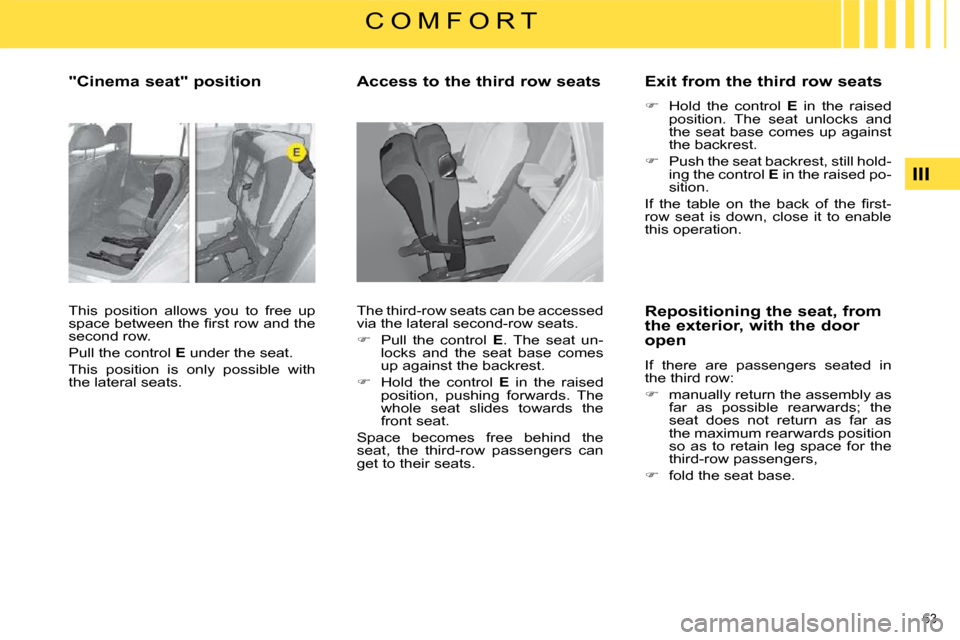
"Cinema seat" position
This position allows you to free up
�s�p�a�c�e� �b�e�t�w�e�e�n� �t�h�e� �fi� �r�s�t� �r�o�w� �a�n�d� �t�h�e�
second row.
Pull the control E under the seat.
This position is only possible with
the lateral seats. Access to the third row seats
The third-row seats can be accessed
via the lateral second-row seats.
� Pull the control E . The seat un-
locks and the seat base comes
up against the backrest.
� Hold the control E in the raised
position, pushing forwards. The
whole seat slides towards the
front seat.
Space becomes free behind the
seat, the third-row passengers can
get to their seats. Exit from the third row seats
� Hold the control E in the raised
position. The seat unlocks and
the seat base comes up against
the backrest.
� Push the seat backrest, still hold-
ing the control E in the raised po-
sition.
� �I�f� �t�h�e� �t�a�b�l�e� �o�n� �t�h�e� �b�a�c�k� �o�f� �t�h�e� �fi� �r�s�t�-
row seat is down, close it to enable
this operation.
Repositioning the seat, from
the exterior, with the door
open
If there are passengers seated in
the third row:
� manually return the assembly as
far as possible rearwards; the
seat does not return as far as
the maximum rearwards position
so as to retain leg space for the
third-row passengers,
� fold the seat base.
Page 69 of 337
64
III
C O M F O R T
THIRD ROW SEATS (GRAND C4 PICASSO)
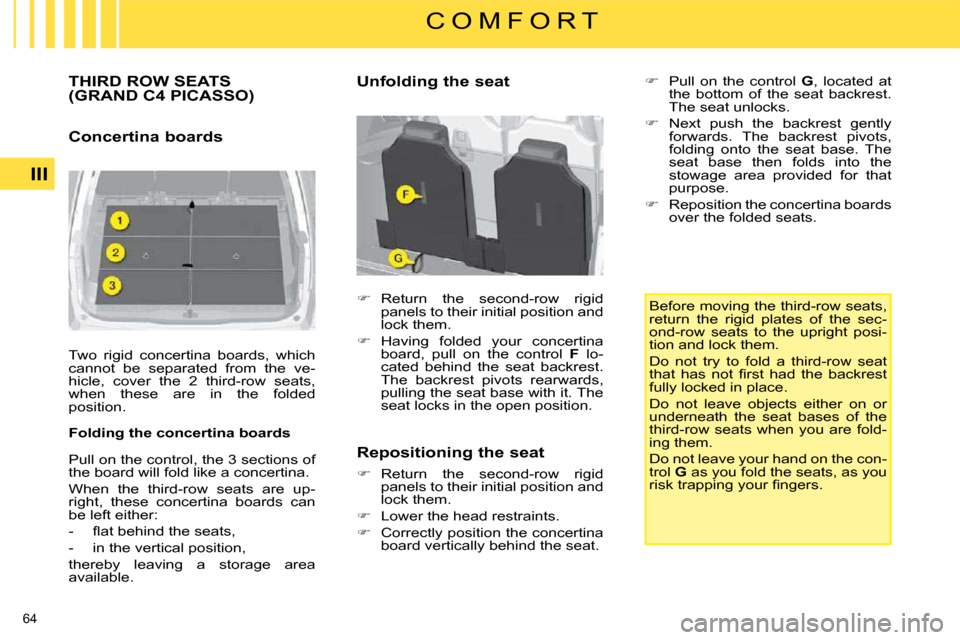
Concertina boards
Two rigid concertina boards, which
cannot be separated from the ve-
hicle, cover the 2 third-row seats,
when these are in the folded
position.
Folding the concertina boards
Pull on the control, the 3 sections of
the board will fold like a concertina.
When the third-row seats are up-
right, these concertina boards can
be left either:
� � � �-� � �fl� �a�t� �b�e�h�i�n�d� �t�h�e� �s�e�a�t�s�,�
- in the vertical position,
thereby leaving a storage area
available. Unfolding the seat
� Return the second-row rigid
panels to their initial position and
lock them.
� Having folded your concertina
board, pull on the control F lo-
cated behind the seat backrest.
The backrest pivots rearwards,
pulling the seat base with it. The
seat locks in the open position.
Repositioning the seat
� Return the second-row rigid
panels to their initial position and
lock them.
� Lower the head restraints.
� Correctly position the concertina
board vertically behind the seat. Before moving the third-row seats,
return the rigid plates of the sec-
ond-row seats to the upright posi-
tion and lock them.
Do not try to fold a third-row seat
�t�h�a�t� �h�a�s� �n�o�t� �fi� �r�s�t� �h�a�d� �t�h�e� �b�a�c�k�r�e�s�t�
fully locked in place.
Do not leave objects either on or
underneath the seat bases of the
third-row seats when you are fold-
ing them.
Do not leave your hand on the con-
trol
G as you fold the seats, as you
�r�i�s�k� �t�r�a�p�p�i�n�g� �y�o�u�r� �fi� �n�g�e�r�s�.� �
� Pull on the control G , located at
the bottom of the seat backrest.
The seat unlocks.
� Next push the backrest gently
forwards. The backrest pivots,
folding onto the seat base. The
seat base then folds into the
stowage area provided for that
purpose.
� Reposition the concertina boards
over the folded seats.
Page 70 of 337
65
C O M F O R T
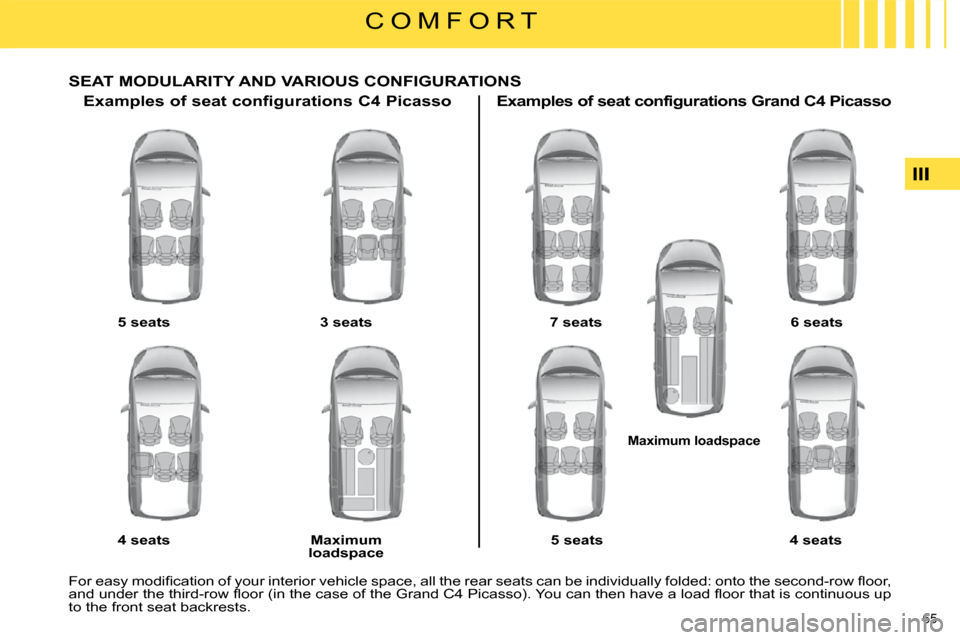
SEAT MODULARITY AND VARIOUS CONFIGURATIONS
Examples of seat configurations C4 Picasso
5 seats
4 seats
3 seats
Maximum
loadspace Examples of seat configurations Grand C4 Picasso
7 seats 6 seats
5 seats 4 seats
Maximum loadspace
� �F�o�r� �e�a�s�y� �m�o�d�i�fi� �c�a�t�i�o�n� �o�f� �y�o�u�r� �i�n�t�e�r�i�o�r� �v�e�h�i�c�l�e� �s�p�a�c�e�,� �a�l�l� �t�h�e� �r�e �a�r� �s�e�a�t�s� �c�a�n� �b�e� �i�n�d�i�v�i�d�u�a�l�l�y� �f�o�l�d�e�d�:� �o�n�t�o� �t�h�e� �s�e�c�o�n�d�-�r�o�w� �fl� �o�o�r�,�
�a�n�d� �u�n�d�e�r� �t�h�e� �t�h�i�r�d�-�r�o�w� �fl� �o�o�r� �(�i�n� �t�h�e� �c�a�s�e� �o�f� �t�h�e� �G�r�a�n�d� �C�4� �P�i �c�a�s�s�o�)�.� �Y�o�u� �c�a�n� �t�h�e�n� �h�a�v�e� �a� �l�o�a�d� �fl� �o�o�r� �t�h�a�t� �i�s� �c�o�n�t�i�n�u�o�u�s� �u�p�
to the front seat backrests.