remove seats Citroen C4 RHD 2015 2.G Owner's Manual
[x] Cancel search | Manufacturer: CITROEN, Model Year: 2015, Model line: C4 RHD, Model: Citroen C4 RHD 2015 2.GPages: 328, PDF Size: 12.72 MB
Page 13 of 328

11
ECO-DRIVING
Limit the causes of excess consumption
Spread loads throughout the vehicle; place the heaviest items
in the bottom of the boot, as close as possible to the
rear
seats.
Limit
the
loads
carried
in
the
vehicle
and
reduce
wind
resis
-
tance
(roof
bars,
roof
rack,
bicycle
carrier
,
trailer
...).
Use
a
roof
box in preference.
Remove
roof bars and roof racks after use.
At
the
end
of
winter
,
remove
snow
tyres
and
refit
your
sum
-
mer
tyres.
Observe the recommendations on maintenance
Check the tyre pressures regularly , when cold, referring to the
label in the door aperture, driver's side.
Carry
out this check in particular:
-
before
a long journey,
-
at
each change of season,
-
after
a long period out of use.
Don't
forget
the
spare
wheel
and
the
tyres
on
any
trailer
or
caravan.
Have
your
vehicle
serviced
regularly
(engine
oil,
oil
filter
,
air
filter
,
passenger
compartment
filter
...)
and
observe
the schedule
of
operations
recommended
in
the
manufacturer's service
schedule.
With
a
BlueHDi
Diesel
engine,
if
the
SCR
system
is
faulty
your
vehicle
becomes
polluting;
go
to
a
CITROËN
dealer
or
a
qualified
workshop
without
delay
to
have
the
emissions
of
nitrous
oxides brought back to the legal level.
When
refuellin
g,
do
not
continue
after
the
third
cut-of
f
of
the
nozzle
to avoid any overflow.
At
the
wheel
of
your
new
vehicle,
it
is
only
after
the
first
1
800
miles
(3
000
kilometres)
that
you
will
see
the
fuel
consumption
settle down to a consistent average.
Page 61 of 328
33
59
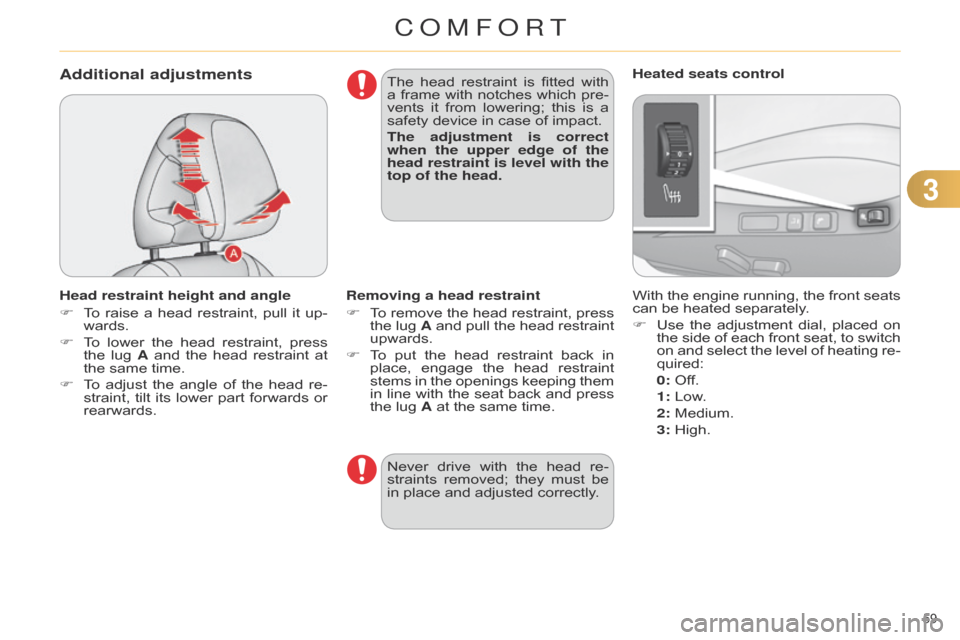
Additional adjustments
Head restraint height and angle
F
T
o
raise
a
head
restraint,
pull
it
up
-
wards.
F
T
o
lower
the
head
restraint,
press
the
lug
A
and
the
head
restraint
at
the
same time.
F
T
o
adjust
the
angle
of
the
head
re
-
straint,
tilt
its
lower
part
forwards
or
rearwards. The
head
restraint
is
fitted
with
a
frame
with
notches
which
pre
-
vents
it
from
lowering;
this
is
a
safety
device in case of impact.
The adjustment is correct
when the upper edge of the
head restraint is level with the
top of the head.
With the engine running, the front seats can
be heated separately.
F
Use
the
adjustment
dial,
placed
on
the
side
of
each
front
seat,
to
switch
on
and
select
the
level
of
heating
re
-
quired:
0:
Off.
1
: Low.
2
: Medium.
3
: High.
Heated seats control
Removing a head restraint
F
T
o
remove
the
head
restraint,
press
the
lug
A
and
pull
the
head
restraint
upwards.
F
T
o
put
the
head
restraint
back
in
place,
engage
the
head
restraint
stems
in
the
openings
keeping
them
in
line
with
the
seat
back
and
press
the
lug A at the same time.
Never
drive
with
the
head
re
-
straints
removed;
they
must
be
in
place and adjusted correctly.
COMFORT
Page 63 of 328
33
61
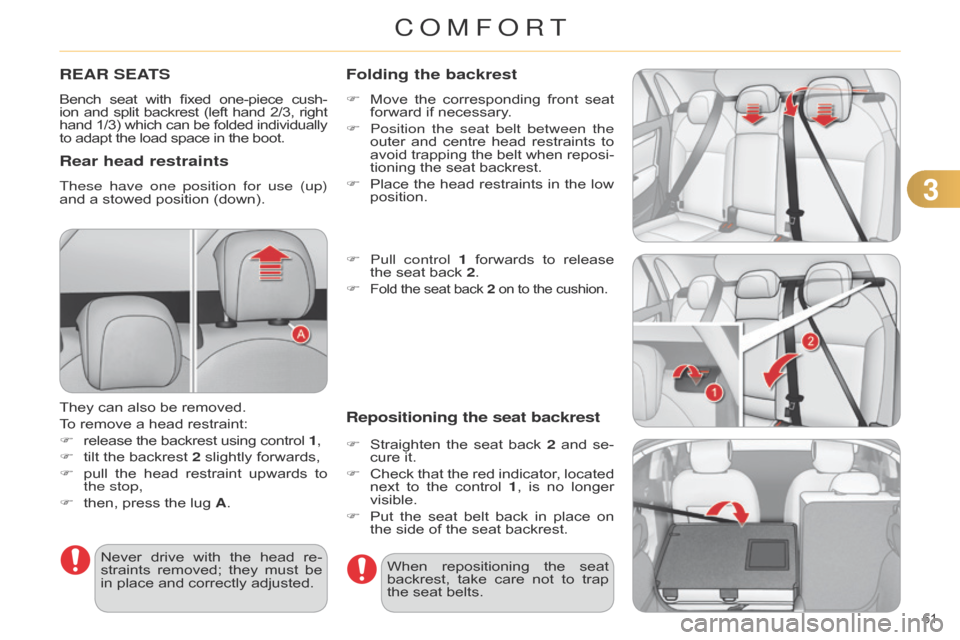
REAR SEATS
Bench seat with fixed one-piece cush -
ion and split backrest (left hand 2/3, right hand
1/3)
which
can
be
folded
individually to
adapt the load space in the boot.
Rear head restraints
These have one position for use (up)
and a stowed position (down).
They
can also be removed.
To
remove a head restraint:
F
release
the backrest using control 1,
F
tilt
the backrest 2 slightly forwards,
F
pull
the
head
restraint
upwards
to
the stop,
F
then,
press the lug A.
Never
drive
with
the
head
re
-
straints
removed;
they
must
be
in
place and correctly adjusted.When
repositioning
the
seat
backrest,
take
care
not
to
trap
the
seat belts.
Folding the backrest
F Move the corresponding front seat forward
if necessary.
F
Position the seat belt between the
outer
and
centre
head
restraints
to
avoid
trapping
the
belt
when
reposi
-
tioning
the seat backrest.
F
Place
the
head
restraints
in
the
low
position.
F
Pull control 1
forwards
to
release
the
seat back 2.
F
Fold the seat back 2 on to the cushion.
Repositioning the seat backrest
F Straighten the seat back 2 and se -
cure it.
F
Check
that
the
red
indicator
,
located
next
to
the
control
1
,
is
no
longer
visible.
F
Put
the
seat
belt
back
in
place
on
the
side of the seat backrest.
COMFORT
Page 103 of 328
101
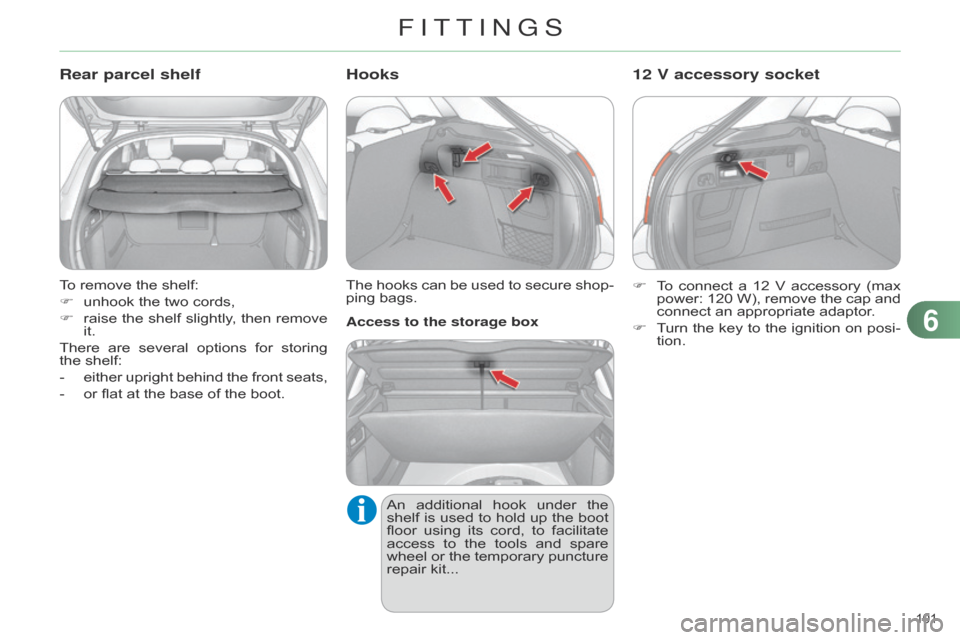
To remove the shelf:
F
unhook
the two cords,
F
raise
the
shelf
slightly
,
then
remove
it.
There
are
several
options
for
storing
the
shelf:
-
either
upright
behind
the
front
seats,
-
or
flat at the base of the boot.
Rear parcel shelf
The hooks can be used to secure shop -
ping bags.
Hooks
An additional hook under the shelf
is used to hold up the boot
floor
using
its
cord,
to
facilitate
access
to
the
tools
and
spare
wheel
or
the
temporary
puncture
repair
kit...
Access to the storage box
F
T
o
connect
a
12
V
accessory
(max
power:
120
W),
remove
the
cap
and
connect
an appropriate adaptor.
F
T
urn
the
key
to
the
ignition
on
posi
-
tion.
12 V accessory socket
6
FITTINGS
Page 113 of 328
77
111
(a) Universal child seat: child seat which
can be installed in all vehicles
using
the seat belt.
(b)
Group
0:
from
birth
to
10
kg.
Infant
car
seats
and
"car
cots"
cannot
be
installed
on
the
front
passenger
seat.
(c)
Consult
the
legislation
in
force
in
your
country
before
installin
g
your
child
on this seat.
(d)
T
o
install
a
child
seat
at
the
rear
,
backward
or
forward
facing,
move
the front seat forward, then straighten
the
backrest
to
allow
enough
room
for
the
child
seat
and
the
child's
legs. Remove
and
stow
the
head
re
-
straint
before
installin
g
a
child
seat
with
backrest
on
a
passen
-
ger
seat.
Refit
the
head
restraint
once
the
child
seat
has
been
re
-
moved.
U:
seating
position
suitable
for
the
in
-
stallation
of
a
child
seat
secured
using
the
seat
belt
and
universally
approved
"rearward
facing"
and/or
"forward
facing".
U(R1):
identical
to
U
,
with
the
vehicle's
seat
backrest
inclined
fully
for
-
wards.
U(R2):
identical
to
U
,
with
the
vehicle's
seat
adjusted
to
the
highest
po
-
sition.
X: seating position not suitable for in -
stalling a child seat for the weight group
indicated.
CHILD SAFETY
Page 114 of 328
77
112
"ISOFIX" MOUNTINGS
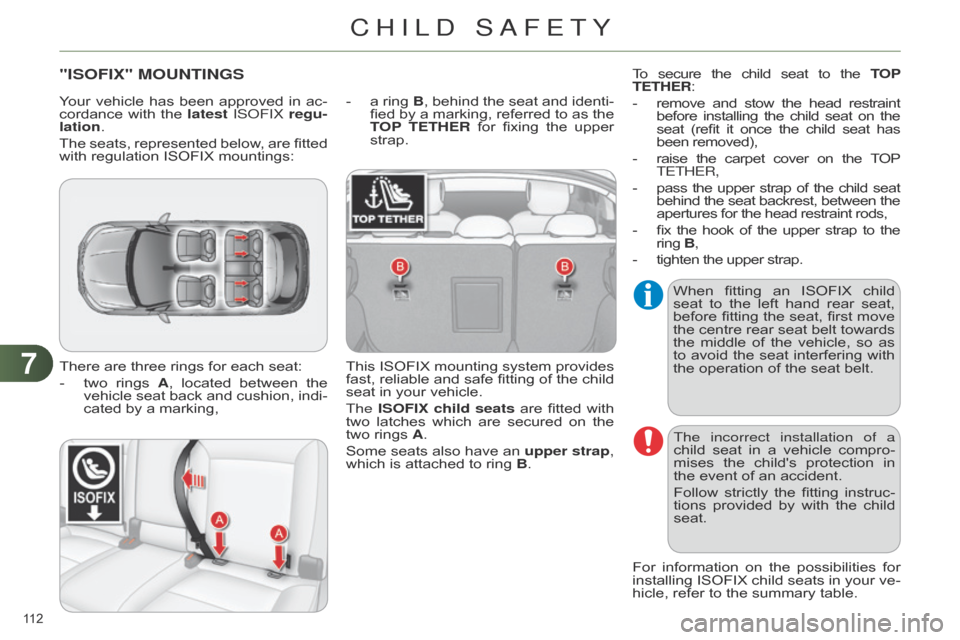
There are three rings for each seat:
-
two
rings
A
,
located
between
the
vehicle
seat
back
and
cushion,
indi
-
cated
by a marking, -
a
ring
B
,
behind
the
seat
and
identi
-
fied
by
a
marking,
referred
to
as
the
T
OP TETHER
for
fixing
the
upper
strap.
This
ISOFIX mounting system provides fast,
reliable and safe fitting of the child
seat
in your vehicle.
The ISOFIX child seats
are
fitted
with
two
latches
which
are
secured
on
the
two
rings A.
Some
seats
also
have
an
upper strap
,
which
is attached to ring B.The incorrect installation of a
child
seat
in
a
vehicle
compro
-
mises
the
child's
protection
in
the
event of an accident.
Follow
strictly
the
fitting
instruc
-
tions
provided
by
with
the
child
seat.
For
information
on
the
possibilities
for
installin
g
ISOFIX
child
seats
in
your
ve
-
hicle,
refer to the summary table.
When
fitting
an
ISOFIX
child
seat
to
the
left
hand
rear
seat,
before
fitting
the
seat,
first
move
the
centre
rear
seat
belt
towards
the
middle
of
the
vehicle,
so
as
to
avoid the seat interfering with the
operation of the seat belt.
Your
vehicle
has
been
approved
in
ac
-
cordance
with
the
latest
IS o FI x regu-
lation.
The
seats,
represented
below
,
are
fitted
with
regulation ISOFIX mountings:
To
secure
the
child
seat
to
the
TO
P
TETHER:
-
remove
and
stow
the
head
restraint before
installing
the
child
seat
on
the seat
(refit
it
once
the
child
seat
has been
removed),
-
raise
the
carpet
cover
on
the
T
OP
TETHER,
-
pass
the
upper
strap
of
the
child
seat behind
the
seat
backrest,
between
the apertures
for the head restraint rods,
-
fix
the
hook
of
the
upper
strap
to
the ring
B
,
-
tighten
the upper strap.
CHILD SAFETY
Page 116 of 328
77
114
* Infant car seats and "car cots" cannot be installed on the front passenger seat.
**
The
ISOFIX infant car seat, secured on the lower rings of a vehicle ISOFIX seat, occupies two rear seats.
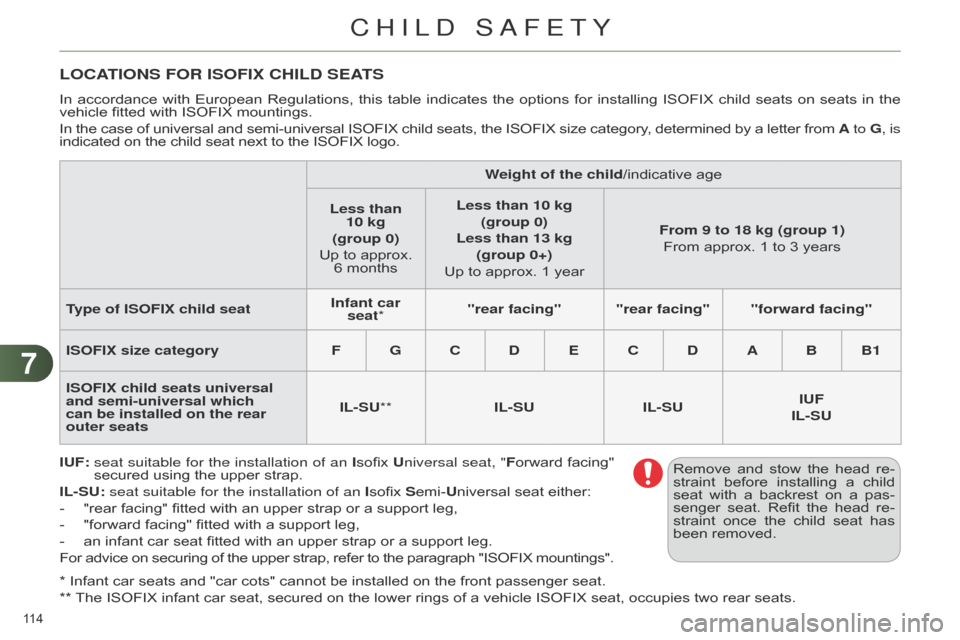
LOCATIONS FOR ISOFIX CHILD SEATS
In accordance with European Regulations, this table indicates the options for installin g ISOFIX child seats on seats in the vehicle
fitted with ISOFIX mountings.
In
the
case
of
universal
and
semi-universal
ISOFIX
child
seats,
the
ISOFIX
size
category
,
determined
by
a
letter
from
A to
G, is
indicated
on the child seat next to the ISOFIX logo.
IUF:
seat suitable for the installation of an
Isofix
U
niversal seat, "Forward
facing"
secured
using the upper strap.
IL-SU: seat suitable for the installation of an Isofix
Semi-Universal seat either:
-
"rear
facing" fitted with an upper strap or a support leg,
-
"forward
facing" fitted with a support leg,
-
an
infant car seat fitted with an upper strap or a support leg.
For
advice
on
securing
of
the
upper
strap,
refer
to
the
paragraph
"ISOFIX
mountings".
W
eight of the child/indicative age
Less than 10
kg
(group 0)
Up
to approx.
6
monthsLess than 10 kg
(group 0)
Less than 13 kg (group 0+)
Up
to approx. 1 yearFrom 9 to 18 kg (group 1)
From
approx. 1 to 3 years
Type of ISOFIX child seat Infant car
seat* "rear facing" "rear facing" "forward facing"
ISOFIX size category F G C D E C D A B B1
ISOFIX child seats universal
and semi-universal which
can be installed on the rear
outer seats IL-SU**
IL-SUIL-SU IUF
IL-SU
Remove
and
stow
the
head
re
-
straint
before
installin
g
a
child
seat
with
a
backrest
on
a
pas
-
senger
seat.
Refit
the
head
re
-
straint
once
the
child
seat
has
been
removed.
CHILD SAFETY
Page 117 of 328
77
115
For optimum installation of the "for -
ward-facing" child seat, ensure that
the
back
of
the
child
seat
is
as
close
as
possible
to
the
backrest
of
the
ve
-
hicle's
seat, in contact if possible.
You
mst
remove
the
head
restraint
before
installin
g
a
child
seat
with
backrest
to a passenger seat.
Ensure
that
the
head
restraint
is
stored
or
attached
securely
to
pre
-
vent
it
from
being
thrown
around
the
vehicle
in
the
event
of
sharp
brak
-
ing.
Refit
the
head
restraint
when
the
child
seat is removed.
ADVICE ON CHILD SEATS
Installing a booster seat
Children at the frontThe incorrect installation of a child seat
in a vehicle compromises the
child's
protection
in
the
event
of
an
accident.
Ensure that there is no seat belt or
seat
belt
buckle
under
the
child
seat,
as
this could destabilise it.
Remember
to
fasten
the
seat
belts
or
the
child
seat
harnesses
keeping
the
slack
relative
to
the
child's
body
to
a
minimum,
even for short journeys.
When
installin
g
a
child
seat
using
the
seat belt, ensure that the seat belt is
tightened
correctly
on
the
child
seat
and that it secures the child seat firmly on the seat of your vehicle. If your passenger
seat is adjustable, move
it
forwards if necessary.
The
legislation
on
carrying
children
on the
front
passenger
seat
is
specific
to each
country
.
Refer
to
the
legislation in
force in your country.
Deactivate
the
passenger
airbag
when
a
"rearward-facing"
child
seat
is
installed on the front seat.
Otherwise,
the
child
would
risk
being
seriously
injured
or
kille
d
if
the
airbag
were
to inflate.The
chest
part
of
the
seat
belt
must
be
positioned
on
the
child's
shoulder
without
touching the neck.
Ensure that the lap part of the seat
belt
passes
correctly
over
the
child's
thighs.
CITROËN
recommends
the
use
of
a
booster
seat
which
has
a
back,
fit
-
ted
with
a
seat
belt
guide
at
shoulder
level.
As
a safety precaution, do not leave:
- a child or children alone and un -
supervised in a vehicle,
- a child or an animal in a vehicle
which
is
exposed
to
the
sun,
with
the
windows closed,
-
the
keys
within
reach
of
children
inside
the vehicle.
At
rear
seating
positions,
always
leave
sufficient
space
between
the
front
seat and:
-
a
"rearward facing" child seat,
-
the
child's
feet
for
a
child
seat
fit
-
ted
"forward facing".
To
do
this,
move
the
front
seat
for
-
wards
and,
if
necessary
,
move
its
backrest
into the upright position. To
prevent
accidental
opening
of
the
doors
and
rear
windows,
use
the
"Child
lock".
Take
care
not
to
open
the
rear
win
-
dows
by more than one third.
To
protect
young
children
from
the
rays
of
the
sun,
fit
side
blinds
on
the
rear
windows.
CHILD SAFETY
Page 129 of 328
88
127
For the airbags to be fully
effective, observe the
following safety rules:
Sit in a normal upright position.
Wear
a
correctly
adjusted
seat
belt.
Do
not
leave
anything
between
the
occupants
and
the
airbags
(a
child,
pet,
object...).
This
could
hamper
the
operation
of
the
air
-
bags
or injure the occupants.
After
an
accident
or
if
the
ve
-
hicle
has
been
stolen
or
broken
into,
have
the
airbag
systems
checked.
All
work
on
the
airbag
system
must be
carried
out
by
a
CITROËN
deal
-
er
or a qualified workshop.
Even if all of the precautions
mentioned
are
observed,
a
risk
of
injury
or
of
minor
burns
to
the
head,
chest
or
arms
when
an
air
-
bag
is
deployed
cannot
be
ruled
out.
The
bag
inflates
almost
in
-
stantly
(within
a
few
millis
econds)
then
deflates
within
the
same
time
discharging
the
hot
gas
via
openings
provided
for
this
pur
-
pose. Front airbags
Do
not
drive
holding
the
steering
wheel
by
its
spokes
or
resting
your
hands
on
the
centre part of the wheel.
Passengers
must not place their feet on the dashboard.
Do
not
smoke
as
deployment
of
the
airbags
can
cause
burns
or
the
risk
of
injury
from
a cigarette or pipe.
Never
remove or pierce the steering wheel or hit it violently.
Do
not
fit
or
attach
anything
to
the
steering
wheel
or
dashboard,
this
could
cause
injuries
with deployment of the airbags.
Lateral airbags
Use
only
approved
covers
on
the
seats,
compatible
with
the
deployment
the
lat
-
eral
airbags.
For
information
on
the
range
of
seat
covers
suitable
for
your
vehicle,
you
can contact a CITROËN dealer.
Refer
to the "Accessories" section.
Do
not
fix
or
attach
anything
to
the
seat
backs
(clothing...).
This
could
cause
injury
to the chest or arms if the lateral airbag is deployed.
Do
not
sit
with
the
upper
part
of
the
body
any
nearer
to
the
door
than
necessary
.
Curtain airbags
Do
not
fix
or
attach
anything
to
the
roof.
This
could
cause
injury
to
the
head
if
the
curtain
airbag is deployed.
If
fitted
on
your
vehicle,
do
not
remove
the
grab
handles
installed
on
the
roof,
they
play
a part in securing the curtain airbags.
SAFETY