Citroen C5 2015 (RD/TD) / 2.G Owners Manual
Manufacturer: CITROEN, Model Year: 2015, Model line: C5, Model: Citroen C5 2015 (RD/TD) / 2.GPages: 344, PDF Size: 12.95 MB
Page 91 of 344

89
C5_en_Chap03_ergo-et-confort_ed01-2014
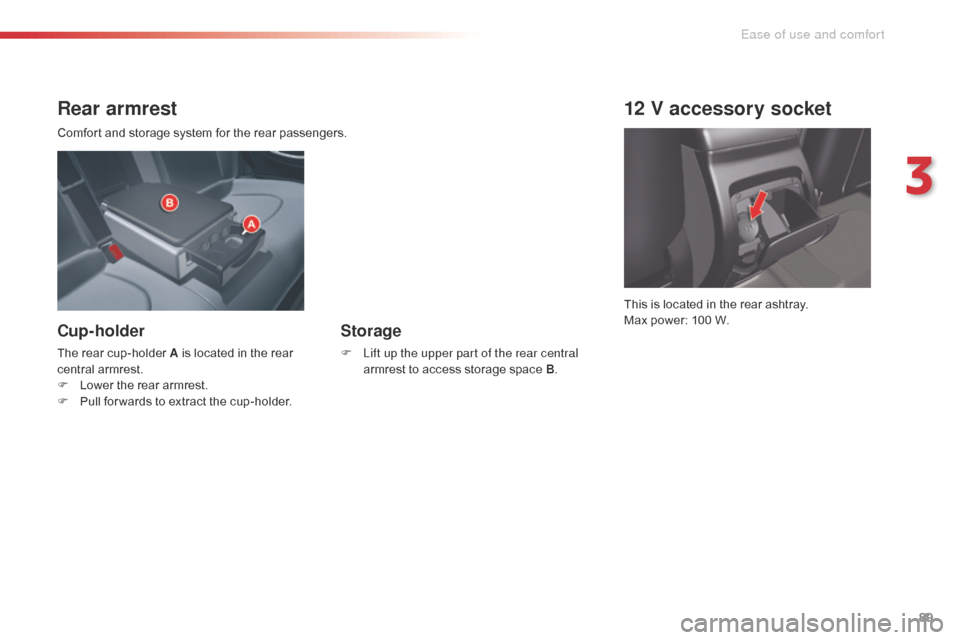
Rear armrest
Comfort and storage system for the rear passengers.
Cup-holder
The rear cup-holder A is located in the rear
central armrest.
F
L
ower the rear armrest.
F
P
ull for wards to extract the cup-holder.
Storage
F Lift up the upper part of the rear central armrest to access storage space B .
12 V accessory socket
This is located in the rear ashtray.
Max power: 100 W.
3
Ease of use and comfort
Page 92 of 344

90
C5_en_Chap03_ergo-et-confort_ed01-2014
Side blinds
F Pull on the tab A and position the blind on the hook B .
Rear blind (Saloon)
F Pull on the tab C to unreel the blind,
F
p osition the blind on the hooks D .
Ski flap
A flap in the backrest, located to the rear of the
armrest, facilitates the carrying of long objects.
To o p e n
F Lower the rear armrest.
F
P ull the flap handle down.
F
L
ower the flap.
F
L
oad the objects from inside the boot.
Ensure that the objects are well secured
and that they do not impede the
operation of the gear lever.
Ease of use and comfort
Page 93 of 344

91
C5_en_Chap03_ergo-et-confort_ed01-2014
Boot fittings (Saloon)
1. Boot floor (spare wheel storage).2. B oot lamp.
3. L ocation for 6 CD changer.
Luggage securing rings
F Use the 4 securing rings on the boot floor to secure your luggage.
For safety reasons in the event of sharp
braking, you are advised to place heavy objects
as far for ward in the boot as possible.
3
Ease of use and comfort
Page 94 of 344

92
C5_en_Chap03_ergo-et-confort_ed01-2014
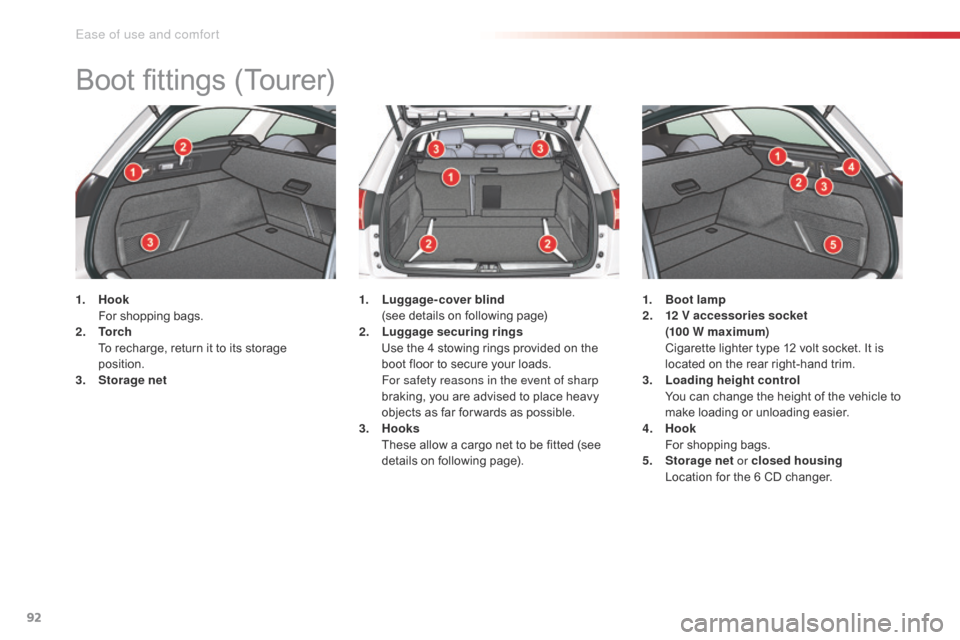
Boot fittings (Tourer)
1. Hook
F or shopping bags.
2.
T
o r c h
T
o recharge, return it to its storage
position.
3.
Sto
rage net 1. L
uggage-cover blind
(
see details on following page)
2.
L
uggage securing rings
U
se the 4 stowing rings provided on the
boot floor to secure your loads.
F
or safety reasons in the event of sharp
braking, you are advised to place heavy
objects as far for wards as possible.
3.
Hoo
ks
T
hese allow a cargo net to be fitted (see
details on following page). 1. B
oot lamp
2. 1 2 V accessories socket
(100 W maximum)
C
igarette lighter type 12 volt socket. It is
located on the rear right-hand trim.
3.
L
oading height control
Y
ou can change the height of the vehicle to
make loading or unloading easier.
4.
Hoo
k
F
or shopping bags.
5.
Sto
rage net or closed housing
L
ocation for the 6 CD changer.
Ease of use and comfort
Page 95 of 344

93
C5_en_Chap03_ergo-et-confort_ed01-2014
Luggage cover (Tourer)
To reel in
F Press the handle (PRESS) gently. The luggage cover reels in automatically.
The moving part A
can be folded along the rear
bench seat backrest.
To remove
F Compress the control 1 and lift the luggage cover on the right then on the left to
remove it.
To install
F Position the left-hand end of the luggage cover roller in its location B behind the rear
bench seat.
F
C
ompress the roller control 1 and put the
roller in place in its location C on the right.
F
R
elease the control to secure the luggage
c ove r.
F
U
nreel it to its fastening on the rear pillar.
3
Ease of use and comfort
Page 96 of 344

94
C5_en_Chap03_ergo-et-confort_ed01-2014
High load retaining net
(Tourer)
Hooked onto the special upper and lower
fixings, this permits use of the entire loading
volume up to the roof:
-
b
ehind the rear seats (row 2),
-
b
ehind the front seats (row 1) when the rear
seats are folded.
When positioning the net, check that the strap
loops are visible from the boot; this will make
slackening or tightening easier.
Installation
F fold down the backs of the rear seats,
F p osition the high load retaining net roller
above the two rails 1 located behind
the rear seats (2/3 bench seat). The
two
notches 2 must be placed above the
two rails, F
s lide the two rails 1 into the notches 2 and
push the roller (lengthways) from right to
left to secure it,
F
r
eposition the rear seat backs.
Ease of use and comfort
Page 97 of 344

95
C5_en_Chap03_ergo-et-confort_ed01-2014
Row 1
To use it in row 1:
F f old down the backs of the rear seats,
F
o
pen the covers 3 of the corresponding
upper fixings,
F
u
nroll the high load retaining net and
position one of the ends of the net's metal
bar in the corresponding fixing cover.
Check that the hook is secured in the rail
located inside the cover 3 ,
F
p
ull the high load retaining net's metal bar
to position the other hook in the second
fixing cover.
Row 2
To use it in row 2:
F o pen the covers 4 of the corresponding
upper fixings,
F
f
rom the rear bench seat, unroll the high
load retaining net, pushing it to detach it
from the retaining hooks,
F
p
osition one of the ends of the net's metal
bar in the corresponding fixing cover.
Check that the hook is secured in the rail
located inside the cover,
F
p
osition the other hook in the second fixing
cover and pull the metal bar towards you.
3
Ease of use and comfort
Page 98 of 344

142
C5_en_Chap05_visibilite_ed01-2014
Exterior lighting controls
Main lighting
The various front and rear lamps of the
vehicle are designed to adapt the driver's
visibility progressively in relation to the climatic
conditions:
-
s
idelamps, to be seen,
-
d
ipped beam headlamps to see without
dazzling other drivers,
-
m
ain beam headlamps to see clearly when
the road is clear.
Additional lighting
Other lamps are fitted to fulfil the requirements
of particular driving conditions:
-
a r
ear foglamp to be seen from a distance,
-
f
ront foglamps for even better for ward
vision,
-
d
irectional headlamps for improved
visibility when cornering,
-
d
aytime running lamps to be seen during
the day.
Settings
Various automatic lighting control modes are
also available depending on options:
-
d
aytime running lamps,
-
a
utomatic illumination of headlamps,
-
d
irectional lighting,
-
g
uide-me-home lighting.In some weather conditions (e.g. low
temperature or humidity), the presence
of misting on the internal sur face of the
glass of the headlamps and rear lamps
is normal; it disappears after the lamps
have been on for a few minutes.
Control stalk for the selection and control of the various front and rear lamps providing the vehicle's lighting.
Visibility
Page 99 of 344

143
C5_en_Chap05_visibilite_ed01-2014
Manual controls
Lamps off.
Automatic illumination of headlamps.
Sidelamps.Dipped headlamps or main
beam headlamps.
B.
S
talk for switching headlamps: pull
the stalk towards you to switch the
lighting between dipped and main beam
headlamps.
In the lamps off and sidelamps modes, the
driver can switch on the main beam headlamps
temporarily ("headlamp flash") by maintaining a
pull on the stalk.
Displays
The lighting is controlled directly by the driver
by means of the ring A and the stalk B .A.
M
ain lighting mode selection ring: turn it
to position the symbol required facing the
mark.
C.
F
oglamps selection ring.
The foglamps operate with the sidelamps and
the dipped and main beam headlamps. Illumination of the corresponding indicator
lamp in the instrument panel confirms that the
lighting selected is on.
5
Visibility
Page 100 of 344

144
C5_en_Chap05_visibilite_ed01-2014
- 1st turn for wards: rear foglamps on.
-
1st turn rear wards: rear foglamps off. - 1st turn for wards: front foglamps on.
-
2nd turn for wards: rear foglamps on.
-
1st turn rear wards: rear foglamps off.
-
2nd turn rear wards: front foglamps off.
Model with rear foglamps
only Model with front and rear
foglamps
In good or rainy weather, both day and
night, use of the front foglamps and the
rear foglamps is prohibited. In these
situations, the power of their beams
may dazzle other drivers. They should
only be used in fog or falling snow.
In these weather conditions, it is your
responsibility to switch on the foglamps
and dipped headlamps manually as the
sunshine sensor may detect sufficient
light.
Do not forget to switch off the front and
rear foglamps when they are no longer
needed.
Visibility