boot CITROEN C5 AIRCROSS 2020 Handbook (in English)
[x] Cancel search | Manufacturer: CITROEN, Model Year: 2020, Model line: C5 AIRCROSS, Model: CITROEN C5 AIRCROSS 2020Pages: 292, PDF Size: 8.59 MB
Page 48 of 292
46
To avoid the risk of injury through pinching
or trapping, before and during operation of
the motorised tailgate:
-
e
nsure that there is no-one close to the
rear of the vehicle,
-
m
onitor the activity of your passengers,
particularly any children.
Bicycle carrier/Towing device
The motorised tailgate is not designed to
support a bicycle carrier.
When installing a
bicycle carrier on a towing
device with connection of a
cable to the towing
socket, the motorised operation of the tailgate
will be automatically deactivated.
If using a
towing device or bicycle carrier not
recommended by CITROËN, it is essential
to deactivate the motorised operation of the
tailgate.
Motorised operation
Activation/deactivation of the
motorised operation of the tailgate is
done in the Driving/Vehicle menu of
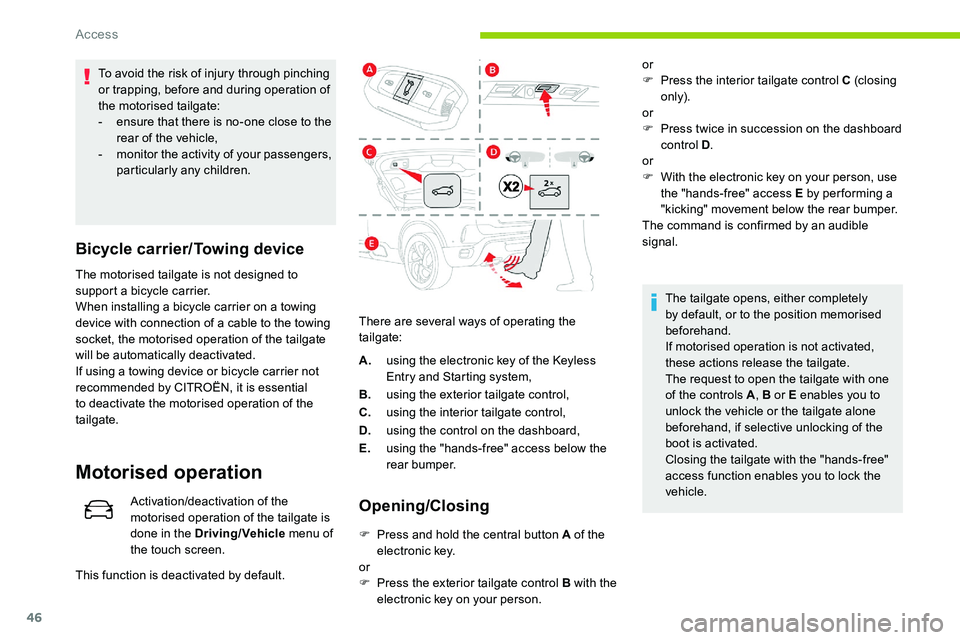
the touch screen. There are several ways of operating the
tailgate:Opening/Closing
F Press and hold the central button A of the
electronic key.
or
F
P
ress the exterior tailgate control B with the
electronic key on your person. The tailgate opens, either completely
by default, or to the position memorised
beforehand.
If motorised operation is not activated,
these actions release the tailgate.
The request to open the tailgate with one
of the controls A
, B or E enables you to
unlock the vehicle or the tailgate alone
beforehand, if selective unlocking of the
boot is activated.
Closing the tailgate with the "hands-free"
access function enables you to lock the
vehicle.
This function is deactivated by default. A.
using the electronic key of the Keyless
Entry and Starting system,
B. using the exterior tailgate control,
C. using the interior tailgate control,
D. using the control on the dashboard,
E. using the "hands-free" access below the
rear bumper. or
F
P
ress the interior tailgate control C (closing
only).
or
F
P
ress twice in succession on the dashboard
control D .
or
F
W
ith the electronic key on your person, use
the "hands-free" access E by per forming a
"kicking" movement below the rear bumper.
The command is confirmed by an audible
signal.
Access
Page 50 of 292
48
Manual closing of the
motorised tailgate in case
of failure
This operation is only necessar y in the case
of failure of the tailgate motor.
If the failure originates from the battery, it is
recommended to recharge it or change it with
the tailgate closed .
In this situation, a significant force may be
needed to close the tailgate.
F
C
lose it gently without slamming, as slowly
as possible, by pushing at the centre of the
tailgate.
Do not lower the tailgate by pushing at one
of its sides – risk of damage!
Precautions in use
To avoid unwanted opening of the tailgate
when using the towing device:
-
d
eactivate the "Hands-Free Tailgate
Access" function in advance in your
vehicle's configuration menu,
-
o
r remove the electronic key from the
recognition zone, with the tailgate
closed. In wintry conditions
To avoid any operating problems, remove
the snow or wait until the ice melts before
requesting motorised opening of the
tailgate.
When washing
When washing the vehicle in an automatic
car wash, do not forget to lock your vehicle
to avoid the risk of unexpected opening.
Recommendations related
to the "
Hands-Free Tailgate
Access " function
If several kicking movements to operate the
tailgate have no effect, wait a
few seconds
before trying again.
The function automatically deactivates in heavy
rain or following a
build-up of snow.
If it does not work, check that the electronic key
is not exposed to a
source of electromagnetic
pollution (smartphone, etc.).
The function may not work correctly with
a
prosthetic leg. The function may not work correctly if your
vehicle is fitted with a
towing device.
In some circumstances, the tailgate may open
or close by itself, particularly if:
-
y
ou hitch or unhitch a trailer,
-
y
ou fit or remove a bicycle carrier,
-
y
ou load or unload bicycles from a bicycle
c a r r i e r,
-
y
ou place or lift something behind the
vehicle,
-
an
animal approaches the rear bumper,
-
y
ou are washing your vehicle,
-
y
our vehicle is being serviced,
-
y
ou are accessing the spare wheel
(depending on version).
To avoid such operating problems, keep the
electronic key away from the recognition zone
or deactivate "Hands-Free Tailgate Access".
After installing a towing device, it is
essential to contact a
CITROËN dealer
or a
qualified workshop so that it is taken
into account by the detection system.
Other wise, risk of "Hands-Free Tailgate
Access" function failure.
Back-up release
To manually unlock the boot in the event of
a battery or central locking failure.
Access
Page 51 of 292
49
Unlocking
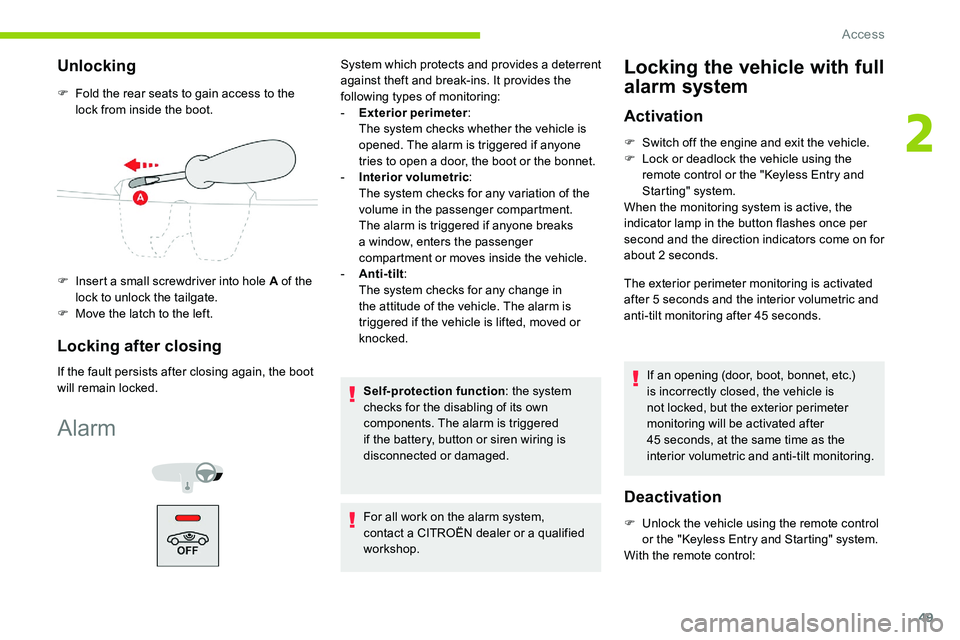
F Fold the rear seats to gain access to the lock from inside the boot.
F
I
nsert a small screwdriver into hole A of the
lock to unlock the tailgate.
F
M
ove the latch to the left.
Locking after closing
If the fault persists after closing again, the boot
will remain locked.
Alarm
System which protects and provides a deterrent
a gainst theft and break-ins. It provides the
following types of monitoring:
-
E
xterior perimeter :
The system checks whether the vehicle is
opened. The alarm is triggered if anyone
tries to open a
door, the boot or the bonnet.
-
I
nterior volumetric :
The system checks for any variation of the
volume in the passenger compartment.
The alarm is triggered if anyone breaks
a
window, enters the passenger
compartment or moves inside the vehicle.
-
A
nti-tilt :
The system checks for any change in
the attitude of the vehicle. The alarm is
triggered if the vehicle is lifted, moved or
knocked.
Self-protection function : the system
checks for the disabling of its own
components. The alarm is triggered
if the battery, button or siren wiring is
disconnected or damaged.
For all work on the alarm system,
contact a
CITROËN dealer or a qualified
workshop.Locking the vehicle with full
alarm system
Activation
F Switch off the engine and exit the vehicle.
F L ock or deadlock the vehicle using the
remote control or the "Keyless Entry and
Starting" system.
When the monitoring system is active, the
indicator lamp in the button flashes once per
second and the direction indicators come on for
about 2
seconds.
The exterior perimeter monitoring is activated
after 5
seconds and the interior volumetric and
anti-tilt monitoring after 45
seconds.
If an opening (door, boot, bonnet, etc.)
is incorrectly closed, the vehicle is
not locked, but the exterior perimeter
monitoring will be activated after
45
seconds, at the same time as the
interior volumetric and anti-tilt monitoring.
Deactivation
F Unlock the vehicle using the remote control or the "Keyless Entry and Starting" system.
With the remote control:
2
Access
Page 52 of 292
50
The monitoring system is deactivated: the
indicator lamp in the button goes off and the
direction indicators flash for about 2 seconds.
If the vehicle automatically locks itself
again (as happens if a
door or the boot
is not opened within 30
seconds of
unlocking), the monitoring system is
automatically reactivated.
Triggering of the alarm
This is indicated by sounding of the siren and
flashing of the direction indicators for thirty
seconds.
The volumetric and anti-tilt monitoring functions
remain active until the tenth successive time
the alarm is triggered.
When the vehicle is unlocked using the remote
control or the "Keyless Entry and Starting"
system, rapid flashing of the indicator lamp
in the button informs you that the alarm was
triggered during your absence. When the
ignition is switched on, this flashing stops
immediately.
Locking the vehicle
with exterior perimeter
monitoring onlyshort press
long press
Deactivate the interior volumetric monitoring
to avoid unwanted triggering of the alarm in
certain cases such as:
-
l
eaving a pet in the vehicle,
-
l
eaving a
window partially open,
-
w
ashing your vehicle,
-
c
hanging a
wheel,
-
h
aving your vehicle towed,
-
t
ransport by ship.
Deactivating the interior
volumetric and anti-tilt
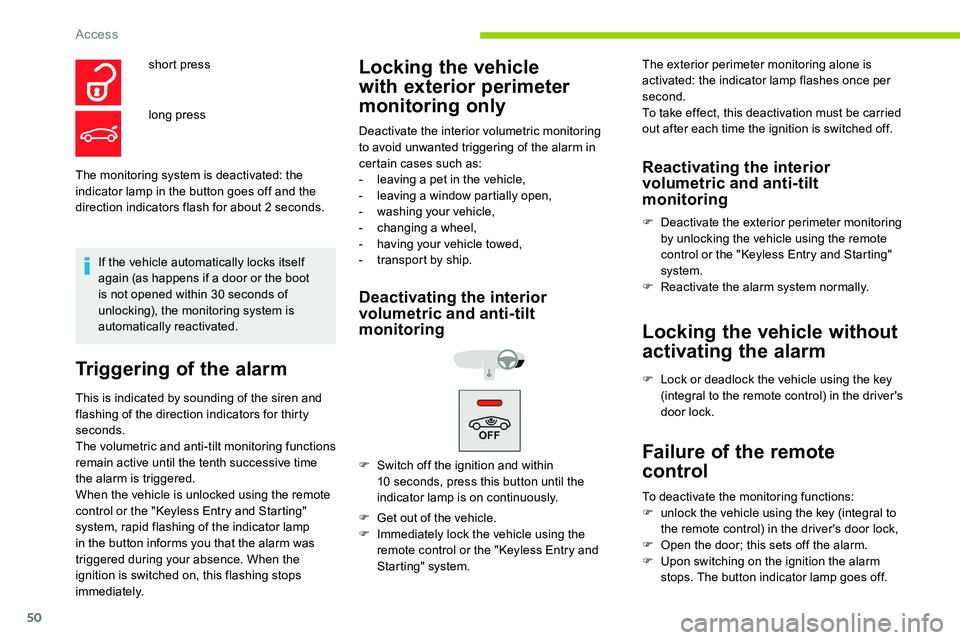
monitoring
F Get out of the vehicle.
F I mmediately lock the vehicle using the
remote control or the "Keyless Entry and
Starting" system.
Reactivating the interior
volumetric and anti-tilt
monitoring
F Deactivate the exterior perimeter monitoring by unlocking the vehicle using the remote
control or the "Keyless Entry and Starting"
system.
F
R
eactivate the alarm system normally.
Locking the vehicle without
activating the alarm
F Lock or deadlock the vehicle using the key (integral to the remote control) in the driver's
door lock.
Failure of the remote
control
To deactivate the monitoring functions:
F u nlock the vehicle using the key (integral to
the remote control) in the driver's door lock,
F
O
pen the door; this sets off the alarm.
F
U
pon switching on the ignition the alarm
stops. The button indicator lamp goes off.
F
S
witch off the ignition and within
10
seconds, press this button until the
indicator lamp is on continuously. The exterior perimeter monitoring alone is
activated: the indicator lamp flashes once per
second.
To take effect, this deactivation must be carried
out after each time the ignition is switched off.
Access
Page 62 of 292

60
Rear seats
The 3 seats of the 2nd row are independent
and of the same width. Their backrests are
adjustable to adapt the boot load space.
Rear head restraints
The rear head restraints can be removed.
To remove a head restraint:
F
p
ull the head restraint as far up as it will go,
F
p
ress the lugs A to release the head
restraint and remove it completely,
F
s
tow the head restraint.
To refit a
head restraint:
F
i
nsert the head restraint rods into the guides
in the corresponding seat backrest,
F
p
ush the head restraint down as far as it will
go,
F
p
ress the lugs A to release the head
restraint and push it fully down. Never drive with passengers seated at
the rear when the head restraints are
removed; they must be in place and in the
high position.
Longitudinal adjustment
Seat operations must only be done with
the vehicle stationary.
Each seat can be adjusted individually.
F
Ra
ise the control and slide the seat
forwards or backwards.
They have two positions:
-
a high position , for when the seat is in use:
F
p
ull the head restraint fully up.
-
a low position , for stowing, when the seat
is not in use:
F
p
ress the lugs A to release the head
restraint and push it fully down.
Once the backrest is folded, it is no longer
possible to slide the seat.
Automatic "electrochrome " model
This system automatically and progressively
changes between day and night use by means
of a
s
ensor measuring the light coming from the
rear of the vehicle.
In order to ensure optimum visibility during
your manoeuvres, the mirror lightens
automatically when reverse gear is
engaged.
Ease of use and comfort
Page 63 of 292

61
Backrest angle
Several adjustment positions are possible.
F
M
ove the seat for ward.
F
P
ull the strap for ward, then tilt the backrest
to the desired position.
Folding the backrests
The backrests must only be operated with
the vehicle stationary.
Preliminary operations:
F
l
ower the head restraints,
F
i
f necessary, move the front seats for ward,
F
c
heck that no person or object could
inter fere with the folding of the backrests
(clothing, luggage, etc.),Repositioning the backrests
Before raising the backrest of the outer
seats to the normal position, please
retrieve the seat belt and hold it during the
operation.
F
c
heck that the outer seat belts are properly
tensioned along the pillars, that the central
belt is stowed and that the tongues of the
three belts are correctly in the storage
position.
F
P
ull the strap 1 firmly to release the
backrest.
F
G
uide the backrest 2 down to the horizontal
position.
F
P
ut the backrest 2 in the upright position
and push firmly to latch it home. Please note: an incorrectly latched
backrest compromises the safety of
passengers in the event of sudden braking
or an impact.
The contents of the boot may be thrown
forward – risk of serious injury!
F
C
heck that the release strap 1 has correctly
returned to its position.
F
E
nsure that the outer seat belts are not
trapped during the operation.
Heating and Ventilation
Air entry
The air circulating in the passenger
compartment is filtered and originates either
from the outside via the grille located at the
base of the windscreen, or from the inside in air
recirculation mode.
Controls
The controls are accessible in the " Air
conditioning " menu of the touch screen and
are also grouped together on the control panel
of the centre console.
3
Ease of use and comfort
Page 64 of 292

62
Air distribution6.Air outlets to the rear footwells.
7. Adjustable air vents with blower,
depending on version.
Advice
1.Windscreen demisting/defrosting vents.
2. Front side window demisting/defrosting
vents.
3. Side adjustable and closable air vents.
4. Central adjustable and closable air vents.
5. Air outlets to the front footwells. Using the ventilation and air
conditioning system
F
T
o ensure that the air is distributed
evenly, keep the external air intake
grilles at the base of the windscreen,
the nozzles, the vents, the air outlets
and the air extractor in the boot free
from obstructions.
F
D
o not cover the sunshine sensor,
located on the dashboard; this is used
for regulation of the automatic air
conditioning system.
F
O
perate the air conditioning system for
at least 5 to 10 minutes once or twice
a month to keep it in per fect working
o r d e r.
F
I
f the system does not produce cold air,
switch it off and contact a CITROËN
dealer or a qualified workshop.
When towing the maximum load on
a
steep gradient in high temperatures,
switching off the air conditioning increases
the available engine power and so
improves the towing ability. Avoid driving for too long with the
ventilation off and prolonged operation
with recirculation of interior air – risk of
misting and deterioration of the air quality!
If the interior temperature is very high
after the vehicle has stood for a long
time in the sunshine, air the passenger
compartment for a few moments.
Put the air flow control at a setting high
enough to quickly change the air in the
passenger compartment.
The condensation created by the air
conditioning results in a discharge of water
under the vehicle which is per fectly normal.
Ease of use and comfort
Page 78 of 292
76
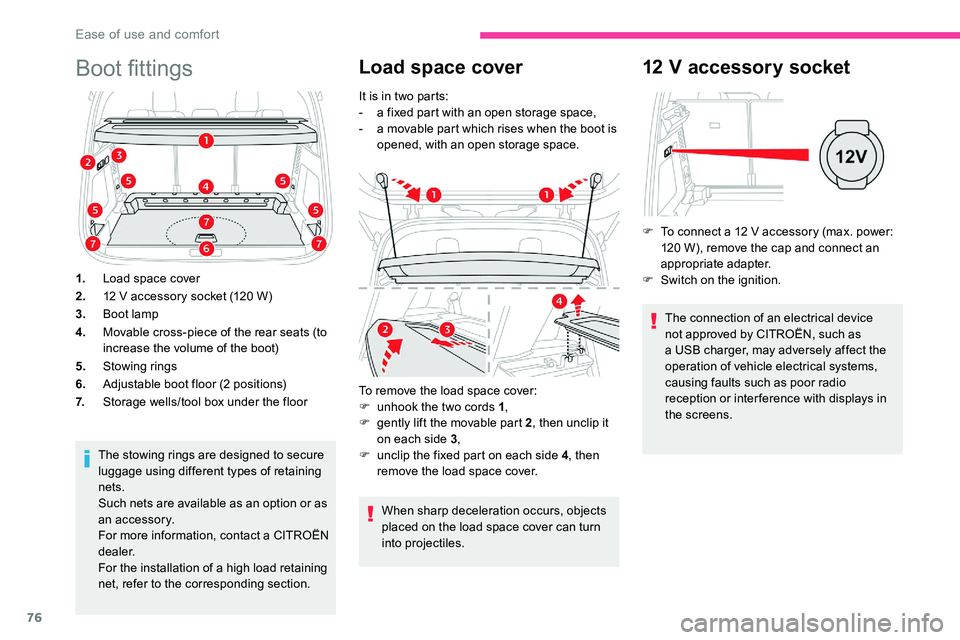
Boot fittings
1.Load space cover
2. 12
V accessory socket (120 W)
3. Boot lamp
4. Movable cross-piece of the rear seats (to
increase the volume of the boot)
5. Stowing rings
6. Adjustable boot floor (2
positions)
7. Storage wells/tool box under the floor
The stowing rings are designed to secure
luggage using different types of retaining
nets.
Such nets are available as an option or as
an accessory.
For more information, contact a
CITROËN
dealer.
For the installation of a
high load retaining
net, refer to the corresponding section.
Load space cover
It is in two parts:
- a f ixed part with an open storage space,
-
a m
ovable part which rises when the boot is
opened, with an open storage space.
To remove the load space cover:
F
u
nhook the two cords 1 ,
F
g
ently lift the movable part 2 , then unclip it
on each side 3 ,
F
u
nclip the fixed part on each side 4 , then
remove the load space cover.
When sharp deceleration occurs, objects
placed on the load space cover can turn
into projectiles.
12 V accessory socket
F To connect a 12 V accessory (max. power:
120 W), remove the cap and connect an
appropriate adapter.
F
S
witch on the ignition.
The connection of an electrical device
not approved by CITROËN, such as
a
USB charger, may adversely affect the
operation of vehicle electrical systems,
causing faults such as poor radio
reception or inter ference with displays in
the screens.
Ease of use and comfort
Page 79 of 292

77
High load retaining net
It offers protection to the occupants when
very sharp braking occurs.
This removable net allows the entire loading
volume up to the roof to be used:
-
b
ehind the front seats (1
st row) when the
rear seats are folded down,
-
b
ehind the rear seats (2
nd row) when the
load space cover is removed.
Behind the front seats
F Fold down the rear seats.
F I nsert the ends of the bar, one after the
other, into the fixing points in the roof.
F
A
ttach the net's straps to the upper
anchoring points, located in the housing of
the Top Tether fixings.
F
P
ull on the straps to stretch the net.
Behind the rear seats
2-position boot floor
This two-position floor allows the boot volume
to be optimised using the lateral stops located
on the sides:
-
Hig
h position ( 100
kg max): to obtain a
flat
floor up to the front seats, when the rear
seats are folded down.
-
L
ow position ( 150
kg max): maximum boot
volume.
F
R
emove the load space cover.
F
I
nsert the ends of the bar, one after the
other, into the fixing points of the roof.
F
A
ttach the straps of the net to the lower
rings, located on each side trim of the boot.
F
P
ull on the straps to stretch the net.
3
Ease of use and comfort
Page 80 of 292

78
Ensure that the boot is empty before
moving the boot floor.
Storage well
To increase the boot volume with the floor in
the low position:
F
P
ull the cross-piece of the rear seats up
vertically to the level of the markings to
remove it.
F
T
o put it back in place, push it as far as it will
go, until it engages. F
R
aise the boot floor as much as possible to
access the storage well.
Depending on version, it includes:
-
a t
emporary puncture repair kit with the
vehicle tools,
-
a s
pare wheel with the vehicle tools.
To change the height:
F
L
ift and pull the floor towards you using its
central handle, then use the lateral stops to
move it.
F
P
ush the floor all the way for wards to place
it in the desired position.
Boot lighting
This comes on automatically when the boot is
opened and goes off automatically when the
boot is closed.
The lighting time varies according to the
circumstances:
-
w
hen the ignition is off, approximately
ten minutes,
-
i
n energy economy mode,
approximately thirty seconds,
-
w
ith the engine running, unlimited.
Ease of use and comfort