ESP CITROEN C5 AIRCROSS 2020 Handbook (in English)
[x] Cancel search | Manufacturer: CITROEN, Model Year: 2020, Model line: C5 AIRCROSS, Model: CITROEN C5 AIRCROSS 2020Pages: 292, PDF Size: 8.59 MB
Page 65 of 292
63
Servicing the ventilation and air
conditioning system
F
E
nsure that the cabin filter is in good
condition and have the filter elements
replaced regularly.
We recommend the use of a
combined
cabin filter. Thanks to its special active
additive, it contributes to the purification of
the air breathed by the occupants and the
cleanliness of the passenger compartment
(reduction of allergic symptoms, bad
odours and greasy deposits).
F
T
o ensure correct operation of the air
conditioning system, have it checked
according to the recommendations in
the Maintenance and Warranty Guide.
Stop & Star t
The heating and air conditioning systems
only work when the engine is running.
Temporarily deactivate the Stop &
Start system to maintain a
comfortable
temperature in the passenger
compartment.
For more information on Stop & Star t ,
refer to the corresponding section.Manual air conditioning
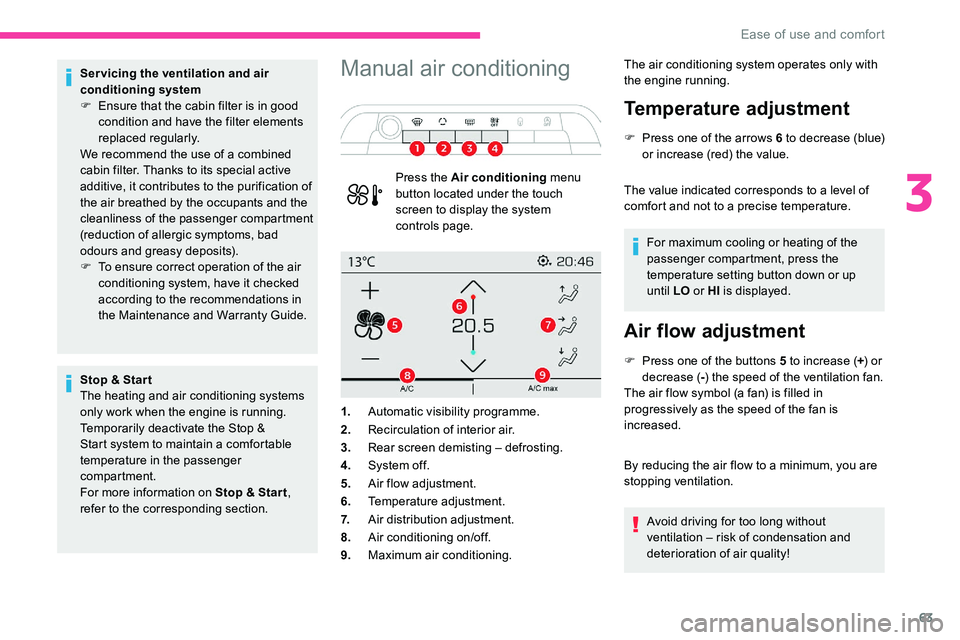
Press the Air conditioning menu
button located under the touch
screen to display the system
controls page. The air conditioning system operates only with
the engine running.
Temperature adjustment
F Press one of the arrows 6
t o decrease (blue)
or increase (red) the value.
The value indicated corresponds to a
level of
comfort and not to a
precise temperature.
For maximum cooling or heating of the
passenger compartment, press the
temperature setting button down or up
until LO or HI is displayed.
Air flow adjustment
F Press one of the buttons 5 to increase (+) or
decrease ( -) the speed of the ventilation fan.
The air flow symbol (a fan) is filled in
progressively as the speed of the fan is
increased.
By reducing the air flow to a
minimum, you are
stopping ventilation.
Avoid driving for too long without
ventilation – risk of condensation and
deterioration of air quality!
1.
Automatic visibility programme.
2. Recirculation of interior air.
3. Rear screen demisting – defrosting.
4. System of f.
5. Air flow adjustment.
6. Temperature adjustment.
7. Air distribution adjustment.
8. Air conditioning on/off.
9. Maximum air conditioning.
3
Ease of use and comfort
Page 67 of 292

65
11.Access to the secondary page.
12 . Passenger compartment pre-conditioning
(depending on version).
13. Selection of adjustment for the automatic
comfort programme (Soft/Normal/Fast).
14 . Mono-zone/Dual-zone.
15. "AQS" (Air Quality System) function
(depending on version).
The air conditioning system operates with
the engine running, but the ventilation and its
controls are available with the ignition on.
Operation of the air conditioning and regulation
of temperature, air flow and air distribution
in the passenger compartment are regulated
automatically.
Temperature adjustment
The driver and front passenger can each set
the temperature independently of one another.
F
P
ress one of the buttons 6 to decrease
(blue) or increase (red) the value.
1.
Automatic visibility programme.
2. Recirculation of interior air.
3. Rear screen demisting – defrosting.
4. System of f.
5. Air flow adjustment.
6. Temperature adjustment.
7. Air distribution adjustment.
8. Air conditioning on/off.
9. Maximum air conditioning.
10. Activation of automatic comfort
programme. The value indicated corresponds to a
level of
comfort and not to a
precise temperature.
It is recommended that you avoid a
difference
of more than 3
in the settings for left and right. For maximum cooling or heating of the
passenger compartment, press the
temperature setting button down or up
until LO or HI
is displayed.
Automatic comfort
programme
F Press button 10 "AUTO " to activate
automatic mode of the air conditioning
system.
When the indicator lamp in the button is on, the
air conditioning system operates automatically:
the system manages the temperature, air
flow and air distribution in the passenger
compartment in an optimum way according to
the comfort level you have selected.
It is possible to adjust the intensity of the
automatic comfort programme by choosing one
of the settings offered in the secondary page,
accessible from button 11 "OPTIONS ".
To change the current setting, shown by
illumination of the corresponding indicator
lamp, press button 13
repeatedly until the
desired mode is displayed:
" Soft ": provides soft and quiet operation by
limiting air flow.
3
Ease of use and comfort
Page 77 of 292

75
Courtesy lampsInterior ambient lighting
The dimmed passenger compartment lighting
improves visibility in the vehicle when the light
i s p o o r.
At night, the interior ambient lighting comes on
automatically when the sidelamps are switched
on.
Depending on version, the ambient lighting
includes:
-
t
wo LEDs located in the front courtesy lamp.
-
a l
ight source in the storage compartment at
the front of the centre console.
-
a l
ight source for each of the front footwells.
-
i
lluminated bezels for the front cup holders.
-
a l
ight source for each of the interior door
opening controls.
The ambient lighting switches off automatically
when the sidelamps are switched off.
1.
Front courtesy lamp
2. Front map reading lamps
3. Rear courtesy lamp
4. Rear map reading lamps (depending on
ve r s i o n)
Front and rear courtesy lamps
In this position, the courtesy
lamp comes on gradually: -
w
hen the vehicle is locked,
-
w
hen the ignition is switched on,
-
3
0 seconds after the last door is closed.
Permanently off.
Permanent lighting.
In "permanent lighting" mode, the lighting time varies
according to the circumstances:
-
w
hen the ignition is off, approximately ten minutes,
-
i
n energy economy mode, approximately thirty
seconds,
-
w
ith the engine running, unlimited.
When the front courtesy lamp is in the
"permanent lighting" position, the rear
courtesy lamp also comes on, except if it
is in the "permanently off " position.
To switch off the rear courtesy lamp, put it
in the "permanently off " position.
Front and rear map reading
lamps
F With the ignition on, operate the corresponding switch. Take care not to put anything in contact
with the courtesy lamps.
-
o
n unlocking the vehicle,
-
o
n removing the key from the ignition,
-
o
n opening a
door,
-
o
n activating the remote control locking
button, in order to locate your vehicle.
It switches off gradually: The interior ambient lighting can
be activated or deactivated and its
brightness adjusted in the Driving/
Vehicle
menu of the touch screen.
3
Ease of use and comfort
Page 78 of 292
76
Boot fittings
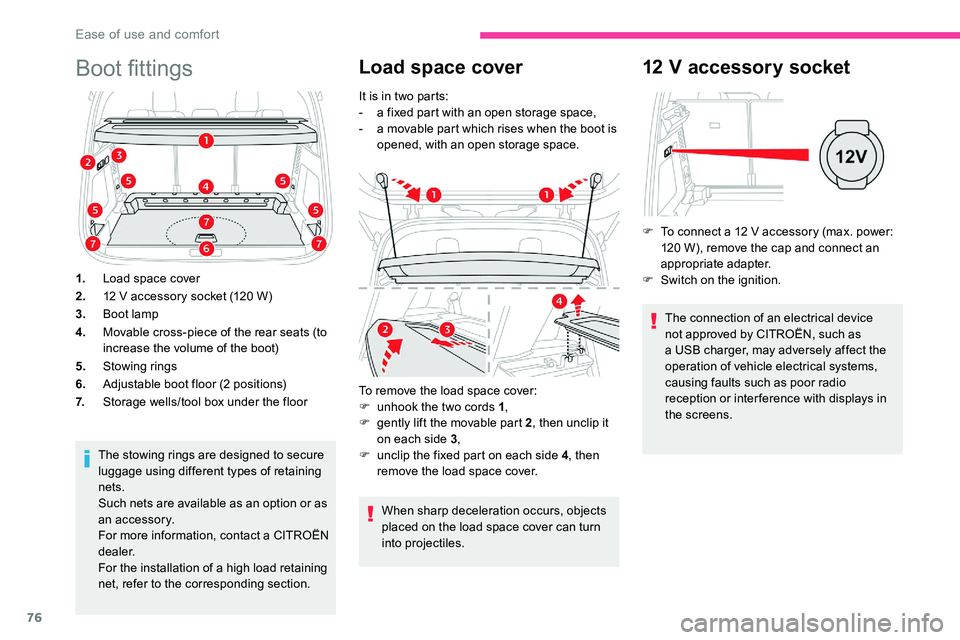
1.Load space cover
2. 12
V accessory socket (120 W)
3. Boot lamp
4. Movable cross-piece of the rear seats (to
increase the volume of the boot)
5. Stowing rings
6. Adjustable boot floor (2
positions)
7. Storage wells/tool box under the floor
The stowing rings are designed to secure
luggage using different types of retaining
nets.
Such nets are available as an option or as
an accessory.
For more information, contact a
CITROËN
dealer.
For the installation of a
high load retaining
net, refer to the corresponding section.
Load space cover
It is in two parts:
- a f ixed part with an open storage space,
-
a m
ovable part which rises when the boot is
opened, with an open storage space.
To remove the load space cover:
F
u
nhook the two cords 1 ,
F
g
ently lift the movable part 2 , then unclip it
on each side 3 ,
F
u
nclip the fixed part on each side 4 , then
remove the load space cover.
When sharp deceleration occurs, objects
placed on the load space cover can turn
into projectiles.
12 V accessory socket
F To connect a 12 V accessory (max. power:
120 W), remove the cap and connect an
appropriate adapter.
F
S
witch on the ignition.
The connection of an electrical device
not approved by CITROËN, such as
a
USB charger, may adversely affect the
operation of vehicle electrical systems,
causing faults such as poor radio
reception or inter ference with displays in
the screens.
Ease of use and comfort
Page 82 of 292
80
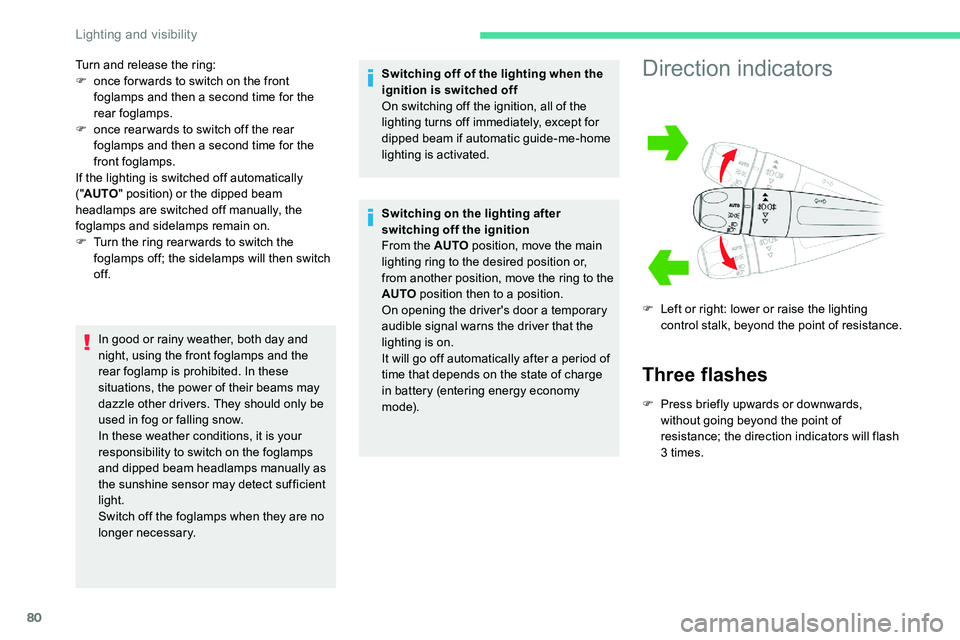
Turn and release the ring:
F o nce for wards to switch on the front
foglamps and then a
second time for the
rear foglamps.
F
o
nce rear wards to switch off the rear
foglamps and then a
second time for the
front foglamps.
If the lighting is switched off automatically
(" AUTO " position) or the dipped beam
headlamps are switched off manually, the
foglamps and sidelamps remain on.
F
T
urn the ring rear wards to switch the
foglamps off; the sidelamps will then switch
of f.
In good or rainy weather, both day and
night, using the front foglamps and the
rear foglamp is prohibited. In these
situations, the power of their beams may
dazzle other drivers. They should only be
used in fog or falling snow.
In these weather conditions, it is your
responsibility to switch on the foglamps
and dipped beam headlamps manually as
the sunshine sensor may detect sufficient
light.
Switch off the foglamps when they are no
longer necessary. Switching off of the lighting when the
ignition is switched off
On switching off the ignition, all of the
lighting turns off immediately, except for
dipped beam if automatic guide-me-home
lighting is activated.
Switching on the lighting after
switching off the ignition
From the AUTO
position, move the main
lighting ring to the desired position or,
from another position, move the ring to the
AUTO position then to a
position.
On opening the driver's door a
temporary
audible signal warns the driver that the
lighting is on.
It will go off automatically after a
period of
time that depends on the state of charge
in battery (entering energy economy
m o d e).Direction indicators
Three flashes
F Press briefly upwards or downwards, without going beyond the point of
resistance; the direction indicators will flash
3
times.
F
L
eft or right: lower or raise the lighting
control stalk, beyond the point of resistance.
Lighting and visibility
Page 83 of 292
81
Daytime running lamps/
sidelamps
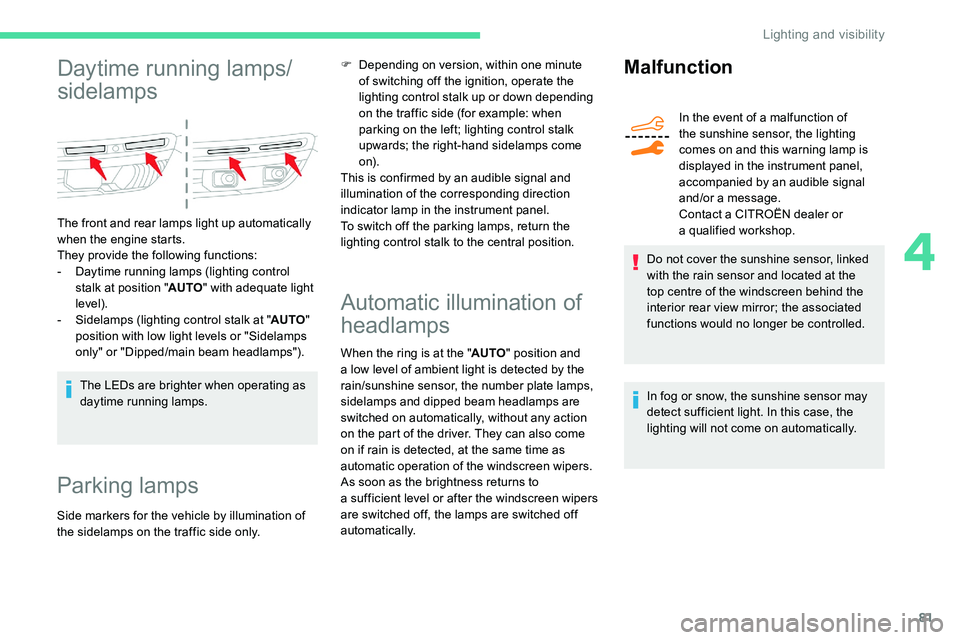
The front and rear lamps light up automatically
when the engine starts.
They provide the following functions:
-
D
aytime running lamps (lighting control
stalk at position " AUTO" with adequate light
level).
-
S
idelamps (lighting control stalk at " AUTO"
position with low light levels or "Sidelamps
only" or "Dipped/main beam headlamps").
The LEDs are brighter when operating as
daytime running lamps.
Parking lamps
Side markers for the vehicle by illumination of
the sidelamps on the traffic side only.
Automatic illumination of
headlamps
When the ring is at the " AUTO" position and
a low level of ambient light is detected by the
rain/sunshine sensor, the number plate lamps,
sidelamps and dipped beam headlamps are
switched on automatically, without any action
on the part of the driver. They can also come
on if rain is detected, at the same time as
automatic operation of the windscreen wipers.
As soon as the brightness returns to
a
sufficient level or after the windscreen wipers
are switched off, the lamps are switched off
automatically.
Malfunction
In the event of a malfunction of
t he sunshine sensor, the lighting
comes on and this warning lamp is
displayed in the instrument panel,
accompanied by an audible signal
and/or a
message.
Contact a
CITROËN dealer or
a
qualified workshop.
Do not cover the sunshine sensor, linked
with the rain sensor and located at the
top centre of the windscreen behind the
interior rear view mirror; the associated
functions would no longer be controlled.
In fog or snow, the sunshine sensor may
detect sufficient light. In this case, the
lighting will not come on automatically.
F
D
epending on version, within one minute
of switching off the ignition, operate the
lighting control stalk up or down depending
on the traffic side (for example: when
parking on the left; lighting control stalk
upwards; the right-hand sidelamps come
o n).
This is confirmed by an audible signal and
illumination of the corresponding direction
indicator lamp in the instrument panel.
To switch off the parking lamps, return the
lighting control stalk to the central position.
4
Lighting and visibility
Page 85 of 292

83
Whatever the position of the front courtesy
lamp switch, they also come on with the
exterior welcome lighting and the guide-me-
home lighting.
Automatic headlamp
dipping
This system automatically changes between
dipped and main beam headlamps according
to the brightness and driving conditions, using
a camera located at the top of the windscreen.
This system is a
driving aid.
The driver remains responsible for the
vehicle's lighting, its correct use for the
prevailing conditions of light, visibility and
traffic, and for obser vation of driving and
vehicle regulations.
The system will be operational as soon as
you exceed 16
mph (25 km/h).
If the speed drops below 9
mph (15 km/h),
the system no longer operates.Activation/Deactivation
F Turn the lighting control stalk ring to the "AUTO " position.
F
I
n the Vehicle/Driving menu,
select the " Driving functions "
tab, then " Automatic headlamp
dip ".
Until deactivated, the lighting system changes
to "automatic illumination of headlamps" mode.
The status of the system remains in memory
when the ignition is switched off.
Operation
If the ambient light level is sufficient and/or if
the traffic conditions do not allow illumination of
the main beam headlamps: -
d
ipped beam is kept on, these
indicator lamps come on in the
instrument panel.
If the ambient light level is very low and the
traffic conditions permit: -
m
ain beam comes on
automatically: these indicator
lamps come on in the instrument
panel.
When the system detects thick fog, it
temporarily deactivates the function.
As soon as the vehicle leaves the area of thick
fog, the function reactivates automatically. This indicator lamp goes off while
the function is deactivated.
Pause
If the situation requires a change of headlamp
b eam, the driver can take over at any time.
F
F
lashing the headlamps pauses the function
and the system changes to "automatic
illumination of headlamps" mode:
-
i
f the "AUTO" and "Dipped beam"
indicator lamps are on, the system
changes to main beam,
They go off automatically after 30
seconds.
4
Lighting and visibility
Page 87 of 292

85
Cornering lighting
If fitted to the vehicle, this system makes use
of the beam from a front foglamp to illuminate
the inside of a
bend, when the main or dipped
beam headlamps are on and the vehicle speed
is below 25
mph (40 km/h) (urban driving,
winding road, junctions, parking manoeuvres,
e t c .) .
Without cornering lighting With cornering lightingActivation/Deactivation
The cornering lighting can be
activated or deactivated in the
Vehicle/Driving
menu of the touch
screen.
Switching on
This system starts:
- w hen the corresponding direction indicator
is switched on,
or
-
f
rom a certain angle of rotation of the
steering wheel.
Switching off
The system does not operate:
- b elow a certain angle of rotation of the
steering wheel,
-
a
bove 25 mph (40 km/h),
-
w
hen reverse gear is engaged.
Wiper control stalk
Programming
Your vehicle may also include some functions
that can be configured:
-
a
utomatic windscreen wipers,
-
r
ear wiping on engaging reverse gear.
In wintry conditions, remove snow, ice or
frost present on the windscreen, around
the wiper arms and blades and the
windscreen seal, before operating the
wipers.
Do not operate the wipers on a
dry
windscreen. Under extremely hot or cold
conditions, ensure that the wiper blades
are not stuck to the windscreen before
operating the wipers.
4
Lighting and visibility
Page 91 of 292
89
General safety
recommendations
Labels are affixed in different locations on
your vehicle. They include safety warnings
and vehicle identification information. Do
not remove them: they are an integral part
of your vehicle.
For any work on your vehicle, use
a qualified workshop that has the technical
information, skills and equipment required,
all of which a
CITROËN dealer is able to
provide.
Depending on country regulations, some
safety equipment may be compulsory:
high visibility safety vests, warning
triangles, breathalysers, spare bulbs,
spare fuses, fire extinguisher, first aid kit,
mud flaps at the rear of the vehicle, etc. We draw your attention to the following
points:
-
T
he fitting of electrical equipment
or accessories not approved by
CITROËN may cause excessive
current consumption and faults and
failures with the electrical system of
your vehicle. Contact a
CITROËN
dealer for information on the range of
recommended accessories.
-
A
s a safety measure, access to
the diagnostic socket, used for the
vehicle's electronic systems, is
reser ved strictly for CITROËN dealers
or qualified workshop, equipped
with the special tools required (risk
of malfunctions of the vehicle's
electronic systems that could cause
breakdowns or serious accidents).
The manufacturer cannot be held
responsible if this advice is not
followed.
-
A
ny modification or adaptation not
intended or authorised by CITROËN
or carried out without meeting the
technical requirements defined by
the manufacturer will result in the
suspension of the legal and contractual
warranties. Installation of accessory radio
communication transmitters
Before installing a
radio communication
transmitter with an external aerial, you
must without fail contact a CITROËN
dealer for the specification of transmitters
which can be fitted (frequency, maximum
power, aerial position, specific installation
requirements), in line with the Vehicle
Electromagnetic Compatibility Directive
(2004/104/EC).
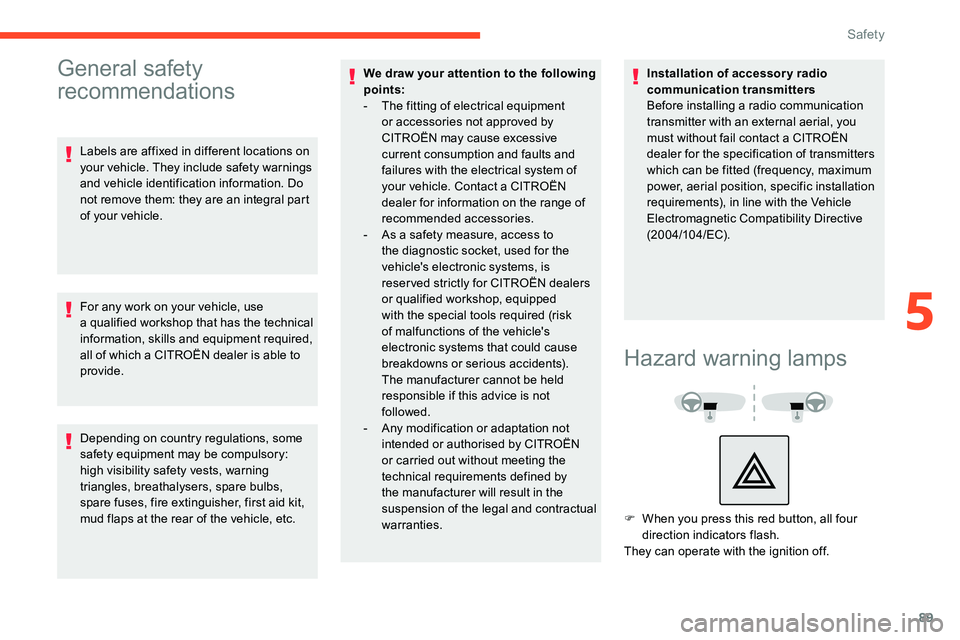
Hazard warning lamps
F When you press this red button, all four direction indicators flash.
They can operate with the ignition off.
5
Safety
Page 96 of 292
94
ASR/DSC
These systems offer increased safety
in normal driving, but they should not
encourage the driver to take extra risks or
drive at high speed.
It is in conditions of reduced grip (rain,
snow, ice) that the risk of loss of grip
increases. It is therefore important for your
safety to keep these systems activated in
all conditions, and particularly in difficult
conditions.
The correct operation of these
systems depends on obser vation of
the manufacturer's recommendations
regarding both the wheels (tyres and
rims), braking and electronic components
and the assembly and repair procedures
used by CITROËN dealers.
The use of snow tyres is recommended,
in order to be able to benefit from the
efficiency of these systems in winter
conditions.
In this case, it is essential to equip the
four wheels with tyres approved for your
vehicle.Trailer stability assist (TSA)
When towing, this system reduces the risk of
the vehicle or trailer swaying.
Operation
The system is activated automatically when the
ignition is switched on.
The electronic stability control (ESC) must not
have any faults.
If the system detects oscillations (snaking) in
the movement of the trailer at speeds between
37 and 99 mph (60 and 160 km/h), it acts
on the brakes to stabilise the trailer and, if
necessary, reduces the engine power to slow
down the vehicle.
The correction is signalled by the
flashing of this warning lamp in the
instrument panel and illumination of
the brake lamps.
For information on the weights and towed
loads, refer to the "Technical data" section or
the registration certificate for your vehicle.
To ensure complete safety while driving with
a
To w b a r d e v i c e , refer to the corresponding
section.
Operating fault
Should a fault occur with the system,
t his warning lamp comes on in the
instrument panel, accompanied by
the display of a
message and an
audible signal.
The trailer stability assist system offers
increased safety in normal driving,
provided that the recommendations on
towing a
trailer are obser ved. It should not
encourage the driver to take risks, such
as towing a
trailer in adverse operating
conditions (overloading, failure to obser ve
the trailer nose weight, worn or under-
inflated tyres, faulty braking system, etc.)
or drive at too high a
speed.
In certain cases, snaking of the trailer
may not be detected by the ESC system,
particularly with a
light trailer.
When driving on slippery or poor sur faces,
the system may not be able to prevent
sudden snaking of the trailer.
If you continue to tow a
trailer, reduce your
speed and drive carefully!
Contact a
CITROËN dealer or a qualified
workshop to have the system checked.
Safety