light CITROEN C5 AIRCROSS 2020 Handbook (in English)
[x] Cancel search | Manufacturer: CITROEN, Model Year: 2020, Model line: C5 AIRCROSS, Model: CITROEN C5 AIRCROSS 2020Pages: 292, PDF Size: 8.59 MB
Page 167 of 292

165
This system warns the driver of the presence
of another vehicle in the blind spots of their
vehicle (areas hidden from the driver's field
of vision), as soon as this presents a potential
danger.
A fixed warning lamp appears in the door mirror
on the side in question:
-
i
mmediately, when being overtaken,
-
a
fter a delay of about one second, when
overtaking a
vehicle slowly.
In addition to the fixed warning lamp in the door
mirror on the side in question, a correction of
trajectory will be felt if you attempt to cross
a
lane marking with the direction indicator
activated, to help you avoid a
collision.This driving aid system is designed to
improve safety when driving and is in no
circumstances a
substitute for the use
of the interior rear view mirror and door
mirrors. It is the driver's responsibility to
constantly check the traffic, to assess the
relative distances and speeds of other
vehicles and to anticipate their movements
before deciding whether to change lane.
Activation/Deactivation
The function is activated and
deactivated in the Driving/Vehicle
menu of the touch screen.
The state of the system stays in the memory
when switching off the ignition.
The system is automatically deactivated
when towing with a
towing device
approved by CITROËN.
Operation
The alert is given by an orange warning lamp
coming on in the relevant door mirror, as soon
as a
vehicle – car, lorry, bicycle – is detected.
A correction of trajectory will be felt if you
attempt to cross a
lane marking with the
direction indicator flashing.
The following conditions must be met for this:
-
a
ll vehicles are moving in the same direction
and in adjacent lanes,
-
t
he speed of the vehicle must be between
7
and 87 mph (12 and 140 km/h) for the
alert and between 40
and 87 mph (65 and
140
km/h) for a correction of trajectory,
-
t
he system must be activated to trigger
a
change of trajectory,
-
y
ou overtake a vehicle with a speed
difference of less than 6
mph (10 km/h),
-
a v
ehicle overtakes you with a speed
difference of less than 16
mph (25 km/h),
-
t
he traffic is flowing normally,
-
ov
ertaking a vehicle over a certain period
of time and the vehicle being overtaken
remains in the blind spot,
-
y
ou are driving on a straight or slightly
curved road,
-
y
our vehicle is not towing a trailer, a
caravan, etc.
Sensors fitted in the front and rear bumpers
monitor the blind spots.
6
Driving
Page 186 of 292

184
F The wheel 6 turns a quarter of a turn anti-
clockwise; take care to keep your hands
clear!
F
C
heck that the mechanism has correctly
locked into place (position A ).
F
C
lose the lock 7 using the key.
F
A
lways remove the key. The key cannot be
removed when the lock is open.
F
C
lip the cap onto the lock.
During use
Never release the locking system with
a
trailer or load carrier on the towball.
Never exceed the maximum authorised
weight for the vehicle – the Gross Train
Weight or GTW.
It is essential that the maximum
authorised load be complied with on the
towing device: if it is exceeded, this device
may detach from the vehicle, which is
a
serious accident risk.
Check that the trailer lamps work
c o r r e c t l y.
Before setting off, check the adjustment of
the headlamp beam height.
For more information on Headlamp
adjustment , refer to the corresponding
section.
After use
When travelling without a
trailer or load
carrier, the towball must be removed and
the protective plug inserted in the carrier
for good visibility of the number plate and
its lighting.Fitting the towball
F Insert the end of the towball 5 into the
carrier 1 and push it upwards; the locking
will take place automatically.
F
B
elow the rear bumper, remove the
protective plug 2 from the carrier 1
.
Practical information
Page 195 of 292
193
If the warning lamp stays on, this indicates
a low Diesel additive level.
For more information on Checking levels ,
refer to the corresponding section.
Following prolonged operation of the
vehicle at very low speed or at idle,
you may, in exceptional circumstances,
notice the emission of water vapour at the
exhaust on acceleration. This does not
affect the behaviour of the vehicle or the
environment.
New vehicle
The first particle filter regeneration
operations may be accompanied by a
"burning" smell, which is per fectly normal.
Manual gearbox
The gearbox does not require any
maintenance (no oil change).
Automatic gearbox
The gearbox does not require any
maintenance (no oil change).
Brake pads
Brake wear depends on the style
of driving, particularly in the case
of vehicles used in town, over short
distances. It may be necessary to
have the condition of the brakes
checked, even between vehicle
services.
Unless there is a
leak in the circuit, a drop in
the brake fluid level indicates that the brake
pads are worn.
After washing the vehicle, dampness, or
in wintry conditions, ice can form on the
brake discs and pads: braking efficiency
may be reduced. Make light brake
applications to dry and defrost the brakes.
Brake disc wear
For information on checking brake
disc wear, contact a CITROËN
dealer or a
qualified workshop.
Electric parking brake
This system does not require any
routine servicing. However, in case
of an issue, do not hesitate to have
the system checked by a
CITROËN
dealer or a
qualified workshop.
For more information on the Electric
parking brake , refer to the corresponding
section.
Wheels and tyres
The pressure must be checked on
all tyres, including the spare wheel,
when the tyres are "cold", at least
once a
month and before a long
j o u r n ey.
The pressures indicated on the tyre pressure
label are valid for "cold" tyres. If you have
driven for more than 10
minutes or more
than 6
miles (10 kilometres) at over 31 mph
(50
km/h), add 0.3 bar (30 kPa) to the values
indicated on the label.
7
Practical information
Page 197 of 292
195
For more information on the Warning
and indicator lamps and the associated
alerts, or the Indicators , refer to the
corresponding sections.
Once the AdBlue
® tank is empty, a system
required by regulations prevents starting
of the engine.
If the SCR system is faulty, the level of
emissions from your vehicle will no longer
meet the Euro 6
standard: your vehicle
becomes polluting.
In the event of a
confirmed fault with the
SCR system, you must go to a
CITROËN
dealer or a
qualified workshop as soon
as possible: after travelling a
distance
of 685
miles (1,100 km), a system will be
triggered automatically to prevent engine
starting.
In either case, a range indicator gives you
the distance you can travel before the
vehicle is immobilised.
Freezing of the AdBlue
®
AdBlue® freezes at temperatures below
around -11°C.
The SCR system includes a
heater for the
AdBlue
® tank, allowing you to continue
driving in very cold conditions.
Supply of AdBlue®
It is recommended that the AdBlue® be topped
up as soon as the first alert is issued indicating
that the reser ve level has been reached.
In order to ensure that the SCR system
operates correctly:
-
U
se only AdBlue
® fluid that meets the
ISO
22241
standard.
-
N
ever transfer AdBlue
® to another
container: it would lose its purity.
-
N
ever dilute AdBlue
® with water.
You can obtain AdBlue
® from a CITROËN
d
ealer or a
qualified workshop.
You can also visit a
ser vice station equipped
with AdBlue
® pumps specially designed for
passenger vehicles.
Recommendations on
storage
If the fluid has frozen, it can be used once it has
completely thawed out at room temperature.
Never keep bottles or containers of
AdBlue
® in your vehicle.
Precautions for use
AdBlue® is a urea-based solution. This liquid
is
non-flammable, colourless and odourless
(when kept in a
cool place).
In the event of contact with the skin, wash the
affected area with soap and water. In the event
of contact with the eyes, wash (irrigate) the
eyes with large amounts of water or with an eye
wash solution for at least 15
minutes. If you feel
a
persistent burning sensation or irritation, get
medical attention.
If swallowed, immediately wash out the mouth
with clean water and then drink plenty of water.
In certain conditions (at high temperature,
for example), the risk of release of ammonia
cannot be excluded: do not inhale the vapour.
Ammonia has an irritant effect on mucous
membranes (eyes, nose and throat).
AdBlue
® freezes below about -11°C and
deteriorates above 25°C. It should be stored in
a
cool place and protected from direct sunlight.
Under these conditions, the fluid can be kept
for at least a
year.
7
Practical information
Page 209 of 292
207
In some weather conditions (e.g. low
temperature or humidity), the presence
of misting on the internal sur face of the
glass of the headlamps and rear lamps is
normal; it disappears after the lamps have
been on for a few minutes.
Light-emitting diodes (LED)
For the replacement of this type of bulb,
you must contact a
CITROËN dealer or
a
qualified workshop.
Halogen bulbs
To ensure good quality lighting, check
that the bulb is correctly positioned in its
housing.Front lamps
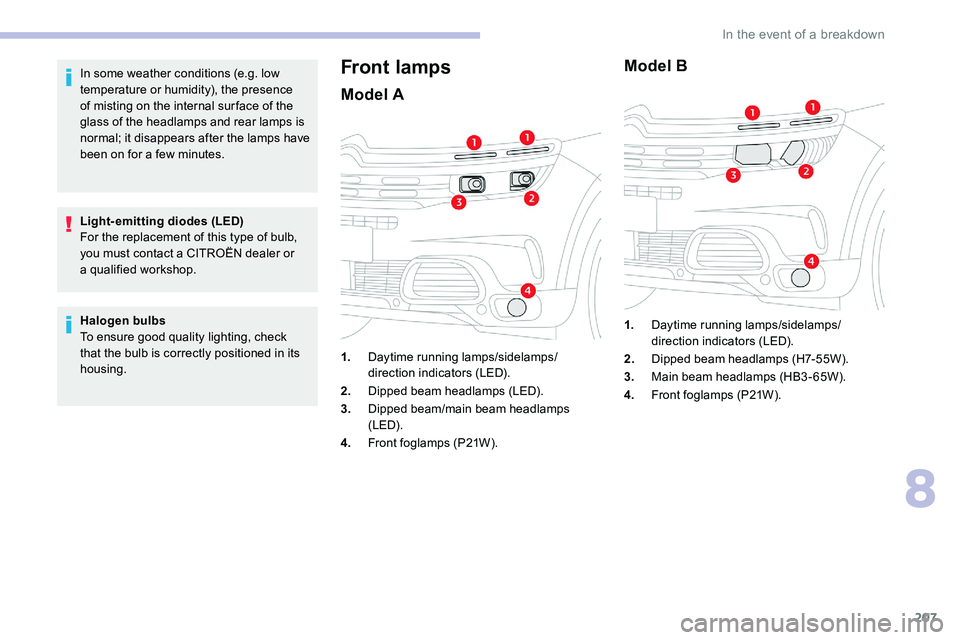
Model A
1. Daytime running lamps/sidelamps/
direction indicators (LED).
2. Dipped beam headlamps (LED).
3. Dipped beam/main beam headlamps
(LED).
4. Front foglamps (P21W).
Model B
1.Daytime running lamps/sidelamps/
direction indicators (LED).
2. Dipped beam headlamps (H7-55W).
3. Main beam headlamps (HB3-65W).
4. Front foglamps (P21W).
8
In the event of a breakdown
Page 212 of 292

210
Rear lamps
1.Brake lamps (LED).
2. Sidelamps (LED).
3. Direction indicators (W Y21W).
4. Reversing lamps (W16W).
5. Foglamps (P21W).
Direction indicators (on the
wings)
F Open the tailgate, then unclip the access
cover on the side in question.
F
U
nblock the lamp fixing nut with a 10 mm
box spanner.
F
T
o avoid losing the nut in the wing trim if it
drops, first place a
cloth below it.
F
M
anually unscrew and remove the lamp
fixing nut.
F
D
isengage the retaining clip, while pushing
the lamp out slightly. F
F
rom the outside, carefully remove the lamp
by pulling it to the rear, then up.
F
D
isengage the cable duct from the panel.
F
T
urn the bulb holder a quarter turn using
a universal pair of pliers if necessary and
pull it out.
F
R
emove the bulb and replace it.
To refit, carry out these operations in reverse
o r d e r.
Reversing lamps (on the tailgate)
F Open the tailgate, then insert a flat
screwdriver into the cut-out to unclip the
access cover on the side in question.
F
U
nblock the lamp fixing nut with a 10 mm
box spanner.
F
M
anually unscrew and remove the lamp
fixing nut.
F
D
isengage the retaining clip, while pushing
the lamp out slightly.
In the event of a breakdown
Page 213 of 292

211
To refit, carry out these operations in reverse
o r d e r.
Foglamps
If changing a bulb within a few minutes of
s witching off the ignition, take care not to
touch the exhaust – risk of burns!
Third brake lamp (LED)
For the replacement of this type of diode bulb,
contact a CITROËN dealer or a qualified
workshop.
Number plate lamps (W5W)
Interior lighting
Courtesy lamps
Front courtesy lamp
F From the outside, carefully remove the lamp by pulling it to the rear.
F
D
isconnect the lamp connector by pressing
on each side.
F
T
urn the bulb holder a quarter turn and pull
it out.
F
R
emove the bulb and replace it.
These bulbs are replaced from outside the rear
bumper:
F
p
ass your hand under the bumper,
F
t
urn the bulb holder a quarter turn and
remove it, F
t
urn the bulb a quarter turn and replace it.
To refit, carry out these operations in reverse
o r d e r.
F
I
nsert a thin screwdriver into one of the cut-
outs in the lens.
F
P
ush it outwards to unclip it.
F
R
emove the lens.
F
R
eplace the faulty bulb.
To refit, press the lens to clip it in.
Rear courtesy lamp
For the replacement of these bulbs, contact
a CITROËN dealer or a qualified workshop.
8
In the event of a breakdown
Page 216 of 292
214
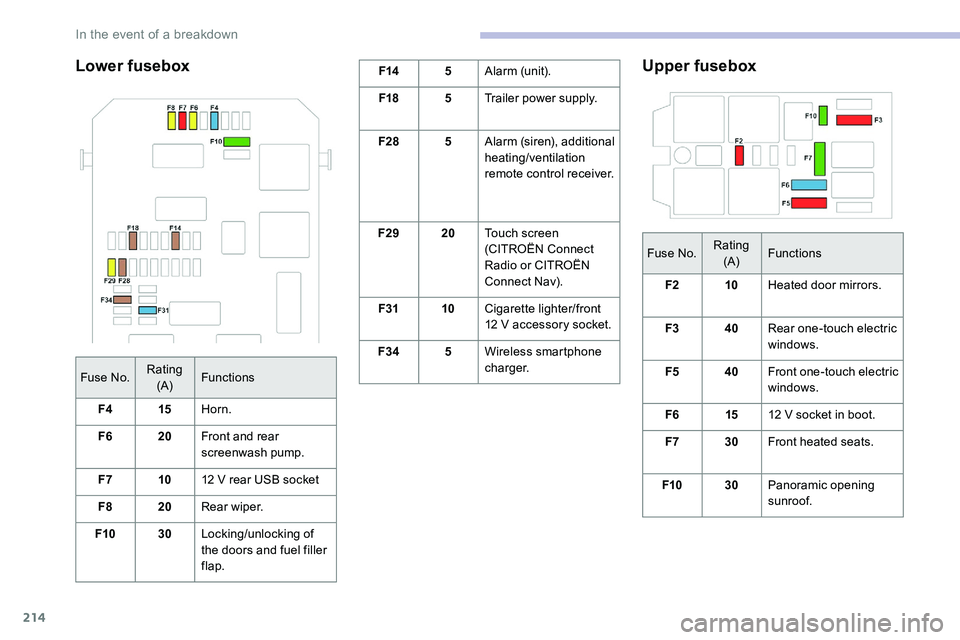
Lower fuseboxF145Alarm (unit).
F18 5Trailer power supply.
F28 5Alarm (siren), additional
heating/ventilation
remote control receiver.
F29 20Touch screen
(CITROËN Connect
Radio or CITROËN
Connect Nav).
F31 10Cigarette lighter/front
12
V accessory socket.
F34 5Wireless smartphone
charger.Upper fusebox
Fuse No. Rating
(A) Functions
F2 10Heated door mirrors.
F3 40Rear one-touch electric
windows.
F5 40Front one-touch electric
windows.
F6 1512
V socket in boot.
F7 30Front heated seats.
F10 30Panoramic opening
sunroof.
Fuse No.
Rating
(A) Functions
F4 15Horn.
F6 20Front and rear
screenwash pump.
F7 1012
V rear USB socket
F8 20Rear wiper.
F10 30Locking/unlocking of
the doors and fuel filler
flap.
In the event of a breakdown
Page 218 of 292
216
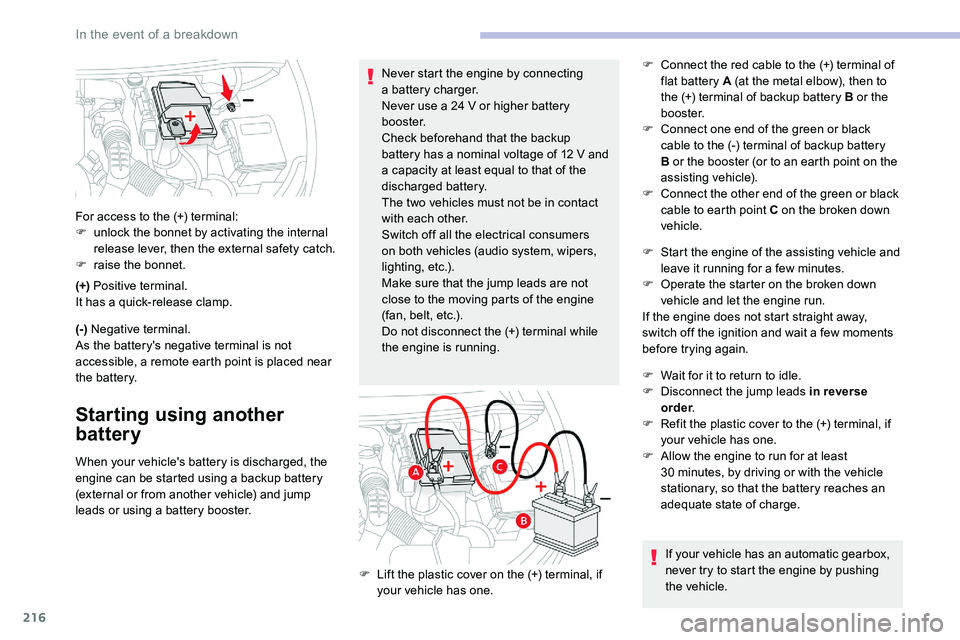
(+) Positive terminal.
It has a quick-release clamp.
(-) Negative terminal.
As the battery's negative terminal is not
accessible, a remote earth point is placed near
the battery.
Starting using another
battery
When your vehicle's battery is discharged, the
engine can be started using a backup battery
(external or from another vehicle) and jump
leads or using a
battery booster.
For access to the (+) terminal:
F
u
nlock the bonnet by activating the internal
release lever, then the external safety catch.
F
r
aise the bonnet.
Never start the engine by connecting
a battery charger.
Never use a 24 V or higher battery
b o o s t e r.
Check beforehand that the backup
battery has a nominal voltage of 12 V and
a capacity at least equal to that of the
discharged battery.
The two vehicles must not be in contact
with each other.
Switch off all the electrical consumers
on both vehicles (audio system, wipers,
lighting, etc.).
Make sure that the jump leads are not
close to the moving parts of the engine
(fan, belt, etc.).
Do not disconnect the (+) terminal while
the engine is running. F
C
onnect the red cable to the (+) terminal of
flat battery A (at the metal elbow), then to
the (+) terminal of backup battery B or the
b o o s t e r.
F
C
onnect one end of the green or black
cable to the (-) terminal of backup battery
B or the booster (or to an earth point on the
assisting vehicle).
F
C
onnect the other end of the green or black
cable to earth point C on the broken down
vehicle.
F
L
ift the plastic cover on the (+) terminal, if
your vehicle has one. F
S
tart the engine of the assisting vehicle and
leave it running for a few minutes.
F
O
perate the starter on the broken down
vehicle and let the engine run.
If the engine does not start straight away,
switch off the ignition and wait a few moments
before trying again.
F
W
ait for it to return to idle.
F
D
isconnect the jump leads in reverse
order .
F
R
efit the plastic cover to the (+) terminal, if
your vehicle has one.
F A llow the engine to run for at least
30 minutes, by driving or with the vehicle
stationary, so that the battery reaches an
adequate state of charge.
If your vehicle has an automatic gearbox,
never try to start the engine by pushing
the vehicle.
In the event of a breakdown
Page 219 of 292
217
Charging the battery using
a battery charger
For optimum ser vice life of the battery, it is
essential to maintain an adequate state of
charge.
In some circumstances, it may be necessary to
charge the battery:
-
u
sing the vehicle mainly for short journeys,
-
i
f the vehicle is to be taken off the road for
several weeks.
Contact a
CITROËN dealer or a qualified
workshop.
To charge the vehicle's battery yourself,
use only a
charger compatible with lead-
acid batteries with a
nominal voltage of
12
V.
Follow the instructions provided by the
manufacturer of the charger.
Never reverse polarities.
It is not necessary to disconnect the
battery. F
S
witch off the ignition.
F
S
witch off all electrical consumers (audio
system, lighting, wipers, etc.). Never try to charge a frozen battery – risk
of explosion!
If the battery has frozen, have it checked
by a CITROËN dealer or by a qualified
workshop who will verify that the internal
components have not been damaged
and that the case has not cracked, which
would mean a
risk of toxic and corrosive
acid leaking.
Some functions, including Stop & Start,
are not available if the battery is not
sufficiently charged.
Disconnecting the battery
F Switch off charger B before connecting the cables to the battery, so as to avoid any
dangerous sparks.
F
E
nsure that the charger cables are in good
condition.
F
I
f the vehicle has one, lift the plastic cover
on the (+) terminal.
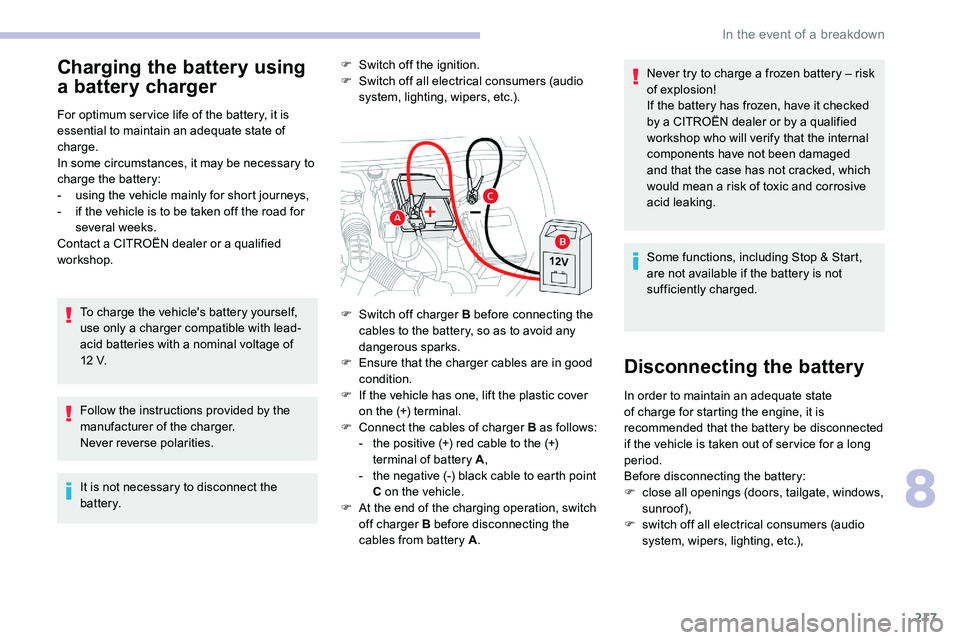
F
C
onnect the cables of charger B as follows:
-
t
he positive (+) red cable to the (+)
terminal of battery A ,
-
t
he negative (-) black cable to earth point
C on the vehicle.
F
A
t the end of the charging operation, switch
off charger B before disconnecting the
cables from battery A . In order to maintain an adequate state
of charge for starting the engine, it is
recommended that the battery be disconnected
if the vehicle is taken out of ser vice for a
long
period.
Before disconnecting the battery:
F
c
lose all openings (doors, tailgate, windows,
sunroof),
F
s
witch off all electrical consumers (audio
system, wipers, lighting, etc.),
8
In the event of a breakdown