tow CITROEN C5 AIRCROSS 2020 Handbook (in English)
[x] Cancel search | Manufacturer: CITROEN, Model Year: 2020, Model line: C5 AIRCROSS, Model: CITROEN C5 AIRCROSS 2020Pages: 292, PDF Size: 8.59 MB
Page 201 of 292

199
The jack must only be used to change
a wheel with a damaged or punctured tyre.
Do not use any jack other than the one
supplied with this vehicle.
If the vehicle does not have its original
jack, contact a
CITROËN dealer or
a
qualified workshop to obtain the correct
jack for it.
The jack meets European standards,
as defined in the Machinery Directive
2006/42/CE.
The jack does not require any
maintenance.
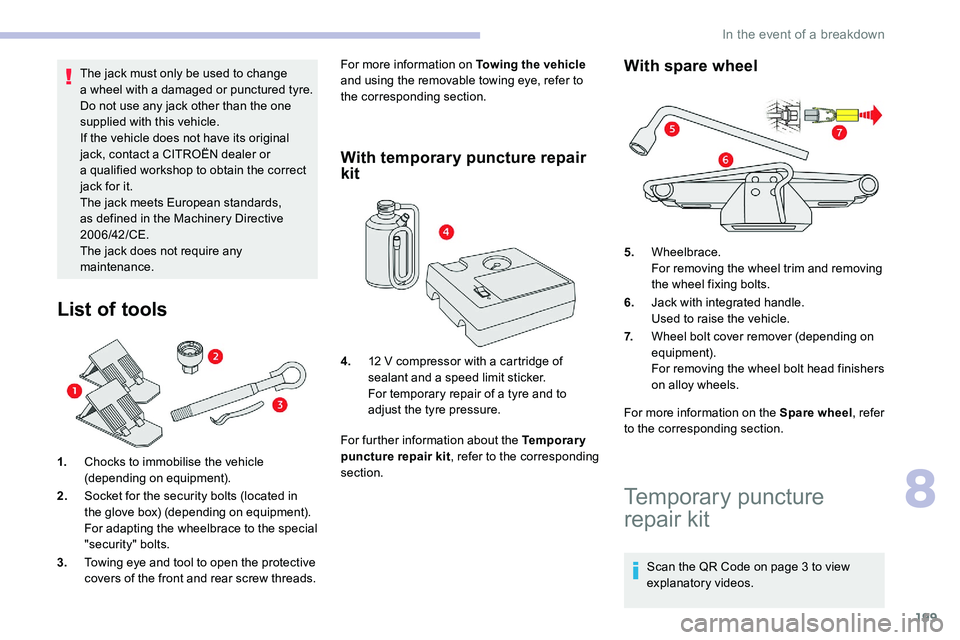
List of tools
1. Chocks to immobilise the vehicle
(depending on equipment).
2. Socket for the security bolts (located in
the glove box) (depending on equipment).
For adapting the wheelbrace to the special
"security" bolts.
3. Towing eye and tool to open the protective
covers of the front and rear screw threads. For more information on Towing the vehicle
and using the removable towing eye, refer to
the corresponding section.
With temporary puncture repair
kit
For further information about the Temporary
puncture repair kit , refer to the corresponding
section.
With spare wheel
For more information on the Spare wheel , refer
to the corresponding section.
4.
12
V compressor with a
cartridge of
sealant and a
speed limit sticker.
For temporary repair of a
tyre and to
adjust the tyre pressure. 5.
Wheelbrace.
For removing the wheel trim and removing
the wheel fixing bolts.
6. Jack with integrated handle.
Used to raise the vehicle.
7. Wheel bolt cover remover (depending on
equipment).
For removing the wheel bolt head finishers
on alloy wheels.
Temporary puncture
repair kit
Scan the QR Code on page 3 to view
e xplanatory videos.
8
In the event of a breakdown
Page 202 of 292

200
Made up of a compressor and a sealant
c artridge, it allows the temporary repair of
a
tyre so that you can drive to the nearest
garage.
It is designed to repair most punctures which
could affect the tyre, located on the tyre tread.
The vehicle's electric system allows the
connection of the compressor for long
enough to inflate a
tyre after a puncture
repair.
Composition of the kit
1. 12 V compressor, with integral pressure
gauge.
2. Sealant cartridge, with integral hose.
3. Speed limit sticker.
Repair procedure
F Park the vehicle without obstructing any
traffic and apply the parking brake.
F
F
ollow the safety instructions (hazard
warning lamps, warning triangle, wearing
high visibility vest, etc.) according to the
legislation in force in the country where you
are driving.
F
S
witch off the ignition.
F
U
ncoil the pipe stowed under the
compressor.
Do not remove any foreign bodies (e.g.
nail, screw, etc.) which have penetrated
into the tyre.
F
C
onnect the pipe from the compressor to
the bottle of sealant. F
R
emove the valve cap from the tyre to be
repaired, and place it in a
clean area.
F
T
urn the bottle of sealant over and secure it
in the notch provided on the compressor.
F
C
onnect the hose from the bottle of sealant
to the valve of the tyre to be repaired and
tighten firmly.
In the event of a breakdown
Page 203 of 292

201
F Check that the compressor switch is in position " O".
F
F
ully uncoil the electric cable, stowed under
the compressor.
F
C
onnect the compressor's electric plug to
one of the vehicle's 12
V sockets.
F
A
ffix the speed limit sticker.
The speed limit sticker must be secured to
the interior of the vehicle in the area close
to the driver, to remind the driver that
a
wheel is in temporary use. F
S witch on the ignition.
If a pressure of 2 bars is not reached after
about 7
minutes, this indicates that the
tyre is not repairable; contact a
CITROËN
dealer or a
qualified workshop for
assistance. F
R emove the kit.
F R emove and then store the bottle of sealant.
Take care, the sealant product is harmful
if swallowed and causes irritation to the
eyes.
Keep this product out of the reach of
children.
The use-by date of the fluid is marked on
the bottle.
After use, do not discard the bottle in
standard waste, take it to a
CITROËN
dealer or an authorised waste disposal
site.
Do not forget to obtain a
new bottle of
sealant, available from a
CITROËN dealer
or a
qualified workshop.
The tyre inflation pressures are given on
this label. F
S
tart the compressor by turning the switch
to position " I" until the pressure of the tyre
reaches 2
bars. The sealant product is
injected under pressure into the tyre; do not
disconnect the pipe from the valve during
this operation (risk of blowback).
F
T
urn the switch to position "O".
F
D
isconnect the compressor's electric plug
from the vehicle's 12
V socket.
F
R
eplace the cap on the valve.F
D
rive immediately for approximately 3 miles
(5
kilometres), at reduced speed (between
12
and 37 mph (20 and 60 km/h)), to plug
the puncture.
8
In the event of a breakdown
Page 204 of 292

202
Do not exceed the speed of 50 mph
( 80 km/h) when driving with a tyre repaired
using this type of kit.
Checking/adjusting tyre
pressures
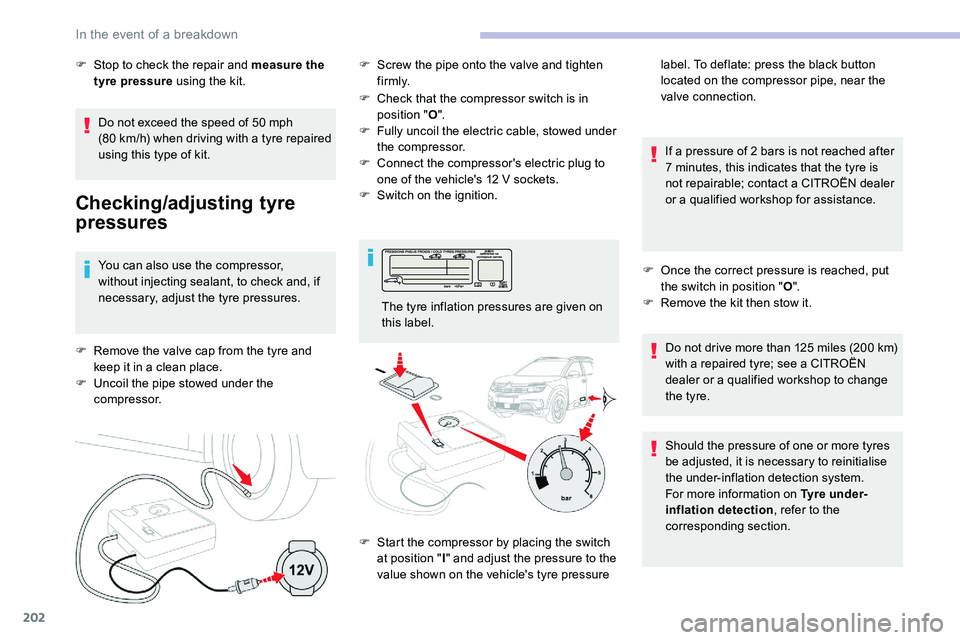
You can also use the compressor,
without injecting sealant, to check and, if
necessary, adjust the tyre pressures.
F
R
emove the valve cap from the tyre and
keep it in a
clean place.
F
U
ncoil the pipe stowed under the
compressor. F
C
heck that the compressor switch is in
position " O".
F
F
ully uncoil the electric cable, stowed under
the compressor.
F
C
onnect the compressor's electric plug to
one of the vehicle's 12 V sockets.
F
S
witch on the ignition.
If a pressure of 2 bars is not reached after
7 minutes, this indicates that the tyre is
not repairable; contact a CITROËN dealer
or a
qualified workshop for assistance.
F O nce the correct pressure is reached, put
the switch in position " O".
F
R
emove the kit then stow it.
F
S
top to check the repair and measure the
tyre pressure using the kit. F
S
crew the pipe onto the valve and tighten
f i r m l y.
The tyre inflation pressures are given on
this label.
F
S
tart the compressor by placing the switch
at position " I" and adjust the pressure to the
value shown on the vehicle's tyre pressure label. To deflate: press the black button
located on the compressor pipe, near the
valve connection.
Do not drive more than 125 miles (200 km)
with a
repaired tyre; see a CITROËN
dealer or a
qualified workshop to change
the tyre.
Should the pressure of one or more tyres
be adjusted, it is necessary to reinitialise
the under-inflation detection system.
For more information on Tyre under-
inflation detection , refer to the
corresponding section.
In the event of a breakdown
Page 205 of 292

203
Spare wheel
Scan the QR code on page 3 to view
e xplanatory videos.
Procedure for changing a
damaged wheel with
the spare wheel using the tools provided with
the vehicle.
Access to the spare wheel
The spare wheel is installed in the boot under
t h e f l o o r.
For access to the spare wheel, first refer to
section on the Tool kit .
Depending on version, the spare wheel is
a
standard size steel or alloy wheel.
For some countries of sale, it is the "space
saver" type.
Taking out the wheel
F Slacken the central nut.
F R emove the fastening device (nut and bolt).
F
L
ift the spare wheel towards you from the
r e a r.
F
T
ake the wheel out of the boot.
Putting the wheel back in place
F Put the wheel back in place in its housing.
F S lacken the nut on the bolt by a few turns.If there is no wheel in the well, the
fastening device (nut and bolt) cannot be
refitted.
Removing a wheel
Wheel with wheel trim
When removing the wheel
, first remove
the wheel trim by pulling at the valve
aperture using the wheelbrace.
When refitting the wheel , refit the wheel
trim, starting by placing its aperture in
line with the valve and then pushing it into
place all round its edge with the palm of
your hand.
F
P
osition the fastening device (nut and bolt)
in the middle of the wheel.
F
T
ighten the central nut to retain the wheel
c o r r e c t l y.
F
S
tore the tool box in the middle of the wheel
and clip it in place.
8
In the event of a breakdown
Page 208 of 292

206
After changing a wheel
Store the punctured wheel in the boot or,
depending on version, remove the central cover
first to store it beneath the floor in place of the
spare wheel. With a 'space-saver' type spare wheel
Driving with more than one 'space-saver'
type spare wheel is prohibited.
Visit a
CITROËN dealer or a qualified
workshop as soon as possible to have the
tightness of the bolts and the pressure of
the spare wheel checked.
Have the punctured tyre examined. After
inspection, the technician will advise you
on whether the tyre can be repaired or if it
must be replaced.
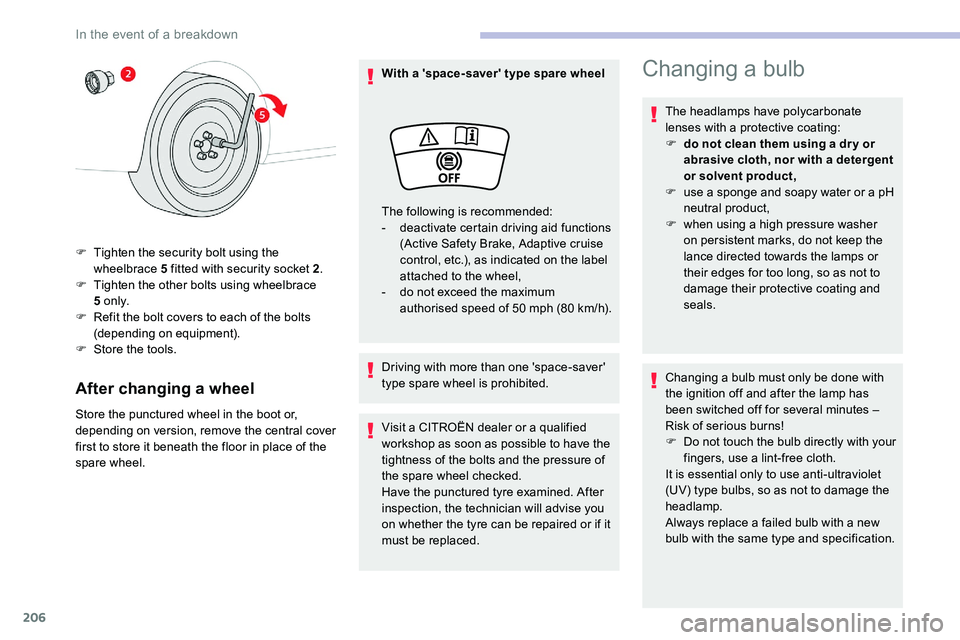
F
T
ighten the security bolt using the
wheelbrace 5 fitted with security socket 2
.
F
T
ighten the other bolts using wheelbrace
5 o n l y.
F
R
efit the bolt covers to each of the bolts
(depending on equipment).
F
S
tore the tools. The following is recommended:
-
d
eactivate certain driving aid functions
(Active Safety Brake, Adaptive cruise
control, etc.), as indicated on the label
attached to the wheel,
-
d
o not exceed the maximum
authorised speed of 50 mph (80 km/h).
Changing a
bulb
The headlamps have polycarbonate
lenses with a
protective coating:
F
d
o not clean them using a dr y or
abrasive cloth, nor with a
detergent
or solvent product,
F
u
se a sponge and soapy water or a pH
neutral product,
F
w
hen using a high pressure washer
on persistent marks, do not keep the
lance directed towards the lamps or
their edges for too long, so as not to
damage their protective coating and
seals.
Changing a
bulb must only be done with
the ignition off and after the lamp has
been switched off for several minutes –
Risk of serious burns!
F
D
o not touch the bulb directly with your
fingers, use a
lint-free cloth.
It is essential only to use anti-ultraviolet
(UV) type bulbs, so as not to damage the
headlamp.
Always replace a
failed bulb with a new
bulb with the same type and specification.
In the event of a breakdown
Page 221 of 292

219
Towing the vehicle
Procedure for having your vehicle towed or
for towing another vehicle using a removable
mechanical device.
Access to the tools
The towing eye is stored in a toolbox, under the
bo ot floor.
The opening tool for the rear protective cover is
secured to the towing eye.
For more information on the Vehicle tools ,
refer to the corresponding section.
Towing your vehicle
F On the front bumper, unclip the cover by using the tool fixed on the towing eye.
F
R
elease the cover to the right and then
downwards.
F
S
crew the towing eye in fully.
F
I
nstall the towbar.F
P
ut the gearbox into neutral.
Failure to obser ve this instruction could
result in damage to certain components
(braking, transmission, etc.) and the
absence of braking assistance the next
time the engine is started. Automatic gearbox: never tow the vehicle
with the front wheels on the ground with
the engine off.
F
U
nlock the steering and release the parking
brake.
F
S
witch on the hazard warning lamps on
both vehicles.
F
M
ove off gently, drive slowly and for a short
distance.
Towing another vehicle
F On the rear bumper, unclip the cover by using the tool fixed on the eye.
F
P
ull the cover downwards.
F
S
crew the towing eye in fully.
F
I
nstall the towbar.
8
In the event of a breakdown
Page 222 of 292

220
F Switch on the hazard warning lamps on both vehicles.
F
M
ove off gently, drive slowly and for a short
distance. General recommendations
Obser ve the legislation in force in the
country where you are driving.
Ensure that the weight of the towing
vehicle is higher than that of the towed
vehicle.
The driver must remain at the wheel of
the towed vehicle and must have a
valid
driving licence.
When towing a
vehicle with all four
wheels on the ground, always use an
approved towing arm; rope and straps are
prohibited.
The towing vehicle must move off gently.
When the vehicle is towed with its engine
off, there is no longer braking and steering
assistance.
In the following cases, you must always
call on a
professional recovery ser vice:
-
v
ehicle broken down on a motor way or
main road,
-
f
our-wheel drive vehicle,
-
w
hen it is not possible to put the
gearbox into neutral, unlock the
steering, or release the parking brake,
-
w
hen it is not possible to tow a vehicle
with an automatic gearbox, engine
running,
-
t
owing with only two wheels on the
ground,
-
w
here there is no approved towbar,
etc. available.
In the event of a breakdown
Page 224 of 292

222
Engine technical data and
towed loads
Engines
The engine characteristics are given in the
vehicle's registration document, as well as in
sales brochures.The maximum power corresponds to the
value type-approved on a
test bed, under
conditions defined in European legislation
(Directive 1999/99/EC).
For more information, contact a
CITROËN
dealer or a
qualified workshop.
Weights and towed loads
The weights and towed loads relating to your
vehicle are given in the registration document,
as well as in sales brochures.
These values are also given on the
manufacturer's plate or label.
For more information, contact a CITROËN
dealer or a
qualified workshop. The GTW (Gross Train Weight) and towed load
values indicated are valid up to a
maximum
altitude of 1,000 metres. The towed load value
must be reduced by 10% for each additional
1,000 metres of altitude.
The maximum authorised nose weight
corresponds to the weight permitted on the
towball.
When exterior temperatures are high,
the vehicle per formance may be limited
in order to protect the engine. When the
exterior temperature is higher than 37°C,
limit the towed weight.
Towing using a lightly loaded vehicle can
adversely affect roadholding.
Braking distances are increased when
towing a trailer.
When using a
vehicle to tow, never exceed
a
speed of 62 mph (100 km/h) (obser ve
the local legislation in force).
If the exterior temperature is high, it is
recommended that the engine be allowed
to idle for 1
to 2 minutes after the vehicle
comes to a
stop, to facilitate its cooling.
D. Tyres/paint code label.
This label is affixed to the driver's door
aperture.
It bears the following information about the
tyres:
-
t
he tyre pressures, unladen and laden,
-
t
he tyre specification, made up of the
dimensions and type as well as the load and
speed indices,
-
t
he spare tyre pressure.
It also indicates the paint colour code.
The vehicle may be originally equipped
with tyres with higher load and speed
indices than those indicated on the label,
without affecting inflation pressure.
Technical data
Page 225 of 292

223
Engines and towed loads – Petrol
Engines1.6 THP 165
(Euro 5) PureTech 130
S&S PureTech 175 S&S
Gearboxes E AT 6
(Automatic 6-speed) E AT 6
(Automatic 6-speed) E AT 8
(Automatic 8-speed)
Codes EP6FDTMD – AT6IIIEB2ADTS STTd
MB6E EP6FADTXD STTd
AT N 8
Model codes
J... 5GS – 5GY
5GXHNS 5GF
Cubic capacity (cm
3) 1,59 81,59 81,59 81,59 8
Max. power: EC standard (kW) 11 0121 9613 3
Fuel UnleadedUnleadedUnleadedUnleaded
Braked trailer (within the GTW limit) (kg)
on a
10% or 12% gradient 550
5501,3 5 0 1,5 0 0
Unbraked trailer (kg) 550550 739750
Maximum authorised nose weight (kg) 646454 64
9
Technical data