height CITROEN C5 AIRCROSS 2020 Handbook (in English)
[x] Cancel search | Manufacturer: CITROEN, Model Year: 2020, Model line: C5 AIRCROSS, Model: CITROEN C5 AIRCROSS 2020Pages: 292, PDF Size: 8.59 MB
Page 7 of 292

5
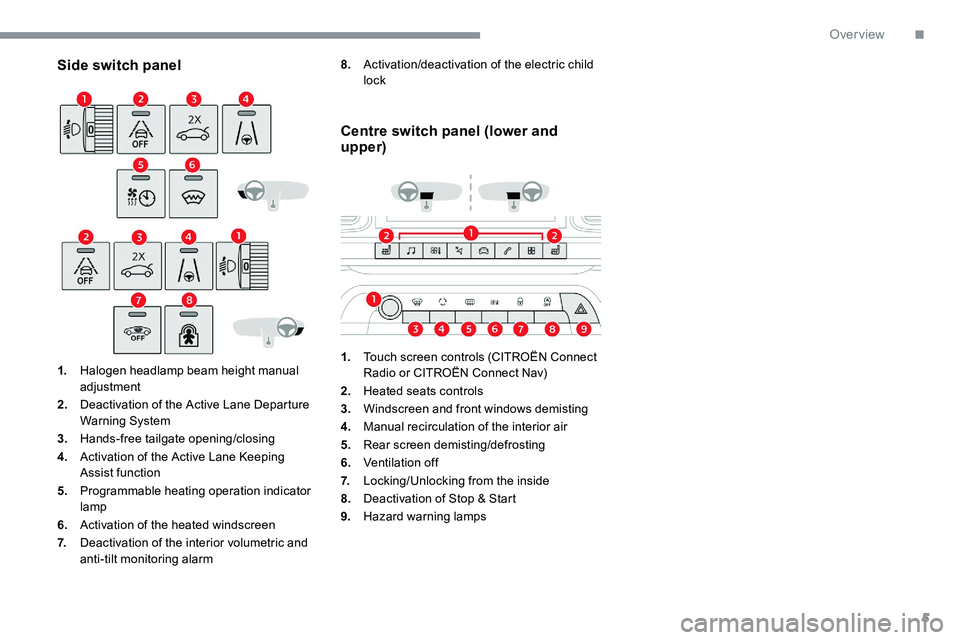
Side switch panel
1.Halogen headlamp beam height manual
adjustment
2. Deactivation of the Active Lane Departure
Warning System
3. Hands-free tailgate opening/closing
4. Activation of the Active Lane Keeping
Assist function
5. Programmable heating operation indicator
lamp
6. Activation of the heated windscreen
7. Deactivation of the interior volumetric and
anti-tilt monitoring alarm
Centre switch panel (lower and
upper)
1.Touch screen controls (CITROËN Connect
Radio or CITROËN Connect Nav)
2. Heated seats controls
3. Windscreen and front windows demisting
4. Manual recirculation of the interior air
5. Rear screen demisting/defrosting
6. Ventilation off
7. Locking/Unlocking from the inside
8. Deactivation of Stop & Start
9. Hazard warning lamps
8.
Activation/deactivation of the electric child
lock
.
Over view
Page 49 of 292

47
It is possible to interrupt the operation of
the tailgate at any point.
Pressing one of these controls again
interrupts the movement that is under way.
Following the interruption of a movement,
pressing one of these controls again
reverses the movement.
" Hands-Free Tailgate Access "
The "Hands-Free Tailgate Access"
function is activated/deactivated in
the Driving/Vehicle menu of the
touch screen.
Ensure that you are steady on your
feet before per forming the quick foot
movement.
Take care not to touch the exhaust system
which may be hot – risk of burns!
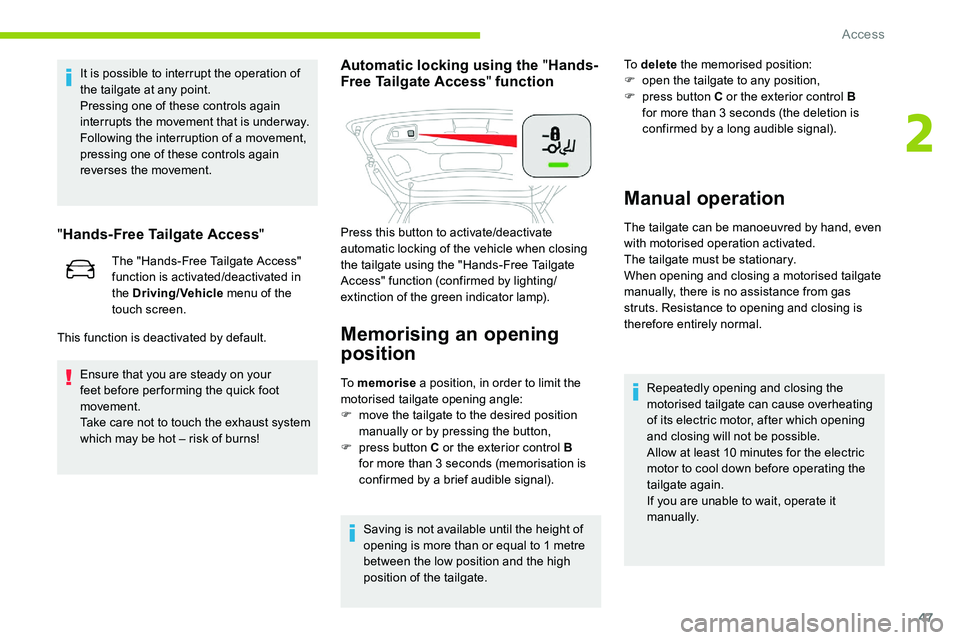
Automatic locking using the " Hands-
Free Tailgate Access " function
Memorising an opening
position
To memorise a position, in order to limit the
motorised tailgate opening angle:
F
m
ove the tailgate to the desired position
manually or by pressing the button,
F
p
ress button C or the exterior control B
for more than 3
seconds (memorisation is
confirmed by a
brief audible signal).
Saving is not available until the height of
opening is more than or equal to 1
metre
between the low position and the high
position of the tailgate. To delete
the memorised position:
F
o
pen the tailgate to any position,
F
p
ress button C or the exterior control B
for more than 3 seconds (the deletion is
confirmed by a long audible signal).
Manual operation
The tailgate can be manoeuvred by hand, even
with motorised operation activated.
The tailgate must be stationary.
When opening and closing a
motorised tailgate
manually, there is no assistance from gas
struts. Resistance to opening and closing is
therefore entirely normal.
This function is deactivated by default. Press this button to activate/deactivate
automatic locking of the vehicle when closing
the tailgate using the "Hands-Free Tailgate
Access" function (confirmed by lighting/
extinction of the green indicator lamp).
Repeatedly opening and closing the
motorised tailgate can cause overheating
of its electric motor, after which opening
and closing will not be possible.
Allow at least 10
minutes for the electric
motor to cool down before operating the
tailgate again.
If you are unable to wait, operate it
manually.
2
Access
Page 56 of 292

54
Correct driving position
Before taking to the road and to make the most
of the ergonomic layout of the instruments and
controls, carry out these adjustments in the
following order:
-
t
he height of the head restraint,
-
t
he seat backrest angle,
-
t
he seat cushion height,
-
t
he longitudinal position of the seat,
-
t
he height and reach of the steering wheel,
-
t
he rear view mirror and door mirrors.
Once these adjustments have been made,
check the instrument panel can be viewed
correctly from your driving position.
Front seats
Caution when moving the
front seats
For safety reasons, only adjust seats
when the vehicle is stationary.
Before moving the seat backwards, ensure
that there is no person or object that might
prevent the full travel of the seat.
There is a risk of trapping or pinching
passengers if present in the rear seats or
of jamming the seat if large objects are
placed on the floor behind the seat.
Front head restraints
Adjusting the height
The adjustment is correct when the upper
edge of the head restraint is level with the
top of the head.
'Two-way' adjustment model
'Four-way' adjustment model
Upwards:
F p ull the head restraint up to the desired
position; the head restraint can be felt to
click into position.
Downwards:
F
p
ress lug A and push the head restraint
down to the desired position.
Upwards:
F
p
ull the head restraint up to the desired
position; the head restraint can be felt to
click into position.
Ease of use and comfort
Page 57 of 292

55
Adjusting the angle
'Four-way' adjustment model
Downwards:
F
p ress and hold button B and push the head
restraint down to the desired position.
F
p
ress and hold button B and push the
lower part of the head restraint for wards or
backwards.
Removing a head restraint
F Press the lug(s) A (depending on version) to unlock the head restraint and remove it
completely,
F
S
tow the head restraint securely.
Refitting a head restraint
F Introduce the head restraint rods into the guides in the seat backrest.
F
P
ush the head restraint down as far as it will
go.
F
P
ress the lug(s) A (depending on version) to
release the head restraint and push it down.
F
A
djust the height of the head restraint.
Never drive with the head restraints
removed; they should be in place and
correctly adjusted for the occupant of the
seat.
Manually-adjusted seats
F Pull the head restraint up as far as it will go.
Longitudinal
F Raise the control bar and slide the seat forwards or backwards. F
T
urn the knob for wards or rear wards.
Lumbar support
(driver only)
F Turn the knob for wards or backwards to
obtain the desired level of lumbar support.
Backrest angle
F Release the bar to lock the seat in position on one of the runners.
3
Ease of use and comfort
Page 58 of 292

56
Height
F Pull the control upwards to raise or push it downwards to lower, as many times as
necessary to obtain the position required.
Electrically-adjusted seats
To avoid discharging the battery, carry
out these adjustments with the engine
running.
Longitudinal adjustment Backrest angle
F Tilt the control for wards or rear wards.
Electric lumbar adjustment
The control allows independent adjustment of
the depth and vertical position of the lumbar
support.
F
P
ress and hold the front or rear
of the control to increase or
reduce the lumbar support.
F
P
ress and hold the top or bottom
of the control to raise or lower the
lumbar support area.
Seat cushion height and angle
Comfort functions
Storing driving positions
(Depending on the country of sale.)
Associated with the electrically-adjusted
driver's seat, this function allows two driving
positions to be memorised, to make these
adjustments easier if there are frequent driver
changes.
It takes account of the electric adjustments of
the seat and the door mirrors.
F
P
ush the control for wards or rear wards to
slide the seat. F
T
ilt the rear of the control upwards or
downwards to obtain the required height.
F
T
ilt the front of the control upwards or
downwards to obtain the required angle.
Ease of use and comfort
Page 60 of 292

58
The massage settings are adjusted in the touch
screen.
The function is activated using the button on
the front seat.F
P
ress this button; its indicator
lamp comes on.
The function is activated immediately with the
last settings memorised and the settings page
is displayed in the touch screen.
If the settings suit you and you make no
changes, the display returns to its original
state.
If you want to change the settings:
F
s
elect another type of massage from the
five offered,
F
s
elect a massage intensity from the three
levels offered: " 1" (Low), " 2" (Normal) or " 3"
(High).
The changes are applied immediately.
Once activated, the system starts a
one hour
massage cycle, made up of sequences of
6
minutes of massage followed by 4 minutes
at rest.
The system stops automatically at the end of
the cycle; the indicator lamp for the button goes
of f.Steering wheel adjustment
F When stationary , pull the control A to
release the steering wheel.
F
A
djust the height and reach to suit your
driving position.
F
P
ush the control A to lock the steering
wheel.
For safety reasons, these adjustments
must only be carried out with the vehicle
stationary.
Mirrors
Door mirrors
Each fitted with an adjustable mirror glass
providing the lateral rear ward vision necessary
for overtaking or parking.
Demisting/Defrosting
If fitted to your vehicle, the
demisting/defrosting of the door
mirrors is done by pressing the rear
screen defrosting control.
Adjustment
They can also be folded for parking in narrow
spaces.
For more information on Rear screen demist –
defrost , refer to the corresponding section.
F
M
ove control A to the right or to the left to
select the corresponding mirror.
F
M
ove control B in any of the four directions
to adjust.
F
R
eturn control A to its central position.
Ease of use and comfort
Page 80 of 292

78
Ensure that the boot is empty before
moving the boot floor.
Storage well
To increase the boot volume with the floor in
the low position:
F
P
ull the cross-piece of the rear seats up
vertically to the level of the markings to
remove it.
F
T
o put it back in place, push it as far as it will
go, until it engages. F
R
aise the boot floor as much as possible to
access the storage well.
Depending on version, it includes:
-
a t
emporary puncture repair kit with the
vehicle tools,
-
a s
pare wheel with the vehicle tools.
To change the height:
F
L
ift and pull the floor towards you using its
central handle, then use the lateral stops to
move it.
F
P
ush the floor all the way for wards to place
it in the desired position.
Boot lighting
This comes on automatically when the boot is
opened and goes off automatically when the
boot is closed.
The lighting time varies according to the
circumstances:
-
w
hen the ignition is off, approximately
ten minutes,
-
i
n energy economy mode,
approximately thirty seconds,
-
w
ith the engine running, unlimited.
Ease of use and comfort
Page 86 of 292

84
Automatic adjustment
of "Full LED " technology
headlamps
If a fault occurs, this warning lamp
c omes on in the instrument panel,
accompanied by a
message and an
audible signal.
Do not touch the "Full LED" technology
headlamps – risk of electrocution!
This system automatically adjusts the height
of the beams from this type of headlamp,
according to the load in the vehicle, to avoid
causing a
nuisance to other road users.
The system then places the headlamp beams
in the lowest position.
Have the system checked by a
CITROËN
dealer or a
qualified workshop.
-
i
f the "AUTO" and "Main beam" indicator
lamps are on, the system changes to
dipped beam.
To reactivate the function, flash the headlamps
again.
The system may suffer inter ference or not
work correctly:
-
u
nder poor visibility conditions (snow,
heavy rain, etc.),
-
i
f the windscreen is dirty, misted or
obscured (by a
sticker, etc.) in front of
the camera,
-
i
f the vehicle is facing highly reflective
signs.
When the system detects thick fog, it
temporarily deactivates the function.
The system is not able to detect:
-
r
oad users that do not have their own
lighting, such as pedestrians,
-
v
ehicles whose lighting is obscured
(for example: vehicles running behind
a
safety barrier on a
motor way),
-
v
ehicles at the top or bottom of
a
steep slope, on winding roads, on
crossroads.
Headlamp adjustment
Manual adjustment of the
halogen headlamps
To avoid causing a nuisance to other road
u sers, the height of the halogen headlamps
should be adjusted according to the load in the
vehicle.
0 Driver only or driver + front passenger.
1 5
people.
4 5
people + loads in the boot.
5 Driver + loads in the boot.
The initial setting is position " 0".
Lighting and visibility
Page 100 of 292

98
This system improves safety in the front
seats in the event of a front or side impact.
Depending on the severity of the impact, the
pyrotechnic pretensioning system instantly
tightens the seat belts against the body of the
occupants.
The pyrotechnic pretensioning seat belts are
enabled when the ignition is on.
The force limiter reduces the pressure of the
seat belt on the chest of the occupant, thus
improving their protection.
Fastening
F Pull the strap, then insert the tongue in the buckle.
F
C
heck that the seat belt is fastened
correctly by pulling the strap.
Unfastening
F Press the red button on the buckle.
F G uide the seat belt as it is reeled in.
Height adjustment
F To adjust the height of the anchorage point, squeeze control A and slide it to the notch
desired.
Rear seat belts
Each of the rear seats has a three-point seat
b elt with inertia reel.
The outer seats are fitted with a
pyrotechnic
pretensioning and force limiting system. Before per forming any operations on the
rear seats, to avoid damage to the seat
belts, check that:
-
t
he outer seat belts are correctly in the
storage position, lying vertically along
the pillar,
-
t
he central seat belt is stowed.
Fastening
F Pull the strap then insert the tongue in the
buckle.
F
C
heck that the seat belt is fastened
correctly by pulling the strap.
Unfastening
F Press the red button on the buckle.
F G uide the seat belt as it is reeled in.
F
O
n the side seat belts, raise the bar to the
top of the backrest to prevent the tongue
from knocking against the side trim.
Rear central seat belt
The seat belt for the rear central seat is
integrated into the roof.
Safety
Page 103 of 292

101
Airbags
General information
System designed to help improve the safety
of the occupants sitting in the front seats and
the rear outer seats in the event of violent
collisions. The airbags supplement the action
of the seat belts fitted with force limiters at the
front seats and at the rear outer seats.
If a collision occurs, the electronic detectors
record and analyse the front and side impacts
sustained in the impact detection zones:
-
I
n the event of violent impact, the airbags
deploy instantly and help better protect
the occupants of the vehicle; immediately
after the impact, the airbags deflate rapidly
in order not to hinder the visibility or the
possible exit of the occupants,
-
i
n the case of a minor or rear impact or
in certain rollover conditions, the airbags
may not be deployed; the seat belt
alone contributes towards ensuring your
protection in these situations. The airbags do not operate when the
ignition is switched off.
This equipment will only deploy once. If
a
second impact occurs (during the same
or a subsequent accident), the airbag will
not be deployed again.
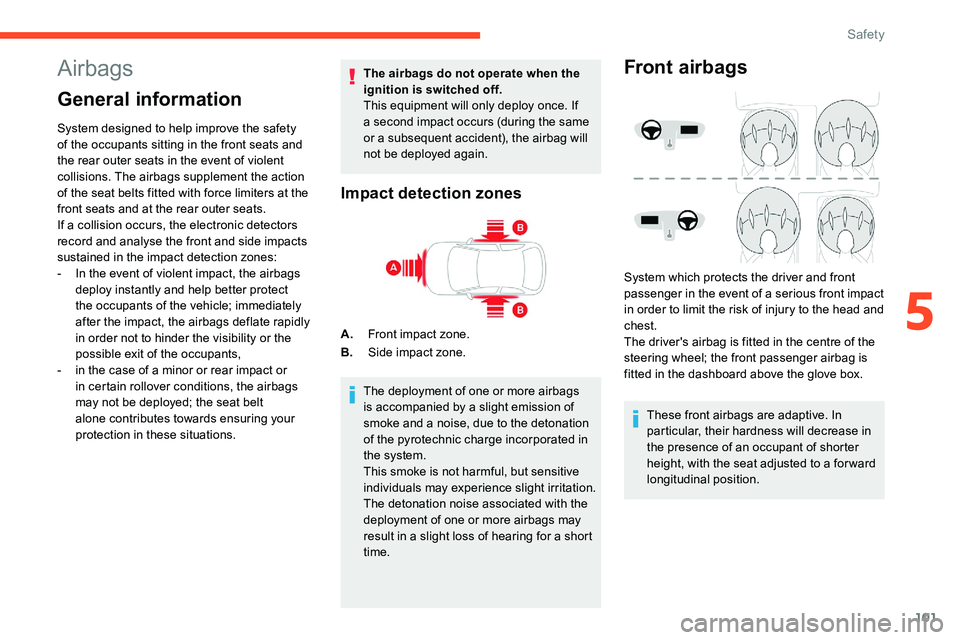
Impact detection zones
A. Front impact zone.
B. Side impact zone.
The deployment of one or more airbags
is accompanied by a
slight emission of
smoke and a
noise, due to the detonation
of the pyrotechnic charge incorporated in
the system.
This smoke is not harmful, but sensitive
individuals may experience slight irritation.
The detonation noise associated with the
deployment of one or more airbags may
result in a
slight loss of hearing for a short
time.
Front airbags
System which protects the driver and front
passenger in the event of a serious front impact
in order to limit the risk of injury to the head and
chest.
The driver's airbag is fitted in the centre of the
steering wheel; the front passenger airbag is
fitted in the dashboard above the glove box.
These front airbags are adaptive. In
particular, their hardness will decrease in
the presence of an occupant of shorter
height, with the seat adjusted to a
for ward
longitudinal position.
5
Safety