width CITROEN C5 AIRCROSS 2020 Handbook (in English)
[x] Cancel search | Manufacturer: CITROEN, Model Year: 2020, Model line: C5 AIRCROSS, Model: CITROEN C5 AIRCROSS 2020Pages: 292, PDF Size: 8.59 MB
Page 62 of 292

60
Rear seats
The 3 seats of the 2nd row are independent
and of the same width. Their backrests are
adjustable to adapt the boot load space.
Rear head restraints
The rear head restraints can be removed.
To remove a head restraint:
F
p
ull the head restraint as far up as it will go,
F
p
ress the lugs A to release the head
restraint and remove it completely,
F
s
tow the head restraint.
To refit a
head restraint:
F
i
nsert the head restraint rods into the guides
in the corresponding seat backrest,
F
p
ush the head restraint down as far as it will
go,
F
p
ress the lugs A to release the head
restraint and push it fully down. Never drive with passengers seated at
the rear when the head restraints are
removed; they must be in place and in the
high position.
Longitudinal adjustment
Seat operations must only be done with
the vehicle stationary.
Each seat can be adjusted individually.
F
Ra
ise the control and slide the seat
forwards or backwards.
They have two positions:
-
a high position , for when the seat is in use:
F
p
ull the head restraint fully up.
-
a low position , for stowing, when the seat
is not in use:
F
p
ress the lugs A to release the head
restraint and push it fully down.
Once the backrest is folded, it is no longer
possible to slide the seat.
Automatic "electrochrome " model
This system automatically and progressively
changes between day and night use by means
of a
s
ensor measuring the light coming from the
rear of the vehicle.
In order to ensure optimum visibility during
your manoeuvres, the mirror lightens
automatically when reverse gear is
engaged.
Ease of use and comfort
Page 172 of 292

170
Standard viewZoom view
Obstacles may appear further away than
they actually are.
It is important to check the sides of the
vehicle during the manoeuvre, using the
mirrors.
The rear parking sensors also supplement
the information on the vehicle's
surroundings.
AUTO mode- when shifting out of reverse (the image
remains displayed for 7 seconds),
-
b
y pressing the white arrow in the top left-
hand corner of the touch screen.
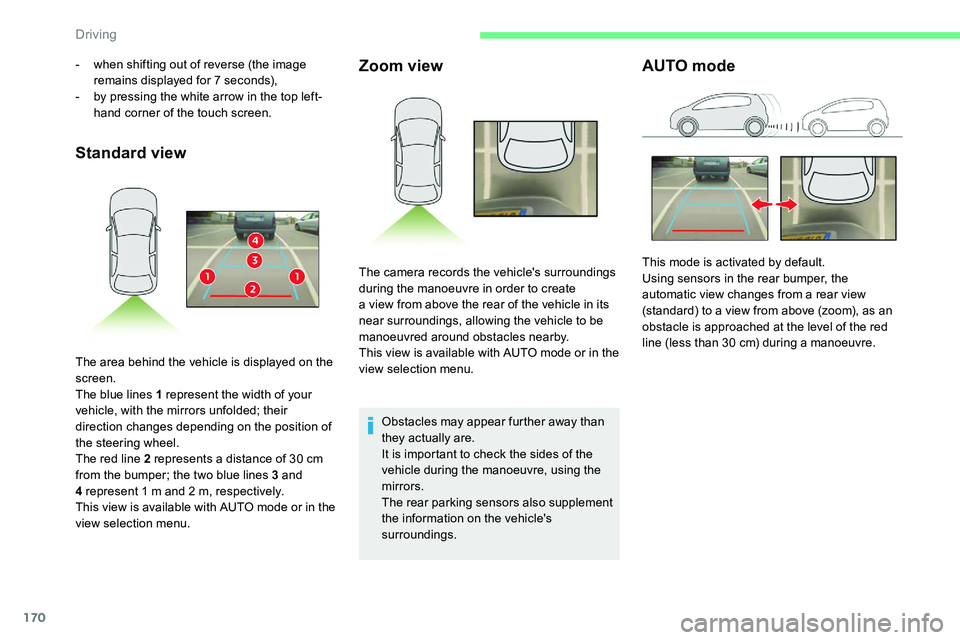
The area behind the vehicle is displayed on the
screen.
The blue lines 1
represent the width of your
vehicle, with the mirrors unfolded; their
direction changes depending on the position of
the steering wheel.
The red line 2
represents a distance of 30 cm
from the bumper; the two blue lines 3
and
4
represent 1 m and 2 m, respectively.
This view is available with AUTO mode or in the
view selection menu. The camera records the vehicle's surroundings
during the manoeuvre in order to create
a
view from above the rear of the vehicle in its
near surroundings, allowing the vehicle to be
manoeuvred around obstacles nearby.
This view is available with AUTO mode or in the
view selection menu. This mode is activated by default.
Using sensors in the rear bumper, the
automatic view changes from a
rear view
(standard) to a
view from above (zoom), as an
obstacle is approached at the level of the red
line (less than 30
cm) during a manoeuvre.
Driving
Page 174 of 292

172
F Select "Panoramic visual aid ".
AUTO mode is displayed by default, with front
vision, if the gearbox is in neutral or with a
gear
engaged, or with rear vision, if reverse is
engaged.
The system is deactivated:
-
a
utomatically above about 19 mph (30 km/h)
(the image disappears temporarily from
12
mph (20 km/h)),
-
b
y pressing the white arrow in the top left-
hand corner of the touch screen.
Standard view Zoom view
Obstacles may appear further away than
they actually are.
It is important to check the sides of the
vehicle during the manoeuvre, using the
mirrors.
The front and rear parking sensors also
provide information on the vehicle's
surroundings.
AUTO mode
With the engine running and the
speed below 12
mph (20 km/h), the
system is activated via the Driving/
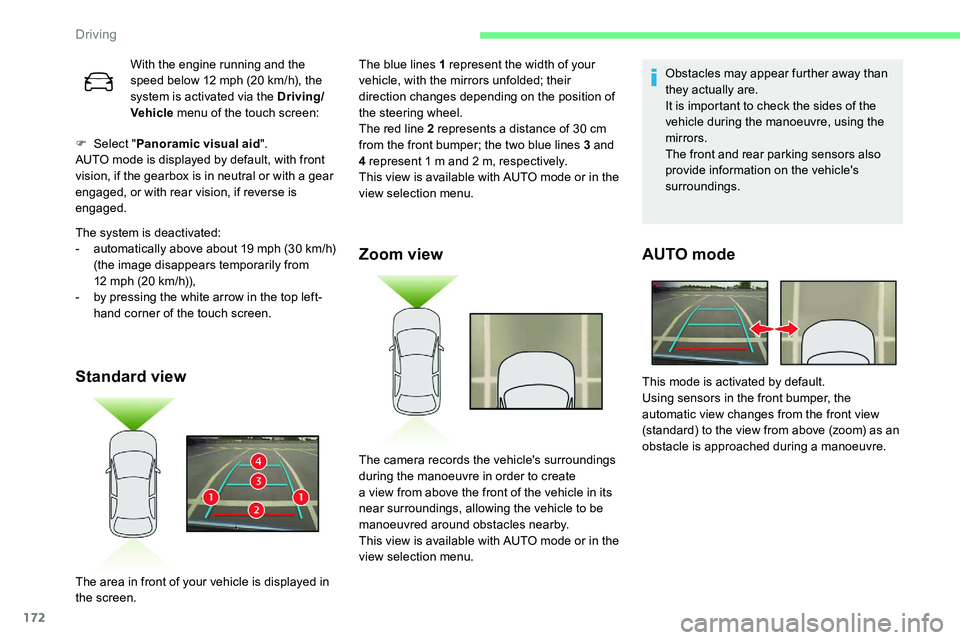
Vehicle menu of the touch screen: The blue lines 1
represent the width of your
vehicle, with the mirrors unfolded; their
direction changes depending on the position of
the steering wheel.
The red line 2
represents a distance of 30 cm
from the front bumper; the two blue lines 3
and
4
represent 1 m and 2 m, respectively.
This view is available with AUTO mode or in the
view selection menu.
The area in front of your vehicle is displayed in
the screen. The camera records the vehicle's surroundings
during the manoeuvre in order to create
a
view from above the front of the vehicle in its
near surroundings, allowing the vehicle to be
manoeuvred around obstacles nearby.
This view is available with AUTO mode or in the
view selection menu. This mode is activated by default.
Using sensors in the front bumper, the
automatic view changes from the front view
(standard) to the view from above (zoom) as an
obstacle is approached during a
manoeuvre.
Driving