instrument panel CITROEN C5 AIRCROSS 2022 Handbook (in English)
[x] Cancel search | Manufacturer: CITROEN, Model Year: 2022, Model line: C5 AIRCROSS, Model: CITROEN C5 AIRCROSS 2022Pages: 276, PDF Size: 7.92 MB
Page 185 of 276

183
In the event of a breakdown
8
► Put the spare wheel back in place in its
housing.
►
Slacken the nut on the bolt by a few turns.
►
Position the fastening device (nut and bolt) in
the middle of the wheel.
►
T
ighten the central nut sufficiently to retain
the wheel correctly.
►
Put the tool box back in place in the middle of
the wheel and clip it in place.
If there is no wheel in the well, the
fastening device (nut and bolt) cannot be
refitted.
Removing a wheel
Parking the vehicle
Immobilise the vehicle where it does
not obstruct traffic: the ground must be level,
stable and non-slippery.
With a manual gearbox, engage first gear
to lock the wheels, apply the parking brake,
unless it is set to automatic mode, and switch
off the ignition.
With an automatic gearbox, select mode P
to lock the wheels, apply the parking brake,
unless it is set to automatic mode, and switch
off the ignition.
Check that the parking brake indicator lamps
on the instrument panel are on fixed.
The occupants must get out of the vehicle
and wait where they are safe.
If necessary, place a chock under the wheel
diagonally opposite the wheel to be changed.
Never go underneath a vehicle raised using a
jack; use an axle stand.
Wheel with wheel trim
When removing the wheel , first remove
the wheel trim by pulling at the valve aperture
using the wheelbrace.
When refitting the wheel , refit the wheel
trim, starting by placing its aperture in line
with the valve and then pushing it into place
all round its edge with the palm of your hand.
► To remove the wheel bolt cover on each of
the bolts, use tool 7 (alloy wheels).
►
Fit security socket
2 on wheelbrace
5
to
slacken the security bolt.
►
Slacken the other bolts using the
wheelbrace
5
only.
► Place the foot of jack 6 on the ground and
ensure that it is directly below the front A or
rear
B jacking point on the underbody, whichever
is closest to the wheel to be changed.
Page 209 of 276

207
CITROËN Connect Radio
10CITROËN Connect Radio
Multimedia audio system -
Applications - Bluetooth
®
telephone
The functions and settings described
vary according to the vehicle version and
configuration, as well as the country of sale.
For safety reasons and because they
require sustained attention by the driver,
the following operations must be carried out
with the vehicle stationary and the ignition
on:
–
Pairing the smartphone with the system via
Bluetooth.
–
Using the smartphone.
–
Connecting to the CarPlay® or Android
Auto applications (certain applications stop
displaying when the vehicle is moving).
– Changing the system settings and
configuration.
The system is protected so that it only operates in the vehicle.
The message Energy economy mode is
displayed when the system is about to go into
standby.
The system’s Open Source Software (OSS) source codes are available at the
following addresses:
https://www.groupe-psa.com/fr/oss/
https://www.groupe-psa.com/en/oss/
First steps
With the engine running, a press mutes
the sound.
With the ignition off, a press turns the system on.
Increase or decrease the volume using
the wheel or the "plus" or "minus" buttons
(depending on the equipment).
Use the buttons on either side of or below the
touch screen to access the menus, then press
the virtual buttons on the touch screen.
Depending on the model, use the "Source" and
"Menu" buttons on the left of the touch screen to
access the menus, then press the virtual buttons
on the touch screen.
At all times it is possible to display the rolling
menus by pressing the screen briefly with three
fingers.
All touch-sensitive areas on the screen are
white.
On pages with multiple tabs at the bottom of the
screen, you can switch between pages either
by tapping the tab for the desired page or by
swiping the pages to the left or right with your
finger.
Press in the shaded area to go back up a level
or confirm.
Press the back arrow to go back a level or
confirm.
The touch screen is of the "capacitive" type.
To clean the screen, use a soft, non-abrasive
cloth (e.g. spectacles cloth) with no additional
product.
Do not use sharp objects on the screen.
Do not touch the screen with wet hands.
Certain information is displayed permanently in
the upper bar of the touch screen:
–
Air conditioning status information (depending
on version), and direct access to the
corresponding menu.
–
Radio Media and
Telephone menu status
information.
–
Privacy status information.
–
Access to the touch screen and digital
instrument panel settings.
Page 219 of 276

217
CITROËN Connect Radio
10Settings
Configuring profiles
Press Settings to display the main page.
Press "Profiles".
Select "Profile 1", "Profile 2", "Profile 3” or
"Common profile ".
Press this button to enter a name for the
profile using the virtual keypad.
Press "OK" to save.
Press the back arrow to confirm.
Press this button to activate the profile.
Press the back arrow again to confirm.
Press this button to reset the selected
profile.
Adjusting the brightness
Press Settings to display the main page.
Press Brightness.
Move the slider to adjust the brightness of
the screen and/or the instrument panel
(depending on version).
Press in the shaded area to confirm.
Modifying system settings
Press Settings to display the main page.
Press "Configuration" to access the
secondary page.
Press "System configuration".
Press the "Units" tab to change the units of
distance, fuel consumption and temperature.
Press the "Factory settings" tab to restore the
initial settings.
Returning the system to factory settings
activates the English language by default
(depending on version).
Press the "System info" tab to display the
versions of the various modules installed in the
system.
Press the "Privacy " tab,
or
Press Settings to display the main page.
Press "Privacy" to activate or deactivate
the private data mode.
Activate or deactivate:
–
"No sharing (data, vehicle position) ".
–
"Only data sharing ”
–
"Data and vehicle position sharing "
Press the back arrow to confirm.
Press Settings to display the main page.
Press "Configuration" to access the
secondary page.
Press "Screen configuration".
Press "Brightness".
Move the slider to adjust the brightness of
the screen and/or the instrument panel
(depending on version).
Press the back arrow to confirm.
Press "Animation".
Activate or deactivate: “Automatic scrolling ”.
Select "Animated transitions".
Press the back arrow to confirm.
Selecting the language
Press Settings to display the main page.
Press "Configuration" to access the
secondary page.
Select "Language" to change the
language.
Press the back arrow to confirm.
Setting the time
Press Settings to display the main page.
Page 223 of 276

221
CITROËN Connect Nav
11– Go to the "Notifications" of messages, emails,
map updates and, depending on the services,
the navigation notifications.
–
Go to the settings for the touch screen and the
digital instrument panel.
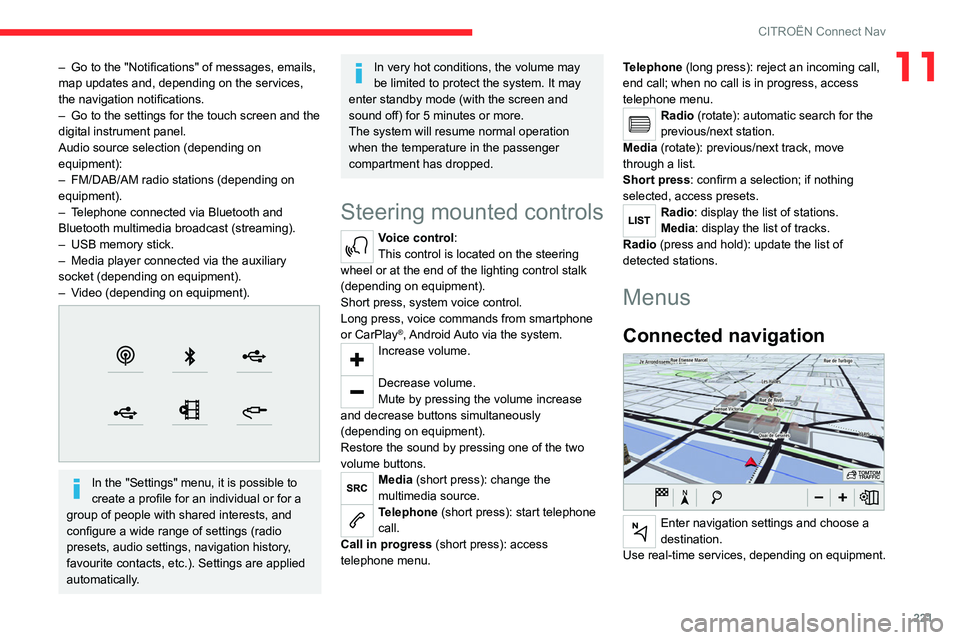
Audio source selection (depending on
equipment):
–
FM/DAB/AM radio stations (depending on
equipment).
–
T
elephone connected via Bluetooth and
Bluetooth multimedia broadcast (streaming).
–
USB memory stick.
–
Media player connected via the auxiliary
socket (depending on equipment).
–
V
ideo (depending on equipment).
In the "Settings" menu, it is possible to
create a profile for an individual or for a
group of people with shared interests, and
configure a wide range of settings (radio
presets, audio settings, navigation history,
favourite contacts, etc.). Settings are applied
automatically.
In very hot conditions, the volume may
be limited to protect the system. It may
enter standby mode (with the screen and
sound off) for 5 minutes or more.
The system will resume normal operation
when the temperature in the passenger
compartment has dropped.
Steering mounted controls
Voice control:
This control is located on the steering
wheel or at the end of the lighting control stalk
(depending on equipment).
Short press, system voice control.
Long press, voice commands from smartphone
or CarPlay
®, Android Auto via the system.Increase volume.
Decrease volume.
Mute by pressing the volume increase
and decrease buttons simultaneously
(depending on equipment).
Restore the sound by pressing one of the two
volume buttons.
Media (short press): change the
multimedia source.
Telephone (short press): start telephone
call.
Call in progress (short press): access
telephone menu. Telephone (long press): reject an incoming call,
end call; when no call is in progress, access
telephone menu.
Radio (rotate): automatic search for the
previous/next station.
Media (rotate): previous/next track, move
through a list.
Short press: confirm a selection; if nothing
selected, access presets.
Radio: display the list of stations.
Media: display the list of tracks.
Radio (press and hold): update the list of
detected stations.
Menus
Connected navigation
Enter navigation settings and choose a
destination.
Use real-time services, depending on equipment.
Page 242 of 276

240
CITROËN Connect Nav
The "Position” settings (All passengers,
Driver and Front only) are common to all
sources.
Activate or deactivate "Touch tones ",
"Volume linked to speed " and "Auxiliary
input ".
Onboard audio: Arkamys Sound Staging©
optimises the sound distribution inside
the passenger compartment.
Configuring profiles
Press Settings to display the main page.
Press the "OPTIONS " button to access the
secondary page.
Select "Setting of the profiles".
Select "Profile 1", "Profile 2", "Profile 3” or
"Common profile ".
Press this button to enter a name for the
profile using the virtual keypad.
Press "OK" to confirm.
Press this button to add a photograph to
the profile.
Insert a USB memory stick containing the
photograph in the USB port.
Select the photograph.
Press "OK" to accept the transfer of the
photograph.
Press "OK" again to save the settings.
The location for the photograph is square; the system reshapes the original
photograph if in another format.
Press this button to reset the selected
profile.
Resetting the selected profile activates
the English language by default.
Select a "Profile" (1 or 2 or 3) to link "Audio
settings" with it.
Select "Audio settings".
Then select "Ambience", "Position"; "Sound ",
"Voice" or "Ringtone ".
Press "OK" to save the selected profile’s
settings.
Modifying system settings
Press Settings to display the main page.
Press the "OPTIONS " button to access the
secondary page.
Select "Screen configuration".
Select "Animation".
Activate or deactivate:Automatic scrolling
Select "Brightness".
Move the slider to adjust the brightness of
the screen and/or the instrument panel.
Press Settings to display the main page.
Press the "OPTIONS " button to access the
secondary page.
Select "System settings".
Select "Units" to change the units of distance,
fuel consumption and temperature.
Select "Factory settings" to restore the initial
settings.
Resetting the system to "Factory
settings" activates English and degrees
Fahrenheit and deactivates summer time.
Select "System info" to display the versions of
the various modules installed in the system.
Selecting the language
Press Settings to display the main page.
Press the "OPTIONS " button to access the
secondary page.
Select "Languages" to change the
language.
Setting the date
Press Settings to display the main page.
Press the "OPTIONS " button to access the
secondary page.
Select "Setting the time-date".
Select "Date".
Press this button to set the date.
Press "OK" to confirm.
Select the display format for the date.
Time and date setting is only available if "GPS synchronisation" is deactivated.
Setting the time
Press Settings to display the main page.
Press the "OPTIONS " button to access the
secondary page.
Select "Setting the time-date".
Select "Time".
Press this button to set the time using the
virtual keypad.
Press "OK" to confirm.
Press this button to set the time zone.
Select the display format for the time
(12h/24h).
Activate or deactivate summer time (+1 hour).
Activate or deactivate GPS synchronisation (UTC).
Page 248 of 276

246
Alphabetical index
Charging cable (Rechargeable
hybrid)
155, 161
Charging connector (Rechargeable
hybrid)
155, 160–162
Charging flap (Rechargeable
hybrid)
155, 160–162
Charging the traction battery (Rechargeable
hybrid)
20, 154, 160–162
CHECK
21
Checking the engine oil level
17
Checking the levels
169–171
Checking tyre pressures
(using the kit)
180, 182
Checks
169, 171–173
Checks, routine
171–172
Child lock
95–96
Children
85, 90–92
Children (safety)
95
Child seats
85, 88–90
Child seats, conventional
90
Child seats, i-Size
92
Child seats, ISOFIX
90–92
Cigar lighter
60
Cleaning (advice)
154, 175–176
Closing the boot
30, 35
Closing the doors
30, 34
Collision Risk Alert
133–134
Configuration, vehicle
23, 25
Connected applications
232
ConnectedCAM Citroën™
11 6
Connection, Bluetooth
215–216,
232–233, 237–238
Connection, Wi-Fi network
233Connectivity 231
Consumption figures
24
Container, AdBlue®
174
Control, emergency boot release
35
Control, emergency door
32–33
Control, heated seats
47
Controls, steering mounted
107–109
Control stalk, lighting
67–68
Control stalk, wipers
72–74
Control unit
155, 157, 161
Courtesy lamp
63, 189
Courtesy lamps
63–64
Cover, load space
63
Cruise control
121, 123–125
Cruise control, adaptive
126
Cruise control by speed limit recognition
121
Cruise control, dynamic with Stop function
121
Cup holder
60
D
DAB (Digital Audio Broadcasting) -
Digital radio
212, 235
Date (setting)
25, 218, 240
Daytime running lamps
68
Deactivating the passenger airbag
86, 89
Deadlocking
29, 31
Deferred charging
25, 161
Deferred charging (Rechargeable
hybrid)
24, 155, 160
Defrosting
56–57
Defrosting, front
56
Demisting 56
Demisting, front
56
Demisting, rear
57
Demisting, rear screen
57
Dials and gauges
9–10
Digital instrument panel
10
Dimensions
206
Dipstick
17, 169
Direction indicators
68, 186–187
Domestic charging
157
Domestic charging (Rechargeable
hybrid)
161–162
Door pockets
60
Doors
34
Driver’s attention warning
136
Driving
97
Driving aids camera (warnings)
11 8
Driving aids (recommendations)
11 7
Driving economically
7
Driving modes
111
Driving positions (storing)
46
Dynamic stability control (DSC)
78–80
E
EBFD 78
Eco-driving (advice)
7
ECO mode
111
Economy mode
165
Electric automatic gearbox (Rechargeable
hybrid)
109
Electric windows
41
Page 250 of 276

248
Alphabetical index
Inflating tyres 172, 206
Inflating tyres and accessories
(using the kit)
180, 182
Infrared camera
11 8
Instrument panel
9–10, 21–22, 118
Intelligent Traction Control
79
Internet browser
229, 232
ISOFIX mountings
90
J
Jack 180, 182, 235
Jump starting
194
K
Key 27, 31–33
Key, electronic
29–30
Keyless Entry and Starting
29–31, 100–101
Key not recognised
101–102
Key with remote control
27–28, 98
Kit, hands-free
215, 237
Kit, puncture repair
179
Kit, temporary puncture repair
179–180, 182
L
Labels, identification 206
Lamp, boot
66, 189
Lamps, parking
68
Lamps, rear 187
Lams with Full LED technology
71
Lane assist
126, 130–131, 133
Lane departure warning active
137, 141
Leather (care)
176
LEDs - Light-emitting diodes
68, 185, 187
Level, AdBlue®
171
Level, brake fluid
170
Level, Diesel additive
171–172
Level, engine coolant
18, 170
Level, engine oil
17, 169
Levels and checks
169–171
Level, screenwash fluid
72, 171
Light-emitting diodes - LEDs
68, 185, 187
Lighting, cornering
71
Lighting dimmer
21
Lighting, exterior
67
Lighting, guide-me home
29, 69
Lighting, interior
63–64
Lighting, mood
63
Lighting, welcome
69
Loading
64–65, 167
Load reduction mode
165
Locating your vehicle
29
Locking
30–31
Locking from the inside
32
Locking the doors
32
Low fuel level
152
Lumbar
45M
Mains socket (domestic network) 155
Maintenance (advice)
154, 175
Maintenance, routine
118, 171
Manoeuvring aids (recommendations)
11 7
Markings, identification
206
Massage function
47
Massage, multi-point
47
Mat
62, 118
Memorising a speed
125
Menu
214
Menu, main
24
Menus (audio)
209–210, 221–222
Menu short cuts
24
Messages
239
Messages, quick
239
Mirror, rear view
49
Mirrors, door
48, 57, 140
Mirror, vanity
60
Misfuel prevention
153
Mobile application
25–26, 59, 160–161
Motor, electric
111–112, 154, 205
Motorised tailgate
36–38
Mountings, ISOFIX
90
N
Navigation 226–228
Navigation, connected
229–231
Net, high load retaining
64–65
Number plate lamps
188