ECO mode CITROEN C6 2012 Handbook (in English)
[x] Cancel search | Manufacturer: CITROEN, Model Year: 2012, Model line: C6, Model: CITROEN C6 2012Pages: 216, PDF Size: 10.23 MB
Page 94 of 216
92
III
A
B
C
D
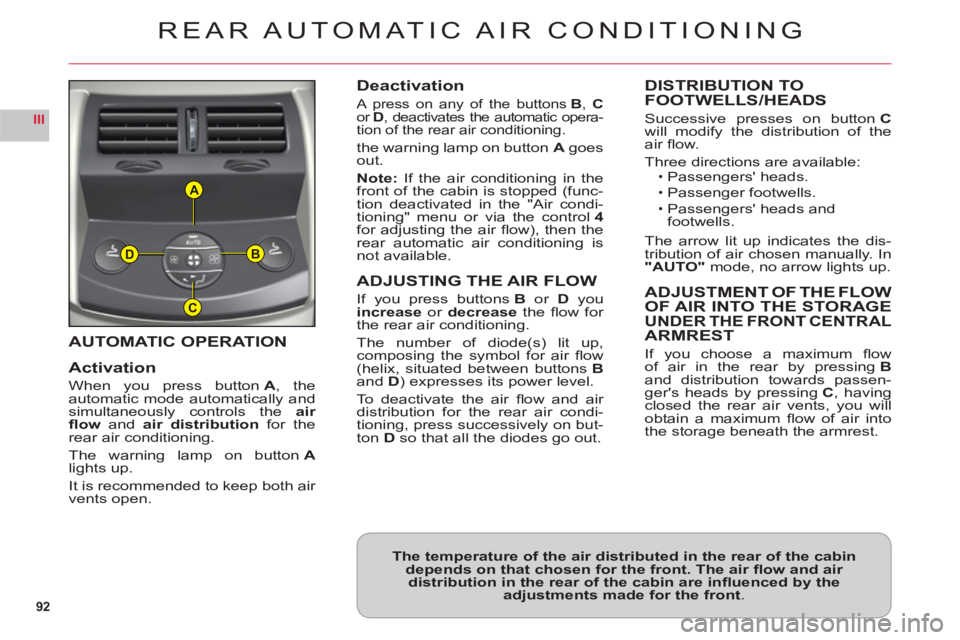
AUTOMATIC OPERATION
Activation
When you press buttonA, the
automatic mode automatically andsimultaneously controls theair
fl ow andair distribution for therear air conditioning.
The warning lamp on buttonAlights up.
It is recommended to kee
p both air
vents open.
Deactivation
A press on any of the buttons B, Cor D, deactivates the automatic opera-
tion of the rear air conditioning.
the warning lamp on button Agoes out.
Note: If the air conditioning in the front of the cabin is stopped (func-
tion deactivated in the "Air condi-
tioning" menu or via the control4for adjusting the air fl ow), then the
rear automatic air conditioning is
not available.
ADJUSTING THE AIR FLOW
If you press buttons Bor Dyou increase or decrease the fl ow for
the rear air conditioning.
The number of diode
(s) lit up, composing the symbol for air fl ow (helix, situated between buttons Band D) expresses its power level.
To deactivate the air fl ow and air distribution for the rear air condi-
tioning, press successively on but-
ton Dso that all the diodes go out.
DISTRIBUTION TO
FOOTWELLS/HEADS
Successive presses on buttonCwill modify the distribution of theair fl ow.
Three directions are available:Passengers' heads.
Passenger footwells.
Passengers' heads and
footwells.
The arrow lit up indicates the dis-
tribution of air chosen manually. In"AUTO"mode, no arrow lights up.
ADJUSTMENT OF THE FLOW
OF AIR INTO THE STORAGEUNDER THE FRONT CENTRALARMREST
If you choose a maximum fl ow
of air in the rear by pressingBand distribution towards passen-ger's heads by pressingC, havingclosed the rear air vents, you willobtain a maximum fl ow of air intothe storage beneath the armrest.
ï
ï
ï
REAR AUTOMATIC AIR CONDITIONING
The temperature of the air distributed in the rear of the cabindepends on that chosen for the front. The air fl ow and air distribution in the rear of the cabin are infl uenced by the adjustments made for the front.
Page 167 of 216
7.17
11
22
33
44
11
22
33
44
05AUDIO/VIDEO
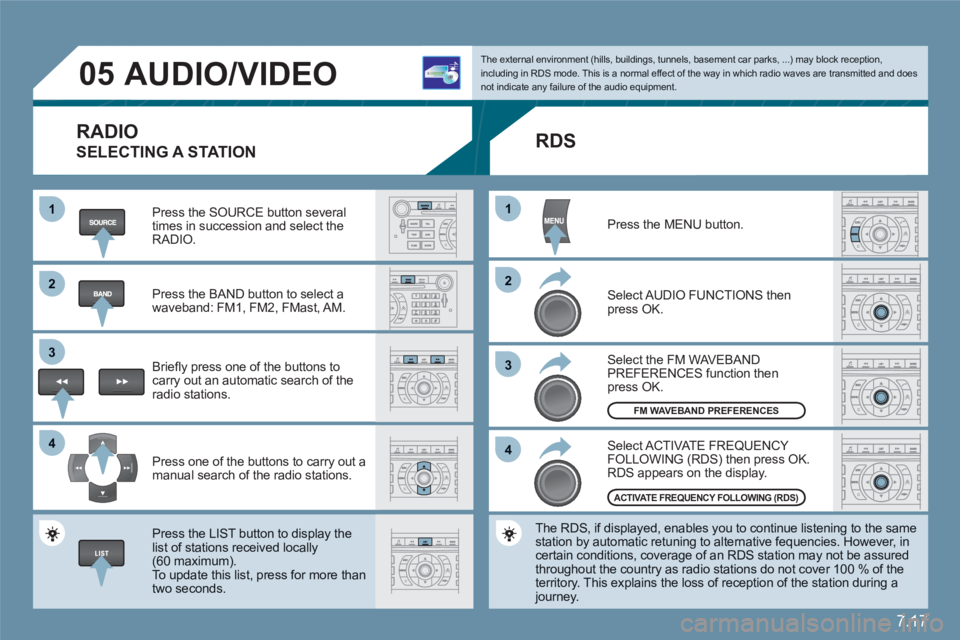
RADIO
SELECTING A STATION
Press the SOURCE button several times in succession and select theRADIO.
Press the BAND button to select awaveband: FM1, FM2, FMast, AM.
Briefl y press one of the buttons to carry out an automatic search of theradio stations.
Press one of the buttons to carry out a manual search of the radio stations.
Press the LIST button to display the list of stations received locally(60 maximum).
To update this list, press for more than two seconds.
The external environment (hills, buildings, tunnels, basement car parks, ...) may block reception,including in RDS mode. This is a normal effect of the way in which radio waves are transmitted and does not indicate any failure of the audio equipment.
RDS
Select ACTIVATE FREQUENCY FOLLOWING (RDS) then press OK. RDS appears on the display.
Select the FM WAVEBANDPREFERENCES function thenpress OK.
Select AUDIO FUNCTIONS then press OK.
Press the MENU button.
The RDS, if displayed, enables you to continue listening to the samestation by automatic retuning to alternative fequencies. However, in certain conditions, coverage of an RDS station may not be assuredthroughout the country as radio stations do not cover 100 % of the territory. This explains the loss of reception of the station during a journey.
FM WAVEBAND PREFERENCES
ACTIVATE FREQUENCY FOLLOWING (RDS)
Page 175 of 216
7.25
33
22
11
44
06
The services offered by the telephone depend on the network, the SIM card and the compatibility of the Bluetooth equipment used. Refer to your telephone's manual and your operator to check which services you have access to. A list of mobile telephones which offer the best range of services is available from dealers.
BLUETOOTH TELEPHONE
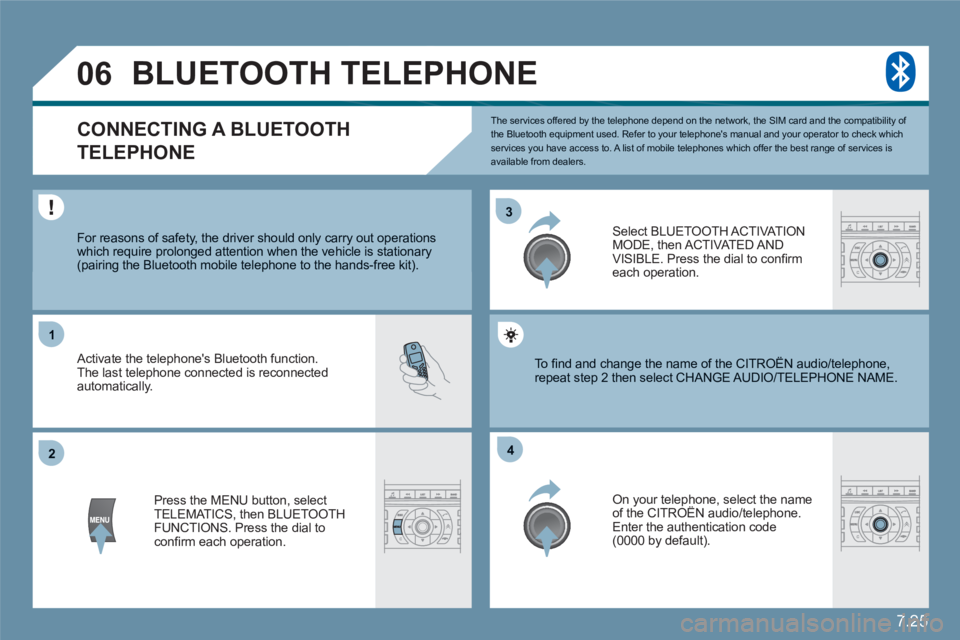
CONNECTING A BLUETOOTH
TELEPHONE
For reasons of safety, the driver should only carry out operations which require prolonged attention when the vehicle is stationary (pairing the Bluetooth mobile telephone to the hands-free kit).
Activate the telephone's Bluetooth function. The last telephone connected is reconnected automatically.
Select BLUETOOTH ACT I VAT IONMODE, then ACTIVATED AND VISIBLE. Press the dial to confi rm each operation.
Press the MENU button, select TELEMATICS, then BLUETOOTH FUNCTIONS. Press the dial to confi rm each operation.
On your telephone, select the nameof the CITROËN audio/telephone. y
Enter the authentication code (0000 by default).
To fi nd and change the name of the CITROËN audio/ttelephone, repeat step 2 then select CHANGE AUDIO/TELEPHOONE NAME.
Page 177 of 216
7.27
1
22
33
55
66
44
06TELEPHONE
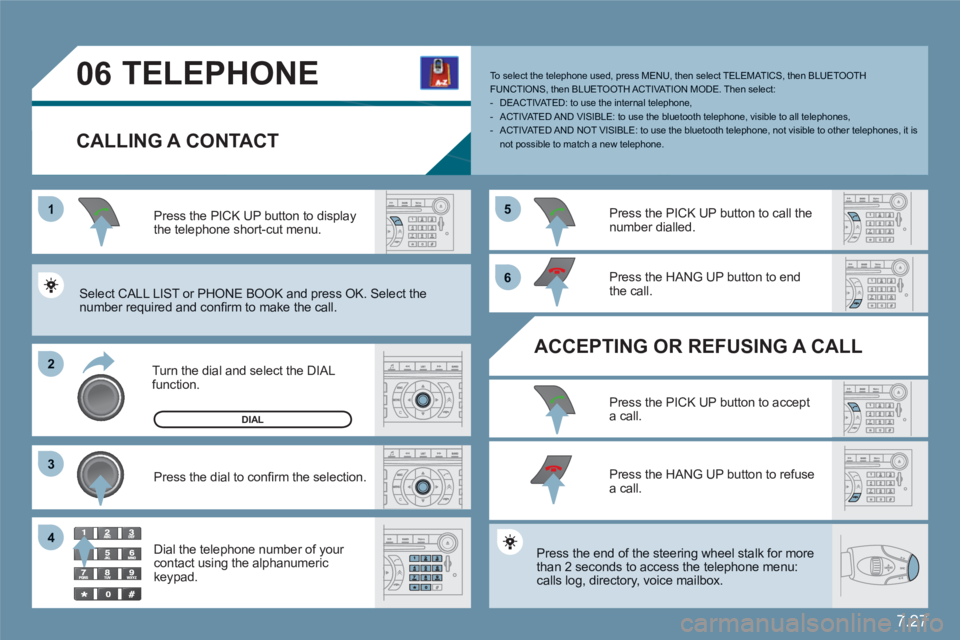
CALLING A CONTACT
Turn the dial and select the DIAL function.
Press the PICK UP button to displaythe telephone short-cut menu.
Press the dial to confi rm the selection.
Dial the telephone number of your contact using the alphanumeric keypad.
Press the PICK UP button to call the number dialled.
Press the HANG UP button to endthe call.
ACCEPTING OR REFUSING A CALL
Press the PICK UP button to accepta call.
Press the HANG UP button to refuse a call.
Press the end of the steering wheel stalk for more than 2 seconds to access the telephone menu: calls log, directory, voice mailbox.
To select the telephone used, press MENU, then select TELEMATICS, then BLUETOOTH FUNCTIONS, then BLUETOOTH ACT I VAT ION MODE. Then select:- DEACTIVATED: to use the internal telephone,- ACTIVATED AND VISIBLE: to use the bluetooth telephone, visible to all telephones,- ACTIVATED AND NOT VISIBLE: to use the bluetooth telephone, not visible to other telephones, it is not possible to match a new telephone.
Select CALL LIST or PHONE BOOK and press OK. Select the number required and confi rm to make the call.
DIAL
Page 186 of 216
7.36
1
4
2
3
3
3
4
4
4
4
3
3
3
3
4
4
3
3
3
3
2
3
3
2
4
3
4
3
3
2
3
4
5
5
5
4
5
5
4
2
3
4
4
4
4
4
3
5
4
4
4
3
5
4
4
4
5
5
4
6
5
5
3
3
3
3
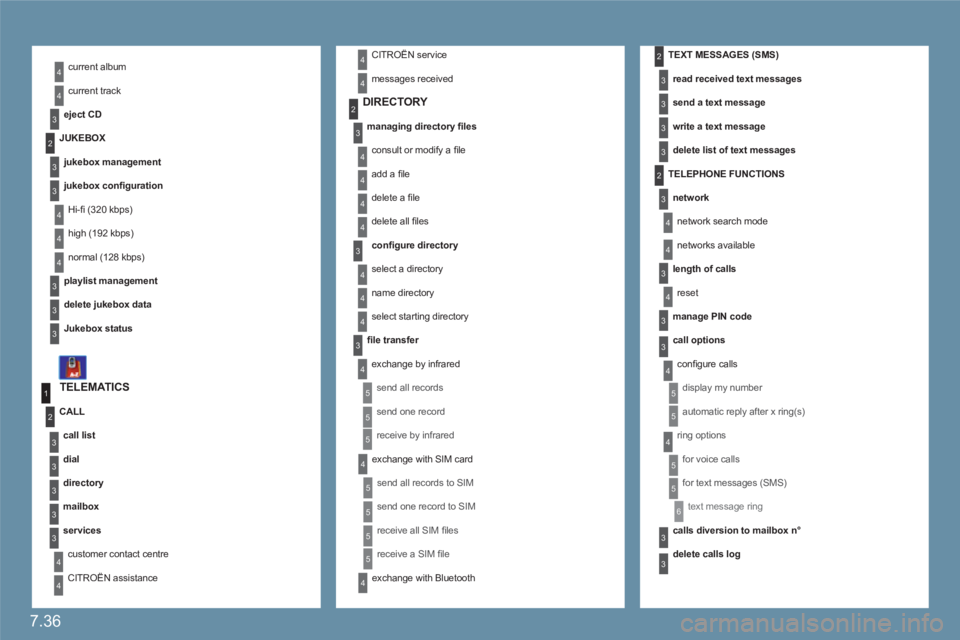
current album
current track
eject CD
TELEMATICS
call list
dial
directory
mailbox
services
customer contact centre
CITROËN assistance
CALL
DIRECTORY
managing directory fi les
consult or modify a fi le
add a fi le
delete a fi le
delete all fi les
confi gure directory
select a directory
name directory
select starting directory
fi le transfer
exchange by infrared
send all records
send one record
receive by infrared
exchange with SIM card
send all records to SIM
send one record to SIM
receive all SIM fi les
receive a SIM fi le
exchange with Bluetooth
TEXT MESSAGES (SMS)
read received text messages
send a text message
write a text message
delete list of text messages
TELEPHONE FUNCTIONS
network
network search mode
networks available
length of calls
reset
manage PIN code
call options
confi gure calls
display my number
automatic reply after x ring(s)
ring options
for voice calls
for text messages (SMS)
text message ring
calls diversion to mailbox n°
delete calls log
JUKEBOX
jukebox management
jukebox confi guration
Hi-fi (320 kbps)
high (192 kbps)
normal (128 kbps)
playlist management
delete jukebox data
Jukebox status
CITROËN service
messages received
Page 187 of 216
7.37
1
2
2
1
2
1
2
2
2
3
3
4
4
4
3
2
2
2
3
4
4
4
3
3
3
3
4
4
4
4
1
2
2
1
2
2
2
1
1
1
3
3
3
3
3
3
3
3
2
Display short cuts version 8.2
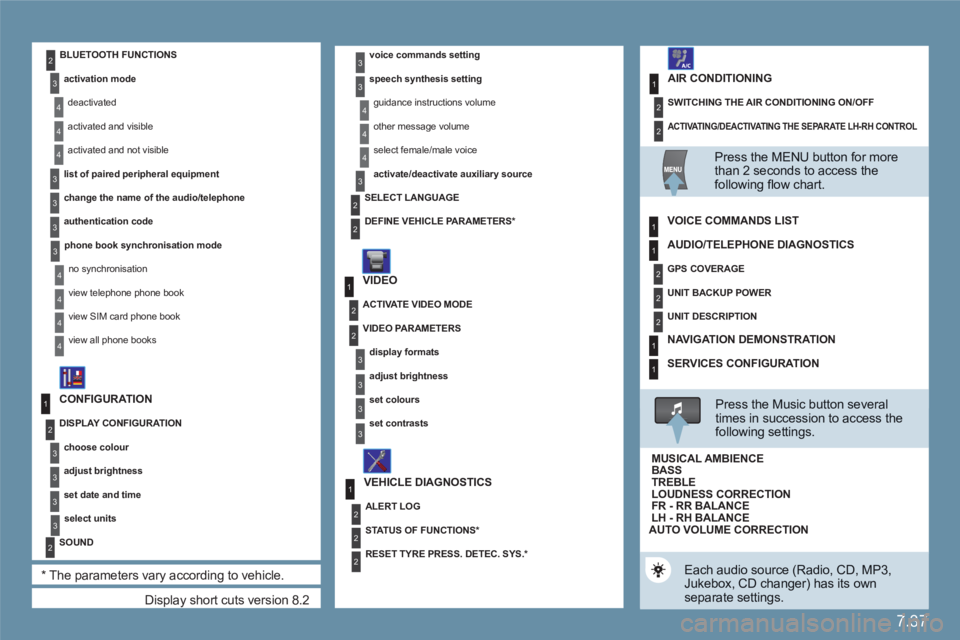
CONFIGURATION
DISPLAY CONFIGURATION
choose colour
adjust brightness
set date and time
select units
SOUND
*
The parameters vary according to vehicle.
voice commands setting
speech synthesis setting
guidance instructions volume
other message volume
select female/male voice
activate/deactivate auxiliary source
VIDEO
VEHICLE DIAGNOSTICS
SELECT LANGUAGE
DEFINE VEHICLE PARAMETERS
*
ACTIVATE VIDEO MODE
VIDEO PARAMETERS
display formats
adjust brightness
set colours
set contrasts
ALERT LOG
STATUS OF FUNCTIONS *
RESET TYRE PRESS. DETEC. SYS. *
BLUETOOTH FUNCTIONS
activation mode
deactivated
activated and visible
activated and not visible
list of paired peripheral equipment
change the name of the audio/telephone
authentication code
phone book synchronisation mode
no synchronisation
view telephone phone book
view SIM card phone book
view all phone books
ACTIVATING/DEACTIVATING THE SEPARATE LH-RH CONTROL
SWITCHING THE AIR CONDITIONING ON/OFF
AIR CONDITIONING
Press the MENU button for more than 2 seconds to access thefollowing fl ow chart.
VOICE COMMANDS LIST
Press the Music button severaltimes in succession to access the following settings.
AUTO VOLUME CORRECTION
Each audio source (Radio, CD, MP3,Jukebox, CD changer) has its own separate settings.
AUDIO/TELEPHONE DIAGNOSTICS
GPS COVERAGE
UNIT BACKUP POWER
UNIT DESCRIPTION
NAVIGATION DEMONSTRATION
SERVICES CONFIGURATION
LOUDNESS CORRECTION TREBLEBASS MUSICAL AMBIENCE
FR - RR BALANCE LH - RH BALANCE
Page 188 of 216
7.38
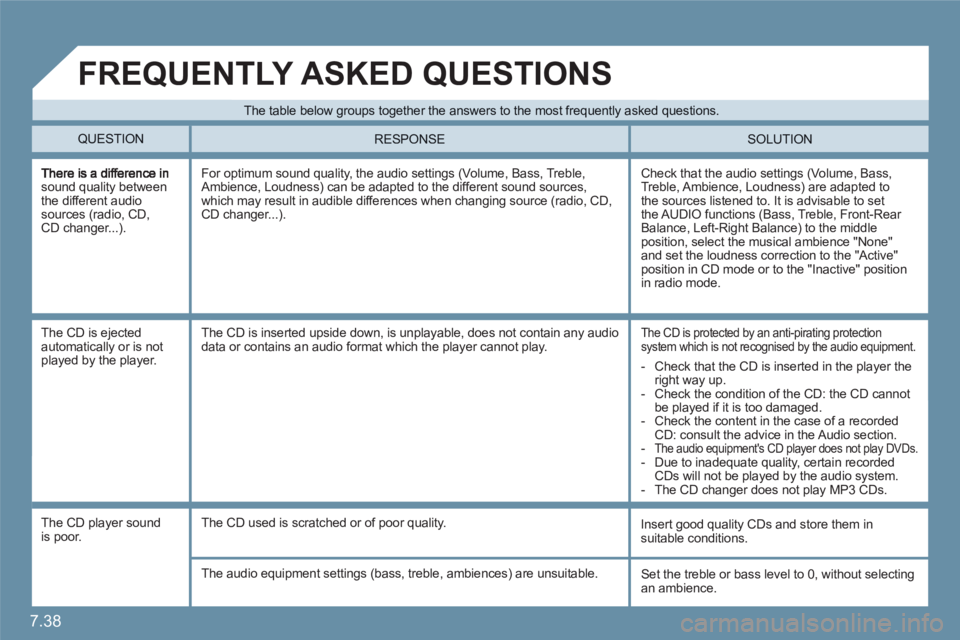
sound quality between the different audio sources (radio, CD,CD changer...).
Check that the audio settings (Volume, Bass, Treble, Ambience, Loudness) are adapted to the sources listened to. It is advisable to set the AUDIO functions (Bass, Treble, Front-Rear Balance, Left-Right Balance) to the middle position, select the musical ambience "None"and set the loudness correction to the "Active" position in CD mode or to the "Inactive" position in radio mode.
For optimum sound quality, the audio settings (Volume, Bass, Treble, Ambience, Loudness) can be adapted to the different sound sources, which may result in audible differences when changing source (radio, CD,CD changer...).
The CD is ejectedautomatically or is notplayed by the player.
The CD is protected by an anti-pirating protectionsystem which is not recognised by the audio equipment.
The CD is inserted upside down, is unplayable, does not contain any audiodata or contains an audio format which the player cannot play.
The CD player sound is poor.
Insert good quality CDs and store them insuitable conditions.
The CD used is scratched or of poor quality.
The audio equipment settings (bass, treble, ambiences) are unsuitable. Set the treble or bass level to 0, without selectingan ambience.
The table below groups together the answers to the most frequently asked questions.
QUESTION SOLUTION
RESPONSE
FREQUENTLY ASKED QUESTIONS
- Check that the CD is inserted in the player the right way up.
- Check the condition of the CD: the CD cannot be played if it is too damaged.
- Check the content in the case of a recordedCD: consult the advice in the Audio section.
-The audio equipment's CD player does not play DVDs.
- Due to inadequate quality, certain recordedCDs will not be played by the audio system.
- The CD changer does not play MP3 CDs.
Page 189 of 216
7.39
SOLUTION RESPONSE
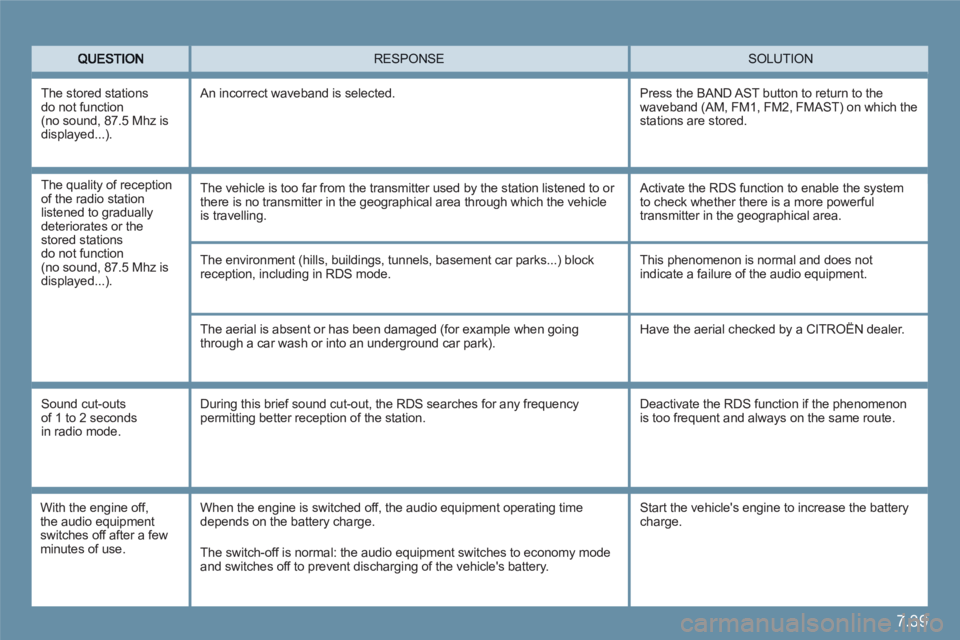
The environment (hills, buildings, tunnels, basement car parks...) blockreception, including in RDS mode.
The aerial is absent or has been damaged (for example when going through a car wash or into an underground car park).
This phenomenon is normal and does notindicate a failure of the audio equipment.
Have the aerial checked by a CITROËN dealer.
Sound cut-outs of 1 to 2 seconds in radio mode.
During this brief sound cut-out, the RDS searches for any frequency permitting better reception of the station.
Deactivate the RDS function if the phenomenon is too frequent and always on the same route.
With the engine off,the audio equipment switches off after a fewminutes of use.
When the engine is switched off, the audio equipment operating timedepends on the battery charge.
The switch-off is normal: the audio equipment switches to economy mode and switches off to prevent discharging of the vehicle's battery.
The stored stations do not function(no sound, 87.5 Mhz isdisplayed...)
.
An incorrect waveband is selected.
Press the BAND AST button to return to the waveband (AM, FM1, FM2, FMAST) on which the stations are stored.
Start the vehicle's engine to increase the battery charge.
The quality of reception of the radio station listened to gradually deteriorates or thestored stations do not function(no sound, 87.5 Mhz isdisplayed...).
The vehicle is too far from the transmitter used by the station listened to or there is no transmitter in the geographical area through which the vehicle is travelling.
Activate the RDS function to enable the system to check whether there is a more powerfultransmitter in the geographical area.
Page 195 of 216
7.45
11
22
33
44
22
44
33
11
03AUDIO
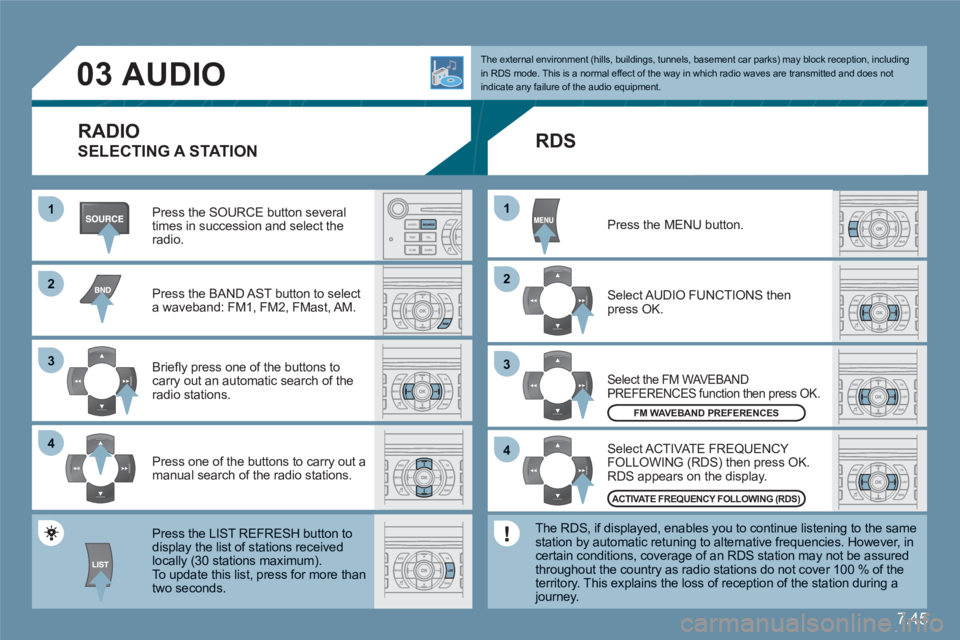
Press the SOURCE button several times in succession and select theradio.
Press the BAND AST button to select a waveband: FM1, FM2, FMast, AM.
Briefl y press one of the buttons to carry out an automatic search of theradio stations.
Press one of the buttons to carry out a manual search of the radio stations.
Press the LIST REFRESH button todisplay the list of stations receivedlocally (30 stations maximum).
To update this list, press for more than two seconds.
Select ACTIVATE FREQUENCY FOLLOWING (RDS) then press OK. RDS appears on the display.
Select the FM WAVEBAND PREFERENCES function then press OK.
Select AUDIO FUNCTIONS then press OK.
Press the MENU button.
FM WAVEBAND PREFERENCES
ACTIVATE FREQUENCY FOLLOWING (RDS)
The external environment (hills, buildings, tunnels, basement car parks) may block reception, including in RDS mode. This is a normal effect of the way in which radio waves are transmitted and does notindicate any failure of the audio equipment.
RDS
The RDS, if displayed, enables you to continue listening to the samestation by automatic retuning to alternative frequencies. However, in certain conditions, coverage of an RDS station may not be assuredthroughout the country as radio stations do not cover 100 % of the territory. This explains the loss of reception of the station during a journey.
RADIO
SELECTING A STATION
Page 207 of 216
7.57
QUESTION SOLUTION ANSWER
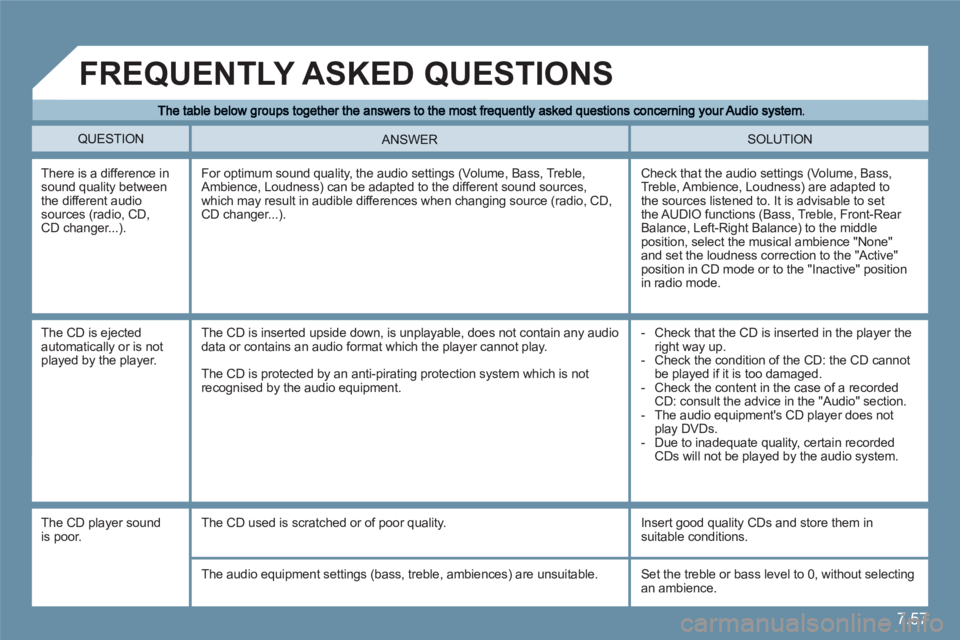
There is a difference in sound quality between the different audio sources (radio, CD,CD changer...).
Check that the audio settings (Volume, Bass, Treble, Ambience, Loudness) are adapted to the sources listened to. It is advisable to set the AUDIO functions (Bass, Treble, Front-Rear Balance, Left-Right Balance) to the middle position, select the musical ambience "None"and set the loudness correction to the "Active" position in CD mode or to the "Inactive" position in radio mode.
For optimum sound quality, the audio settings (Volume, Bass, Treble, Ambience, Loudness) can be adapted to the different sound sources, which may result in audible differences when changing source (radio, CD,CD changer...).
The CD is ejectedautomatically or is notplayed by the player.
- Check that the CD is inserted in the player the right way up.
- Check the condition of the CD: the CD cannot be played if it is too damaged.
- Check the content in the case of a recordedCD: consult the advice in the "Audio" section.
- The audio equipment's CD player does not play DVDs.
- Due to inadequate quality, certain recordedCDs will not be played by the audio system.
The CD is inserted upside down, is unplayable, does not contain any audiodata or contains an audio format which the player cannot play.
The CD is protected by an anti-pirating protection system which is notrecognised by the audio equipment.
FREQUENTLY ASKED QUESTIONS
The CD player sound is poor.
The CD used is scratched or of poor quality.
Insert good quality CDs and store them in suitable conditions.
The audio equipment settings (bass, treble, ambiences) are unsuitable. Set the treble or bass level to 0, without selectingan ambience.