boot CITROEN C6 2012 Handbook (in English)
[x] Cancel search | Manufacturer: CITROEN, Model Year: 2012, Model line: C6, Model: CITROEN C6 2012Pages: 216, PDF Size: 10.23 MB
Page 79 of 216
77
II
SPEED-SENSITIVE REAR SPOILER (DEFLECTOR)
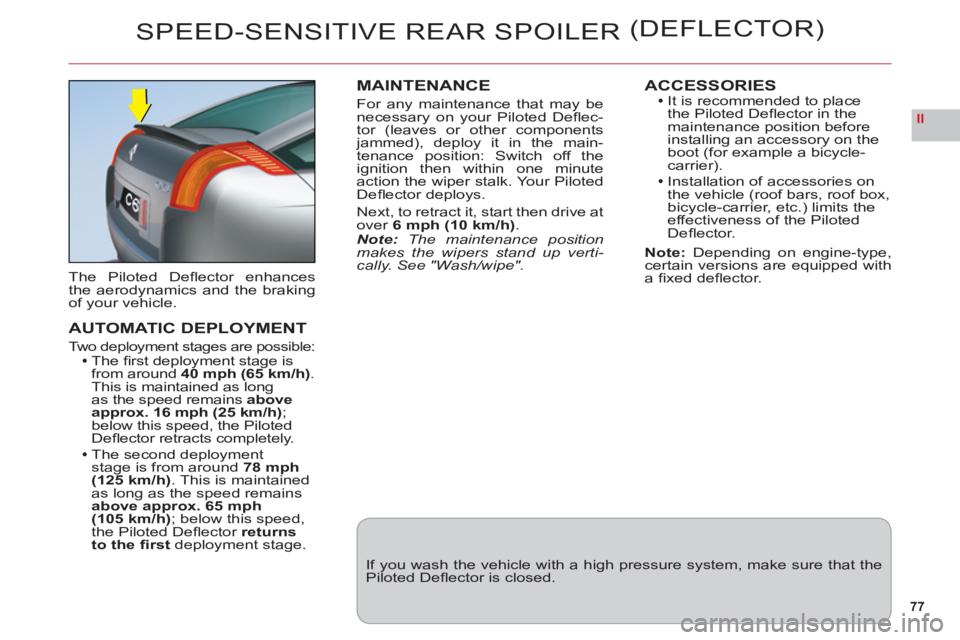
The Piloted Defl ector enhancesthe aerodynamics and the brakingof your vehicle.
AUTOMATIC DEPLOYMENT
Two deployment stages are possible:The fi rst deployment stage isfrom around 40 mph (65 km/h).This is maintained as long
as the speed remainsabove approx.16 mph (25 km/h);
below this speed, the Piloted
Defl ector retracts completely.
The second deploymentstage is from around 78 mph(125 km/h). This is maintained
as long as the speed remainsabove approx.65 mph (105 km/h); below this speed,
the Piloted Defl ector returns
to the fi rstdeployment stage.
MAINTENANCE
For any maintenance that may be
necessary on your Piloted Defl ec-
tor (leaves or other components jammed), deploy it in the main-
tenance position: Switch off the
ignition then within one minute
action the wiper stalk. Your Piloted
Defl ector deploys.
Next, to retract it, start then drive at
over 6 mph (10 km/h).Note: The maintenance position makes the wipers stand up verti-cally. See "Wash/wipe".
ACCESSORIESIt is recommended to place
the Piloted Defl ector in themaintenance position before
installing an accessory on the
boot (for example a bicycle-carrier).Installation of accessories on
the vehicle (roof bars, roof box,
bicycle-carrier, etc.) limits theeffectiveness of the Piloted Defl ector.
Note:Depending on engine-type,certain versions are equipped witha fi xed defl ector.
If you wash the vehicle with a high pressure system, make sure that thePiloted Defl ector is closed.
Page 84 of 216
82
III
LOCKING/UNLOCKING
FROM THE INSIDE
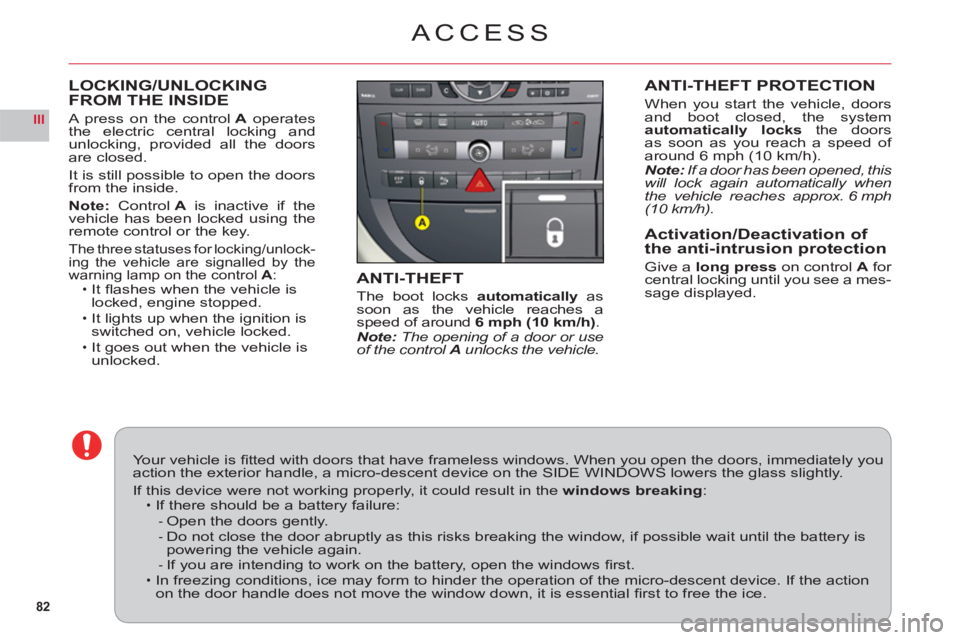
A press on the controlA operates
the electric central locking andunlocking, provided all the doorsare closed.
It is still possible to open the doorsfrom the inside.
Note: ControlAis inactive if thevehicle has been locked using theremote control or the key.
The three statuses for locking/unlock-ing the vehicle are signalled by the
warning lamp on the control A:It fl ashes when the vehicle is
locked, engine stopped.
It lights up when the ignition is switched on, vehicle locked.It goes out when the vehicle is unlocked.
ï
ï
ï
ACCESS
ANTI-THEFT PROTECTION
When you start the vehicle, doors
and boot closed, the system
automatically locksthe doorsas soon as you reach a speed of
around 6 mph (10 km/h).Note: If a door has been opened, this will lock again automatically whenthe vehicle reaches approx. 6 mph(10 km/h).
Activation/Deactivation of
the anti-intrusion protection
Give a long press on control Afor central locking until you see a mes-sage displayed.ANTI-THEFT
The boot locks automatically as soon as the vehicle reaches a
speed of around6 mph (10 km/h).Note: The opening of a door or use of the control A unlocks the vehicle.
Your vehicle is fi tted with doors that have frameless windows. When you open the doors, immediately youaction the exterior handle, a micro-descent device on the SIDE WINDOWS lowers the glass slightly.
If this device were not working properly, it could result in thewindows breaking:If there should be a battery failure:
Open the doors gently.Do not close the door abruptly as this risks breaking the window, if possible wait until the battery ispowering the vehicle again.If you are intending to work on the battery, open the windows fi rst.In freezing conditions, ice may form to hinder the operation of the micro-descent device. If the actionon the door handle does not move the window down, it is essential fi rst to free the ice.
ï
--
-ï
Page 86 of 216

84
III
A
B
ACCESS
BOOT
This can be unlocked, vehiclestopped:With either the remote control
or the key.
Using the interior central
unlocking button, or simply byopening a door.
Opening from the outside
Press upwards on the lever A.Note:In any event, as soon as the
vehicle is moving at more than
around 6 mph (10 km/h), the boot is locked.
When the vehicle is stationary, the boot unlocks when a door is opened or if the interior
central locking/unlocking button is pressed.
•
•
•
•
Closing the boot
Use the moulded handle on the
inside of the boot trim to lower the boot.
Press fi rml
y shut.
UNLOCKING IN EMERGENCY
In the event of a problem withunlocking the boot, the lock can bereleased if you fold the rear bench-seat:1.Insert a screwdriver into the
aperture Bin the lock.2.Turn it until the boot is unlocked.
For the Lounge Pack seats, contacta CITROËN dealer or a qualifi edg,
workshop.
Page 88 of 216

86
III
AUTOMATIC AIR CONDITIONING
AIR CONDITIONING
This system automatically adjusts the temperature, the fl ow of air and the distribution of air inside the cabin,
depending on your desired comfort level.
Provided
you retain automatic mode (by pressing button "AUTO") and all the air vents are open, you will main-
tain an optimum comfort level, also removing humidity
and misting, whatever the ambient climatic conditions.
The temperature inside the cabin cannot be lower than
the temperature outside if the air conditioning is not
operating.
To be e
ffective, the air conditioning should only be used
with the windows closed. If after a lengthy stop in bright sunlight the interior temperature is excessive, air the passenger compartment by opening the windows for a
few moments, then close them again.
To keep the air conditioning compressor well sealed, it
is essential to operate the air conditioning at least once every month.
The air conditioning operates by using power from the engine. This results in a slight increase in fuel con-sumption.
Sensors
The automatic regulation of the air conditioning inside
the cabin makes use of a number of sensors, relieving you of the need to make adjustments, other than the desired cabin temperature.
Take care not to obstruct sensor A.
Air inlet
Check that the exterior grille for the air inlet, at the bot-
tom of the windscreen, is clean and free of dead leaves,snow, etc.
If washing the vehicle with a high pressure jet, avoid
targeting the air inlet zone.
Air circulation
For your comfort we advise you to maintain a proper
distribution of air within the cabin, both at the front andat the rear.
The air vents to the
face have thumbwheels so that you can
adjust the fl ow of air, and grilles to orient the direction.
Th
ere are air vents on the fl oor underneath the frontseats and on the rear control panel, for enhancedheating of the rear seat positions.
Do not obstruct the air outlets located in the boot area.
Dust/pollen fi lter
There is a fi lter for excluding pollen and dust.
This
fi lter has to be changed according to the vehicle
maintenance schedule. See "Maintenance and WarrantyGuide".
Page 101 of 216

99
III
A
BC
D
REAR SEATS
Seat cushion folded.
Stow the head restraints.
Pr
ess the controlA located at theend of the backrest and fully tilt for-
wards.
The benchseat backrest can befolded in two sections. When youreposition the backrest, make sure
that it locks in place.Your vehicle's boot can be kept
isolated from the passen
ger com-
partment.
T
o lock the access to the boot:1.Place the benchseat in its correct position.The red warning lamp oncontrol Ashould no longer be
visible.
2.Insert the ignition key in thelock.3. Lock it.
Before moving the seats
So as to avoid damaging the seat belts by jamming them, takecare to keep them to the sides of the backrest.
LOCKING/UNLOCKING OF THE ACCESS INTO THE BOOT VIA THE REAR BENCHSEATREAR CENTRAL SEAT BELT
For easier opening of the seat beltcover D, you should fi rst raise thecentral head restraint.
Insert the fi rst fasteningC into thefront left hand (black) buckle, then
insert the second fastening B intothe front right hand buckle.
Page 119 of 216
117
III
5
4
4
1
3
2
6
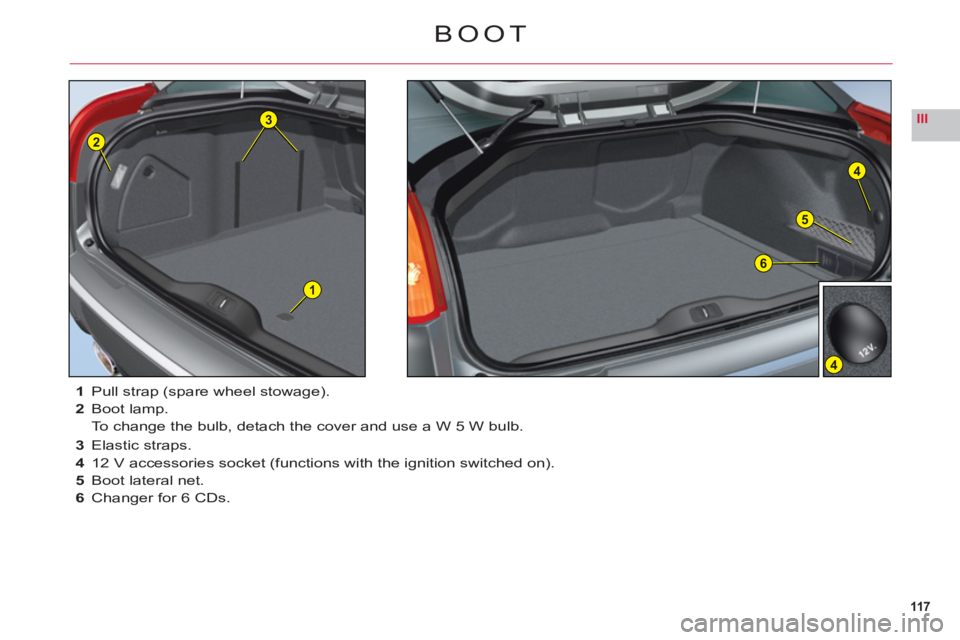
1Pull strap (spare wheel stowage).
2Boot lamp.
To change the bulb, detach the cover and use a W 5 W bulb.
3 Elastic straps.
4 12 V accessories socket (functions with the ignition switched on).
5 B
oot lateral net.
6 Changer for 6 CDs.
BOOT
Page 126 of 216

124
IV
A
D
C
B
BATTERY LOCATION AND
ACCESS
The battery is located in the bootunder the left hand wing trim. To
access the battery, rotate the pin
on the fl ap by a 1/4.
CHANGING THE BATTERY (Contact a CITROËN dealer or a qualifi ed
workshop).
1. Release the two pins on each side at the back of the boot, and remove
the boot fl oor.2. On each side trim, release the two fi xing pinsA.3. Undo the two screws Bon each side and remove the sill embellisher.4. On the side trim close to the battery, release the pin D.5. Separate the side trim close to the battery, pulling hard to free the other fi xing points.
6. Unclip the boot lamp C.7.Disconnect both battery terminals.8. Release the battery from its support.9. Remove the battery.
Before changing or repairing the battery, open all four windows.
If you have to unlock your vehicle with the key because of a problem with the battery, any opening/closingof a door with the window closed may seriously damage the glass to the point of breaking it.
12 V BATTERY
Page 127 of 216
125
IV
STARTING THE ENGINE AFTER DISCONNECTING AND RECONNECTING THE BATTERY1. Turn the ignition key.2. Wait approximately 1 minute before operating the starter in order to allow the electronic systems to re-initialise.
After the battery has been disconnected for a lengthy period of time, it may be necessary to re-initialise the followingfunctions:The anti-pinch on the windows.
The anti-pinch on the sun roof.
The multifunction displa
y parameters (date, time, language, units of distance and of temperature).
The Radio stations.
The NaviDrive.
See NaviDrive chapter.
IMPORTANT
In the event of a battery failure, and if the boot is closed, it is then necessary to feed an electrical supply to your
vehicle. See following page.
•
•
••
•
12 V BATTERY
Page 129 of 216

127
IV
F2 F9 F6 F5 F1 F7 F4 F3 F10 F8 F13 F12 F14F17 SH F11
F15F15
G29
G30
G31
G32
G33
G34
G35
G36
G38
G40G37
G39
FUSES
DASHBOARD
Good Bad Pliers A
FUSEBOXES
There are two fuseboxes under the dashboard, one in
the engine compartment and another in the boot under
the left hand wing trim.
Dashboard fuses
To access the fuses under the dashboard, open the glovebox and then detach the stowage cover.
REPLACING A FUSE
Before replacing a fuse, you should ascertain the cause of the fault and have it remedied. The numbers of the fuses are indicated on the fusebox.
Replace the fuse that has blown with one of the
same rating (same colour).
Use the special pliersAplaced on the fl ap close to the fuseboxes. The fl ap also has spare fuses available.
Re
placement fuses
and
pliers
A
Box B
Box C
Page 131 of 216
129
IV
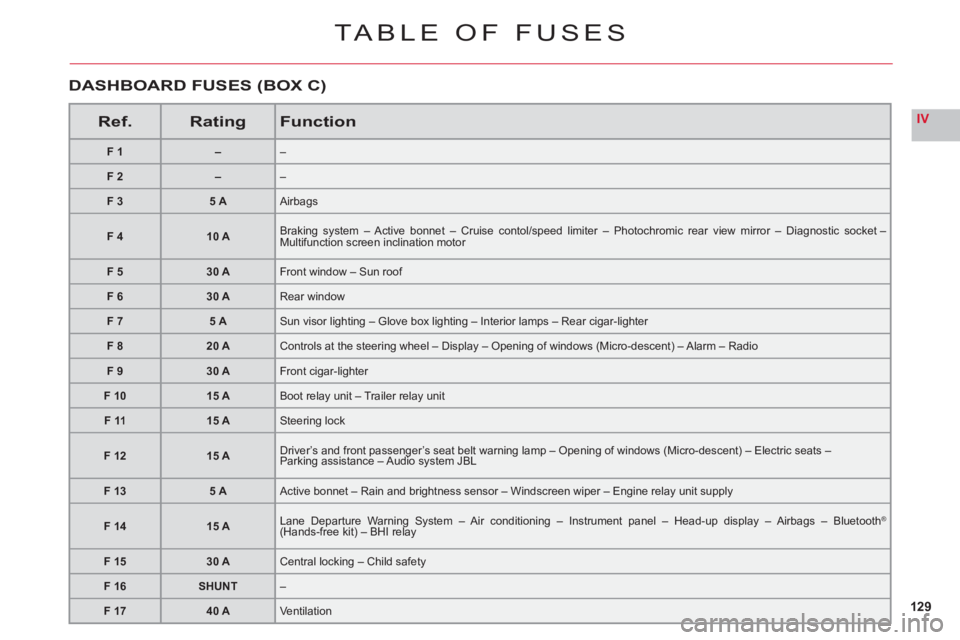
TABLE OF FUSES
Ref.RatingFunction
F1––
F2––
F 35 AAirbags
F 410 ABraking system – Active bonnet – Cruise contol/speed limiter – Photochromic rear view mirror – Diagnostic socket – Multifunction screen inclination motor
F 530 AFront window – Sun roof
F 630 ARear window
F 75 ASun visor lighting – Glove box lighting – Interior lamps – Rear cigar-lighter
F 820 AControls at the steering wheel – Display – Opening of windows (Micro-descent) – Alarm – Radio
F 930 AFront cigar-lighter
F 1015 ABoot relay unit – Trailer relay unit
F 1115 ASteering lock
F1215 ADriver’s and front passenger’s seat belt warning lamp – Opening of windows (Micro-descent) – Electric seats –Parking assistance – Audio system JBL
F 135 AActive bonnet – Rain and brightness sensor – Windscreen wiper – Engine relay unit supply
F 1415 ALane Departure Warning System – Air conditioning – Instrument panel – Head-up display – Airbags – Bluetooth® (Hands-free kit) – BHI relaygg
F 1530 ACentral locking – Child safety
F 16SHUNT–
F 1740 AVentilation
DASHBOARD FUSES (BOX C)