buttons CITROEN C6 2012 Handbook (in English)
[x] Cancel search | Manufacturer: CITROEN, Model Year: 2012, Model line: C6, Model: CITROEN C6 2012Pages: 216, PDF Size: 10.23 MB
Page 111 of 216
109
III221
2
2
INTERIOR LIGHTING
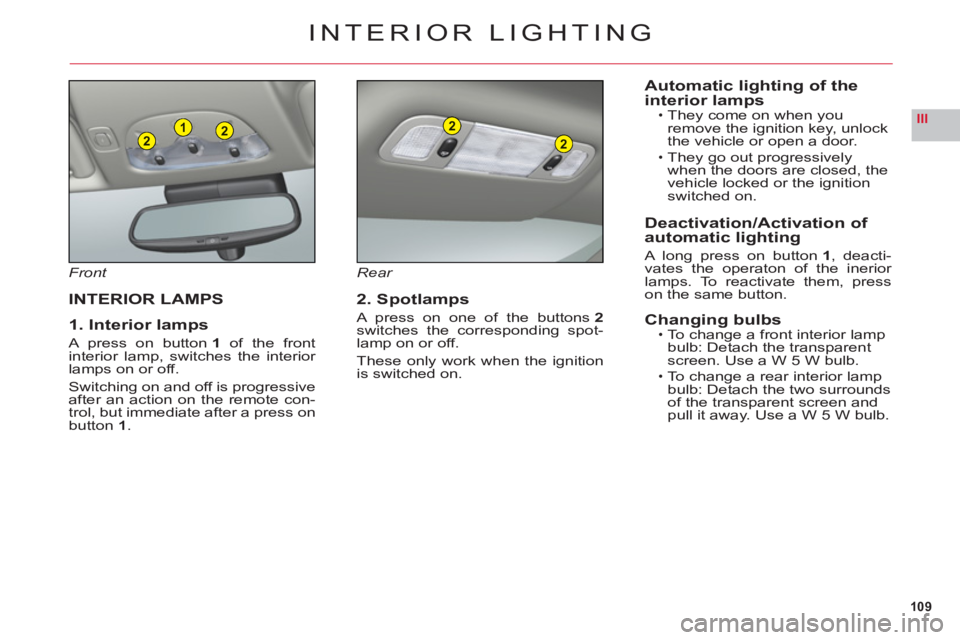
Front
INTERIOR LAMPS
1. Interior lamps
A press on button 1 of the front
interior lamp, switches the interior lamps on or off.
Switching on and off is progressiveafter an action on the remote con-
trol, but immediate after a press on
button 1.
Rear
2. Spotlamps
A press on one of the buttons2switches the corresponding spot-lamp on or off.
These only work when the ignition
is switched on.
Automatic lighting of the
interior lampsThey come on when you
remove the ignition key, unlock
the vehicle or open a door.
They go out progressively
when the doors are closed, the
vehicle locked or the i
gnitionswitched on.
Deactivation/Activation of
automatic lighting
A long press on button1, deacti-
vates the operaton of the inerior lamps. To reactivate them, presson the same button.
Changing bulbsTo change a front interior lamp
bulb: Detach the transparent
screen. Use a W 5 W bulb.
To change a rear interior lamp bulb: Detach the two surroundsof the transparent screen and pull it away. Use a W 5 W bulb.
•
•
•
•
Page 112 of 216
110
III
C
D
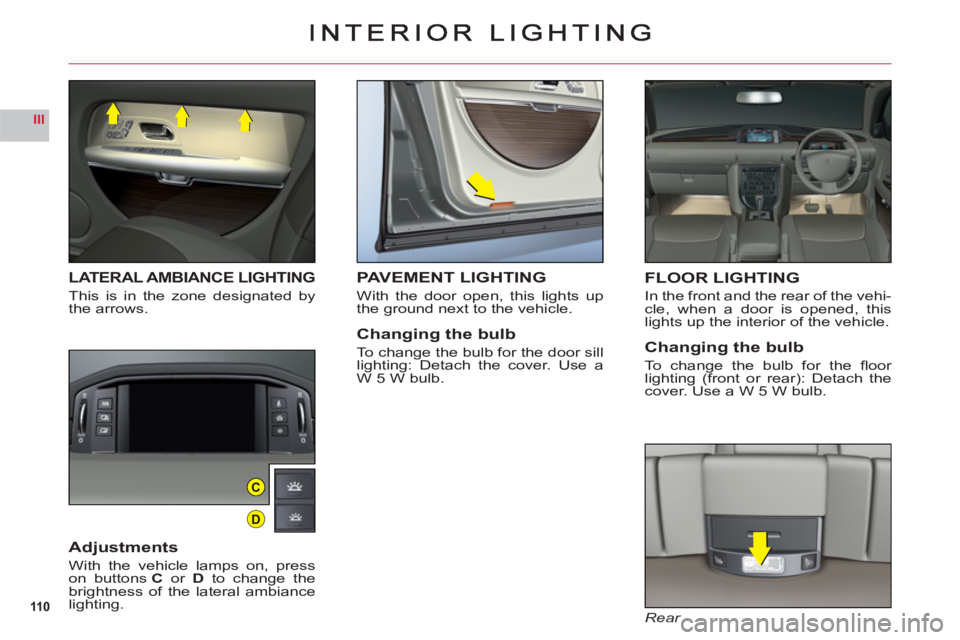
LATERAL AMBIANCE LIGHTING
This is in the zone designated bythe arrows.
Adjustments
With the vehicle lamps on, presson buttonsC or D to change the
brightness of the lateral ambiancelighting.
FLOOR LIGHTING
In the front and the rear of the vehi-cle, when a door is opened, thislights up the interior of the vehicle.
Changing the bulb
To change the bulb for the fl oor lighting (front or rear): Detach thecover. Use a W 5 W bulb.
Rear
PAVEMENT LIGHTING
With the door open, this lights up
the ground next to the vehicle.
Changing the bulb
To change the bulb for the door sill lighting: Detach the cover. Use a
W 5 W bulb.
Page 167 of 216
7.17
11
22
33
44
11
22
33
44
05AUDIO/VIDEO
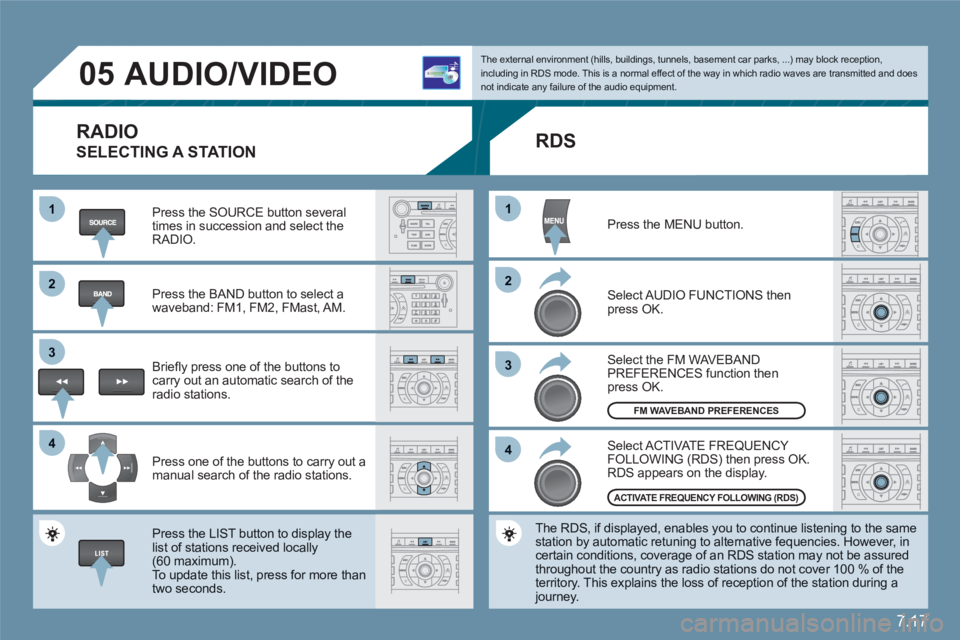
RADIO
SELECTING A STATION
Press the SOURCE button several times in succession and select theRADIO.
Press the BAND button to select awaveband: FM1, FM2, FMast, AM.
Briefl y press one of the buttons to carry out an automatic search of theradio stations.
Press one of the buttons to carry out a manual search of the radio stations.
Press the LIST button to display the list of stations received locally(60 maximum).
To update this list, press for more than two seconds.
The external environment (hills, buildings, tunnels, basement car parks, ...) may block reception,including in RDS mode. This is a normal effect of the way in which radio waves are transmitted and does not indicate any failure of the audio equipment.
RDS
Select ACTIVATE FREQUENCY FOLLOWING (RDS) then press OK. RDS appears on the display.
Select the FM WAVEBANDPREFERENCES function thenpress OK.
Select AUDIO FUNCTIONS then press OK.
Press the MENU button.
The RDS, if displayed, enables you to continue listening to the samestation by automatic retuning to alternative fequencies. However, in certain conditions, coverage of an RDS station may not be assuredthroughout the country as radio stations do not cover 100 % of the territory. This explains the loss of reception of the station during a journey.
FM WAVEBAND PREFERENCES
ACTIVATE FREQUENCY FOLLOWING (RDS)
Page 168 of 216
7.18
1
22
05AUDIO/VIDEO
INFORMATION AND ADVICE
The MP3 format, an abbreviation of MPEG 1.2 & 2.5 Audio Layer 3, is an audio compression standard which permits the recording of several tens of music fi les on a single disc.
In order to be able to play a recorded CDR/DVDR or CDRW/DVDRW, when recording it is preferable to select standardsISO 9660 level 1.2 or Joliet. If the disc is recorded in another format, it may not be played correctly.It is recommended that the same recording standard is always used for an individual disc, with as low a speed as possible (4x maximum)for optimum sound quality. In the particular case of a multi-session CD, the Joliet standard isrecommended.
The audio equipment will only play audio fi les with the extension ".mp3" with a sampling rate of 22.05 KHz or 44.1 KHz. No other type of fi le (.wma, .mp4, .m3u...) can be played.
It is advisable to restrict fi le names to 20 characters without usingspecial characters (e.g.: " " ? ; ù) to avoid any playing or displayingproblems.
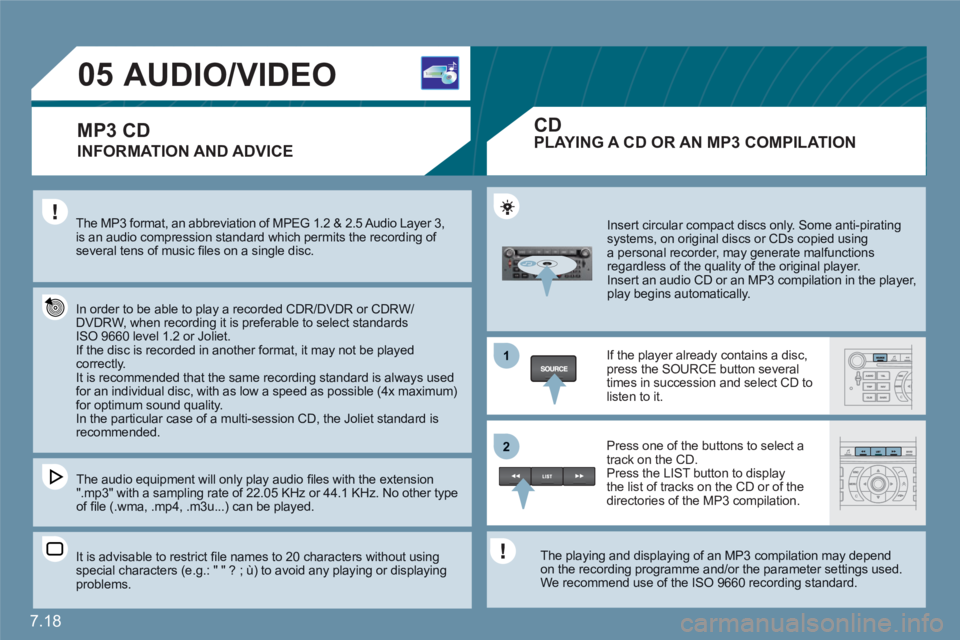
Insert circular compact discs only. Some anti-piratingsystems, on original discs or CDs copied usinga personal recorder, may generate malfunctionsregardless of the quality of the original player.
Insert an audio CD or an MP3 compilation in the player, play begins automatically.
If the player already contains a disc,press the SOURCE button several times in succession and select CD tolisten to it.
Press one of the buttons to select atrack on the CD. Press the LIST button to display the list of tracks on the CD or of thedirectories of the MP3 compilation.
The playing and displaying of an MP3 compilation may depend on the recording programme and/or the parameter settings used.We recommend use of the ISO 9660 recording standard.
MP3 CDPLAYING A CD OR AN MP3 COMPILATION
CD
Page 172 of 216
7.22
11
22
11
33
22
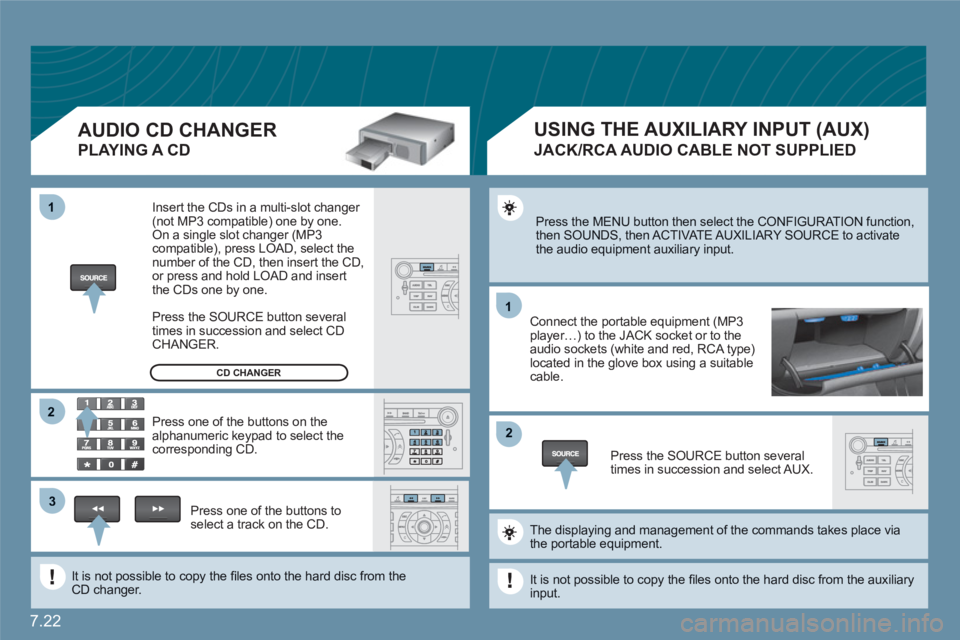
Press the MENU button then select the CONFIGURATION function, then SOUNDS, then ACTIVATE AUXILIARY SOURCE to activatethe audio equipment auxiliary input.
Connect the portable equipment (MP3player…) to the JACK socket or to the audio sockets (white and red, RCA type)located in the glove box using a suitable cable.
Press the SOURCE button severaltimes in succession and select AUX.
The displaying and management of the commands takes place viathe portable equipment.
It is not possible to copy the fi les onto the hard disc from the auxiliaryinput.
USING THE AUXILIARY INPUT (AUX)
JACK/RCA AUDIO CABLE NOT SUPPLIED
AUDIO CD CHANGER
PLAYING A CD
Insert the CDs in a multi-slot changer (not MP3 compatible) one by one. On a single slot changer (MP3compatible), press LOAD, select the number of the CD, then insert the CD,or press and hold LOAD and insert the CDs one by one.
Press the SOURCE button severaltimes in succession and select CD CHANGER.
Press one of the buttons on thealphanumeric keypad to select the corresponding CD.
Press one of the buttons toselect a track on the CD.
It is not possible to copy the fi les onto the hard disc from theCD changer.
CD CHANGER
Page 181 of 216

7.31
08CONTROL SHORT-CUTS
STEERING WHEEL CONTROLS
RADIO: selection of the previous stored station.
MP3/JUKEBOX: selection of the previous directory.
Selection of the previous item on a menu.
RADIO: selection of the next stored station.
MP3/JUKEBOX: selection of the next directory. Selection of the next item on a menu.
RADIO: automatic search for a higher frequency. CD/MP3/JUKEBOX: selection of the next track.
CD: continuous press: fast forwards play.
RADIO: automatic search for a lower frequency.CD/MP3/JUKEBOX: selection of the previous track. CD: continuous press: fast backwards play.
- Change of sound source. - Confi rmation of a selection. - Pick up/Hang up the telephone.- Press for more than 2 seconds:access to the telephone menu.
Volume increase.
Volume decrease.
Mute: by pressing the volumeincrease and decreasebuttons simultaneously.
The sound is restored by pressing one of the two volume buttons.
Page 193 of 216
7.43
11
223344
55
6677
1010
111
1212131314141515
88
99
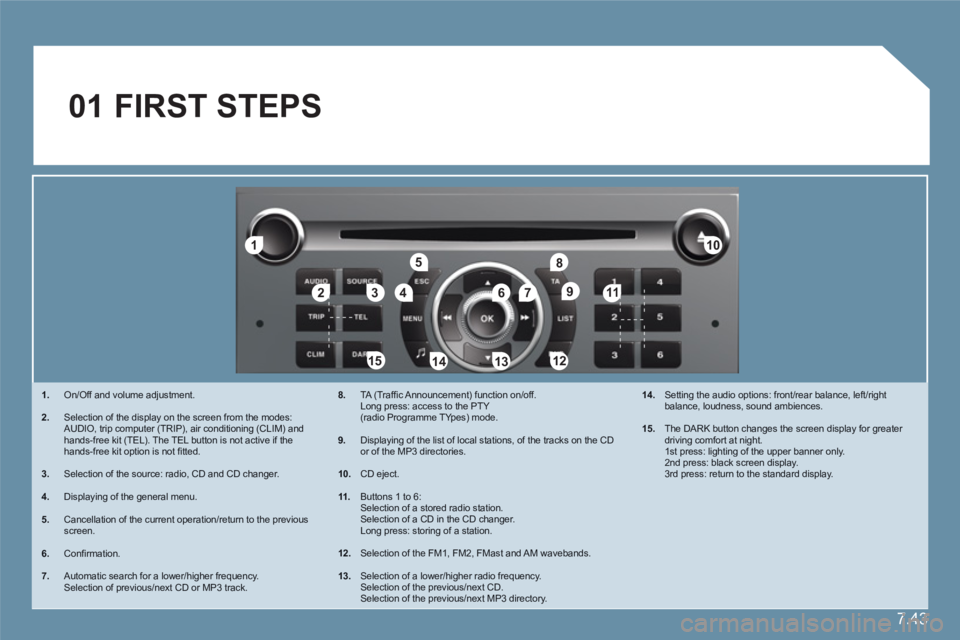
01 FIRST STEPS
1.On/Off and volume adjustment.
2.Selection of the display on the screen from the modes:AUDIO, trip computer (TRIP), air conditioning (CLIM) and hands-free kit (TEL). The TEL button is not active if the hands-free kit option is not fi tted.
3.Selection of the source: radio, CD and CD changer.
4.Displaying of the general menu.
5.Cancellation of the current operation/return to the previous screen.
6.Confi rmation.
7.Automatic search for a lower/higher frequency. Selection of previous/next CD or MP3 track.
8. TA (Traffi c Announcement) function on/off.Long press: access to the PTY(radio Programme TYpes) mode.
9.Displaying of the list of local stations, of the tracks on the CD or of the MP3 directories.
10.
CD eject.
11 .
Buttons 1 to 6: Selection of a stored radio station. Selection of a CD in the CD changer. Long press: storing of a station.
12. Selection of the FM1, FM2, FMast and AM wavebands.
13.
Selection of a lower/higher radio frequency. Selection of the previous/next CD. Selection of the previous/next MP3 directory.
14.
Setting the audio options: front/rear balance, left/rightbalance, loudness, sound ambiences.
15.
The DARK button changes the screen display for greater driving comfort at night.1st press: lighting of the upper banner only.2nd press: black screen display.3rd press: return to the standard display.
Page 195 of 216
7.45
11
22
33
44
22
44
33
11
03AUDIO
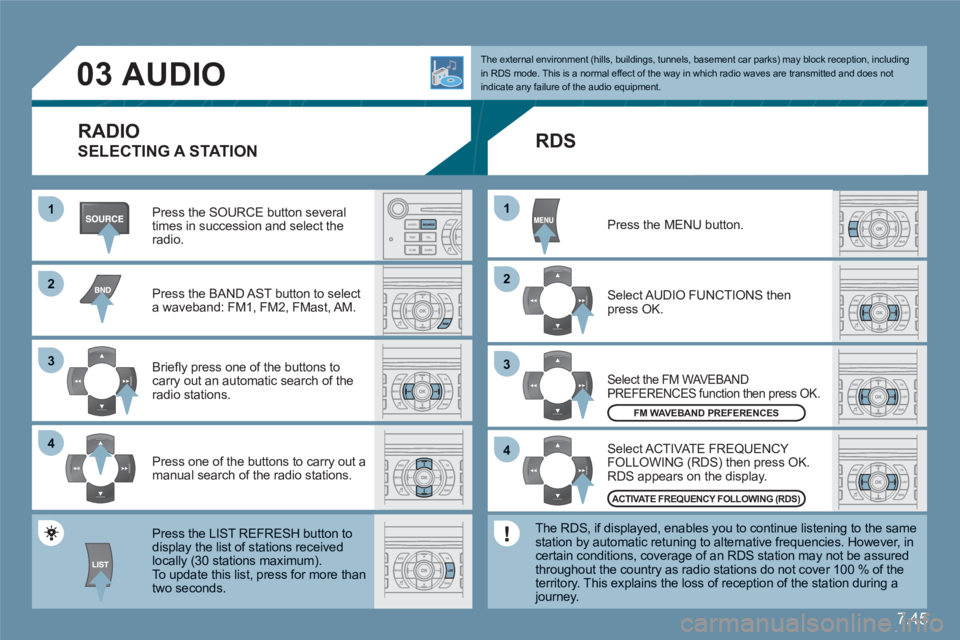
Press the SOURCE button several times in succession and select theradio.
Press the BAND AST button to select a waveband: FM1, FM2, FMast, AM.
Briefl y press one of the buttons to carry out an automatic search of theradio stations.
Press one of the buttons to carry out a manual search of the radio stations.
Press the LIST REFRESH button todisplay the list of stations receivedlocally (30 stations maximum).
To update this list, press for more than two seconds.
Select ACTIVATE FREQUENCY FOLLOWING (RDS) then press OK. RDS appears on the display.
Select the FM WAVEBAND PREFERENCES function then press OK.
Select AUDIO FUNCTIONS then press OK.
Press the MENU button.
FM WAVEBAND PREFERENCES
ACTIVATE FREQUENCY FOLLOWING (RDS)
The external environment (hills, buildings, tunnels, basement car parks) may block reception, including in RDS mode. This is a normal effect of the way in which radio waves are transmitted and does notindicate any failure of the audio equipment.
RDS
The RDS, if displayed, enables you to continue listening to the samestation by automatic retuning to alternative frequencies. However, in certain conditions, coverage of an RDS station may not be assuredthroughout the country as radio stations do not cover 100 % of the territory. This explains the loss of reception of the station during a journey.
RADIO
SELECTING A STATION
Page 196 of 216
7.46
11
22
11
22
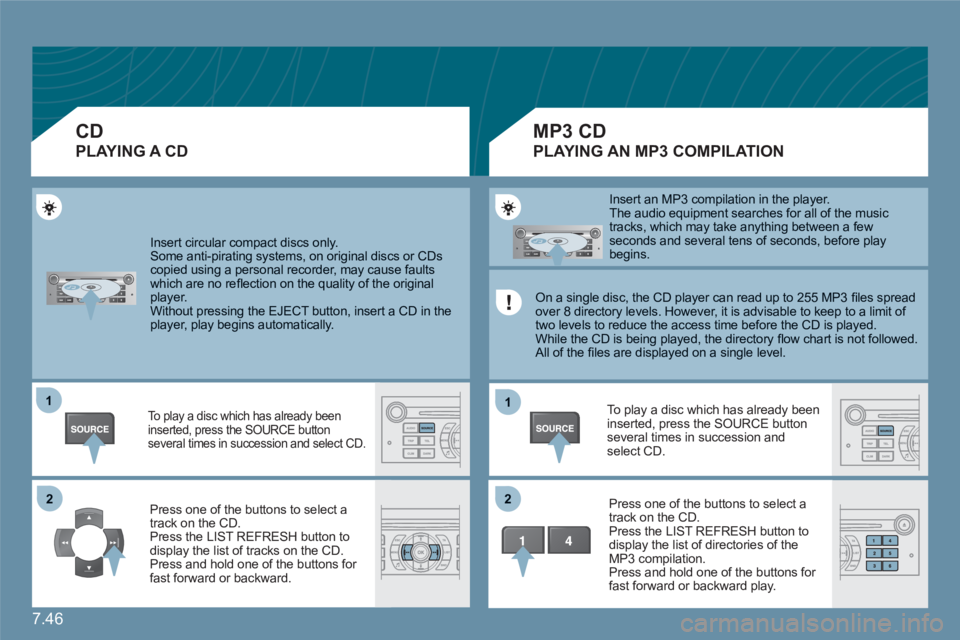
Insert circular compact discs only. Some anti-pirating systems, on original discs or CDscopied using a personal recorder, may cause faults which are no refl ection on the quality of the originalplayer.
Without pressing the EJECT button, insert a CD in theplayer, play begins automatically.
To play a disc which has already beeninserted, press the SOURCE button several times in succession and select CD.
Press one of the buttons to select atrack on the CD. Press the LIST REFRESH button todisplay the list of tracks on the CD. Press and hold one of the buttons for fast forward or backward.
Insert an MP3 compilation in the player. The audio equipment searches for all of the music tracks, which may take anything between a few seconds and several tens of seconds, before playbegins.
On a single disc, the CD player can read up to 255 MP3 fi les spreadover 8 directory levels. However, it is advisable to keep to a limit of two levels to reduce the access time before the CD is played. While the CD is being played, the directory fl ow chart is not followed.All of the fi les are displayed on a single level.
To play a disc which has already been inserted, press the SOURCE buttonseveral times in succession and select CD.
Press one of the buttons to select a track on the CD.
Press the LIST REFRESH button todisplay the list of directories of the MP3 compilation.
Press and hold one of the buttons for fast forward or backward play.
CD
PLAYING A CD
MP3 CD
PLAYING AN MP3 COMPILATION
Page 197 of 216
7.47
03
11
22
33
The MP3 format, an abbreviation of MPEG 1.2 & 2.5 Audio Layer 3,is an audio compression standard which permits the recording of several tens of music fi les on a single disc.
In order to be able to play a recorded CDR or CDRW, when recordingit is preferable to select standards ISO 9660 level 1.2 or Joliet.
If the disc is recorded in another format, it may not be playedcorrectly. It is recommended that the same recording standard is always usedfor an individual disc, with as low a speed as possible (4x maximum) for optimum sound quality.
In the particular case of a multi-session CD, the Joliet standard is recommended.
The audio equipment will only play fi les with the extension ".mp3" with a sampling rate of 22.05 KHz or 44.1 KHz. No other type of fi le (.wma, .mp4, .m3u...) can be played.
It is advisable to restrict fi le names to 20 characters without usingspecial characters (e.g. " " ? ; ù) to avoid any playing or displayingproblems.
MP3 CD
INFORMATION AND ADVICE
AUDIO
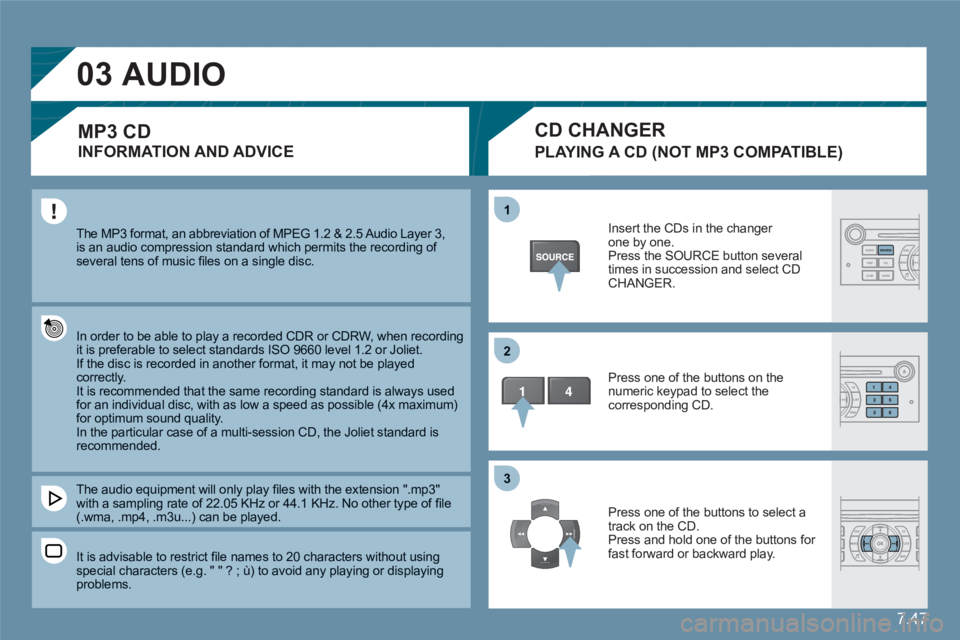
PLAYING A CD (NOT MP3 COMPATIBLE)
Insert the CDs in the changer one by one.
Press the SOURCE button several times in succession and select CD CHANGER.
Press one of the buttons on the numeric keypad to select the corresponding CD.
Press one of the buttons to select atrack on the CD.
Press and hold one of the buttons for fast forward or backward play.
CD CHANGER