ESP Citroen DS3 2014 1.G User Guide
[x] Cancel search | Manufacturer: CITROEN, Model Year: 2014, Model line: DS3, Model: Citroen DS3 2014 1.GPages: 376, PDF Size: 12.55 MB
Page 83 of 376
81
DS3_en_Chap04_confort_ed01-2014
Mirrors
Each fitted with an adjustable mirror glass permitting t he la teral r earward v ision n ecessary f
or overtaking or parking. They can also be
f
olded for parking in confined spaces.
demisting - def rosting Adjustment
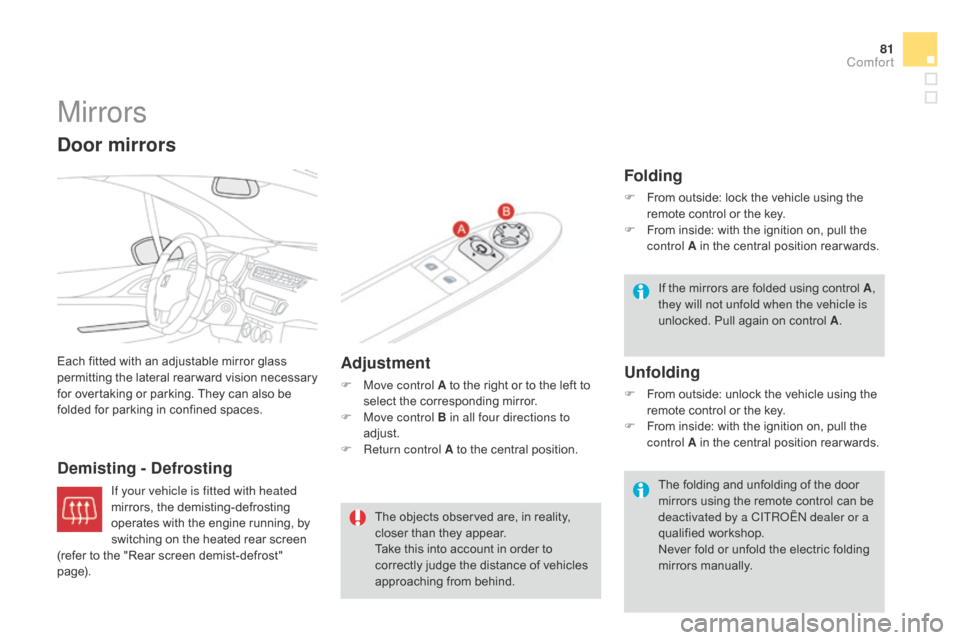
F Move control A
to the right or to the left to s
elect the corresponding mirror.
F
M
ove control B in all four directions to
adjust.
F
R
eturn control A to the central position.
door mirrors
The objects observed are, in reality, closer than they appear.
Take
this into account in order to
c
orrectly judge the distance of vehicles
a
pproaching from behind.
Folding
F From outside: lock the vehicle using the r
emote control or the key.
F
F
rom inside: with the ignition on, pull the
c
ontrol A in the central position rear wards.
Unfolding
F From outside: unlock the vehicle using the r
emote control or the key.
F
F
rom inside: with the ignition on, pull the
c
ontrol A in the central position rear wards.
If
t
he
m
irrors
a
re
f
olded
u
sing
c
ontrol
A,
they will not unfold when the vehicle is
unlocked. Pull again on control A
.
The folding and unfolding of the door
m
irrors using the remote control can be
d
eactivated by a CITR
oË
N dealer or a
qualified
w
orkshop.
Never
fold or unfold the electric folding
m
irrors
m
anually.
If your vehicle is fitted with heated
mirrors,
the
demisting-defrosting
o
perates
with
the
engine
running,
by
s
witching
on
the
heated
rear
screen
(
refer
to
the
"Rear
screen
demist-defrost"
pag
e).
comfort
Page 92 of 376

DS3_en_Chap04_confort_ed01-2014
Digital air conditioningThe air conditioning operates when the engine is running, as well as in STOP mode with Stop & Start.
Automatic operation
1. Automatic "comfort" programme
Press the "AUTO" button. T
he "AUTO" symbol is displayed.
We
recommend that you use
t
his mode. It provides optimised
a
utomatic
control of all of the following
f
unctions:
passenger compartment
t
emperature, air flow, air distribution and air
i
ntake,
in
accordance with the comfort value
t
hat
you
have chosen.
This
system is designed to operate effectively
i
n
all
seasons, with the windows closed. For
your comfort, when the engine is
s
witched off, the settings are retained
u
ntil the engine is switched on again.
To prevent too great a distribution of
c
old air when the engine is cold, the air
f
low will only reach its optimum level
g
radually.
2. Temperature adjustment
The value indicated on the display corresponds
to
a level of comfort and not to a temperature in
d
egrees Celsius or Fahrenheit. On
entering the vehicle, if the interior
i
s very cold or hot, there is no need to
change the value displayed in order
t
o reach the required level of comfort.
T
he system corrects the temperature
d
ifference automatically and as quickly
a
s possible.
Press the " 5" and " 6" buttons to
change
this value. A setting around
t
he value 21
enables optimum
c
omfort to be obtained. However,
d
epending on your requirements, a
s
etting between 18 and 24 is usual.
3. Automatic "visibility" programme
The automatic comfort programme m
ay not be sufficient for rapid
d
emisting or defrosting of the
w
indscreen and side windows
(humidity,
several passengers, ice, etc.).
In
this
case, select the automatic visibility
p
rogramme. The button 3 indicator lamp
comes
on.
The
system automatically controls the air
c
onditioning and the flow of air and provides
o
ptimum
air distribution to the windscreen and
s
ide
windows. It deactivates air recirculation 5.
To
exit
this programme, press button 3 again
or "AUTO" ,
the indicator lamp on the button
g
oes
off
and "AUTO"
is displayed.
With
Stop & Start, when demisting has
b
een activated, the STOP mode is not
a
vailable.
Page 116 of 376
DS3_en_Chap06_conduite_ed01-2014
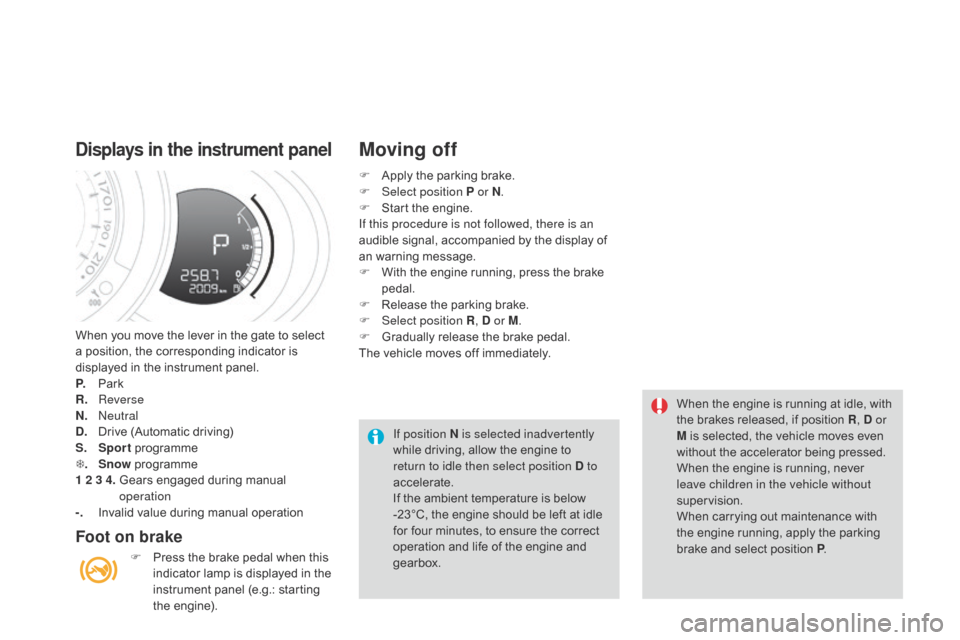
When you move the lever in the gate to select a position, the corresponding indicator is
d
isplayed in the instrument panel.
P.
Pa
rk
R.
R
everse
N.
N
eutral
d
.
D
rive (Automatic driving)
S.
Sport
pro
gramme
T .
Snow
pro
gramme
1 2 3 4.
G
ears engaged during manual
ope
ration
-.
I
nvalid value during manual operation
displays in the instrument panel
Foot on brake
F Press the brake pedal when this i
ndicator lamp is displayed in the
i
nstrument panel (e.g.: starting
t
he
eng
ine).
Moving off
If position N is selected inadvertently
while driving, allow the engine to
r
eturn to idle then select position d to
accelerate.
If
the ambient temperature is below
-
23°C, the engine should be left at idle
f
or four minutes, to ensure the correct
o
peration and life of the engine and
g
earbox. When
the engine is running at idle, with t
he brakes released, if position R
, d or
M is selected, the vehicle moves even
w
ithout the accelerator being pressed.
When
the engine is running, never
l
eave children in the vehicle without
supervision.
When
carrying out maintenance with
t
he engine running, apply the parking
b
rake and select position P.
F
A
pply the parking brake.
F
Sel
ect position P or N
.
F
S
tart the engine.
If this procedure is not followed, there is an
audible signal, accompanied by the display of
a
n
warning message.
F
W
ith the engine running, press the brake
ped
al.
F
R
elease the parking brake.
F
Sel
ect position R
, d or M
.
F
G
radually release the brake pedal.
The
vehicle moves off immediately.
Page 119 of 376
11 7
DS3_en_Chap06_conduite_ed01-2014
Gear shift indicatorSystem which reduces fuel consumption by advising the driver to change up.
Operation
Example:
- Y ou are in third gear.
-
Y
ou press the accelerator pedal.
-
T
he system may suggest that you engage
a
higher gear.
The
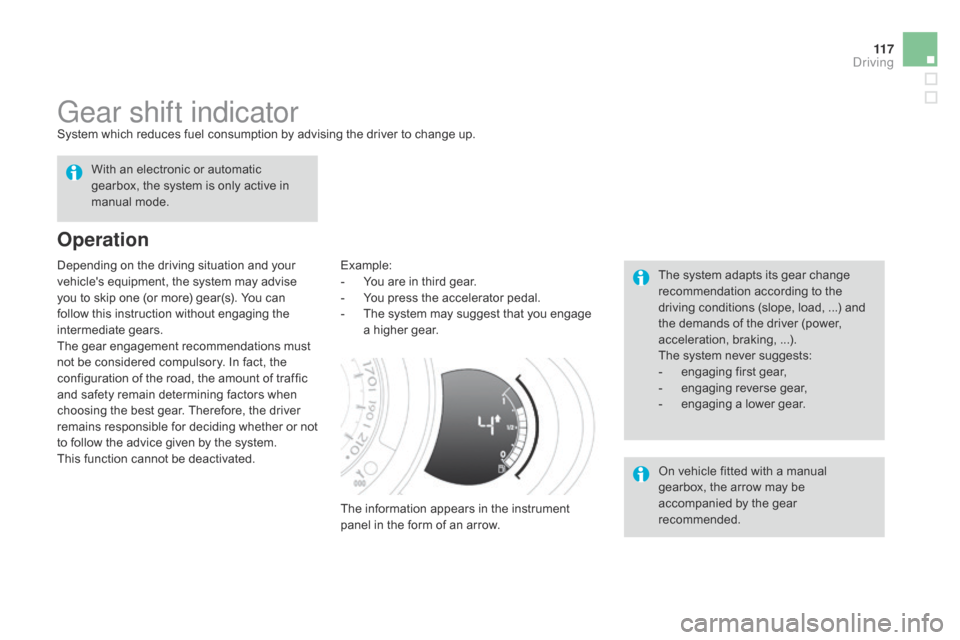
information appears in the instrument
p
anel in the form of an arrow. The
system adapts its gear change
r
ecommendation according to the
d
riving conditions (slope, load, ...) and
t
he demands of the driver (power,
a
cceleration, braking, ...).
The
system never suggests:
-
e
ngaging first gear,
-
enga
ging
r
everse
g
ear,
-
e
ngaging a lower gear.
With
an
electronic
or
automatic
g
earbox,
the
system
is
only
active
in
m
anual
m
ode.
On vehicle fitted with a manual
g
earbox, the arrow may be
a
ccompanied by the gear
re
commended.
Depending
on
the
driving
situation
and
your
v
ehicle's
equipment,
the
system
may
advise
y
ou
to
skip
one
(or
more)
gear(s).
You
can
f
ollow
this
instruction
without
engaging
the
i
ntermediate
g
ears.
The
gear
engagement
recommendations
must
n
ot
be
considered
compulsory.
In
fact,
the
c
onfiguration
of
the
road,
the
amount
of
traffic
a
nd
safety
remain
determining
factors
when
c
hoosing
the
best
gear.
Therefore,
the
driver
r
emains
responsible
for
deciding
whether
or
not
t
o
follow
the
advice
given
by
the
system.
This
function
cannot
be
deactivated.
driving
Page 124 of 376
DS3_en_Chap06_conduite_ed01-2014
System which prevents the vehicle from exceeding the speed programmed by the
d
river.
When
the programmed speed limit is reached,
p
ressing the accelerator pedal in the normal
m
anner no longer has any effect.
The
speed limiter is switched on
m
anually:
it r
equires a programmed speed of at least
20
mph (30 km/h).
The
speed limiter is switched off
by manual
o
peration of the control.
The
programmed speed can be exceeded
t
emporarily by pressing the accelerator firmly.
To
return to the programmed speed, simply
s
low down to a speed below the programmed
s
peed.
The
p
rogrammed
s
peed
r
emains
i
n
t
he
m
emory
w
hen the ignition is switched off.
Speed limiter
The speed limiter cannot, in any circumstances, replace the need to respect speed limits, nor can it r
eplace the need for vigilance on the part of the driver.
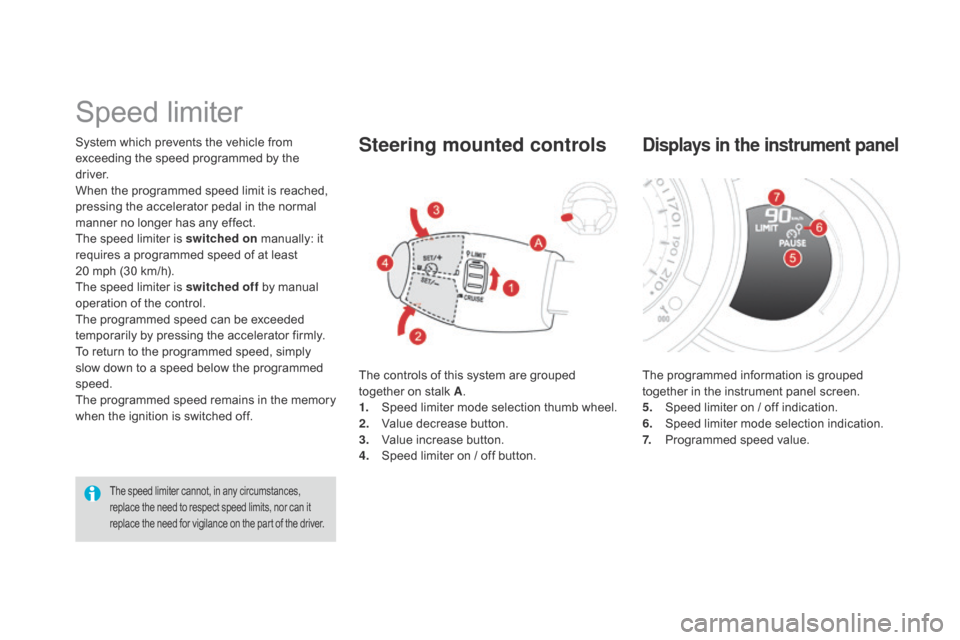
The controls of this system are grouped together on stalk A.
1.
S
peed limiter mode selection thumb wheel.
2.
V
alue decrease button.
3.
V
alue increase button.
4.
S
peed limiter on / off button.
Steering mounted controls
The programmed information is grouped together in the instrument panel screen.
5.
S
peed limiter on / off indication.
6.
S
peed limiter mode selection indication.
7.
P
rogrammed speed value.
displays in the instrument panel
Page 126 of 376
DS3_en_Chap06_conduite_ed01-2014
Cruise control
System which automatically maintains the speed of the vehicle at the value programmed
b
y the driver, without any action on the
accelerator
ped
al.
The cruise control is switched on
m
anually:
it r
equires a minimum vehicle speed of 25 mph
(
40 km/h), as well as the engagement of:
-
f
ourth gear on a manual gearbox,
-
s
econd gear on a or automatic or electronic
g
earbox, in sequential mode,
-
position A
on an electronic gearbox or
p
osition d on an automatic gearbox.
The cruise control is switched off
m
anually
o
r by pressing the brake or clutch pedal or
o
n triggering of the ESP system for safety
r
easons.
It
is possible to exceed the programmed speed
t
emporarily by pressing the accelerator pedal.
To
return to the programmed speed, simply
r
elease the accelerator pedal.
Switching
off the ignition cancels any
p
rogrammed speed value. The
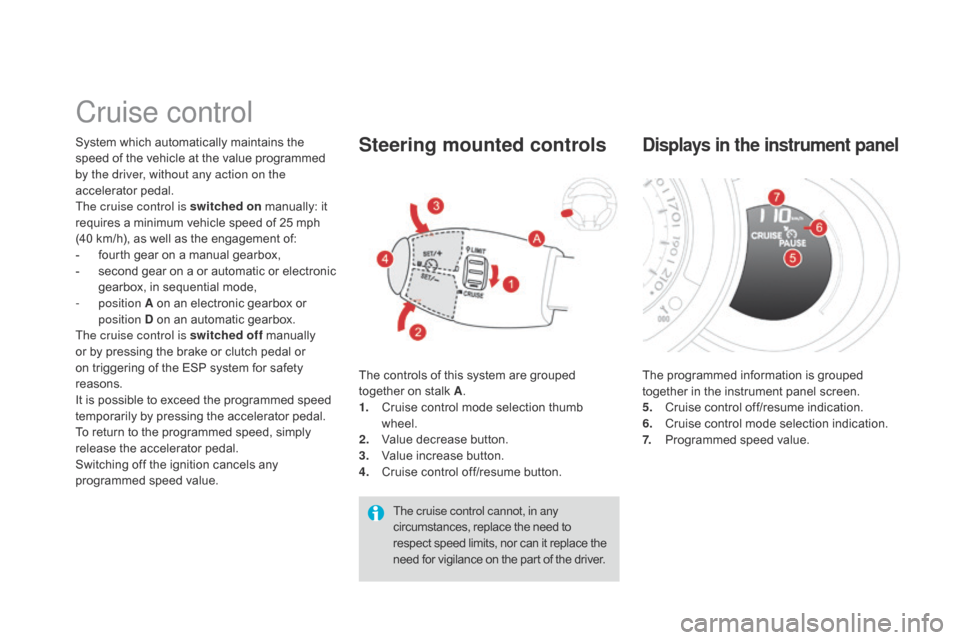
controls of this system are grouped
t
ogether on stalk A.
1.
C
ruise control mode selection thumb
w
heel.
2.
V
alue decrease button.
3.
V
alue increase button.
4.
C
ruise control off/resume button.Steering mounted controls
The cruise control cannot, in any
circumstances, replace the need to r
espect speed limits, nor can it replace the
n
eed for vigilance on the part of the driver.The
programmed information is grouped
t
ogether in the instrument panel screen.
5.
C
ruise control off/resume indication.
6.
C
ruise control mode selection indication.
7.
P
rogrammed speed value.
displays in the instrument panel
Page 135 of 376
133
DS3_en_Chap07_visibilite_ed01-2014
Model without AUTO lighting
Model with AUTO lighting
Manual controls
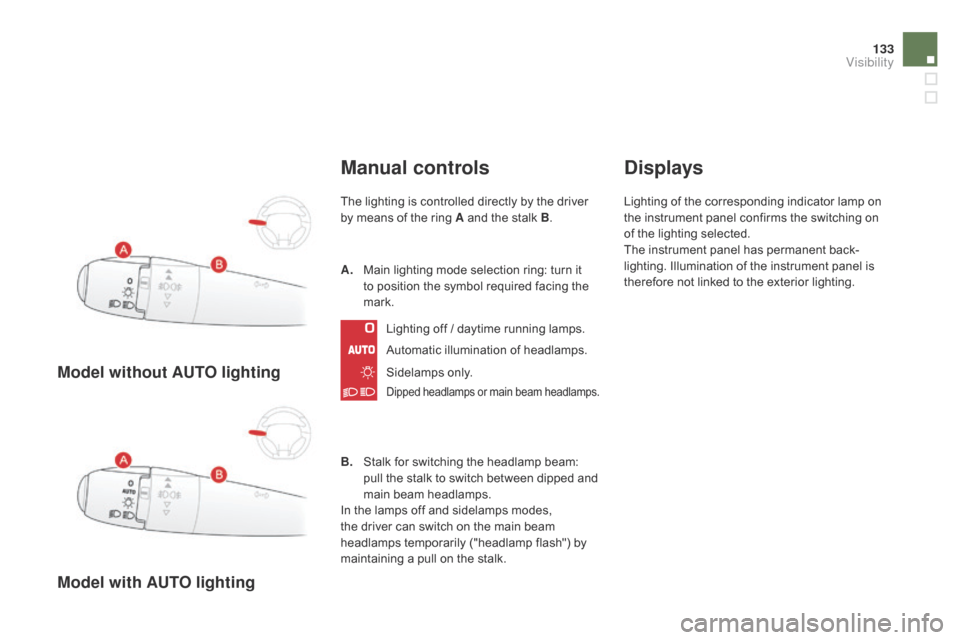
The lighting is controlled directly by the driver by means of the ring A and the stalk B.
Automatic
illumination of headlamps.
B.
S
talk for switching the headlamp beam:
p
ull the stalk to switch between dipped and
m
ain beam headlamps.
In
the lamps off and sidelamps modes,
t
he driver can switch on the main beam
h
eadlamps temporarily ("headlamp flash") by
m
aintaining a pull on the stalk.
A.
M
ain lighting mode selection ring: turn it
t
o position the symbol required facing the
ma
rk.Lighting
off / daytime running lamps.
Sidelamps
o
nly.
Dipped headlamps or main beam headlamps.
displays
Lighting of the corresponding indicator lamp on the instrument panel confirms the switching on
o
f the lighting selected.
The
instrument panel has permanent back-
lighting.
Illumination of the instrument panel is
t
herefore not linked to the exterior lighting.
Visibility
Page 141 of 376
139
DS3_en_Chap07_visibilite_ed01-2014
System for selection and control of the various front and rear wiping modes for the elimination
o
f rain and cleaning.
The vehicle's front and rear wipers are
designed
to improve the driver's visibility
p
rogressively according to the climatic
c
onditions.
Wiper controls
Programming
Various automatic wiper control modes are also a vailable according to the following options:
-
a
utomatic
r
ain
sen
sitive
w
indscreen
w
ipers,
-
r
ear wiping on engaging reverse gear.
Model with AUTO wiping
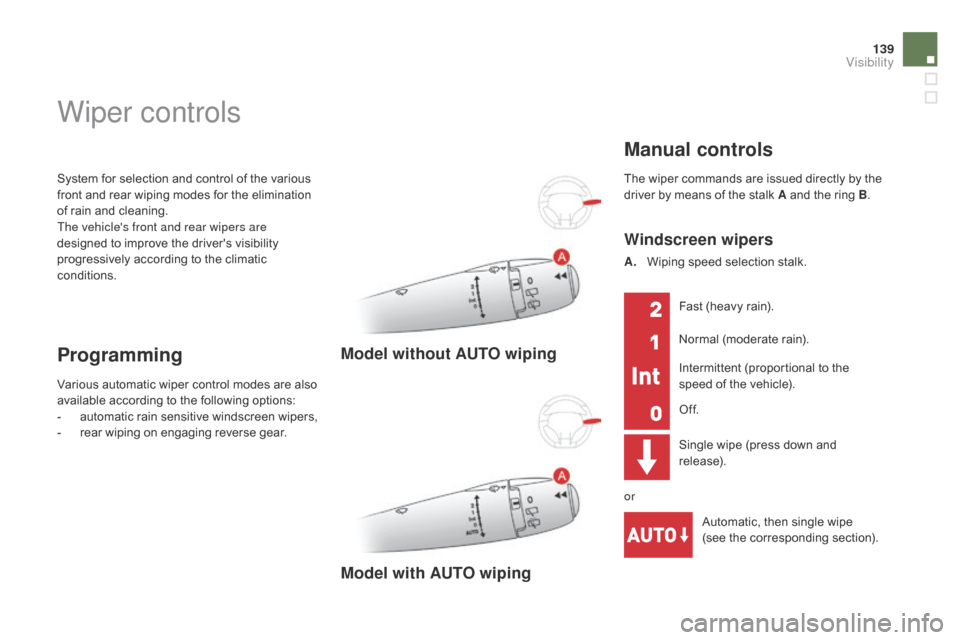
The wiper commands are issued directly by the driver by means of the stalk A and the ring B.
Manual controls
Windscreen wipers
A. Wiping speed selection stalk.
Single wipe (press down and
r
elease).Automatic,
then single wipe
(see
the corresponding section).
Fast
(heavy rain).
Normal
(moderate rain).
Intermittent
(proportional to the
s
peed of the vehicle).
Of f.
or
Model without AUTO wiping
Visibility
Page 145 of 376
143
DS3_en_Chap07_visibilite_ed01-2014
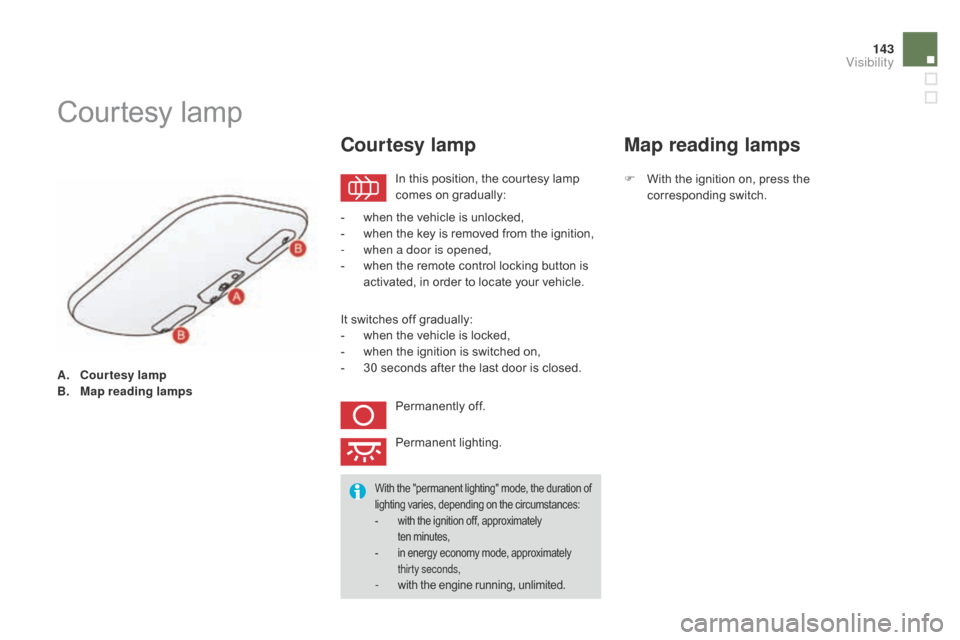
A. courtesy lamp
B. M
ap reading lamps
Courtesy lam p
In this position, the courtesy lamp c
omes on gradually:
courtesy lamp
- when the vehicle is unlocked,
- w hen the key is removed from the ignition,
-
w
hen a door is opened,
-
w
hen the remote control locking button is
a
ctivated, in order to locate your vehicle.
It
switches off gradually:
-
w
hen the vehicle is locked,
-
w
hen the ignition is switched on,
-
3
0 seconds after the last door is closed.
Permanently
off.
Permanent
l
ighting.
With the "permanent lighting" mode, the duration of lighting varies, depending on the circumstances:
-
w
ith the ignition off, approximately
t
en minutes,
-
i
n energy economy mode, approximately
t
hirty seconds,
- with the engine running, unlimited.
Map reading lamps
F With the ignition on, press the c
orresponding s witch.
Visibility
Page 152 of 376
Under-inflation detection
System which automatically checks the pressures of the tyres while driving.
T he under-inflation detection system
d
oes not replace the vigilance or the
r
esponsibility of the driver.
This
system does not avoid the need to
c
heck the tyre pressures (including the
s
pare wheel) every month as well as
b
efore a long journey.
Driving
with under-inflated tyres
i
mpairs road holding, extends braking
d
istances and causes premature
t
yre wear, particularly under arduous
condition
(high loading, high speed,
lon
g
jo
urney).The inflation pressures defined for
your vehicle can be found on the tyre
pressure
label.
See
the "Identification markings"
s
ection.
Tyre
pressures should be checked
w
hen the tyres are "cold" (vehicle
stopped
for 1 hour or after a journey of
l
ess than 6 miles (10 km) at moderate
s
peeds).
Other wise
(when hot), add 0.3 bar to
t
he pressures shown on the label.
Driving
with under-inflated tyres
i
ncreases fuel consumption.
The
system monitors the pressures in the four
t
yres, once the vehicle is moving.
It
compares the information given by the four
w
heel speed sensors with reference values,
which must be reinitialised ever y time the
tyre pressures are adjusted or a wheel
changed .
The
system triggers an alert as soon as it
d
etects a drop in the inflation pressure of one
or
more tyres.